Adirondack chair

Love these chairs!
Built from Plan(s)
Love these chairs!

This project was for a garage entry and is perfect for what was needed. As described in the plans, it took about 9 hours. We chose to use Home Depot instead of Lowe's for materials. Some cuts were not done correctly and some missing. Went back once to complete. Rented a Nailer which was huge! Well worth it. The plans did not include how to attach the lockers to the benches, so we used 'L' brackets. May have missed those directions somewhere? We had orignally planned to make 3 benches and 4 lockers. Decided to use an existing bench in place of the middle Braden bench and worked just fine. Would not use pine again, but only plywood. Many pieces were warped and difficult to get lockers square, and we picked out the lumber! We chose not to add the drawers to the benches, but will add canvas bins for shoes.

We needed some privacy from the neighbors and to hide their pool equipment and voilà!!! 4 2x4 for the frame 22 1x4 for the slats

I used one of the plans found on the site but modified it by making mine 8 inches wider. They are slightly higher as well to match what I replaced in our master bedroom. This was actually the first project that I took on after looking at bedroom furniture for over a month and realizing how expensive cheap furniture is.


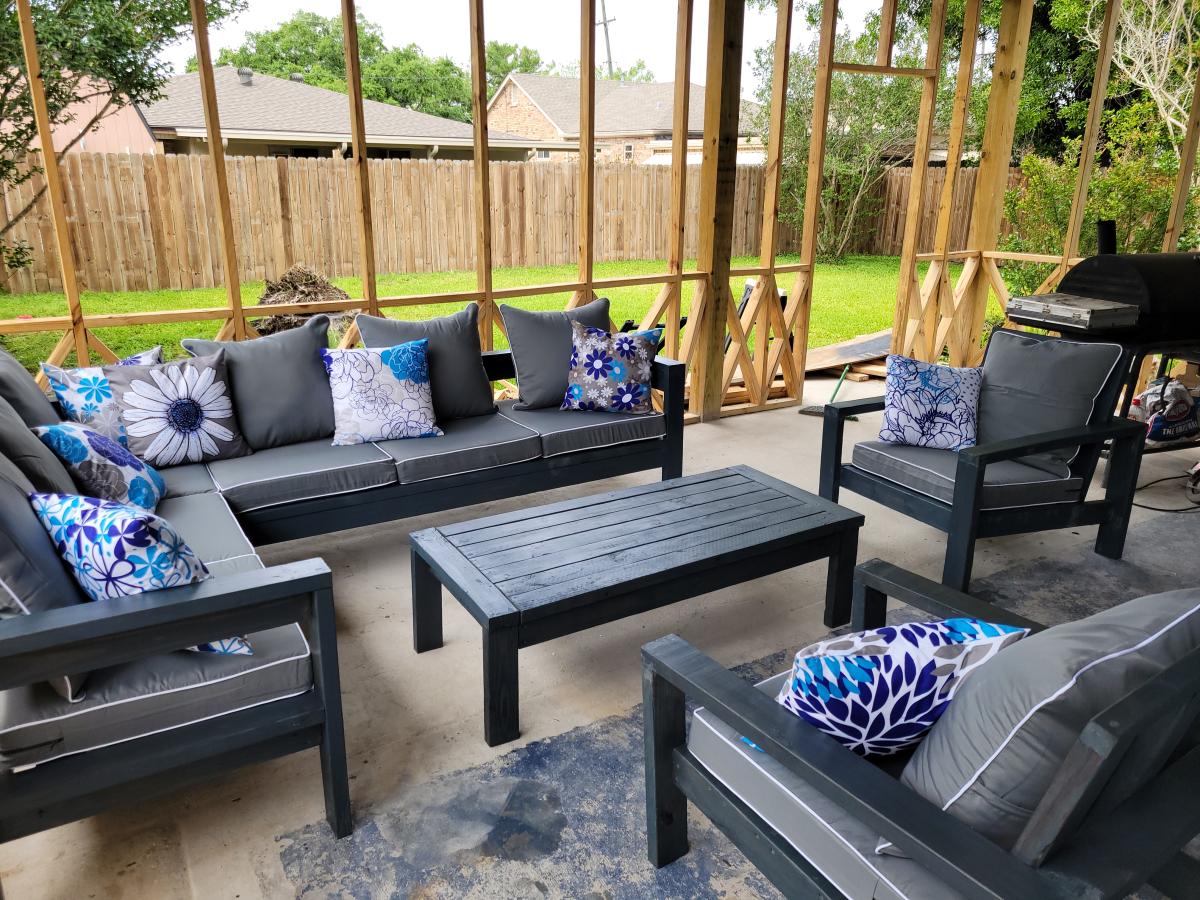
Your easy to follow 2x4 proje ts turned out amazing. My outdoor set is complete. The chairs, also, came from your plans. I built all of it by myself in one weekend. Thank you

I used the plans for the cfaft table top and shelf but changed a few things. On the left side table i made a shelf/cubby hole for wrapping paper and some small shelves I think it came out good!


I used the farmhouse doll bed as inspiration, and ran with it. Mostly I made it up as I went along- but it's sturdy, and cute. I still need to finalize the cushion, but I'm happy with it overall.


Loved this! It was really easy. Can't wait to build more!


Just finished baseball season and made this light for our coach with finishing touches of all players signing the balls.

Clara table with one piece top and chairs modified with 2x2 legs and one piece seat.


I loved this plan. It fits perfect in our daughter's bedroom as a night stand.

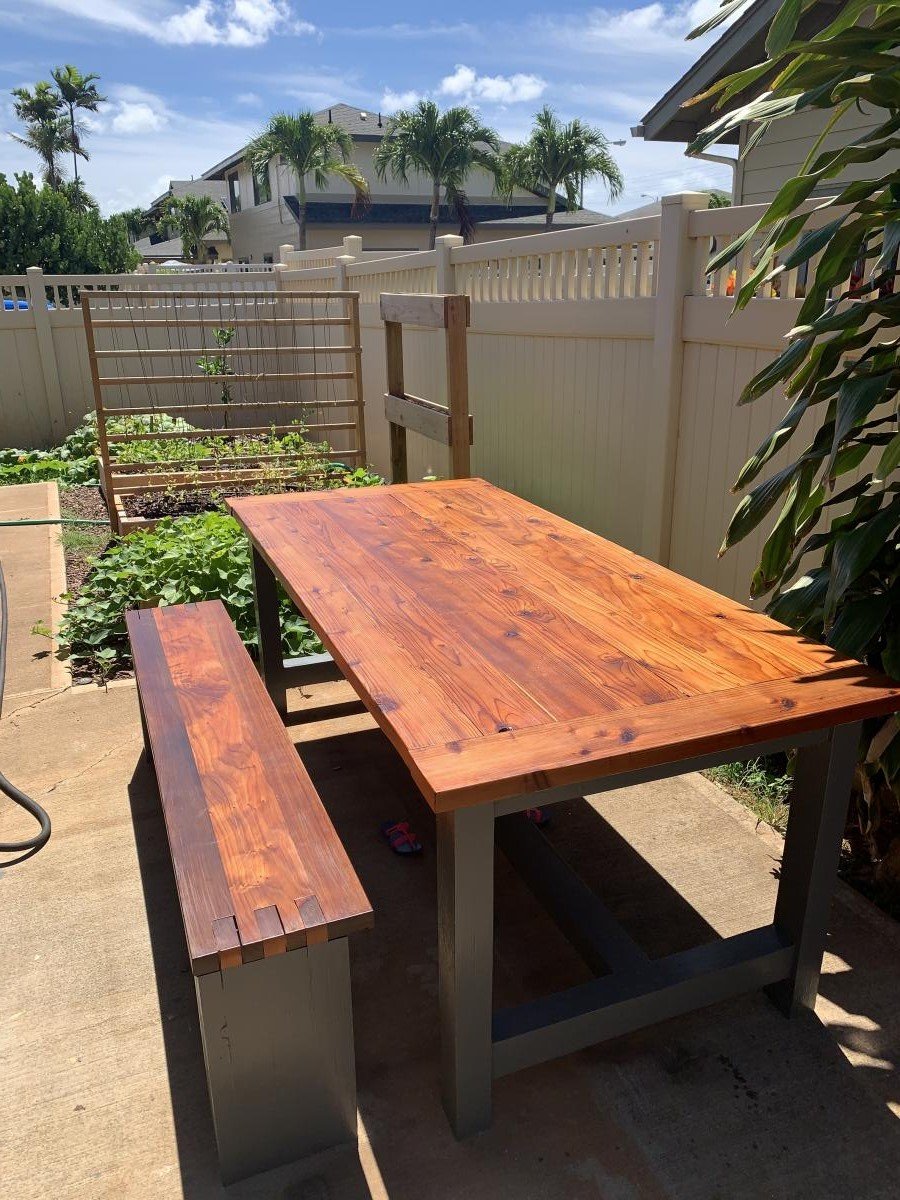
Farmhouse Table and Bench. Made from all redwood. Table is all new wood, and half the bench was from reclaimed redwood. Used Danish Oil and Spar Urethane to finish the tops, and paint to finish the legs.

Mon, 07/22/2019 - 11:14
What a gorgeous table and chairs. the top is done very nicely! Love it!

Great plans and easy to follow!

This man crate is a gift for a co worker who is retiring. We'll put all his keepsake gifts in here and he'll have to open it with a crowbar. :) The dimensions on this were adjusted to the size of 17" long, 12" wide, and 10 3/4" high (about the size of a case of copier paper). It is made with 1/2" birch plywood and poplar craft boards. I chose to use the hardwood plywood since I found out folks would be signing it, and it's much easier to write on this with a ballpoint pen than on regular plywood. Plus, less sanding for me to do ! ;)
To keep it from being so heavy when it's filled, I substituted 1/4" plywood for the top and bottom, and left the trim off of the ends. I arranged the pieces so the trim on the front & back covered the cut ends of the 1/2" plywood.
The lettering was traced on (it's "Stencil" font, in 105 pt size, printed from Powerpoint) using a ballpoint pen to dent the surface, then a black Sharpie pen to outline. Hubby thought it looked nice just with the letters in outline, and that's shown in the picture.
Also on this one, I made a little gift tag with some clip-art, and mod-podge'd it to the bottom.


Tue, 11/19/2013 - 16:03
The man crate was a big hit at the retirement party! I think we're starting a tradition ;) We had his wife stash the crowbar, and when it was time for him to open it, we asked, "does anyone have a crowbar?" - and then his wife said, "Here you go!" and pulls one out of her shoulder bag! It was a hoot! :)

I loved the idea of building a washer and dryer pedestal for extra laundry basket storage underneath! Sashua's is beautiful so I took her idea and modified it a bit to work for me. My washer is very, very heavy and I was worried that if there was no support under the weight in the middle, it would start to bow and sag. The original plan also put the washer too high for me to have been able to use without a step stool. So in my modification I screwed cleats into the 2X4 frame of the laundry room wall, placed the 3/4" plywood on top of it and screwed it in. In the front, I used 4X4's as the two corner leg supports and then added two 1X6 supports in the front center, creating three laundry basket bays. I placed it directly onto the floor as opposed to building the bottom base. This saved me money since I was able to buy half the lumber and also allowed me to lower the height of the platform while leaving enough space for my baskets. The top of my platform is approximately 14 1/2" high, which is just low enough so that I can see into the soap filling compartment at the top of the washer. Being that I'm only 5'2" I would have needed to use a step stool to use my washer at the original 19 1/2" plan height. I framed the top edge of the platform with 2X2's, to ensure that my washer or dryer never walked off the edge. Finally, I added some trim along the front edge and around the legs and that's it!


Mon, 02/15/2016 - 12:25
I REALLY like this modified version, I think it looks GREAT! when you say you screwed cleats to the back wall, are you talking a 2x4 across the back fastened to the studs, or what did you use? I think my wife would love this version, and I may just have to get started on one myself. ![]()

I started this project months ago... hoping to give this to Marlee for her 3rd birthday... that was September. Here it is... 99.99% complete... 3.5 months past the deadline... Just in time for Christmas. I used the plans for Grace's Kitchen pieces with some modifications. I extended the cabinet for the sink... gave her a farmer's sink... and extra counter space. What kitchen doesn't need additional counter space??? I left it open storage for now... I wanted to add doors... but ran out of time... ha ha... The oven I added the drop down door below the oven compartment for additional storage. I painted the burners on her cooktop.. just like Grammie's... I couldn't find the handles I wanted in black... I had to buy the stainless ones and prime and spray them black... that was pricey ... The fridge has 5+ coats of magnetic primer under the stainless steel paint. I got a pic of an icemaker/water dispenser from the web and Mod Podged it to the freezer door. I had just as much fun shopping for her supplies as I did making the kitchen. Most of the food products are from Melissa & Doug... and mostly all made of wood!! Too bad she's only here a couple nights a month.... maybe I might have to have my own friends over to play when she's not here!!! Thank you Ana... once again I owe it all to you!!!!


Mon, 01/02/2012 - 08:31
This is probably the best one I have seen! Honestly - the fridge is fantastic and that sink is insanely awesome! I am jealous now lol....I am sure she loves it and who says YOU aren't allowed to play with it while she is not there ;)
Mon, 01/02/2012 - 19:12
Thank you. That's very nice of you to say, there are many beautiful sets on here. Yours is very nice too. I love the grill on your stove. That's a great addition.
Thu, 01/05/2012 - 18:31
I think the extra space is going to work out well. My granddaughter is already using it and if she didn't have it, I suspect she'd make my play sandwich on the floor!! I would like to make another piece, for additional storage and maybe a microwave, but I'm running out of space in her room!!!
Mon, 02/06/2012 - 19:08
Could you please tell me the dimensions of your sink & counter? Thanks,
Sun, 08/19/2012 - 10:30
Where did you find that cute sink? Id love to make this for my daughter, you did a great job.
Sun, 08/19/2012 - 18:35
Thank you, I built the sink. Just made a box and painted it with stainless steel paint. I really winged it with the sink. The counter top is two boards that were scrap from the fridge joined with pocket holes. I splurged and bought the faucet.
Fri, 08/23/2013 - 09:22
I love your kitchen set at first i thought it was the real deal. the stainless on black looks amazing what paint did you use to get the stainless color? also what did you use for the stove knobs they look real Great job.

The plans were great! I hadn't built anything this big before but just followed the instructions step by step. I did also built a base to put it on (pavers on sand then pressure treated 2x6 frame). It took quite a while but that's just mostly because I had "helpers" and had to work on it when I had a spare minute. I was pleasantly surprised by how much we were able to pack in there. We added electricity and made a few other modifications to a larger shed we had so my husband could use that as an office. I built this to store all the tools, yard equipment, etc that we moved out of there.


I used your plans for the painted barn doors using plywood but modified them and stained the door instead.


Comments
Ana White Admin
Mon, 04/10/2023 - 10:07
Great chairs!
Looks like a fun time and the chairs look fabulous! Thanks for sharing.