


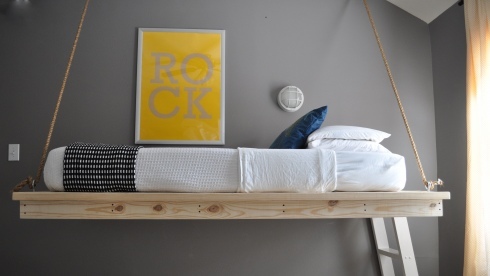
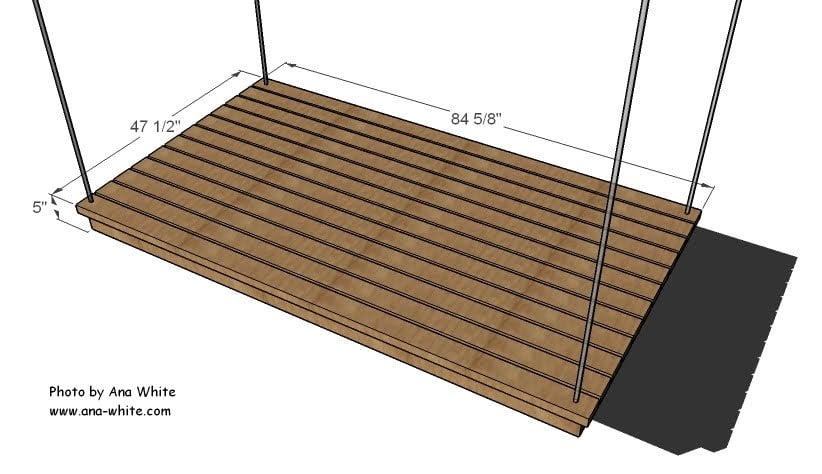
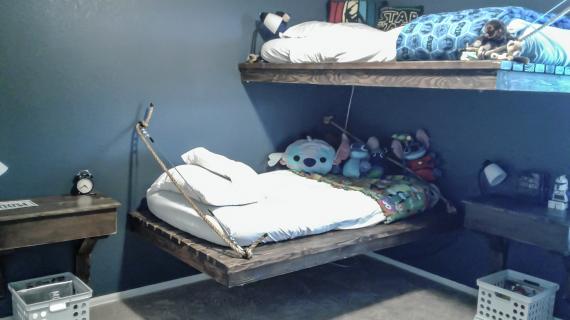
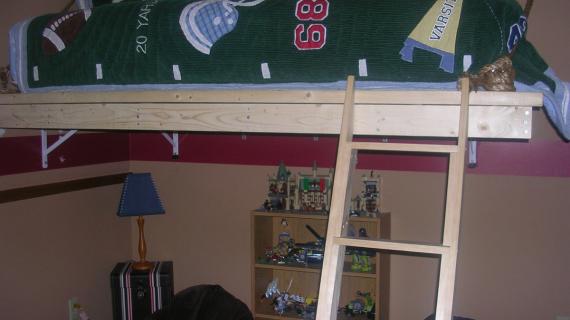
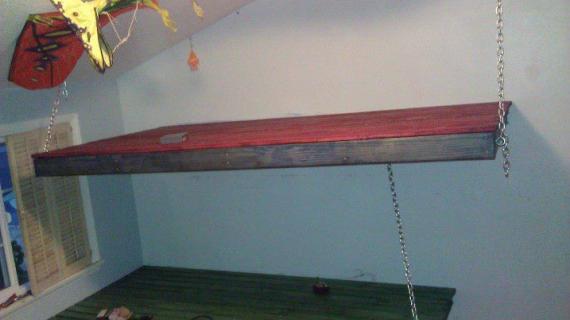
A hanging daybed big enough to fit a standard twin mattress. It has extra room on all sides to hold drinks, books, phones and maybe even a snack.

I've had these plans drawn up for quite a while now, and just haven't posted them. Because I thought that they were too simple. Imagine that, too simple. I wondered how the hanging daybed would look.
 |
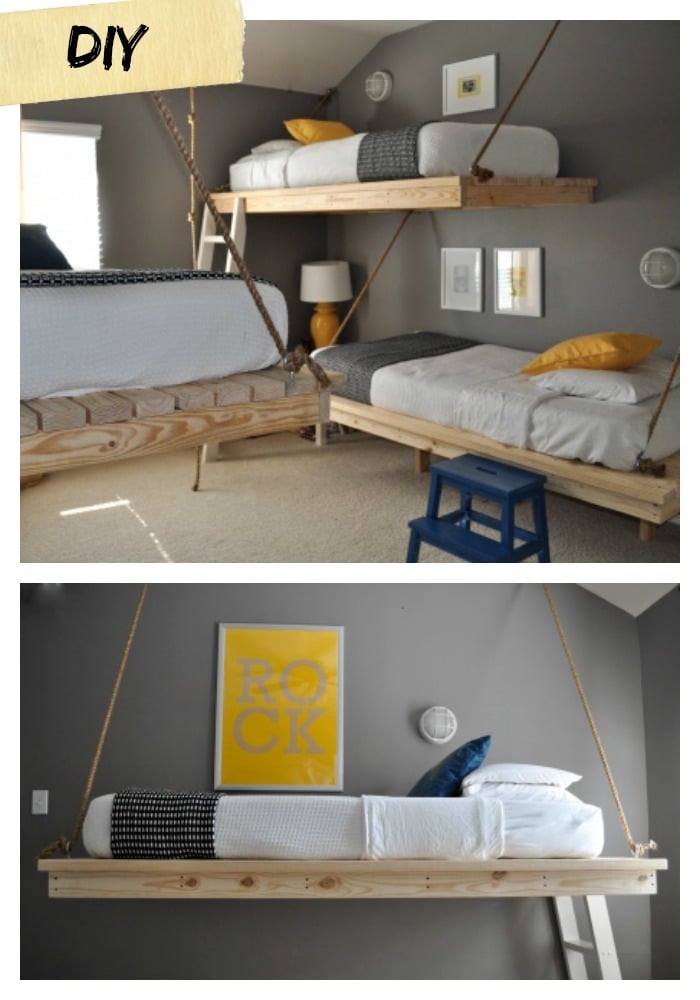
| photo by Ana White, Hanging Daybed designed and built by Jacob and Ana White |
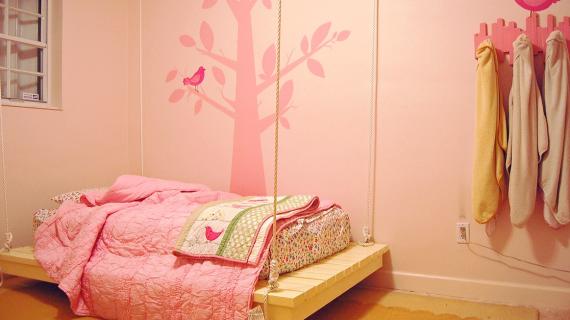
And then a major media company called and asked if I would build this bed and photograph it for them. So I enlisted the hubs help and we started building it one evening. It only took about an hour, without a miter saw (my beloved saw is at the lake, miss ya!) and as we were building it, these are some of the ideas that we had: 1. Let's turn it into a picnic table top 2. Let me just burn it. We need to have a bonfire. (that was NOT me) 3. Oh, Mom, you made me a deck for my swimming pool! (again, NOT me) 4. Don't put too many screws in it, then we can disassemble it and use the lumber for something else (maybe that was me). You get the idea. We weren't in love with it. So I kept repeating to myself, never judge a project until it's finished. Even though I was looking at 17 scrap stud 2x4s put together with 100 screws in the most basic and simple way. Talk about not a lot to work with. So we threw it all together, threw Grandma's handmade quilt and threw Aunt Sherry's retro ruffled pillowcases on top, and I tell ya, I was ready to throw myself on too!
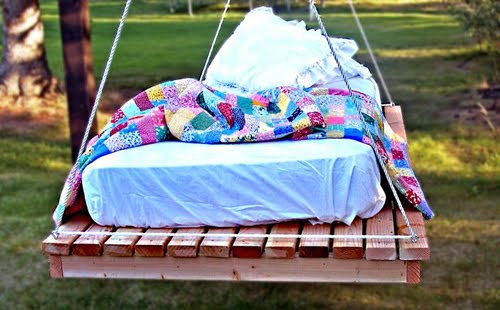 |
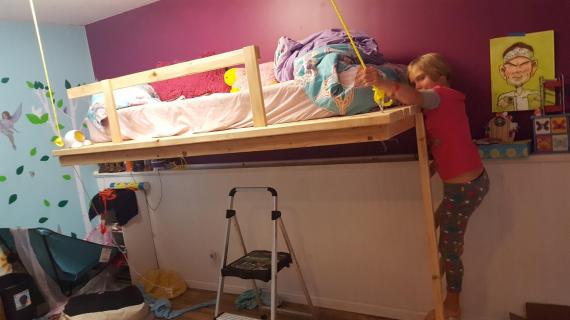
| photo by Ana White, Hanging Daybed designed and built by Jacob and Ana White |
 |
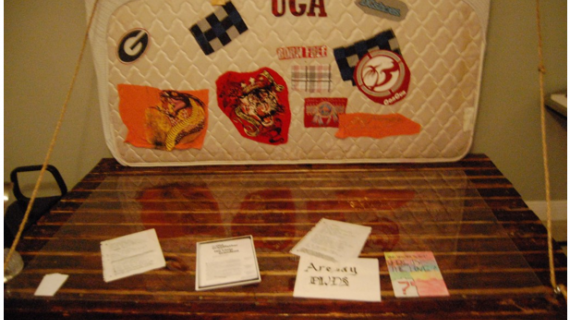
| photo by Ana White, Hanging Daybed designed and built by Ana White |
It looks good, but oh my, it feels amazing. Even I, who is often the butt of duct tape and fishing jokes (as in the only way I will relax is if I'm duct taped to the boat) found myself enjoying a quiet swaying. If you don't have a hanging daybed, do yourself a favor. Buy 17 2x4s, 100 3" wood screws, 50' of chain or rope and 8 eye bolts and skip your workout and build this. You won't regret it. And here's how.
Pin For Later!
Preparation
17 – 2×4 studs (should be less than $2 each)
100 3″ wood screws
50′ of rope or chain with a load limit of at least 200 pounds (for an 800 pound capacity)
4 – Eyebolts (8 if you also need bolts for the ceiling mount too)
Finishing Supplies as desired Drill with a countersink and drill bits to match the eye bolts and the screw heads
2 – 2x4s @ 82 3/4″ (Frame Sides)
6 – 2x4s @ 42 1/2″ (Frame Joist)
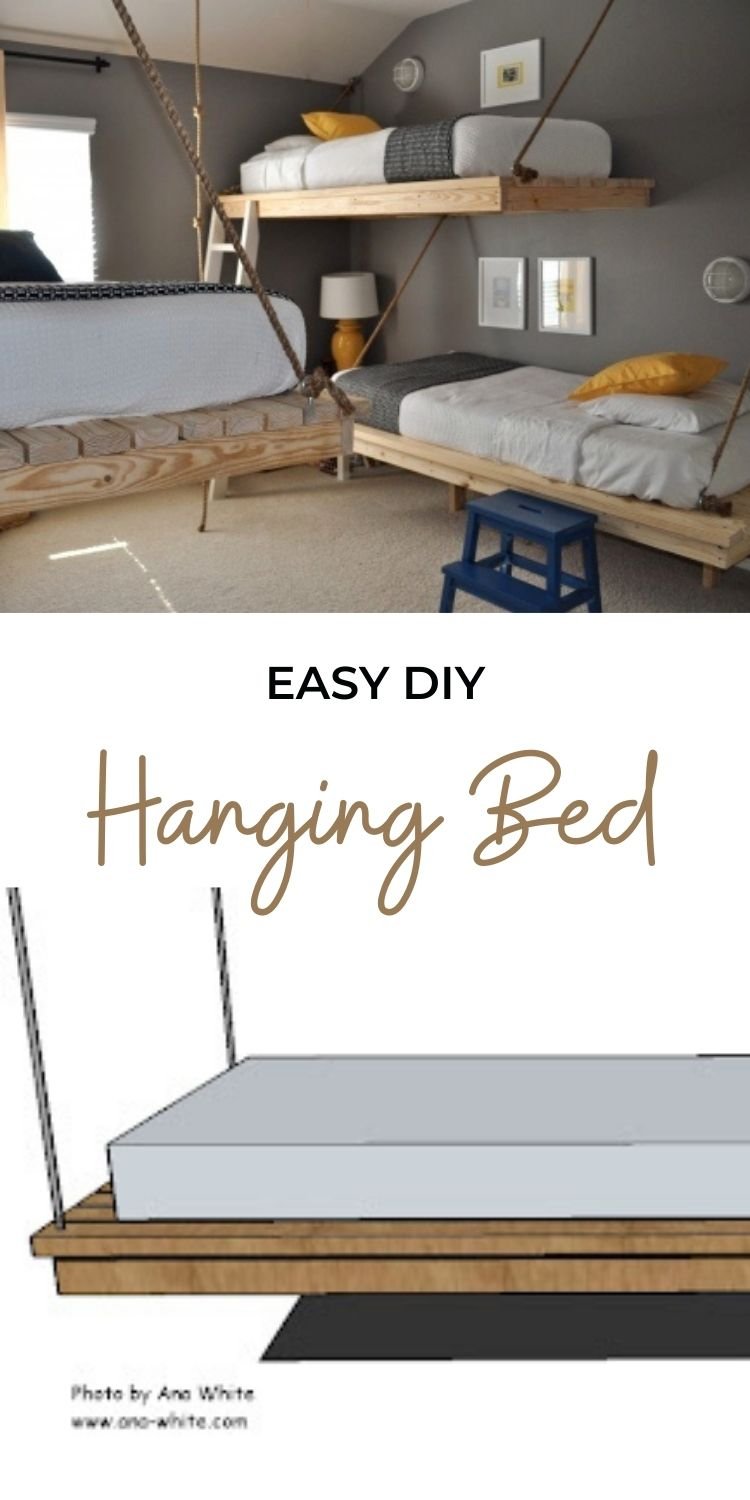
12 – 2×4 @ 84 3/4″ (Deck Boards)


Instructions
Step 1
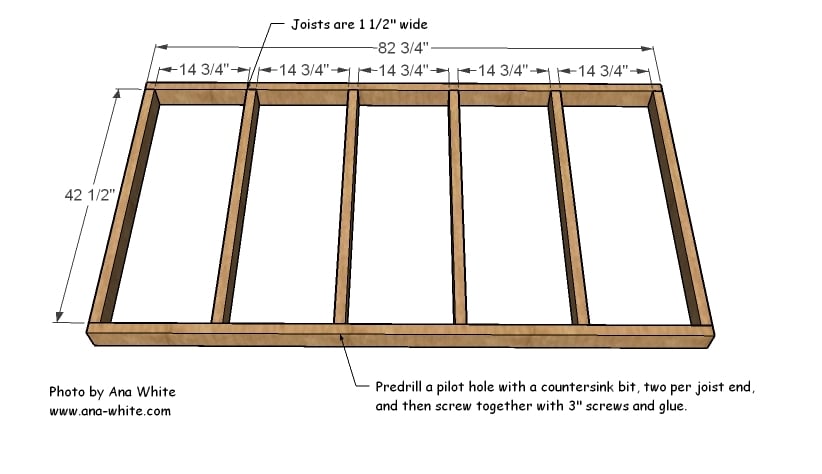
Cut your frame sides at 82 3/4″ long. Mark the sides with a carpenter’s square every 14 3/4″ as shown above, leaving a 1 1/2″ gap between the marks for your studs. Then in those 1 1/2″ gaps, predrill two holes with a countersink bit. You can even start your screws. Then screw the studs to the frame sides with 3″ screws.
Step 2
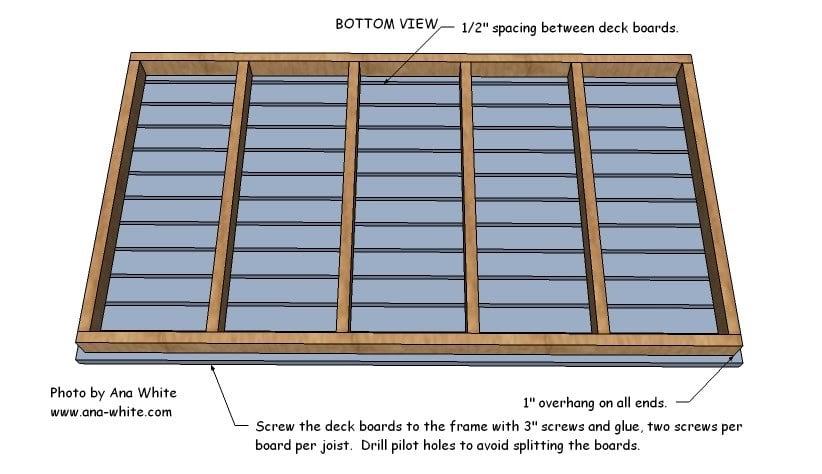
pply glue to the top of the bed frame and lay the deck boards on the frame. Adjust so that the deck boards overhang 1″ on all sides as shown in the diagram above. Space the deck boards 1/2″ apart and screw down, 2 screws per deck board per joist.
Step 3
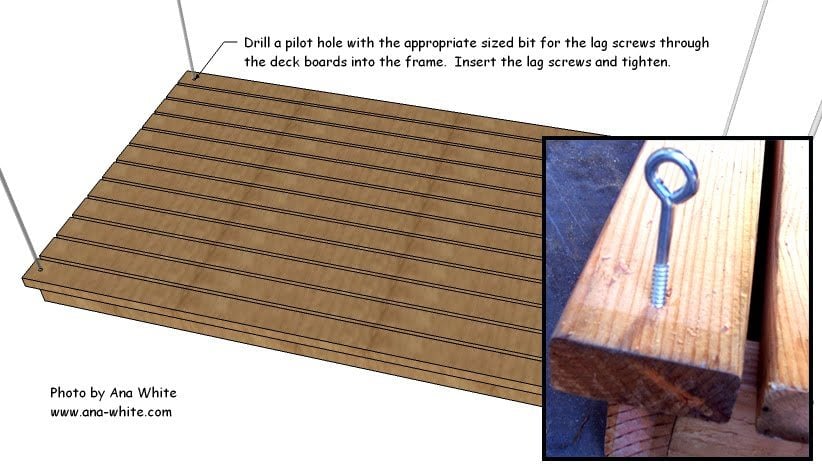
Drill a hole with the appropriate sized drill bit for the lag screws in the corners of the daybed. The pilot hole must be drilled over the bed frame. Apply glue to the pilot hole and screw the lag screw into the bed, securing tightly. TIP: Avoid over tightening and stripping the wood and creating a weak joint.
Step 4
See finishing instructions.


Comments
Jennifer Doherty (not verified)
Wed, 08/04/2010 - 18:27
That is so cool! And SIMPLE!
That is so cool! And SIMPLE! Wow! :)
Did you hang yours from a tree?
manielynn (not verified)
Wed, 08/04/2010 - 18:38
Now, where to hang :) I think
Now, where to hang :) I think I need a new pergola! Another great design - you're amazing.
Youthful One (not verified)
Wed, 08/04/2010 - 21:05
So fun!I think I need the
So fun!
I think I need the plans for a pulley system to lift the bed out of the way for day time and let it down for sleeping. Better than a murphy bed! My boys would be all over that - they wouldn't have to make their bed - just lift it out of sight!
Shaynethemom
Thu, 05/26/2011 - 08:38
That is a great idea... def
That is a great idea... def gonna have to remember that one for when my little guys get bigger/older.. great space saver
Guest (not verified)
Sat, 06/04/2011 - 19:54
Pulley system
What a creative idea. That's something my MIL would think of. She's so creative that way. Always thinking outside the box. I plan to make these beds for my boys this week. I can't wait to get them up!!
Jenny (not verified)
Thu, 08/05/2010 - 05:48
I want to see pictures of
I want to see pictures of where it is hanging from. I can't imagine a tree branch long and strong enough? Did you build a frame for it to hang from?
Erin @ SYL: Sl… (not verified)
Thu, 08/05/2010 - 06:30
i would absolutely LOVE to
i would absolutely LOVE to have this in my bedroom... Wonder how I convince my landlord on this?
Ana White (not verified)
Thu, 08/05/2010 - 07:09
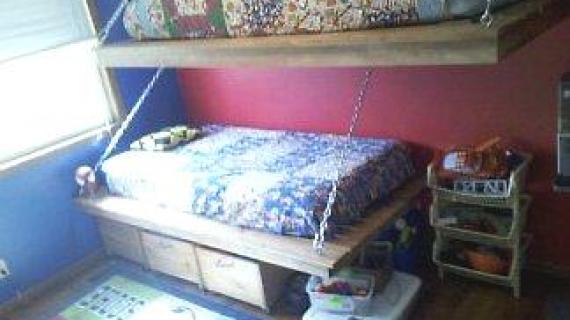
We actually had no intention
We actually had no intention of keeping this daybed as it was being built, so our plan was to hang it from the swing set frame. And we did. Keep in mind it's a BEEFY swing set frame, but that's why you see the rope at an angle. Be careful about hanging the bed in a place that can adequately support the weight - about 250 pounds per eyehook.
Lazy Gardens (not verified)
Thu, 08/05/2010 - 11:06
Ana - It's not clear where
Ana -
It's not clear where those eyes are screwed into.
Are they an eyebolt that goes all the way through the bottom frame, with a washer to keep them from stripping out, or just a big screw-eye going in from the top?
Ana White (not verified)
Thu, 08/05/2010 - 14:40
So here's the deal on the eye
So here's the deal on the eye bolts. I technically used eye lag screws, 4" long, threaded properly with glue and the appropriate sized pilot hole, through both the deck boards and into the frame boards. IMPORTANT: Must be screwed into the frame boards. If you are nervous about doing this properly, I highly suggest using LAG BOLTS with nuts and washers, would need to be 6" long, drilled all the way through the deck and the frame boards. Check periodically if the bolts are still tight. Another method is to use lag bolts drilled horizontal into the frame sides, bolted down with nuts and washers. I would do this on the ends instead of the sides. Hope this makes sense, I've got kid's climbing on me as I type :)
Guest (not verified)
Tue, 12/13/2011 - 11:47
Lag Bolts vs Lag Screws
Actually both descriptions refer to the same thing. The phrase is used for both. I would say use eye bolts thru the entire thickness of the frame. After all it would be us using the hanging bed / chair. This means a 6 inch long eye bolt with MACHINE threads, also I would suggest using "body washers" one on top and one on the bottom to prevent any compression (damage) to the wood. The bottom nut should also be a locking type nut to prevent loosening. The end of the bolt can be cut off to remove the excess.
The Cozy Cape (not verified)
Sun, 08/22/2010 - 16:24
I love the idea of this and
I love the idea of this and have actually been combing the internet for the last month to try to figure out to build one of these myself. I want to replace me old love seat in my sunroom with one of these swinging beds. One questions: any ideas on putting a back and/or arms on this easily. We use our sunroom to read quite a bit and I think we'd need a back on it.
Three Boys, On… (not verified)
Thu, 10/28/2010 - 18:34
[...] took a while, but we
[...] took a while, but we finally got the boys’ room done! I was inspired once again by Ana White. When the time came for August to switch to a big boy bed, we decided to [...]
Bedroom For Th… (not verified)
Tue, 11/09/2010 - 10:57
[...] The Bumper Crop that
[...] The Bumper Crop that they done by themselves. The room features cool DIY hanging beds inspired by Ana White that not only look good but also very practical in terms of space saving. The beds are hanging from [...]
Three Boys in … (not verified)
Tue, 11/09/2010 - 17:41
[...] room features cool DIY
[...] room features cool DIY hanging beds inspired by Ana White that not only look good but also very practical in terms of space saving. This stylish boys bedroom [...]
Comfy Boys Roo… (not verified)
Wed, 11/10/2010 - 05:29
[...] images are taken from a
[...] images are taken from a project by the family behind The Bumper Crop. Inspired by hanging beds from Ana White, the bedroom is done by themselves. This modern boy’s bedroom looks very practical and could help [...]
Kate (not verified)
Wed, 11/10/2010 - 05:57
I'm planning to build one to
I'm planning to build one to hang under our tree house for reading during the day and camping at night. I'll send a picture in the spring.
Oh My What?!?!… (not verified)
Wed, 11/10/2010 - 15:41
[...] You can find a step by
[...] You can find a step by step guide here [...]
Minimalist Thr… (not verified)
Thu, 11/11/2010 - 10:06
[...] hang for boys will be
[...] hang for boys will be undertaken by the family behind The Bumper Crop. This design is inspired by Ana White who not only looks good but also very practical in terms of saving space available. Bed hanging [...]
Creative Three… (not verified)
Thu, 11/11/2010 - 17:28
[...] of money on furniture.
[...] of money on furniture. So, check this boy children bedroom pictures gallery and give your opinion. Ana WhiteSponsored [...]
emmah (not verified)
Fri, 11/12/2010 - 05:52
could you do this indoors
could you do this indoors
Ana White (not verified)
Fri, 11/12/2010 - 06:00
Absolutely, check this out:
Absolutely, check this out: http://www.ohdeedoh.com/ohdeedoh/inspiration/1-2-3-hanging-beds-ah-ah-a…
Unique Boys Be… (not verified)
Mon, 11/15/2010 - 06:07
[...] Bumper Crop that they
[...] Bumper Crop that they have done by themselves. The room features cool DIY hanging beds inspired by Ana White that not only look good but are also very practical in terms of space saving. The beds are hanging [...]
Rooms You Can … (not verified)
Tue, 11/16/2010 - 11:14
[...] Hanging Daybed [...]
[...] Hanging Daybed [...]
Stylish Bedroo… (not verified)
Thu, 12/02/2010 - 16:40
[...] created by the family
[...] created by the family behind The Bumber Crop. There are three hanging beds in the room, inspired by Ana White. The beds definitely save space, and also look good in a simple flat wooden bed design. They are [...]
audra (not verified)
Fri, 12/10/2010 - 06:14
Please help i am new to all
Please help i am new to all this, how can i do a double bed frame for this?Just for the ground..Measurements please or suggestions!!! This is a great piece and so simple
Contemporary B… (not verified)
Thu, 12/16/2010 - 03:55
[...] example of design style
[...] example of design style bedroom boys with hammocks that they do for themselves, yangterinspirasi by Ana White, who not only looks good but also very practical in terms of space. Bed hanging from the walls with [...]
Stacey Gray (not verified)
Wed, 12/22/2010 - 18:54
We just built this same bed
We just built this same bed today for my son (indoors, in a corner and bolted to 2 walls). Rather than using rope though we used chains-kind of fits his personality a little better. He was so excited about it and it was a little rough getting him to bed tonight, probably will be the same way tomorrow night. It only took a couple of hours, the plans were simple enough for me to understand (even though my husband did most of the work), and I love the rough kind of unfinished look for it. I will upload pictures of it tomorrow. We added a rail because my son is still a little young for a really high bed.
Some helpful tips? If you are using a chain, make sure that your carabiners (I think that they are called something else at the store, but it's basically a carabiner) fit over your eye lag screws before buying, ours just barely fit. We used our chop saw and were able to cut more than 1 board at a time which made the work go a lot faster. We mounted the framework with the chains before putting up the rest of the boards so that it was lighter. Oh, on the top portion rather than using 2x4s we used 1x4s, we were hoping that it would make the bed a little lighter, although I think that the 1x4s were a little more expensive. We just used the remaining wood to build a rail and tomorrow we will use the rest to make a ladder.
Thanks so much for all of your wonderful plans! We love it, and since my son's room is really small-it opens up a lot of extra floor space for playing.
Loftsängar | V… (not verified)
Thu, 12/23/2010 - 05:07
[...] och som funkar även om
[...] och som funkar även om man inte har fyra meter till tak. Den översta är en modifierad version av den här sängen som det finns snickarbeskrivning [...]
Hanging Daybed… (not verified)
Thu, 12/30/2010 - 17:27
[...] in Brag Blog Put on
[...] in Brag Blog Put on my TO-DO List Save as PDF Print this PostShare/Bookmark My Parents live in Montville, Queensland Australia, if you google this you will discover the most stunning ranges in Australia, and nothing seemed more perfect than a gorgeous Ana White Daybed project for their gazebo in the back garden’s. and the hanging daybed would suit my Dad to a TEA after a big lunch! http://ana-white.com/2010/08/easiest-hanging-daybed.html [...]
Boy’s Bedroom … (not verified)
Tue, 01/04/2011 - 20:17
[...] Bumper Crop that they
[...] Bumper Crop that they have done by themselves. The room features cool DIY hanging beds inspired by Ana White that not only look good but are also very practical in terms of space saving. The beds are hanging [...]
Free Hanging B… (not verified)
Mon, 01/10/2011 - 04:51
[...] Hanging Daybed at Ana’s
[...] Hanging Daybed at Ana’s Site [...]
Beth (not verified)
Tue, 01/11/2011 - 18:11
I love this bed! I really
I love this bed! I really want to figure out where I can hang one-I want to lay in it and read :) Thanks so much for posting-blogged it here: http://makealong.blogspot.com/2010/08/those-summer-nights.html
Outfitting the… (not verified)
Thu, 01/20/2011 - 16:53
[...] design the other day
[...] design the other day and I really like it as a replacement for the boys beds at the cabin. The beds are made out of 2×4’s although I would be tempted to replace the 2x4s on the deck for 1x6s [...]
Hey, I like th… (not verified)
Sun, 01/23/2011 - 10:25
[...] Outdoor Hanging Daybed:
[...] Outdoor Hanging Daybed: [...]
Lindsay (not verified)
Sat, 01/29/2011 - 14:06
Ana, I love your work and
Ana,
I love your work and think you provide a great service! I have a question on this....I have a pergola over my deck and I would love to use this as seating at my long outdoor table. Do you think this is feasible or do you have reservations about this? Thanks so much and I hope to hear from you!
Design Bedroom… (not verified)
Wed, 02/02/2011 - 07:56
[...] room features cool DIY
[...] room features cool DIY hanging beds inspired by Ana White that not only look good but are also very practical in terms of space saving. The beds are hanging [...]
Kelly Lane (not verified)
Tue, 02/15/2011 - 10:52
I love this bed and really
I love this bed and really want to try and attempt this for my son's new "big boy" bed. However, we are getting him a full sized bed.... do you have the dimensions for this sized bed or suggestions on measuring it correctly???
Hanging Beds @… (not verified)
Fri, 02/18/2011 - 22:32
[...] I have to admit, this
[...] I have to admit, this is unique! Interested to make one? You can find instructions for a DIY Hanging Bed and read more about the featured beds here. No comments « Soap [...]
Wona (not verified)
Mon, 03/28/2011 - 22:41
Wonder if this can be managed around a ceiling fan
I have a daughter that has moved in to my home with my granddaughter and grandson. I showed this to my grdaughter and she loved it. I really want to do this in her room if I can manage it but there is a ceiling fan in there. She currently has a full size bed but the room she is in is just almost too small for that size bed so we need to go to a smaller bed for her if we can. Does anyone have any suggestions?
Guest (not verified)
Mon, 04/04/2011 - 11:41
Love this
I want to make this for my toddler. But how do you locate the beams in the ceiling? And can you use this design for a platform/trundle bed?
Guest (not verified)
Mon, 04/04/2011 - 11:41
Love this
I want to make this for my toddler. But how do you locate the beams in the ceiling? And can you use this design for a platform/trundle bed?
Skadi (not verified)
Sun, 04/10/2011 - 11:30
inspiring
Ana,
Skadi
Guest (not verified)
Sun, 04/17/2011 - 13:36
Wood Chaise and day bed
I downloaded both. Can't wait for my husband to go golfing. Not telling him or he'll want to help and i want to do it myself. I'm 74 and used to do woodworking years ago and can't wait to start again. Have to find my tools. These are so fun. Thank you!
Guest (not verified)
Thu, 06/02/2011 - 20:05
Day beds
I'm hoping these will be in my boys' room by next week:) I LOVE them and when I showed them the pictures of them today they were so excited! I wanted to make them bunk beds but I didn't know if I wanted to commit to them. We've had them in the past and I didn't like them for very long. These are a very fresh alternative. Thank you ANA for sharing your amazing gift and for inspiring so many women to pick up a power tool and not look back!
Nik (not verified)
Mon, 06/27/2011 - 14:38
Hanging bed for adults?
liked this idea a lot but do not really know if that works for well fed adults - 200lb-250lb? the ouside corners are secured with eye bold and ropes attached tot he bed frame, how about the inner side. How to you attach it to the side wall and wall by the head? Please take into account that some houses are built with single brick wall t divide one residence to the other...
Tumaini Rivera (not verified)
Sun, 07/17/2011 - 20:40
This is what started my crush on Ana White
You see, I found these beds a while ago on the internet and fell head over heels for this website. If yall want to read more about my "crush" on Ana White, you've gotta read this http://flippinfactory.wordpress.com/2011/07/14/i-have-a-crush-on-ana-wh…
Guest (not verified)
Mon, 08/08/2011 - 13:56
Check this out!!
Check this page out!
http://www.facebook.com/#!/pages/Custom-Hanging-Daybeds/189916454404322
Guest (not verified)
Mon, 09/05/2011 - 11:03
What a lucky find!
I am so happy I found this site! Have wanted to have a hanging bed for so long and knew it couldn't be that hard to build... only thing is I had no idea how to start and haven't done woodwork since I was a young kid 20 years ago! My dad can figure out just about anything, so I know I have his help, but there is just something about being able to do it yourself that makes it so much better. I'm a struggling transplant patient unfortunately, homebound 95% of my day and waiting for a second transplant after six years of rejection. I definitely won't be doing it all myself but I'm already putting the shopping list together and scheduling my dads time :). We are renovating my new apartment, a loft style space that I got to redesign completely! Never having done design before, I am so excited to have found a new love and passion that helps to fill my endless days... most of all I want to create one of a kind interesting decor that keeps the place fun. (I actually entered the great room into that new HGTV show, HGTV'd, where they choose an ultimate fan to have a one of a kind ultimate, dream come true makeover... it's all I can think about lately even if it's the longest shot ever... but God it would be amazing to have my dream room to enjoy every day, while I am home on IV's) Anyway, I want to create amazing design like HGTV even if they don't come, but need to find a way to achieve it on a very small budget... love to recycle and reuse and this site is so awesome to inspire ideas of how to do that, to learn from, to be walked through step by step... I hope that between now and the new year I am able to come back and post the fun process of transformation. My goal is a place so cozy I don't want to leave, that I can settle into before my transplant call and know it is waiting for me to come back to to heal... and may they do things right this time so I can keep designing and find my way back to life when it's over! If anyone wants to check out our space, I'll add the link below :)... we had a wonderful amish family come and build the maple stairs for us on site, letting me design them myself as we started... I know I love them and am hoping others do to!
Thanks Ana for sharing your talent and inspiration... I am so happy to have found you and look forward to surfing your site and making use of some of your great ideas... this hanging bed for starters!
http://my.hgtv.com/hgtvd/Multipurpose-Room/Historic-Loft-Renovation-See…
mountain mom (not verified)
Wed, 10/19/2011 - 07:50
total cost of this project?
definitely building the hanging bunk twin beds for my 2 girls this Fall! fabulously rustic chic! my husband is less than handy, so we're planning on having a co-worker who does woodwork build it for us. can you give me an estimate on how much the total supplies cost to build this, including wood for a ladder, so i may have a general idea on how much this project will cost us? wondering what a fair price would be to pay the gentleman building this for us? is this project too heavy to secure to an interior wall? our girls are 5yrs and 2 1/2 yrs old. thanks!