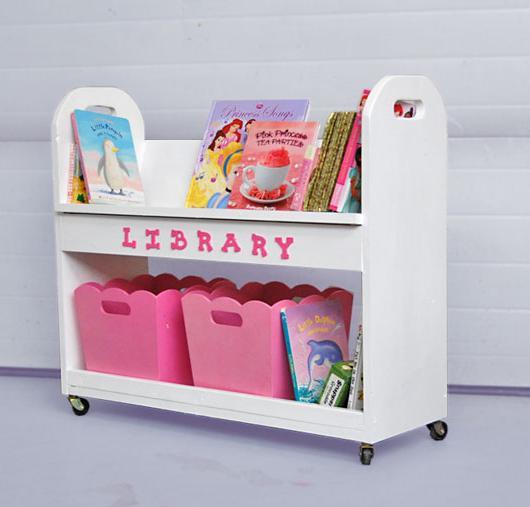


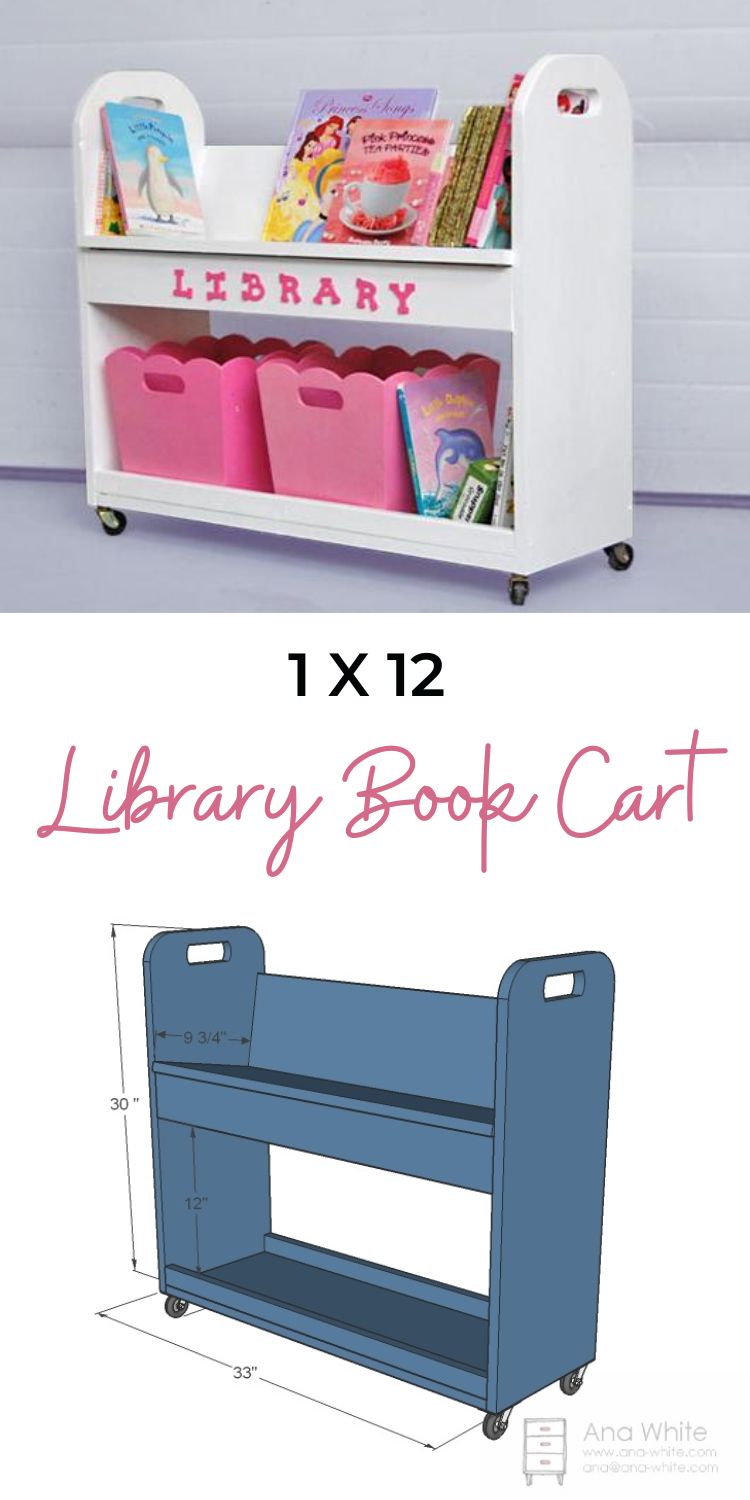
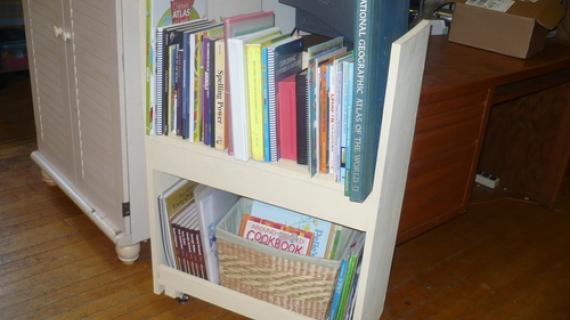
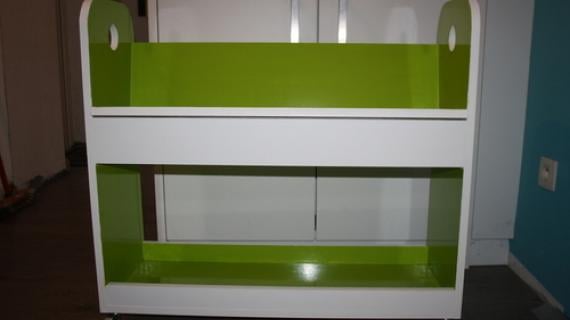
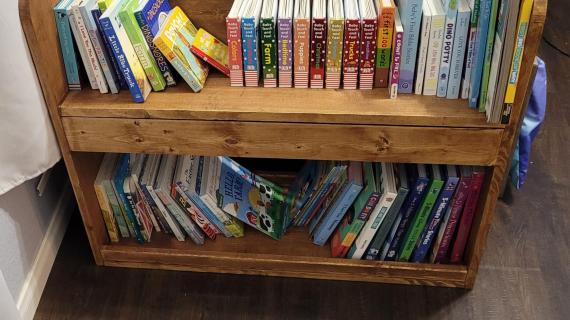
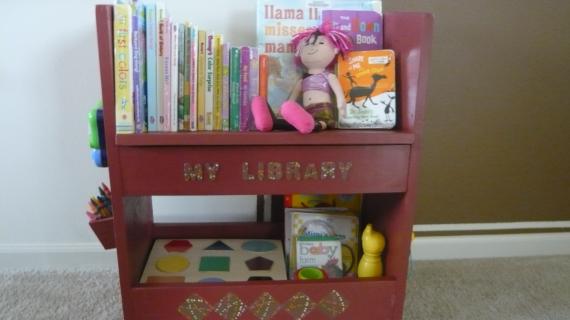
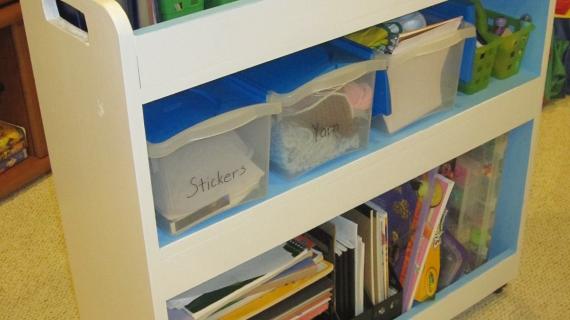
A rolling cart featuring a angled top book shelf perfect for keeping books in place, and a large bottom shelf perfect for baskets or bins, sized for children. This is a free woodworking plan to build your own from Ana-White.com
Pin For Later!
Preparation
- 1 – 1×12, 10 feet long
- 1 – 1×2, 6 feet long
- 1 – 1×4, 3 feet long
- 1 – 1×8, 3 feet long
- 2″ self tapping star bit Screws OR 1 1/4″ Pocket Hole Screws (for Kreg Jig)
- 1-1/4" brad nails
- Wood filler, glue and finishing supplies
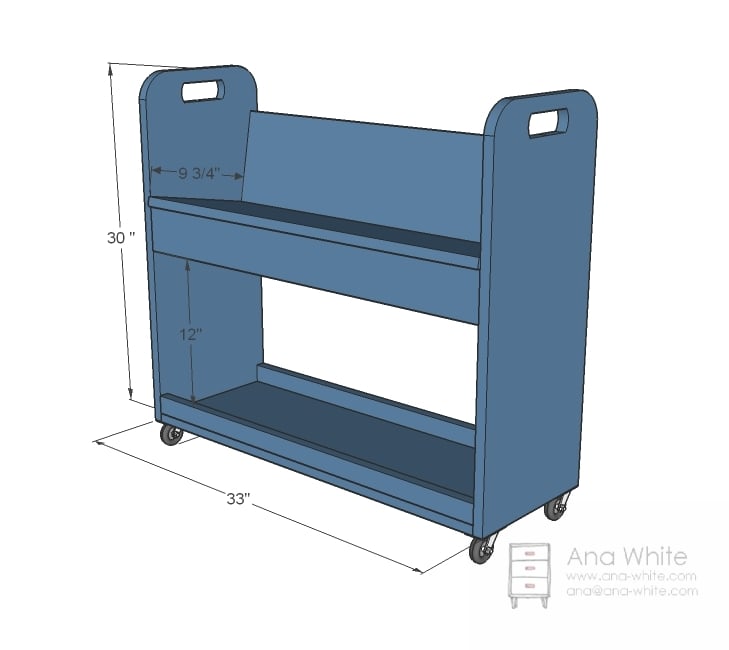
- 2 – 1×12 @ 28″ (Sides)
- 2 – 1×12 @ 31 1/2″ (Shelves)
- 1 – 1×4 @ 31 1/2″ (Top Shelf Support)
- 2 – 1×2 @ 31 1/2″ (Bottom Shelf Trim)
- 1 – 1×8 @ 31 1/2″ Top Back)


Instructions
Step 1
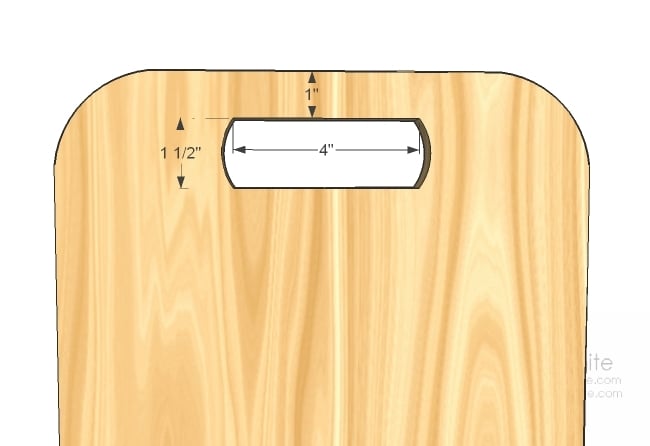
On the two side pieces, cut out the handle and round the corners if desired.
Step 2
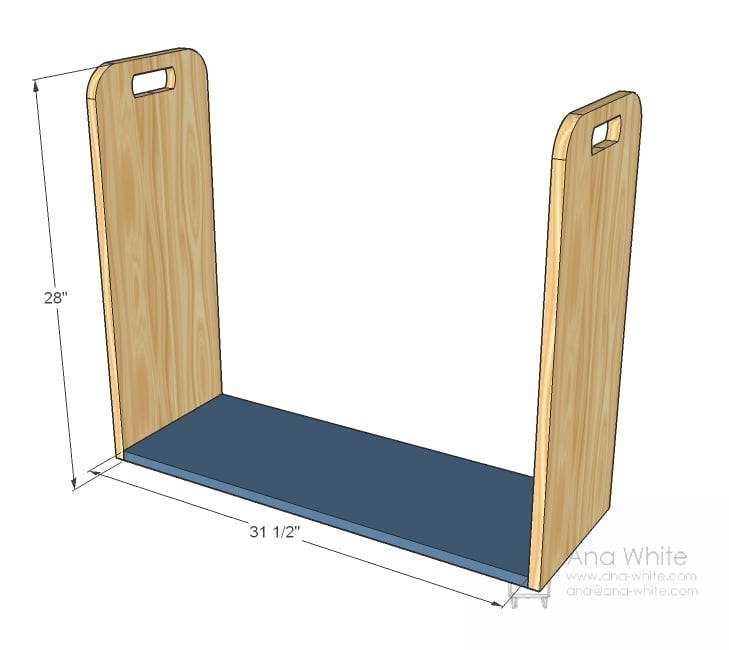
Attach the bottom shelf to the sides with either 3/4" pocket holes and 1-1/4" pocket hole screws, or 2" self tapping star bit screws.
Step 3

Attach the bottom shelf sides as shown using 1-1/4" brad nails and glue.
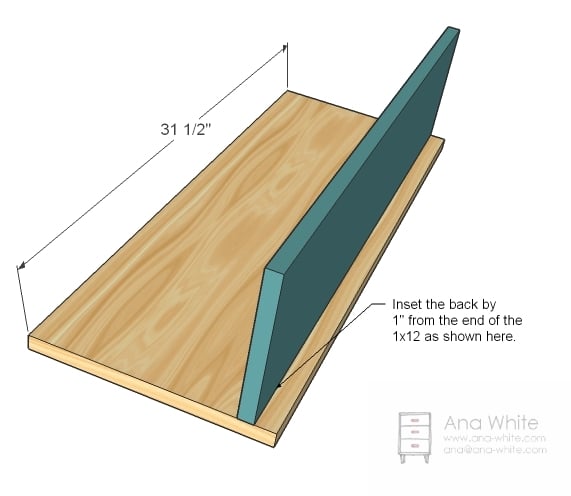
Step 4

Top Shelf Support Measure and mark out the location for the top shelf support as shown in the diagram above. Use either the 3/4" pocket holes and 1-1/4" pocket hole screws, or 2" self tapping screws.
Step 5
Attach the back piece to the top shelf with screws or 1-1/4" brad nails and glue.
Step 6
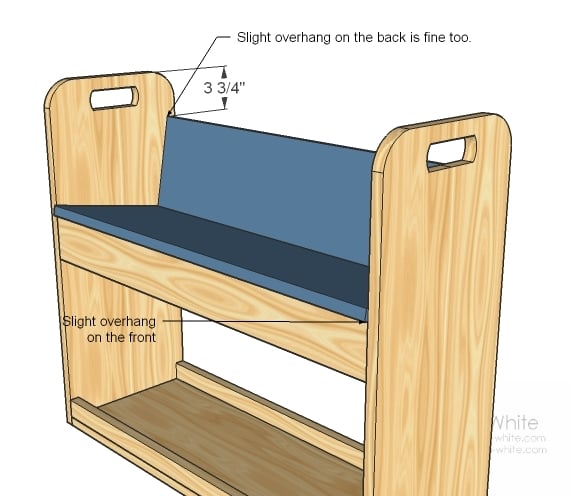
Top Shelf
Place top shelf on top of top shelf support. Mark and screw in place with 2″ screws and glue.
Step 7

Wheels
Attach caster wheels to base of the cart with screws included with the caster wheels.
Sand well with 120 grit sandpaper. Remove and sanding residue.


Comments
Chrystal (not verified)
Tue, 12/28/2010 - 22:16
LOVE this!! Its just
LOVE this!! Its just fantastic & so are you :) i'll be adding it to my to do list!! Thanks Ana for all that you do!!
CatherineG (not verified)
Tue, 12/28/2010 - 23:42
Thanks, Ana! I have
Thanks, Ana! I have children's books in anticipation of a child someday soon, and this would hold them all perfectly. BTW, I purchased four of the 20-gallon totes from Home Depot - perfect for my Christmas stuff and much better than cardboard boxes! Hope they keep supporting the site!
Johanna (not verified)
Wed, 12/29/2010 - 02:41
thanks Ana, I love this! so
thanks Ana, I love this! so beautiful and simple!
Jessica (not verified)
Wed, 12/29/2010 - 02:43
I was loving this in the
I was loving this in the catalog last night & wishing you would make plans! I wake up this morning to plans! Thank you!!
Jessica (not verified)
Wed, 12/29/2010 - 02:45
I was loving this in the
I was loving this in the catalog last night & wishing you would make plans! I woke up this morning to plans! Yay! Thank you!
orangesugar (not verified)
Wed, 12/29/2010 - 03:42
When you do the upholstered
When you do the upholstered bed are you going to use bed rail clips (like this http://www.rockler.com/product.cfm?page=10&Max=999)? I was going to try and build an upholstered bed from your chunky leg bed frame eventually, but couldn't figure out how to use the clips without them interfering with the fabric. I'd rather use the clips over screws because it would have to be disassembled and moved and reassembled.
Annie (not verified)
Wed, 12/29/2010 - 03:43
I just got my Land of Nod
I just got my Land of Nod catalogue in the mail, and wondered if the library cart was something you had drawn-up plans for. WOW! What a wonderful coincidence! This cart looks like it'll work even better! Thanks, Ana, for all the inspiration and the extra help we need to complete these awesome projects!
Heather (not verified)
Wed, 12/29/2010 - 03:47
Sooo cute! Yet another
Sooo cute! Yet another project to add to my list! :)
Britt (not verified)
Wed, 12/29/2010 - 04:29
So excited for this! I'm a
So excited for this! I'm a teacher and have been thinking of purchasing one, but they are way too much $, this is the perfect solution.
Amanda (not verified)
Wed, 12/29/2010 - 04:46
As a total booklover, I LOVE
As a total booklover, I LOVE this library cart! Can't wait till I can build something like this for my little one!
Shauna (not verified)
Wed, 12/29/2010 - 04:51
Perfect for our homeschool
Perfect for our homeschool books in our teeny tiny house! Thanks Ana - I can't wait to get started!
Pam the Goatherd (not verified)
Wed, 12/29/2010 - 05:08
This is definitely going on
This is definitely going on the "to make" list! Thanks, Ana!!!
Pam the Goatherd (not verified)
Wed, 12/29/2010 - 05:12
My children are all grown up
My children are all grown up and moving out on their own so I have plans to convert their room into a sewing/craft room which will also be our guest bedroom. This book cart will be great for storing my craft and sewing books. I'll be making the day bed/trundle bed to go in that room also. We raised three kids in a two bedroom mobile home and have learned to make the most of every inch of space. Your plans are helping me to re-do our whole house with even more efficient, space-saving furniture. Thanks so much for sharing with us, Ana!
Kim (not verified)
Wed, 12/29/2010 - 06:40
I love this, but I am
I love this, but I am equally excited about the farmhouse benches that are coming! Hope they are here before the new year.....I have a naked table :)
Cherie82 (not verified)
Wed, 12/29/2010 - 06:44
I can't wait to make this
I can't wait to make this this weekend, (along with the dress up rack) for my baby girl's 4th birthday. She is going to love using it to cart all of her Fancy Nancy books everywhere. Thank you so much.
Raven (not verified)
Wed, 12/29/2010 - 06:45
Love it! I homeschool my
Love it! I homeschool my kids and we take out dozens of books every week. I want this! Thank you!
Melissa (not verified)
Wed, 12/29/2010 - 06:54
I was just going to email you
I was just going to email you today with this idea! I am so glad that you found this plan and already have it done. I think this may be the first Ana White project I will make! Thank you. I do have an awesome side table idea that I need to get to you.
Krista (not verified)
Wed, 12/29/2010 - 07:00
Ooooh, this is too cool! My
Ooooh, this is too cool! My kiddos would love pushing this around. And I know Kyras teacher would love this...maybe a teachers gift :)
Good for you making something for yourself, it's how we keep motivated right!?
Oh and I am uber exited to see you have a kitchen banquette on your list of plans to do!!! Woot!
Jill (not verified)
Wed, 12/29/2010 - 07:57
Great project. The size
Great project.
The size for the back of the top shelf wasn't given. Any guess what this may be?
AmyLynn (not verified)
Wed, 12/29/2010 - 08:30
What a great idea for the
What a great idea for the craft room! Maybe I'll try the 16 inch version so it can hold my scrapbook paper - next to my table when I'm in there, back on the wall when I'm not!
Rebecca (not verified)
Wed, 12/29/2010 - 09:21
It is exhausting the amazing
It is exhausting the amazing things you come up with for me to add to my build list! I LOVE this. My daughter is a huge reader. This would be awesome for downstairs use and move. Love it! Thank you
shelley (not verified)
Wed, 12/29/2010 - 09:28
I am so, so excited! You
I am so, so excited! You just made my day! I was just looking at a certain website last night and saw this and thought...."Man, I wish Anna had the plans for this on her website. This would be absolutely perfect for us." Yay!!!!! Thank you!
Brittney (not verified)
Wed, 12/29/2010 - 11:17
SO cute! I wish my girls
SO cute! I wish my girls were a little younger so we could make this! We'll have to figure out someone to make it for!!
Ana White (not verified)
Wed, 12/29/2010 - 11:52
Jill, thanks for noting!
Jill, thanks for noting! Just fixed it! Really appreciate you feedback. Ana
Samantha (not verified)
Wed, 12/29/2010 - 19:15
Ohh I love love love
Ohh I love love love this!!
Also, I about jumped out of my computer chair telling my husband that the Kitchen Helper is on your to do list. I've been wanting one (and I meand badly) for the last 2 years. If I buy you a coffee will that entice you to put that next on your list ;)
April K (not verified)
Wed, 12/29/2010 - 20:06
This is so cute and would
This is so cute and would look great in my daughter's room! I am so very excited about the kitchen helper and can't wait to see the plans! My hubby gave me the go ahead to purchase one online for $150 this week, but I haven't wanted to part with the money! Now I will be patient just a little longer! You are awesome, Ana!
Lynn Peters (not verified)
Thu, 12/30/2010 - 01:48
I am building this for me and
I am building this for me and for my office! I think I may have to make one (or two) for the home office and for work. I love the look and it would make organizing easier in both places. I think I will use your plans for the file cabinet base to measure a box for the lower shelf. That way I can have a long hanging file box below and space for binders and books on top! You are amazing!
Angela (not verified)
Thu, 12/30/2010 - 03:49
My 3 year old wants one for
My 3 year old wants one for the play area in the basement, one in the living room and then 3 upstairs (one for each bedroom). I said it has wheels to move it "thats sooo cool mommy" she reponded. As I type with her on my lap the list of how many she thinks we need is growing.
So we will be making one well 2 a more grown up painted on for my sewing/craft area. Would be great not to be confined by my bookshelf. I am so limited on space as it is.
Angela (not verified)
Thu, 12/30/2010 - 03:51
What a great idea with the
What a great idea with the hanging folders below ok maybe I now need 3 not 2.
Donna (not verified)
Thu, 12/30/2010 - 12:46
I am building this tomorrow!
I am building this tomorrow! Got my list ready and heading to homedepot!
Thanks Ana, you are amazing!
Ana White (not verified)
Thu, 12/30/2010 - 12:48
can't wait to see!
can't wait to see!
JuliaSays (not verified)
Sat, 01/01/2011 - 14:34
I love this! I was just
I love this! I was just telling my husband that I was on a search for a better way to organize our kiddos' books. This is perfect!
Nan Tovar (not verified)
Sun, 01/02/2011 - 16:39
Thanks, Ana! Might be just
Thanks, Ana! Might be just the thing to get my daughter's books out of the various baskets they are in! Loving the price, too :)
Katterin (not verified)
Sun, 01/09/2011 - 15:50
As a new homeowner and a
As a new homeowner and a single mom of an almost-one-year-old (man, time flies!) baby girl, and being the type of person who jumps into new crafts/hobbies on a whim, I've been watching the site and making plans to start building soon...but this was the plan that actually got me going! My cart is sitting in the garage, wheels removed, wood filler drying so that I can put on a coat of primer after the baby goes to bed.
brckhous (not verified)
Wed, 01/26/2011 - 10:51
Ana, I LOVE those pink
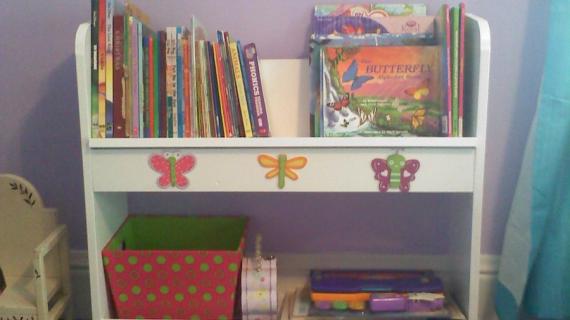
Ana, I LOVE those pink scallop-edge bins on the bottom shelf. Where are they from?
Guest (not verified)
Tue, 04/12/2011 - 15:27
WOW!
Another one of MY designs. Yes, I designed this for the Land of Nod, along with many other items you decided to post. I am a single father raising two young girls. I support our family as a designer.
Yes, Anna, you are amazing.
Jenny W (not verified)
Fri, 01/04/2013 - 11:20
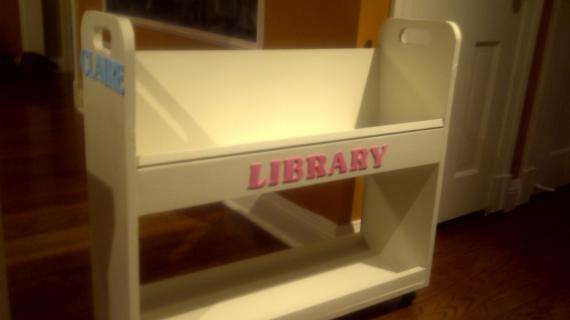
Library Cart
Thank you SO much for this easy to follow plan -- My husband made this as his first project with a new saw and it came out beautifully! I had been eyeing the pricey land of nod version for over a year so I am thrilled!!
jazz4sale@hotm…
Sat, 08/02/2014 - 09:01
Issue cutting out handles
I am having a hard time cutting out the handle holes. My problem is the tight curve with the jigsaw. I have cut stress cuts so that as I am going around the blade is not under pressure but I can't seem to get it well rounded. Any pointers or techniques for this?
Thanks in advance.