


How to build a sink base cabinet - free plans from Ana-White.com. Part of the Momplex Vanilla Kitchen Plans.


Hi everyone!
We are almost through sharing all the base cabinet plans for the Momplex Vanilla Kitchen!

Just in case you missed it, we shared project plans to DIY:
- 42" blind corner base cabinet plan
- 36" pie cut lazy susan corner base cabinet
And today, we are sharing probably the most important cabinet plan of all - the sink base!
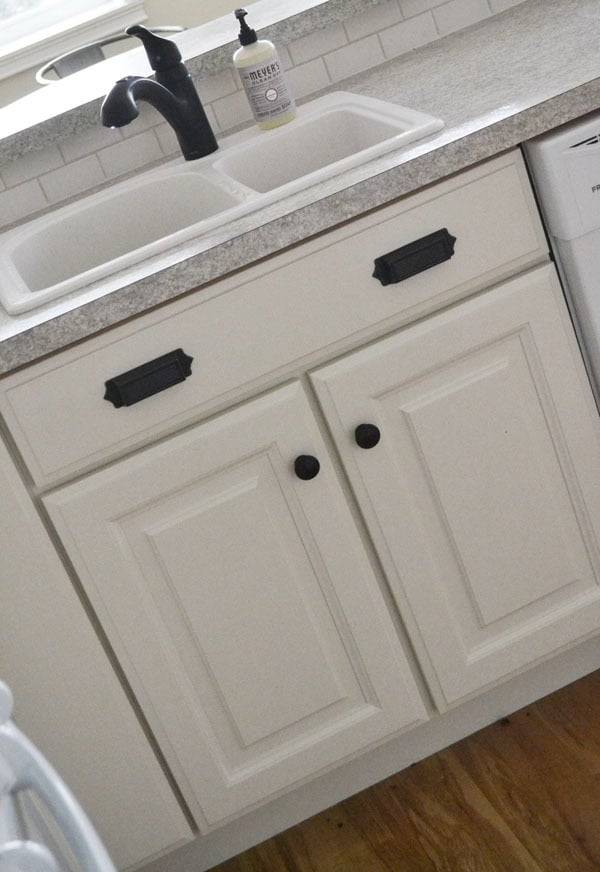
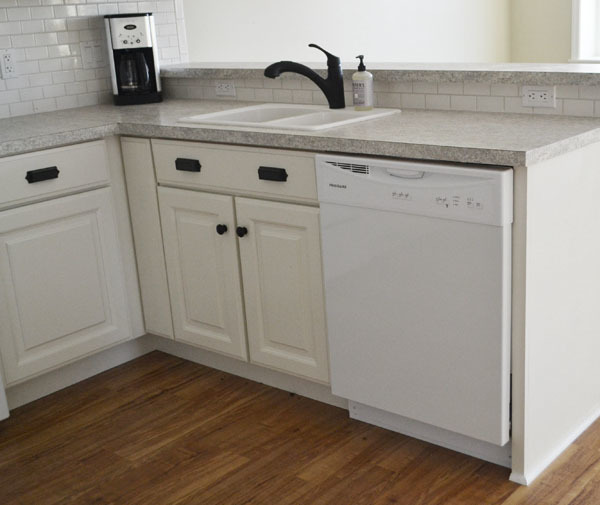
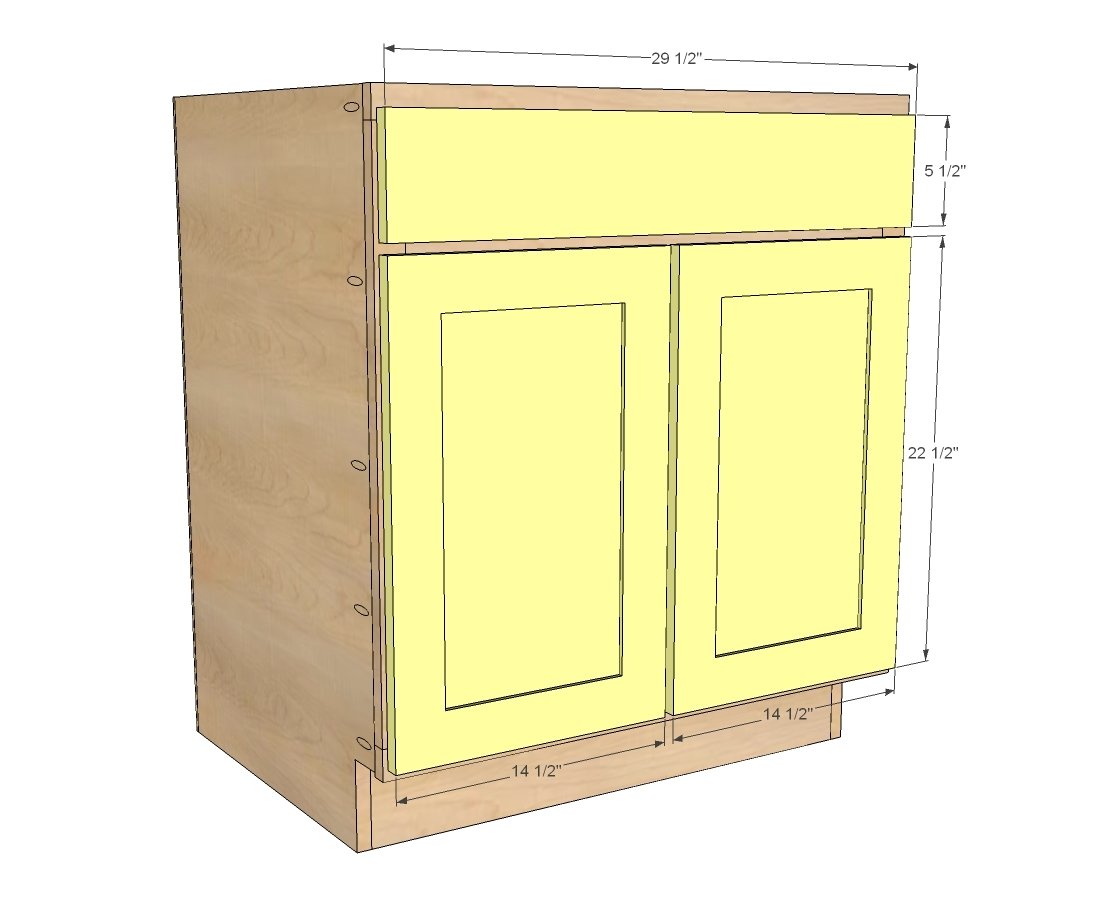
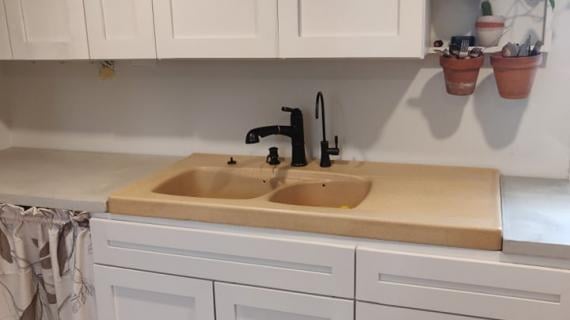
Sink bases usually come in 36" and 30" widths to accommodate standard sized sinks. We'd have loved to put a big sink in for Mom, but with the kitchen shrinking due to a wider hallway, we just didn't have the space.
But Mom's just one person, so the smaller sink does what it needs to for her.
NOTE: We are planning a 30" apron sink for the other Momplex unit - so stay tuned for that if you are looking for a small footprint sink base cabinet, but a larger sink.
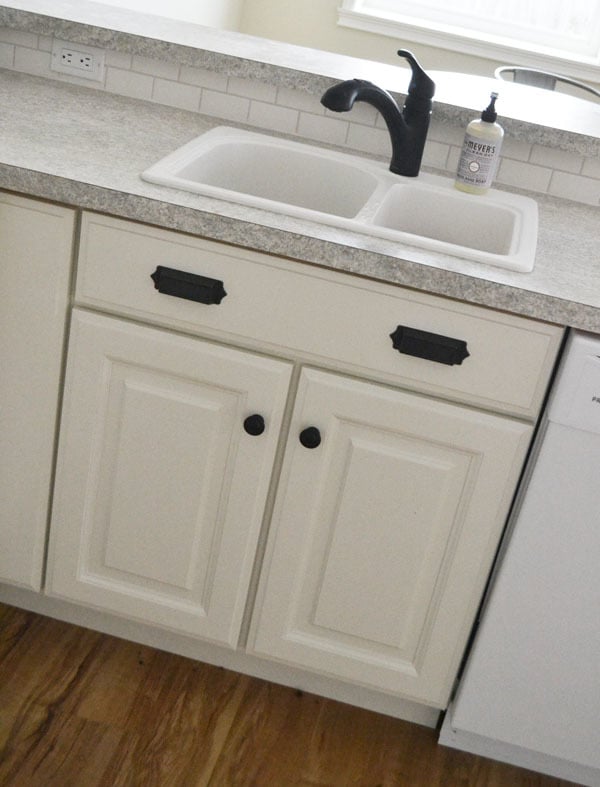
But you can still fit a double sink in a 30" base - although I don't recommend that faucet - a gooseneck would be much better (live and learn and fight the urge to replace it).
Check out the plans following for the 30" sink base!
Happy Building!
XO Ana
PS - If you are building kitchen cabinets, PLEASE take a second to read through our base cabinet building post.
PSS - We will also share plans for other base cabinets that are not in the Momplex Vanilla kitchen that are standard sized.

Preparation
3/4" plywood ripped into strips 22 1/4" long (for sides and shelves)
3/4" plywood scrap from ripping sides and shelves (for top supports)
3/4" plywood ripped into strips 5" long (for base supports - we used cheaper plywood here)
1x2s for face frames
1/4" plywood (for backs)
1-1/4" pocket hole screws
3/4" finish nails
edge banding for shelves
CARCASS
2 - 3/4" plywood @ 22-1/4" x 34-1/2" (side panels)
1 - 3/4" plywood @ 22-1/4" x 28" (bottom shelf)
2 - 3/4" plywood @ 5" x 28" (bottom supports)
2 - 3/4" plywood @ 3-1/2" (can vary) x 28" (top supports)
1 - 1/4" plywood @ 32" x 29-1/2" (back)
FACE FRAME
3 - 1x2 @ 27"
2 - 1x2 @ 30"
1 - 1x2 @ 21"
SHELVES
3/4" plywood @ 22" x 27-3/4" (measure and adjust to fit shelf pins/edge banding)
DOOR/DRAWER FACE for FULL OVERLAY (1-1/4")
5 1/2" x 29-1/2" (drawer face)
2 - 22-1/2" x 14-1/2" (door)


Please read through the entire plan and all comments before beginning this project. It is also advisable to review the Getting Started Section. Take all necessary precautions to build safely and smartly. Work on a clean level surface, free of imperfections or debris. Always use straight boards. Check for square after each step. Always predrill holes before attaching with screws. Use glue with finish nails for a stronger hold. Wipe excess glue off bare wood for stained projects, as dried glue will not take stain. Be safe, have fun, and ask for help if you need it. Good luck!
Instructions
Step 1
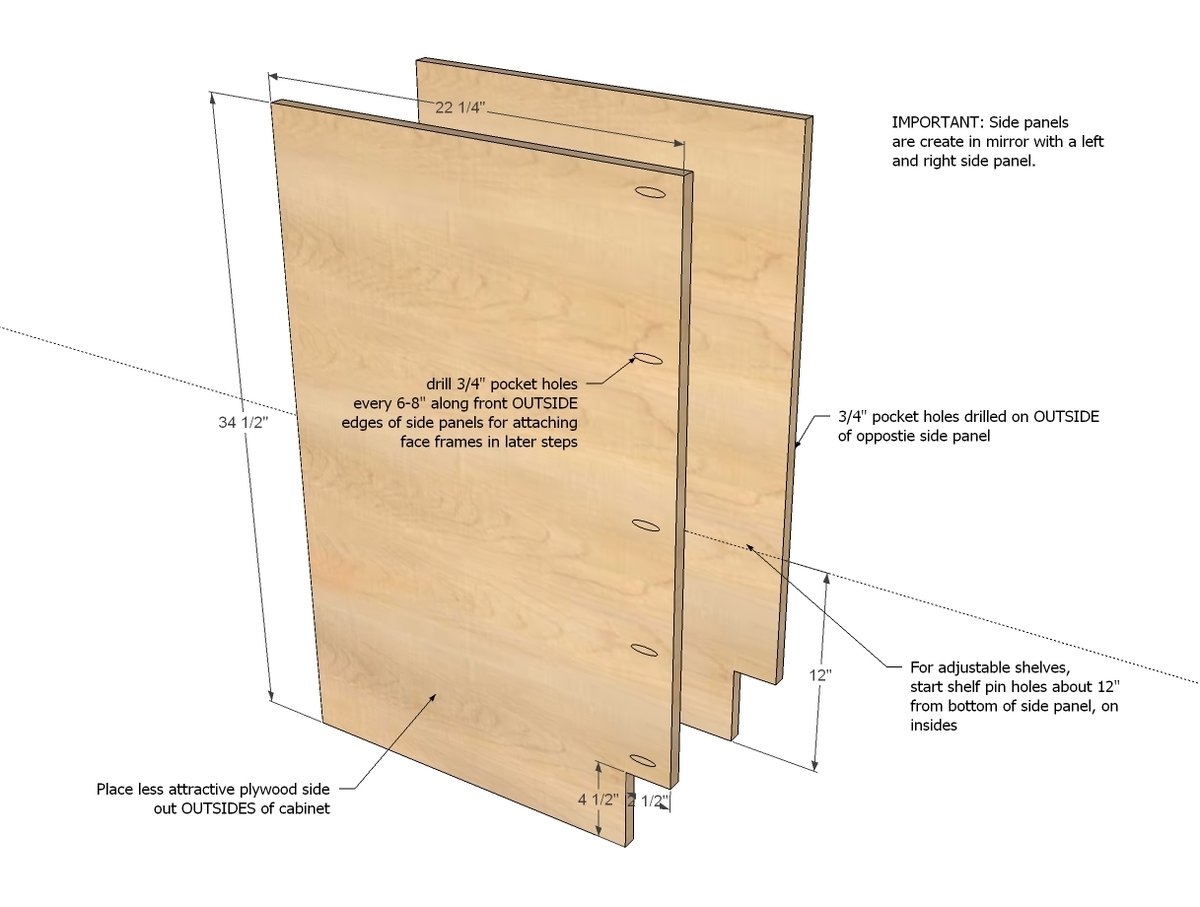
Start with the SAME side panels that you use on all of the base cabinets. But remember that the side panels should be made up in mirror - meaning you will place 3/4" pocket holes on outsides (for attaching face frames in later steps) and shelf pin holes (for adjustable shelves) on insides, with the toekick at the bottom front.
Step 2

Attach the two bottom supports to the side panels, using the 5" wide strips of plywood. These guys will get covered up with toekick material or hidden under cabinet, so don't worry about using cheaper plywood or placing pocket holes hidden.
Remember to drill 3/4" pocket holes facing upward for attaching bottom shelf, about every 6-8 inches.
Step 3

Next, add your bottom shelf. Attach bottom shelf to the sides with 3/4" pocket holes and 1-1/4" pocket hole screws, and attach bottom supports to the bottom shelf.
Step 4

Top supports are attached as shown. You may wish to use a smaller board at the top front support depending on your sink type/size - or when you cut out for your sink, just plan on cutting through that top support.
You could also just leave out the top front support, but you will need to be extra careful when attach the face frame in later steps to make sure the sides are still 28" appart.
Step 5

Step 6

Build the face frame seperately, using 3/4" pocket holes and 1-1/4" pocket hole screws. Then attach to front of cabinet through the predrilled pocket holes on sides and top using 1-1/4" pocket hole screws and glue. The bottom won't have enough room to fit a drill in, so we nailed and glued along the bottom.
Step 7
We used full overlay doors (purchased from Cabinet Now) in the above sizes. When cabinets are assembled, this leaves a 1/2" reveal of face frame between all doors and drawers. For these door sizes you will need 1-1/4" Concealed Euro Hinges, 2 per door.
For the false drawer front on the sink, simply nail and glue in place from back.
It is always recommended to apply a test coat on a hidden area or scrap piece to ensure color evenness and adhesion. Use primer or wood conditioner as needed.
Comments
tbotello
Thu, 12/05/2013 - 13:06
Price comparison?
I'm really curious to know what your finish cost is per cabinet (or for the entire cabinets) versus store bought. We're about to build and were looking at going with IKEA cabinets since they're less expensive and I'd love to know if these would be even more cost effective.
In reply to Price comparison? by tbotello
Ana White
Thu, 12/05/2013 - 18:40
Hi! I can tell you that we
Hi! I can tell you that we spent about $2000 on the cabinets - including doors, drawers, hardware etc. BUT that is with 3/4" PureBond Plywood, full face frames made with hardwood, full overlay hardwood framed doors in a raised panel cope and stick, and the wall cabinets go to the ceiling.
This also included boxing in the fridge.
I know we have a similar sized kitchen (but couldn't afford the raised panel doors) built with comparable materials and it cost $7500 (this was before I built furniture).
If you built cabinets like IKEA does - and I've heard they actually stand up decently -
image from IKEA
You are into the cabinet two side panels of particle board and a bottom shelf, and a 1x2 support across the top. You have to buy legs seperately. Doors are particle board with veneer. This is $195 for the 36" base. I know we could build this for much much less .....
Would you all be up for a set of cabinet plans that are more budget friendly?
tbotello
Thu, 12/05/2013 - 19:05
Yes, we're definitely up for
Yes, we're definitely up for "budget friendly" plans! We're only just now about to break ground so we're quite a bit aways from kitchen walls being up. That IKEA cabinet/door combo is the exact one we're going with except the shaker front's will be white.
dananryan
Mon, 12/09/2013 - 08:29
Yes please!!!
Hi Ana,
We just found out that we'll be moving next summer (curtesy of Uncle Sam).
We will have to sell our house and would love to fix up our outdated kitchen without breaking the bank.
Budget friendly frameless cabinets would be an awesome alternative to Ikea.
:-)
tbotello
Sat, 12/14/2013 - 14:34
And we're also going with
And we're also going with Kraus 36" stainless farmhouse sink so it'll be interesting to see how we plan on designing the base sink around that.
DecorSanity
Thu, 12/05/2013 - 15:45
Fantastic!
Love these cabinet plans, awesome. Although it's probably an industry term I should know, I don't know what "vanilla" means--I'm sure it's not a reference to the color of the cabinets. I'd say this kitchen is far from plain old vanilla, it's like triple chocolate chunk! ;-)
In reply to Fantastic! by DecorSanity
Ana White
Thu, 12/05/2013 - 18:48
Aw thanks!!!! We have
Aw thanks!!!!
We have dubbed it the "vanilla" kitchen just because we went pretty standard with everything, and it's got a ton of white in it. We are working on kitchen number 2 (planning phase right now) and it's much more complicated ... we just might have to call it the 3x choc chunk!
runawayoctober
Fri, 12/06/2013 - 13:37
I would love to know more
I would love to know more about that ceiling light in the second picture, please! :D
JohnRR
Sat, 12/05/2015 - 16:22
Ceiling light
I know this comment is almost exactly two years old, but if anyone else is curious about that light it sems to be this one: http://www.homedepot.com/p/Hampton-Bay-Estelle-3-Light-Champagne-Flushm….
cherelle6kids
Fri, 12/13/2013 - 14:40
Looking forward to the apron sink base!
Ana,
Thanks so much for your site!! Looking forward to your plans for the apron sink base. We are trying to purchase a farmhouse and the kitchen needs a complete overhaul! Would appreciate a post on how you go about putting appliances where and such.
You're given me the inspiration to build. So far, I've made the queen storage bed for my son and I'm currently working on mud room lockers.
God Bless you! Praying for a safe delivery of that little one.
tlcheek
Sat, 07/09/2016 - 04:29
MomPlex Kitchen
Anna-
Thank you so much for the plans! I came across your site a couple years ago and loved it. It took me a while to get all the tools to start building and learn how to use them. I've made the adirondack chairs, planter and small table as my learning projects. I'm proud to say I've just completed the blind corner cabinet, 12" base cabinet, 30" sink base and the 36" corner cabinets for my kitchen. I'm just waiting for my counter tops to be delivered to install. I used 3/4 birch and I have to say they are beautiful! Thanks again!