Chicken Coop
My husband used your plans to make this for our pet chicken that we hatched in a homemade incubator. I painted it though!!!
Built from Plan(s)
Recommended Skill Level
Intermediate
My husband used your plans to make this for our pet chicken that we hatched in a homemade incubator. I painted it though!!!
From start to completion, it was exactly two weeks. One of those weeks, I was sick and didn't get a chance to do much. I believe we picked the hottest days to work on this project, so we were taking more breaks than actually working.
I used a mix of 2x4's and 1x4's for this project. It is only 4 feet long so I thought 2x4's would make it too bulky. It goes together very quickly and it looks great!

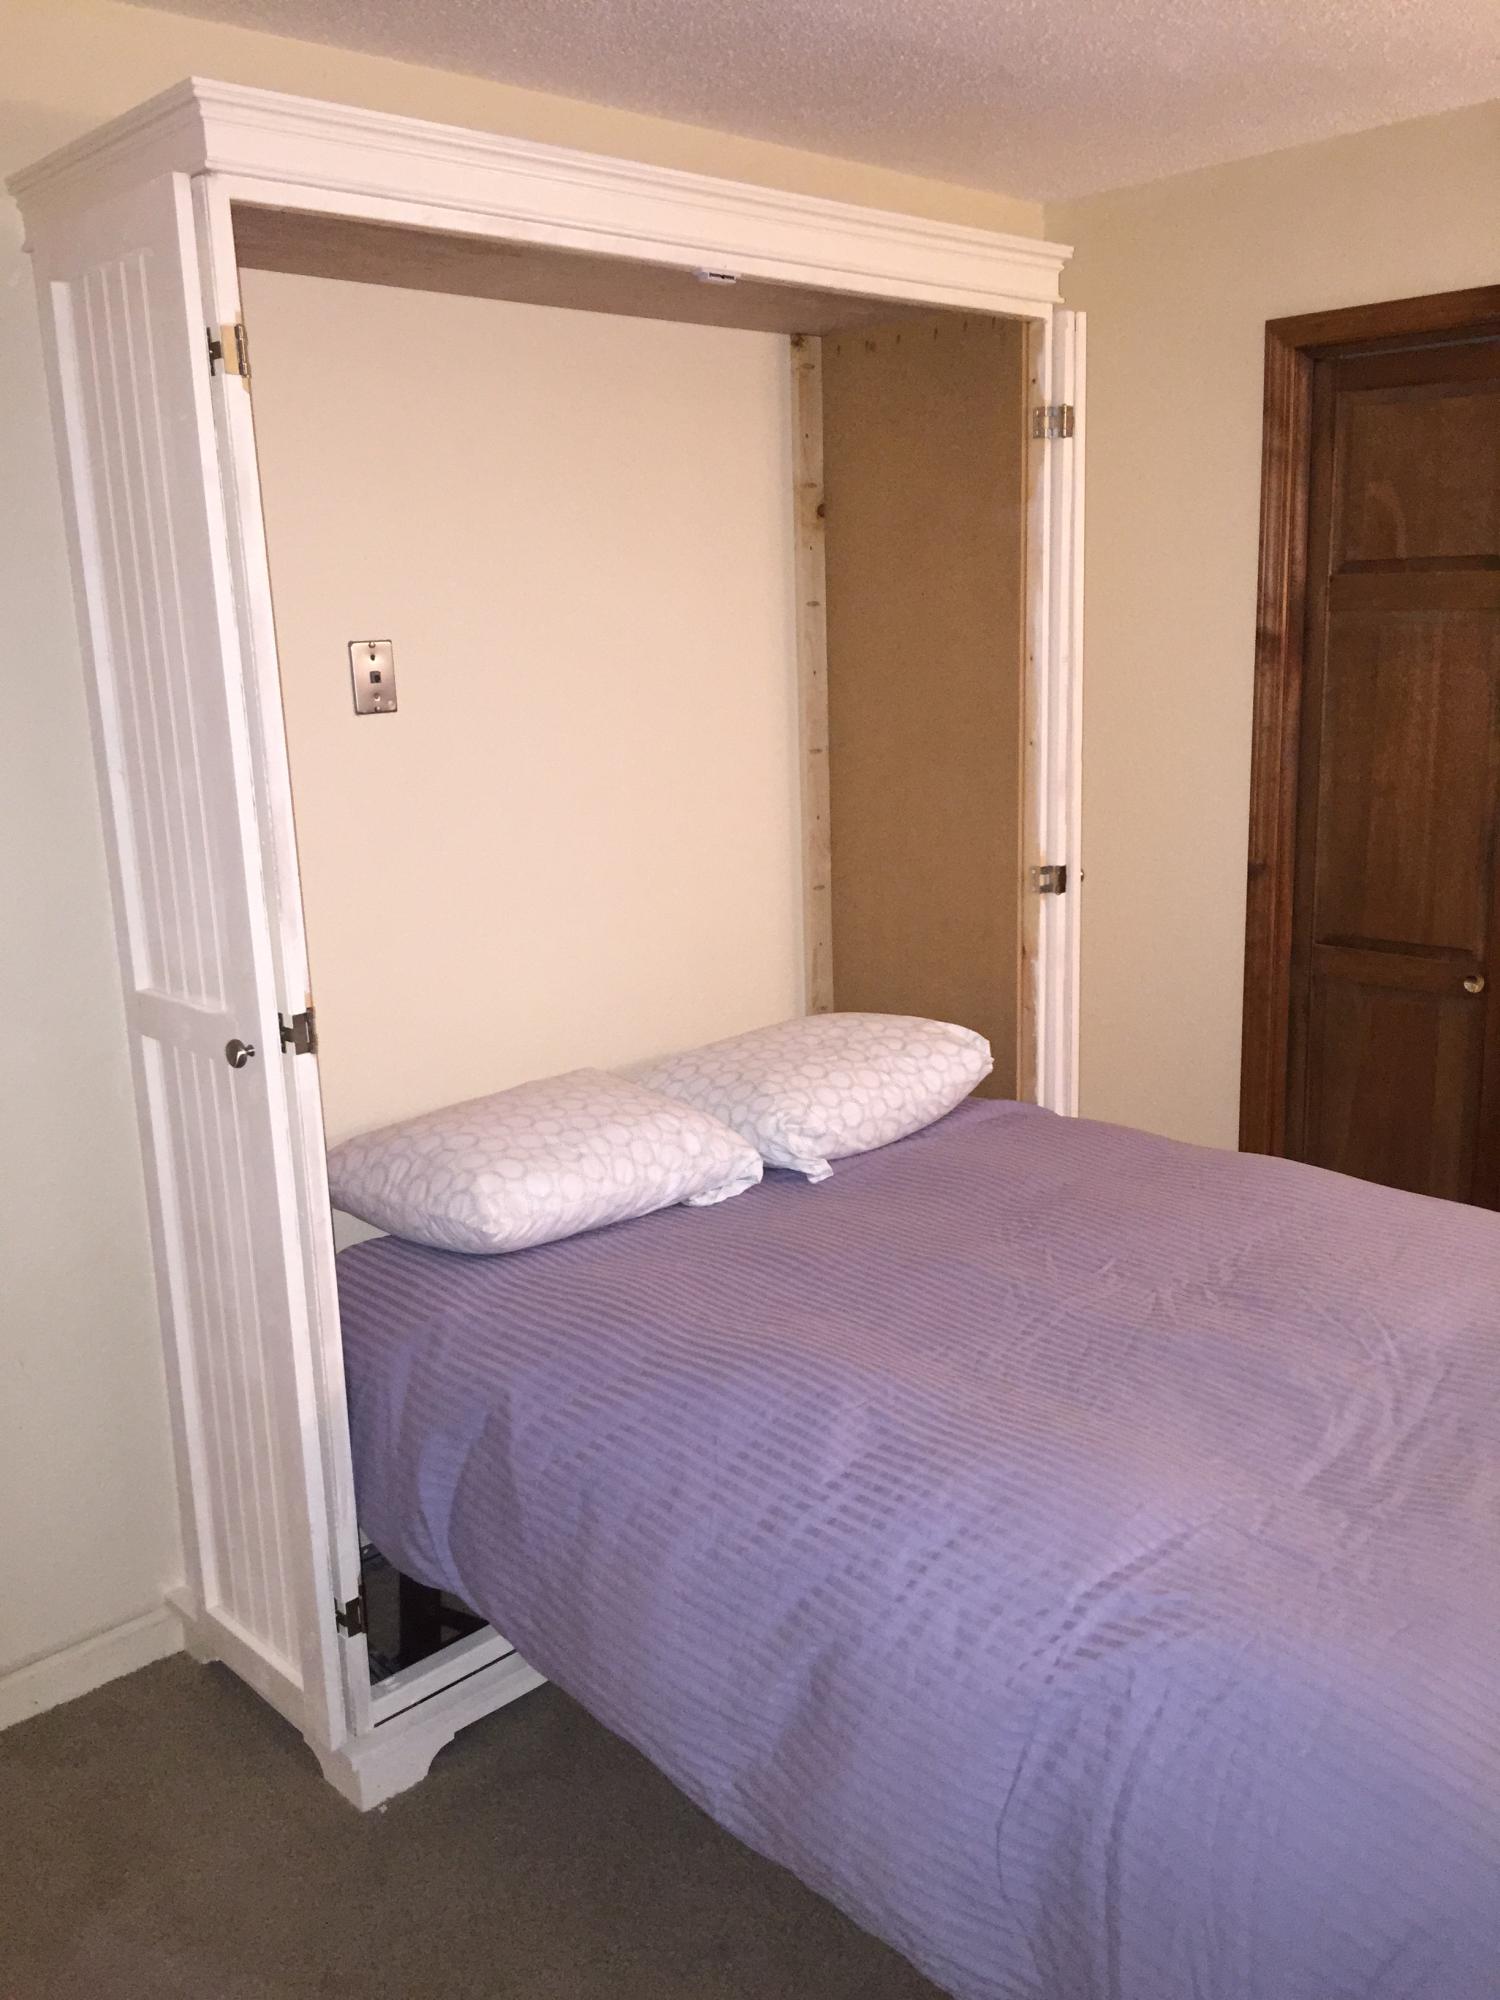
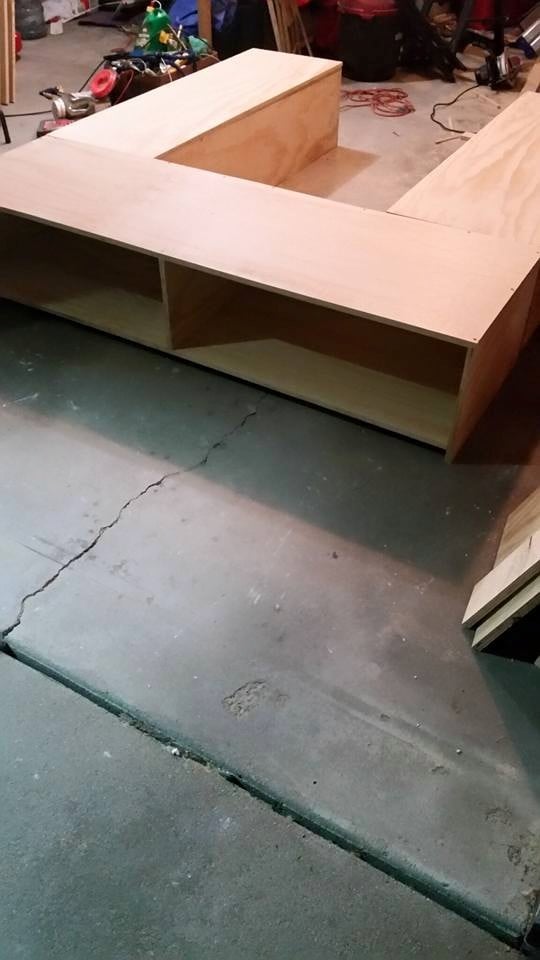
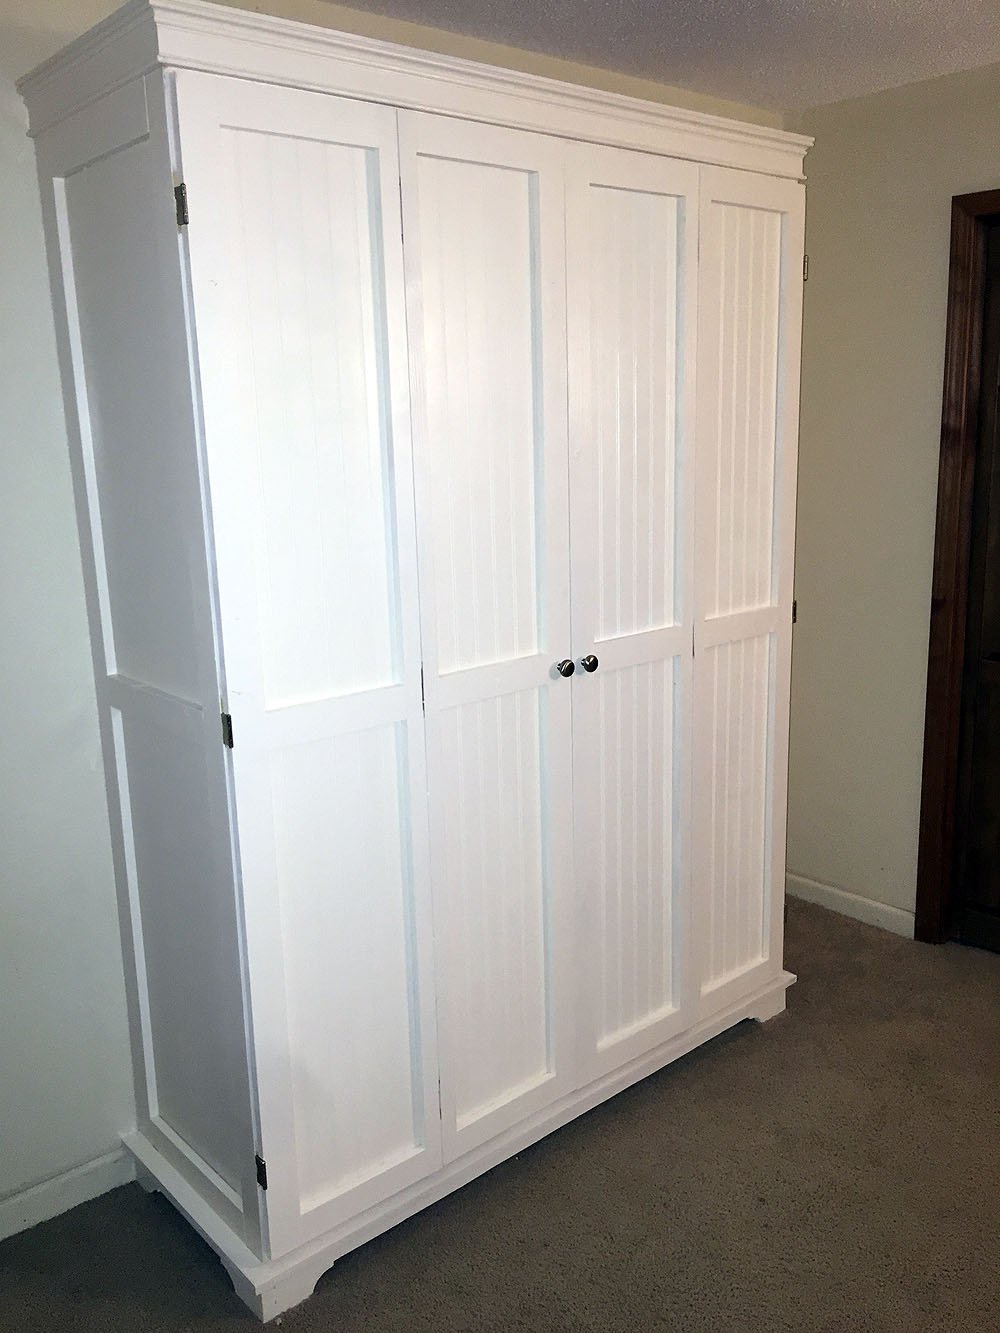
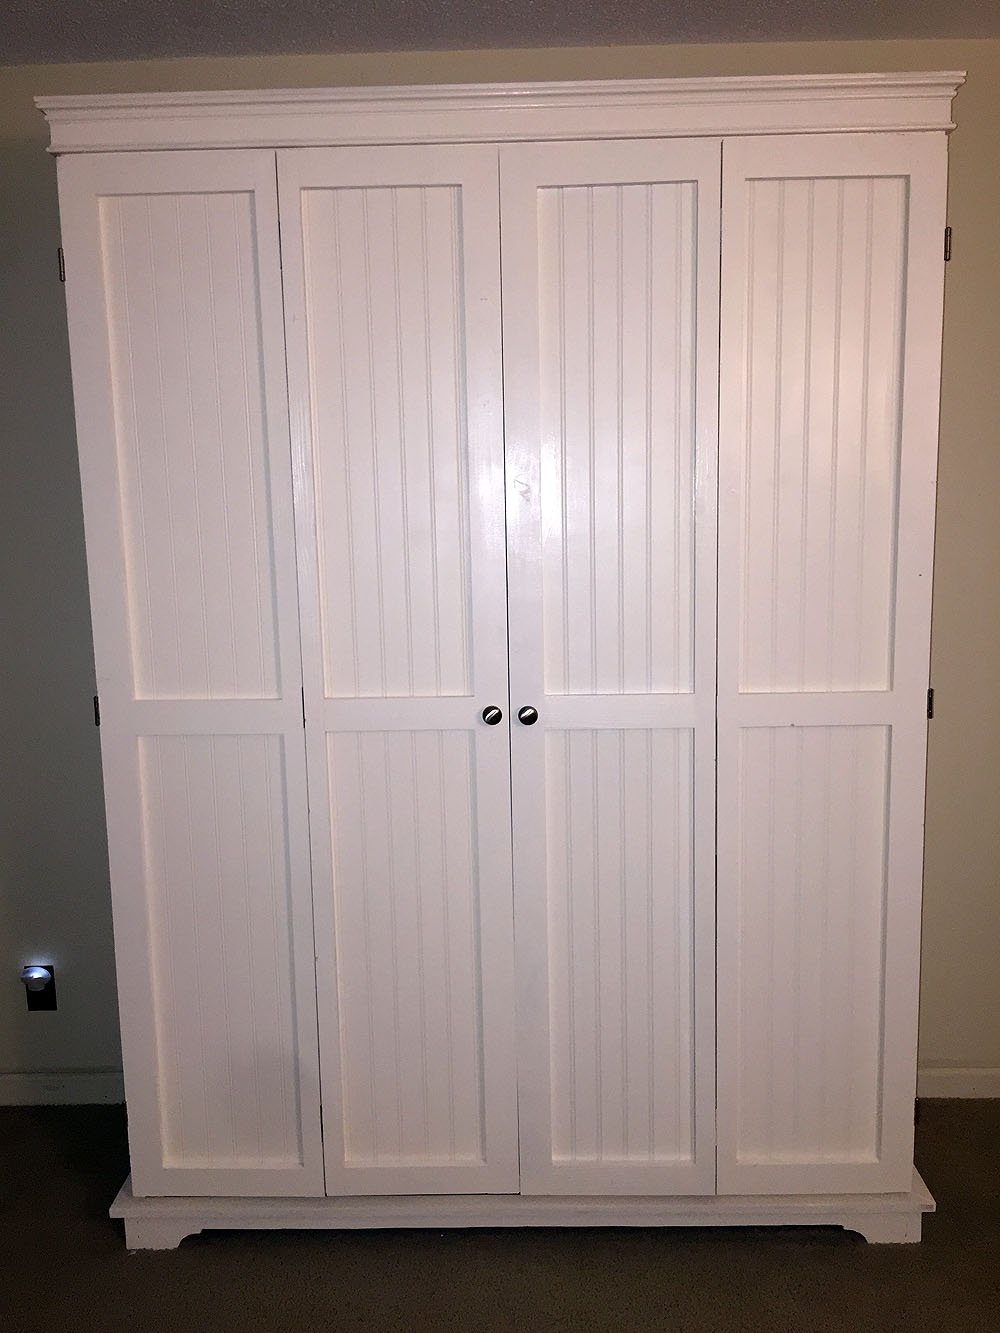
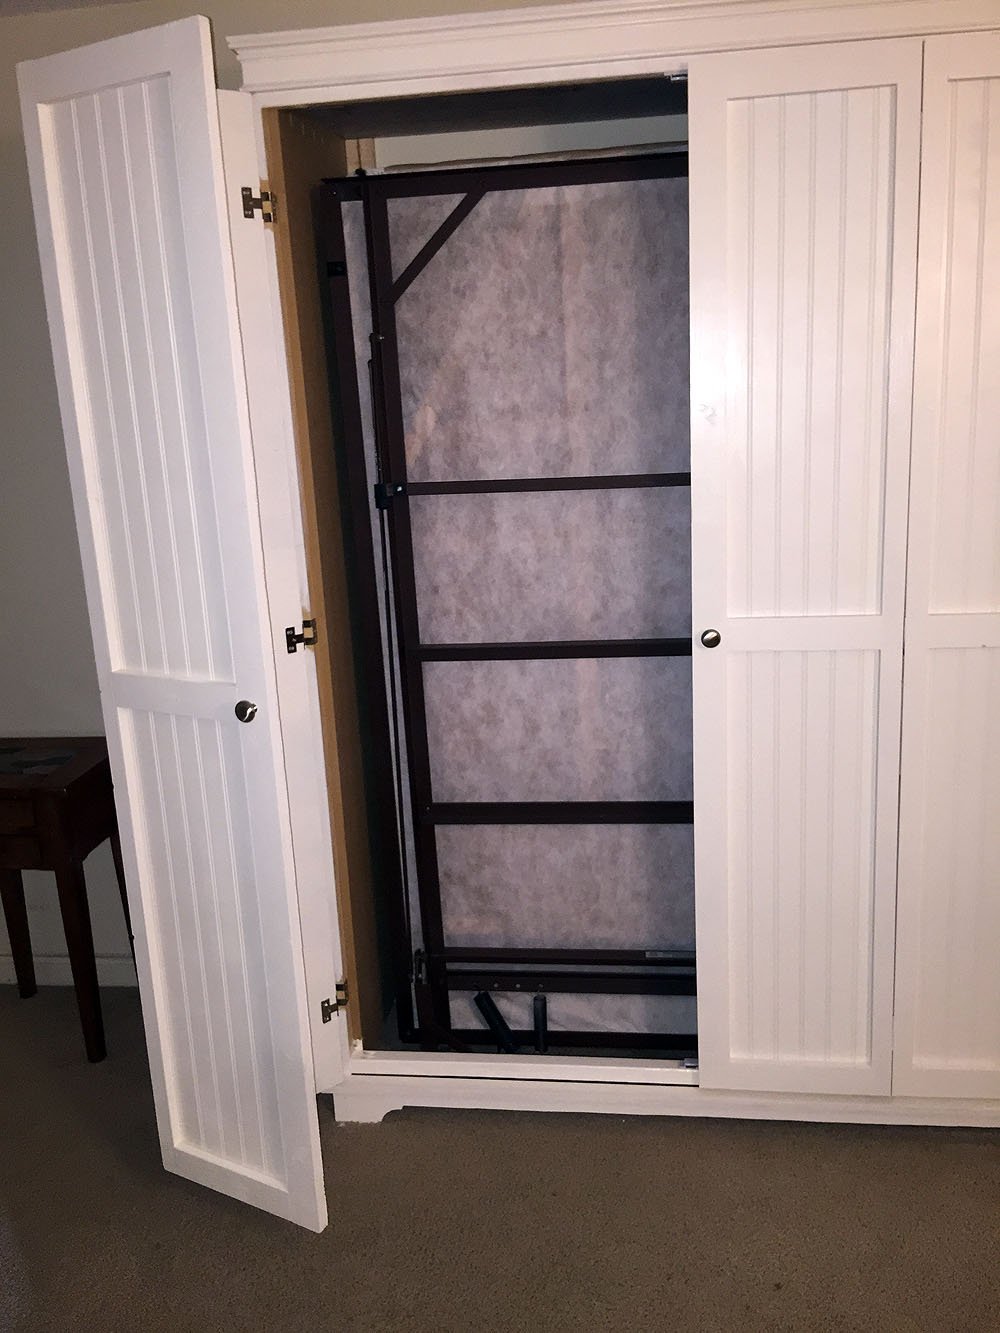
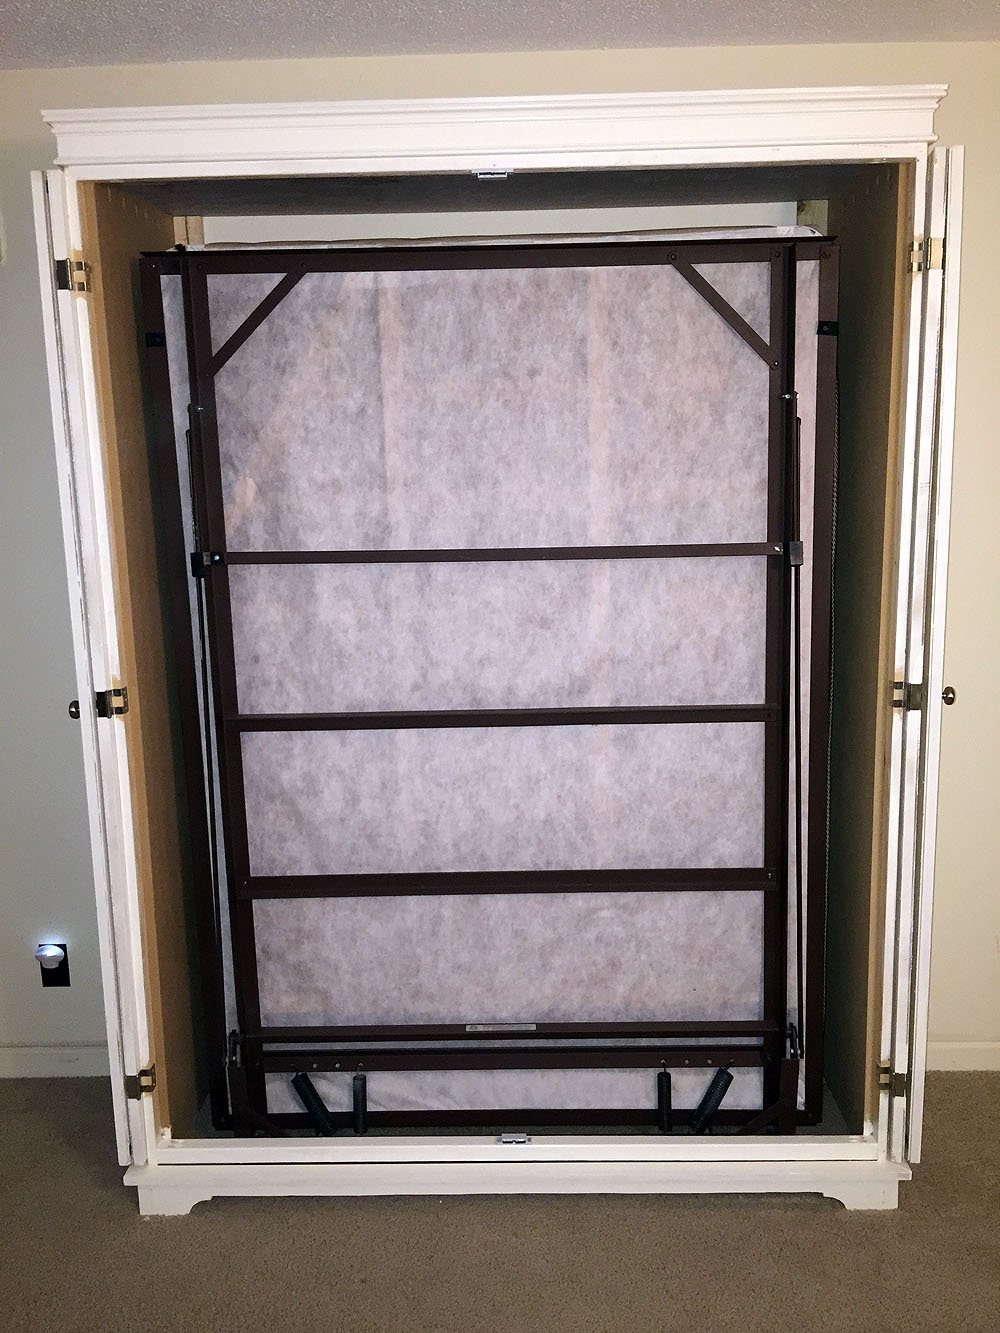
I made this cabinet to house my murphy bed. I used the Toy or TV Armoire plans as a start and adjusted the measurements as needed.

Tue, 06/02/2020 - 16:22
Do you have plans or details about the door materials/ hinges?
Thu, 12/03/2015 - 07:30
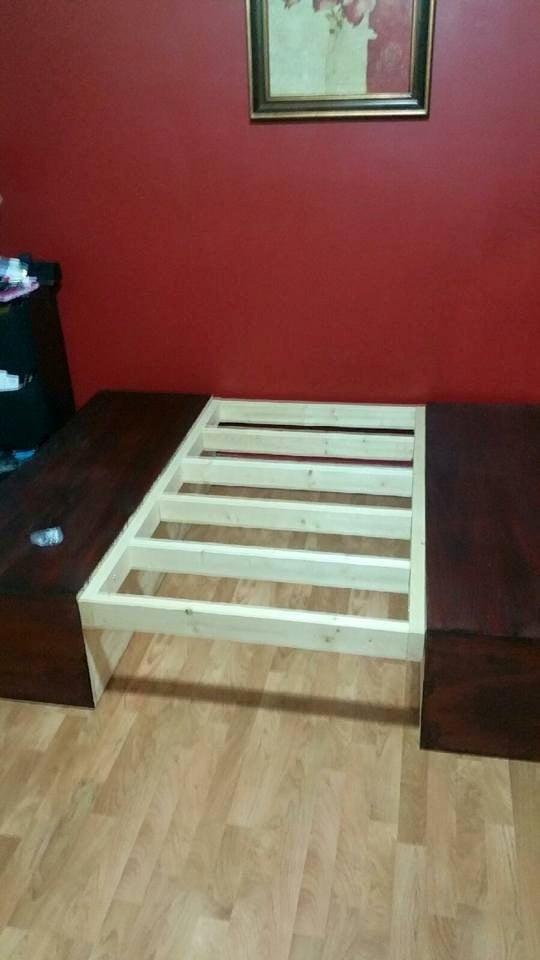
This was an actual "original murphy bed" that i found on craigslist for $100
Wed, 02/02/2022 - 02:55
Awesome! What style hinges did you use to make the doors fold back flush with the sides?
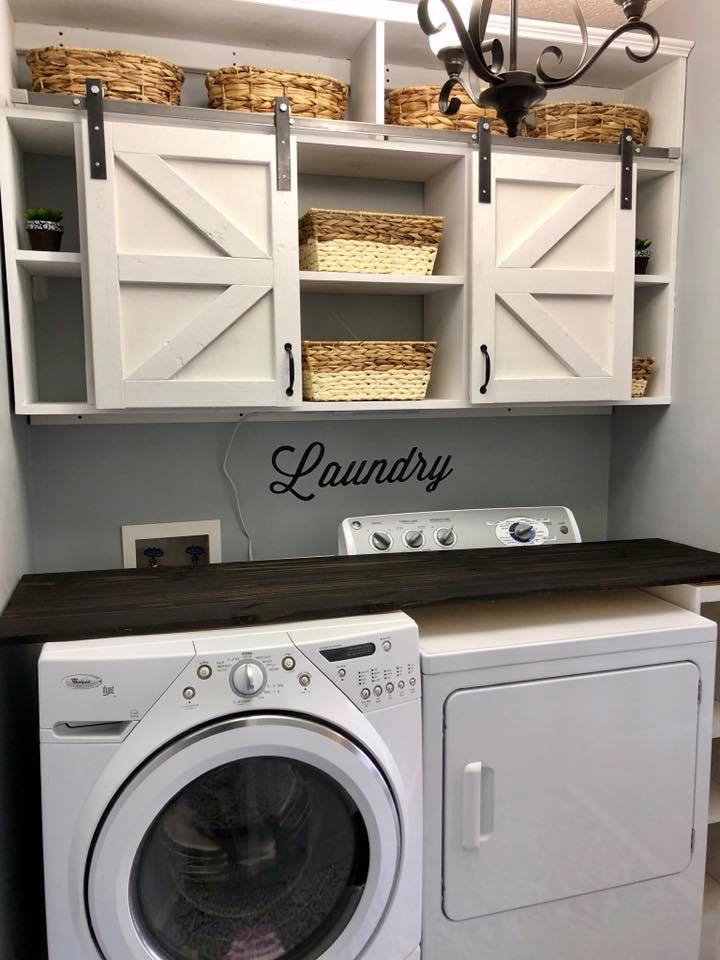
Built by Kelly Flood Gugliemoni, shared on Facebook.
Sliding barn door hardware is DIY, cabinets are DIY - tutorials linked below.
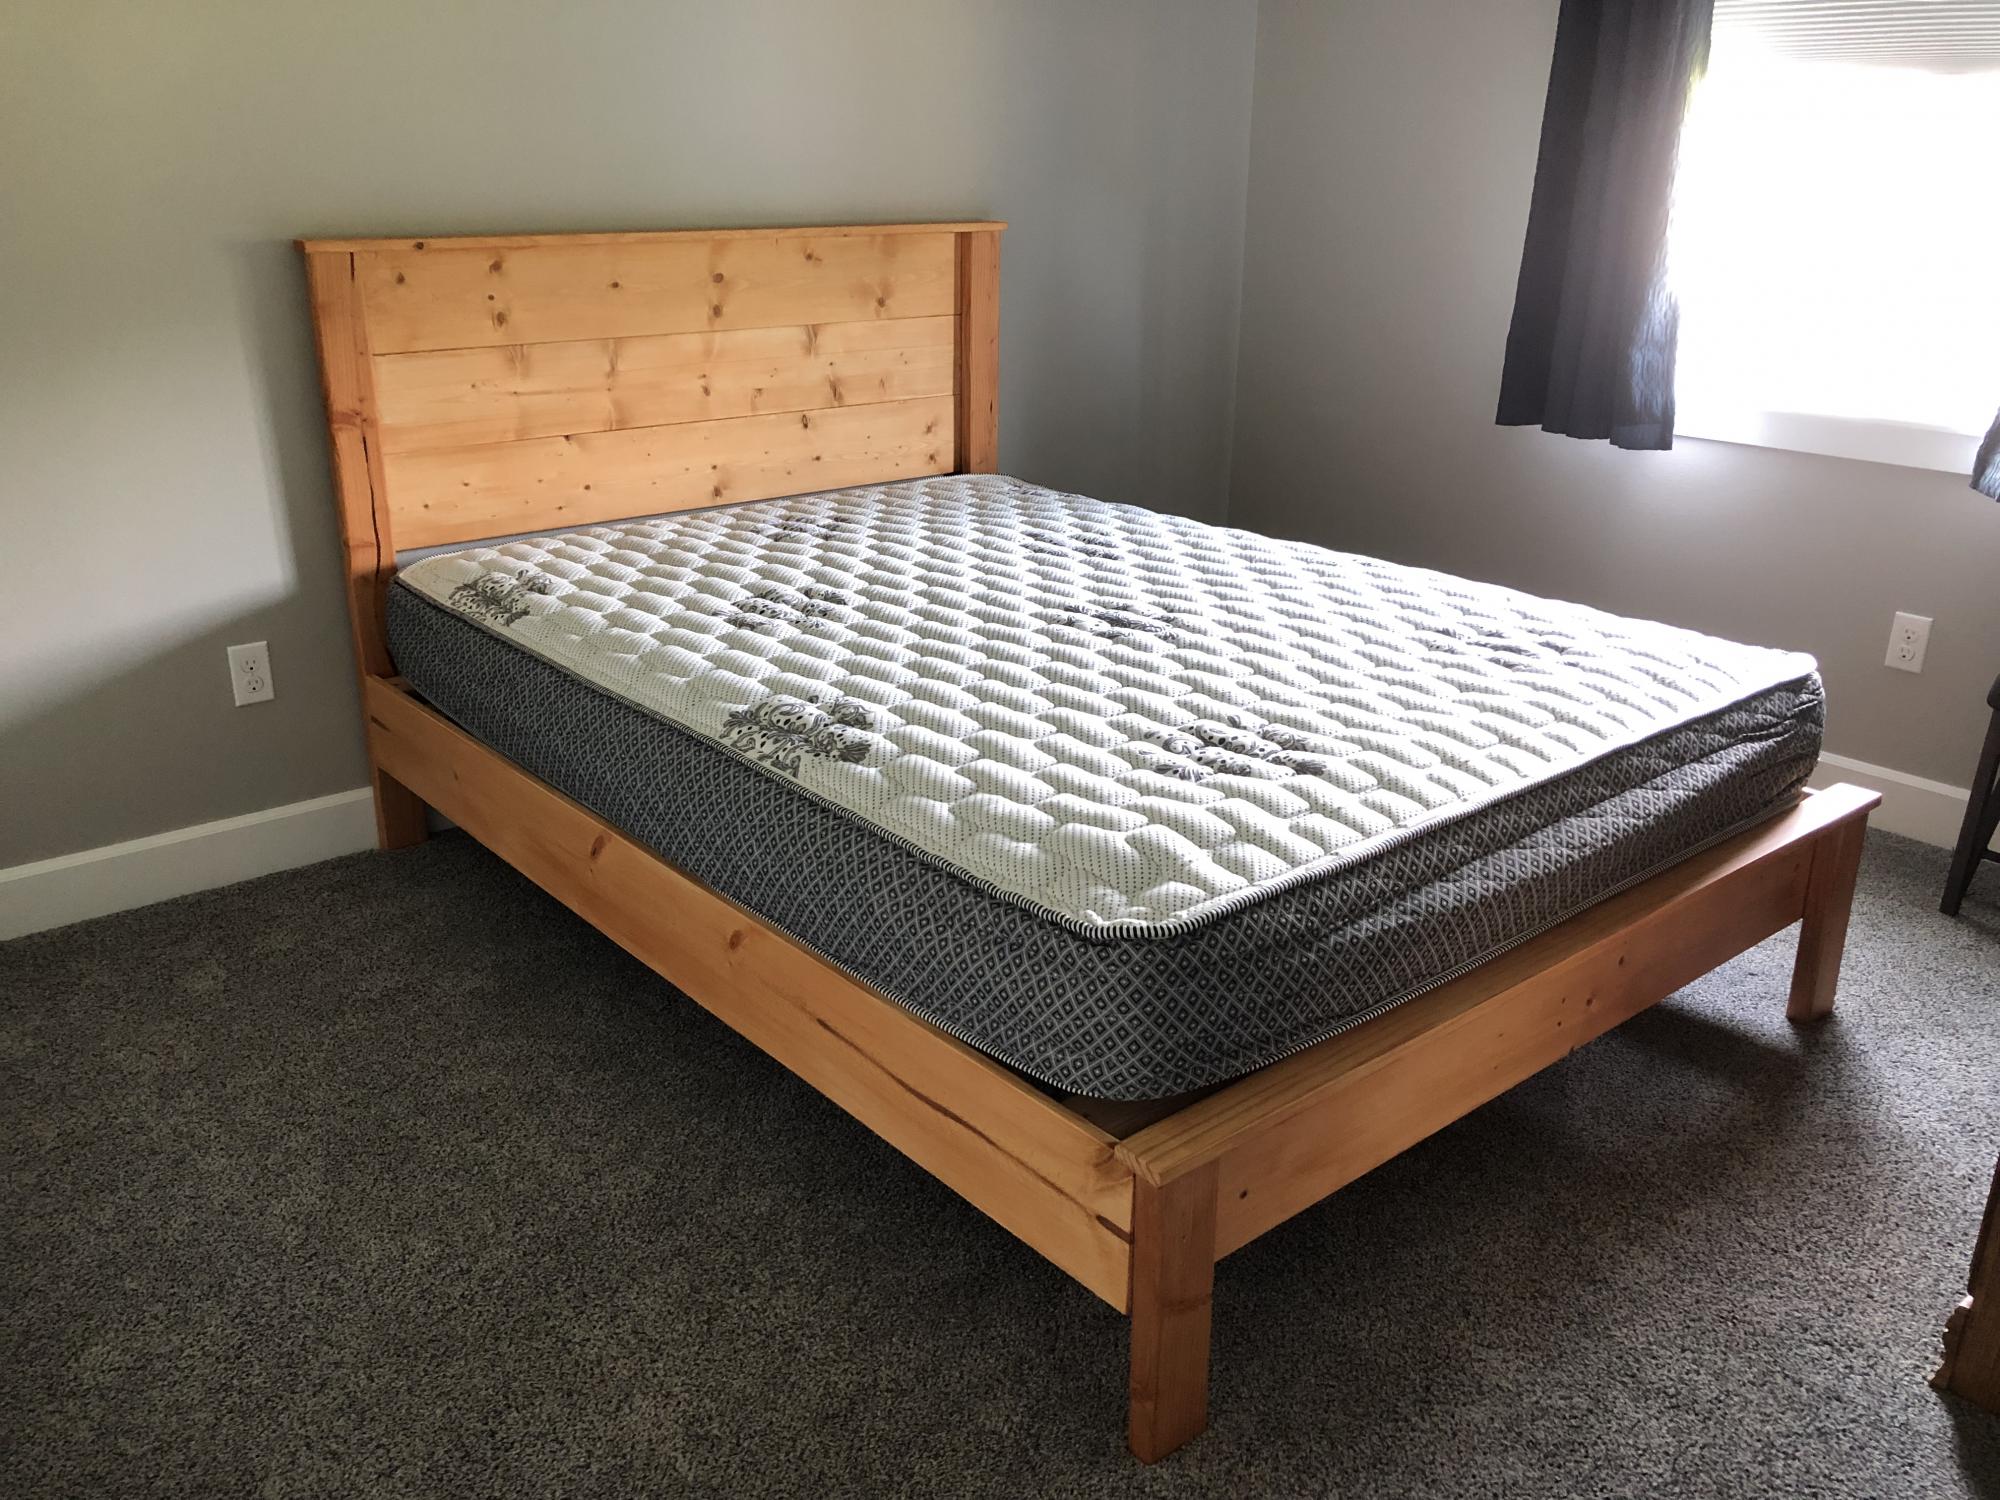
We looked for a simple plan for a bed and found this one on Ana’s site. Easy to build in a weekend.

Mon, 06/03/2019 - 11:35
Thank you so much for sharing a photo! I've been looking forward to seeing how the bed turns out! Great job!
After thinking about it for 2 weeks, going over and over in my head of the sizes to cut and remembering the video of what went where, I put it to action. Took me about 2.5 hrs to build and modify where I needed to.
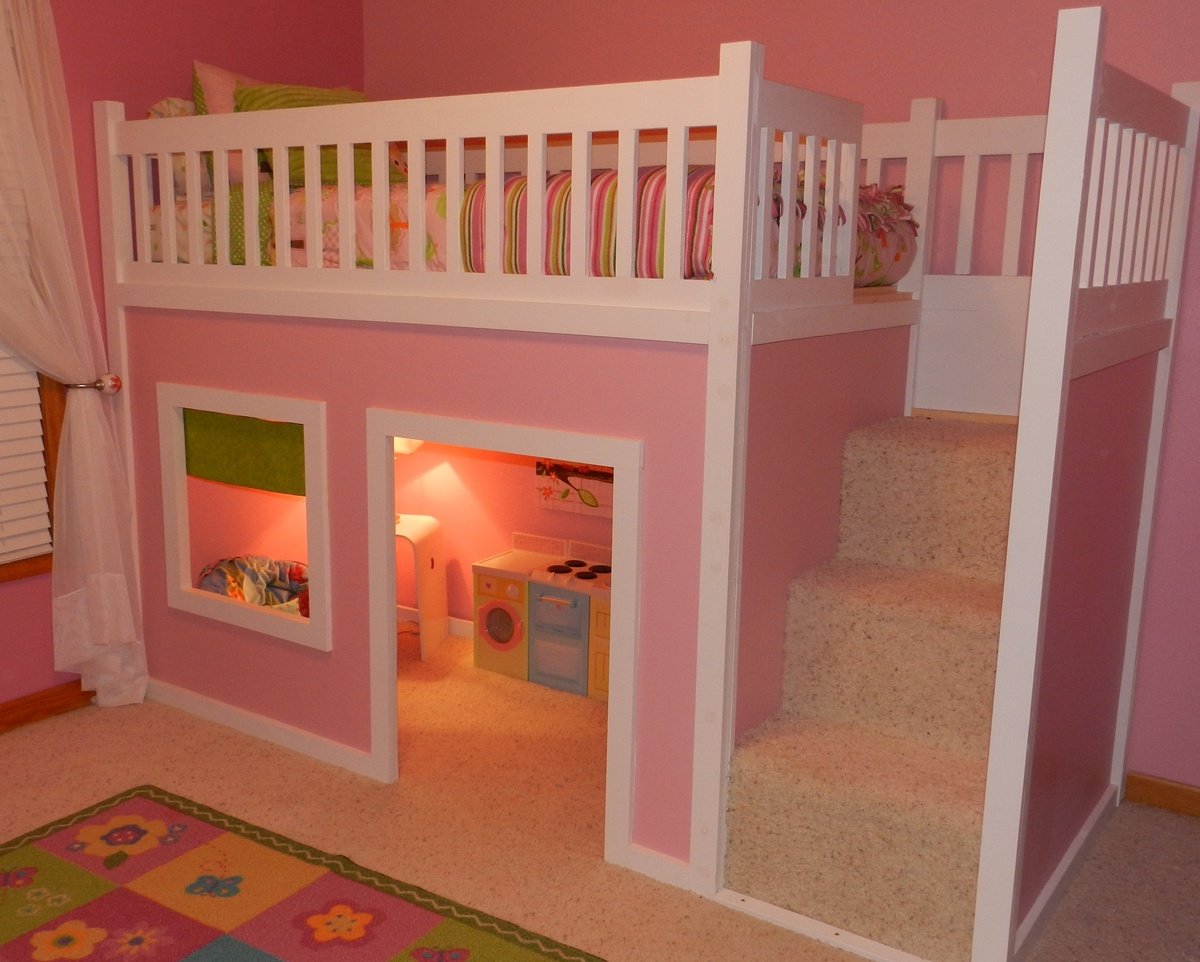
When I showed my husband the plans for this playhouse loft bed on Ana's site, he decided that we needed to build it for our daughter for Christmas. We combined the two plans for the Playhouse & the stairs and modified it slightly to fit our space. We had left-over carpet which we used on the stairs. She absolutely LOVES it!! And secretly, I think her 3 older brothers do, too. Thanks SO much, Ana!!
Sat, 01/12/2013 - 19:47
Omg....I love this I need to know how to do out....so I can make my husband build it..
Thu, 01/05/2012 - 06:34
are the plans free, and if so can I get a copy?
Thu, 01/05/2012 - 07:16
Philip and Guest -
The plans are free, and click on the links in the post
From Plan: (plans are linked here)
Sun, 01/15/2012 - 17:58
RE: http://ana-white.com/2012/01/playhouse-loft-bed-stairs
Would you please send me the plans for the Playhouse Loft Bed with Stairs?
Thank you.
Tue, 01/17/2012 - 09:20
I would like to know how to get a copy of the plans for this bed. This is exactly what I want to do in my little girls room but I have not beed able to find plans. Thanks!
In reply to Playhouse Loft Bed Plans by Guest (not verified)
Fri, 01/27/2012 - 21:44
If you look in the section above, you'll see "From Plan:" There are two links (they're black and don't look like links. You'll need to hover over them). One for the basic bed and one for the stairs.
Tue, 01/17/2012 - 18:38
I do not see the plans for the playhouse loft bed. Where is it located? Can you email it to me or post the link?
Thu, 01/19/2012 - 21:42
In reply to Age by Guest (not verified)
Fri, 01/27/2012 - 21:38
I would say your 2 year old daughter is a little young for a bed this high. I think general guidelines would suggest waiting until age 6 for lofted and bunked beds, but I think that's being very cautious. Our daughter is just about to turn 4 and she does fine in it.
Wed, 01/25/2012 - 11:29
You did a great job! That looks fantastic!
I'm going to be making this bed within the next month or two for my daughter. She's 4 (will be 5 in April). I know the overall design isn't *that* high off the floor, but my daugter has a tendency to roll out of bed...often. LOL
Do you find the guardrail/slats are high enough to prevent roll offs, or should I add some height to them when I build?
Yours turned out awesome! I can see why your daughter (and sons) love the bed!
Cindy
In reply to Looks fantastic! by Cindy from Indiana (not verified)
Fri, 01/27/2012 - 21:34
Hi Cindy.
Thanks for your kind words.
We had the same concerns about our daughter rolling or falling out. She is almost 4, but still had rails on her previous bed. We put the slats that the mattress sits on in the very lowest possible position and actually traded twin mattresses with her brother who had a thinner mattress. Her's had a pillow-top and even the extra 2 inches made quite a difference.
There are nearly 9 inches between the top of her mattress and the top of the rails which is plenty to prevent accidental roll-outs, but it certainly wouldn't hurt to add extra if it would make you more comfortable.
Now if we could just keep her from standing up there, I'd feel a whole lot better. lol
Good luck with yours.
Kara
Sat, 01/28/2012 - 07:27
Hey Kara,
Thank you so much for replying! That does make me feel more comfortable that there will be around 9" between the mattress top and the rail top. Not sure yet if I'll add a bit more or not, but it's good to hear how it worked out for you guys. Now I'll be hoping to keep my little dare devil from trying to 'fly' off the top of it and we'll be good to go. LOL
Thanks, again! That was really helpful.
Cindy
Thu, 01/26/2012 - 12:59
Hi! LOVE THIS!!! Am planing on making for my daughter. Any chance there are plans for this in a Full Size bed?
In reply to Hi! LOVE THIS!!! Am planing by Guest (not verified)
Fri, 01/27/2012 - 21:48
I've seen some posts on Ana's Brag Boards of these lofts with full sized mattresses on top. Ana's original plan is a twin bed, but others have modified it to suit their needs. You may just want to search and see if anyone has included their plans for a full. Sorry I can't be more help. Good luck!
Tue, 01/31/2012 - 18:32
That is very nice if you dont mind me asking how long did you make that one... I am wanting to make one for my daughter but I dont have 103 inches that called for in the one plan...
In reply to Very Nice... by JessiW (not verified)
Sat, 02/04/2012 - 16:10
We made our bed to the exact specifications that Ana gave (103"), however, if you need to save space, you could leave the stairs off and opt for the ladder.
In reply to Bed Plans by Kelly Kelley (not verified)
Wed, 02/15/2012 - 18:34
Hi Kelly,
There are links to the 2 plans in the "ABOUT THIS PROJECT" section above. Just hover your cursor over the "From Plans:" and the links will change color. They appear black and therefore, don't look like they're linked to anything. They're both there. Good luck!!
Sat, 02/11/2012 - 09:30
I need the plans for this can someone please send me them :) [email protected]
Wed, 02/15/2012 - 18:40
There are links to the 2 plans in the "ABOUT THIS PROJECT" section above. Just hover your cursor over the "From Plans:" and the links will change color. They appear black and therefore, don't look like they're linked to anything.
Or...I've added them here.
http://ana-white.com/2010/09/playhouse-loft-bed
http://ana-white.com/2010/09/easy-playhouse-loft-bed-with-storage-stairs
Mon, 03/05/2012 - 20:01
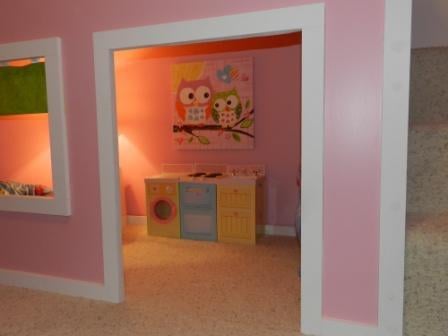
Hi there, I was wondering if you could tell me where you got the fabulous little washer and dryer combo that I see in the photo. I know the sweet owl painting is from target, but I love the little play space you seem to have created! :)
Sat, 03/17/2012 - 22:52
I LOVE this so much! I love the color scheme as well, we decided to copy the scheme in my daughter's room. I was wondering where you got the curtain from? Did you buy it or make it yourself? It's almost exactly the color of the green paint we bought so I would love to know. Also, I love the washer and dryer too, also curious about that. Thanks!
In reply to Cute Decorations! by Kirstie (not verified)
Mon, 03/19/2012 - 19:40
Hi Kristie.
I made the little curtain and the little washer/stove/sink set are from the Playskool Rose Petal Cottage collection. Good luck building your playhouse. It's a little girl's dream!!
Wed, 03/21/2012 - 20:27
Hi Kara,
I'm really interested in building two of these for my girls... they caught my attention because they've been asking for a bunk bed and I don't want to do a bunk bed because I hate the idea of struggling to change the bedsheets. Just wondering if it's a hassle with a bed this height.
Yours looks amazing, btw!
Thanks,
Sarah
Tue, 04/10/2012 - 11:18
oh my god i love this it would be awesome for my daughter also. were you able to stay in your budget???? do you think is a safe style for a 3 year old? she would go absolutely nuts!
Fri, 04/13/2012 - 20:17
so beautiful! if i wanted to do this with a full mattress how would i tweak the measurements? i want to do this with a full with the stairs... just so she can be in the bed for a longer period and also the space underneath to be a bit bigger... also if i wanted to make the stairs have a drawer? i really would appreciate alll the feedback if possible because im so far from handy... :-/ and 1 more thing how did u get a light down there?
Fri, 05/11/2012 - 18:27
I was wondering if once put together is it easy to take apart? My dad builds houses for a living and was going to make it for my daughter at his house then bring it to mine to set it up
Sun, 06/10/2012 - 14:40
My husband and I just finished making this bed with stairs for our 3 year old and he loves it.
Tue, 06/12/2012 - 06:41
what age would you reccommend this for?? my son is 3 n a half and i woant to attempt to make this bed, but dont want to spend time and money if i will have to buy him a new bed in a couple of years. i would like it to last a good while. also, like veahava, i was wondering if this was easy to dismantle once put together as i am planning a move in the future, thankyou
Tue, 10/02/2012 - 02:14
This is absolutely divine - you are so talented! I have just found this website and can't imagine I'd ever be able to make something so beautiful. Putting up a shelf is beyond me. Your daughter must be so proud of her little nighttime palace!
Sun, 10/21/2012 - 20:01
I am trying to get the plans for this bed with the stairs but when I click on the link it doesn't give me the plans. Help, my granddaughter would love love love this. Thank you so much.
Wed, 01/16/2013 - 06:05
hi!
Someoneo to tell me how many hours spent on it?
Mon, 02/04/2013 - 20:53
PLEASE, PLEASE, PLEASE, SOMEONE TELL ME HOW TO GET THE PLANS, I REALLY WANT THIS BED FOR MY LITTLE GIRL!!!!

In reply to PLEASE, PLEASE, PLEASE, by ochoa
Mon, 05/25/2015 - 22:12
You can download more plans from these resources:
Thu, 02/14/2013 - 12:36
This is awesome, how do I get a copy of the plans for this bed? I would love to do this for my grand daughter as a birthday gift
Thu, 02/14/2013 - 12:48
found the link, here is it for those wo are also looking I can't wait to start this project THANKS
http://ana-white.com/2010/09/easy-playhouse-loft-bed-with-storage-stairs
Wed, 09/11/2013 - 05:11
We made this bed for our daughter and now my son and daughter play with her kitchen and table underneath in the playhouse. Your instructions were so easy to follow and everything matched up perfectly. We did do the ladder due to space but the bed is beautiful. We get so may compliments when people come over and I always tell them about your website. You truly have awesome ideas! I can not wait for the next project and I am sure it will be off your site :-)
Mon, 10/07/2013 - 17:26
I love your playhouse with loft bed! How tall is the underneath part? Would you be able to fit a desk underneath? Also, could the plans be adjusted to accommodate a double bed?
THANK YOU!!
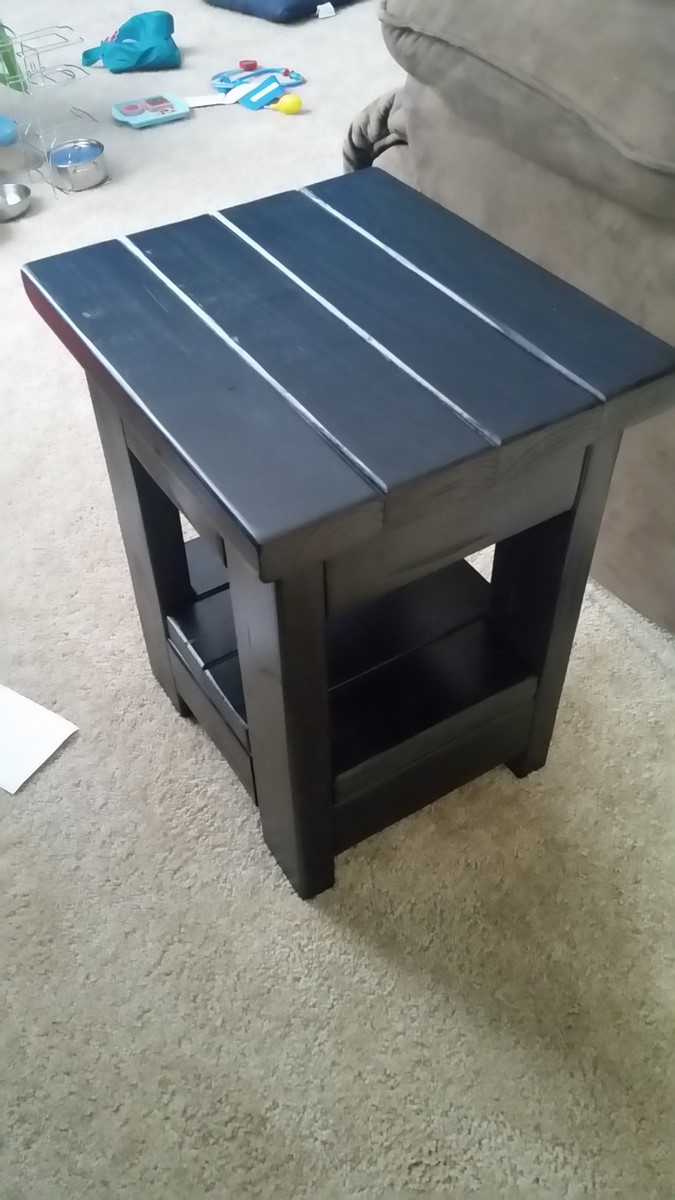
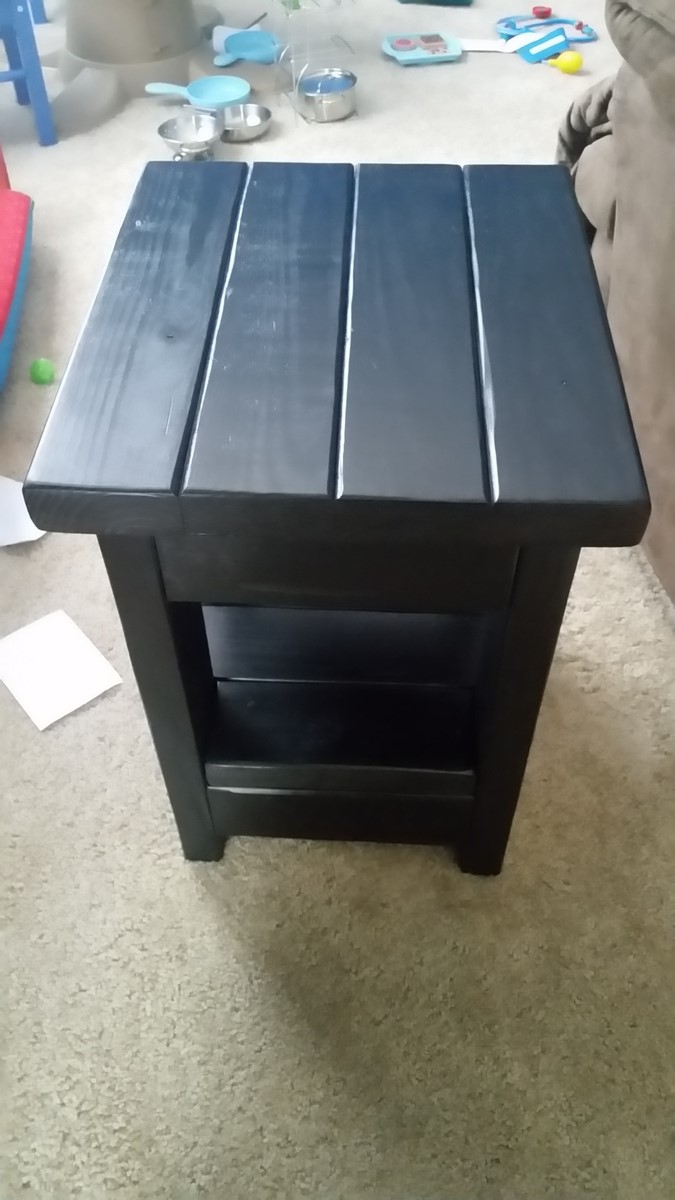
I made a smaller version of the Tryde End Table with Shelf. I made 2 of them from 6 2X4's
Mon, 05/25/2020 - 06:27
Love this! Do you have the dimensions of the pieces for this one?

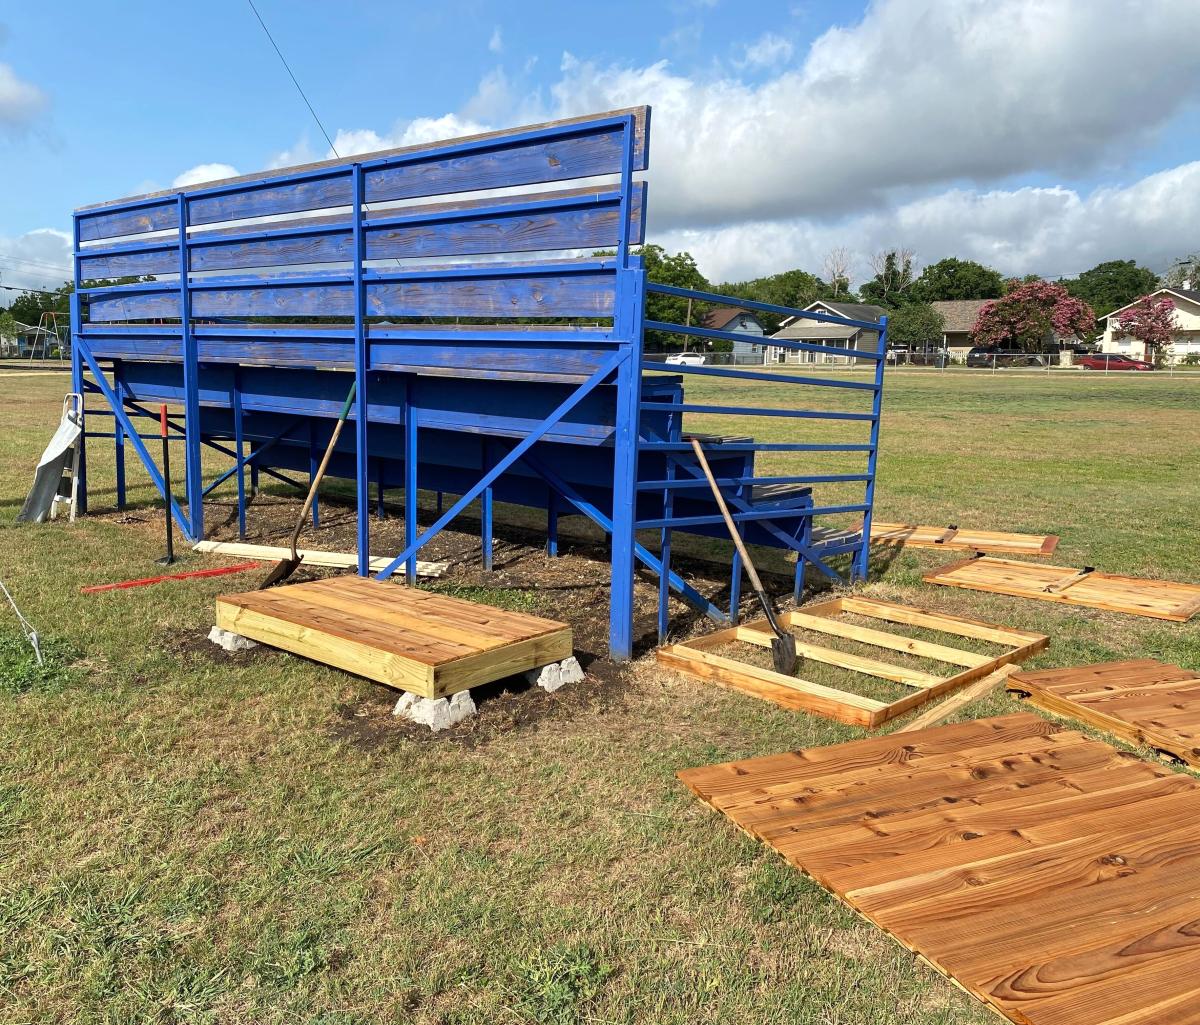
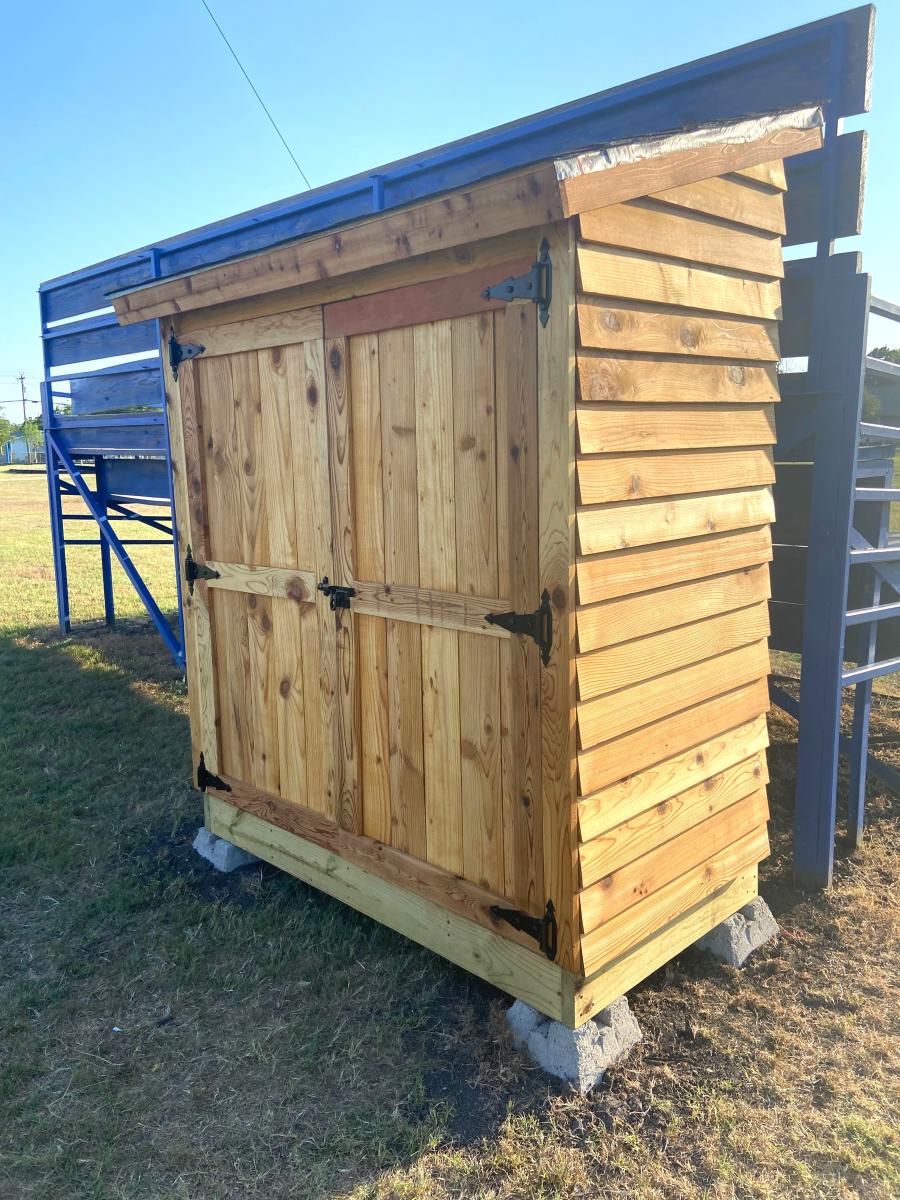
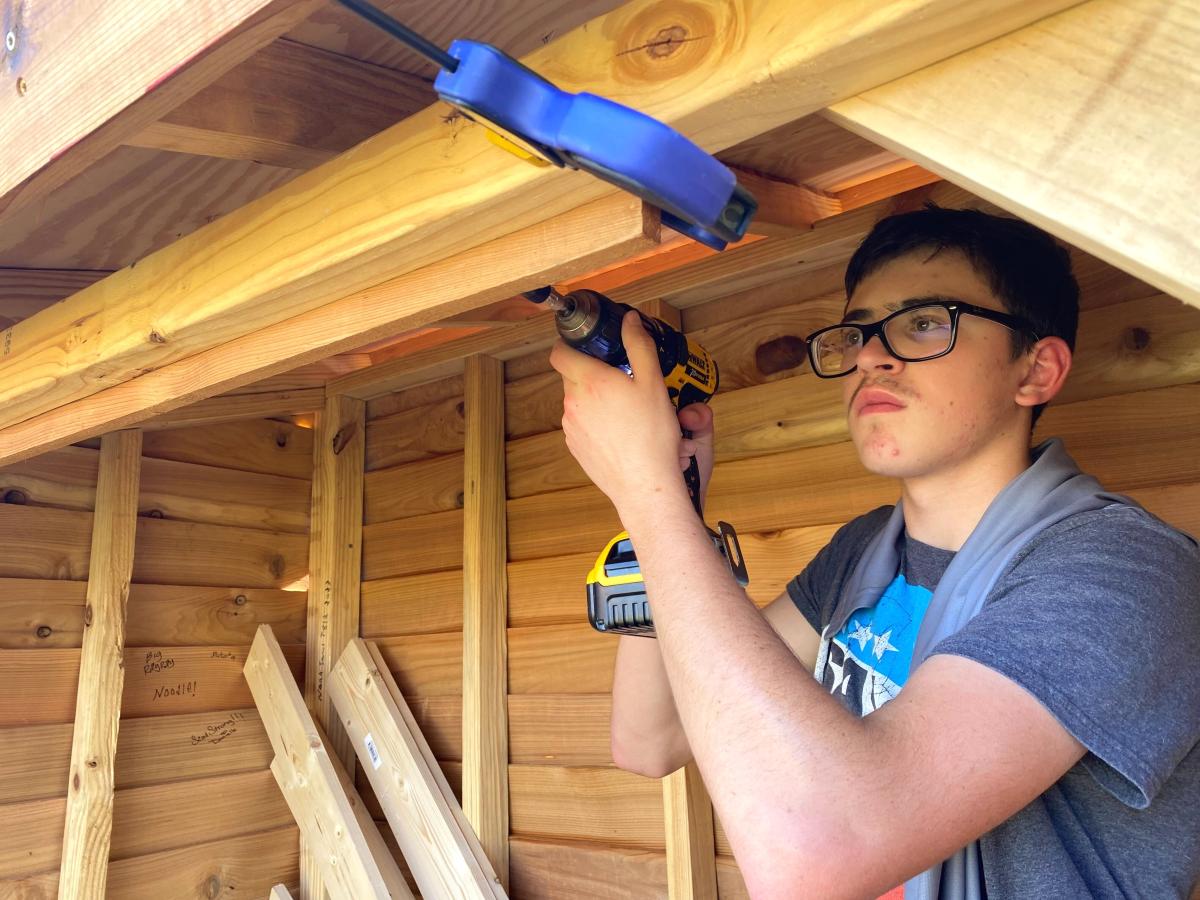
My son used your plans to help students at his old elementary school for his Eagle Scout Project. He was able to adjust the plans to meet the school's needs. Local Austin Texas news did a report on it. Thank you for the inspiration!
https://www.fox7austin.com/news/boy-scout-builds-shed-stocks-it-with-re…
Robert Saul

Extra large chalk board for church coffee shop. Made from plywood 90 x 40 (cut by Home Depot), chalk board paint, pine boards for frame. Used stencils for most lettering. The board on right is attached with Velcro strips so it’s removable so that I can change out every season. Super easy to build.
Sheri Robertson
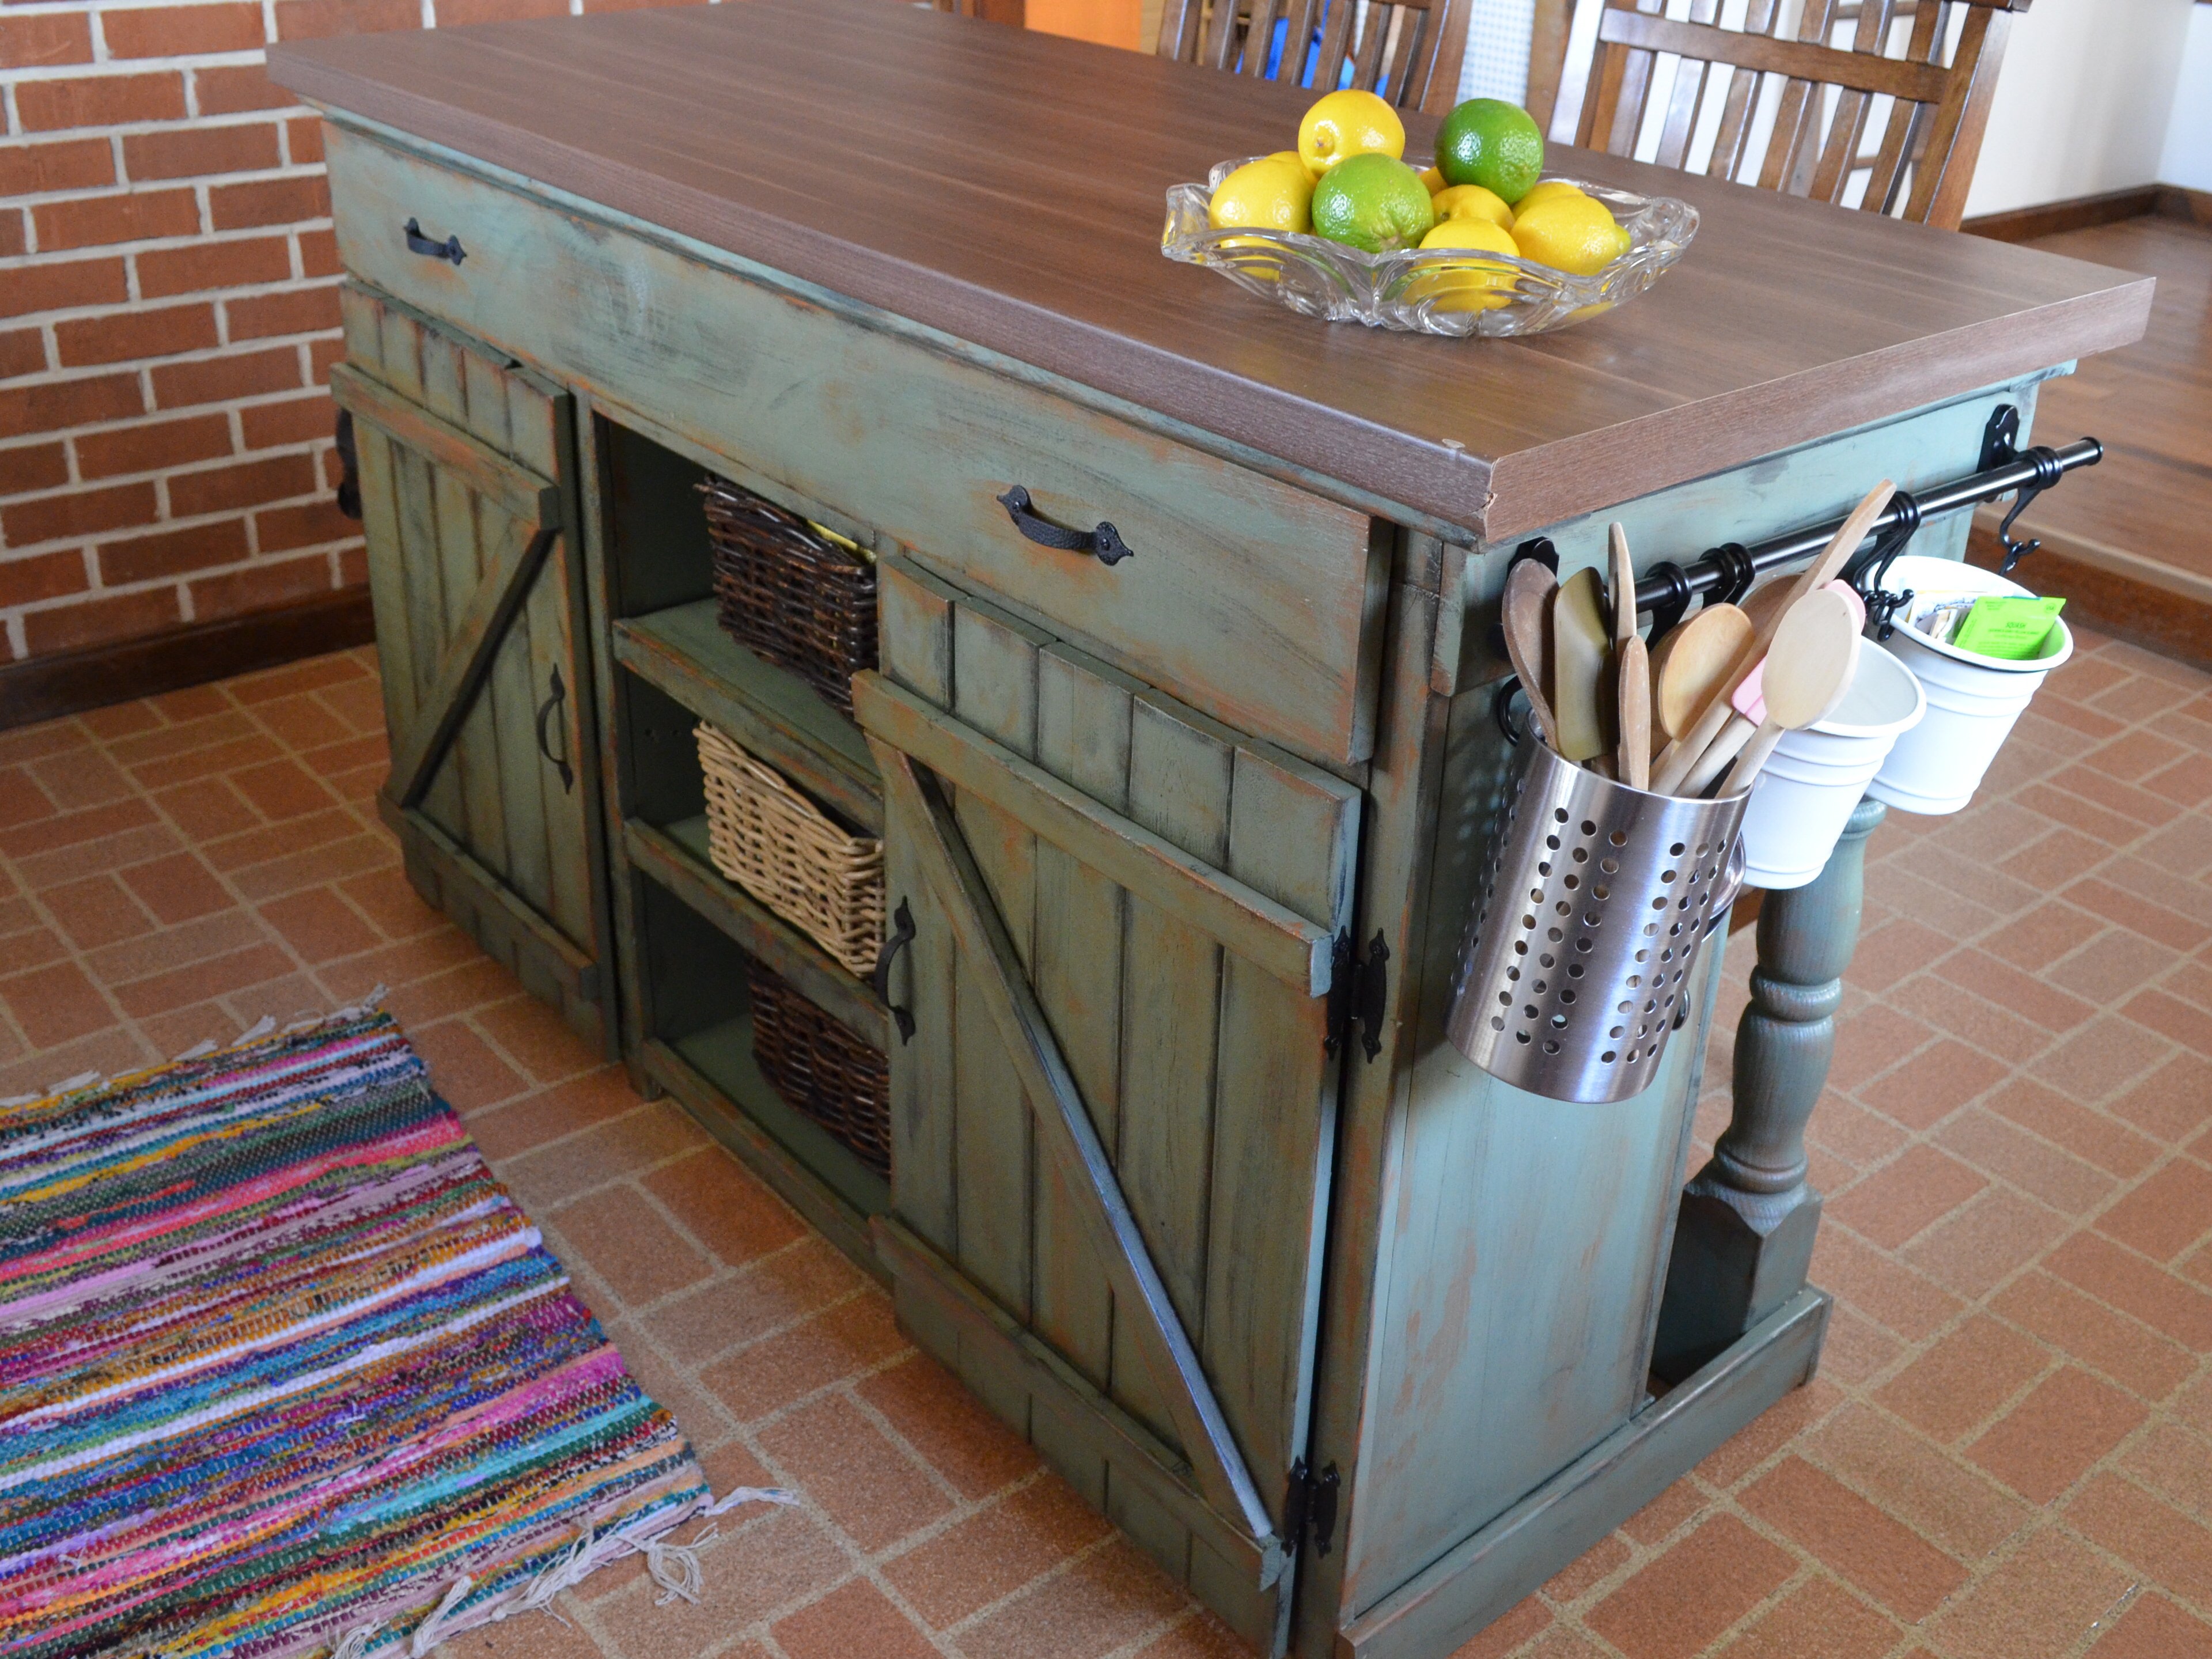
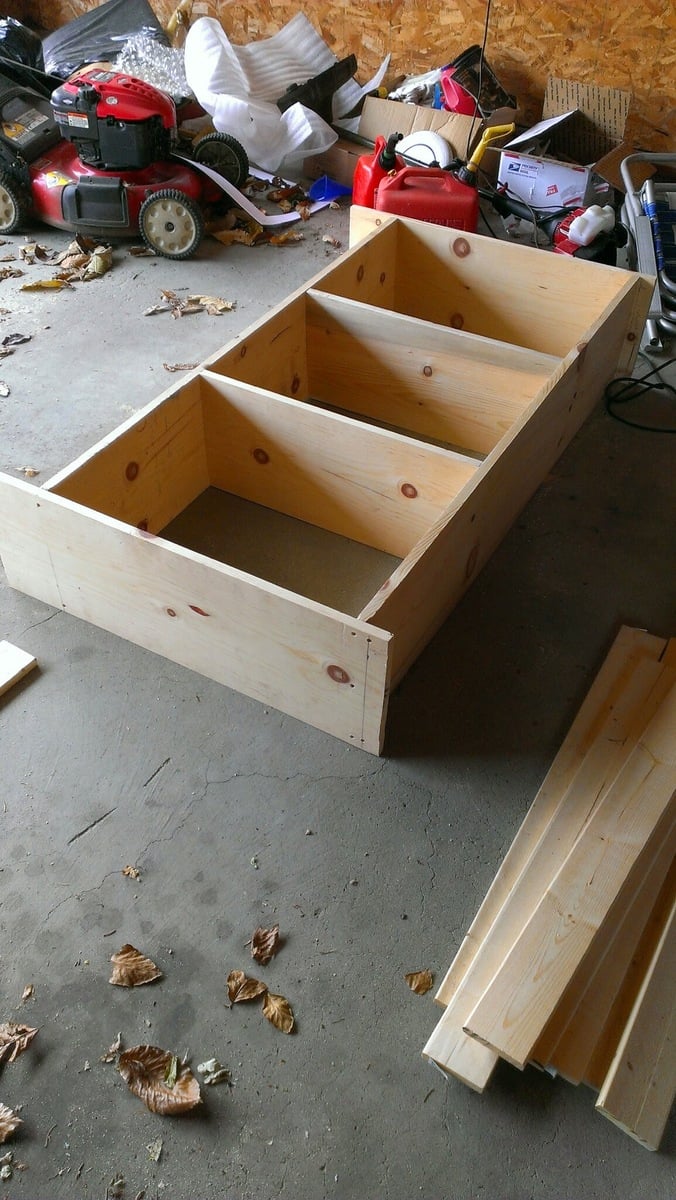
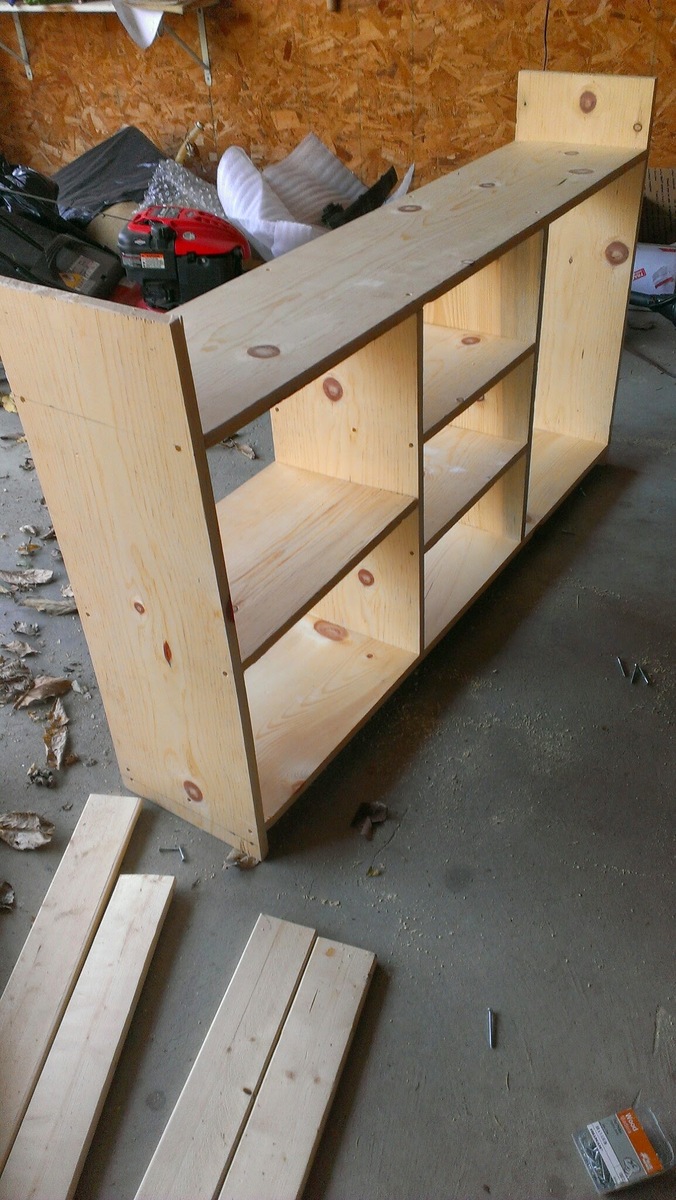
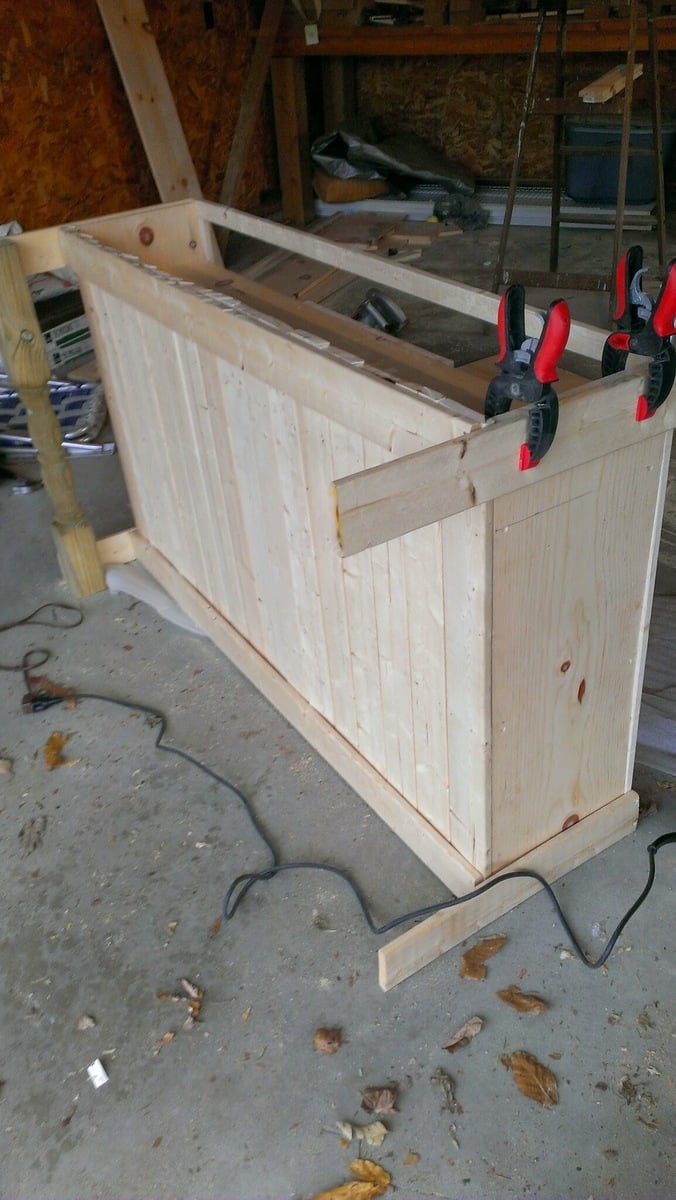
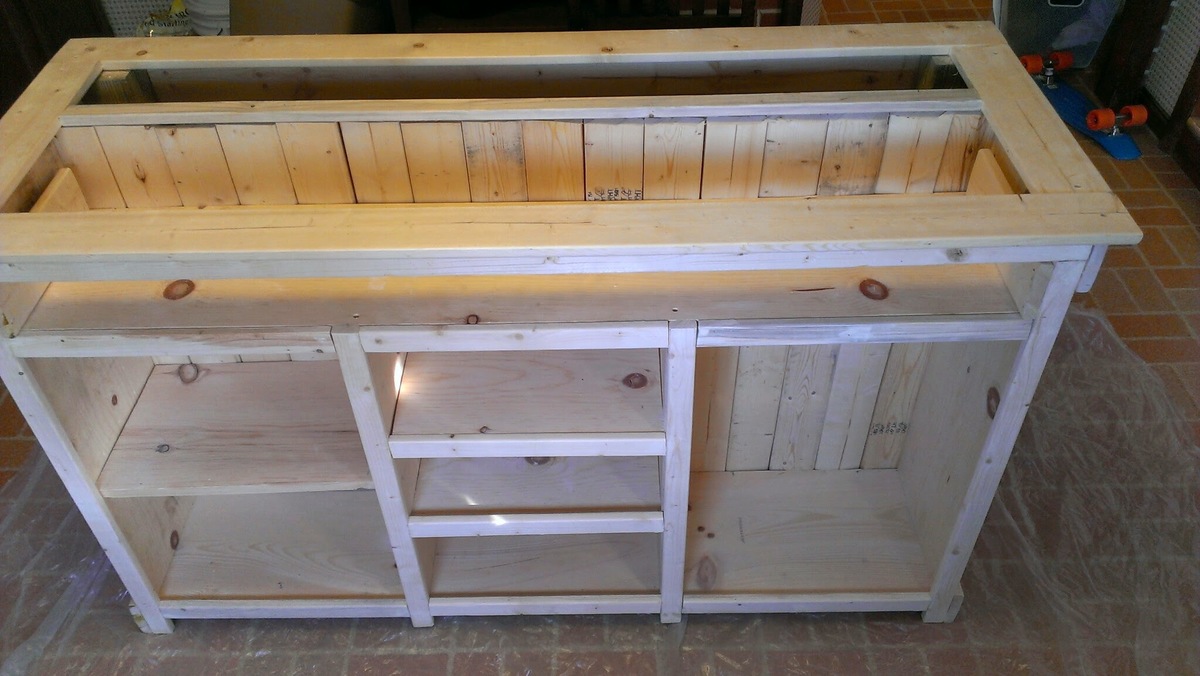
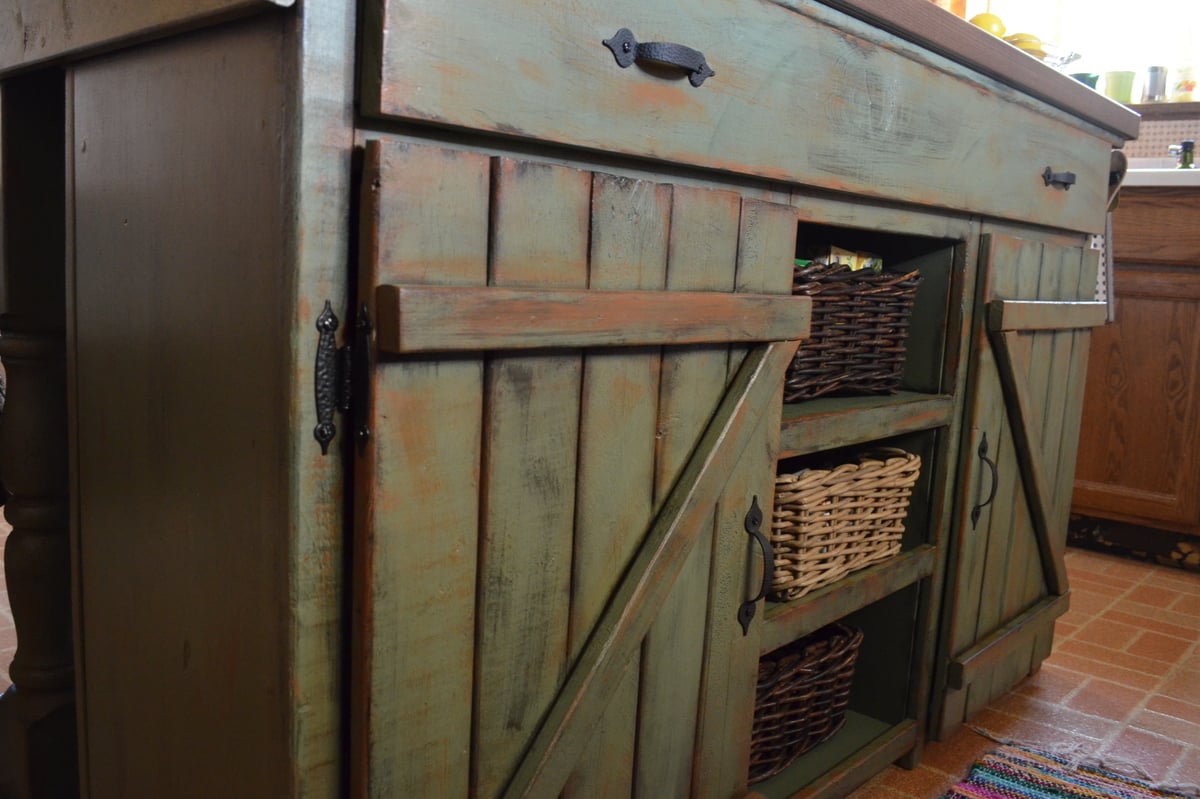
Grabbed some cheap whiteboard for my first project. My wife was looking at buying an island and I decided to surprise her by trying my hand at building one. Turned out to be an enjoyable new hobby that I hope to continue (plus, Laura now says I am her "favorite husband!").
Materials breakdown:
The lumber is white board from Lowe's for $115
The countertop is laminate Pragel from Ikea for $59 (cut to size)
Paint, polyurethane and drawer hinges were $50
I had another $75 in tools, glue, wood filler, nails, etc, because this was my first project.
In reply to Love the color by NimbleShopper
Wed, 04/02/2014 - 17:38
My wife, Laura, helped with the paint and came up with the dry-brush distressing technique.
In reply to Impressive by Ana White Admin
Wed, 04/02/2014 - 17:42
We just moved into an old house with a garage and the previous owners left a work table and an ancient Craftsman jig-saw, circular saw, and scroll saw (all from 1956). They were a bit sketch, but they got the job done!

Fri, 04/04/2014 - 21:42
wow. very impressed. love the finish! it turned fantastic for your first project; looks like you have a new hobby!
In reply to wow. very impressed. love the by birdsandsoap
Tue, 11/15/2016 - 00:15
I love that. It have a nice design. ین درها دارای تکنولوژی مدرن و پیشرفته بوده و استفاده از آن سهل و آسان می باشد. وجود موتور توبولار و مرکز کنترل پیشرفته الکتروند فرانسه در آن باعث ایجاد امنیت، آرامش خیال و سهولت کارکرد آن بصورت دستی و اتوماتیک شده است. این مدل درب اتوماتیک به دلیل کم حجم بودن و جمع شدن در زیر سقف فروشگاه ها و یا مراکز تجاری و یا به صورت عمودی در سوله ها و کارخانه ها، هم باعث کارآیی بیشتر و هم دارای زیبایی مضاعف می باشد و کاربرد آن در مراکز تجاری، فروشگاه ها و صنعتی باعث ایجاد امنیت، راحتی و سهولت در استفاده از آن شده است .
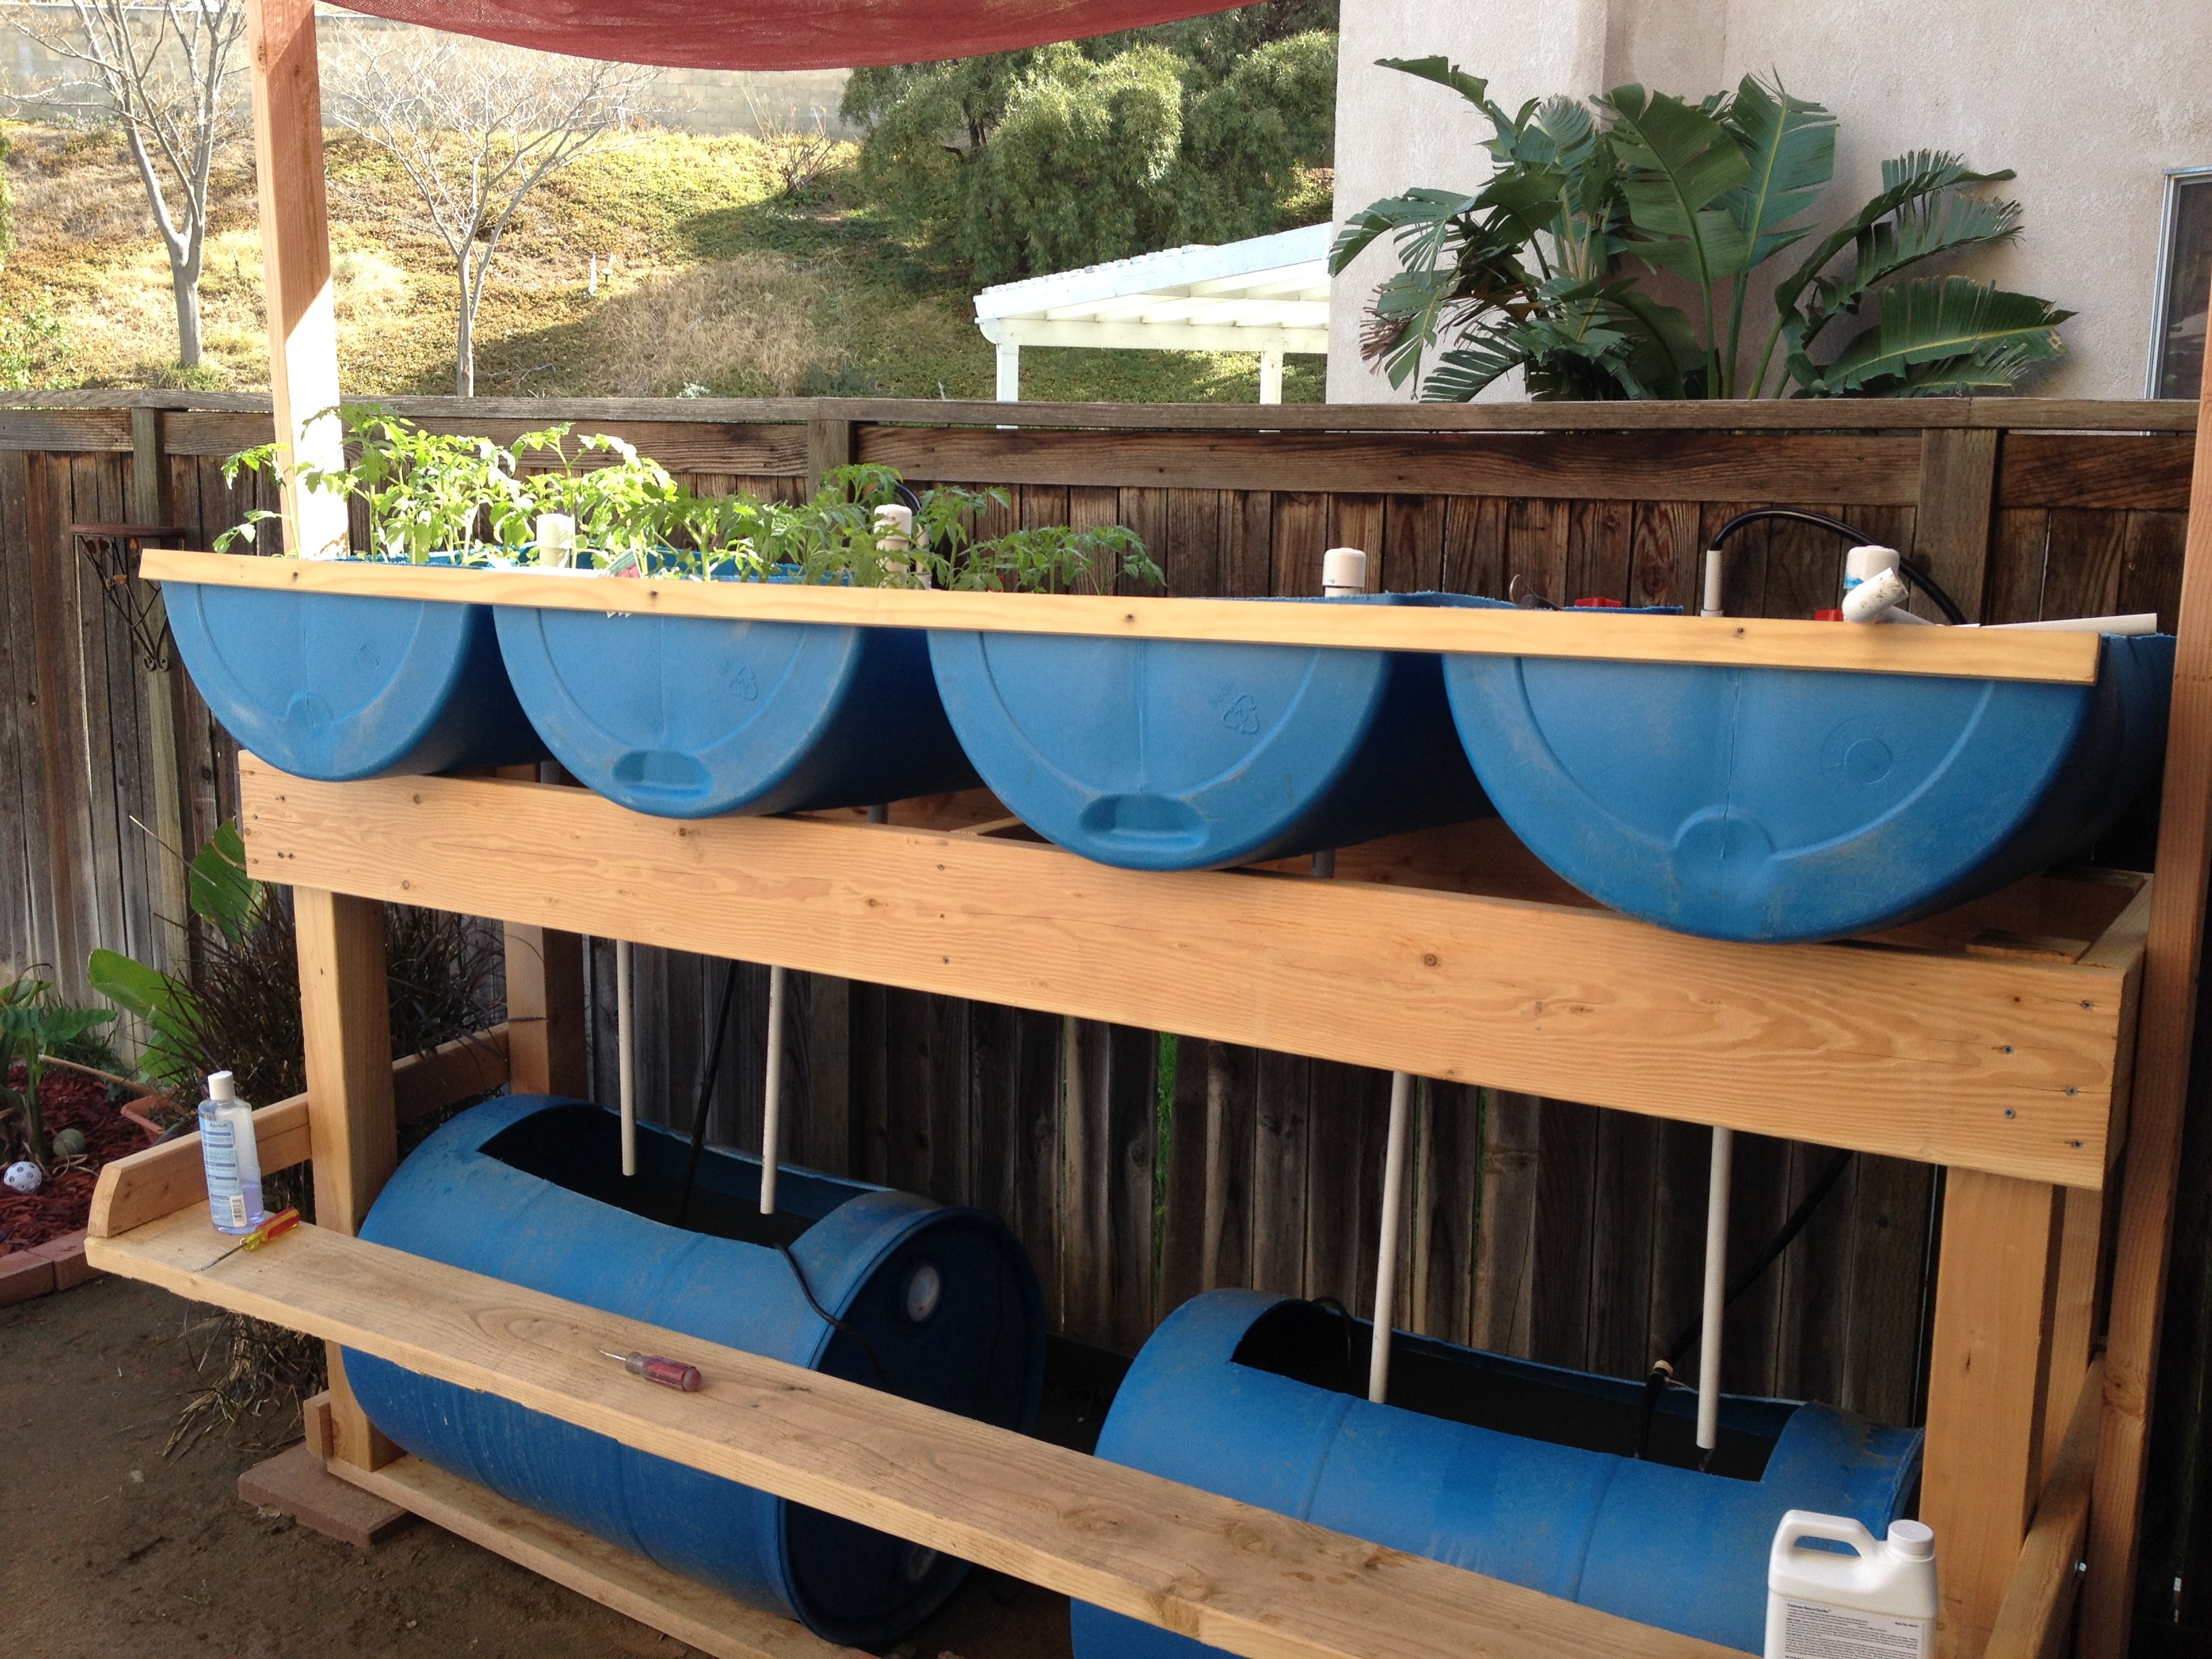
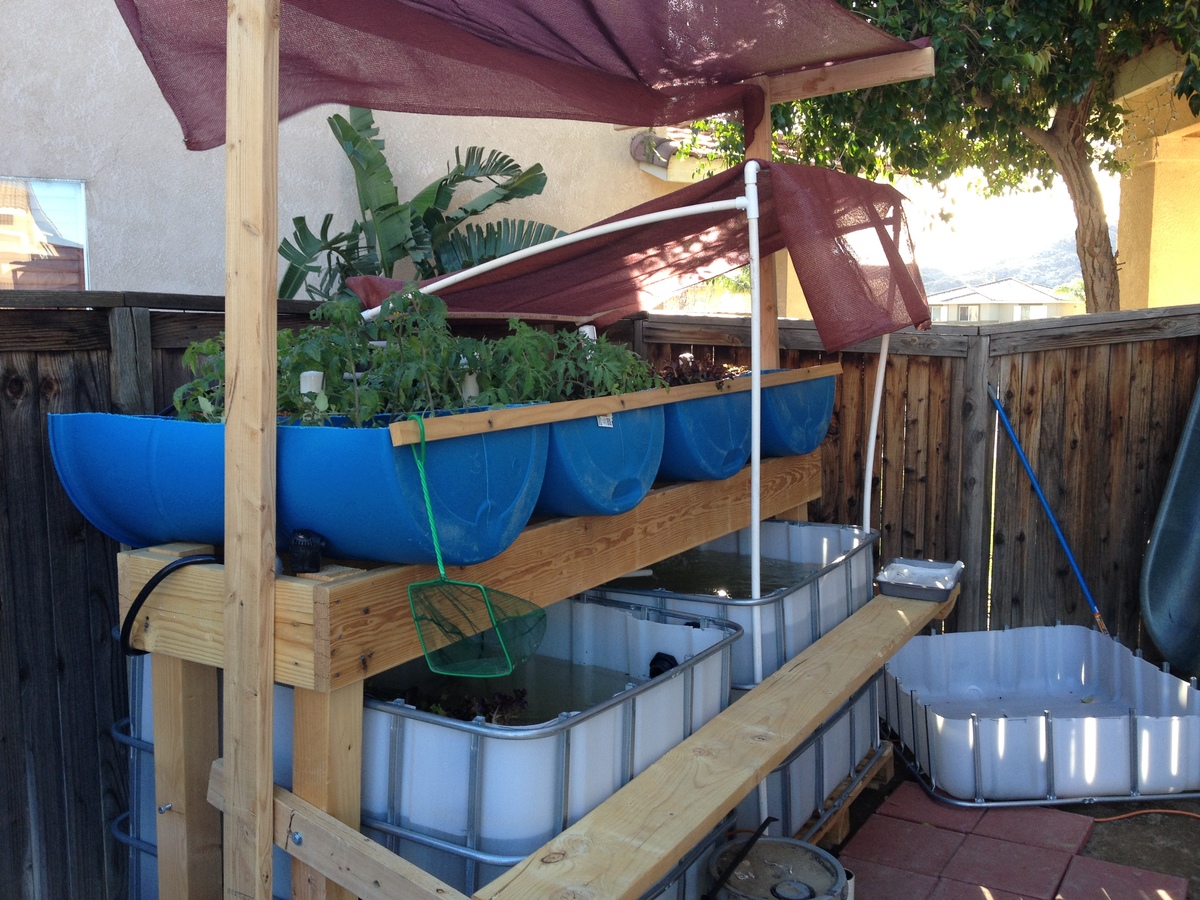
The better way to garden! I built the original, and then the fish got too big for the 55gal tanks below. Had to upgrade to 2 300gal IBC containers. Now I have 50 tilapia that are ready to eat, adn enough vegatables to feed us for the year.... awesome!
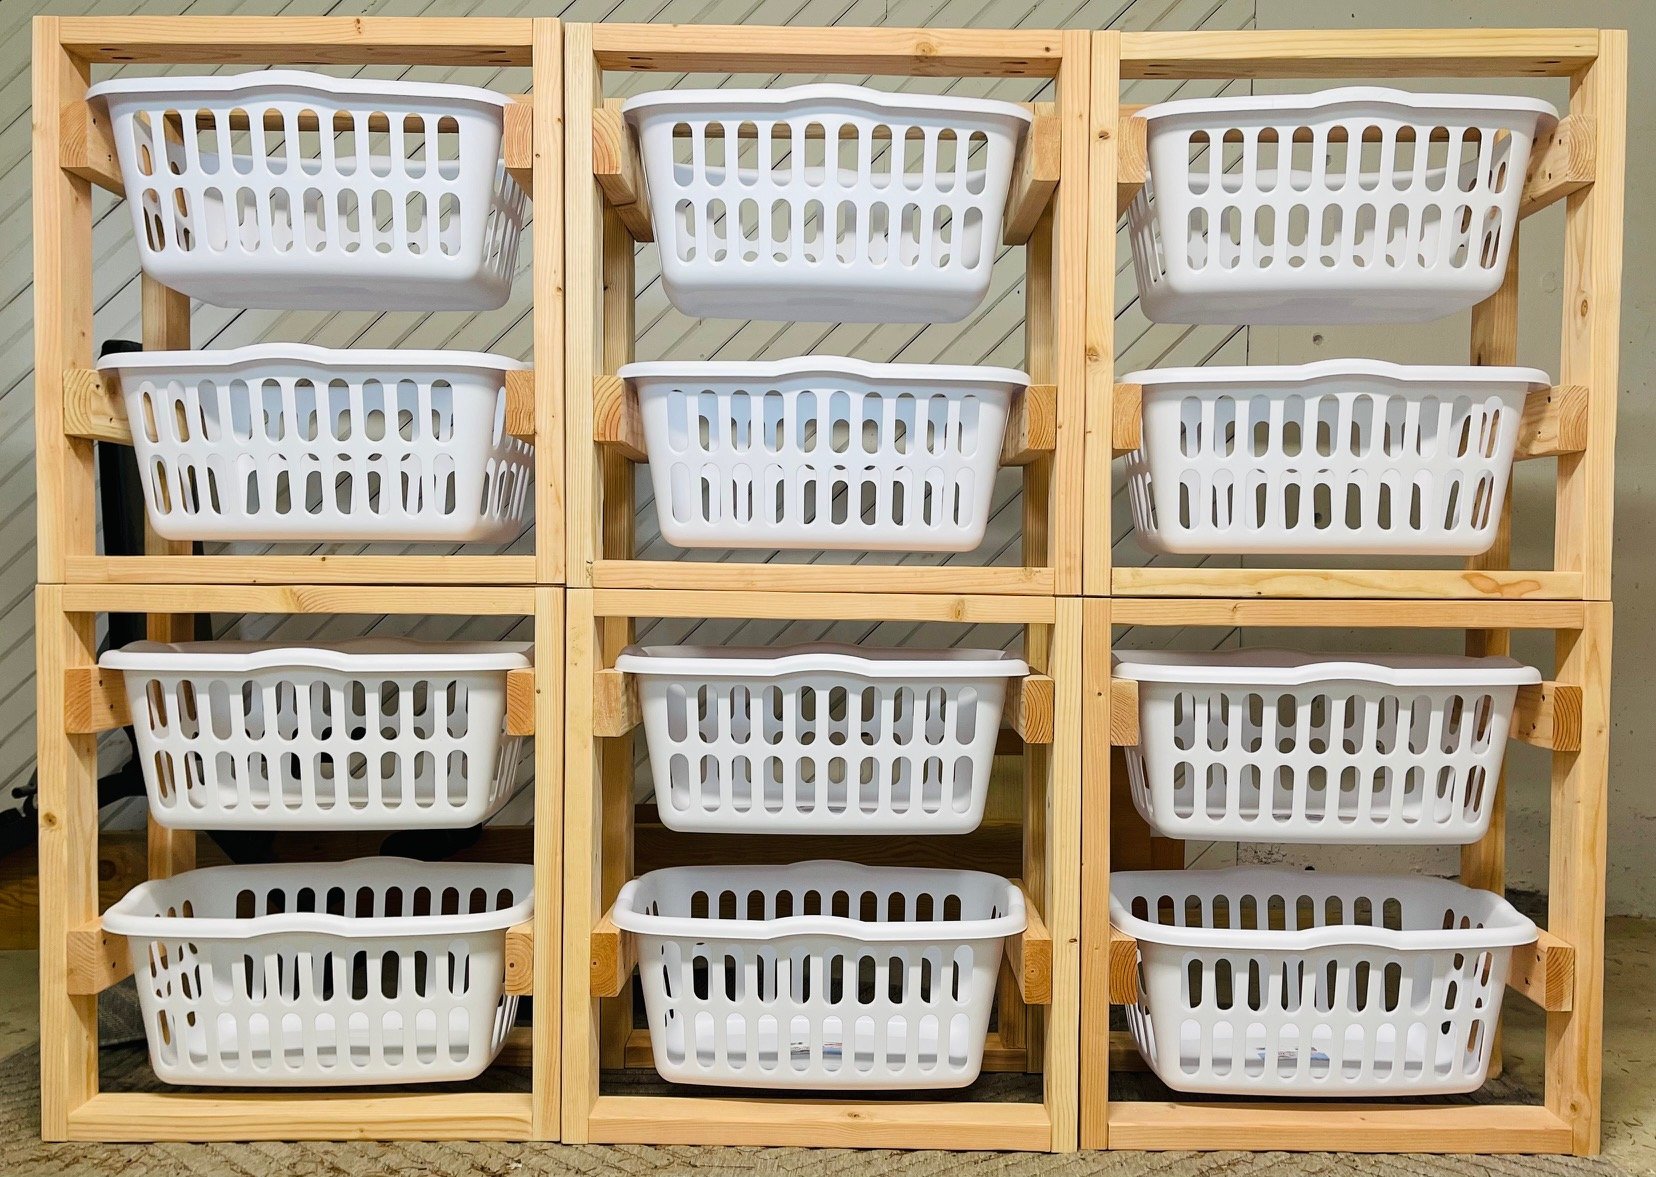
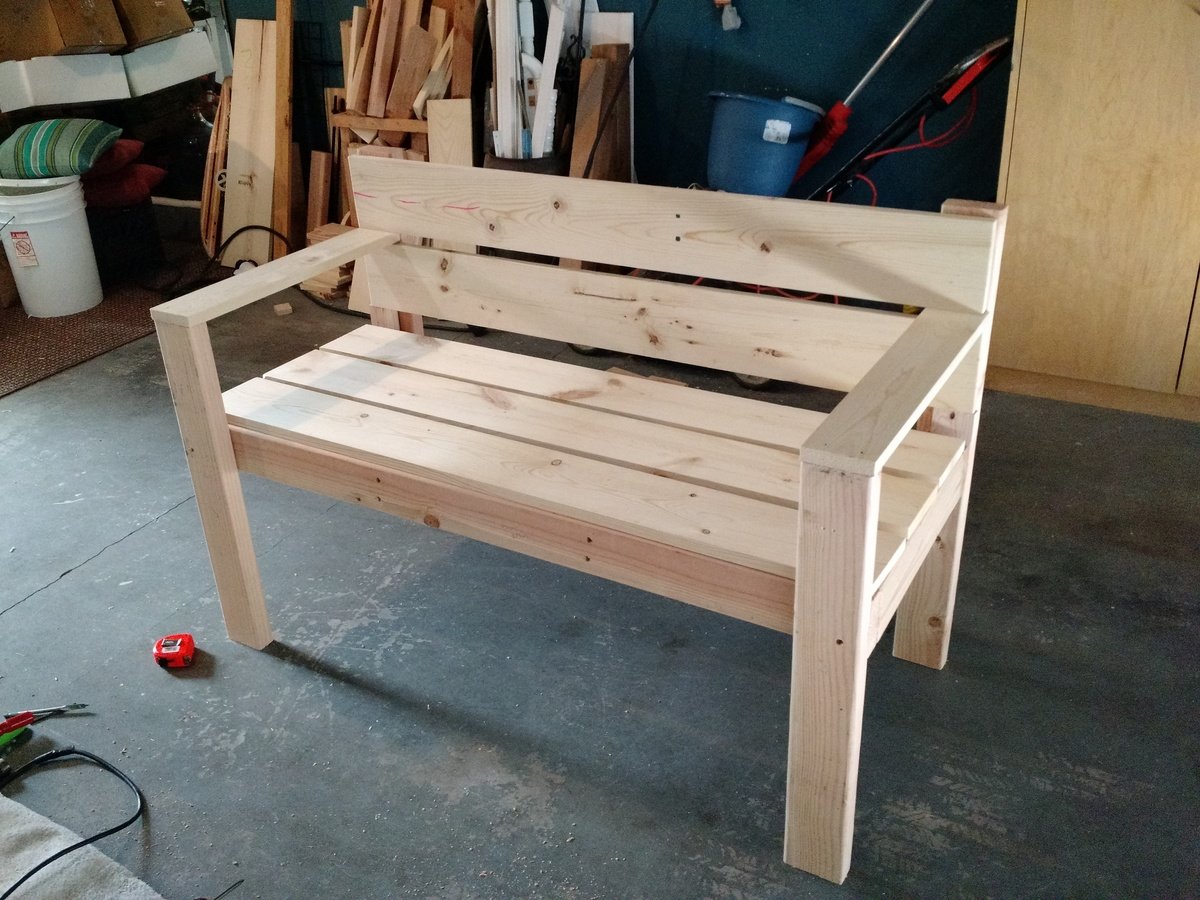
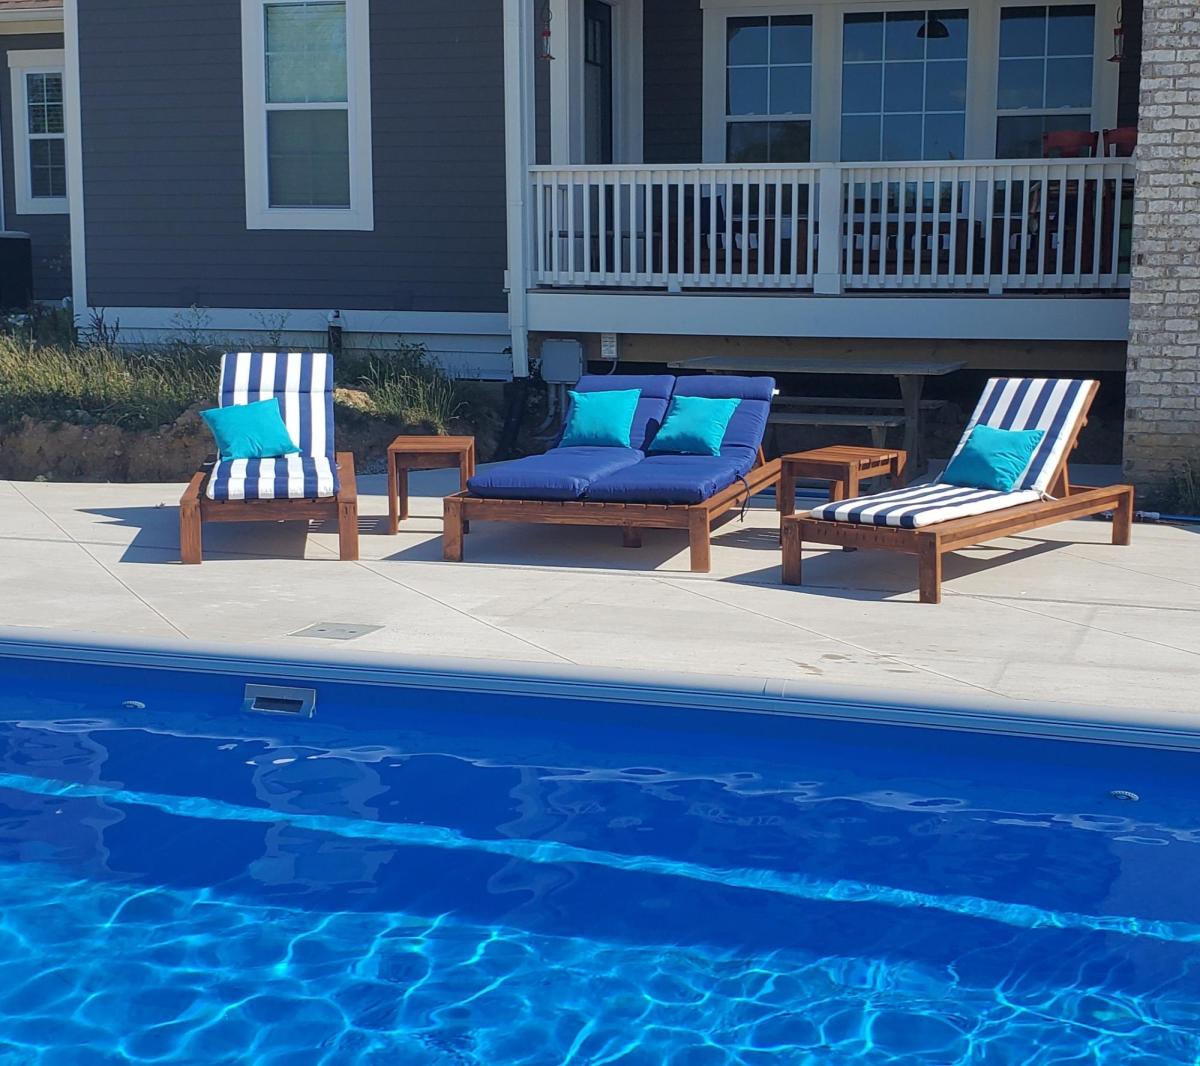
First time building for re-sell. I sanded everything before assembly and used pocket hole contruction so I wouldn't need to fill holes. Each one will be finished per customer request. Each unit takes about 2 hours to build start to finish.
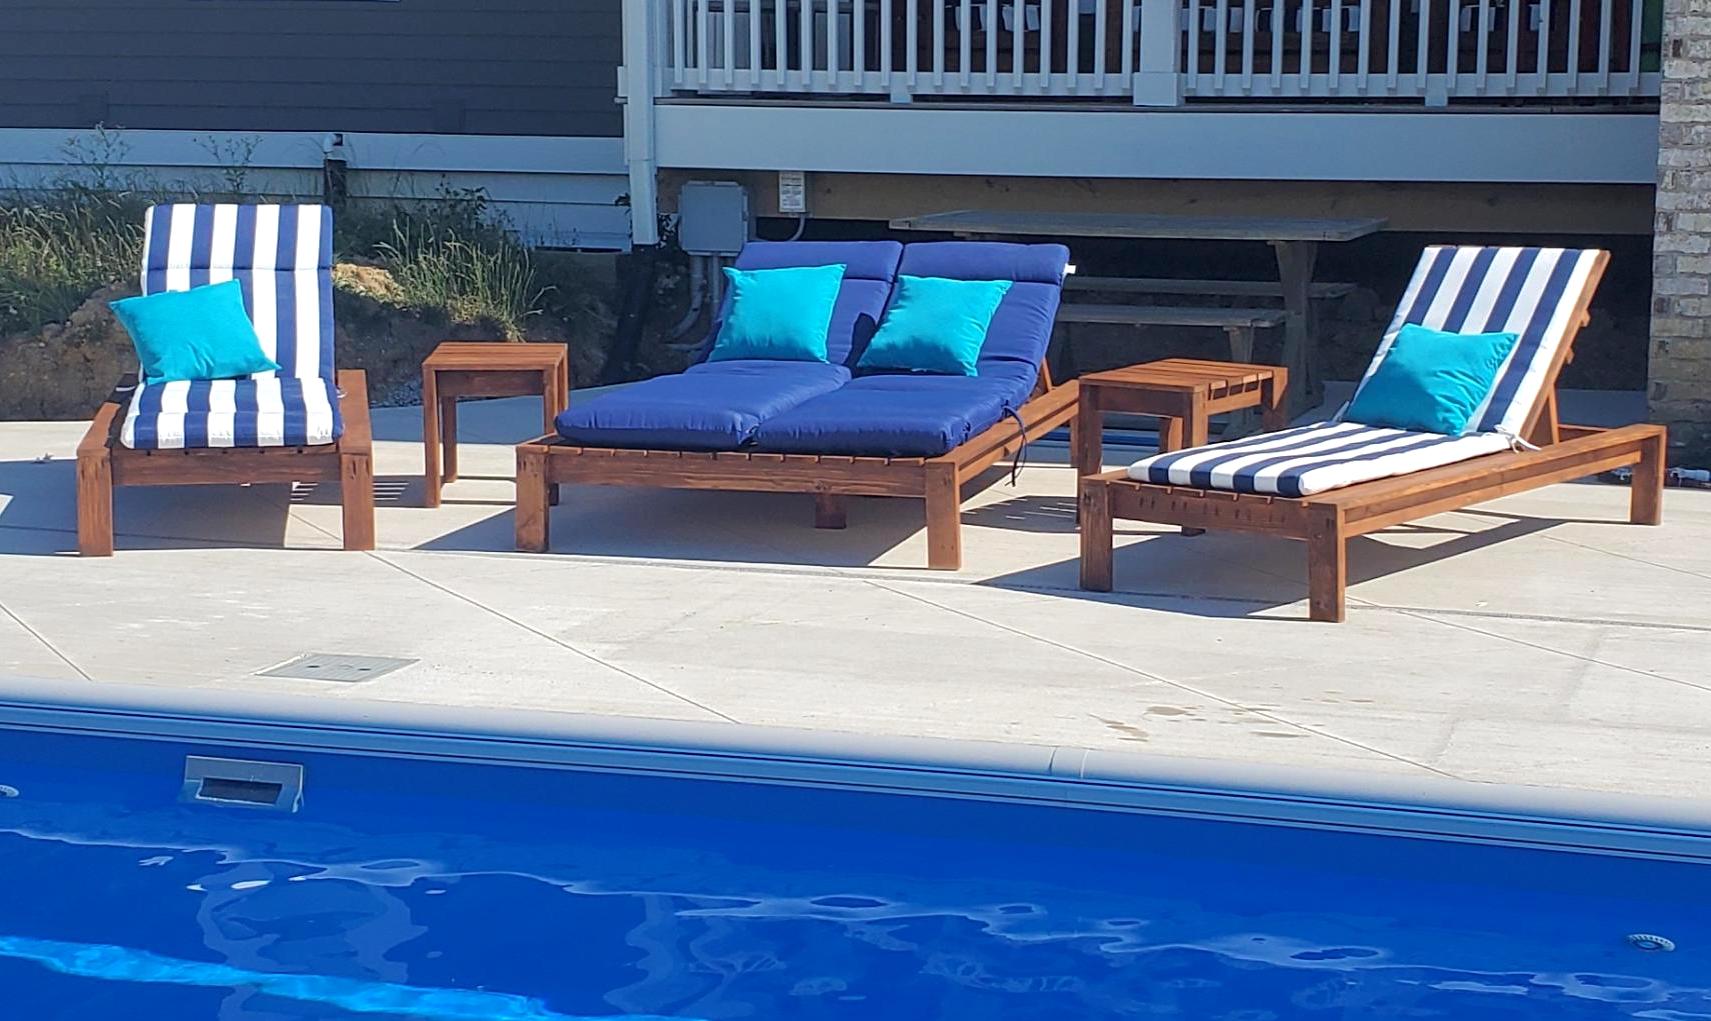
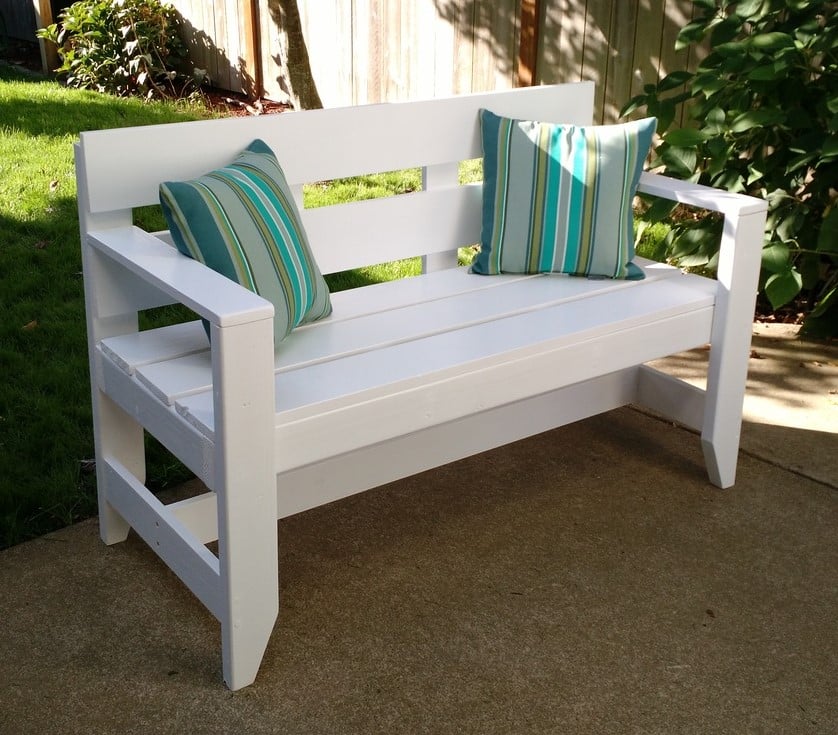
Part of a huge order I did for outdoor furniture. Love how they turned out! Thank you!
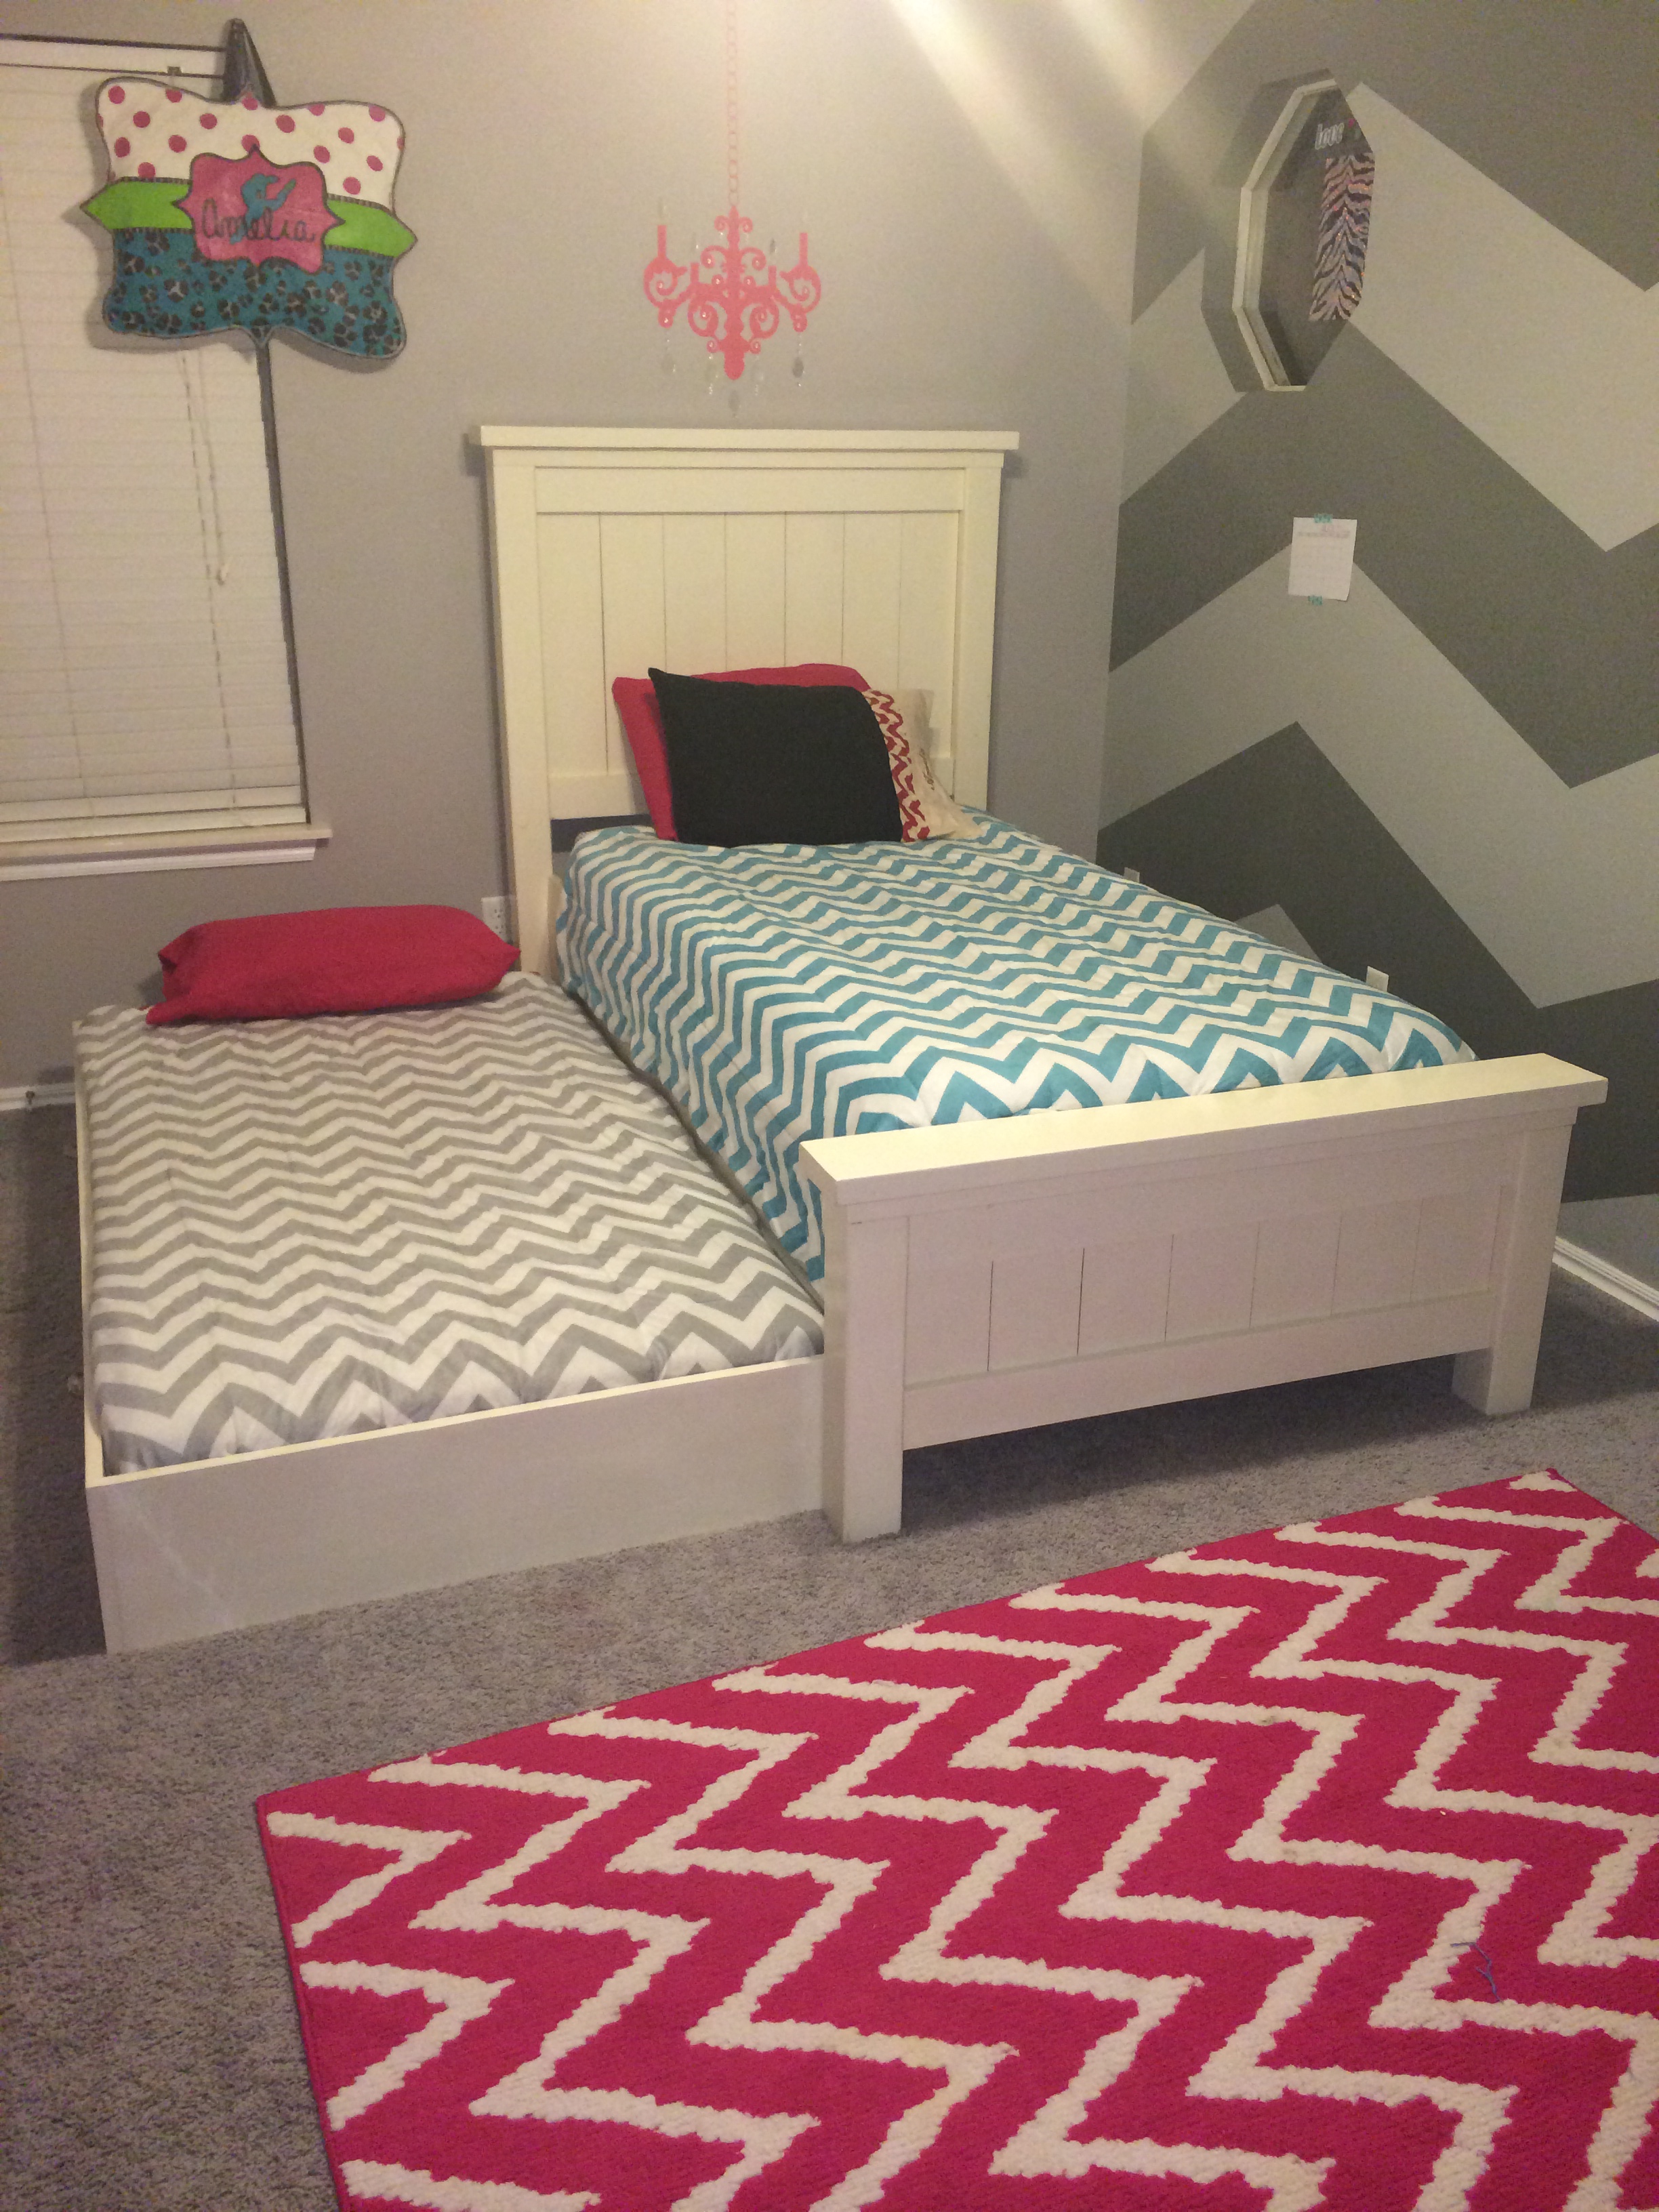
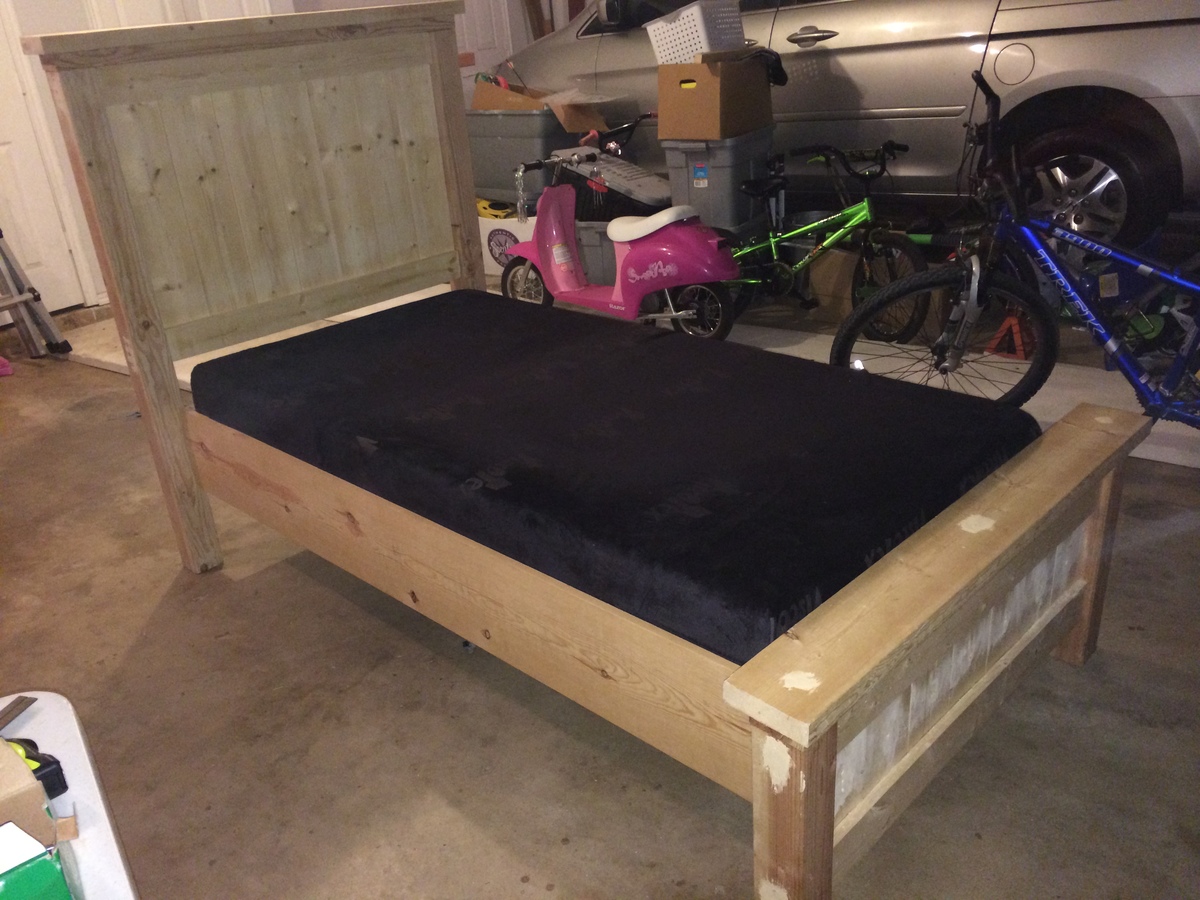
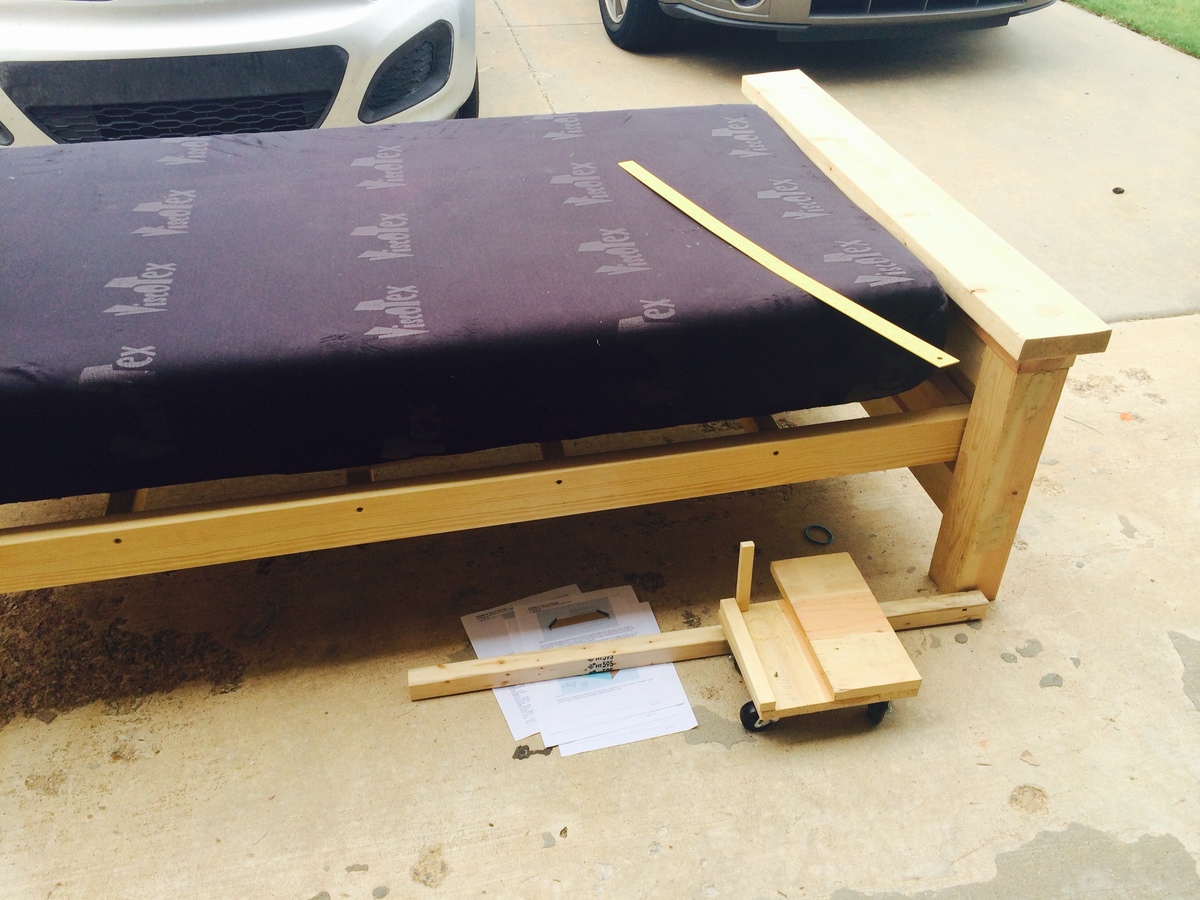
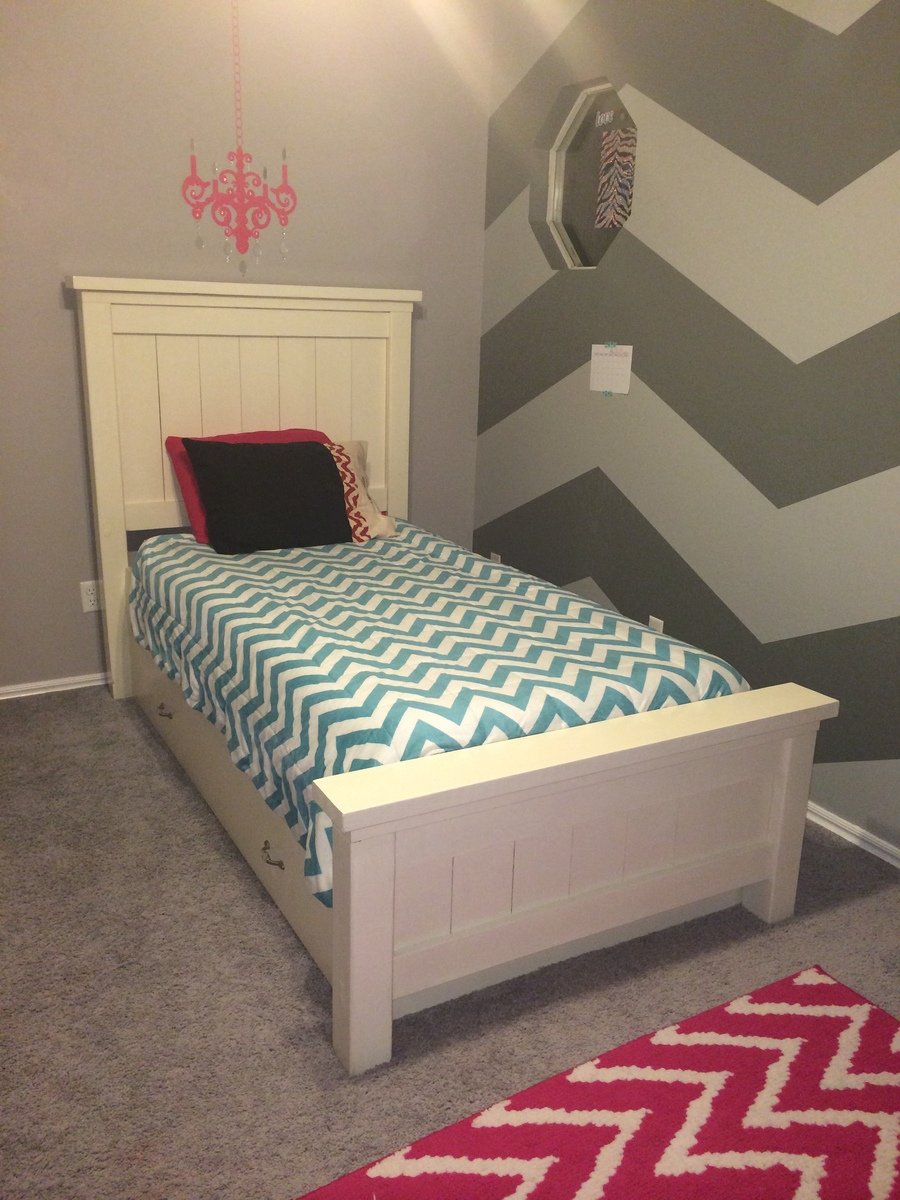
We made the traditional Twin Farmhouse bed using Ana's plans. We did modify the height of the headboard and foot board in case we decide to move the bed to under her window.
I was very particular about the sizing and placements of the sideboard/trundle. I did not want a big gap between the mattress and the trundle. Also, did not want the actual bed mattress to sit down too far into the 1X10 and look like a crib.
Very happy with the results. Thanks so much, Ana!!!
Mon, 08/18/2014 - 05:01
This looks great! I see you have carpet (as do I) did you use caster wheels? It looks like it's resting on the floor. I want t build but, I'm concerned about the ease of sliding. Tips appreciated.
Thanks in advance.
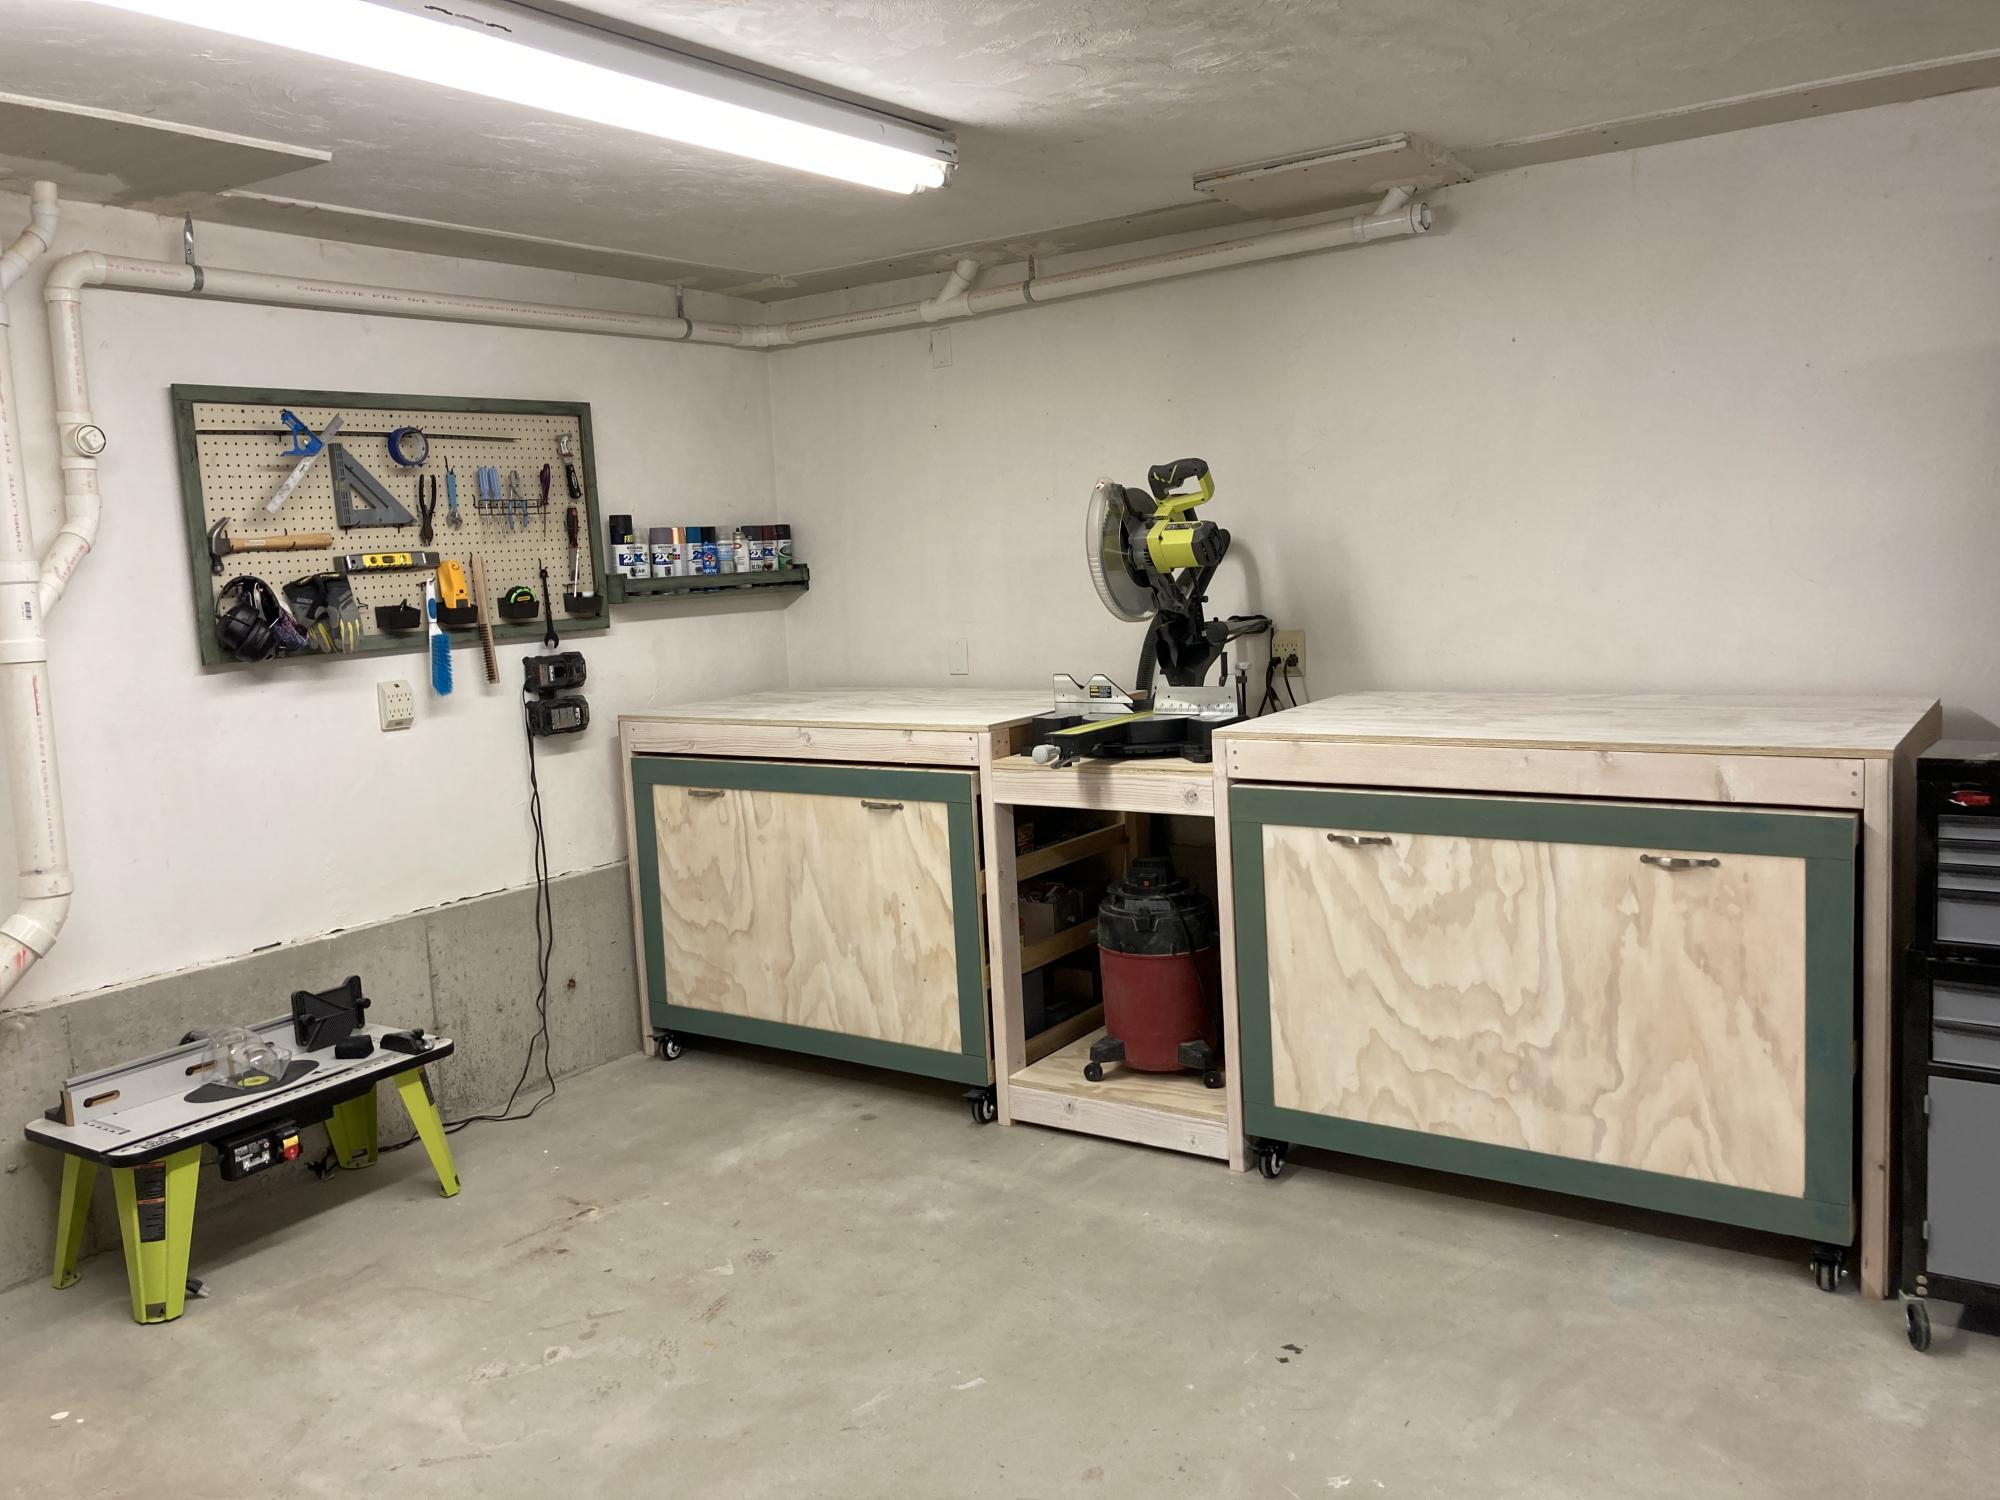
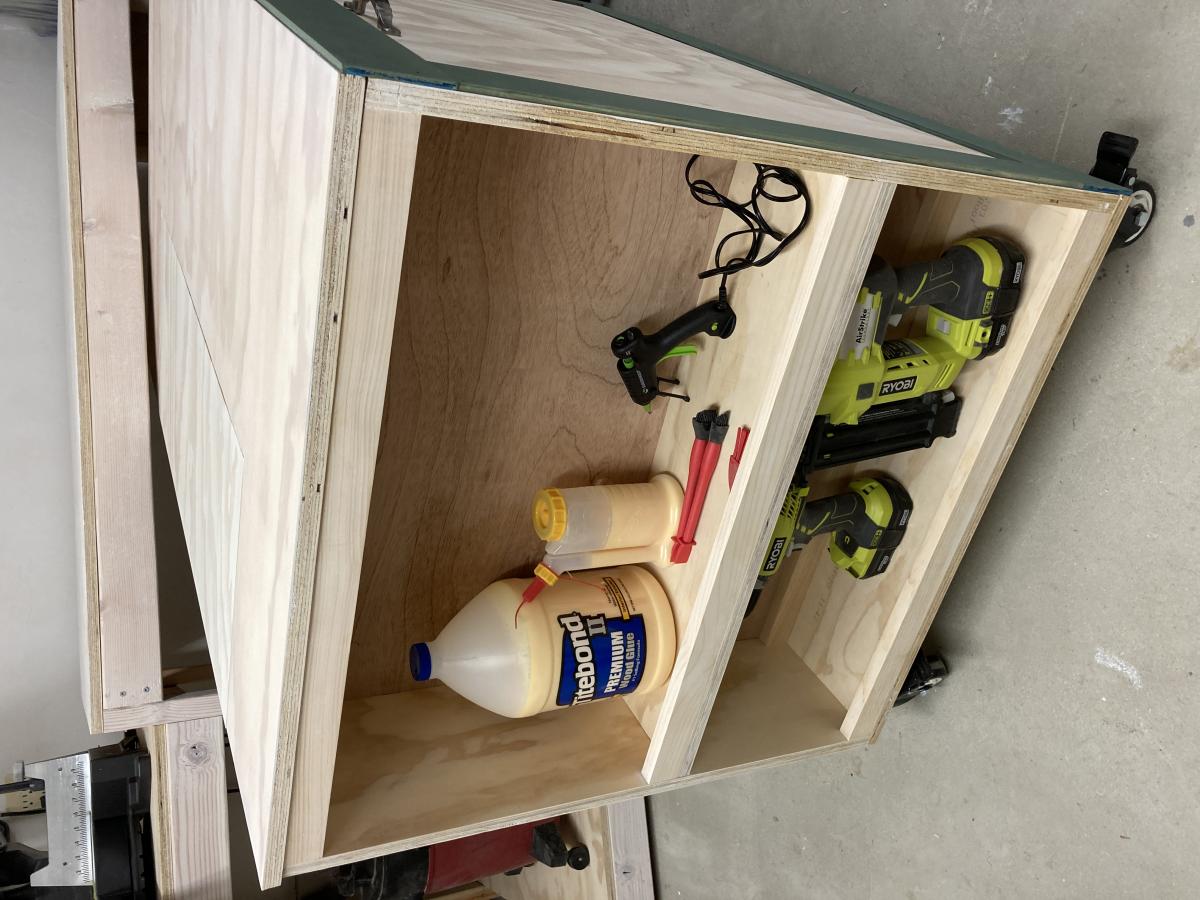
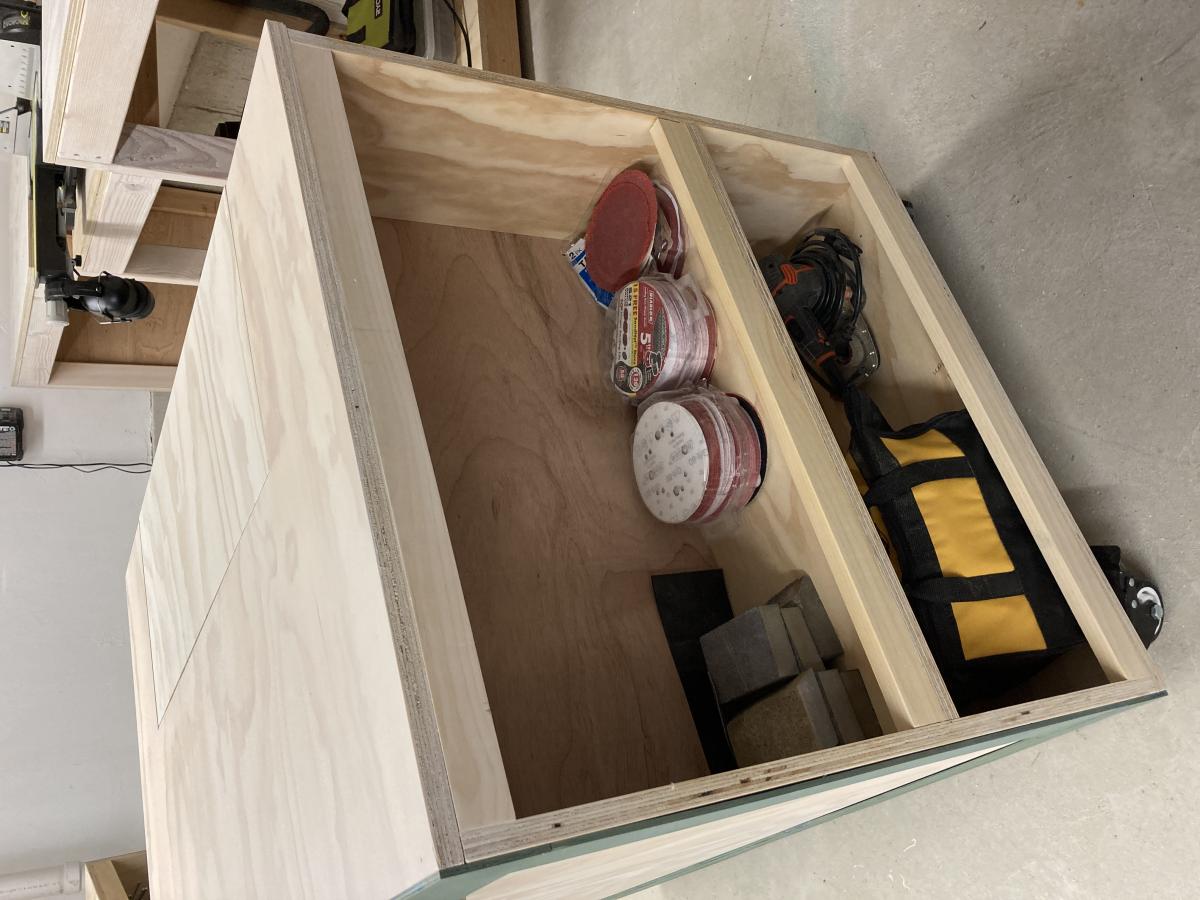
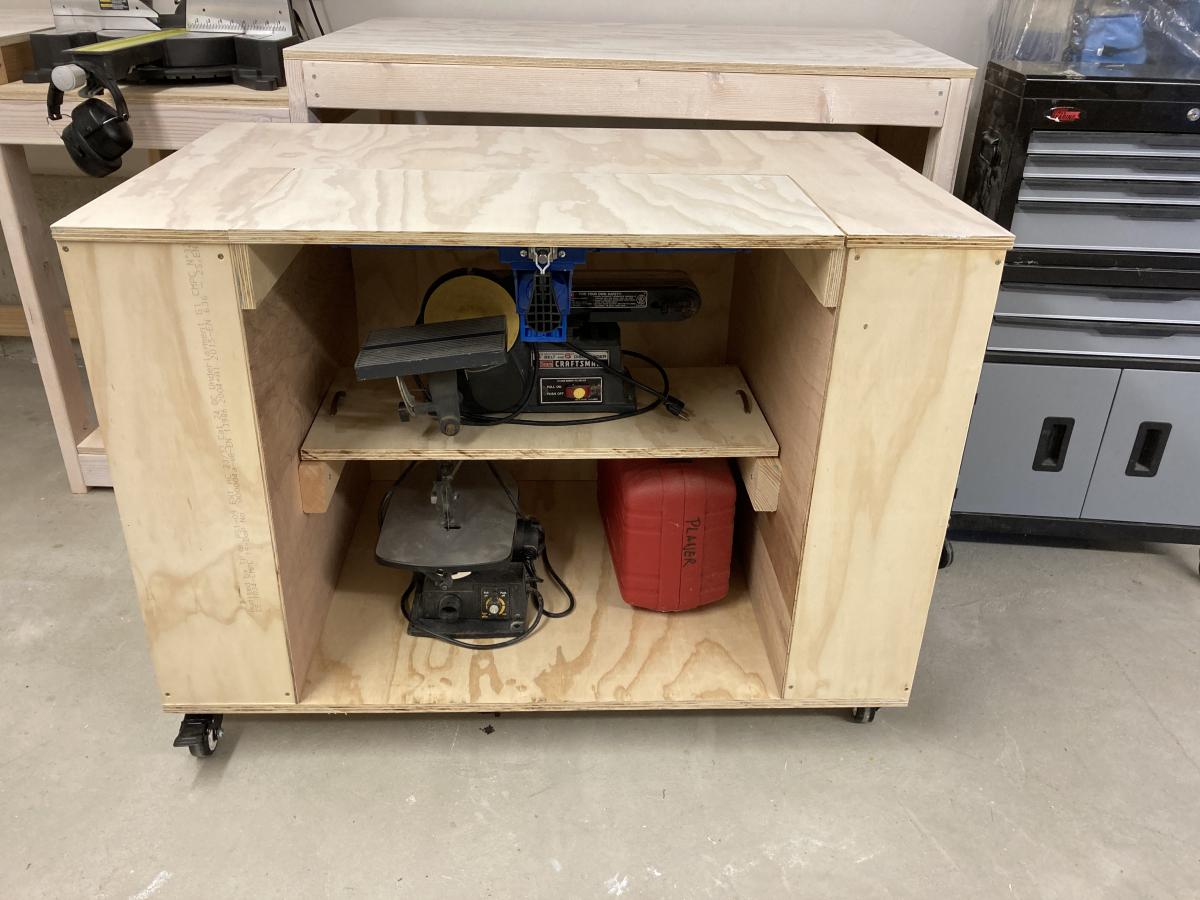
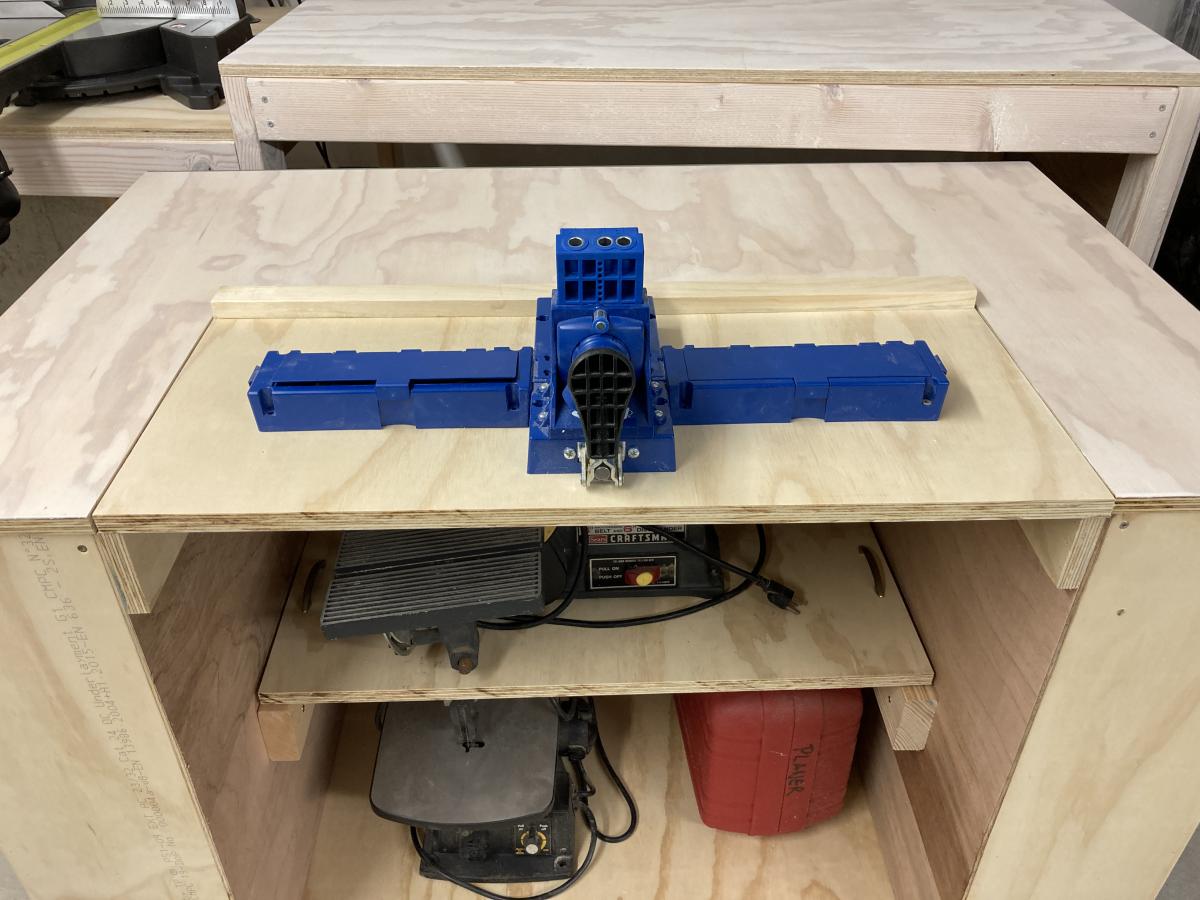
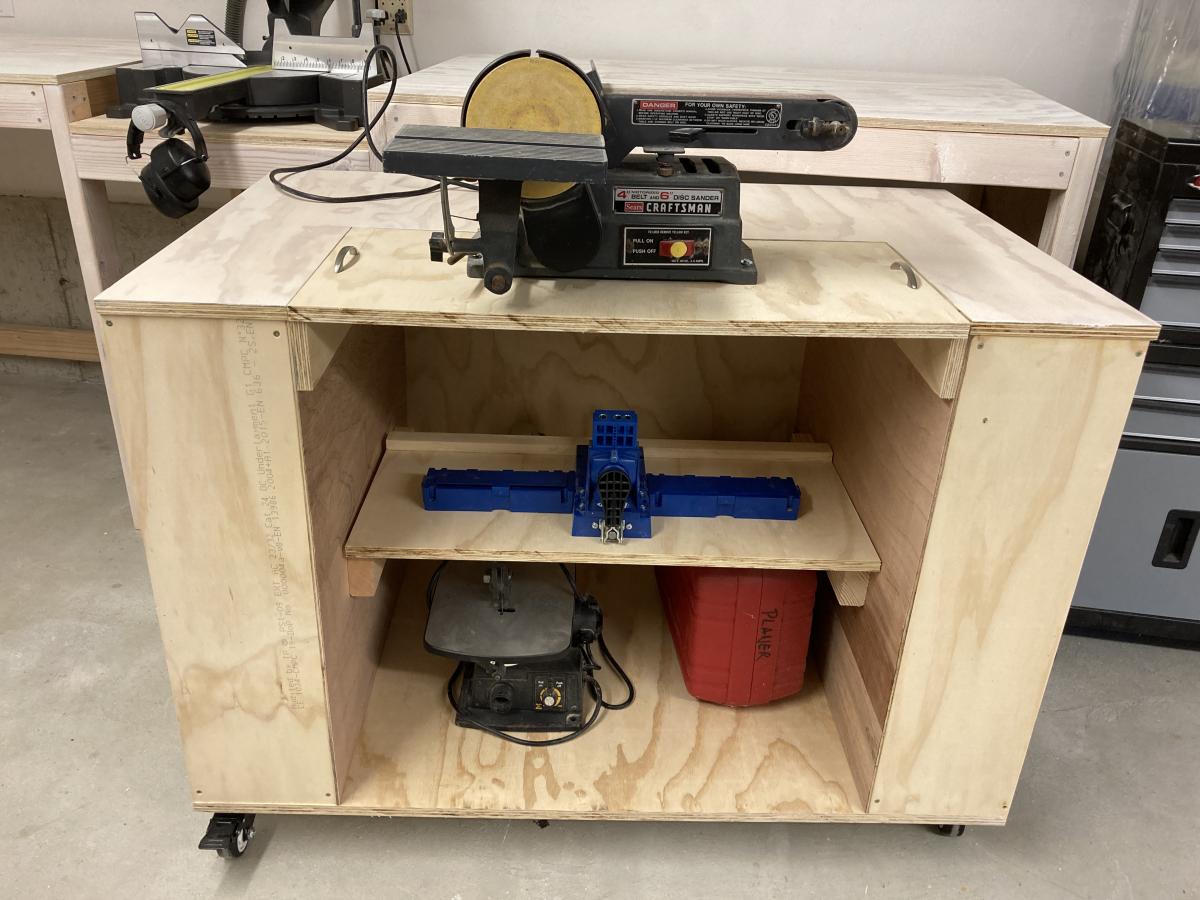
When I first saw Ana's Ultimate Work Bench I was blown away. I *had* to make this. I love how neat the garage looks when everything is put away.
I had to make a few extra cuts in order to allow room for my table saw fence, but other than that the only thing I did differently was to pretty it up using a white gel wood stain that I sealed with finishing paste. I also added trim using the leftover 1/4 inch plywood.
Thank you for being such an inspiration, Ana. I love your plans!
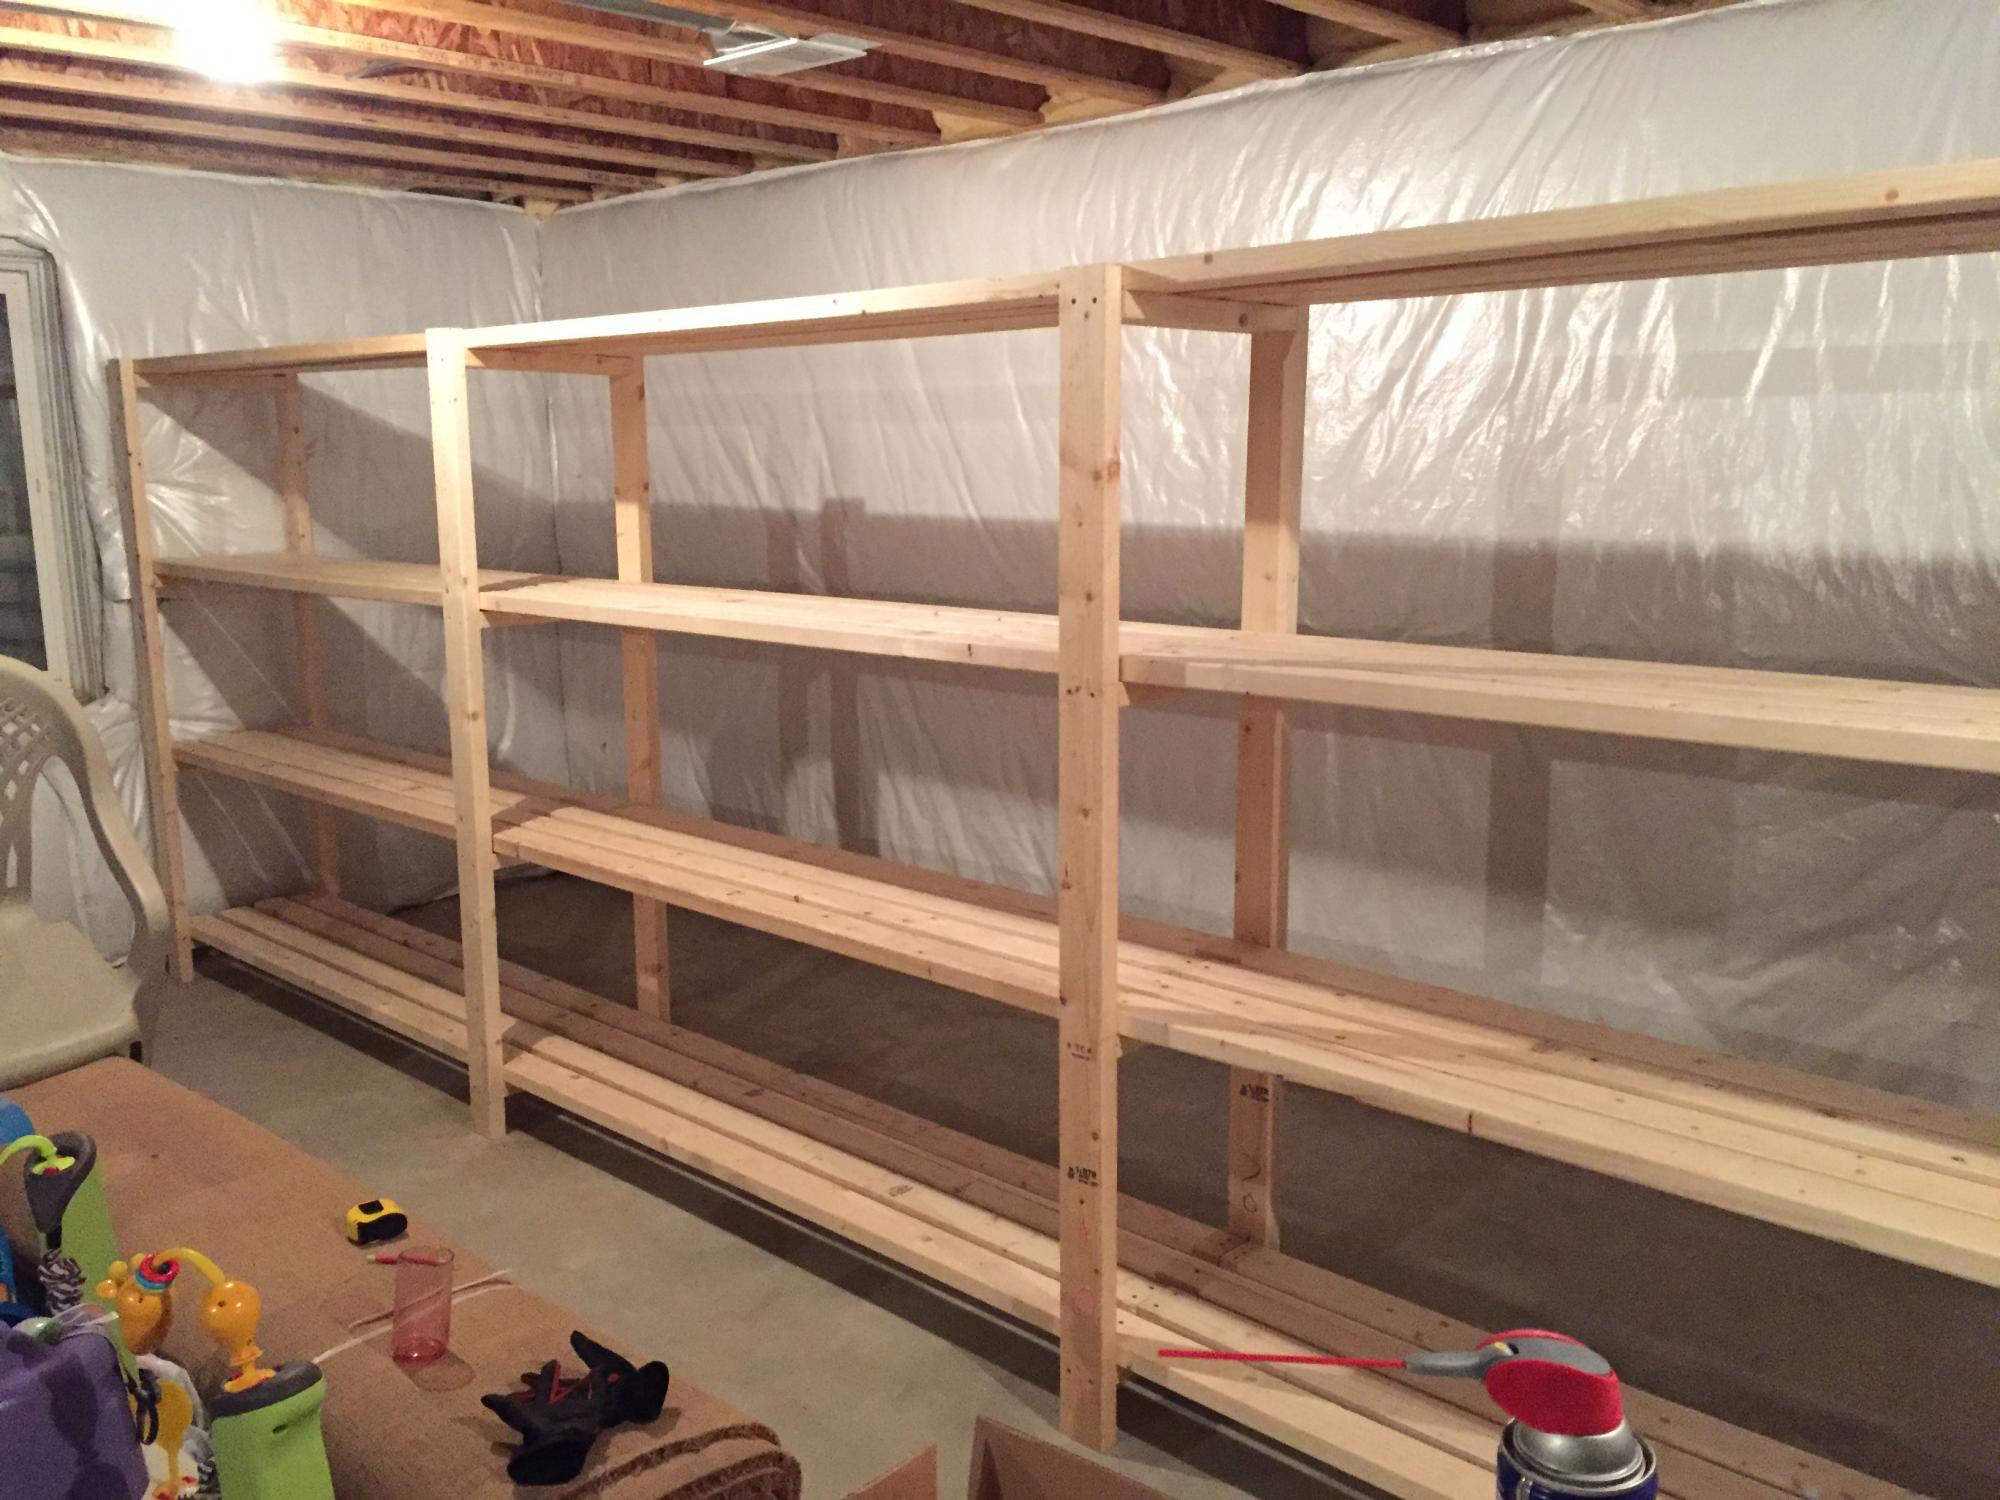
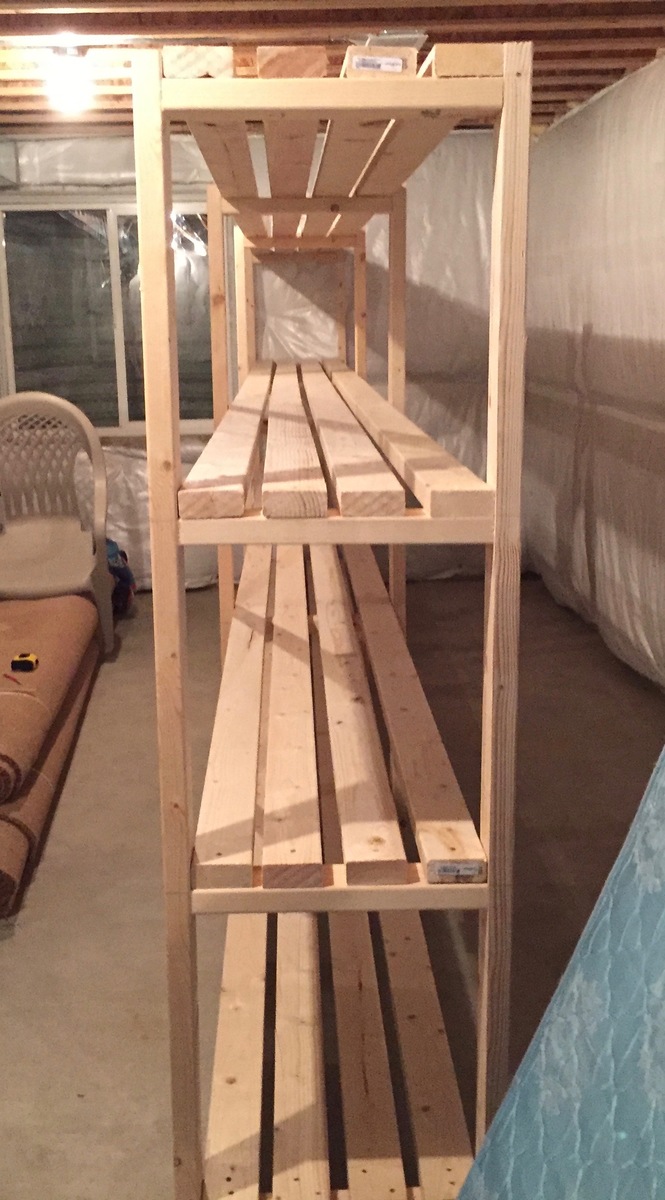
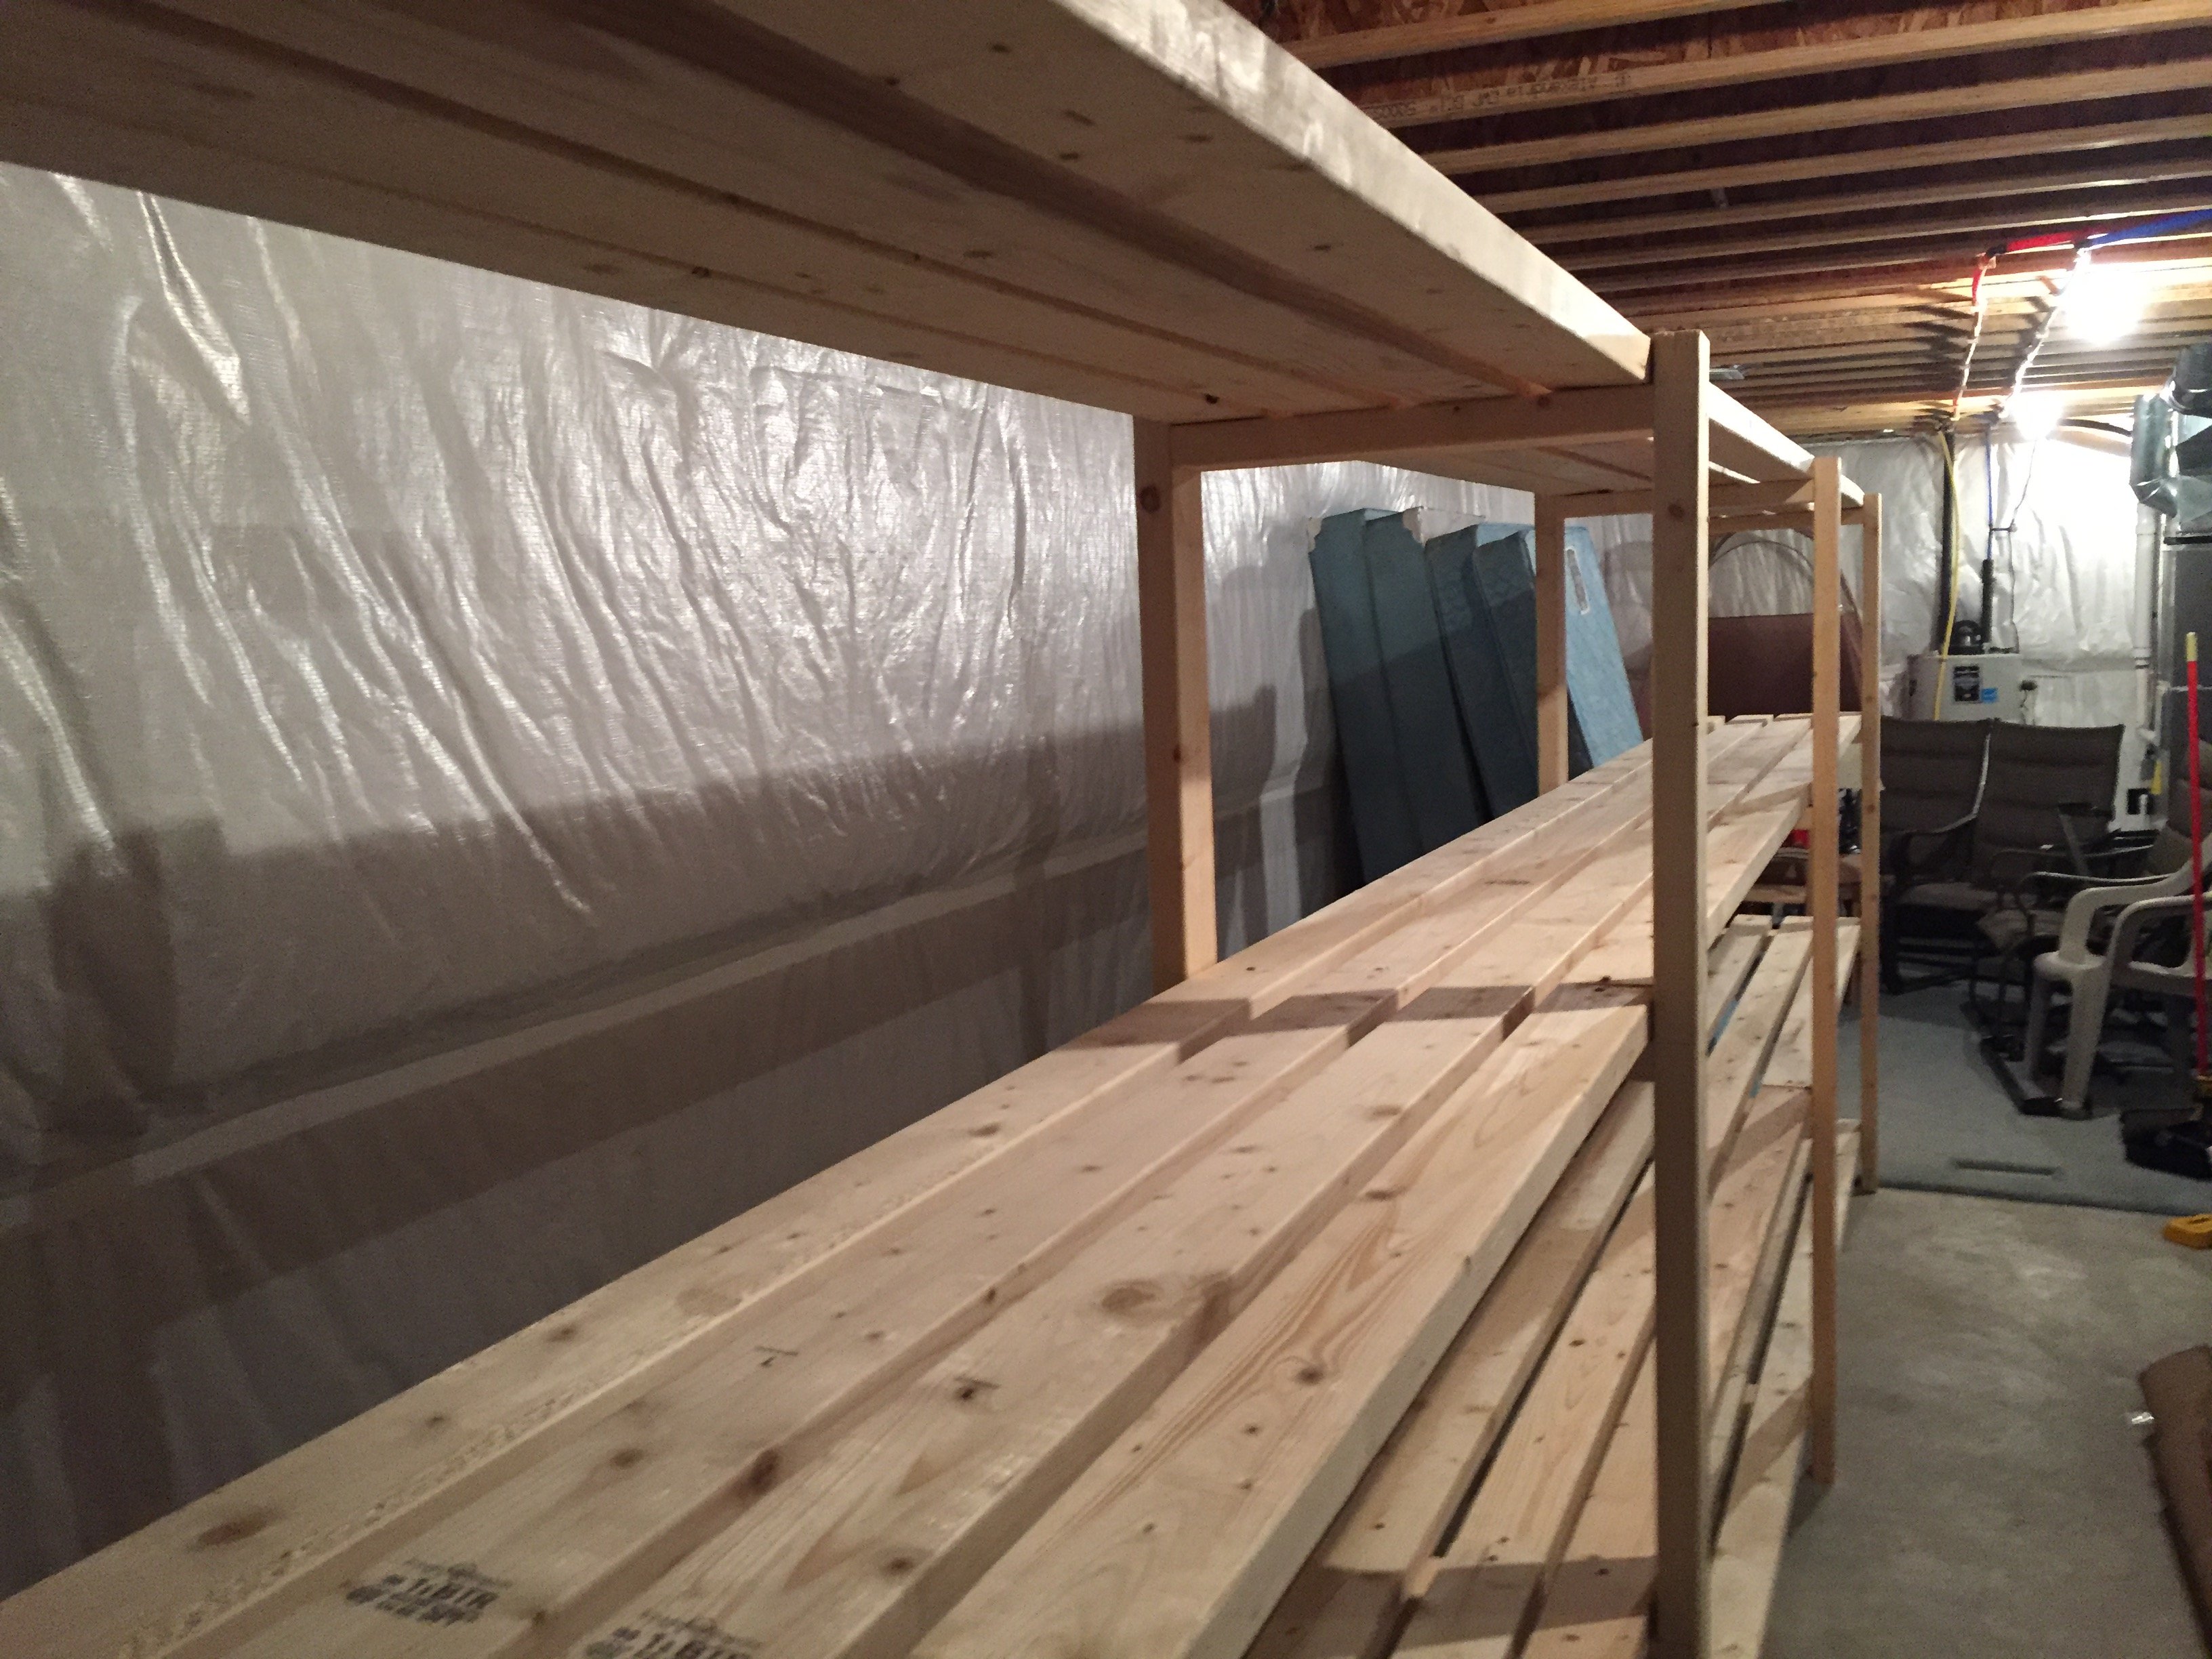
Thanks for the instructions! Here's my version. I haven't built much of anything before, but I needed it in my basement to handle kids' stuff. My version is 18 feet long. I combined a 12-foot and 6-foot 2x4 to get that length, which meant less cutting, which I had done at Lowe's (for free). I used the 6-foot 2x4s throughout the shelf to ensure it was strong (in other words, I didn't want a 12-foot "section" and a weaker 6-foot "section" added on).
I was able to get everything in my car but the ride home was slow. I also had to use my egress window to get the 12-foot boards in the basement.
Total cost for me was about $170 including a couple boxes of screws and wood glue. I could've easily spent double the cost on store-bought shelving. Thanks for the plans!
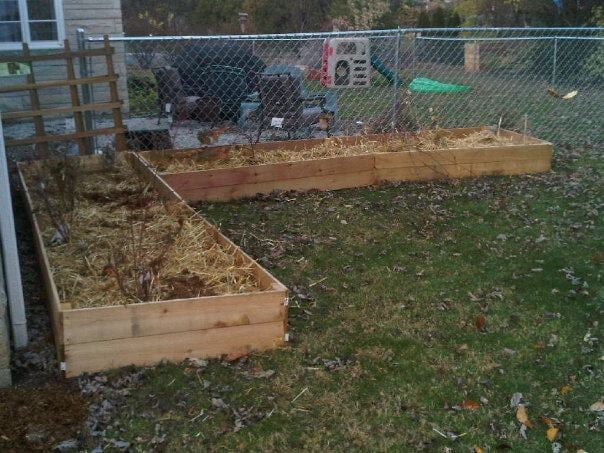
I used the same cedar fence boards, but for a large berry patch made with minimal cuts. The end boards are 1/2 the length of the long side boards. I made them 2 fence widths high - about 11 inches. Each bed is nearly 12 feet long. I joined the dogeared ends of 2 boards in the center, making a diamond cut out pattern that looked good. In order to support the tall sides, I used cedar 2x4x8 boards. Use 18-24 inch posts on each corner and at the center joint. I cut an additional board in half, affixing it to the center posts, to brace the long sides and add stability. Each box is approximately 3 feet wide, 12 feet long, and 11 inches tall. You'll need 8 fence posts for the long sides, 2 for the short sides, and 1/2 for the brace - you could use a different piece of wood for this, but the cedar fence posts are such a deal. You'll also need approximately 9 feet of cedar 2x4 for the corner posts - I bought 8 foot lengths and cut each into 2 foot posts for stability. The cost was around I'll add 2x4 posts in the spring and put a trellis behind the raspberries. If the birds start to steal my blueberries, I'll add metal or wooden corner posts that will support fruit netting. We're planting strawberries around the base of the larger fruit bushes. The 11 inch sides should keep rabbits from invading. If they are persistent, I'll add a few inches of chicken wire around the top edge. This made the equivalent square footage of 4 of Ana's original $10 beds.
Fri, 12/07/2012 - 17:57
This was similar to the construction I used for a compost bin - will post that next!
Sun, 12/09/2012 - 10:40
I'm putting together several L-shaped raised beds out of 6x6s with the internal walls being 2x6s. This gives me encouragement. I really like the look of this! Thanks.
Sun, 12/09/2012 - 10:42
I'm putting together several L-shaped raised beds out of 6x6s with the internal walls being 2x6s. This gives me encouragement. I really like the look of this! Thanks.
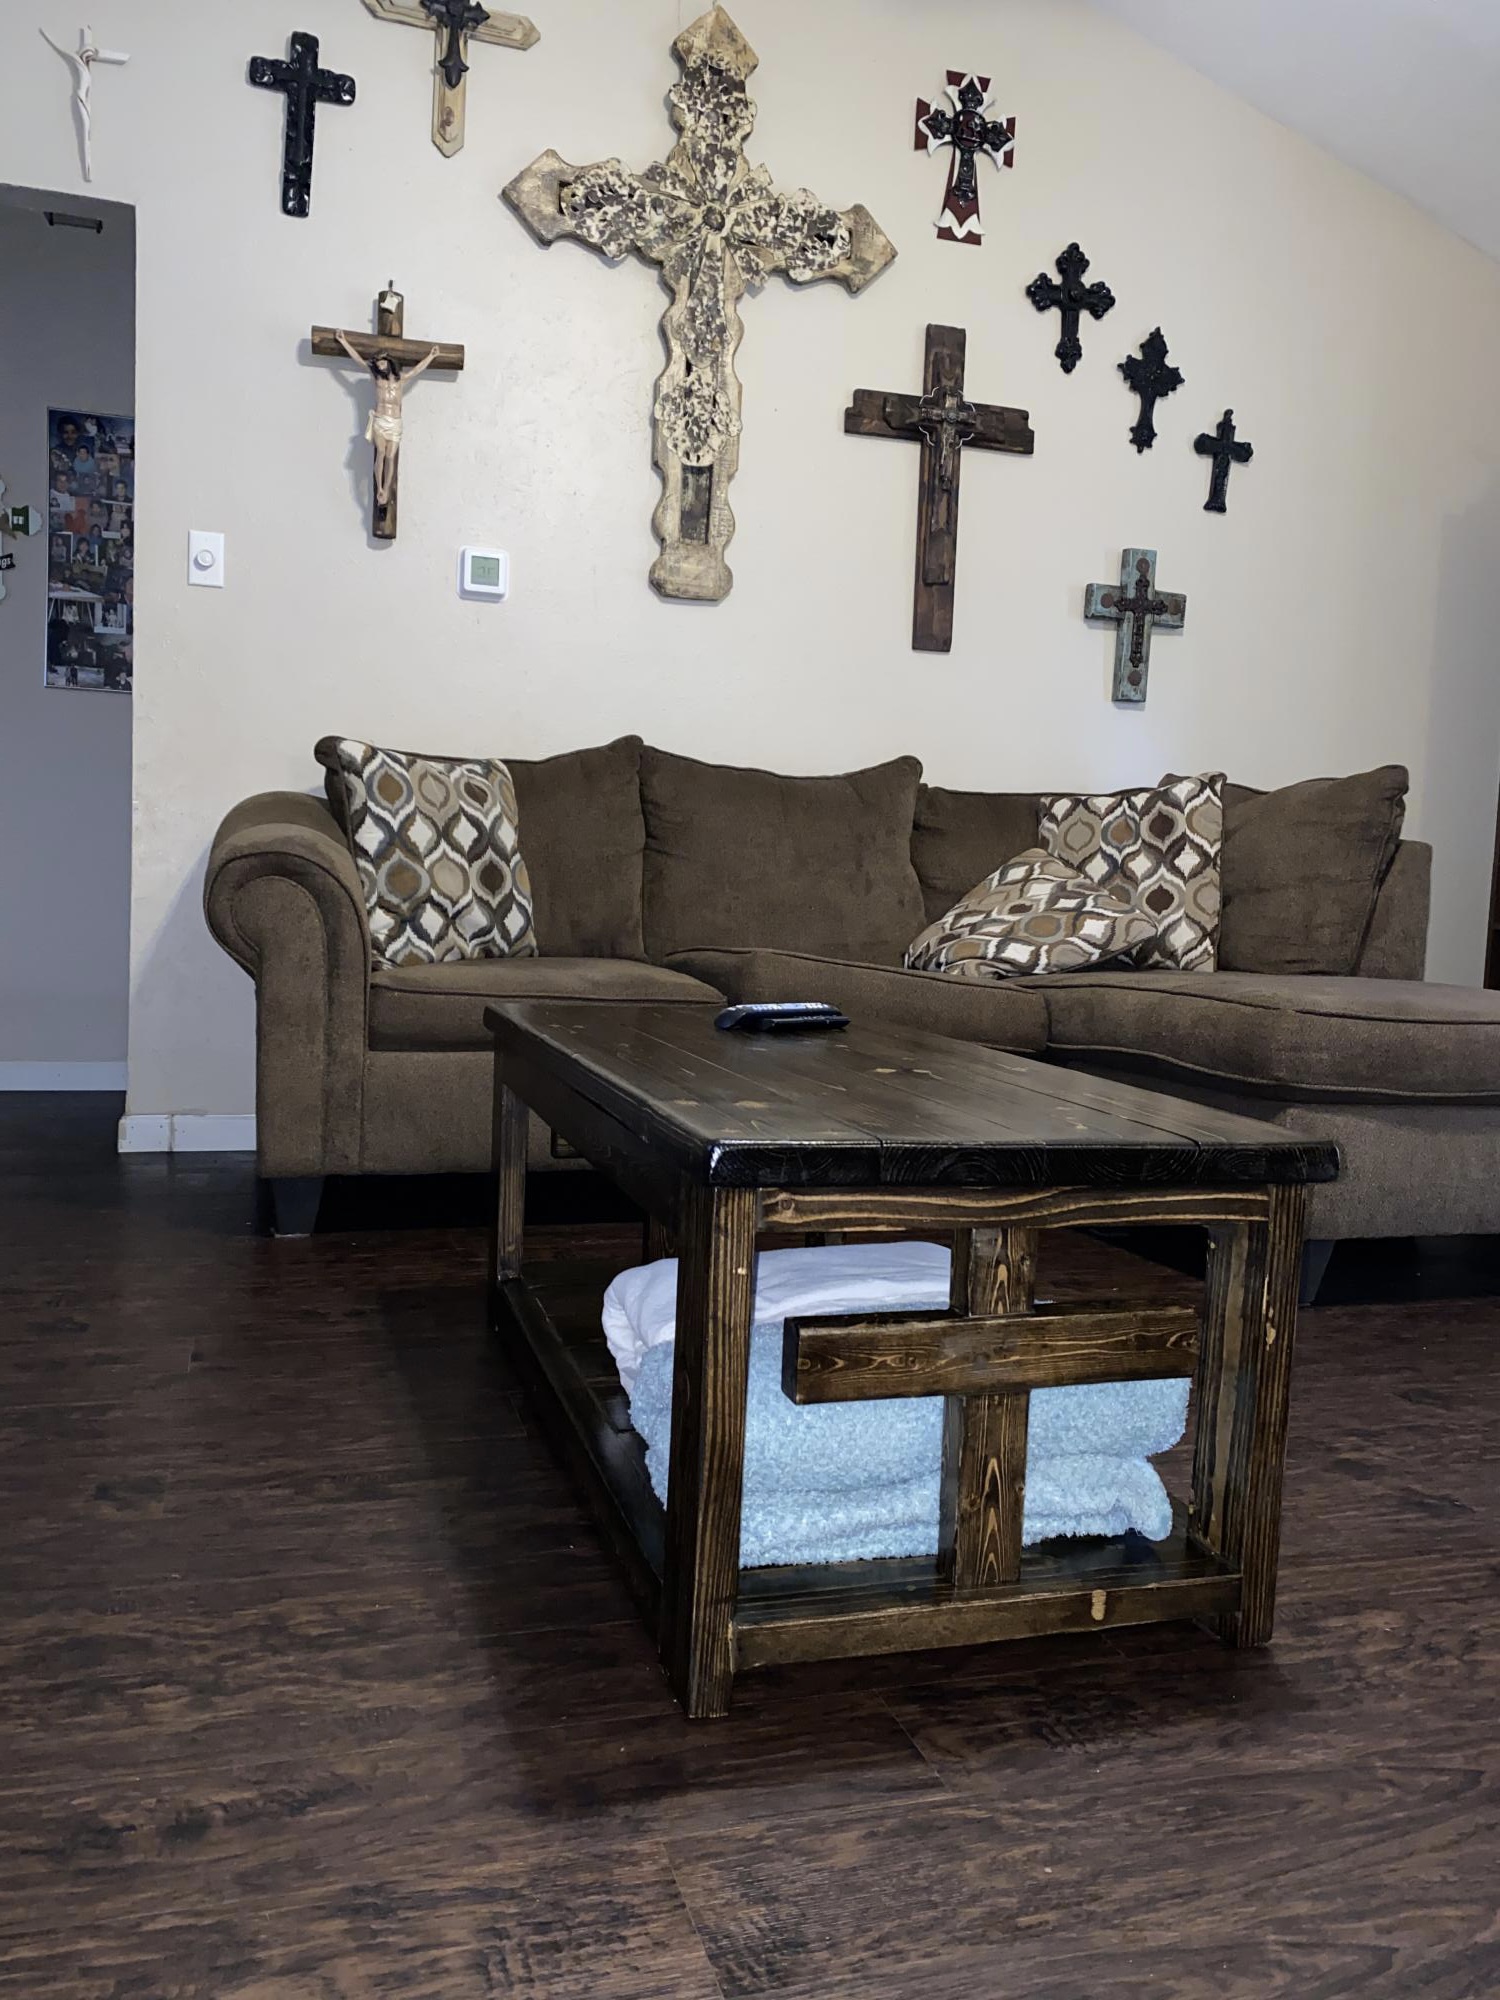
My second ever project my wife said I could do followed your plans are use pocket hose after asking about using them and you sent me a link on how to use it. I did not use the X instead my wife wanted me to Make a cross so it would go with the crosses in our living room thanks for the plans.
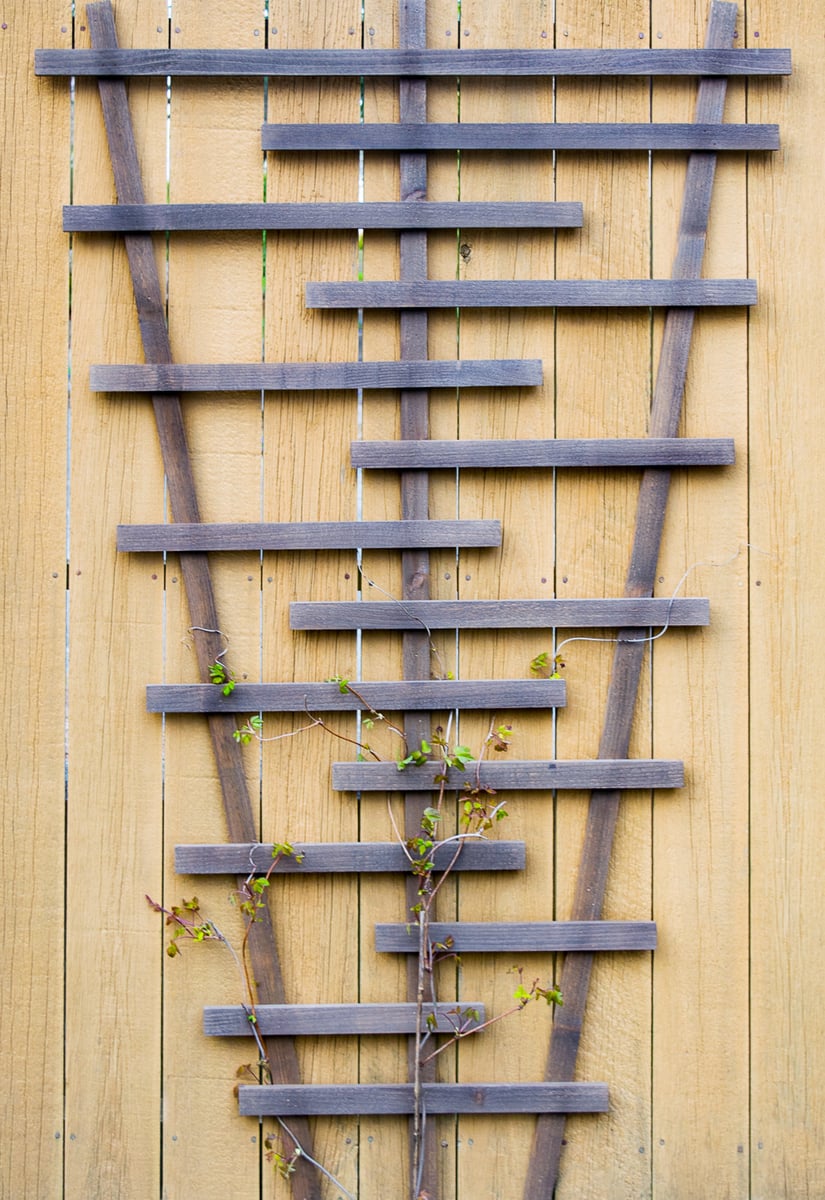
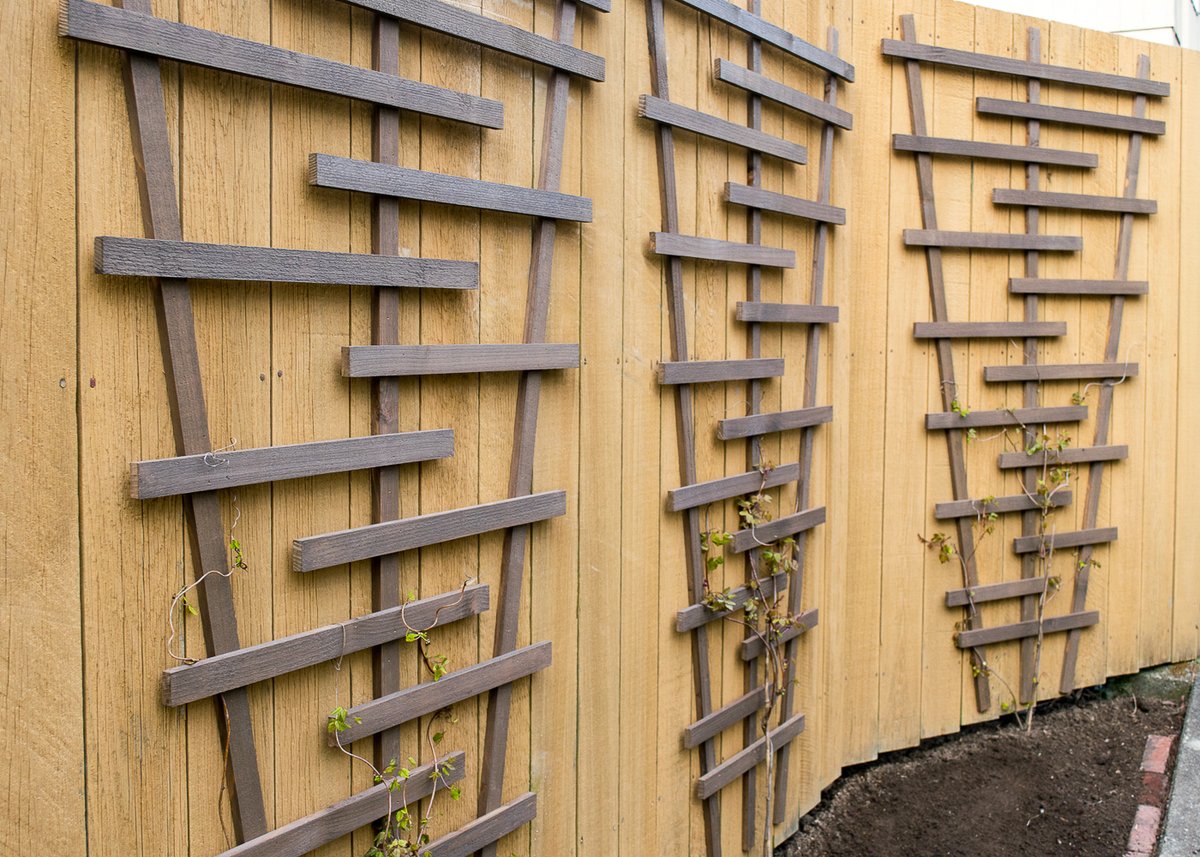
I made this garden trellis with cheap 6' cedar fence pickets ripped down to 1 1/2" strips. Get the free plans and tutorial at The Handyman's Daughter!