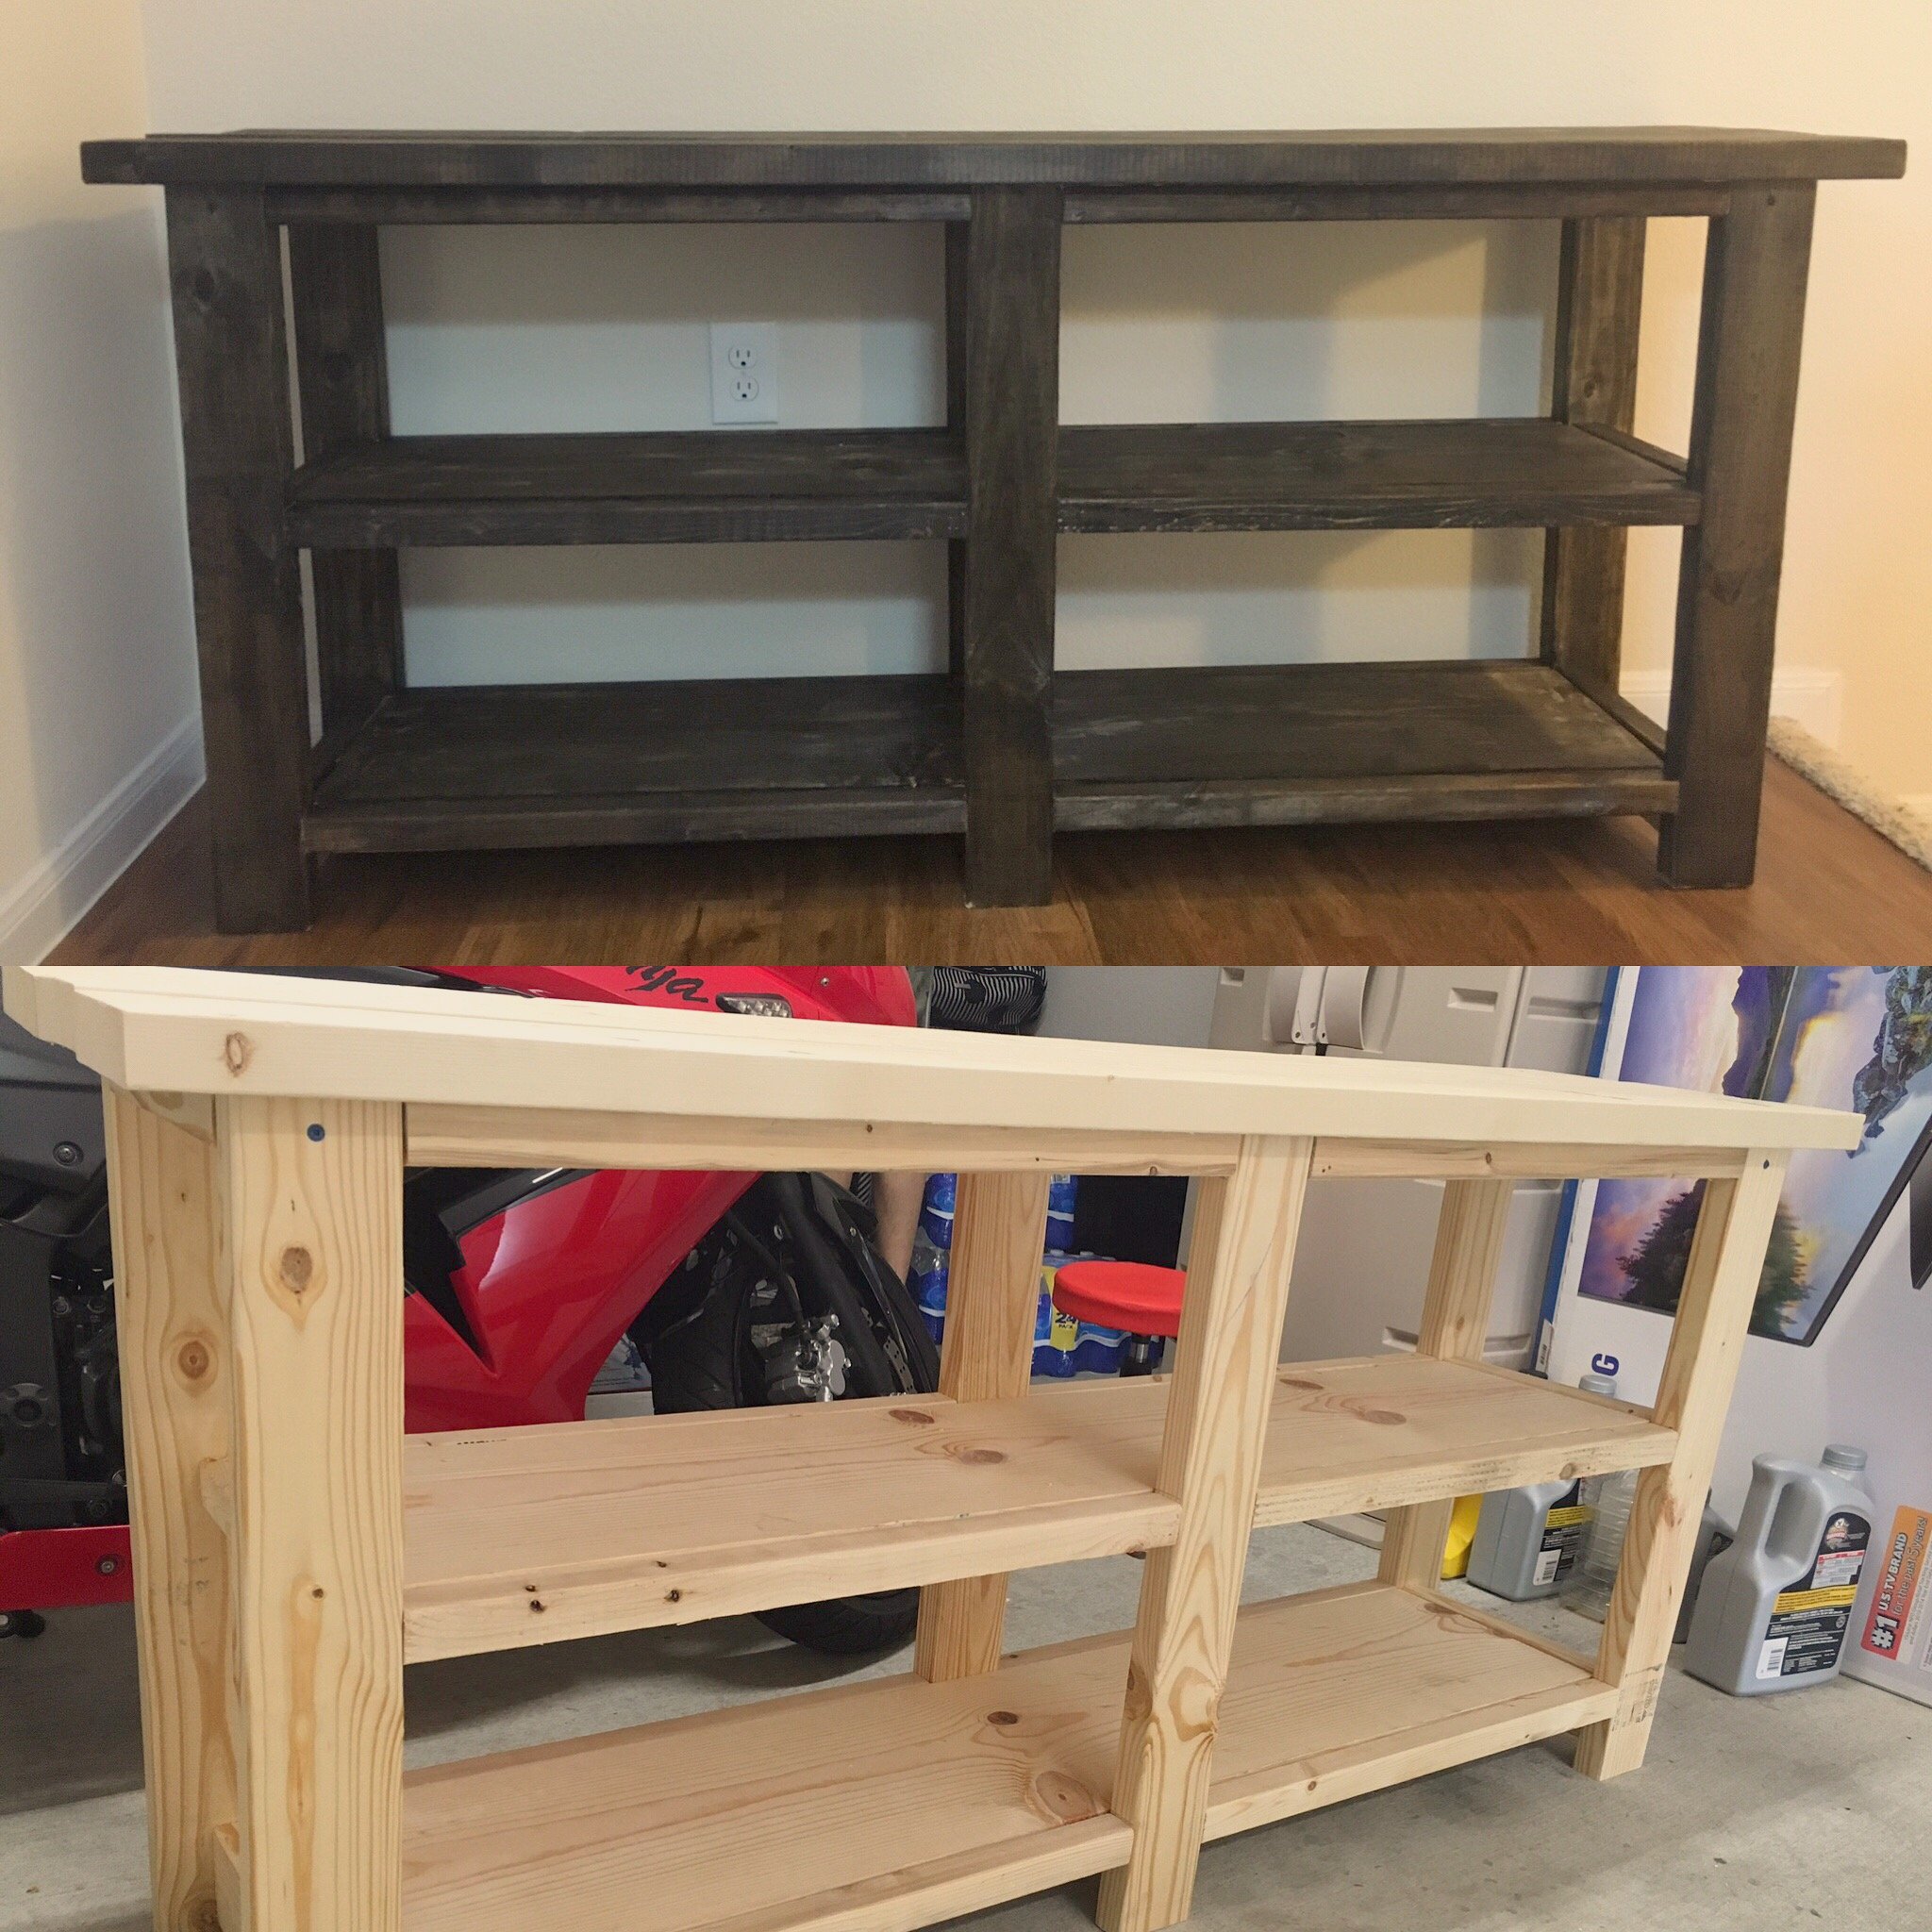
My first project
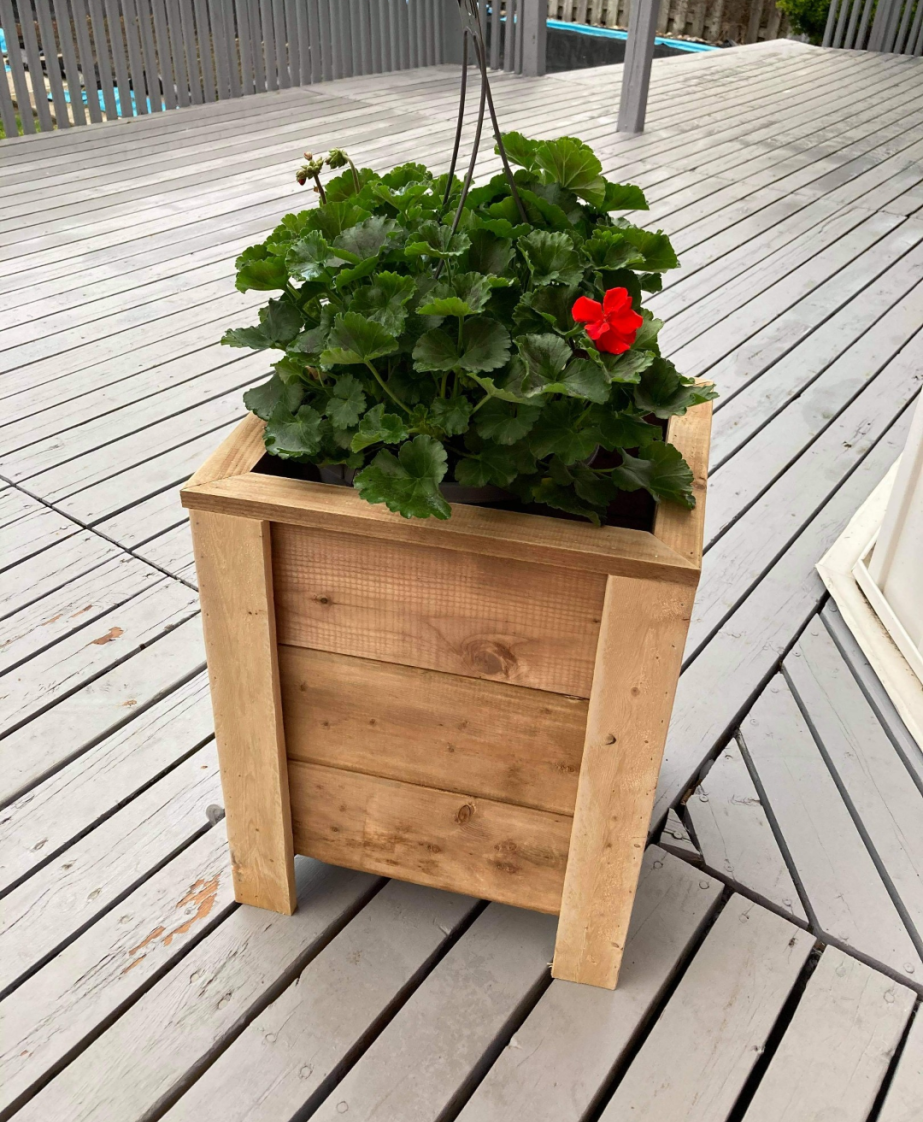
Loved how these plans were so easy to follow and certainly appreciate the accompanying video.
Built from Plan(s)
Loved how these plans were so easy to follow and certainly appreciate the accompanying video.
This was a great last minute Christmas gift. Took me a little over two hours. Made completely out if pallet wood.

Sun, 12/26/2021 - 13:19
It looks great, I'm sure the recipient loved it! Thanks for sharing:)

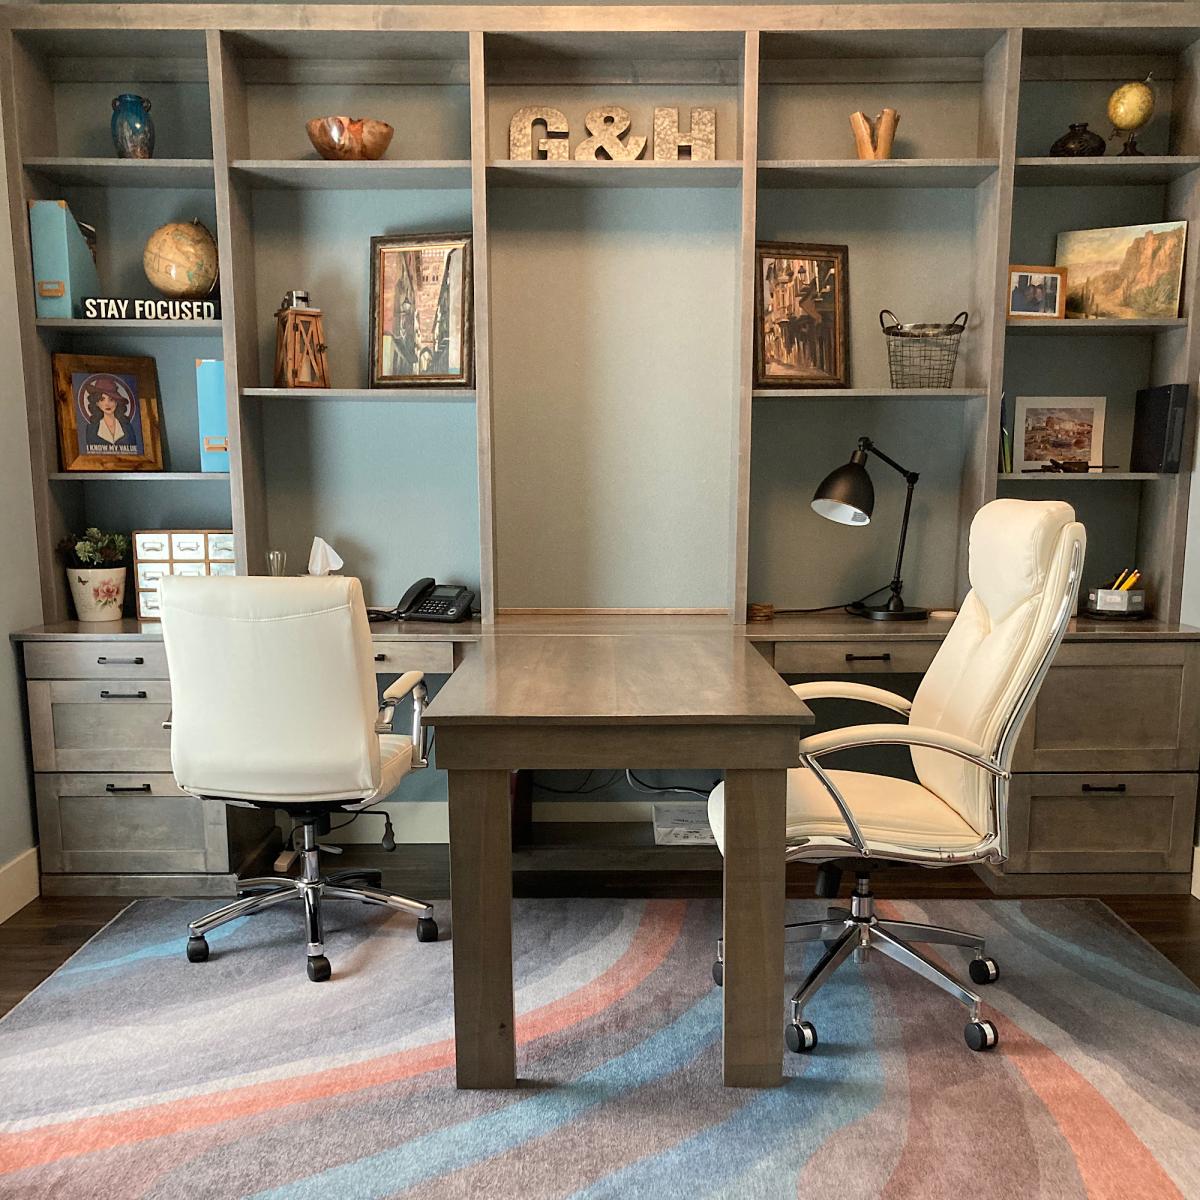
Thank you Ana for so many amazing plans and shelf help that helped me get this monster built! Now my husband has a nice office where he can work from home. I was so impressed with how easy it was to make the plans in shelf help and how quickly it all arrived. (I can’t link the drawer slide trick plans, but they were key and I based the middle table off of the foldable farmhouse idea)
Thu, 01/27/2022 - 15:52
WOW, WOW, WOW!!! This is gorgeous, thank you so much for sharing- posting to Facebook now!

My husband and I needed more room and storage in our small one bedroom apartment. In order to get both we needed to get rid of our big hutch, desk and tv stand. So when I saw these cubes shelves I thought they would be perfect, then I saw TRACYSMITH's brag post a decided that was perfect! I painted it and did some organizing and it was probably the best decision we have ever made!
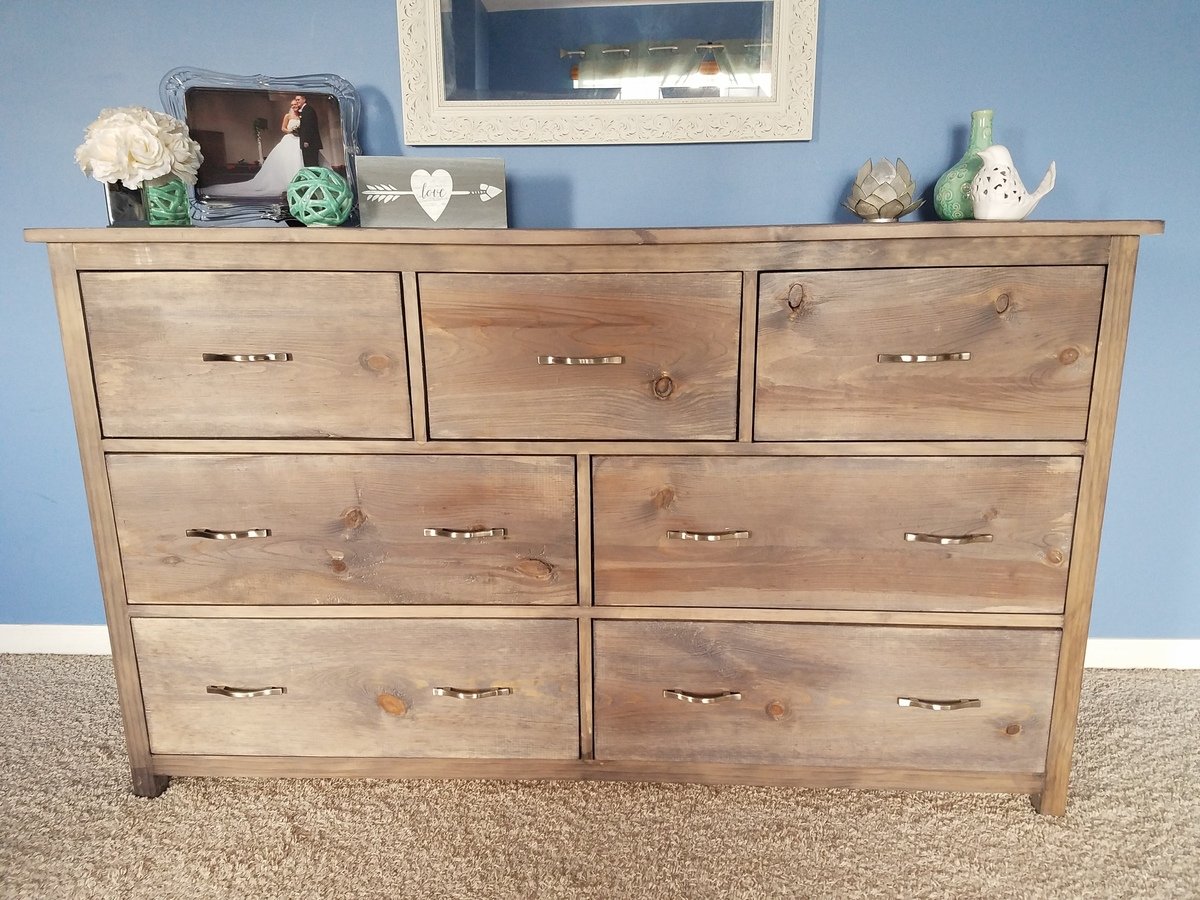
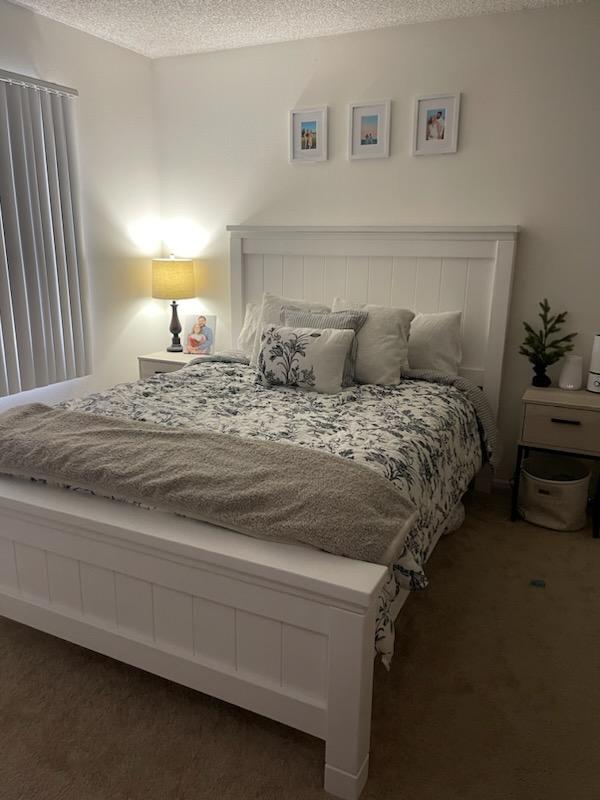
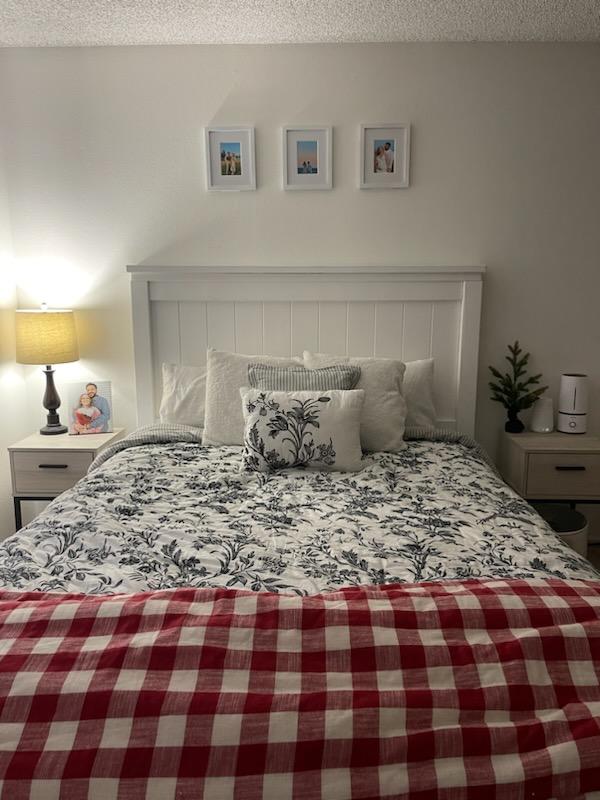
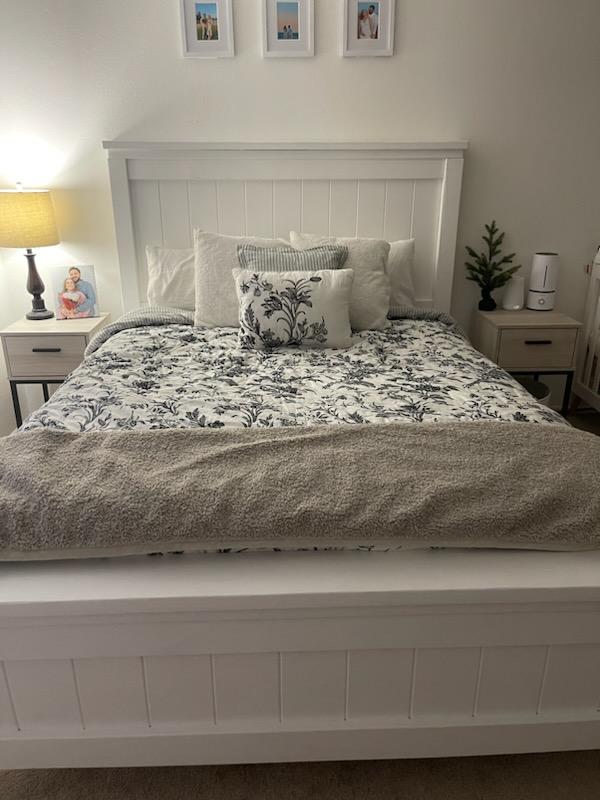
First time using drawer slides, and what a learning curve it was! The color is Varathane Weathered Wood Accelerator. This piece is huge and heavy! Absolutely love it and rebuilding other bedroom pieces to match this color. I also built a matching dresser which is taller and much more narrow. It can be found here: http://www.ana-white.com/2018/08/DIY_furniture/tall-bedroom-dresser
Mon, 03/01/2021 - 12:41
Are there plans for this dress, or the tall matching one?
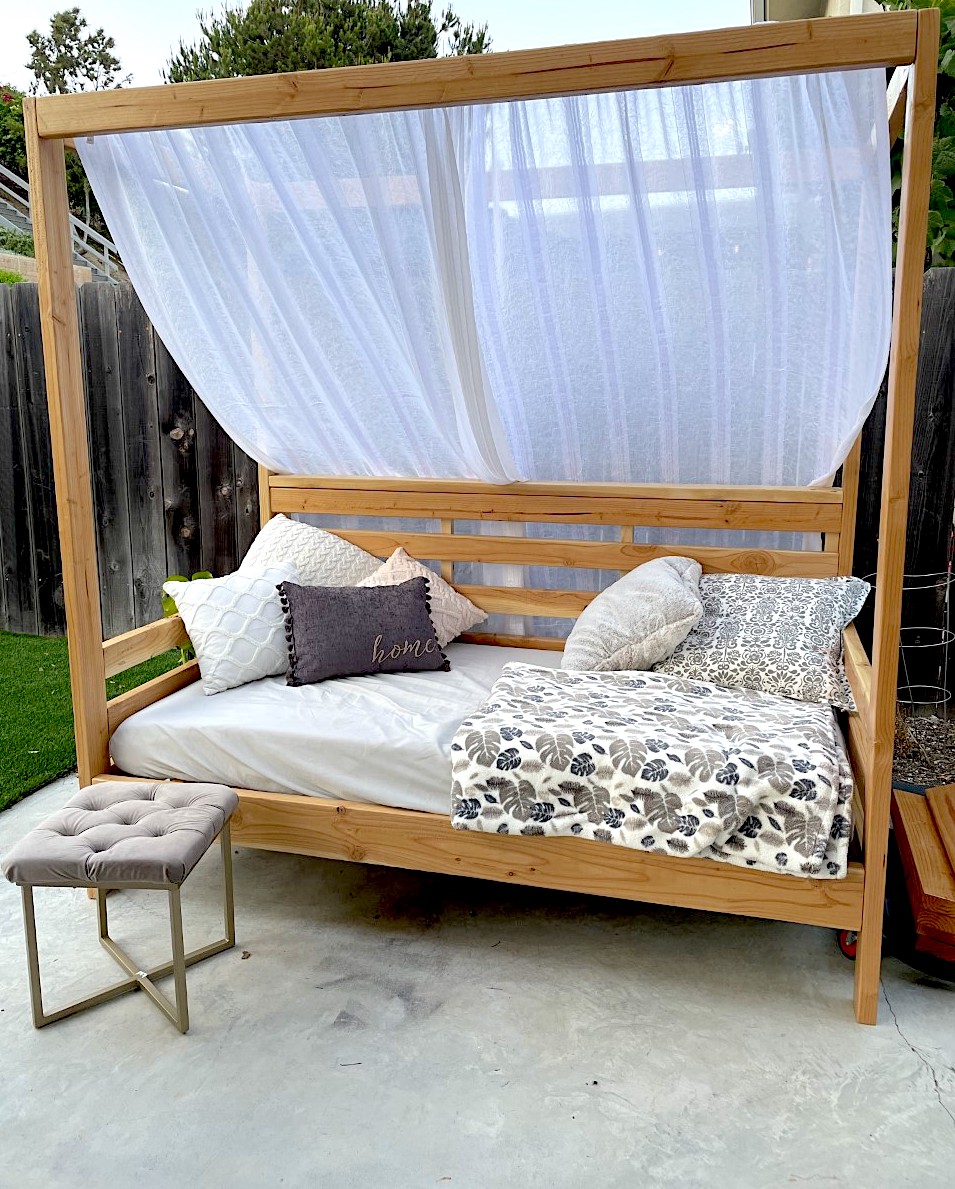
What a great project!! My private outdoor space is amazing. Thanks Ana!!
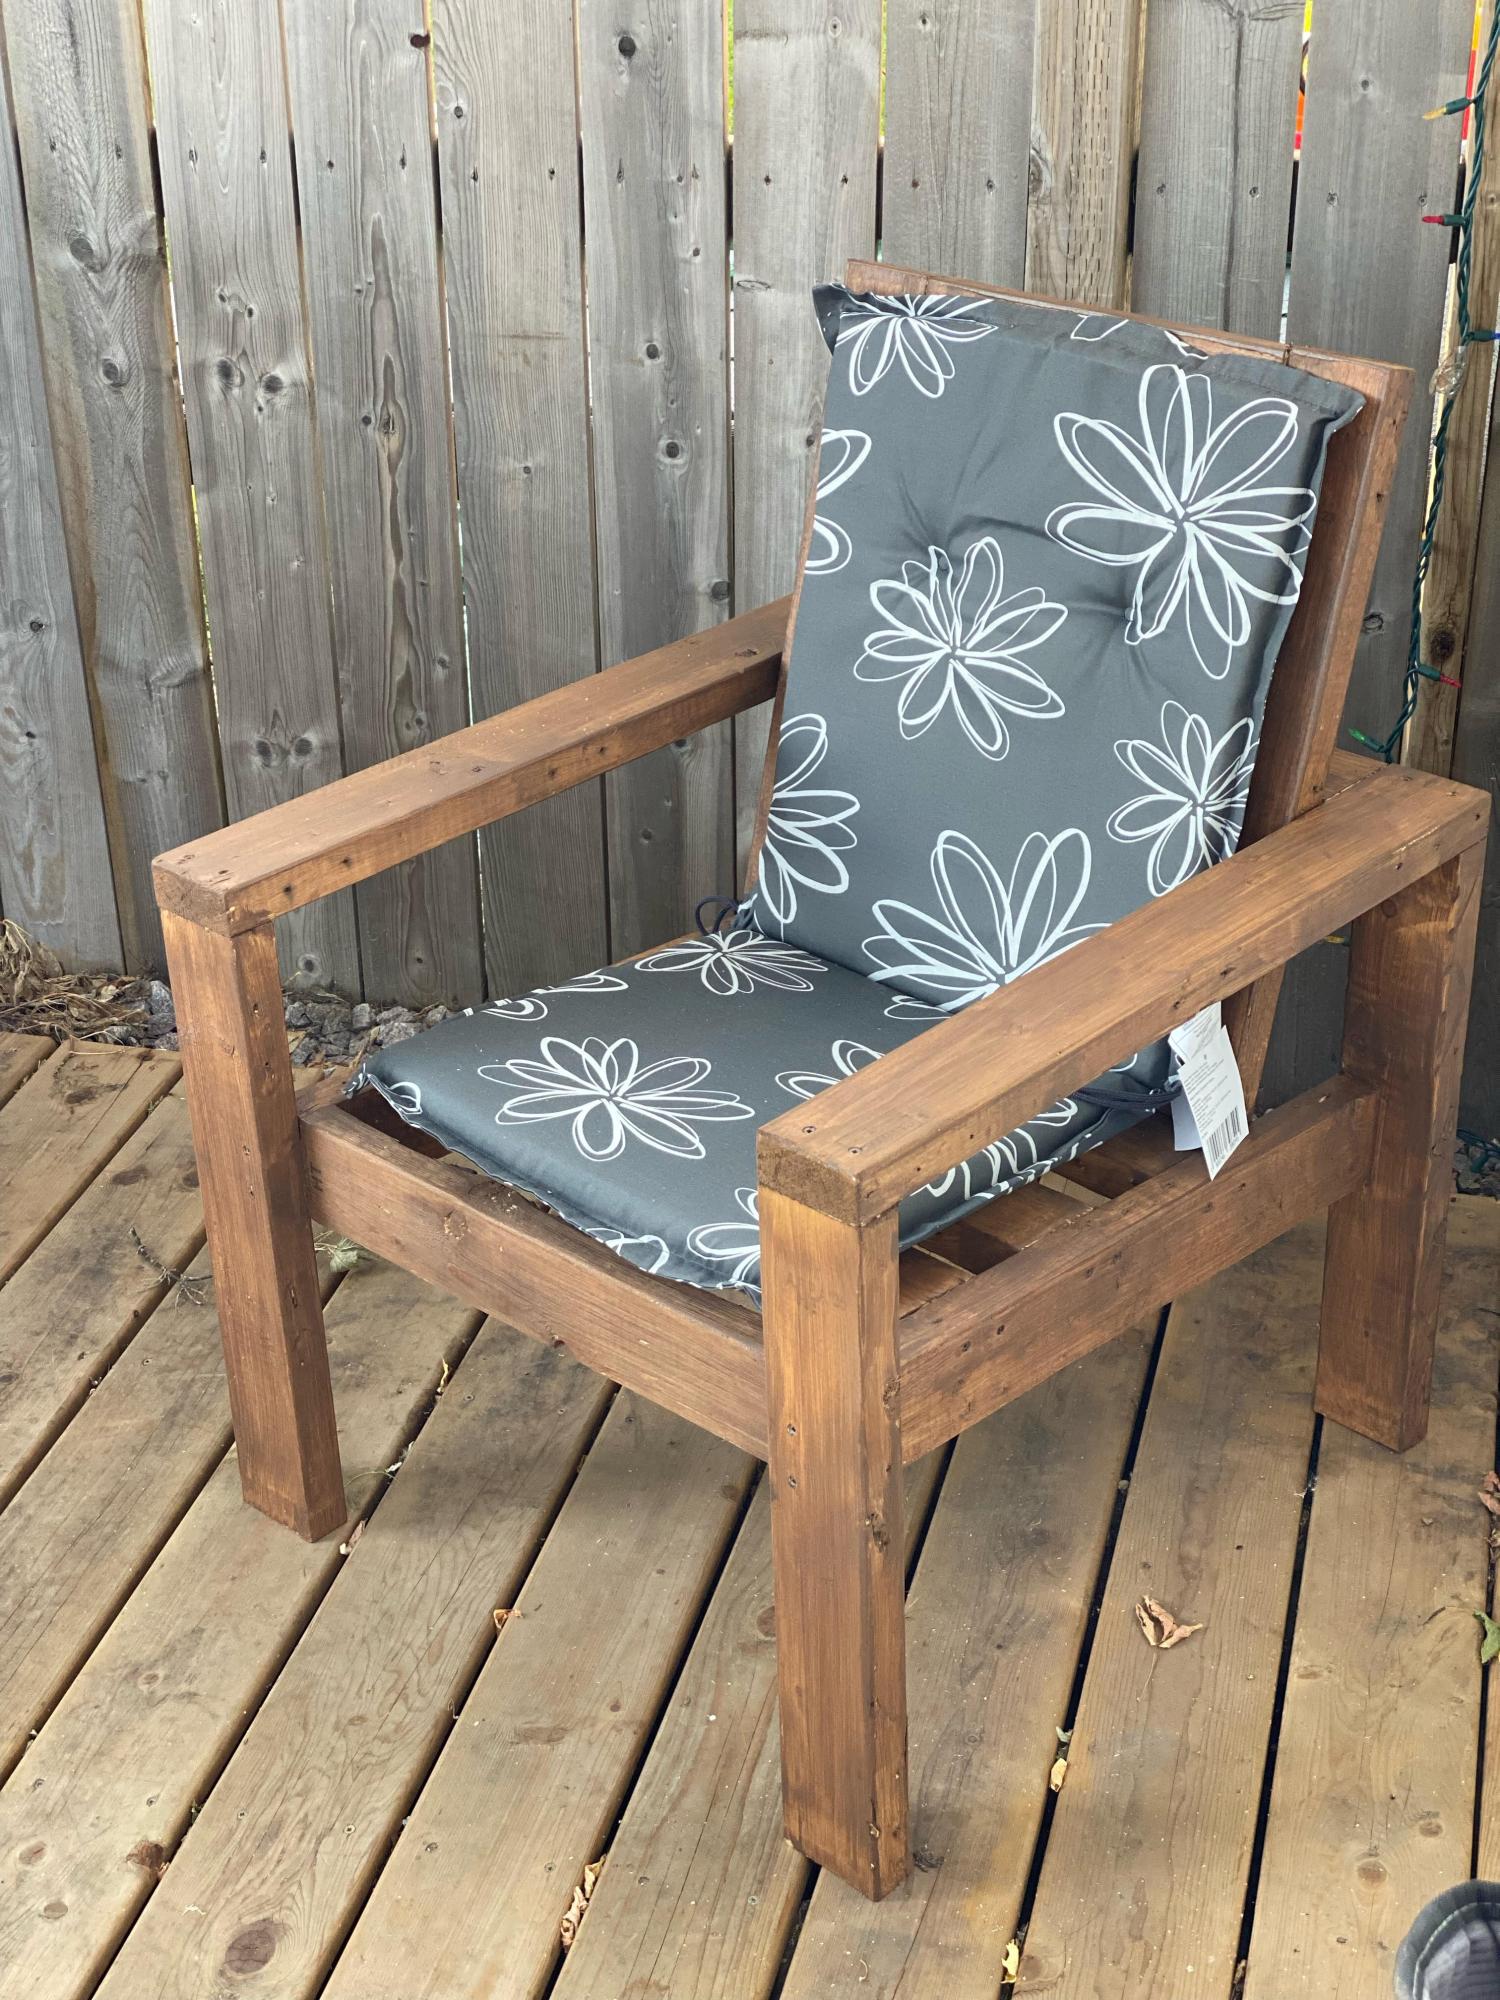
Essential outdoor chair, by Al.
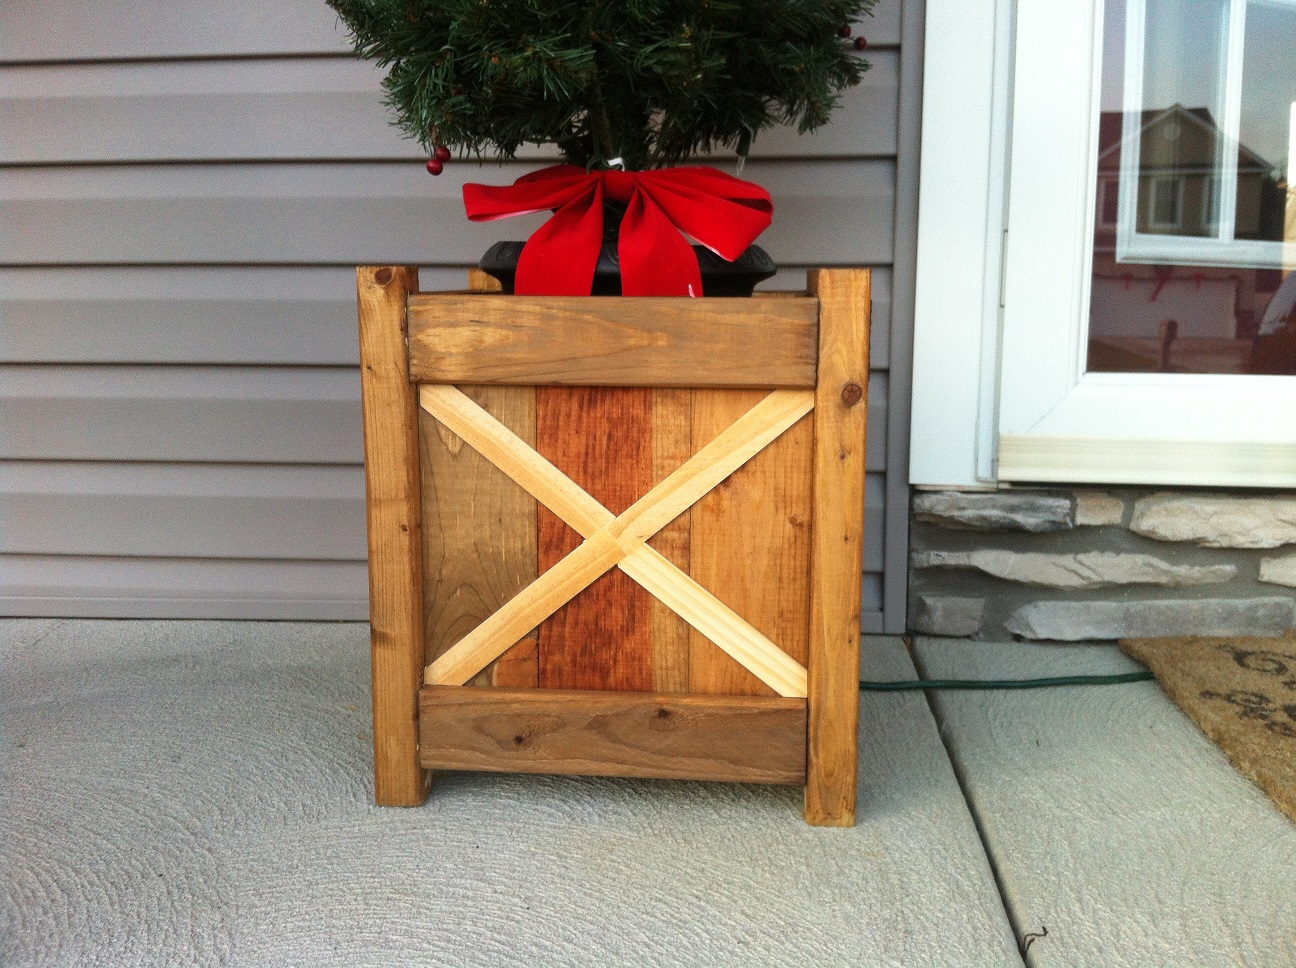
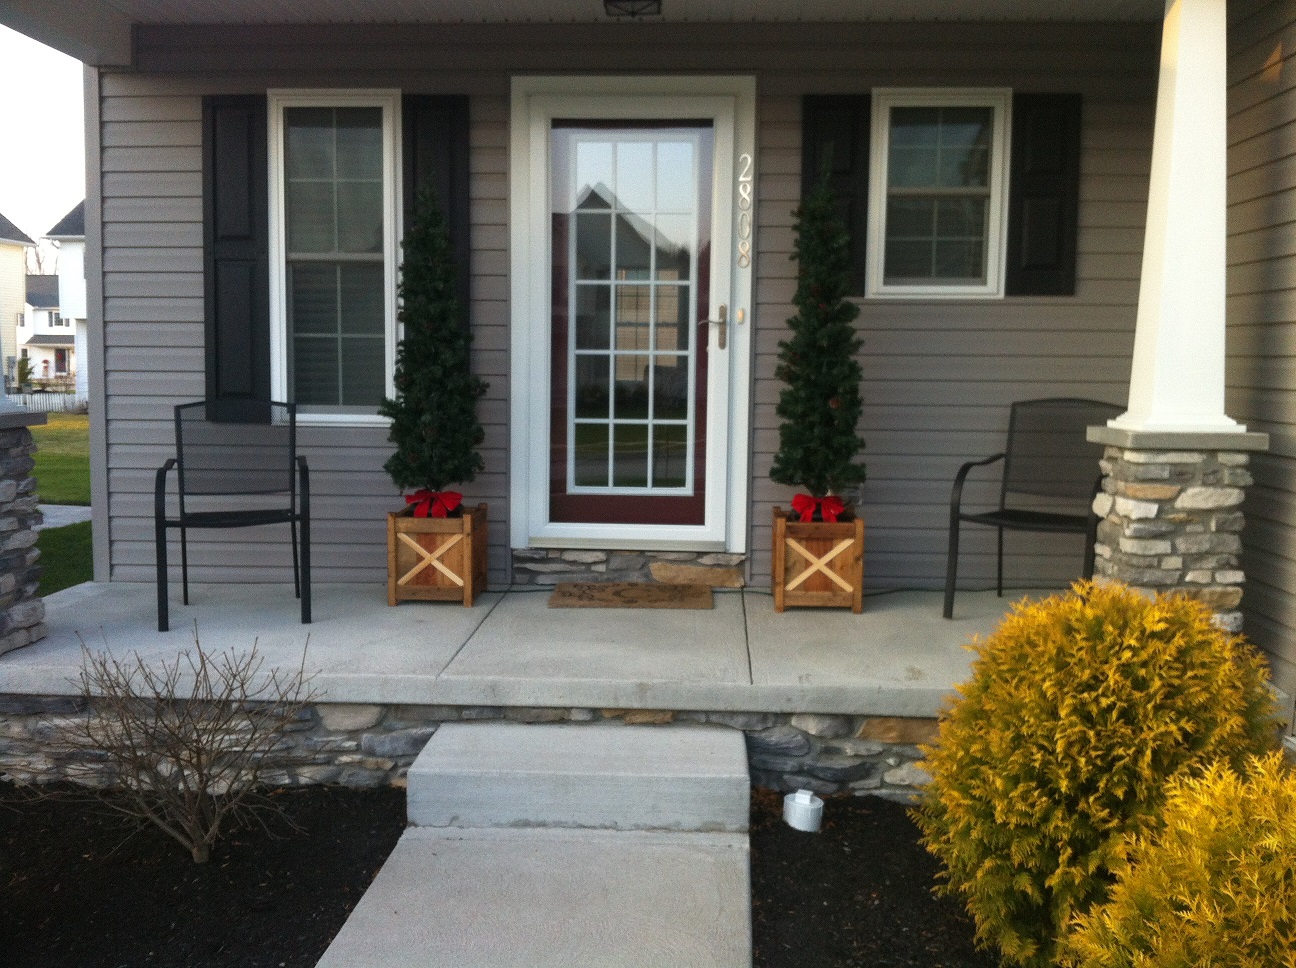
I built these out of necessity to keep my tipsy Christmas decorations from blowing over. The last couple years I spent a lot of time picking these trees up off the ground. I like how they turned out and were relatively easy to build.
I was excited I got to use my Kreg Jig for the first time, which looked more difficult to use than it actually was. Although these are cedar planters I used all pine from big box orange. Some leftover from the farmhouse queen bed I built and the rest I purchased.
The finish didn't turn out as grey as I would have hoped using the steel wool and vinegar, but I still like the aged look. I added the "x" detail in the front afterward and instead of staining my wife thought it looked better natural. Either way I would have been happy. I will be able to use these year round in some capacity.
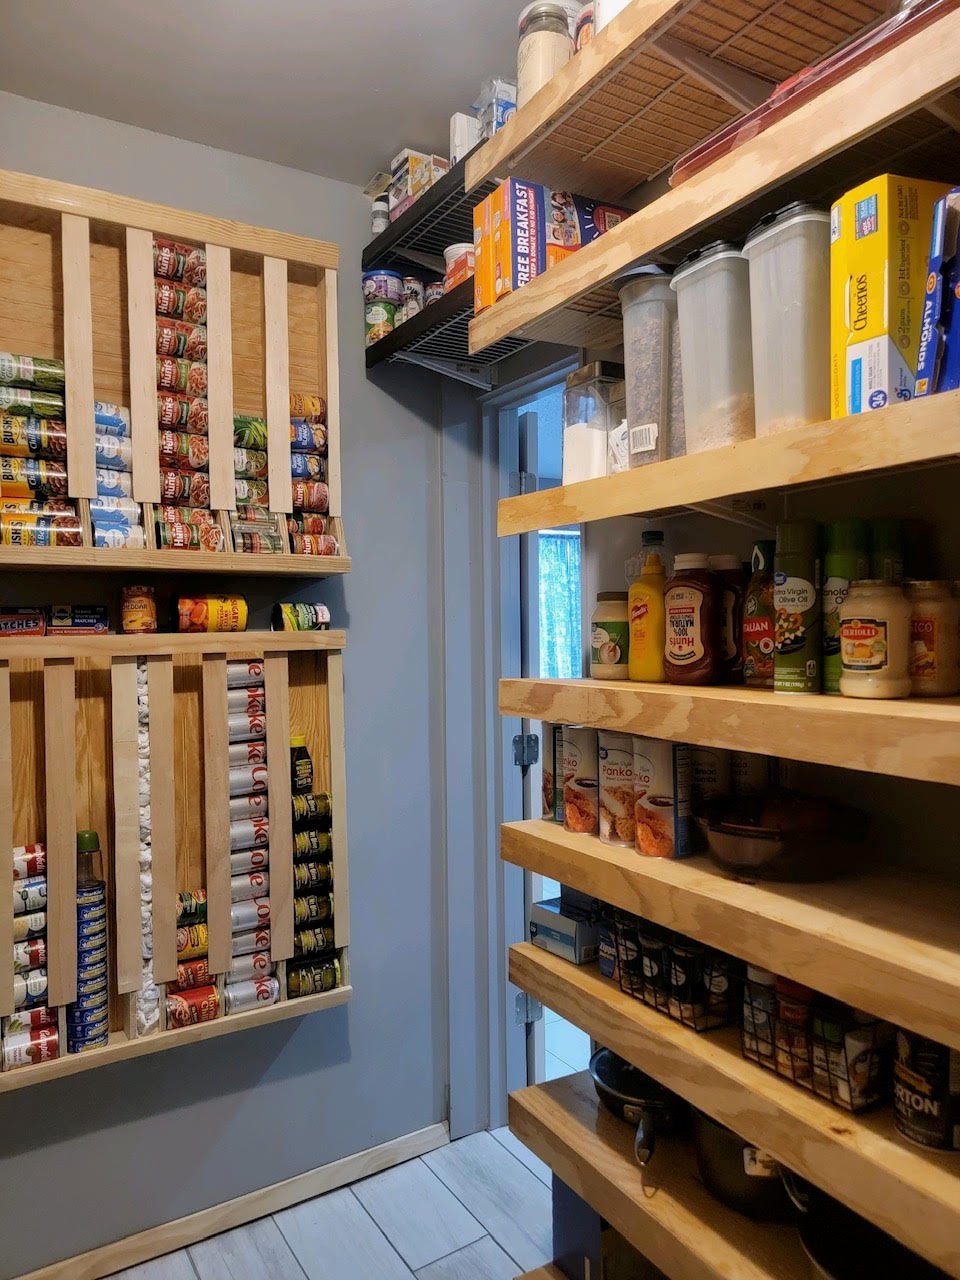
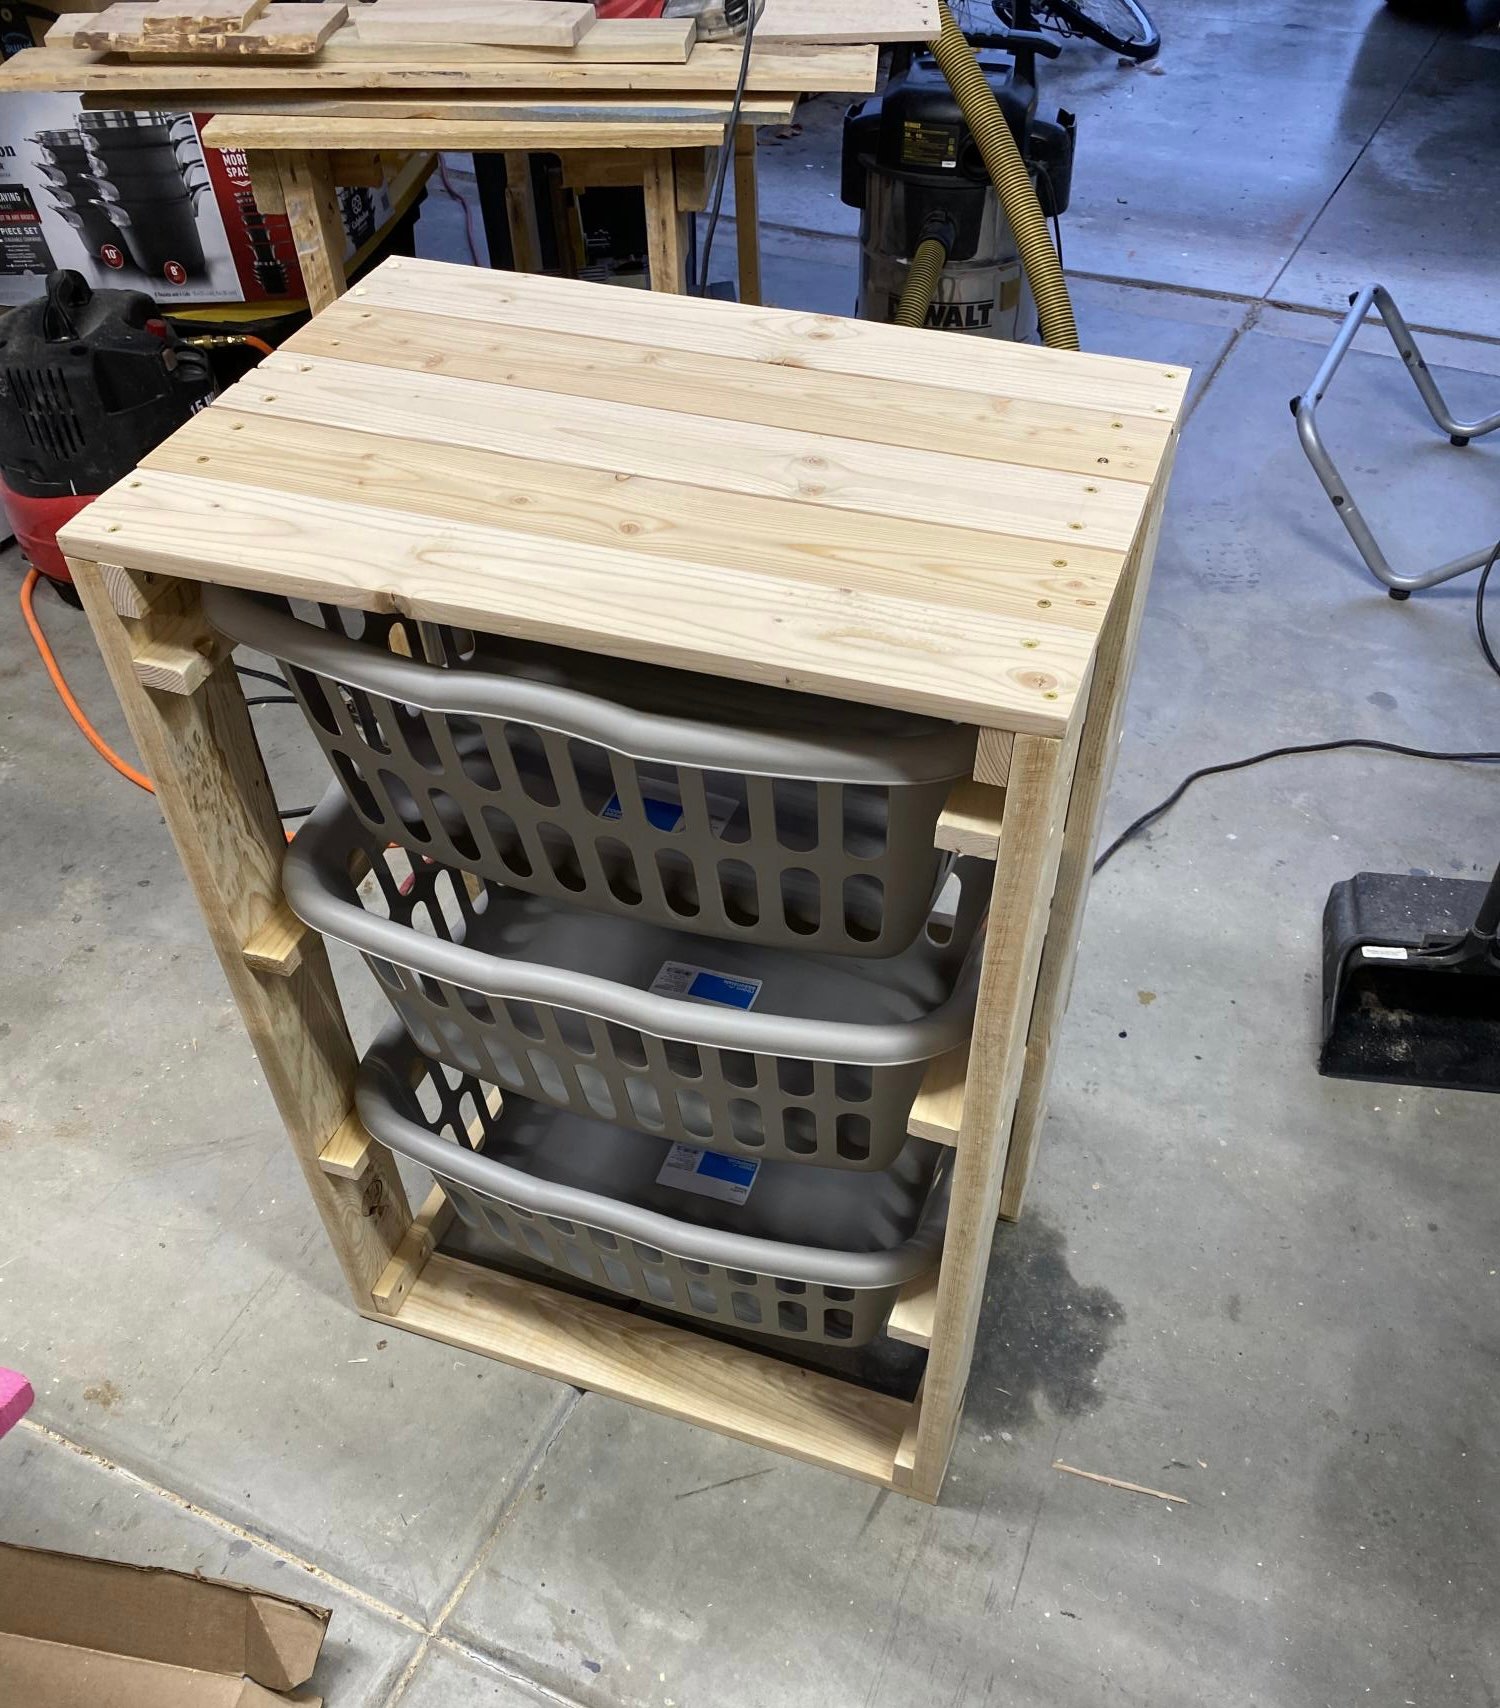
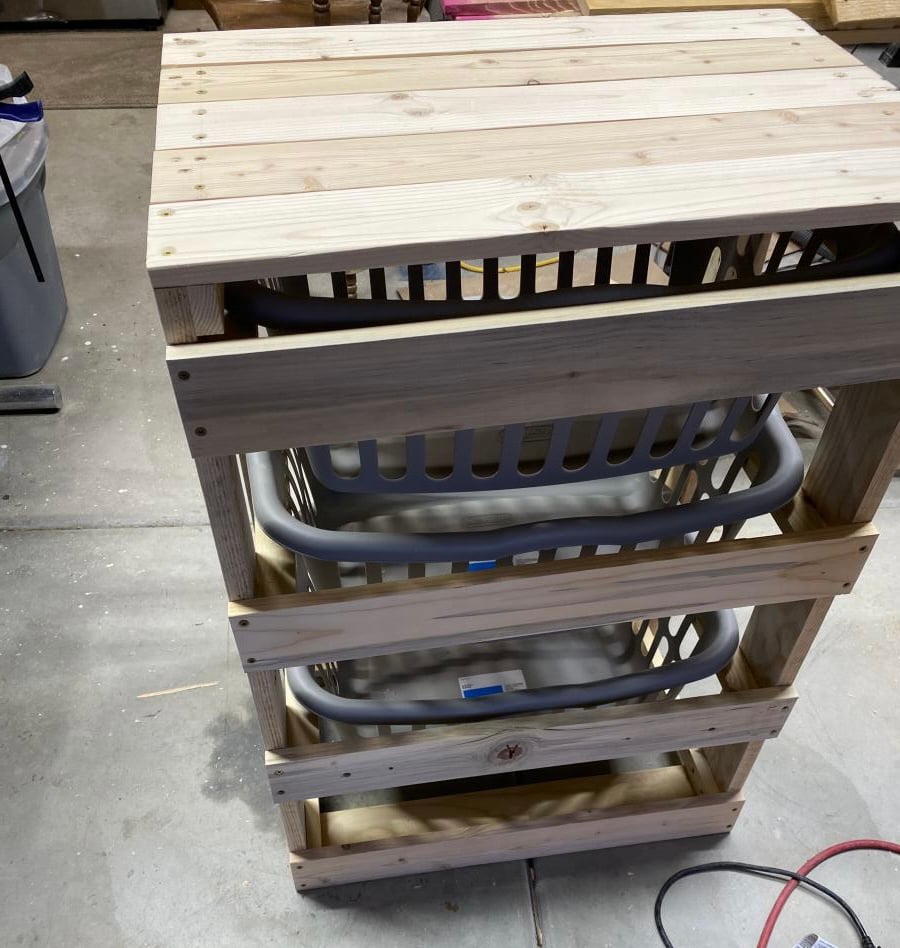
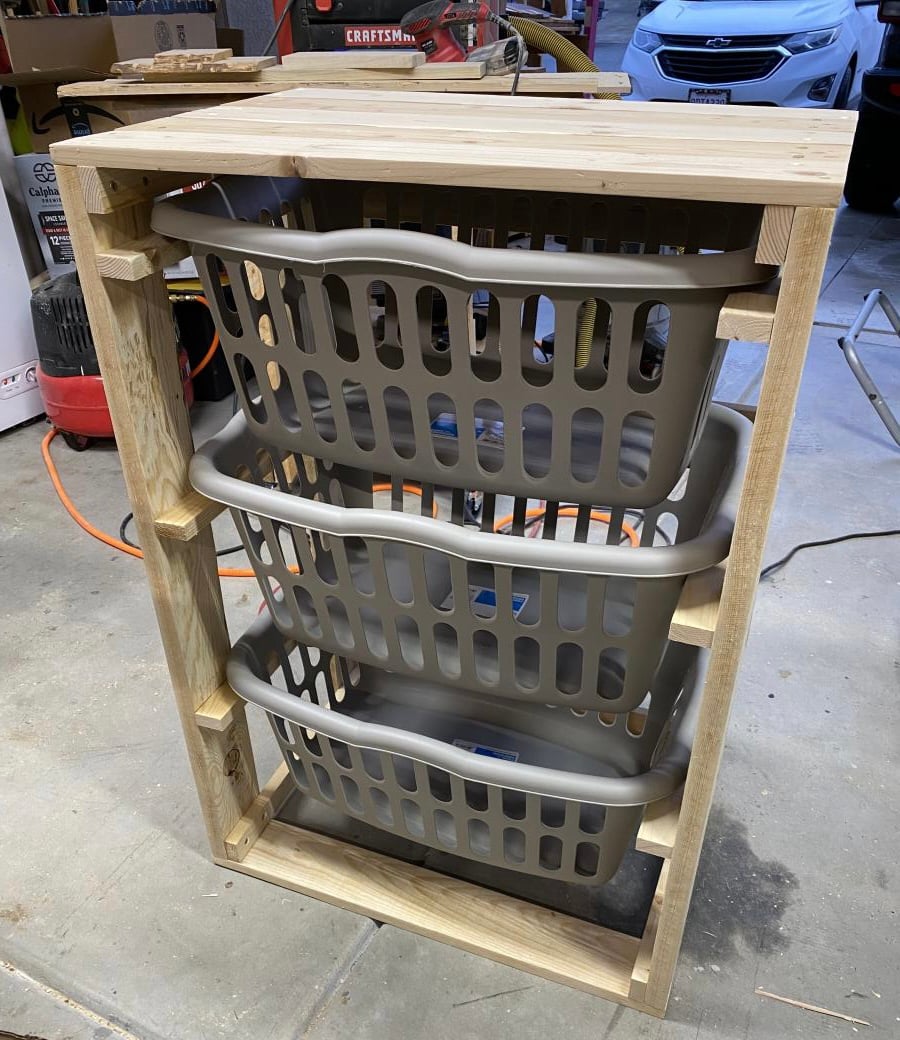
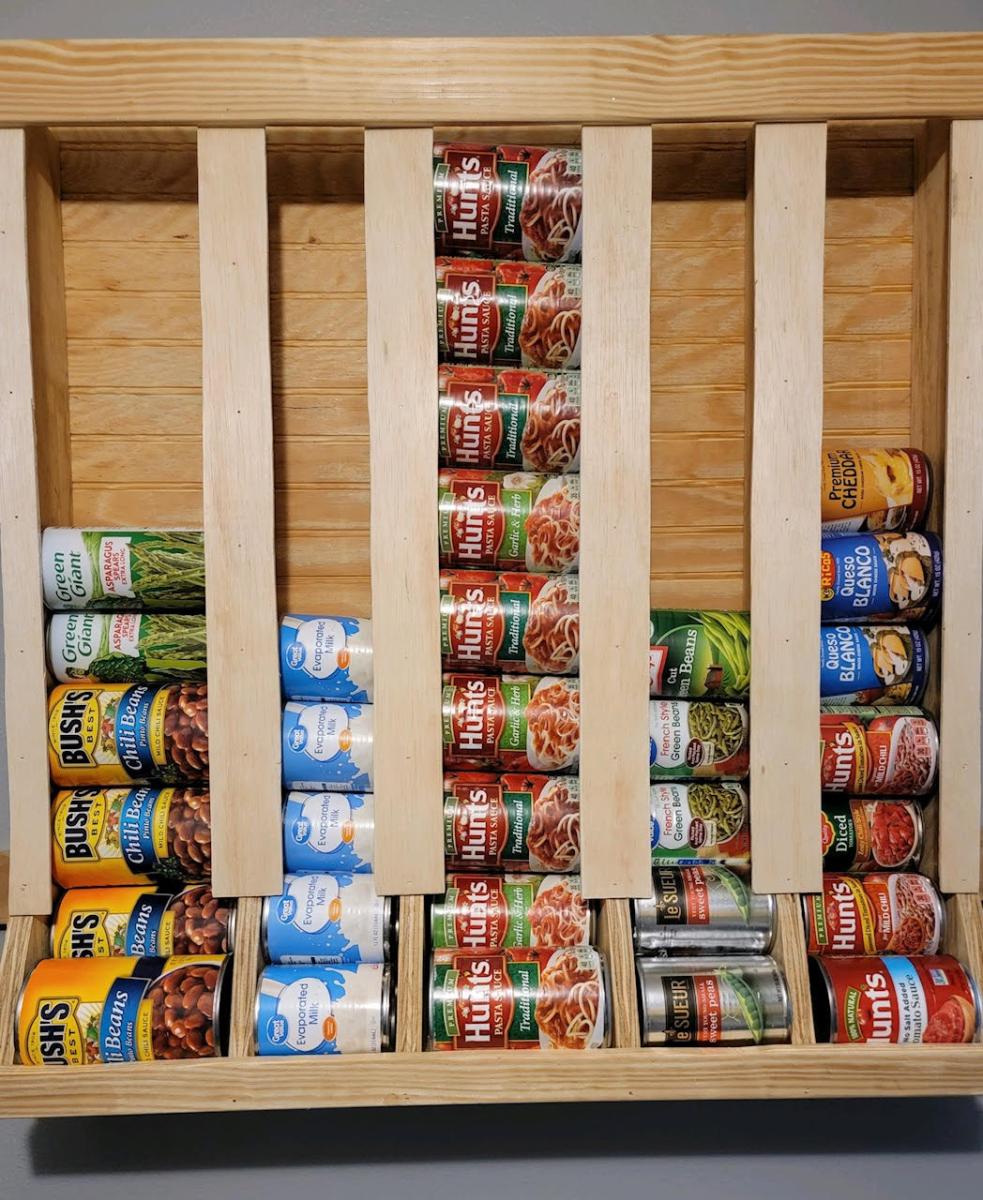
"Here are some pictures of a pantry organizer that my friend Belinda built."
-Bubba
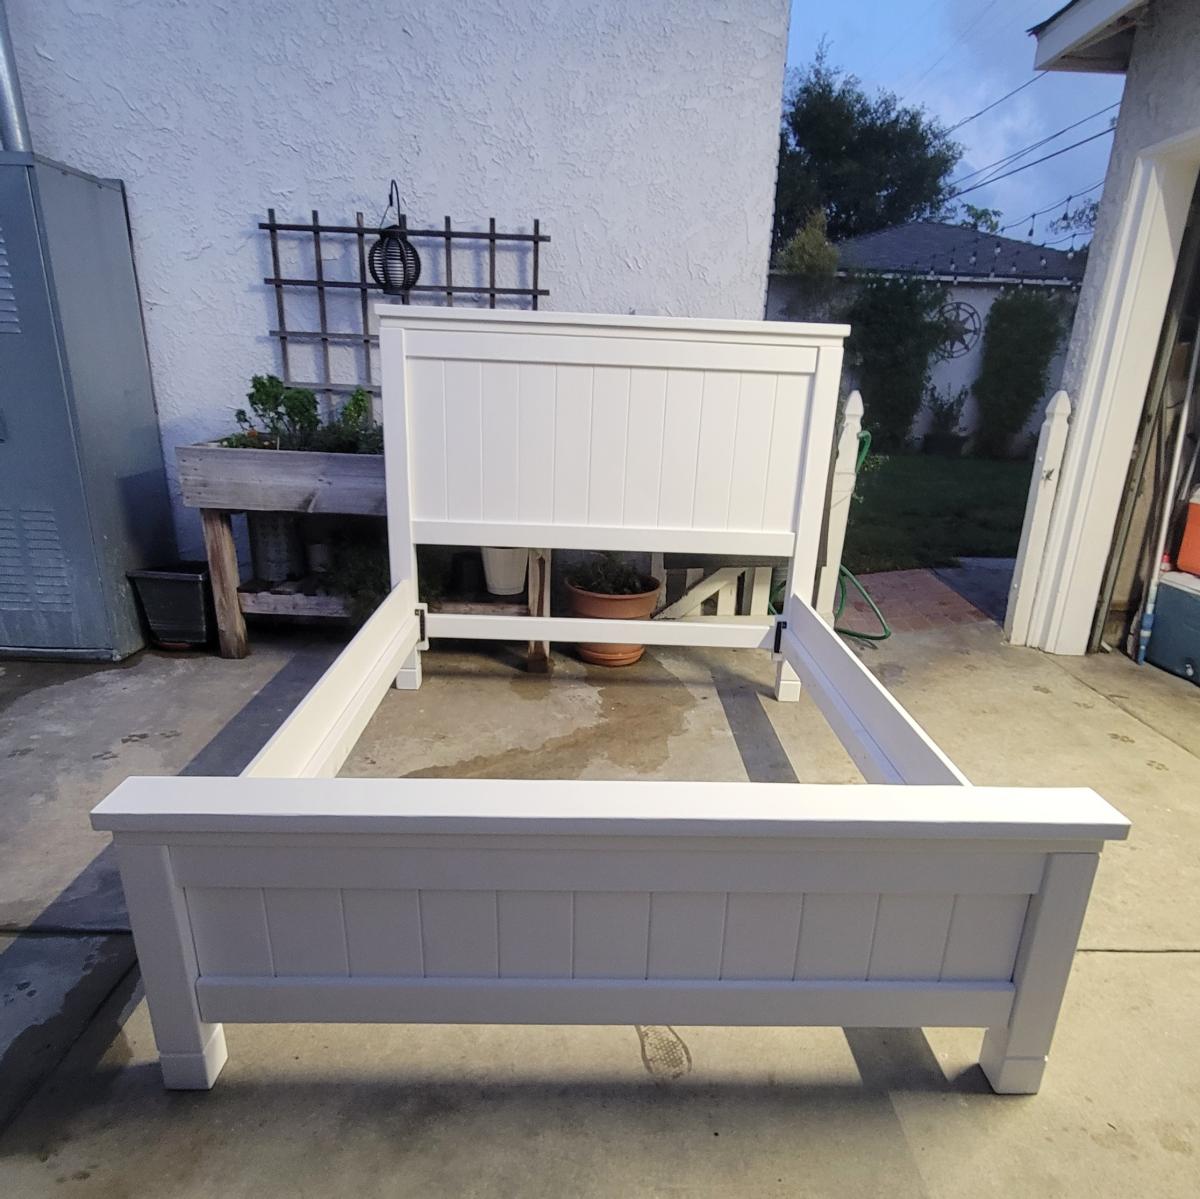
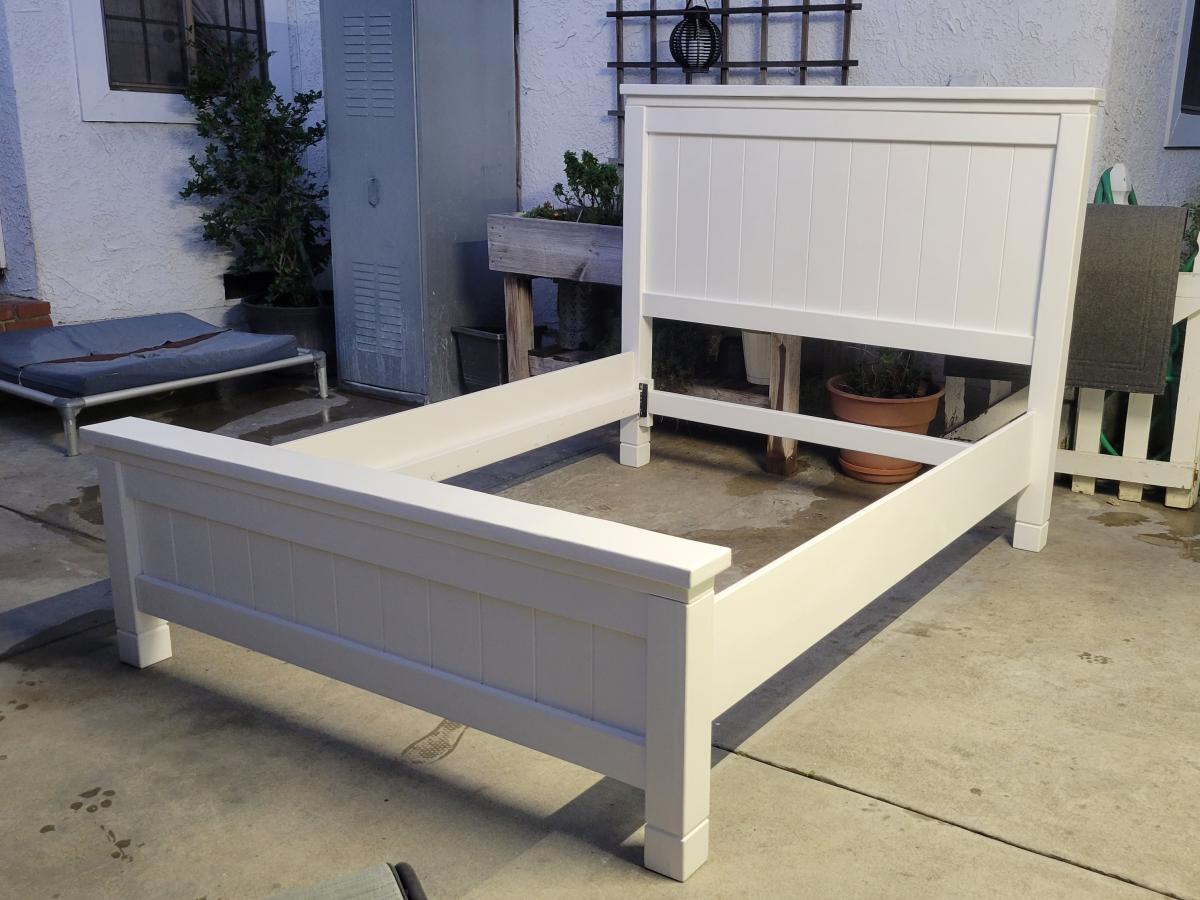
I am a newbie to wood working and was inspired by Ana's Farmhouse bed frame. I built this for my newly married daughter and she is so happy with it. It's very sturdy and has plenty of storage underneath. The instructions, buy & cut lists were super easy to follow. I can't wait to build the Extra Wide Dresser next.
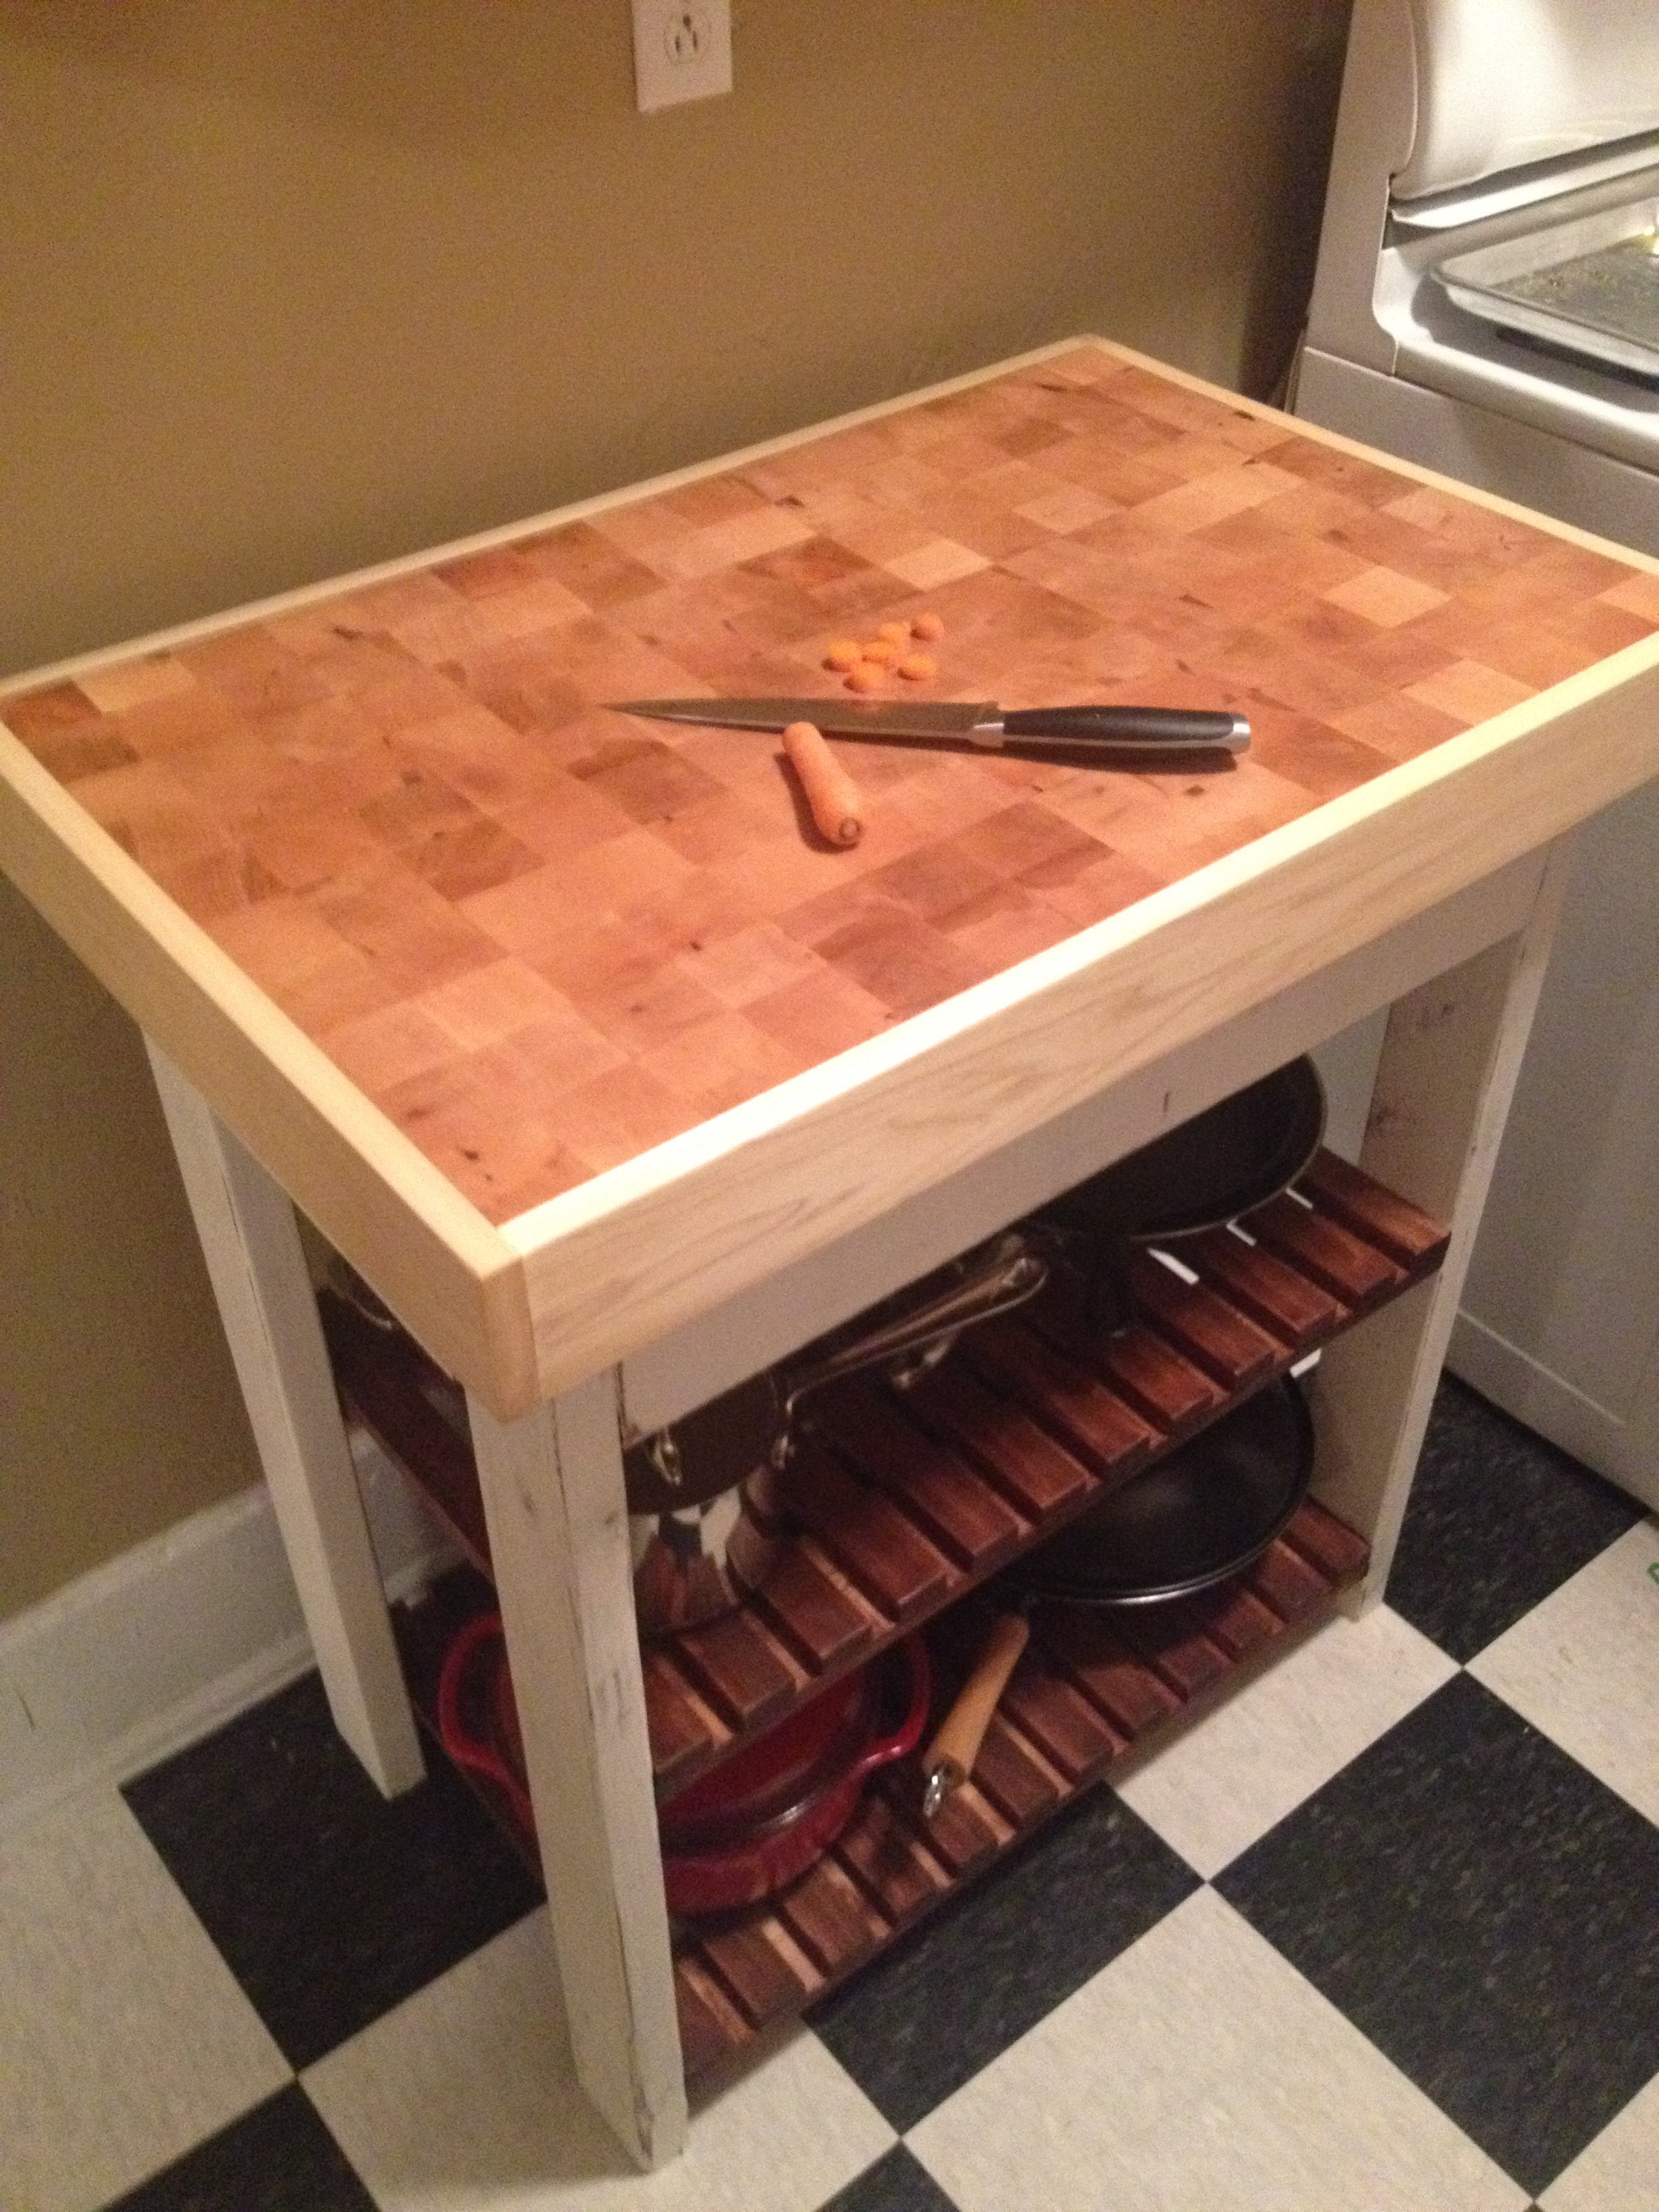
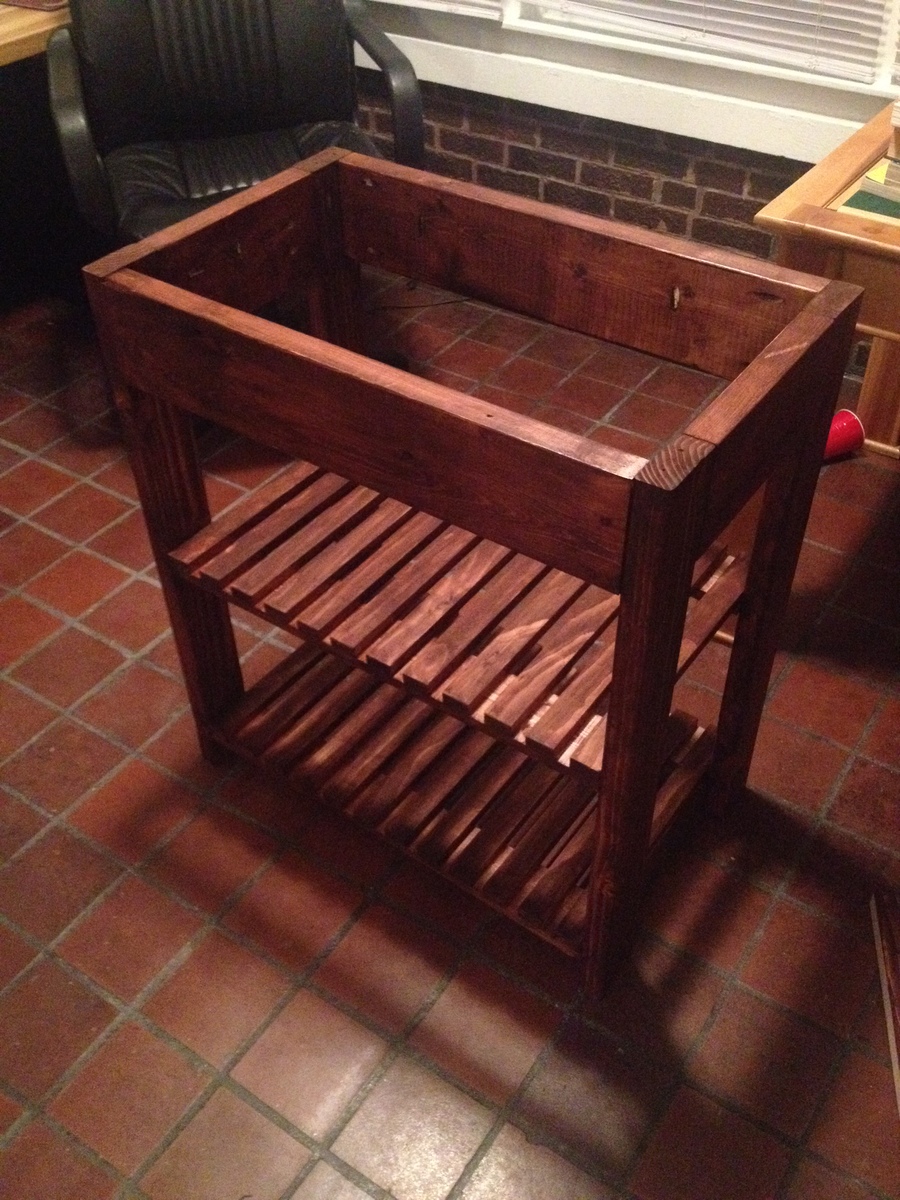
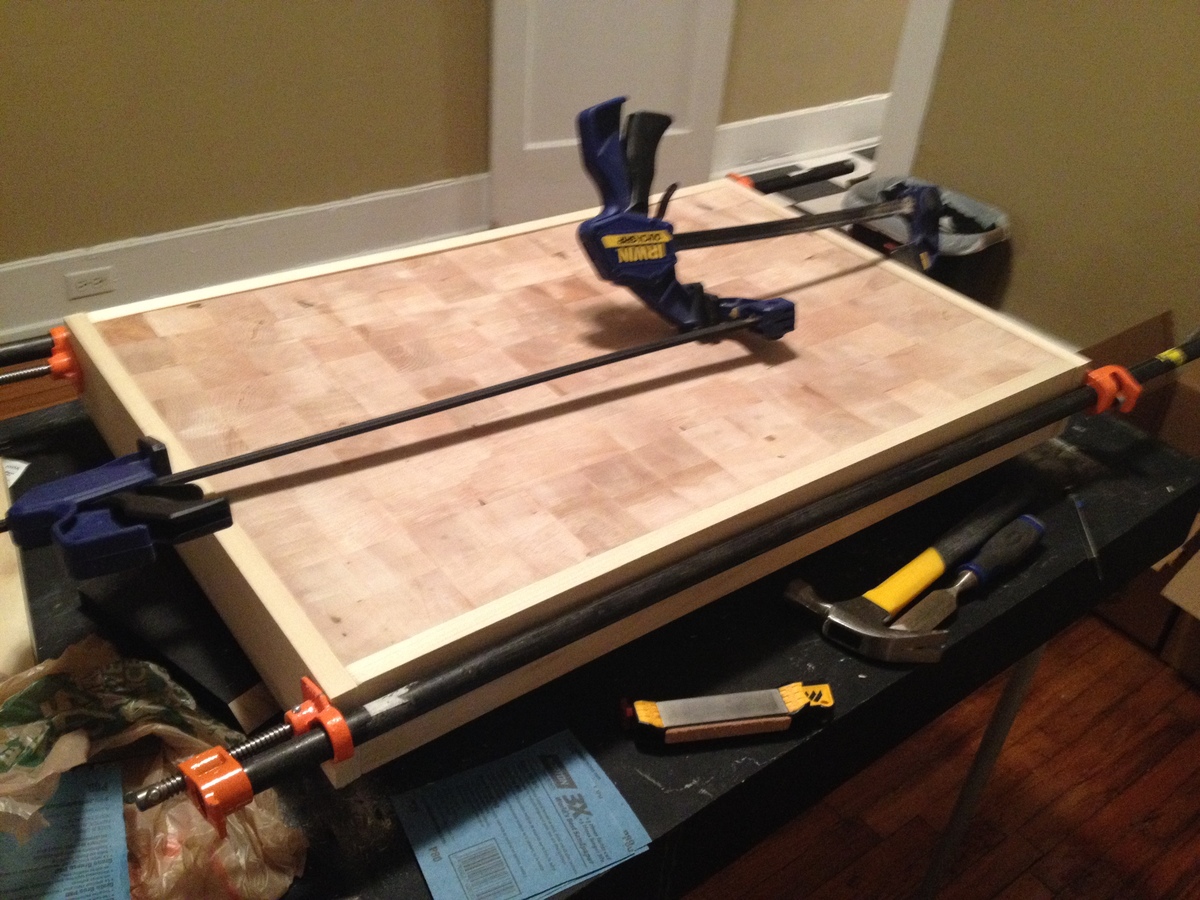
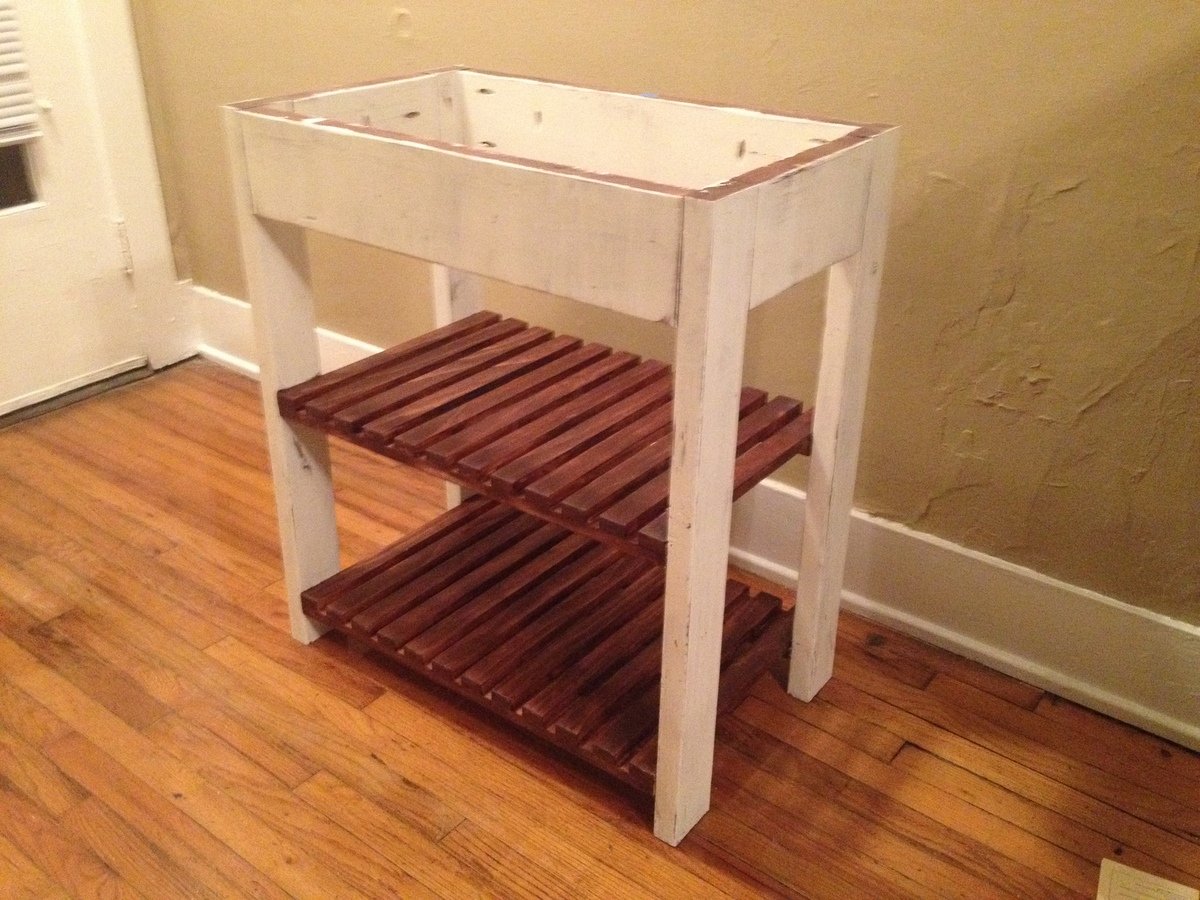
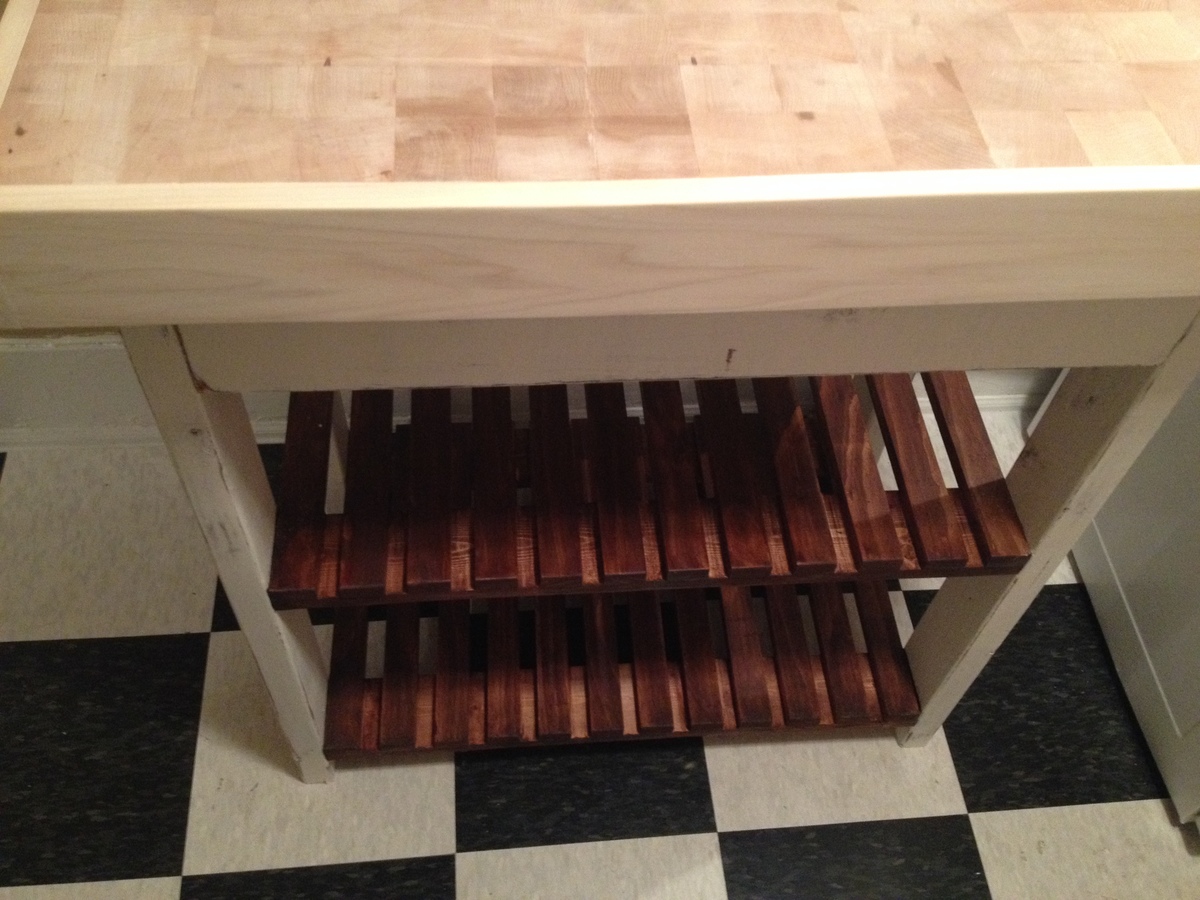
This "island" was inspired by the plans for the Easy Kitchen Island, with a bit of a twist. My roommate is really into cooking, and had a little butcher block that he wanted to upgrade. Our kitchen is fairly narrow, but there was a huge bare spot underneath some cabinets that was begging to be used. Our cabinets were overflowing and we needed more storage space. The kitchen island-butcher block combo solved both problems and fit nicely under our cabinet.
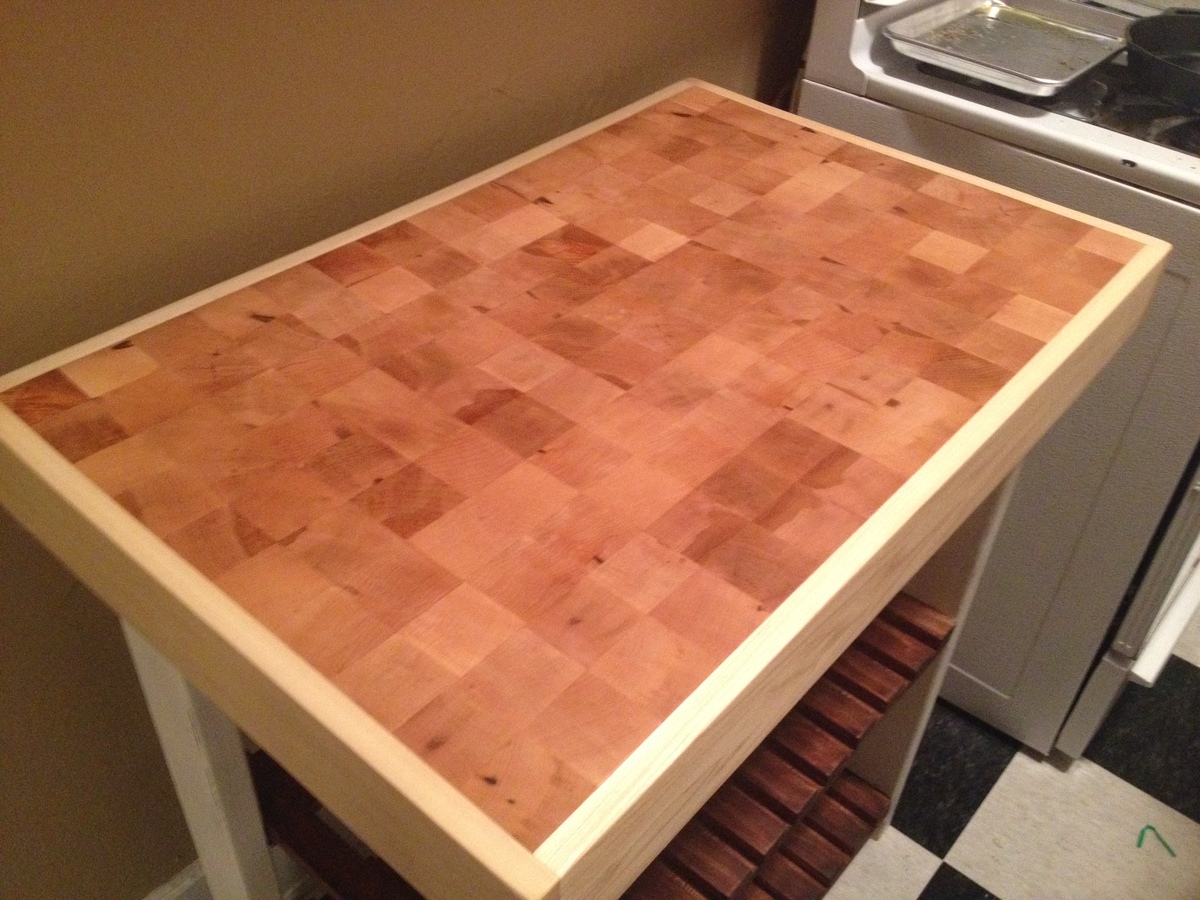
After a little research, we decided to go with an end-grain board made with maple. We looked around and ended up getting a bunch of wood off of eBay for about 65 bucks. The butcher block turned out to be a bear of a project. Without access to a table saw (not going to happen in this apartment) it took some sanding, then more sanding, then a trip to my dad's to use a table saw after all, then more sanding, then more...well, you get the picture. Once all the pieces were assembled, we glued a 1"x4" poplar border onto the sides to give it a more uniform appearance from the sides, as well as to hide the connection to the structure.
Finally the block was complete and it was time to build the structure of the island. The cuts and the assembly of the main pieces took a grand total of an hour and a half - a great relief after spending weeks on the butcher block. We decided to glue the slats onto the supports to make life easier. Once we got done with that it was time to finish the structure.
We decided to follow Ana's directions on crackled milk paint. We tried to follow them exactly, but weren't able to get the same amount of crackling on ours. No worries, though, we just sanded down some edges and gave the whole thing a good coat of Polycrylic.
Once all that was done, we screwed the block on and construction was complete! We gave the block and the poplar several coats of Boos Block Mystery Oil as the conditioner and we were done. The oil really brought out the color and the body of the wood, and we couldn't be happier with the results. Can't wait to chop a turkey on it!

Fri, 11/22/2013 - 15:38
This looks super! I'm intrigued by your butcher block top. The squares look so perfect and even. It looks like a tremendous amount of work went into it, and it's absolutely beautiful! Love the paint and stain used on the island structure too!
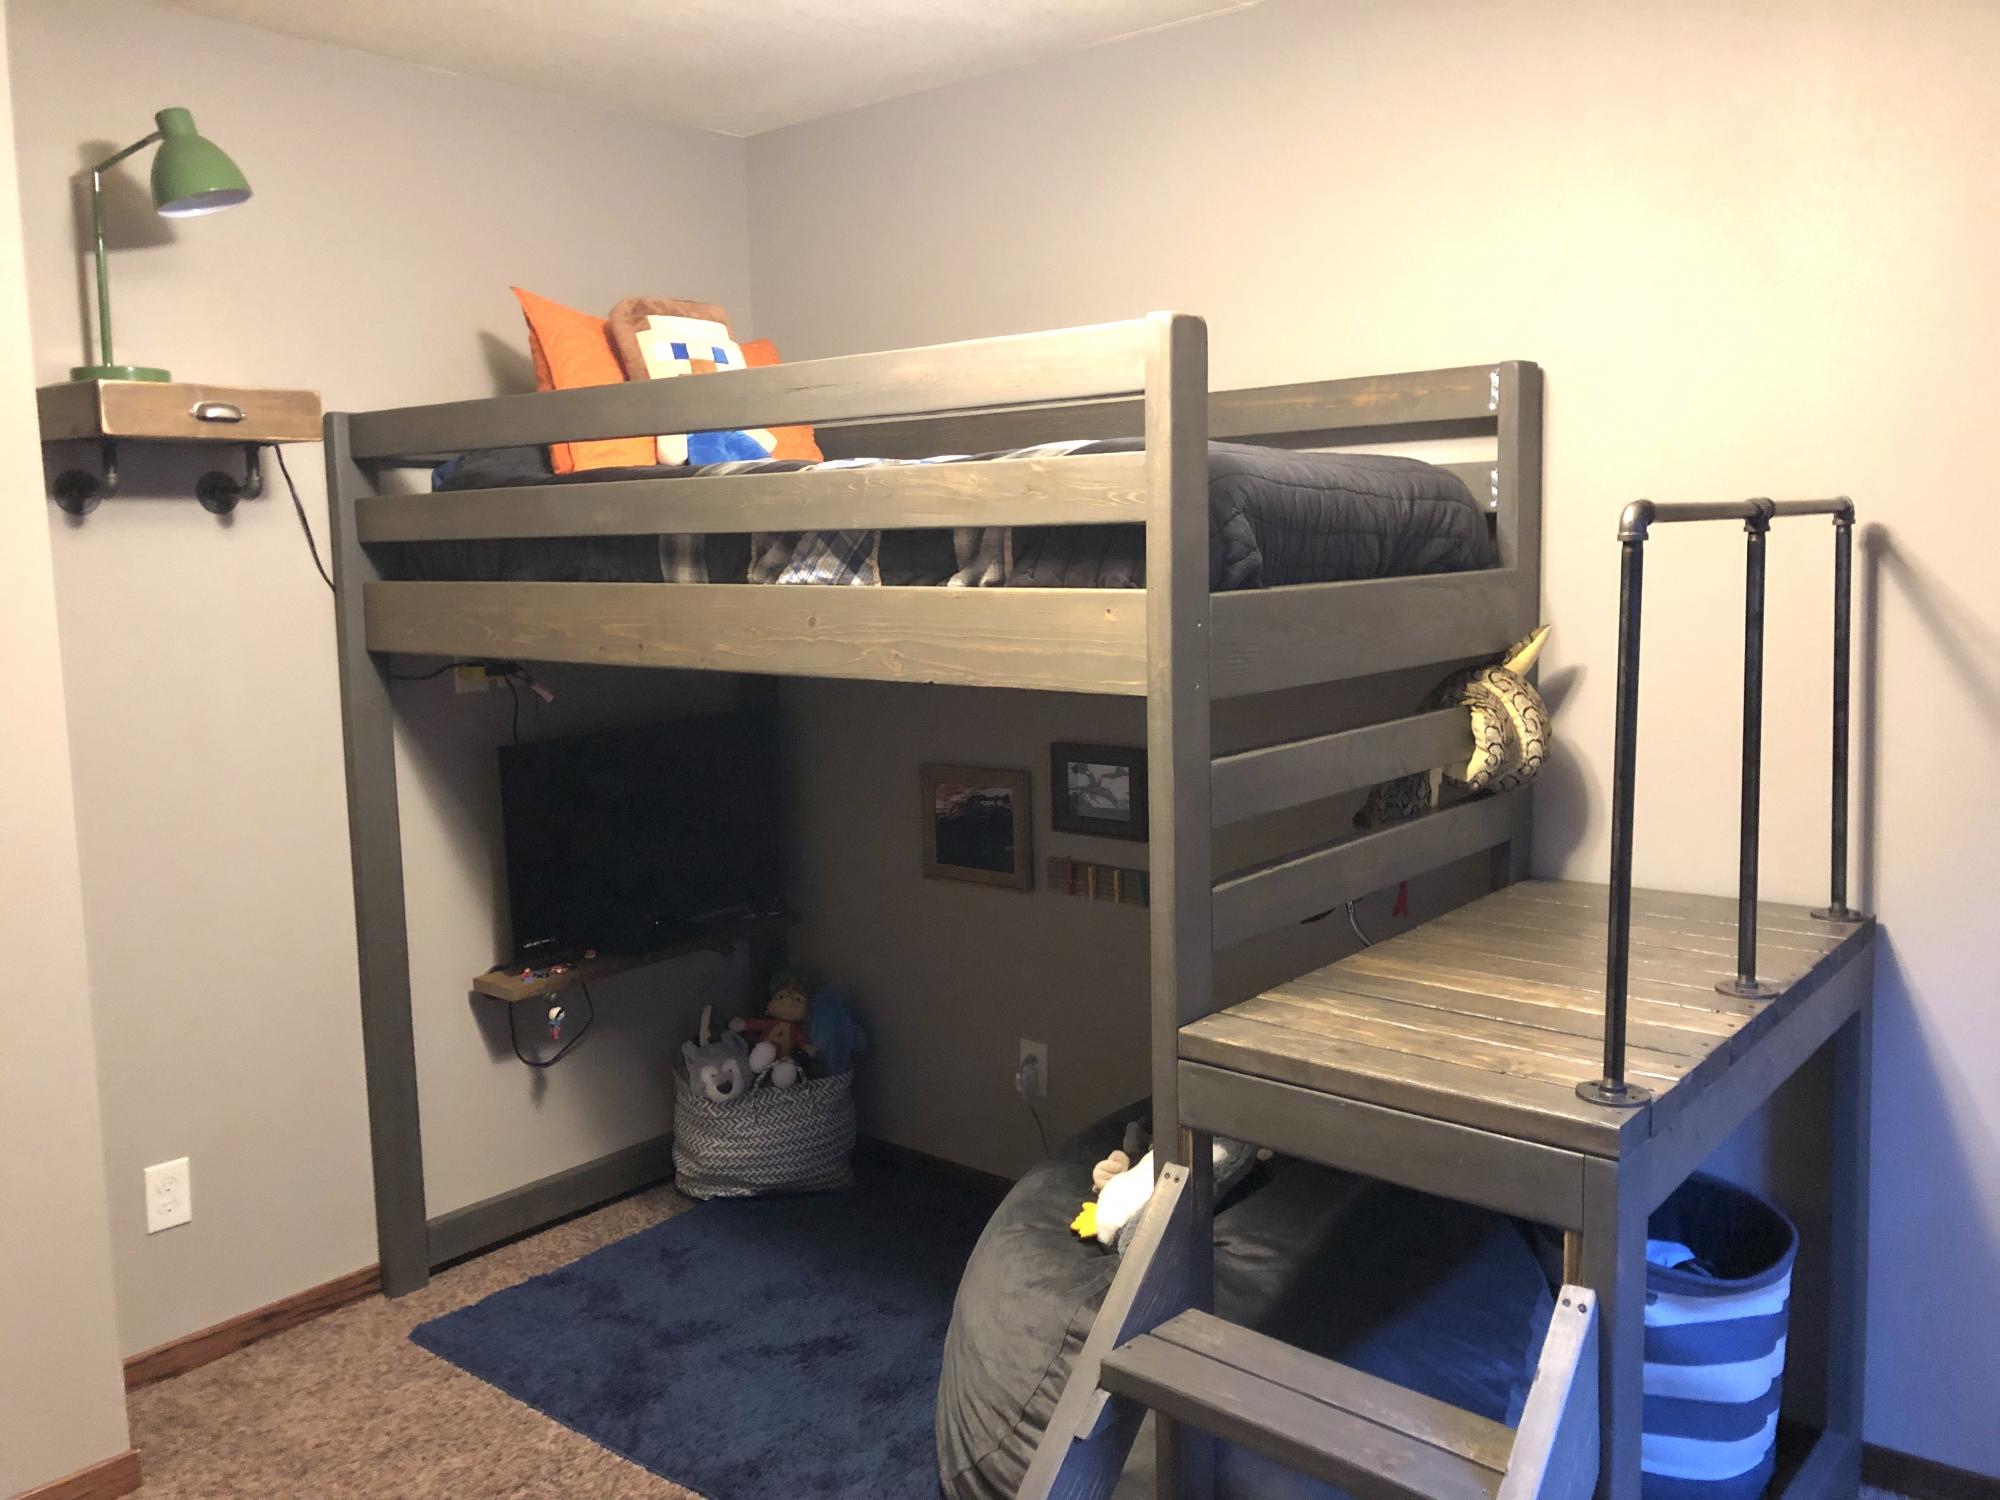
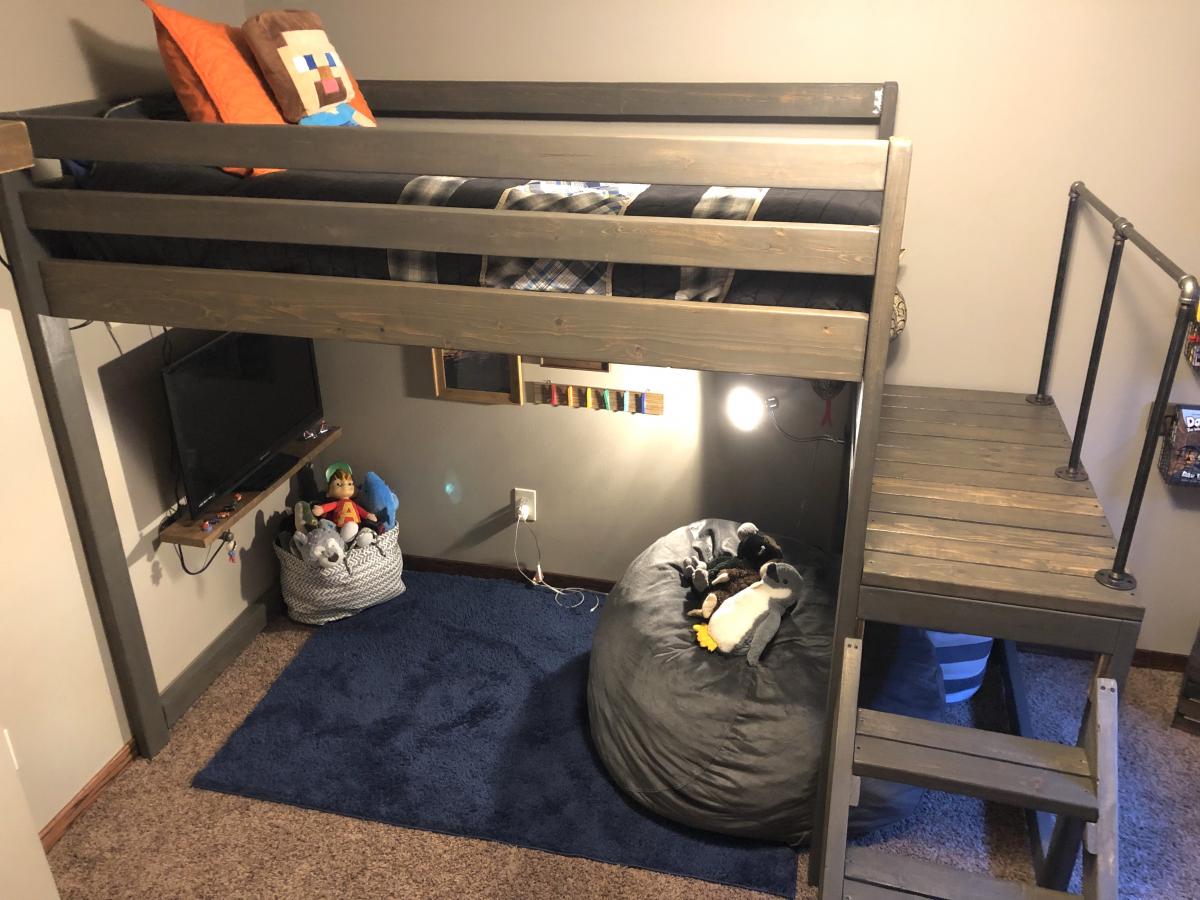
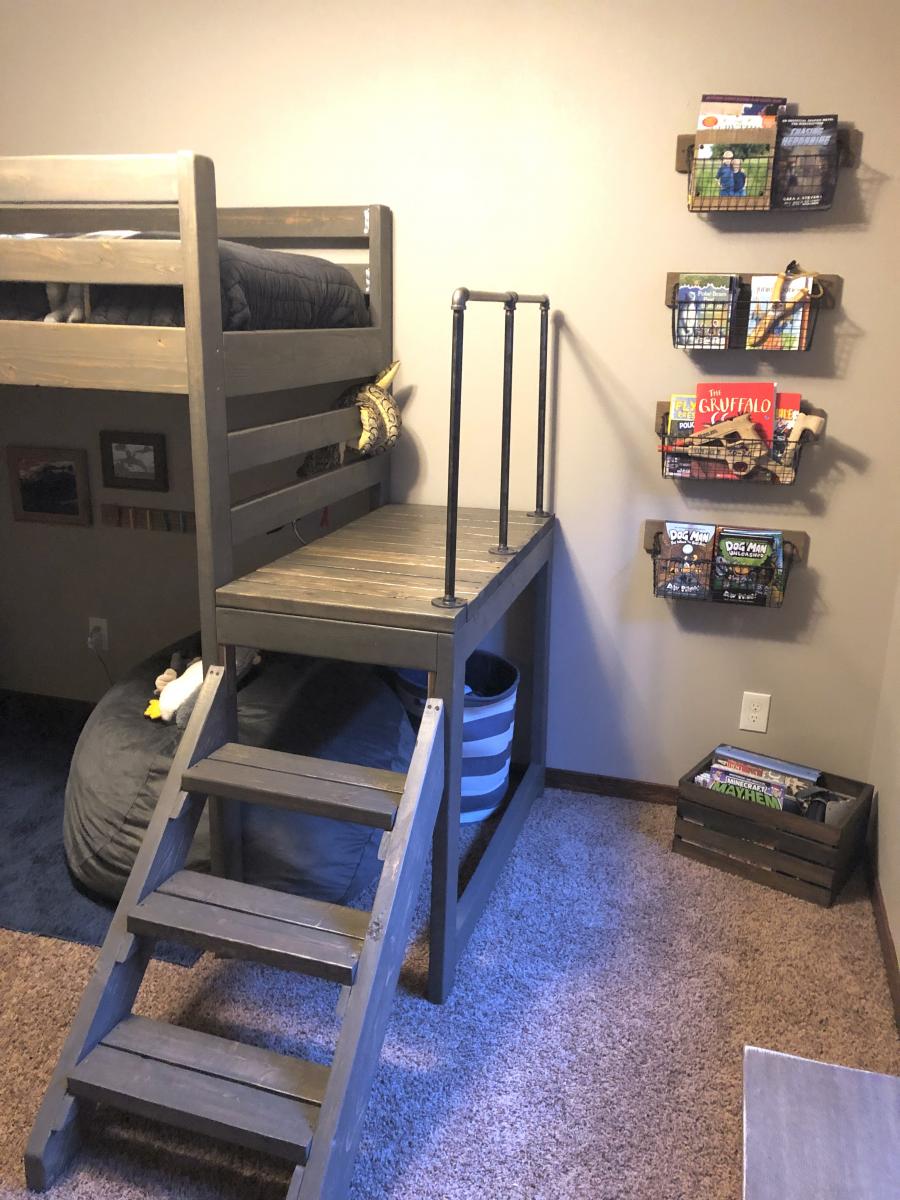
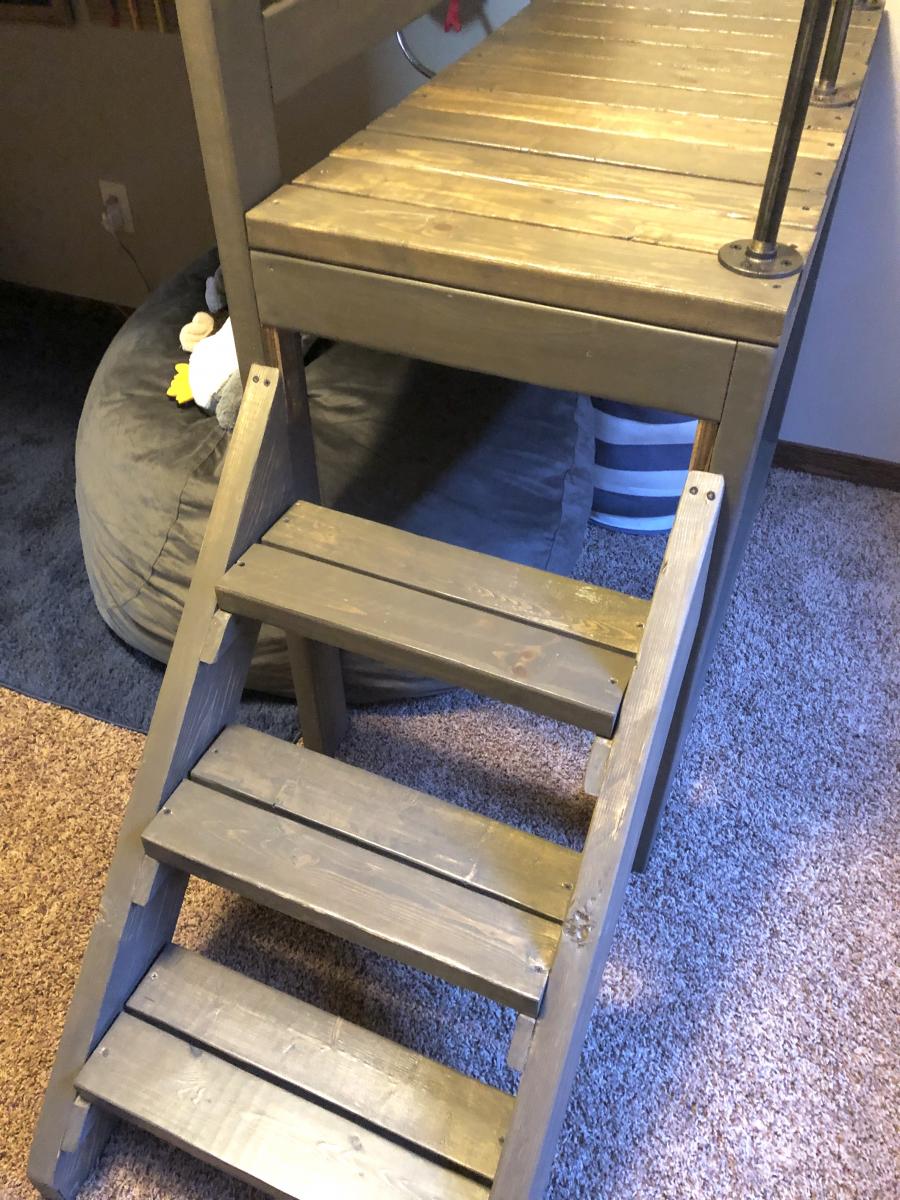
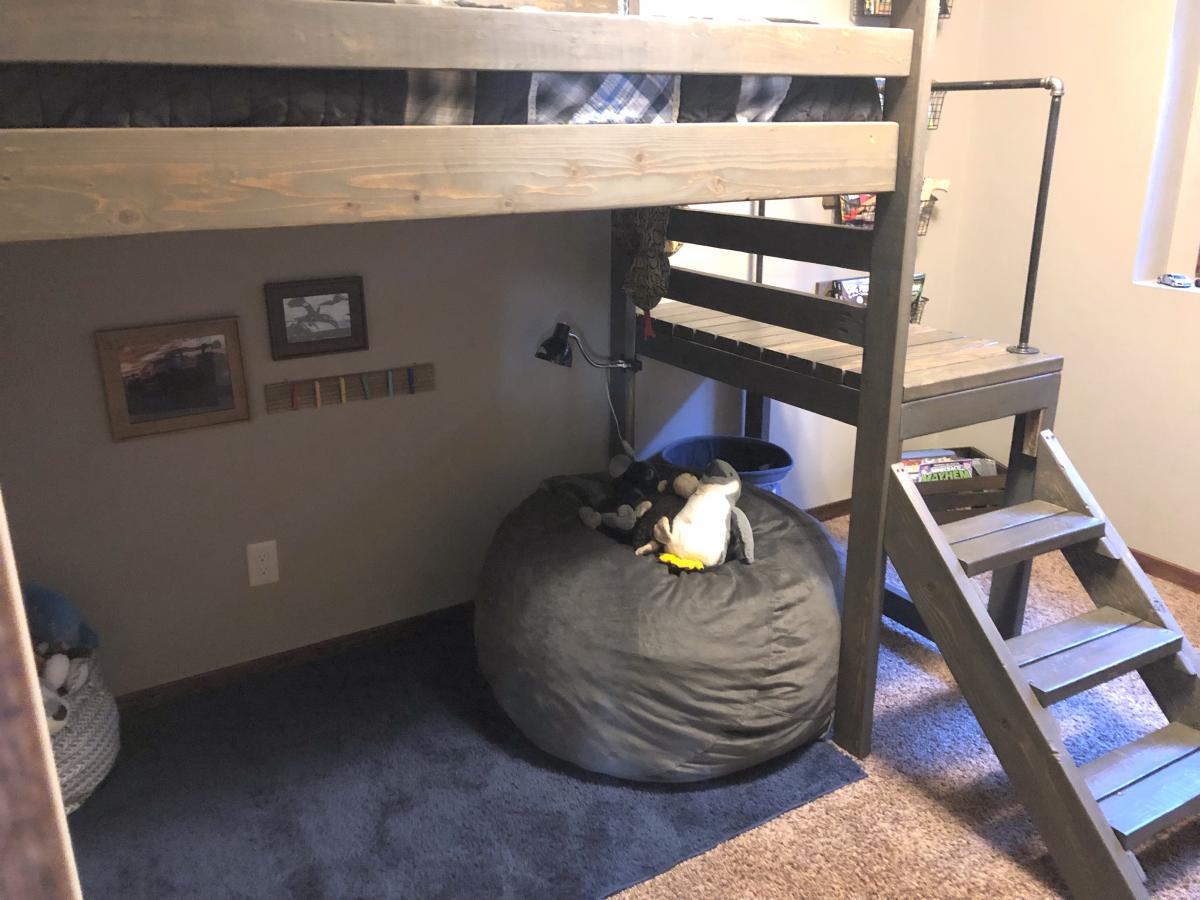
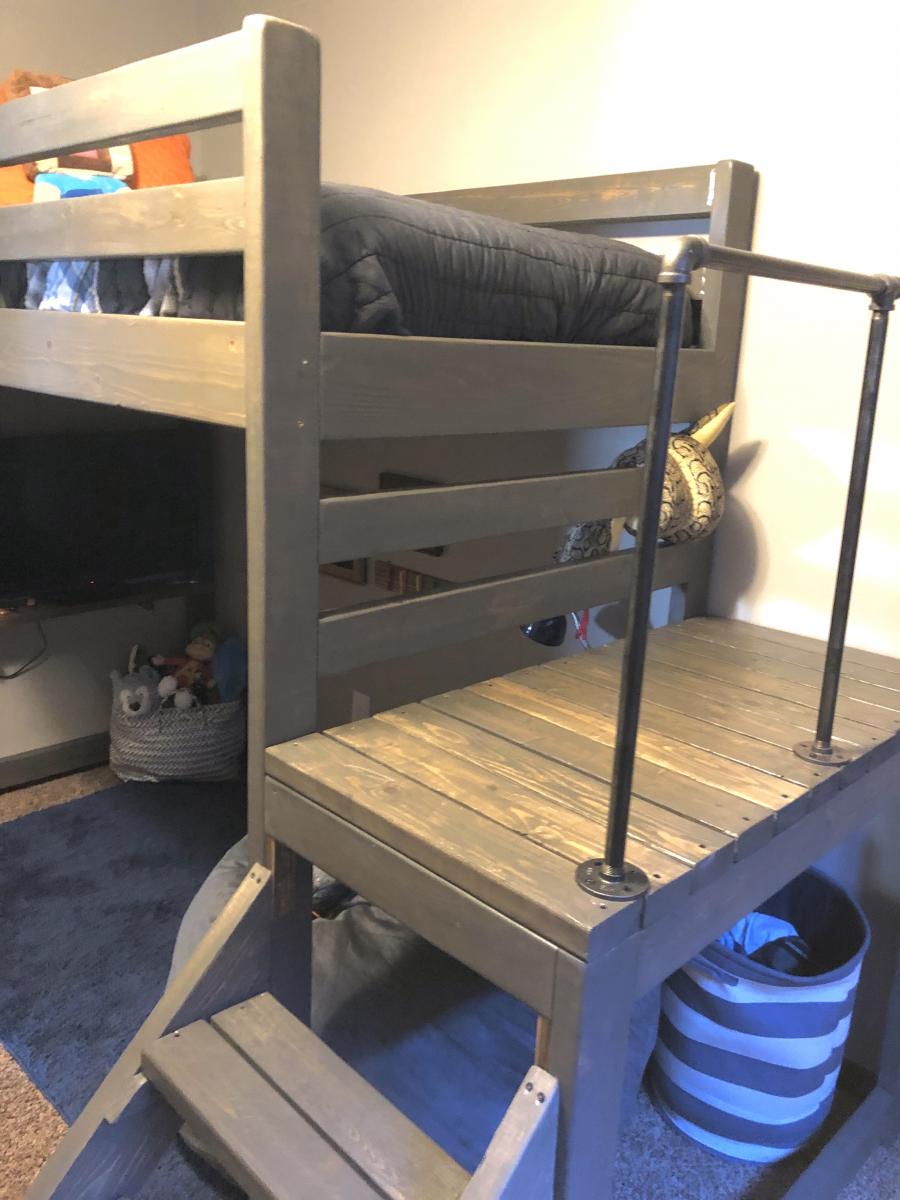
I built this bed for my 8 year old son's room "face lift." His only request was to have a place to hang out, but being his room was so small, that was a struggle! The loft bed allowed us to make a cozy little hangout - the poor guy can't get rid of his siblings now!
I added a few extra inches to the height of the Camp Loft plan, I also added the pipe hand rail for additional safety and give his room a little older boy vibe! It was a very easy build, the staining/sealing took the longest. The stairs make it much easier to change sheets and getting up and down for those of us who aren't 8 year olds :).
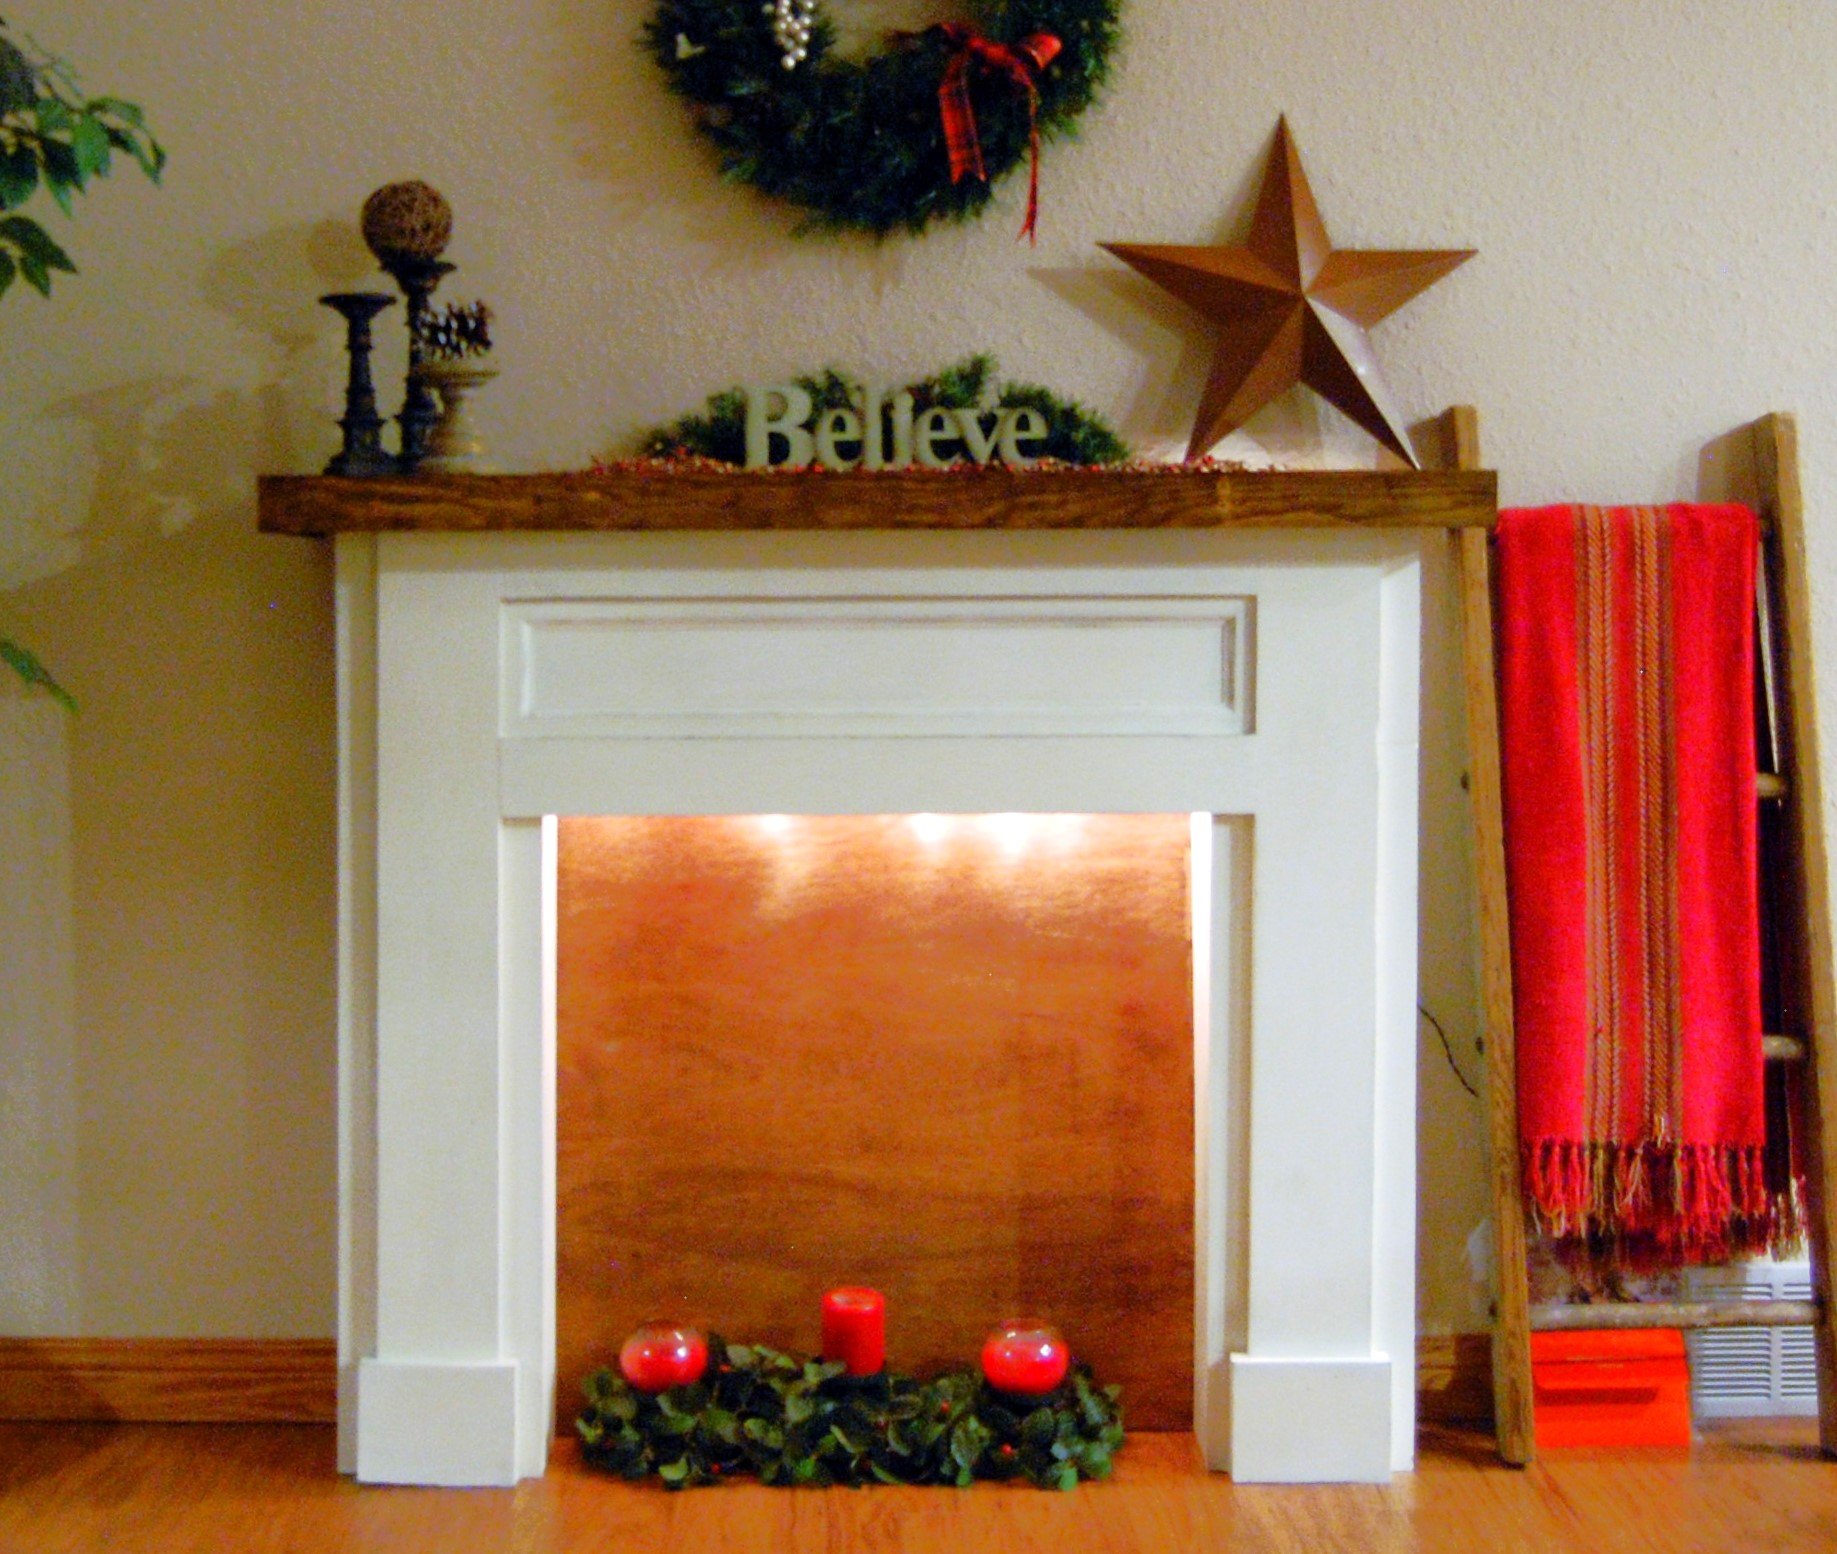
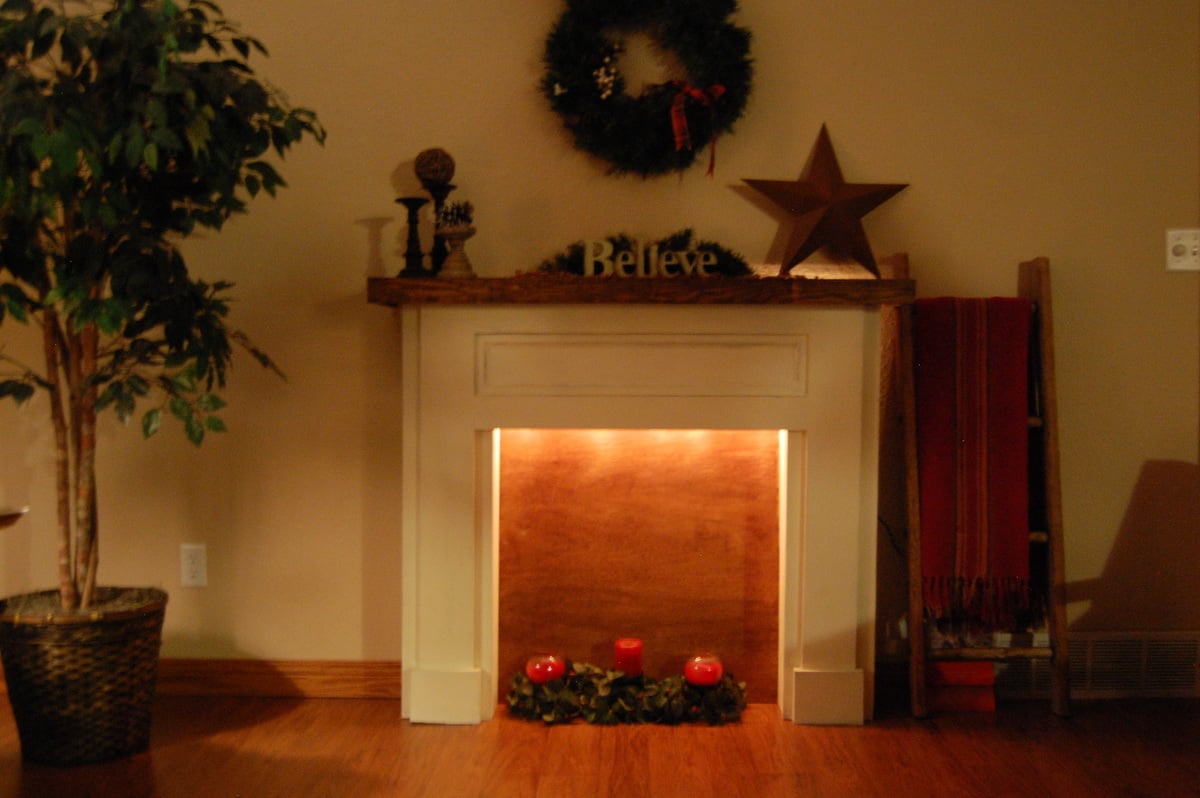
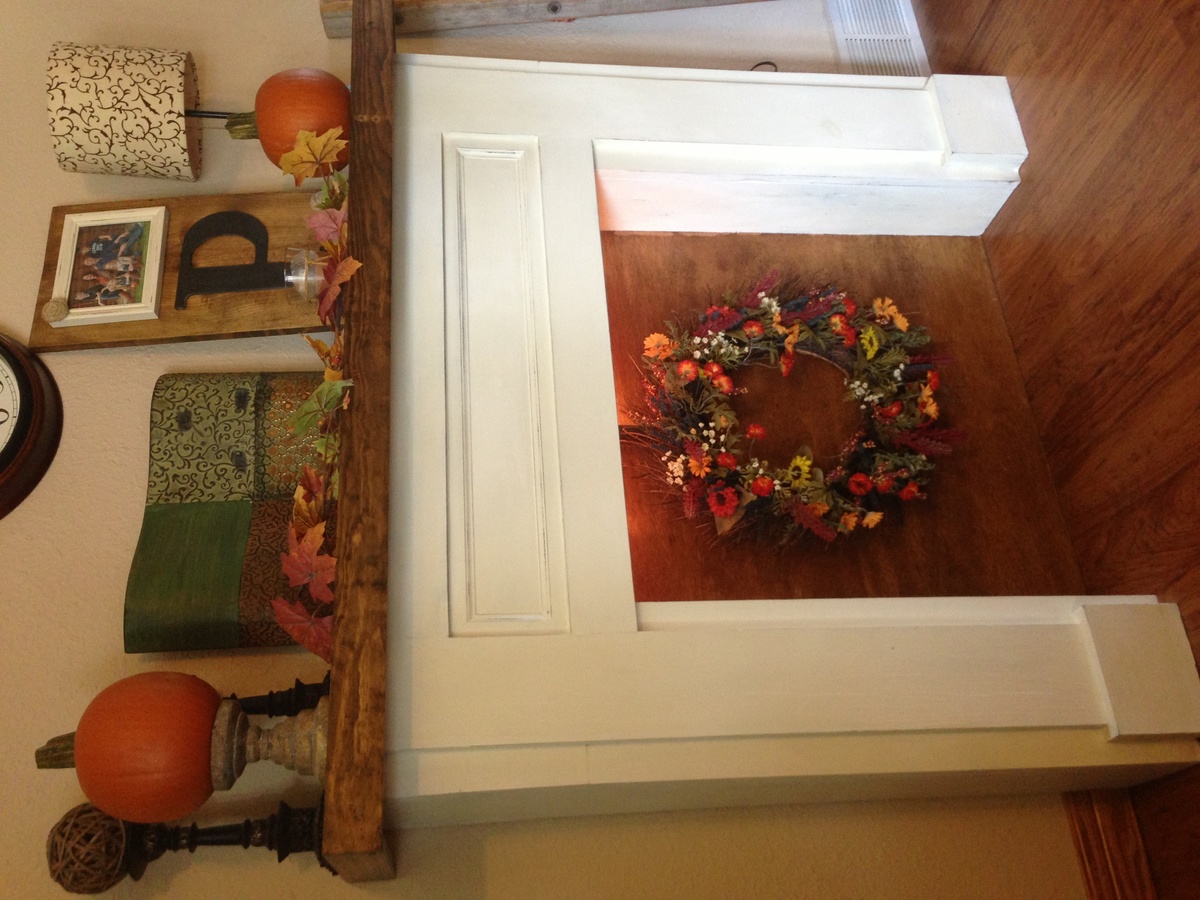
I searched hundreds of faux mantles online for just the right one to build! I ended up coming back to the very first one that inspired me...Mimi's! I revised it to make it deeper by using 1x8's for the depth. I used 1x6's for the inside box depth so that I would have some space behind for extension cords, etc. I also decided to insert wood ledges above the box (on the inside) so that I could put Christmas lights in for a soft glow, which I love. After building the top trim as shown in the plan, I decided that I wanted to "beef up" the mantle portion so I screwed 1x3's along the front and sides of the mantle top. I love how it turned out! I even ended up building a duplicate one for a friend that saw it and loved it! I am pretty new to woodworking and have 4 kids, so it took me much longer than it should have, but it was well worth it!

Thu, 03/26/2015 - 13:00
What are building plans and everything I need to have this made
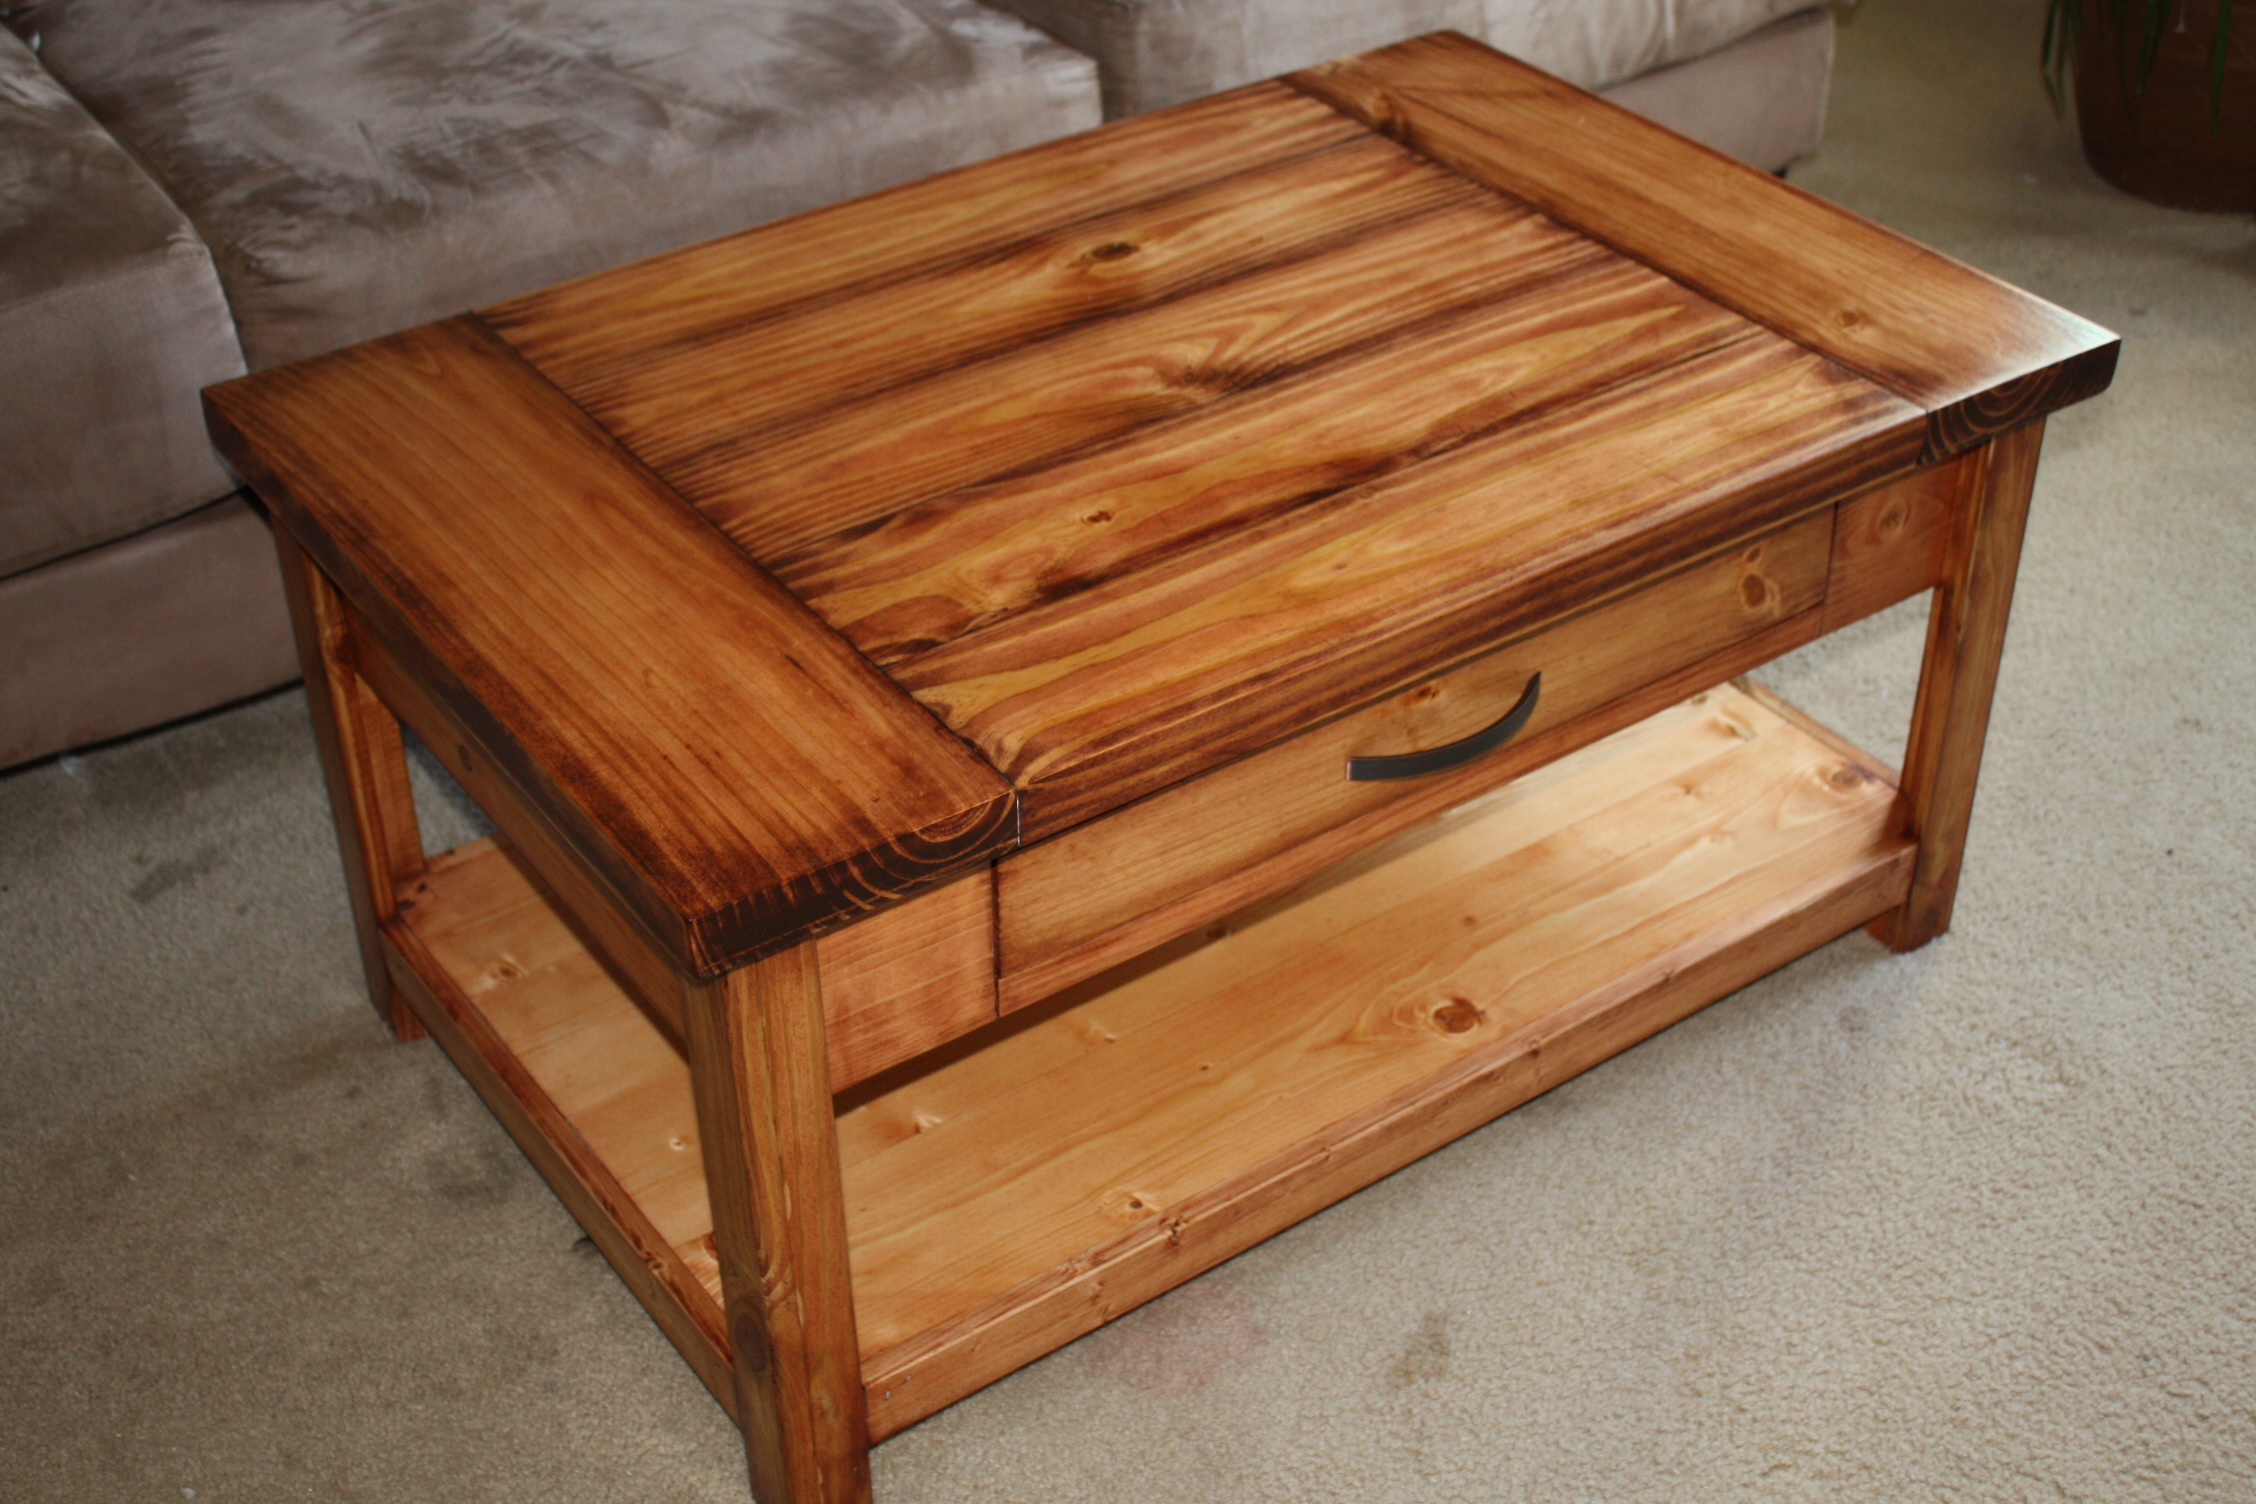
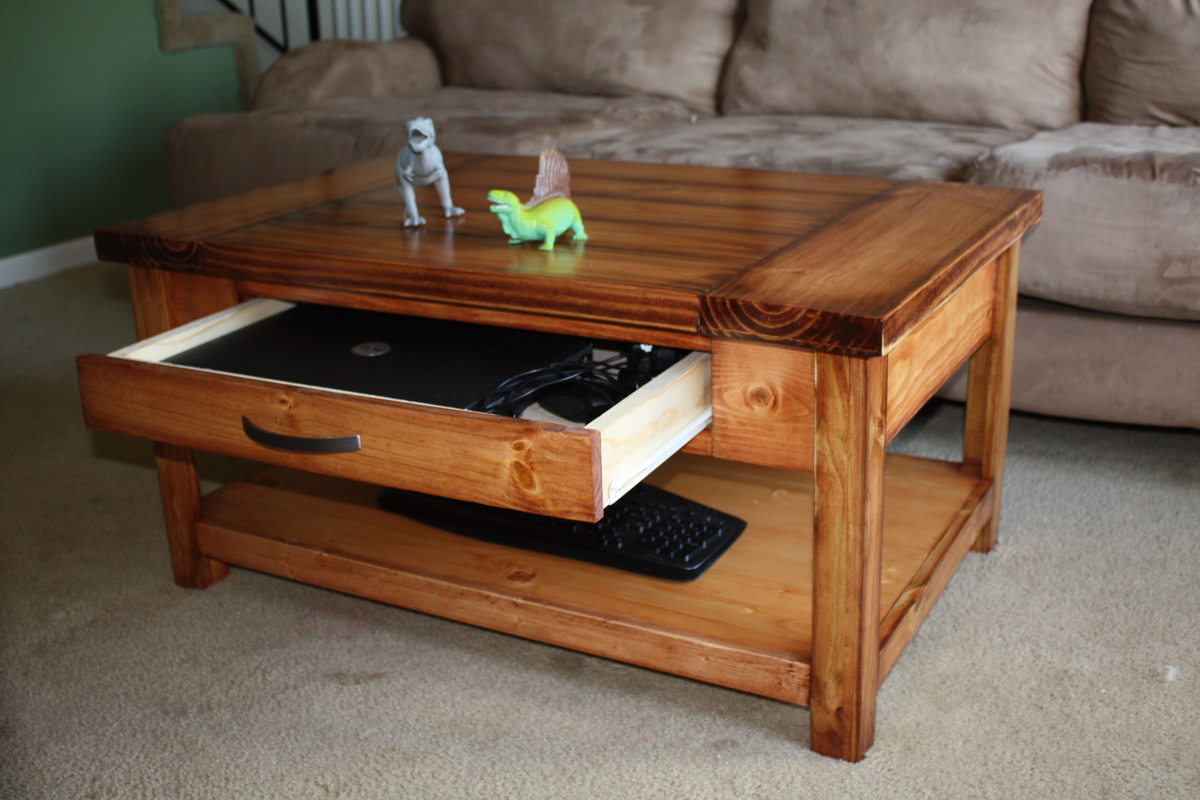
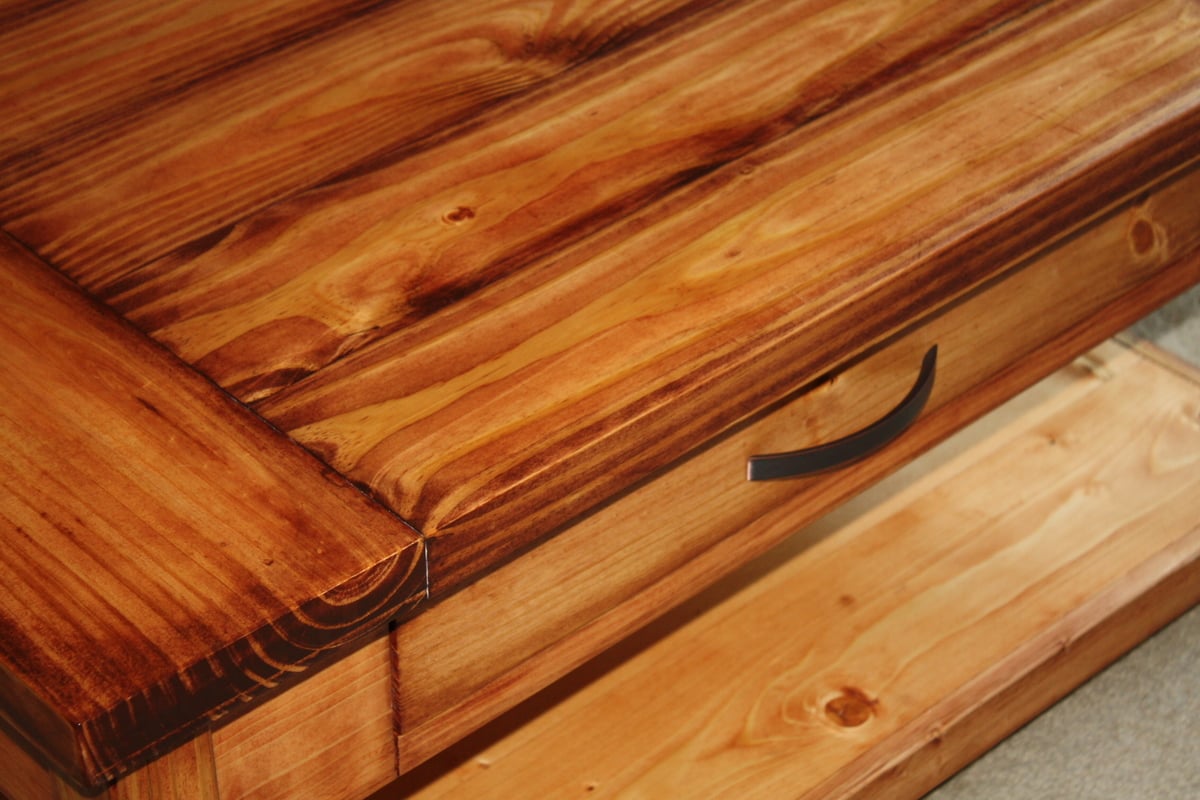
This is my second build. I used the Benchright plan but had to modify it for one drawer. The Dimensions are 39 long, 25 wide, and 19 tall. I have heard others comment on how difficult drawers are. I thought I would just jump in head first with the kind of drawer that closes flush with the rest of the table - really had some trouble with making it square. I ended up shimming the face onto to the drawer because even though it opens and closes smoothly, it isn't square with the rest of the table...
I had originally planned to make the 20 second tidy up table for my living room and begun purchasing materials. However, I was let go from my job last Sunday, so changed my plans. I took inventory of all the supplies and materials I had on hand and tried to find a plan that would not require any more spending to build... to sell... to pay rent.... and thus the new table was born. And I love it. And I hate to sell it.
I tried to copy the finish on the 20 second tidy up table, and this is how it ended up. I used Minwax Golden Pecan for the base color and Red Oak for the accent color. The colors got a little blended together through the staining process. I really love how it turned out though because it's a nice warm color. The only thing I don't like is the grain in the pine didn't take much if any color, so it's still a bit yellow, which seems slightly out of place when I look at it. I think it will darken with age and look a little better. Otherwise, this was a super fun project!!

Tue, 03/27/2012 - 04:43
Stain it all! You will get more money for it stained than painted or unfinished.
Tue, 03/27/2012 - 06:09
I will try to do that this weekend... if I can find some money to get stain with. Hehe. I think it would look really great stained with the same method that Ana used on the 20 second tidy up table... rubbing the edges with a darker color... I love that look.
Tue, 04/10/2012 - 04:58
This is awesome! I love it. You did a great job. Do you by any chance have the construction process on this? I would love to try it for my "first" project!! thank you.
Mon, 05/14/2012 - 15:30
I love the 20 second tidy up table and have plans to make 1 but I've been so busy with work that I've been commissioned to build. Nothing for me for a while.... So goes unemployed life. No complaints!!!
This was my first project building something from this site. I absolutely love it! We didnt add the X's because the miter saw was at my dad's house, which I was kind of sad about, but I think it still looks good. Not too bad for mine and my husbands first build!
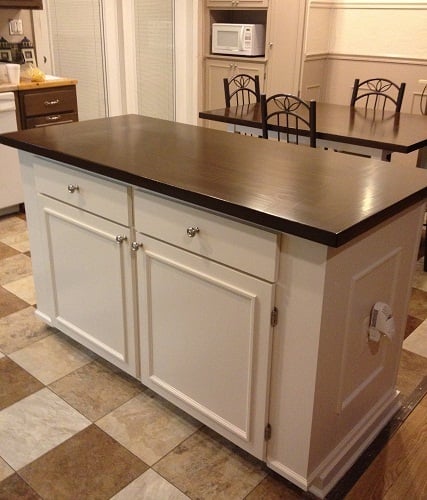
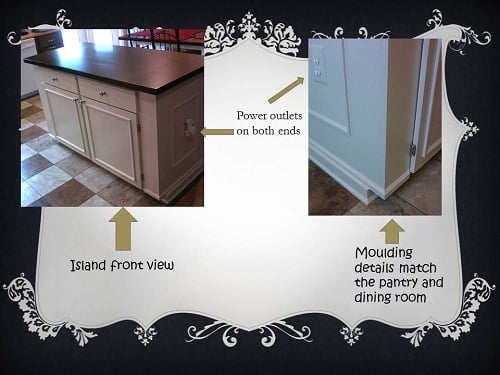
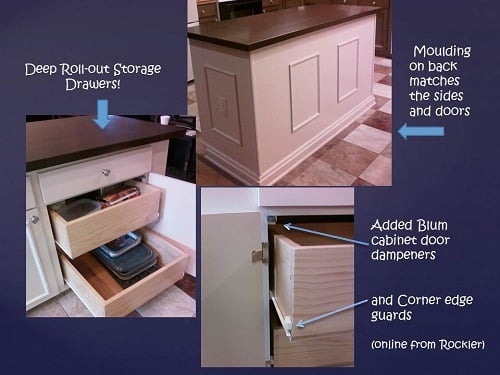
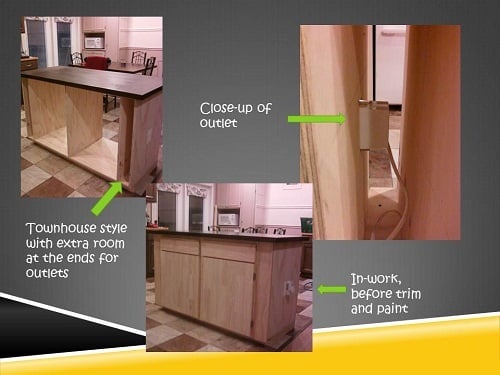
I’ve wanted a new island for awhile but wasn’t quite sure what I wanted it to look like, until I saw Ana’s cabinet plans for the Momplex kitchen! We wanted a fairly large island, so we did two 24” base cabinets “townhouse style” (from Ana’s Kitchen Cabinet Base 101 post) plus we added a little extra space at both ends, so Hubby could install some electrical outlets and we’d still have plenty of room for the drawers. The old island had power already, so he got the outlets wired pretty fast. Behind the doors are some deep pull-out drawers to hold all the stuff you’d usually have to bend down and reach for. Now it’s so convenient! I built a Farmhouse Table top for it and love it! We built flat doors and trimmed them up to match the island sides and back (also matches our pantry and dining room). This project took us about 40 hours to build and finish, and it was so worth it! Ana, you are a rockstar in our house! We now have a real showpiece for our kitchen, thanks to Ana White!

Fri, 03/30/2012 - 21:14
Absolutely stunning! I'm in the process (sooo sooo close to being done) of making a banquette seating area with the creamy colored drawer base and the top stained in walnut. I put the same half round trim on my drawer fronts too. I saw a vanity on display at Lowes with this detail and had to copy it. I love the look! I am also building a trestle table from plans from www.thisoldhouse.com to match. I bought some beautiful matching chairs from Target.com. I can't wait to get it finished. I'm about to go paint the drawers right now. The table components were just primed 15 minutes ago. :-)
Sat, 03/31/2012 - 08:04
Brigitte and Pam, thank you very much for the nice comments! :) I'm having a ball building projects from this site. This is our favorite one so far (we say that every time haha). I have to smile and run my hand across the top whenever I walk past it - I guess when the novelty wears off I'll stop doing that :) Now I'm ready to add those door dampeners to all the cabinet doors in my house (so cool not hearing a slam when you shut them). Brigitte, your project sounds beautiful, can't wait to see the pictures of it!
Sat, 03/31/2012 - 18:57
Absolutely gorgeous! I really love the colors. I've never tried the color express stain - and I have to try it now! The top is so seamless. Love it!
Sun, 04/01/2012 - 05:33
Mebohn, thanks very much for the nice comment! You'll love the color express when you try it. Walnut is my favorite and I've used it for lots of projects. I like brushing it on to get a nice dark first coat, and then on this one, rubbed on a 2nd coat (needed to wait an extra hour for the first coat to dry). I used lots of wood glue and Kreg screws to assemble this top (it's 5 pieces of 1x10, 3 across and 1 at each end) and then added 1x4 underneath (around the edges and across the center for attaching) to make it 1 1/2 inches thick. Then a whole lot of sanding :)
Sat, 05/26/2012 - 06:46
Mariah, Thanks very much for the nice comment! I'm really happy with how this turned out. Now I want to re-do all my kitchen cabinets with Ana's plans. :) PS -- I saw your jugsaw puzzle table this morning on the brag board -- super creative!!
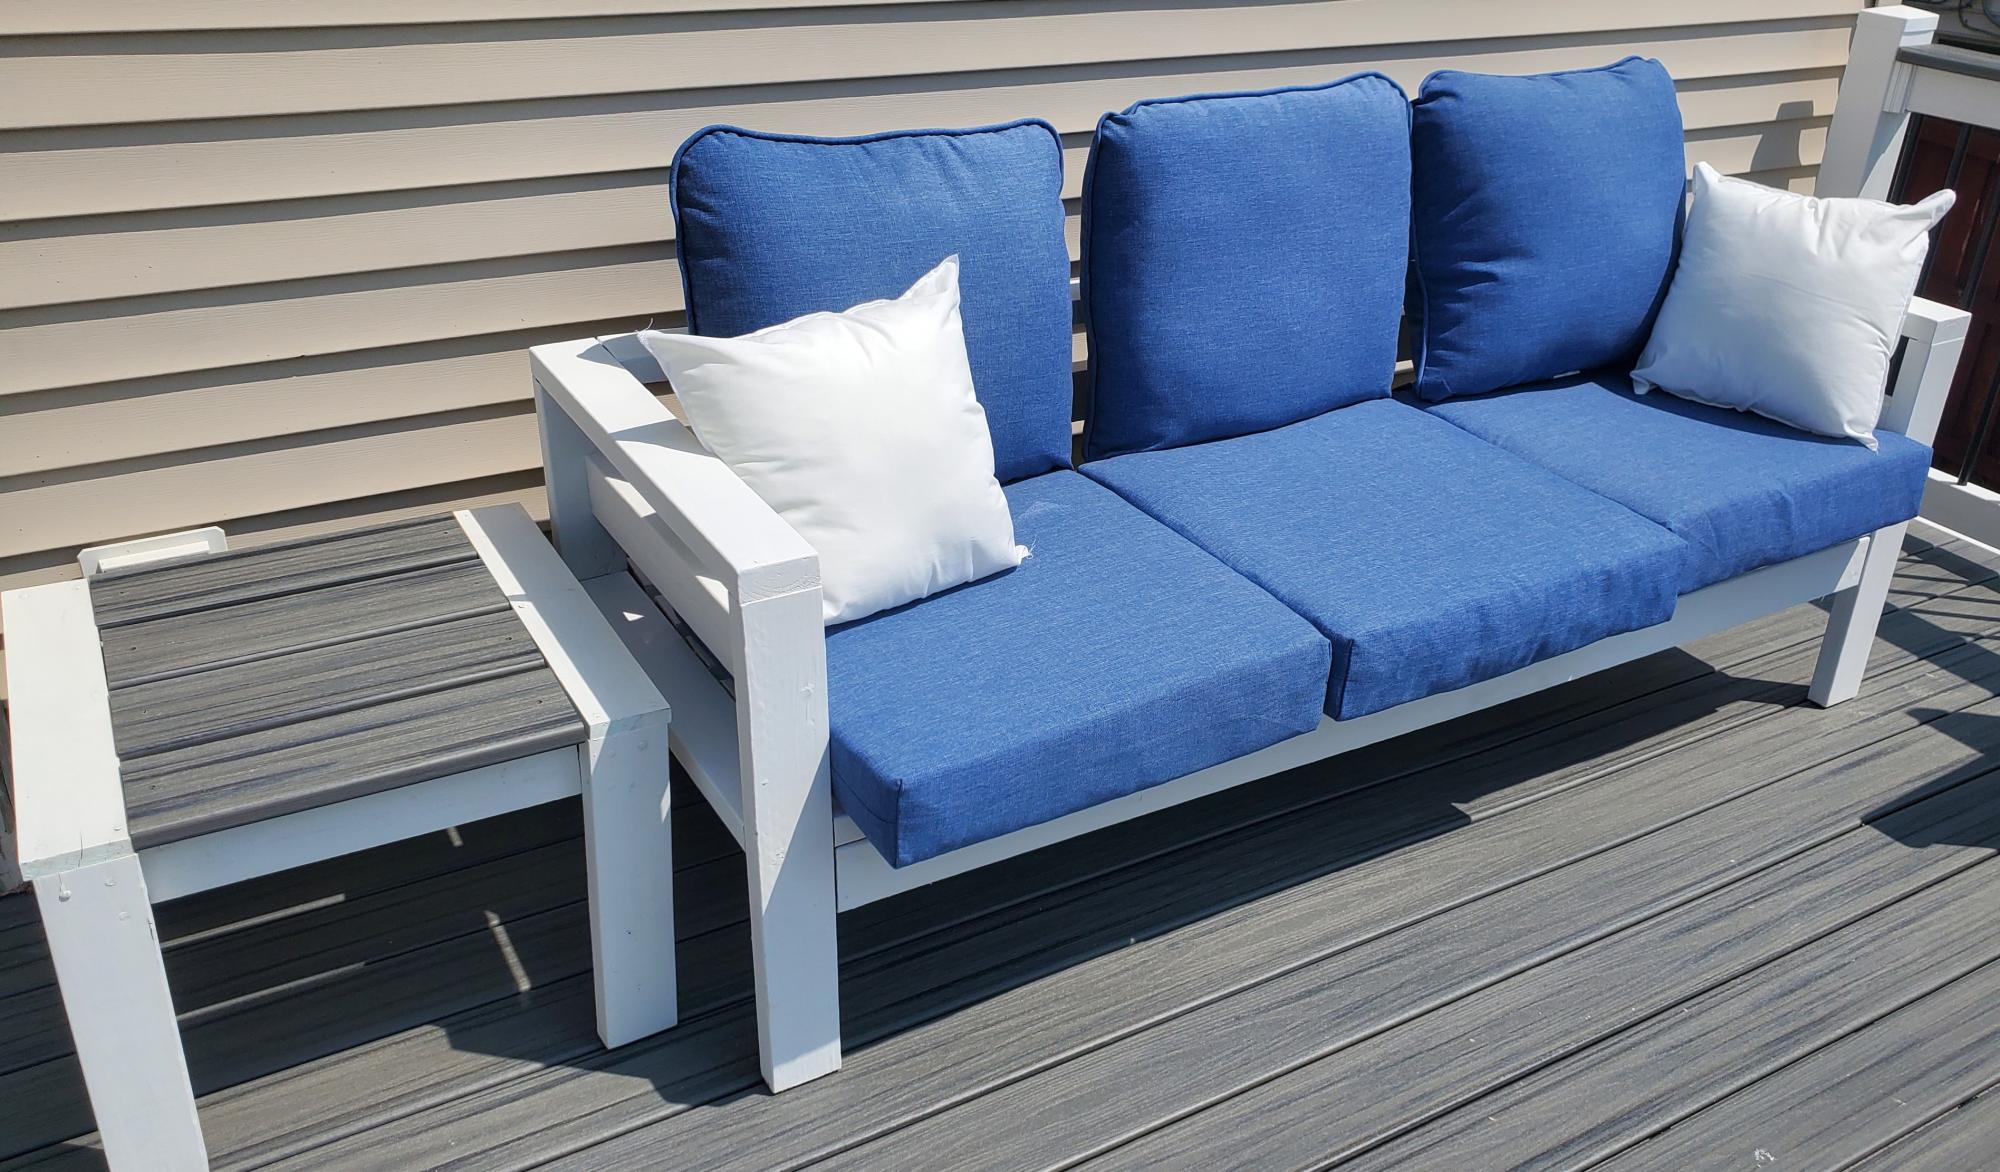
Deck sofa from a Ryobi/Ana video a few years ago. End table is also from Ana's plan using leftover Trex decking. Special thanks to Jen for her assistance.
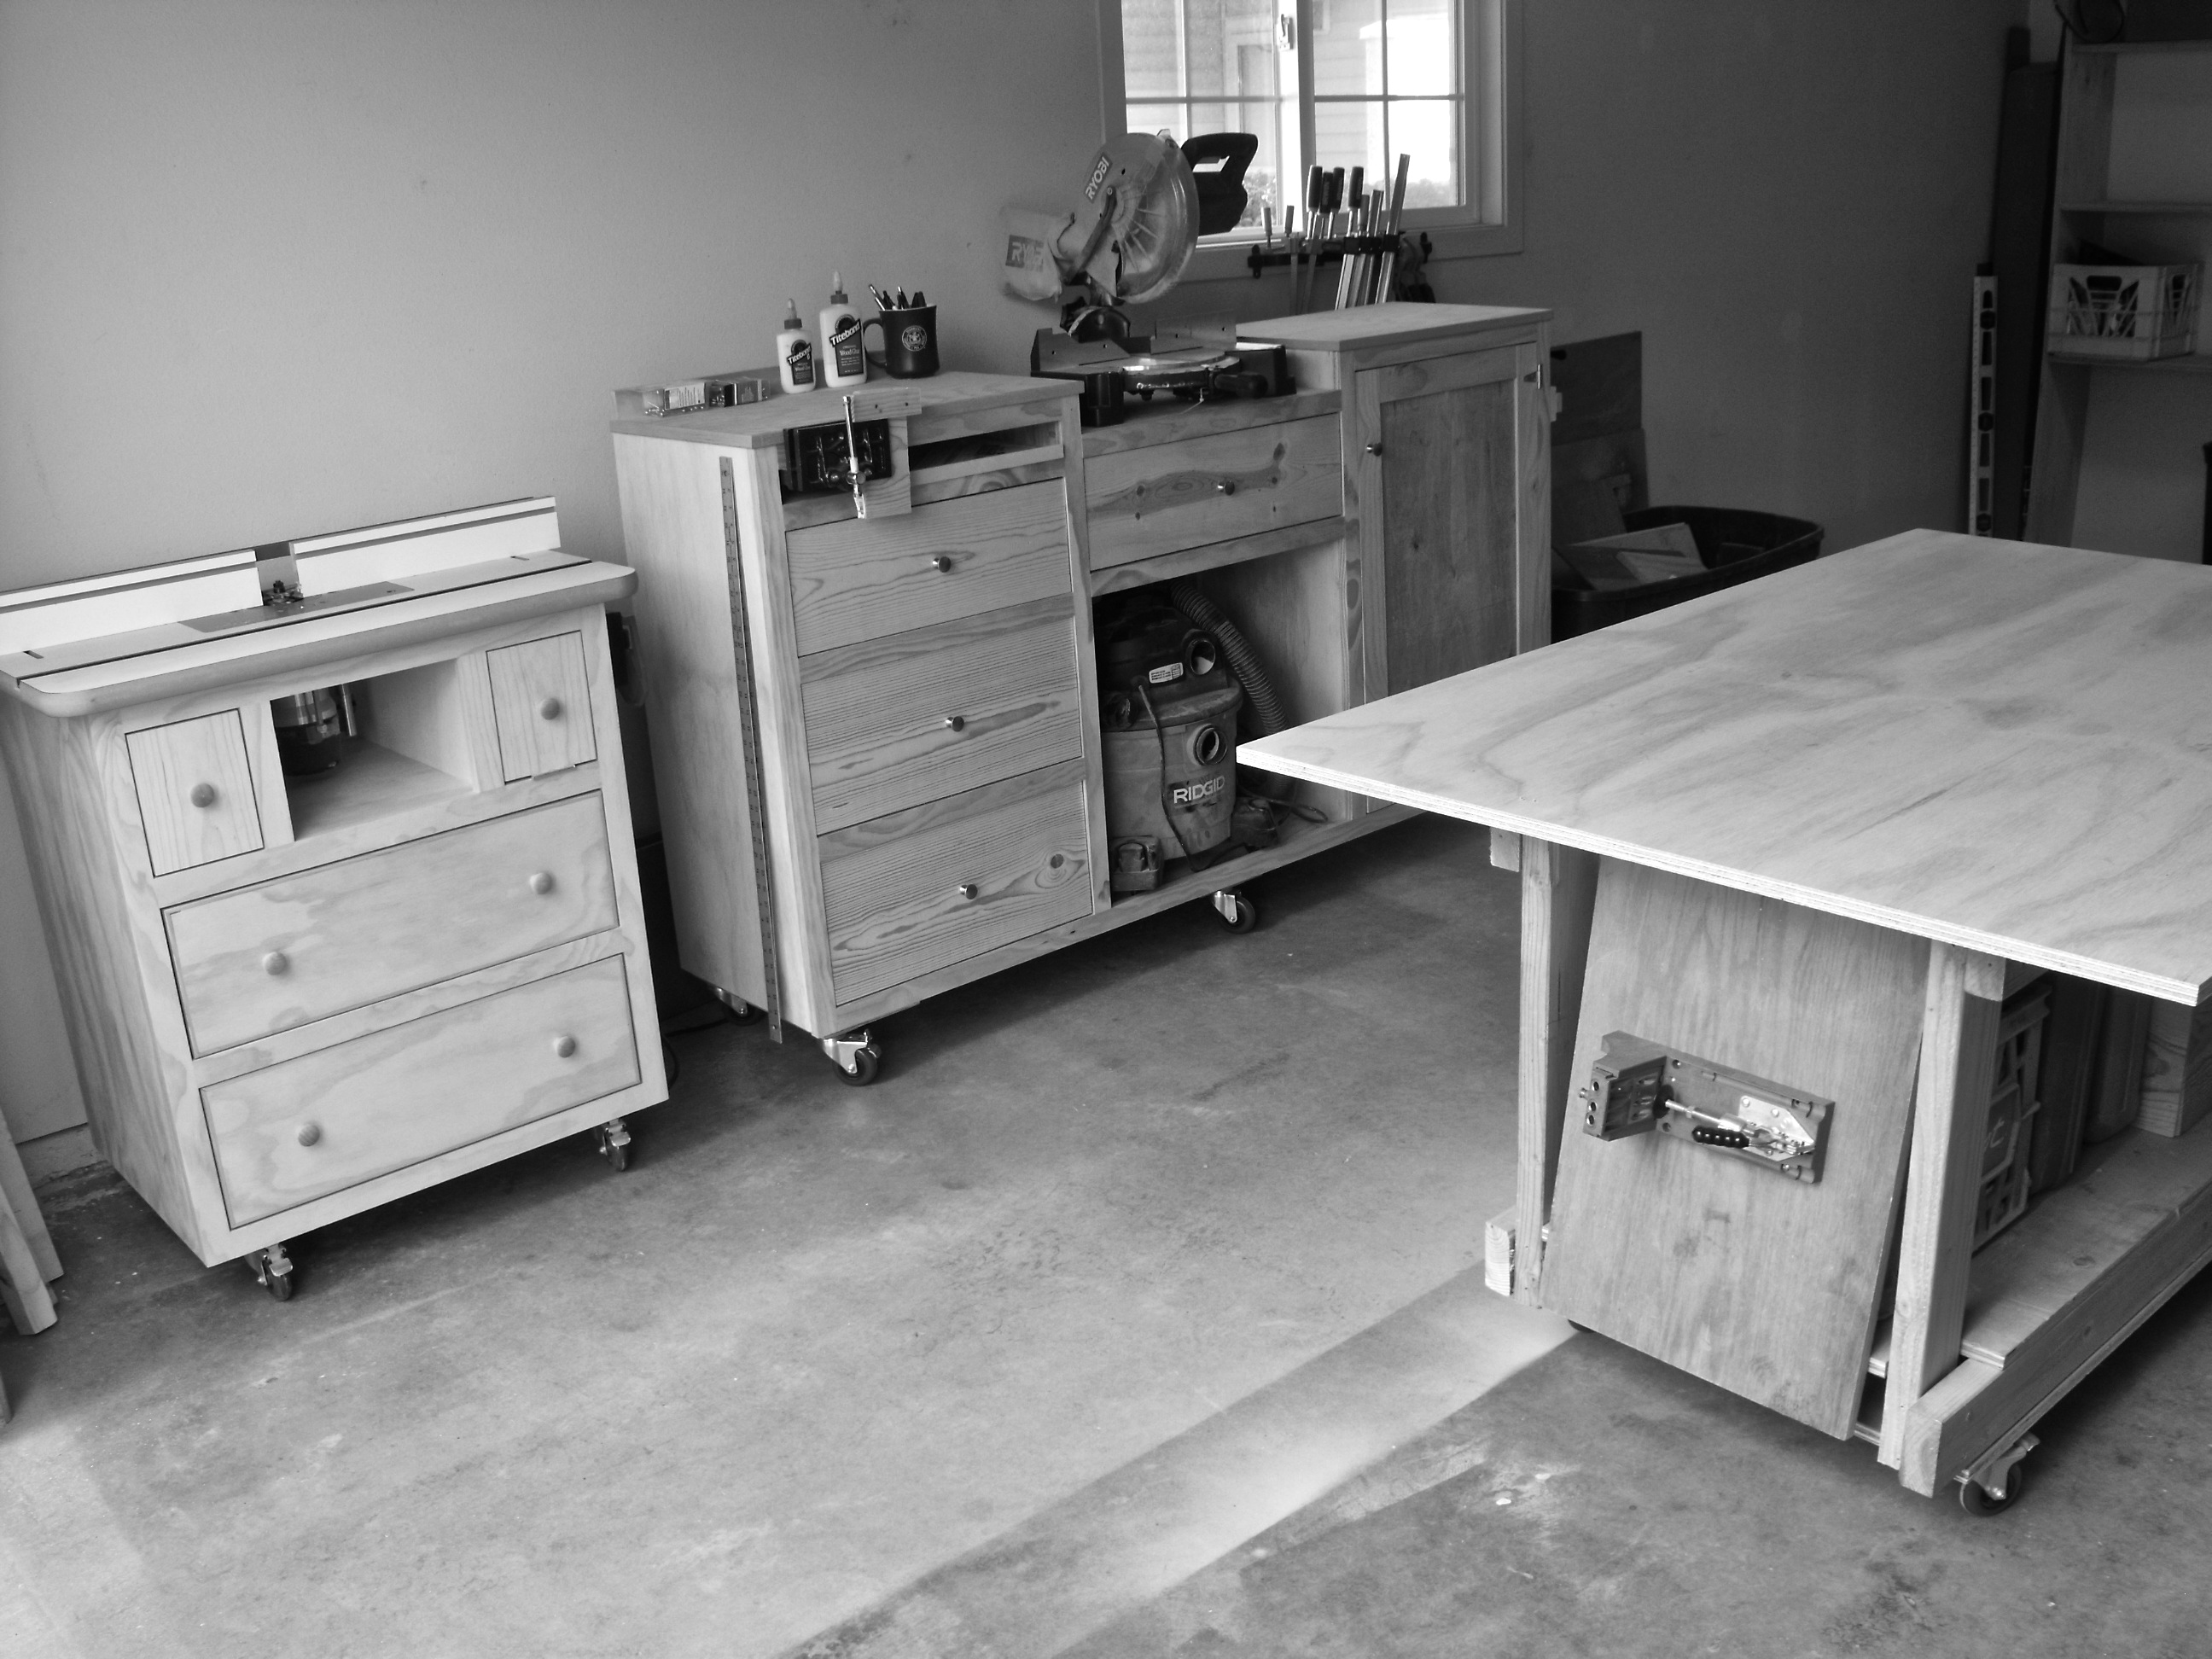
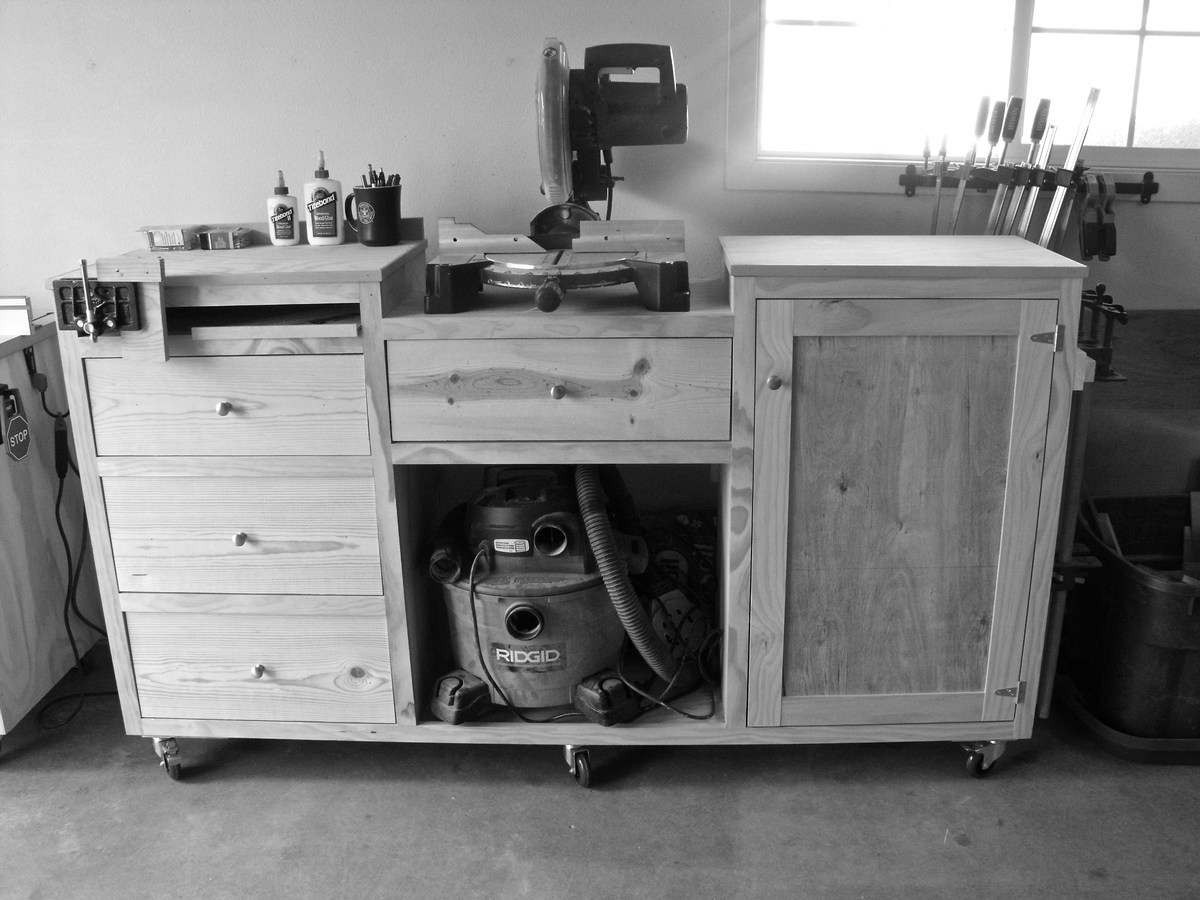
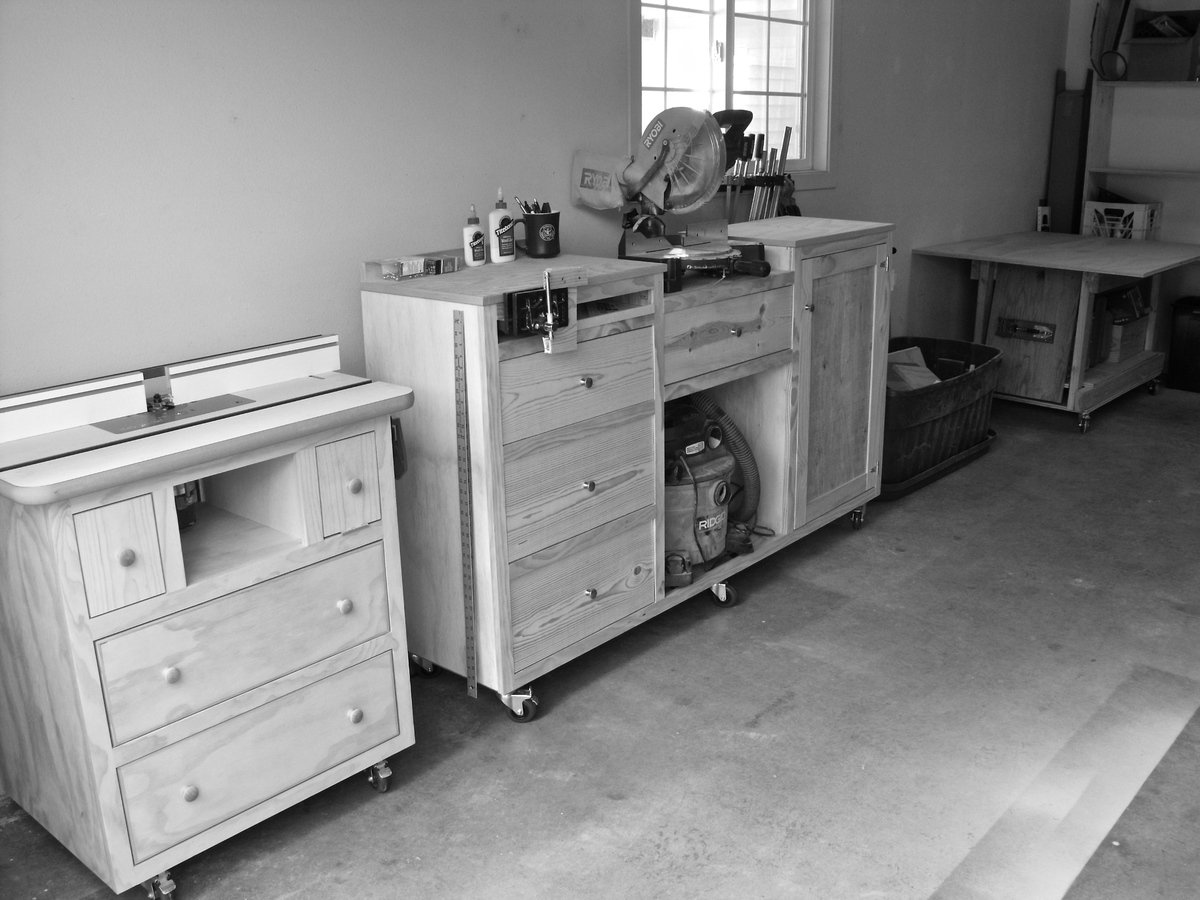
It seems like organization is always a work in progress especially in my one car garage shop. Honestly it took years to realize what I needed to customize my space in order to organize things. I've built bulky work benches out of 2x4s and plywood. I've rearranged the work space over and over again over the last few years and finally came up with my own system
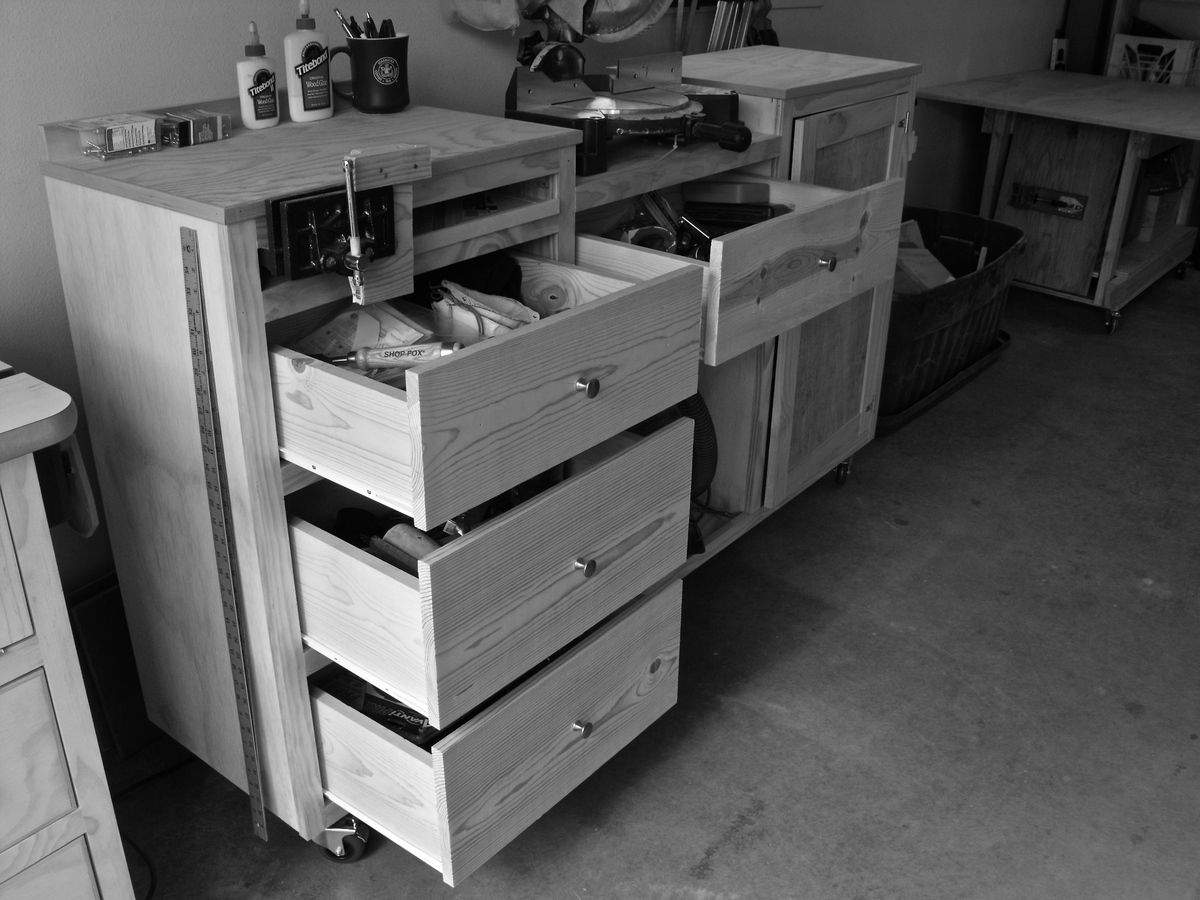
The miter station is a life saver. I had one of the fancy ones with the foldable wings but didn't like it. The object of it was to be able to fold the wings down for storage but I never did and it caused other space saving problems. Now I can easily store all of my small tools and woodworking knick knacks all in one spot. You can find plans for these if you google miter station, but take my advice and custom make one that fits all of your needs. There's a spot for my vice and speed square too. Things like that make it count.
The router table is probably my favorite tool in the shop. You can do so many things with the router table. I started out with just a top and a base and worked from there. Now everything router is in the cabinet ready to go.
Everything is on wheels. Us military guys and gals have to move around a lot so we have to plan for that. Now everything can just roll up the ramp and in to the truck.
Take some time and think about the efficiency of your shop space. How does everything flow? Or do you even flow at all? I used to woodwork myself in to a bunch of brick walls and now I don't.
Thanks for checking it out
Patrick


Fri, 04/06/2012 - 22:05
wow. This is very impressive. I love how tall the pieces are so you don't have to bend down, I'm always working with my tools on the ground and it is a pain.
I covet your router table.
And the miter station is awesome. I just may copy that! I love how it houses all of your other tools as well. OMG! It even holds your shop vac, and has a handy ledge for pipe clamps?! I would love a simple plan.
I'm really curious about your kreg jig setup on that work table too.... details please.
Well Done!
Sat, 04/07/2012 - 09:20
You've got to get up off the ground. I did that for a looooong time and my back suffered big time.
The kreg jig is mounted to a piece of plywood. Then I drilled 2 holes in the top corners and hung them on the side of the work table.
The miter station has to be custom made for your shop needs but planning it out is very important. I needed a spot for my vice and a quick spot for my speed square. So I calculated all the space needed for 3 drawers and then just added a few inches. Also measure how high your saw sits and recess your work surface exactly that amount.
Grizzly tools has a good deal on simple router table set ups right now. I'd check that out. Eventually the miter saw will be hooked up to the shop vac. I bought an outlet that automatically turns the vacuum on when I use the saw.
It's just like the other stuff. Start with the face frame and the rest will come to you.
Patrick

Sat, 04/07/2012 - 11:49
If working without plans makes you twitch, Startwoodworking.com, Fine Woodworking and Popular Woodworking usually all have plans for shop furniture like this. There are enough variations over the years that you can usually find the features you're looking for if you do some mixing and matching. I know there was a very nice router table plan last year.
For the record, I work more like Patrick unless what I'm building gets complex.
Sun, 04/08/2012 - 00:25
Me too! i always seem to get inspired by a plan, and by the end of the project, it's totally different than the original because of all of the adjustments I make. I have never even considered building shop furniture before, these photos are inspiring!
Thanks Clay for the link, I will have to go burn some time on that site as well. Someday (when I don't have a leaky garage) I will have a shop worthy of such beautiful equipment.
Great Job again, Patrick!

Sun, 04/08/2012 - 04:06
Really nice job on these and oh so practical! And Patrick, thanx for serving!

Sun, 04/15/2012 - 14:24
Uh, this is amazing. Good thing I can tell your shop vac and scraps bin have DUST on them, or I think you might be lying about this somewhere you actually work :) ! I just got around to finishing my work space table. I am planning on doing some major organizing before the heat of the summer hits, and then maybe a router table like this might make it to the top of my list.
Mon, 06/11/2012 - 19:56
Patrick, with the recent release of your Farmhouse Table, I find myself watching it over and over and my jaw is always on the floor by the end. In a way, the flow and the craftsmanship is intoxicating. My family is in the process of moving to a new home and I am mostly looking forward to organizing the garage space. I need a man cave and it needs a miter saw station and a router table.
Did you construct it all with pocket holes? What material is the majority of the carcasses, face frames and drawer fronts?
Thanks for the excellent pictures and marvelous video!
Scott
In reply to Sheer inspiration! by Scott Kershaw (not verified)
Mon, 06/11/2012 - 22:54
The materials are just standard pine boards from Home Depot. White pine for the face frames and drawers and 3/4 pine plywood for the cabinets. I'm glad you like the video and I really appreciate the nice words. We have some new stuff coming up, so be checking back for the router table plan.
Patrick
Tue, 06/12/2012 - 18:36
Do you use a table saw for any of your projects? What would you estimate the cost of the miter saw station, alone, to be? For some odd reason, nice 3/4" birch plywood is the same cost as 3/4" pine/fir plywood here is Missoula, MT. An 8' x 4' sheet goes for ~$45. Is your switch for the vacuum the Rockler product like in this video: http://www.youtube.com/watch?v=7LmSVvOnxsI ? Sorry for all the questions. Your station is by far the closest to the what my mind has been imagining and what my garage could handle. Thanks!
In reply to Thank you, Patrick! by Scott Kershaw
Tue, 06/12/2012 - 20:18
I just bought a used Grizzly table saw. It's pretty new to me so I'm all excited about learning on it. For the most part I used a circular saw with a straight edge. Now that I have a table saw, all that should go a lot faster. The switch is very similar to that one, but I bought it from sears a few years back. The miter station is hard to make plans for. Every miter saw is different so the platforms need to be different sizes to match whatever saw you're using. Then you have to keep in mind the size of your shop vac and design it around that as well.
Wed, 06/13/2012 - 05:31
Table saws are something that can last fifty years or more without any trouble, so you can get them used pretty readily. You want to buy a good sturdy saw. Locally the used market is dominated by Craftsman/Sears saws. The saws made before 1962 were made by King-Seeley, a company local to me, and those are pretty good saws (I own one and really like it). The ones made after that were made by Emerson Electric, and the owners of those saws have not had such kind things to say about them.
In reply to Patrick what router table top by jlouki01
Tue, 03/12/2013 - 12:47
I got that table top at Rockler. It's been great so far.
Tue, 09/16/2014 - 06:30
Hi Patrick,
I am in the process of desinging a similar miter station, but am curious as to how long your's is? Some of the recommendations call for a full 8 ft long base, but not sure I have the space in my garage for something like that. What is the length of yours?
Thanks!
Thu, 06/02/2016 - 13:55
Hey Patrick. Thank you for providing so many plans to such beautiful pieces. I am about to start working on the router station this weekend. I can't wait to get started. The reason for the message, could you possibly provide the plans for the miter station you created. I am a new woodworker and I need plans to be able to create some of these pieces. I would love to have a garage of similar pieces. Is that something you could provide? I would be happy to purchase it from you. Thank you again for your hard work. - Justin
Tue, 12/12/2017 - 10:25
I would also be very interested in the plans for your saw table.
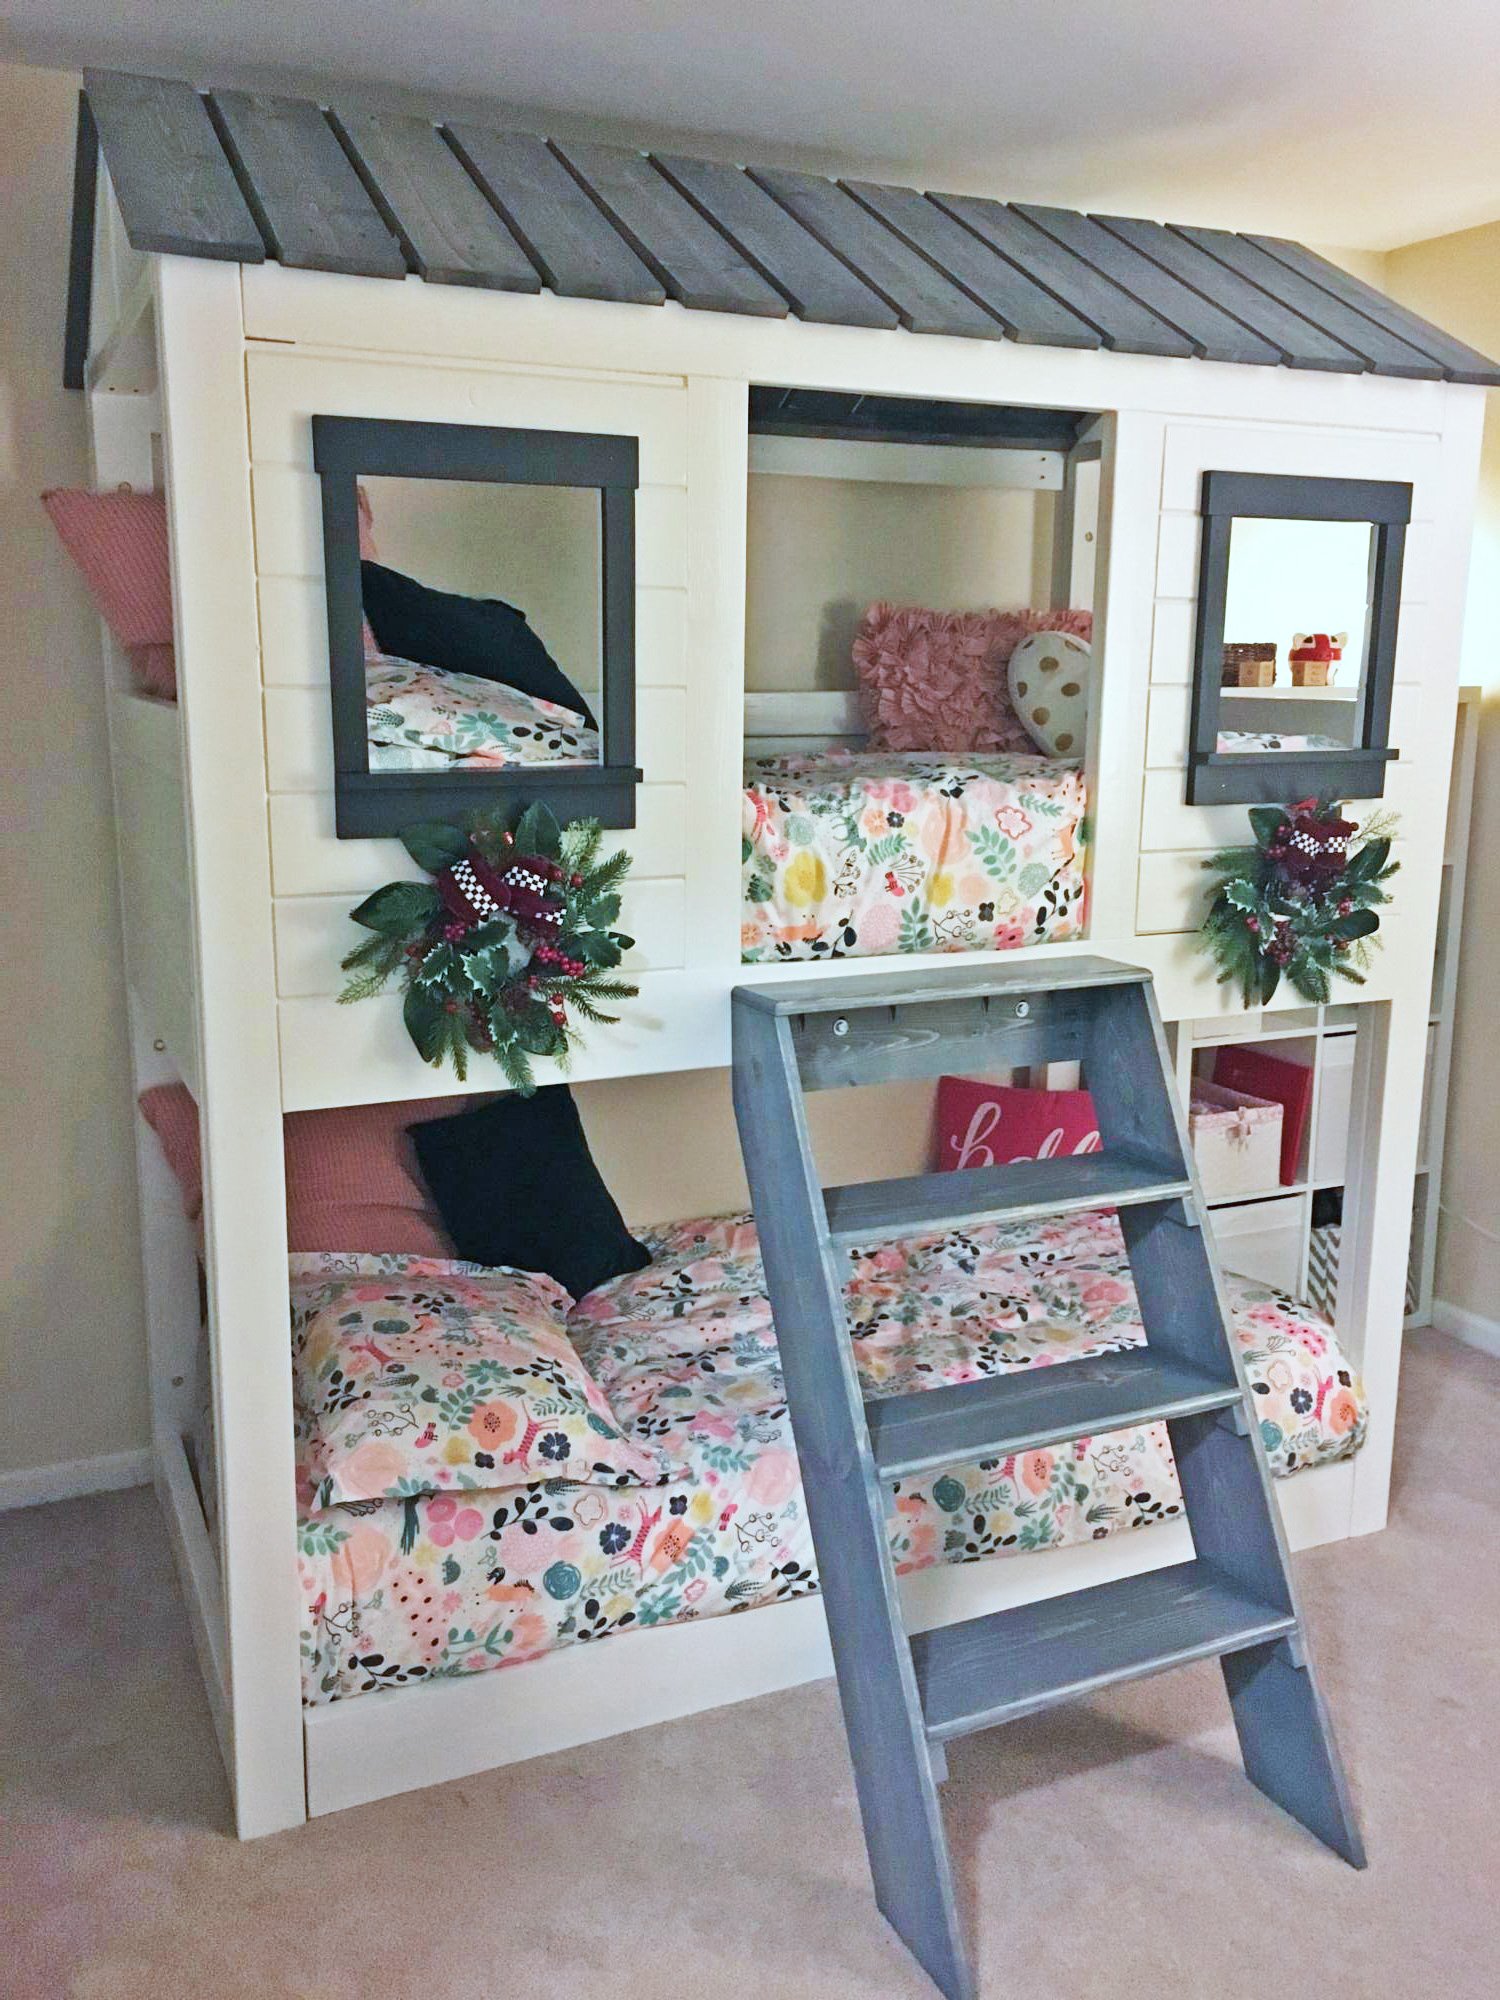
Best Christmas present according to my 4-year-old twins :) I combined ideas from Jen Woodhouse's "cabin bed" and "loft cabin bed" after seeing another brag post from someone who had turned it into a bunk bed. I added a separate platform for the lower mattress for uniformity and to provide some air circulation for the mattress. I also opted for a 2x6 as the bottom weight-bearing beam because I wanted to be able to add an extra couple pocket screws since this mama likes to play in the top bunk too! My girls took turns sleeping in the top/bottom for the first 2 nights, and have been camping out together in the top bunk ever since... and my husband and I are finally getting to sleep in on the weekends because they never want to come out of their room!
**Side note -- I'm not sure how my pictures got flipped but I have no idea how to fix it!
Wed, 01/08/2020 - 06:09
This is exactly what I am looking for. How tall is it? Can you post plans of how you modified it?
Fri, 10/02/2020 - 09:33
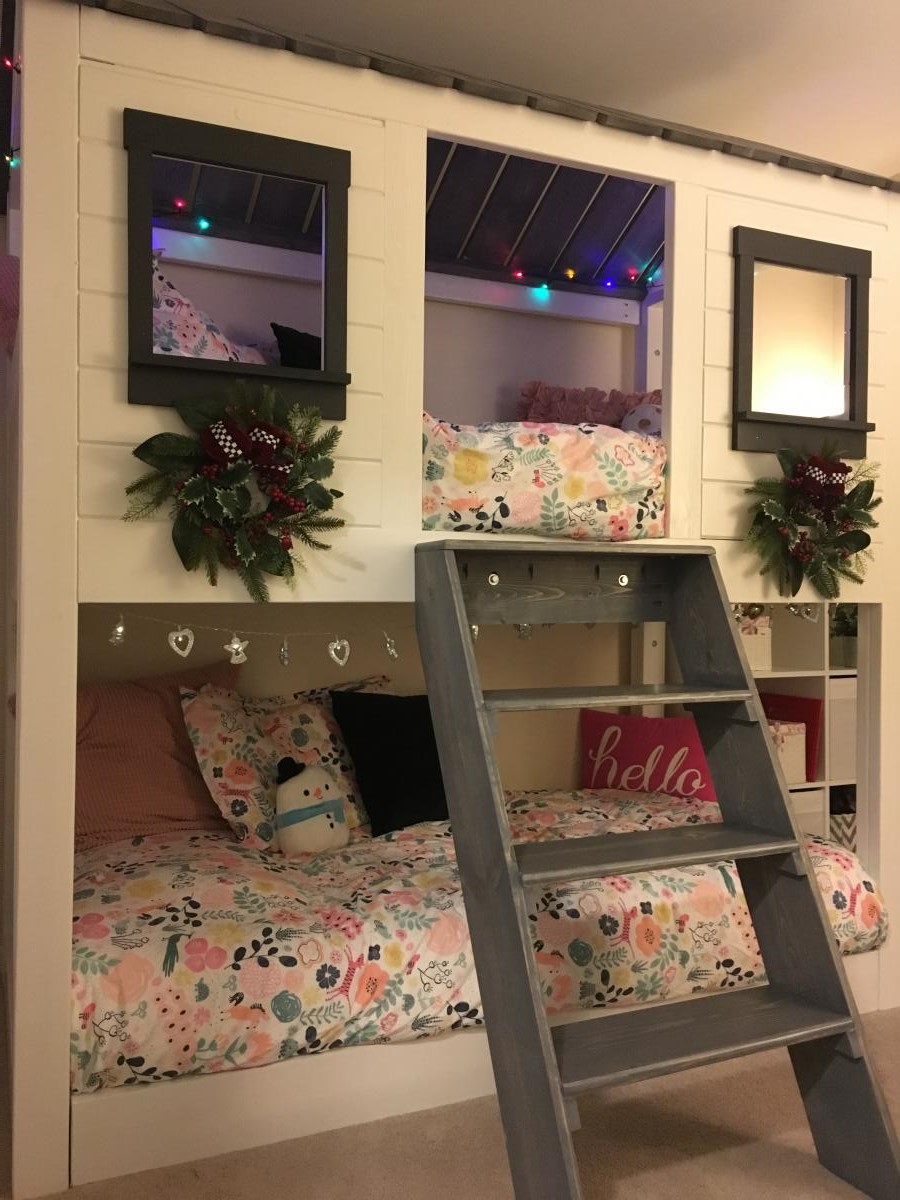
I am SO sorry but I haven't been on here since I posted the bunkbeds (almost 9 months ago!) I had written out all of my modified measurements on the Jen Woodhouse plans but have since lost it somewhere in my garage :( Here is what I can tell you at the moment: short side of "front" & "back" panels = 77.25" ; I kept the angles on the sides/roof the same, so the highest point of roof = 89" (I have short 8' ceilings so this leaves ~7" space up top). I used what I believe were 5" tongue & groove flooring panels instead of plywood for all sides, framed by 2x4s and 2x6 underneath for a little extra support. The height from the bottom of the top bunk to the floor is 38", and I added a 2x6 piece between the bottom legs of the 2 side pieces, flush with the outside edge. I built a rectangular frame for the bottom mattress using 2x6" on the long sides and 2x4 on the short sides -- the 2x4s are raised off the floor in order to allow for air circulation under the mattress and act as the end slats (they're flush on top with the rest of the slats, which I used 2x4s instead of the 1x in the plans)... instead of the 2x2 supports for the mattresses I used some scrap 2x3s from my kids old toddler beds which I had also built but tried to recycle as much of the wood as I could for this project, plus the 2x6 gave me a little more wiggle room -- if you use 2x4 you won't have space for 2x3 supports. The front "door" opening is 22.75", which I based on my size and me being able to get in and out easily (as mentioned above, I like to camp out with my kids sometimes!). The window openings are 12" w x 13.5" h, but the height is measured after I made a 1x3" window ledge which is flush with the inside of the wall; the rest of the windows are framed with 1x2s and 1x3s.
The full width of the side panels is 38" and the front/back are 78.5" -- I based these on the mattresses which I had already bought (Novaform twin from Costco -- since they're memory foam they're a little easier to "squeeze" in the top bunk than I would imagine a regular mattress would be).
I think that covers everything, sorry again about replying so late!
Fri, 10/02/2020 - 09:42
2 more things:
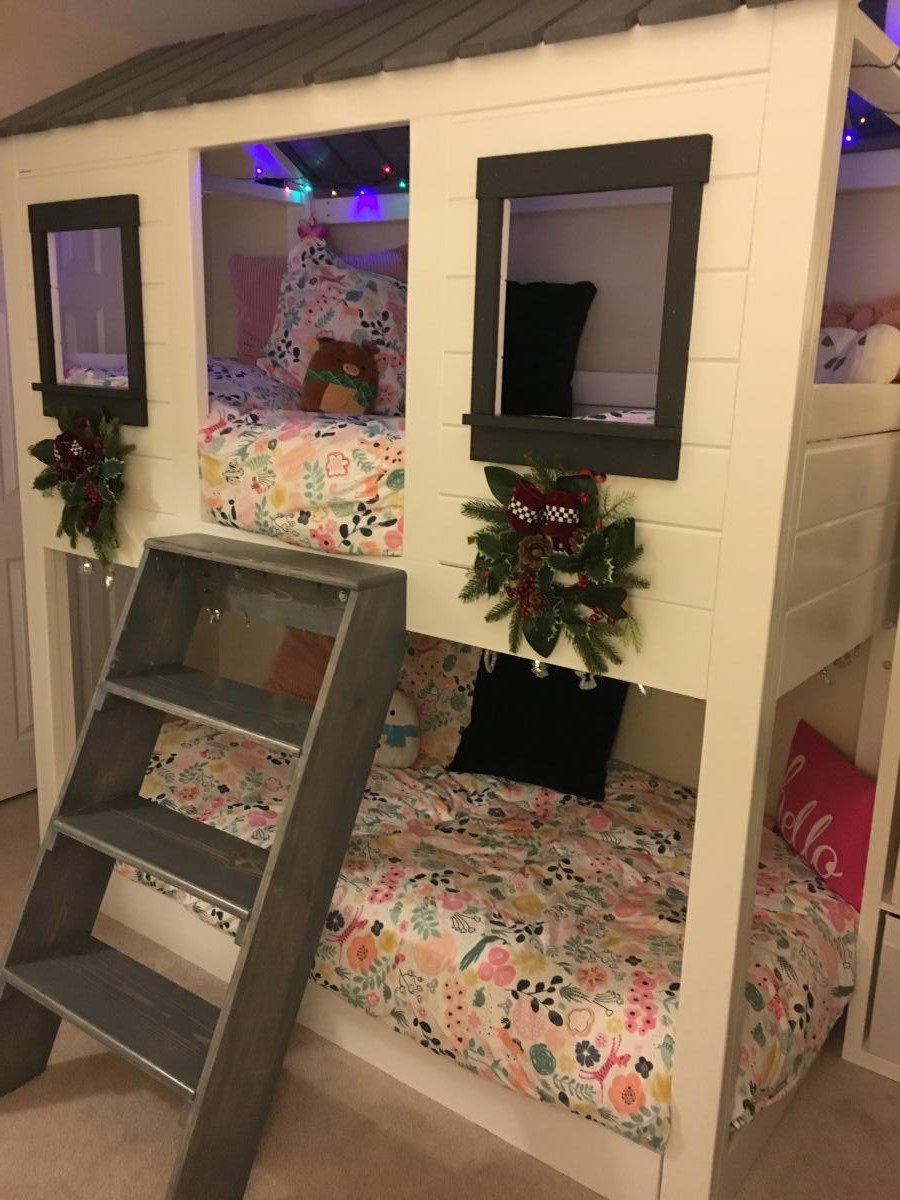
The bottom "frame" was meant to be removable for easy assembly/disassembly as my family moves a lot! That is why I used the inner 2x4s to hold the long side rails together, and the short-side 2x6s which are attached to the side frames are merely fore the illusion that it's all one piece. I did place a couple 2.5" screws through the inside of the 2x4s right into the legs of the upper bunk to make sure it stays in place.
When building the front panels with the windows, I decided on door opening first, then window opening (based on the size of the tongue & groove flooring), then calculated the width of all the pieces to create the window opening. I used pocked holes to connect the tongue & groove flooring to the "frame" created by the 2x4 pieces, and TONS of wood glue in between the boards. Adding the window frames with glue & nails helped provide a little more stability to the windows, although once the glue was dry there was zero movement around the window but I never know with my extremely-destructive twins! Now they're able to climb all over the bunk using the window ledge for support and it's no problem.
Total cost was under $200. The wood was a combination of select pine, Douglas fir. I used Minwax clear finish. Instead of slats I used plywood. This is going into the spare bedroom. We are quite pleased.
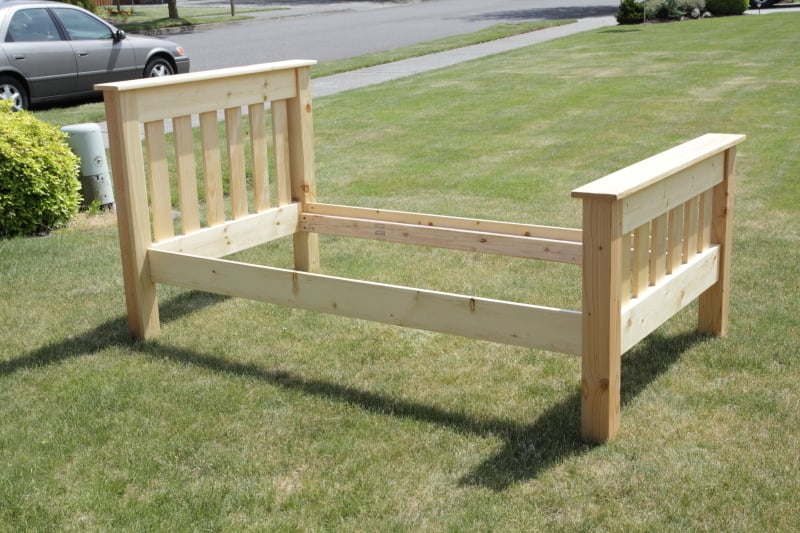
Mon, 05/28/2012 - 19:51
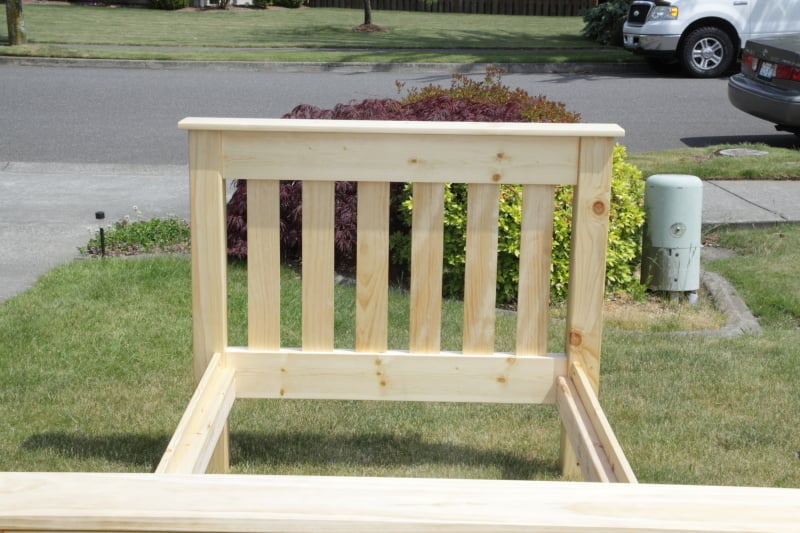
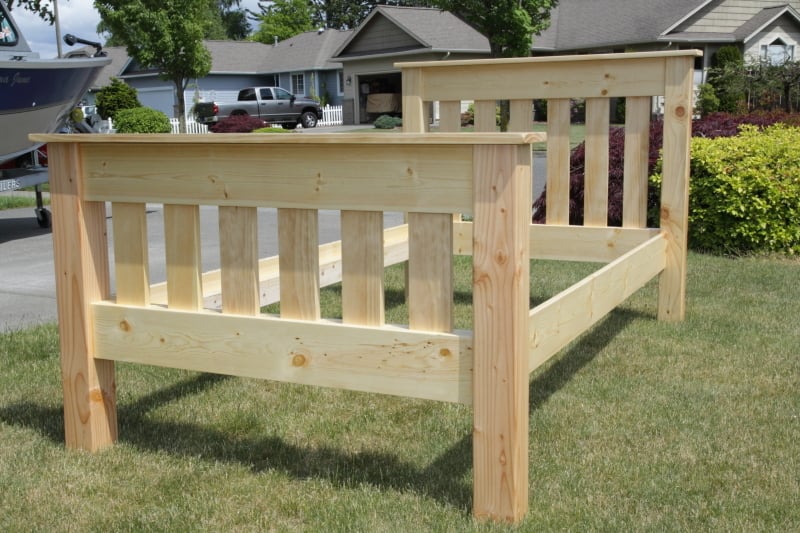
We chose to go with a 1 x 6 instead of a 2 x 4 for the top of the head and foot boards.
Tue, 05/29/2012 - 16:29
Can you take the bed apart in case you move? You did a great job.
Fri, 06/01/2012 - 20:45
Yes it comes apart. A total of four pieces. Headboard, footboard, and the two sides. Also a fith piece if you count the plywood base for the mattress. The sides are screwed in at each of the corners of the head and footboards.
Mon, 05/12/2014 - 19:01
Thinking of building this for my son as we move from crib to bed. Just curious how sturdy and strong the bed is? From the pictures it doesn't look like there's much wood where the rails attach to the head and footboard. Did you use pocket holes and screws? Any comments on how it's held up, what you might do differently? Also any idea if it'll hold a kid and parent for nightly story time?
Thanks...nice work!
Wed, 05/14/2014 - 15:22
It is in our guest room and does not get much use. However, it is screwed in at the corners not with pocket screws because the rails were too close to the edges. I chose to screw them in starting farther back and at a 45 degree angle to send the screw deeper towards the center of the four posts. It is very strong. Another suggestion would to purchase bed hardware. Hardware can be found online or in a hardware stores for attaching rails to bed posts. I've used such hardware for fixing commercial beds I've purchased.
Hope this helps.
Tue, 01/20/2015 - 15:25
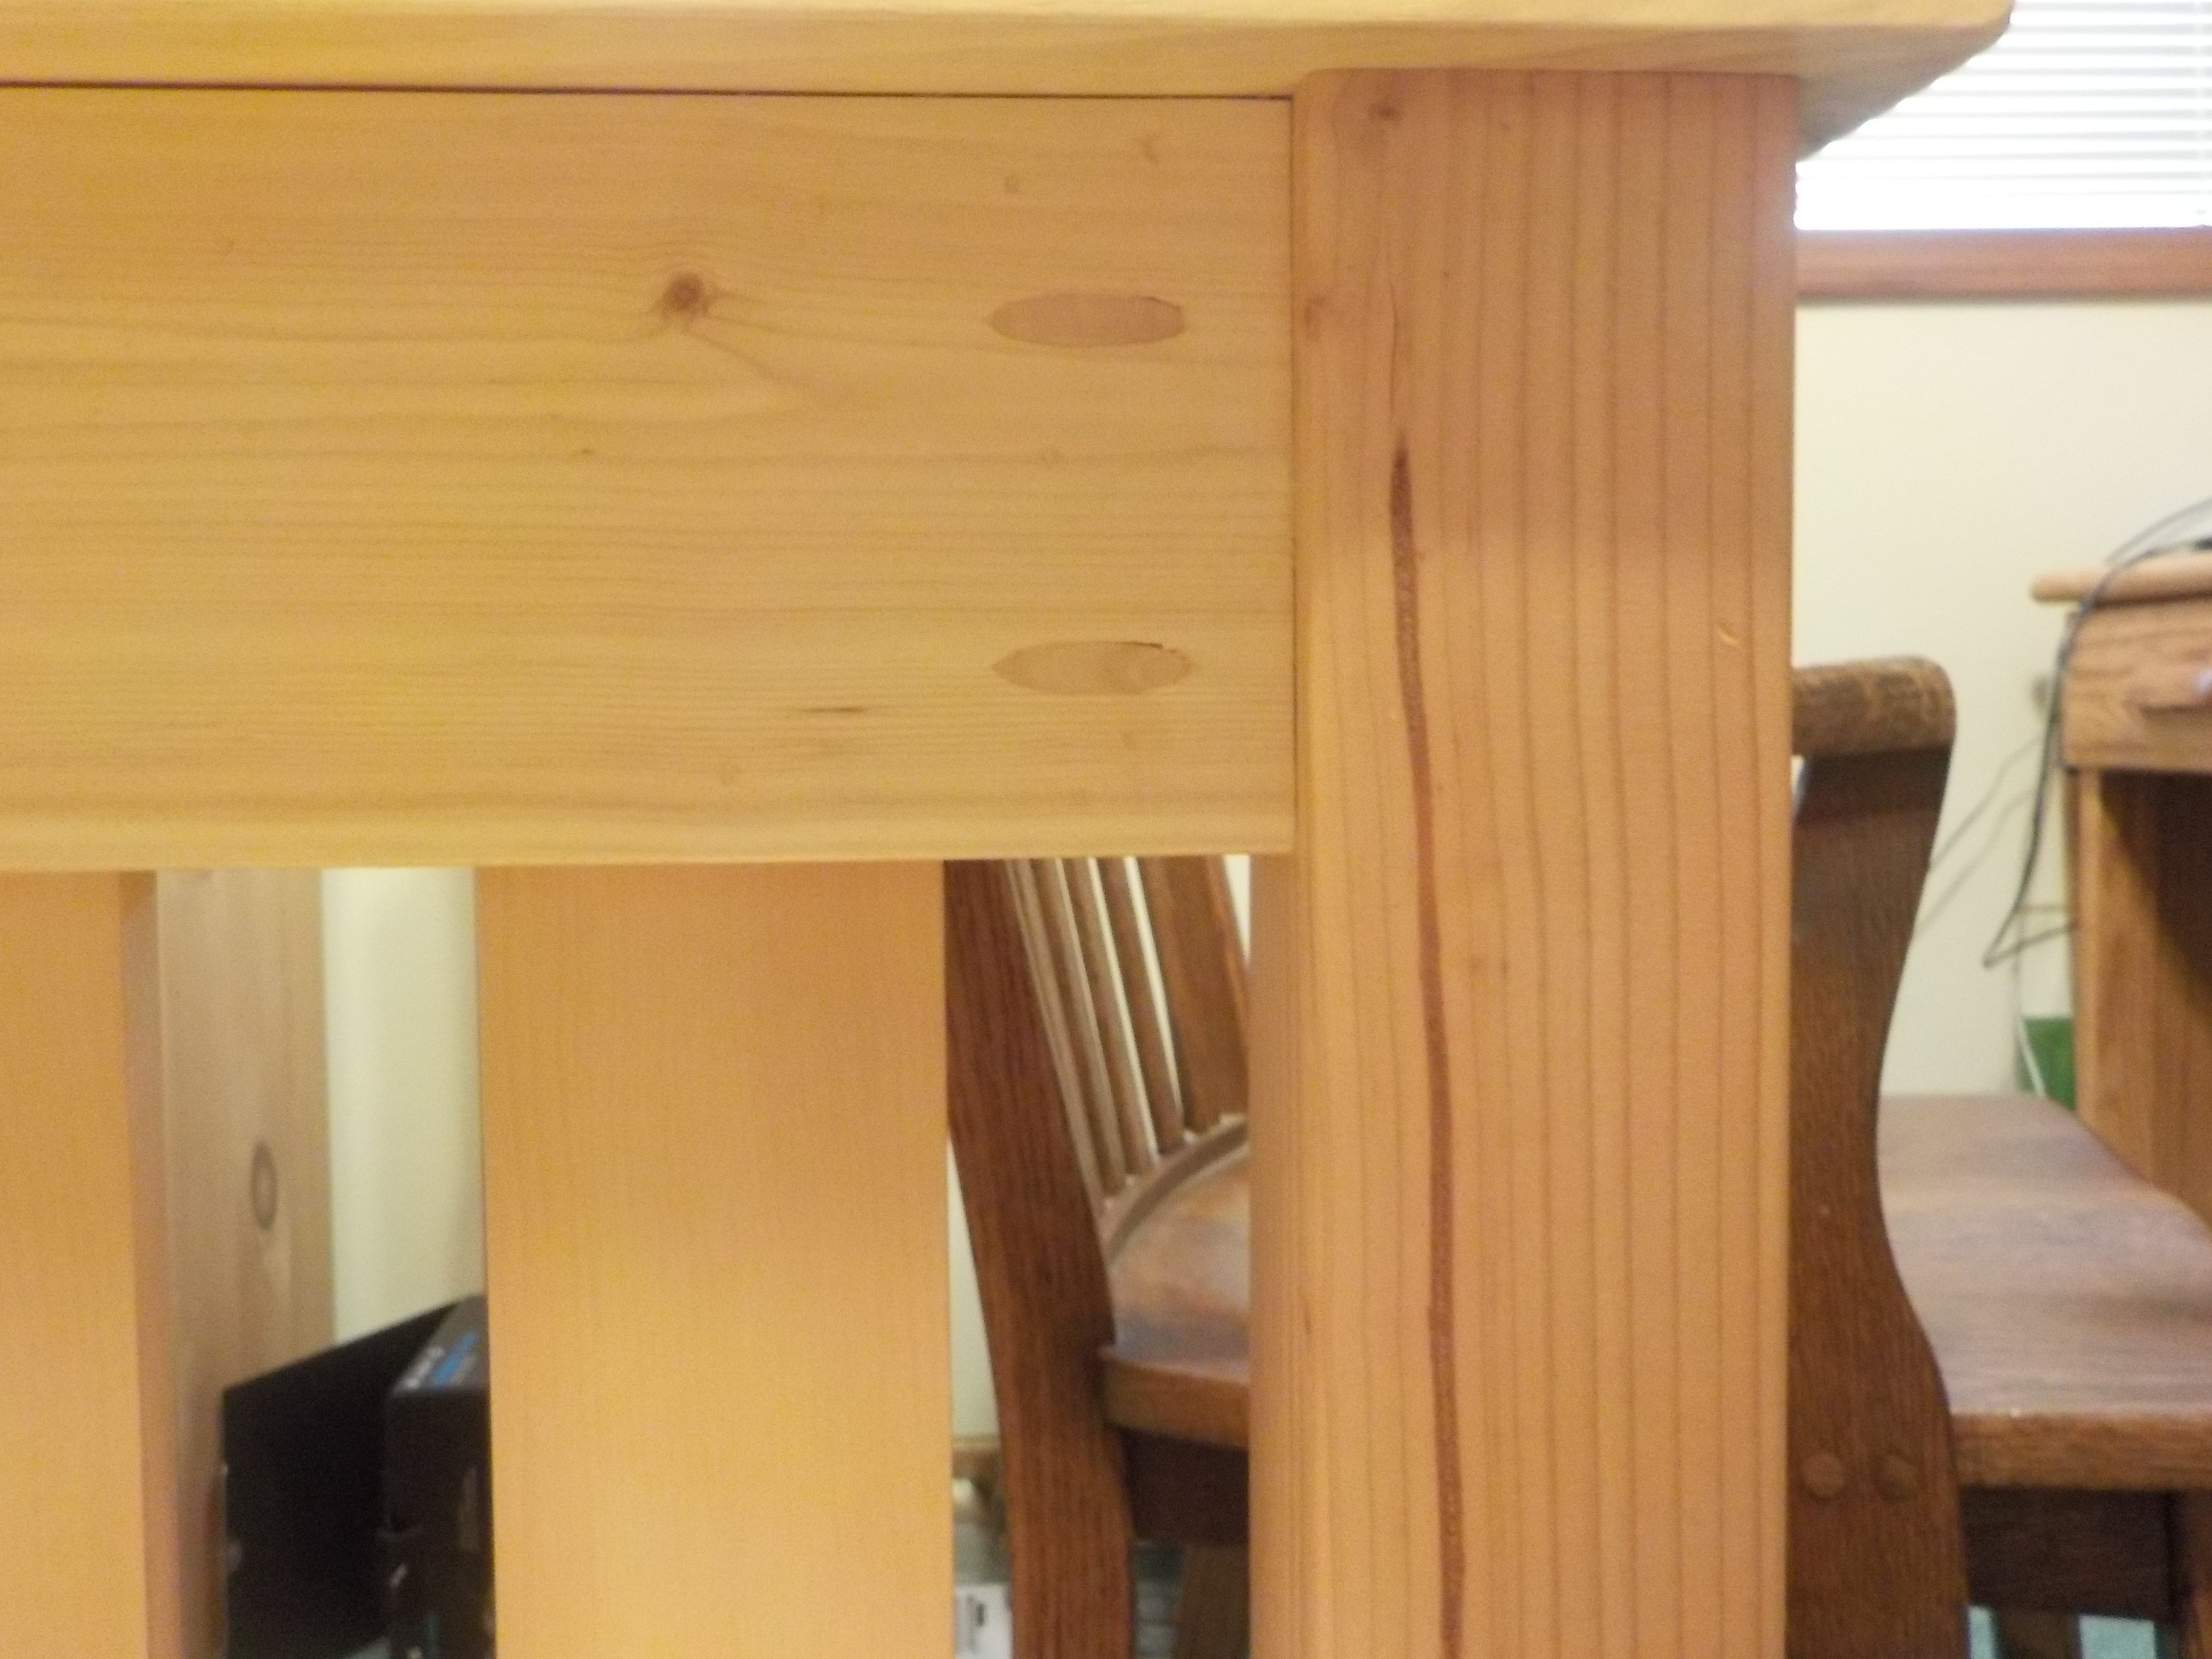
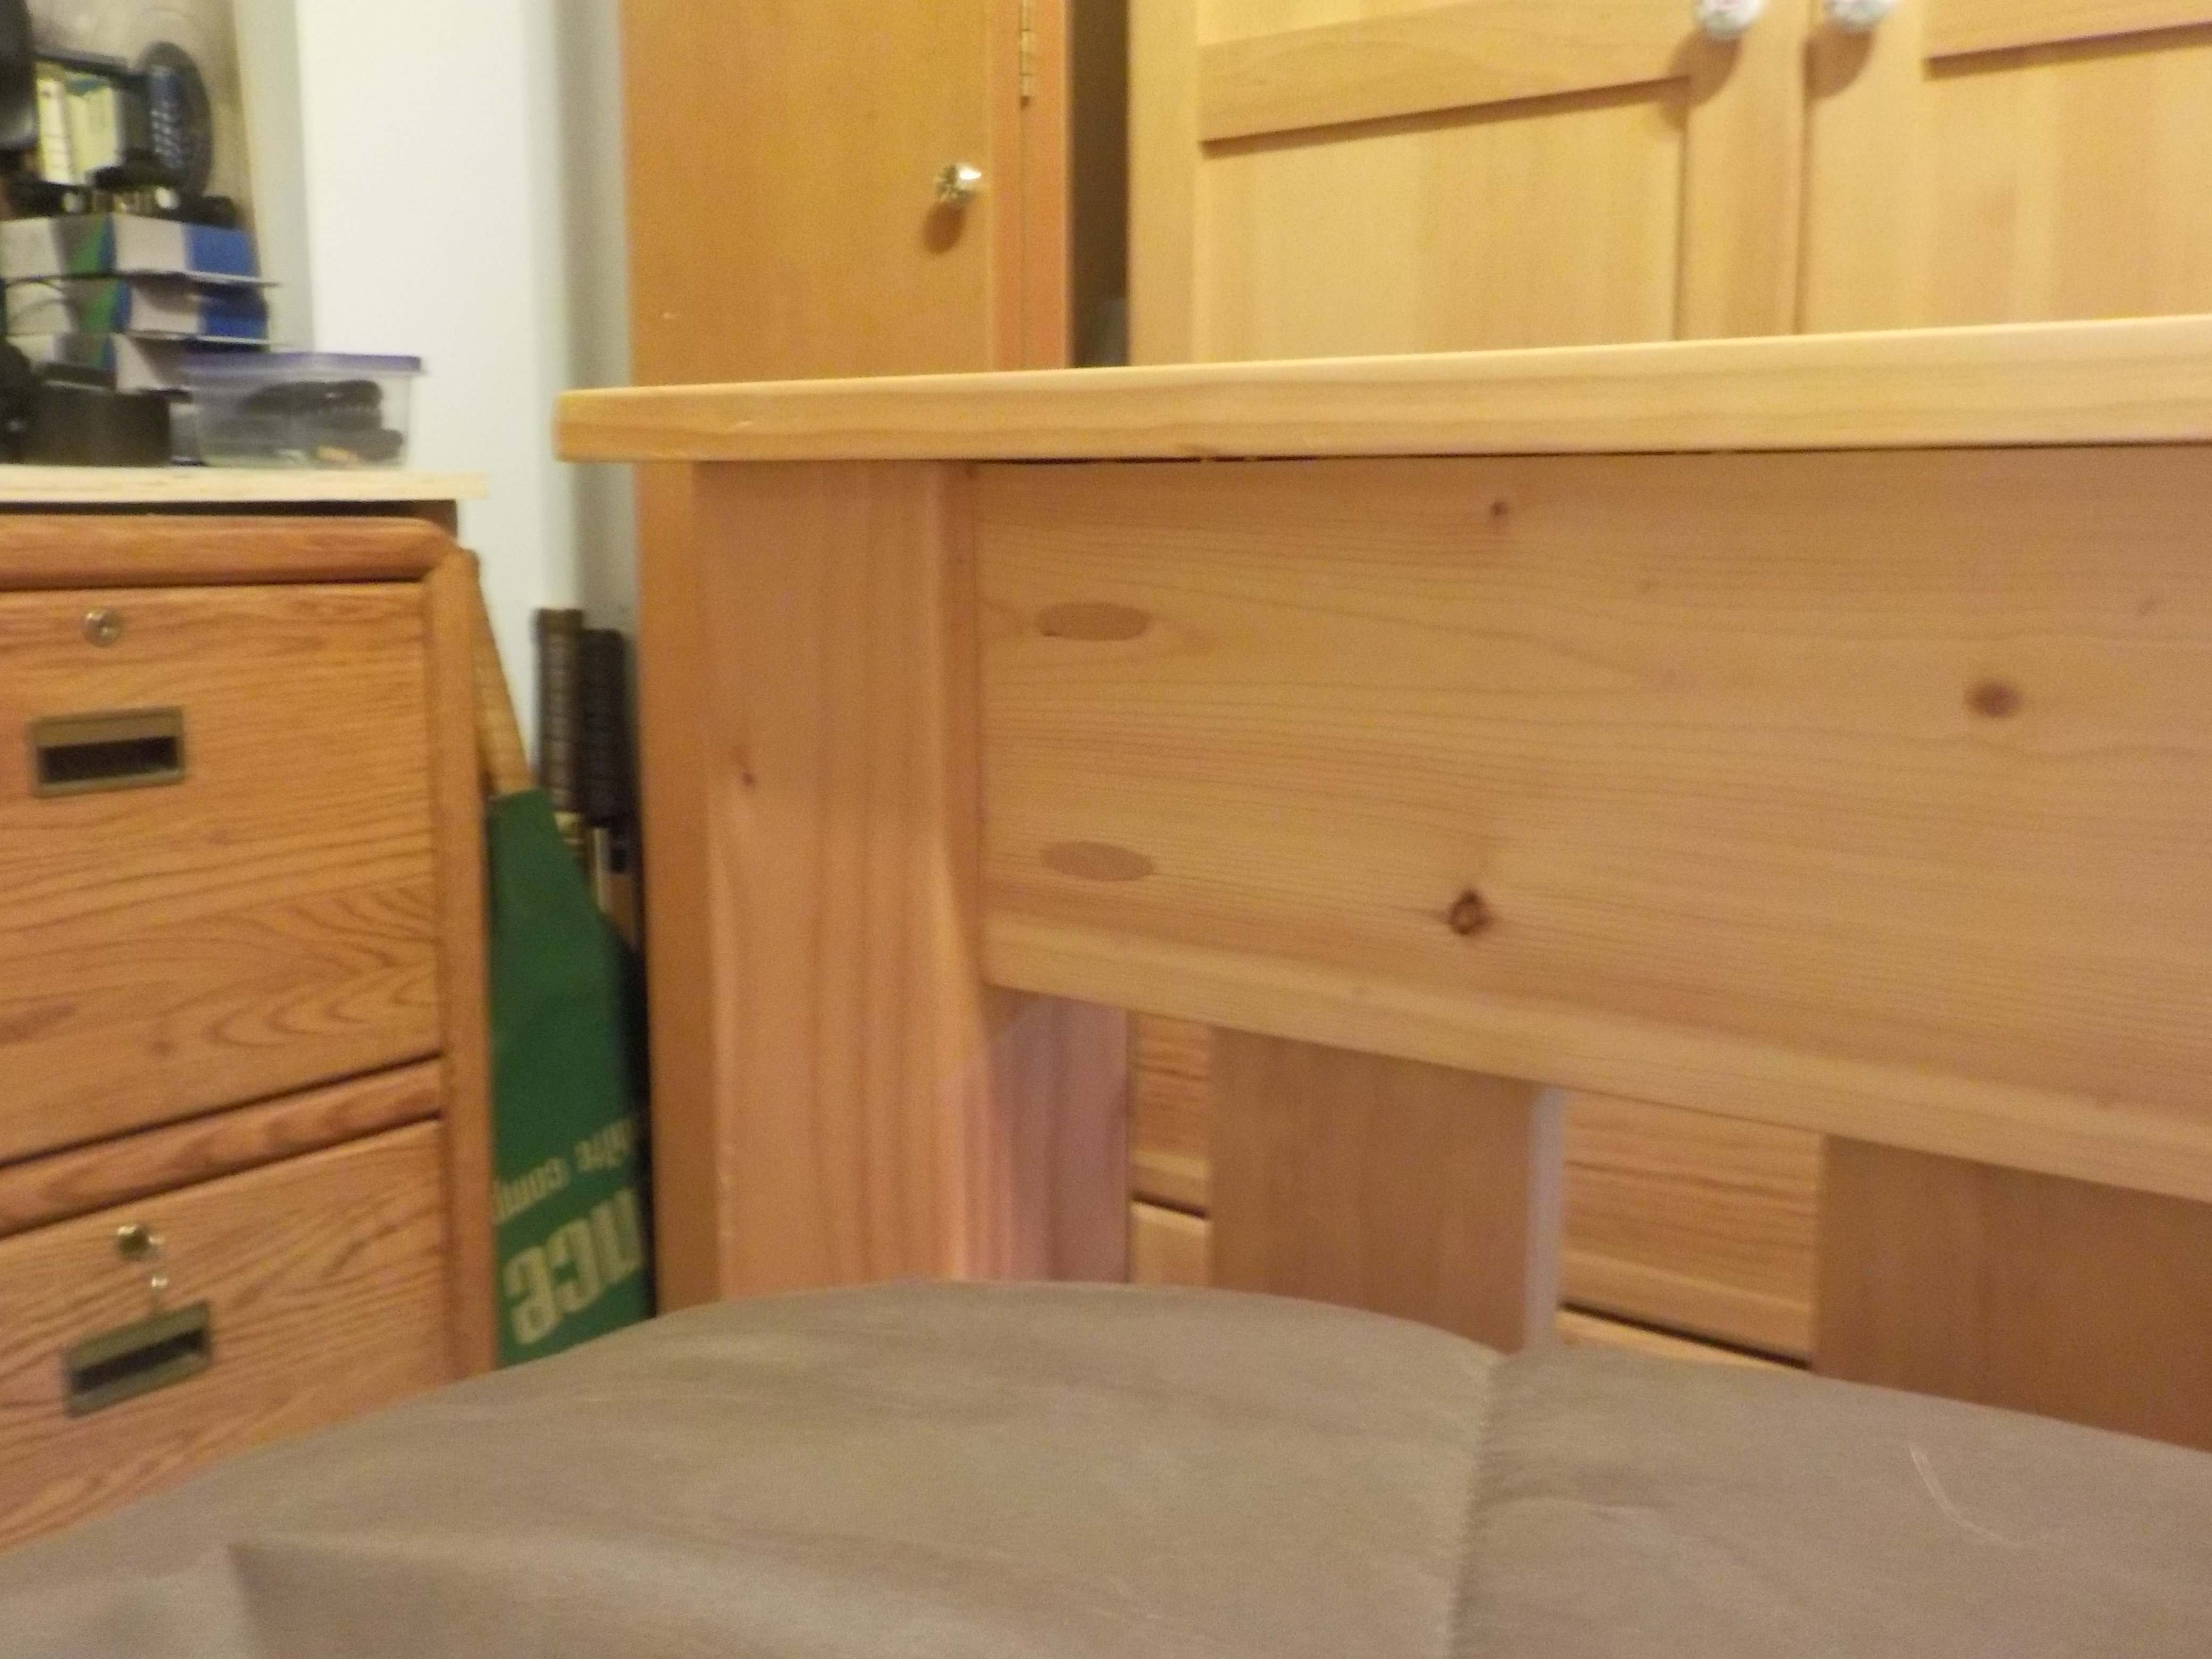
Sorry it took so long to answer. Where I put the screws depended on how the bed was going to be placed in the room. In our case, the headboard was going to up against a wall. Therefore the screws were on the wall side of the headboard. The footboard of the bed had the screws on the mattress side. Kreg sells pocket hole plugs that work very well. Glue them in after you screw the head and foot boards together and sand them before finishing.
The sides of the bed that are attached to the head and foot boards and screwed in too. I had to screw them in at a sharper angle to get enough sideboard material but deep enough into the head and foot boards in. Use the longest screws possible for strength without going all the way through the four corner posts.
Tue, 01/20/2015 - 15:50
Either way described above will work. See added photos of plugged finished pocket holes and underside attachment to foot-board.
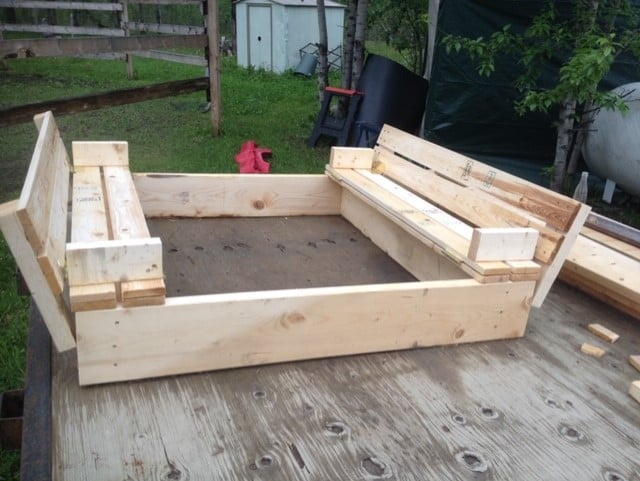
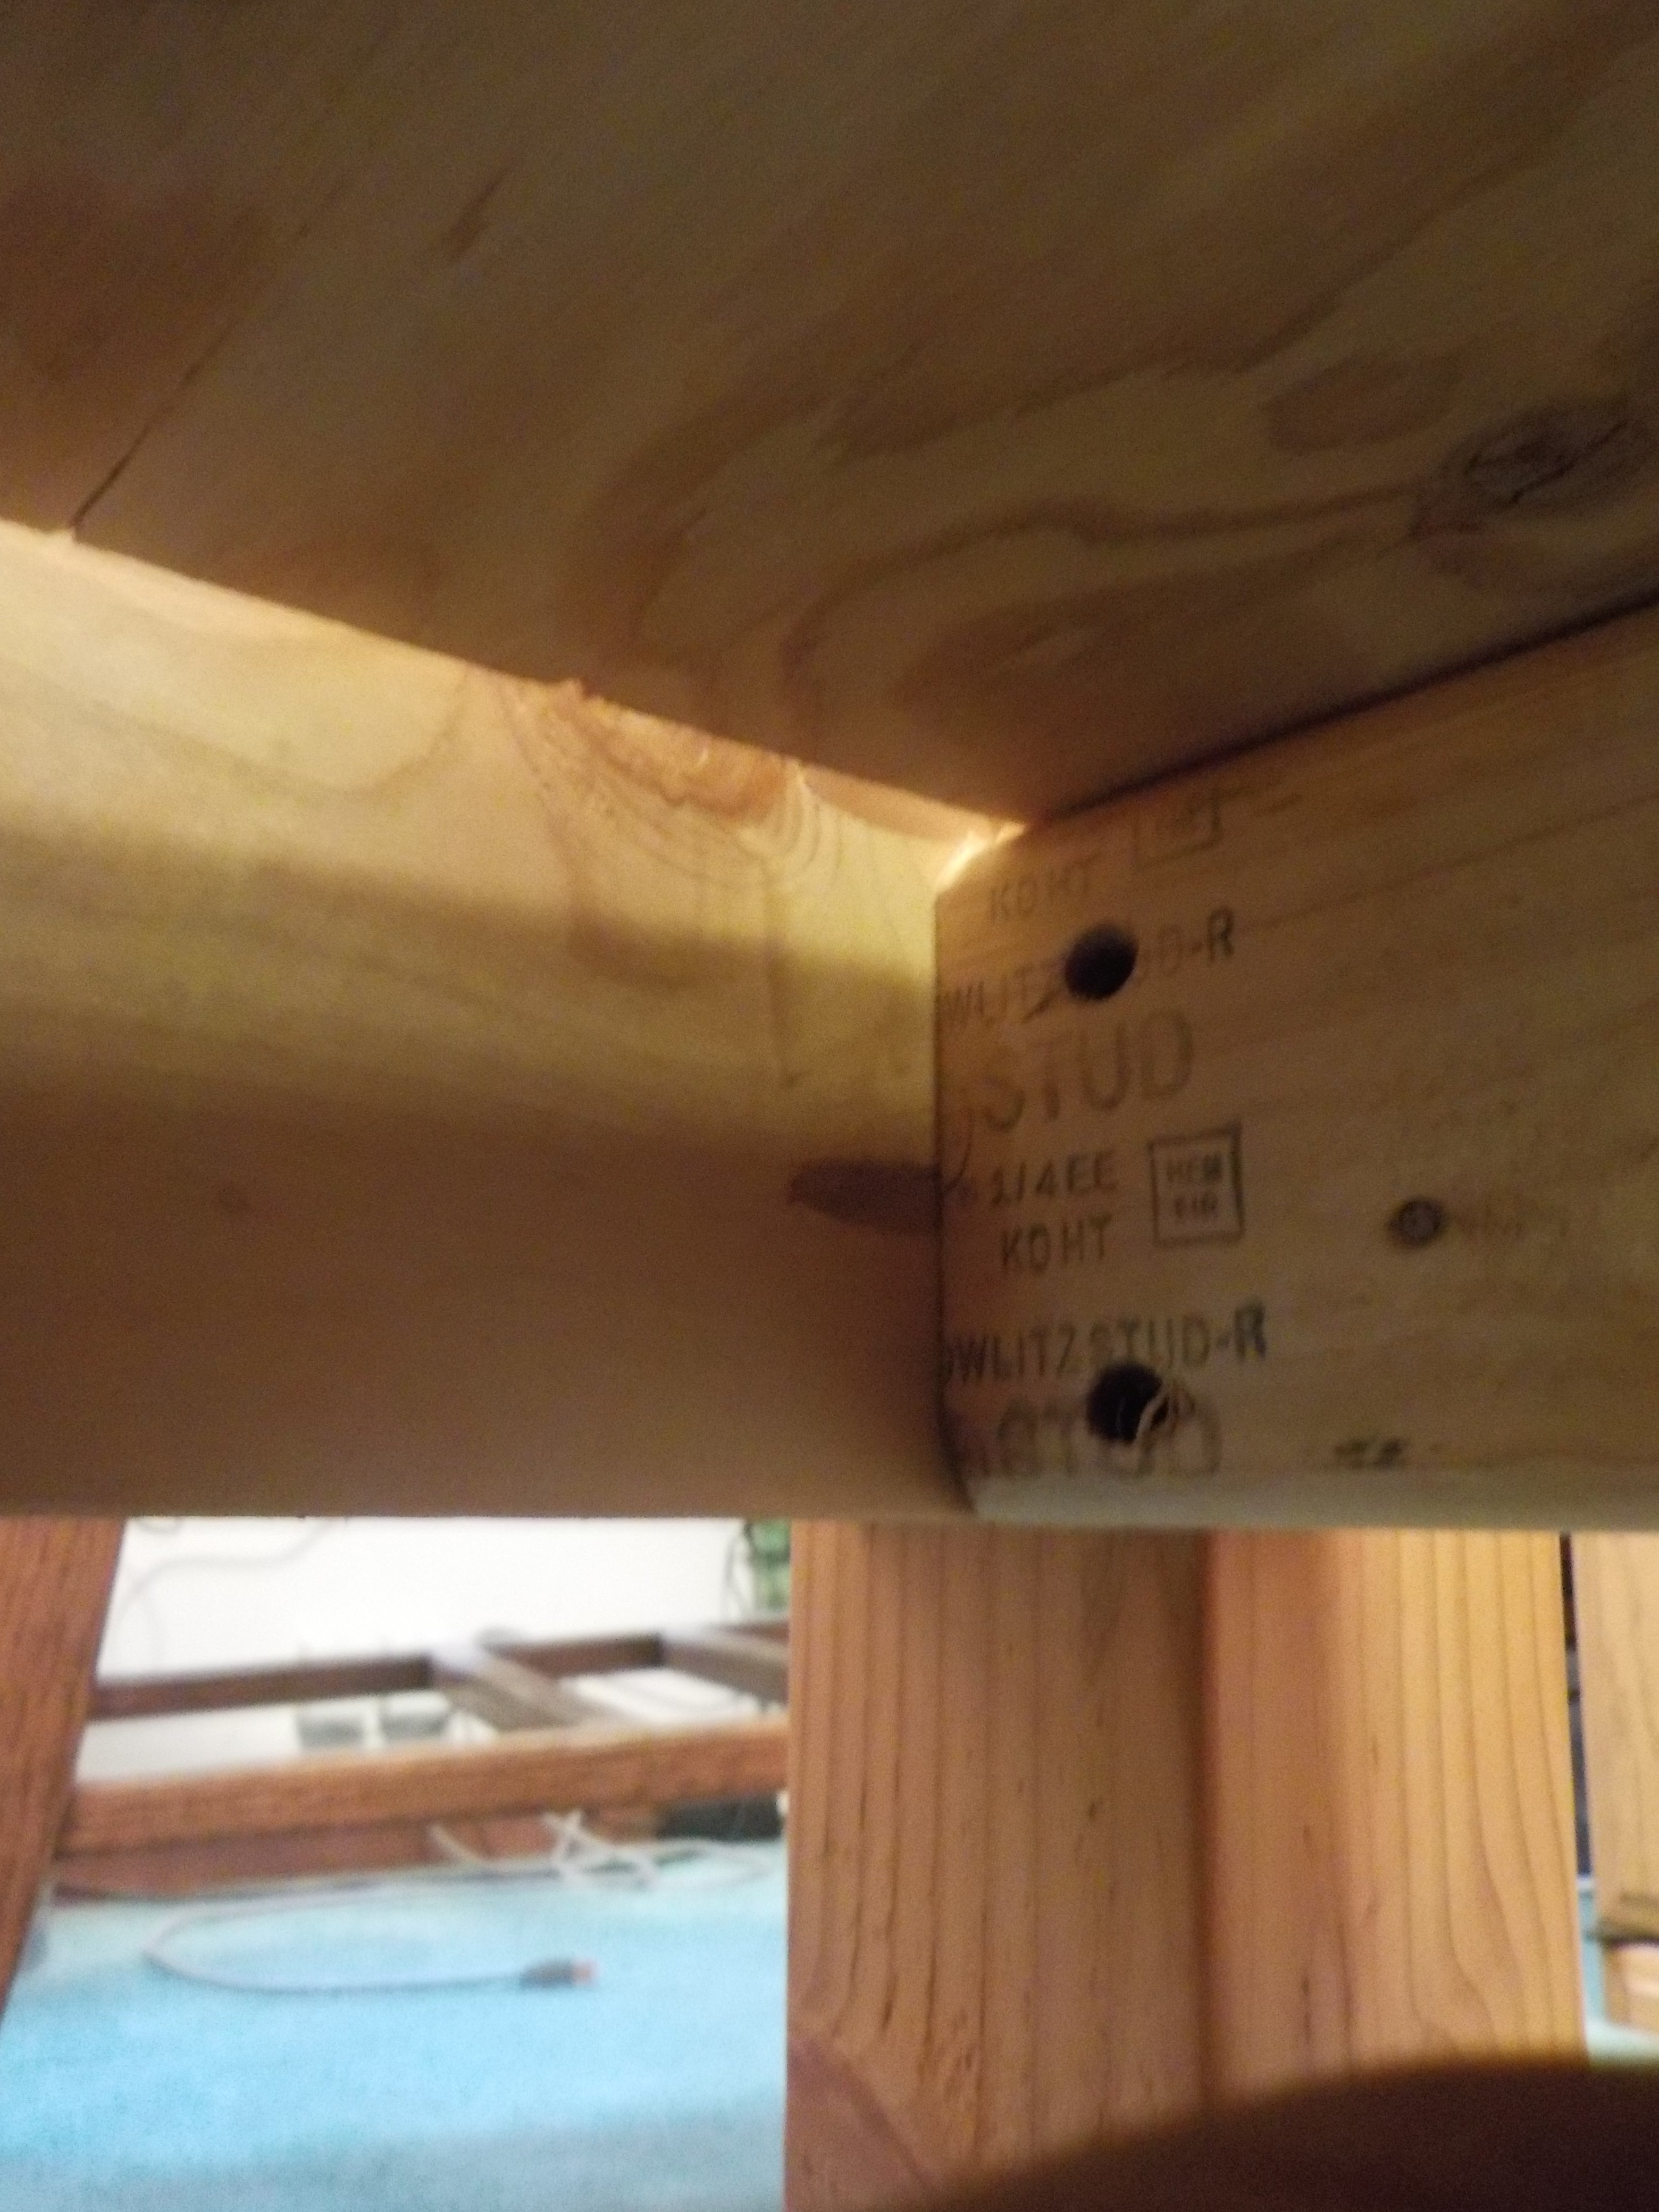
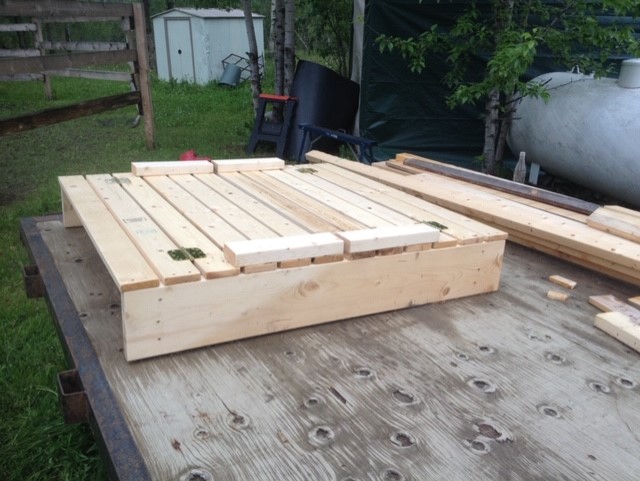
I built this sandbox for my kiddo's because we have cats! It was great. Easy to build, great plans for it.


Comments
Ana White Admin
Tue, 12/21/2021 - 10:20
Beautiful first projects!
Thank you for sharing, love the raw look and the build is fantastic!