Community Brag Posts

Dog Crate

Submitted by mdgervais on Thu, 05/08/2014 - 08:44

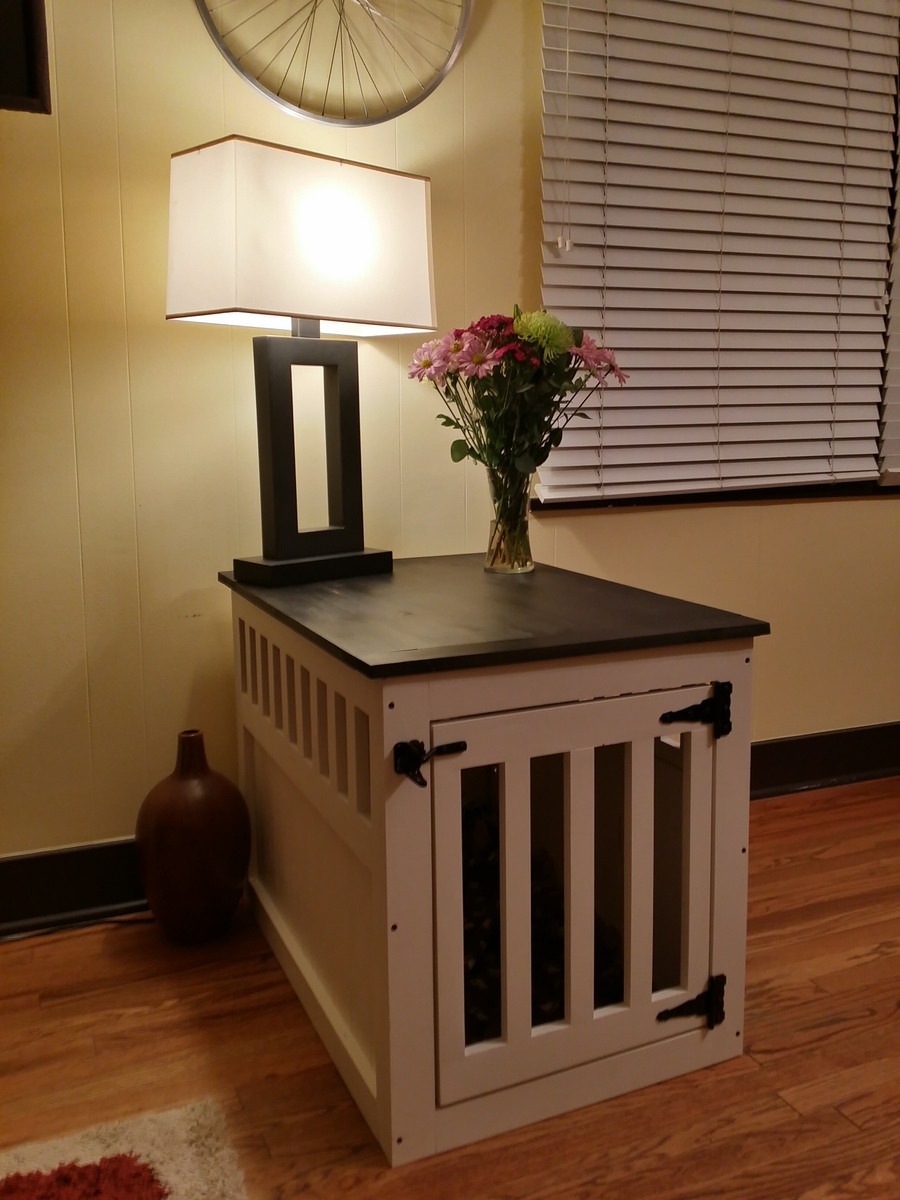
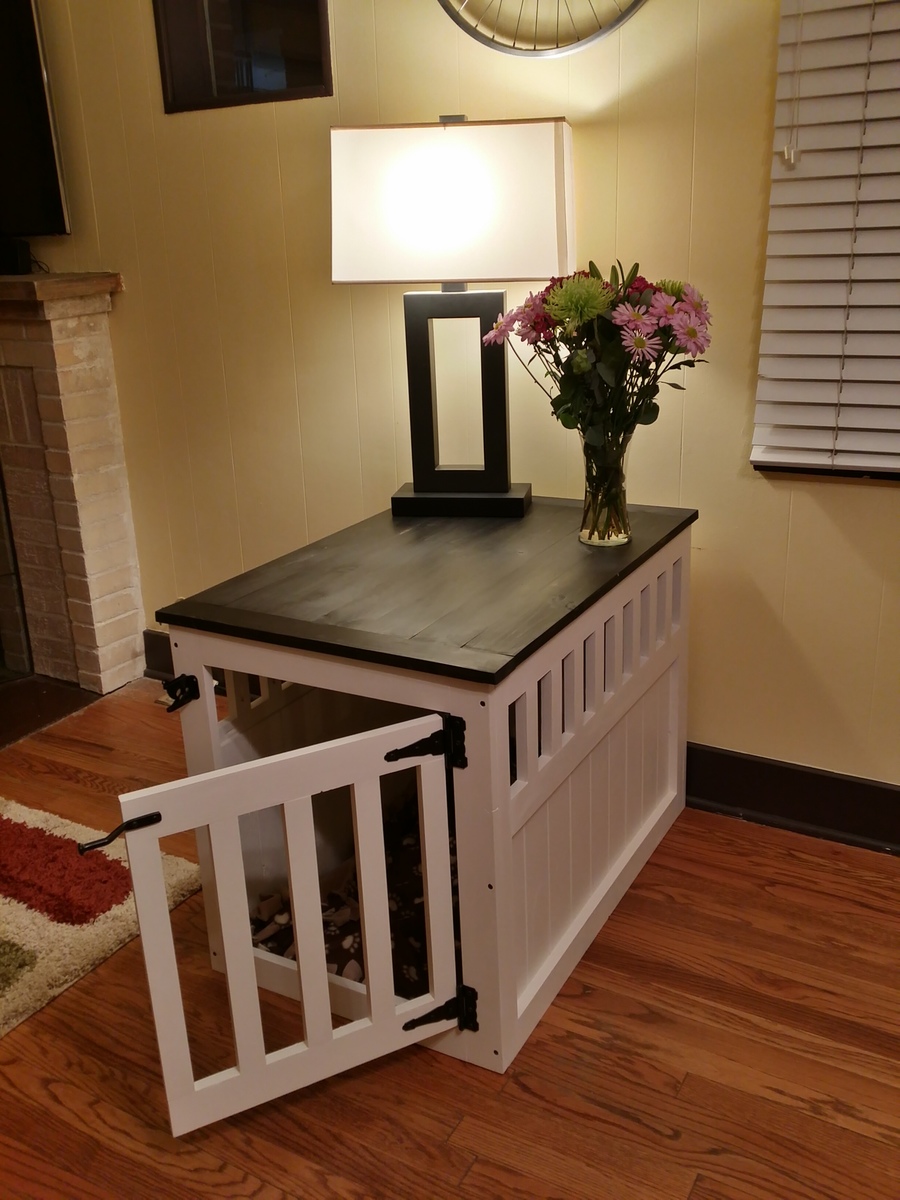
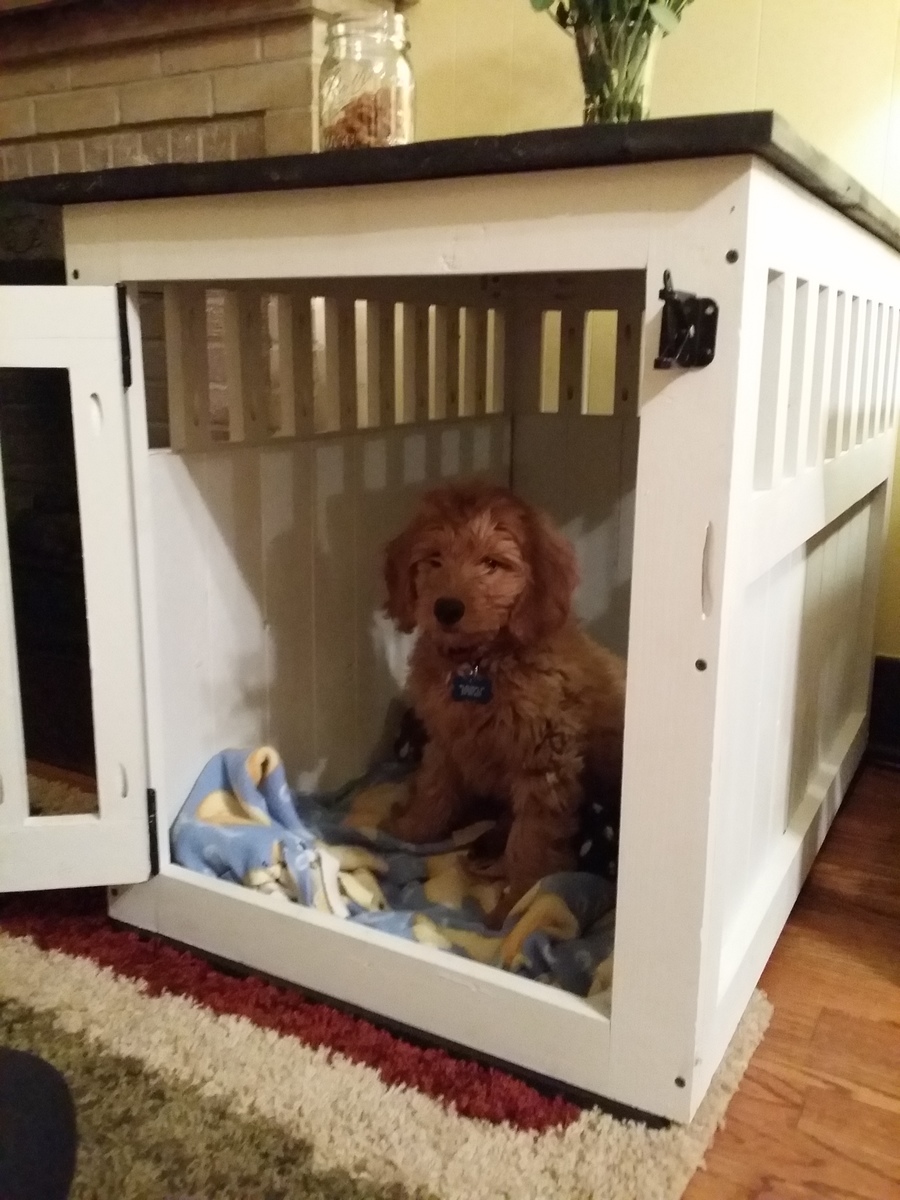
Recently I added a family member and his name is Myles. He needed a home so before we picked him up I built him one of these for him to grow into. The one pictured is actually the second one I built that was built for a friend. I followed the original instructions. I used a couple different bits of material. My table top is 1x4's and for the sides i used bead-board. I painted it an off white with eggshell finish. The table top is stained with Minwax Ebony stain. I love how it turned out and most of all my puppy enjoys it as well.

I left the bottom open. The dimensions in the plans make it so you can set the crate right on top of a crate replacement trey series 700 from PetCo. This makes it very easily to clean by just lifting the crate off the trey and hosing it off and also prevents the wood from absorbing any liquids.

Built from Plan(s)
Estimated Cost
$125
Estimated Time Investment
Day Project (6-9 Hours)
Recommended Skill Level
Intermediate

Old pallet wood, wine holders

Submitted by Anonymous (not verified) on Mon, 08/08/2016 - 16:39

I had to make the back legs longer, since I used all pallet planks for this, threw me off a bit. And I made the arms an extra 5" long to notch in wine glass holders. If I do it again, I'll angle the back a bit more, but as is its pretty great. Guess who picked pink?

Estimated Cost
Free pallet planks and screws, $27 gallon of paint.
Estimated Time Investment
Weekend Project (10-20 Hours)
Finish Used
Satin latex outdoor paint.
Recommended Skill Level
Beginner

Farmhouse Potting Bench

Submitted by jhunch on Mon, 05/25/2020 - 10:58

We had a pile of old wood and an old fence in the backyard that I wanted to repurpose. I had a spot along my house in the back yard that was empty, that really needed something. Thanks to Ana's "Farmhouse Potting Bench" tutorial and plans, we got inspired. We changed the measurements to make sure we could incorporate an old stained glass window that I've had, just waiting for a purpose. We also changed the measurements to accommodate the different sizes of wood that we had on hand. Our project took a much longer time, because of all the measurement changes and wrapping our head around how to mount the window, but it was worth it. We're really happy with how it turned out.

Built from Plan(s)
Estimated Cost
very little. All material on hand
Estimated Time Investment
Day Project (6-9 Hours)
Finish Used
special walnut
Recommended Skill Level
Intermediate

Wood Vanity

Submitted by Anonymous (not verified) on Tue, 02/13/2024 - 12:21

This is my third time using these lovely and simple plans, this time for a made-to-measure vanity. Grateful for the plans!

Katie

Queen Storage Bed

Submitted by HR Dad on Thu, 07/19/2012 - 14:43

My boy was sleeping on a queen box spring / mattress sitting on the floor; figured he needed a bed and the storage bed seemed just the ticket.

Found some beadboard on clearance for $16 a 4x8 sheet so picked up about 5 sheets. It was on clearance since it was prefinished. Not a big deal since I knew I'd be painting the bed (had to prime the stained wood first). I think the beadboard adds a nice touch on the ends.

Haven't built drawers yet, but the wife kind of likes the looks of the cubby bins so drawers can wait.

The headboard wasn't from any plan; just followed the same basic concept as the bed; sides are 3/4 plywood, but I rabbitted out the trim in order to insert the 1/4 beadboard. Used some scrap hardboard pegboard as a template for the shelf pin holes on the inside of the headboard to enable an adjustable shelf.

The bed sits up a little high for our liking, but eventually we will remove the boxspring and just set the mattress on the bed frame; just have to figure out where to store the boxspring . .

I miss the family when they're out of town, but at least I get a lot of projects done . . .

Built from Plan(s)
Estimated Time Investment
Weekend Project (10-20 Hours)
Finish Used
Behr Interior Paint
Recommended Skill Level
Beginner

Comments

YankeeBelle

Thu, 08/30/2012 - 17:19

This is beautiful. Love your colors and use of beadboard! Great job! I love the bins too....really terrific!

Herb Garden Planter, easy to build, I can't believe how little it costs to make!

Submitted by Sue Hill on Sat, 05/10/2014 - 15:26

I'm just in love with all the Ana White projects. I tackled the faux fireplace mantel, made quite a few toolbox planters so this little box was easy. My biggest mistake was not verifying the thickness of the wood pickets I used. I couldn't find the cedar ones at Home Depot or Lowes so I used pressure treated pine pickets, on sale for $1.16 each! What I didn't realize until I was putting the first box together is that they were 5/8" thick instead of 1/2". I questioned my woodworking skills when everything didn't fit together correctly, but soon figured out the problem. Since I had cut out two of them together, I finagled the design slightly to be able to use the cut pieces. You'll notice the end pieces are on top of the bottom piece of wood on certain ones. I continued to build a third box and it went together smoothly. Wow, I wish that I had a nail gun! I used 1 1/4" exterior screws and pre-drilled the holes. I have three more pickets left and I'm going to run to Home Depot to find some galvanized nails for them. I wish I could find some cedar pickets, the pressure treated pine is rough to work with. I also printed out "HERB GARDEN" on my ink jet printer, then traced the letters using carbon paper. I outlined, then filled in the letters with a Sharpie paint pen. It came out rustic looking because the wood was rough. I was hesitant to sand the wood because I didn't want to breathe in the sawdust. I put a white wash finish on the stenciled box. The other ones are still unfinished. Looking through my stash of hardware, I found the cutest fork and spoon handles, saved from an old birdhouse. I put the picture on my Facebook timeline and a friend sent me a message asking to buy it for her daughter's birthday. I'd better get busy making the next three.

Estimated Cost
$2 or more depending on the handles used.
Estimated Time Investment
An Hour or Two (0-2 Hours)
Finish Used
White washed with white DecoArt Patio paint.
Recommended Skill Level
Beginner
Seasonal And Holiday

Outdoor Sectional

Submitted by Anonymous (not verified) on Fri, 08/12/2016 - 14:24

We were inspired when we saw Ana's Outdoor Sectional on Pinterest and after checking out the site we decided to build ours using the modified plans with 2 x 4s as it was much more cost effective. It was a really fun weekend project for my husband and I and not difficult at all. 

Double Kayak Rack

Submitted by JamieLynn on Tue, 05/26/2020 - 09:44

I couldn't find a plan for this but found a picture of what I was looking for. It's a little too big but works. Took about 3 hours to make. Used mostly scrap wood.

Estimated Time Investment
Afternoon Project (3-6 Hours)
Recommended Skill Level
Beginner

Small Famhouse

Submitted by Anonymous (not verified) on Thu, 02/15/2024 - 10:19

Nothing with finess but I always loved the look of old farm houses so I built my own.

Georgie

Kiddie Chairs

These chairs were easy to build, although I modified Ana's plans a little bit. I opted for solid wood 2x2s for the legs (I wanted it to be sturdier), and a solid seat instead of a slatted one. I notched out the back of the seat so it would fit flush against the back legs. Because of my modifications, my chair was just a couple bucks more.

Also, I was so excited to find solid wood balusters for the chair legs - they're not only better quality, but cheaper than furring strips!

Check out my blog link for a complete play-by-play!

Estimated Cost
$7.00
Estimated Time Investment
Afternoon Project (3-6 Hours)
Finish Used
Primed with Zinsser 3-in-1 Primer, then painted with Red Valspar Paint found in the "Oops" section of Lowes. Three coats of Rustoleum Satin Polyurethane.
Recommended Skill Level
Beginner

Comments

DIY Stuffed Animal Zoo Tower

This is my second stuffed animal zoo tower.  This time around I used cheap 2x2 furring strips.  Not the best pick of lumber, but it gets the job done well. :)

Built from Plan(s)
Estimated Cost
$30
Estimated Time Investment
Afternoon Project (3-6 Hours)
Finish Used
Watco Danish Oil (Medium Walnut)
Recommended Skill Level
Beginner

COVID 19 end of year home school project success

Submitted by Anonymous (not verified) on Sun, 05/31/2020 - 07:10

Great build. Hubbie extended to couch one seat and added legs for additional support. We painted after assembly and the x’s were a PITA to paint. Love the end result. Now to pick coffee table plans!

Estimated Cost
300 not including cushions
Estimated Time Investment
Weekend Project (10-20 Hours)
Finish Used
Sherwin Williams Caviar exterior paint and spray poly
Recommended Skill Level
Intermediate

Wood Garage Shelves

Submitted by Anonymous (not verified) on Tue, 02/20/2024 - 08:40

This was made using Ana's "Garage Shelf" plans. I modified it for a corner spot between two exiting cabinets, so it took a bit of thought, but the Ana's technique for the build made it so easy.
AND I used up scrap wood that I'd been hording in the garage for the build.
Thank you Ana!

Seesaw

Submitted by embleier on Tue, 07/24/2012 - 11:12

I made this Seesaw for my 4 year old's birthday present! It was SUPER easy...and she LOVES it!

Estimated Cost
$25
Estimated Time Investment
An Hour or Two (0-2 Hours)
Recommended Skill Level
Intermediate

Cottage Loft bed playhouse with stairs, lights and desk

Submitted by kadnetop on Fri, 08/19/2016 - 10:18

We took the loft bed plans and modified a bit for our daughters bed. We made it a little taller including the doorway. Instead of a ladder we did a set of carpeted stairs with entry to the underneath space through a door on the inside and added a light for a 'secret' hideout. Everything else were just some added features. We built flower boxes and added foam blocks with silk flowers. For the gable we used bead board. For the shutter we used small wood strips and the horizontal pieces are just the free paint sticks from lowes cut down. We then added wired in lights hooked up to her light switch. (she loves this part) Then he built a fold down desk that can be opened or closed for when they want to play in there. The school supplies we used the rod and tin buckets from Ikea kitchen area. Over it took about 6 weeks to do everything between watching the kids and working. Cost for materials and the extras came to a little over $600. 

Built from Plan(s)
Estimated Cost
$600-$700
Estimated Time Investment
Week Long Project (20 Hours or More)
Finish Used
White color= Behr -Polished Pearl (we matched it to annie sloans Old White)
Green trim color- Valspar- green trellis
Recommended Skill Level
Intermediate

Modern Adirondack

Submitted by Anonymous (not verified) on Mon, 06/01/2020 - 14:55

Lots of room for improvement but I'm pretty excited for my first time following plans.

Thanks, I love your videos and have learned a lot.

Estimated Time Investment
An Hour or Two (0-2 Hours)
Recommended Skill Level
Beginner

Bathroom shelf with hooks

This was inspired by your Flat Wall Bookshelf and made using a piece of 1x6, a piece of 1x4, and a smidge of recycled paint. We added towel hooks to the ends (the same ones that kept pulling out of the wall), and mounted the whole thing to studs in the bathroom. Thanks for the plans!

Estimated Cost
$0.10 out of pocket
Estimated Time Investment
Day Project (6-9 Hours)
Finish Used
Unknown pale green Martha Stewart paint from a recycling center. Cost: $0.50 for the quart.
Recommended Skill Level
Beginner

modular locker with old shutter

Submitted by KendraRyan on Wed, 05/21/2014 - 14:20

This was my first project! I used the plans for the modular locker, but used an old shutter for the door instead. Next, I think i'm going to try to connect 5 or so in a row for an entryway, all with different shutter doors :)

Estimated Time Investment
Afternoon Project (3-6 Hours)
Recommended Skill Level
Starter Project

Comments

John Deere Toy Box

Submitted by Anonymous (not verified) on Sun, 08/21/2016 - 11:37

I built this toy box for my nephew, who is into Tractors, using the plan provided by Ana. I made some modifications to the lid mostly, other than that the differences are cosmetic. I thought the plan was super simple and easy to use!

Built from Plan(s)
Estimated Time Investment
Weekend Project (10-20 Hours)
Finish Used
Machine Paint
Recommended Skill Level
Beginner

Comments

manna18

Sat, 01/04/2020 - 02:30

wow, this is very useful and looking awesome too .I will make one something like this

Back