Community Brag Posts

Sweet Pea Cottage

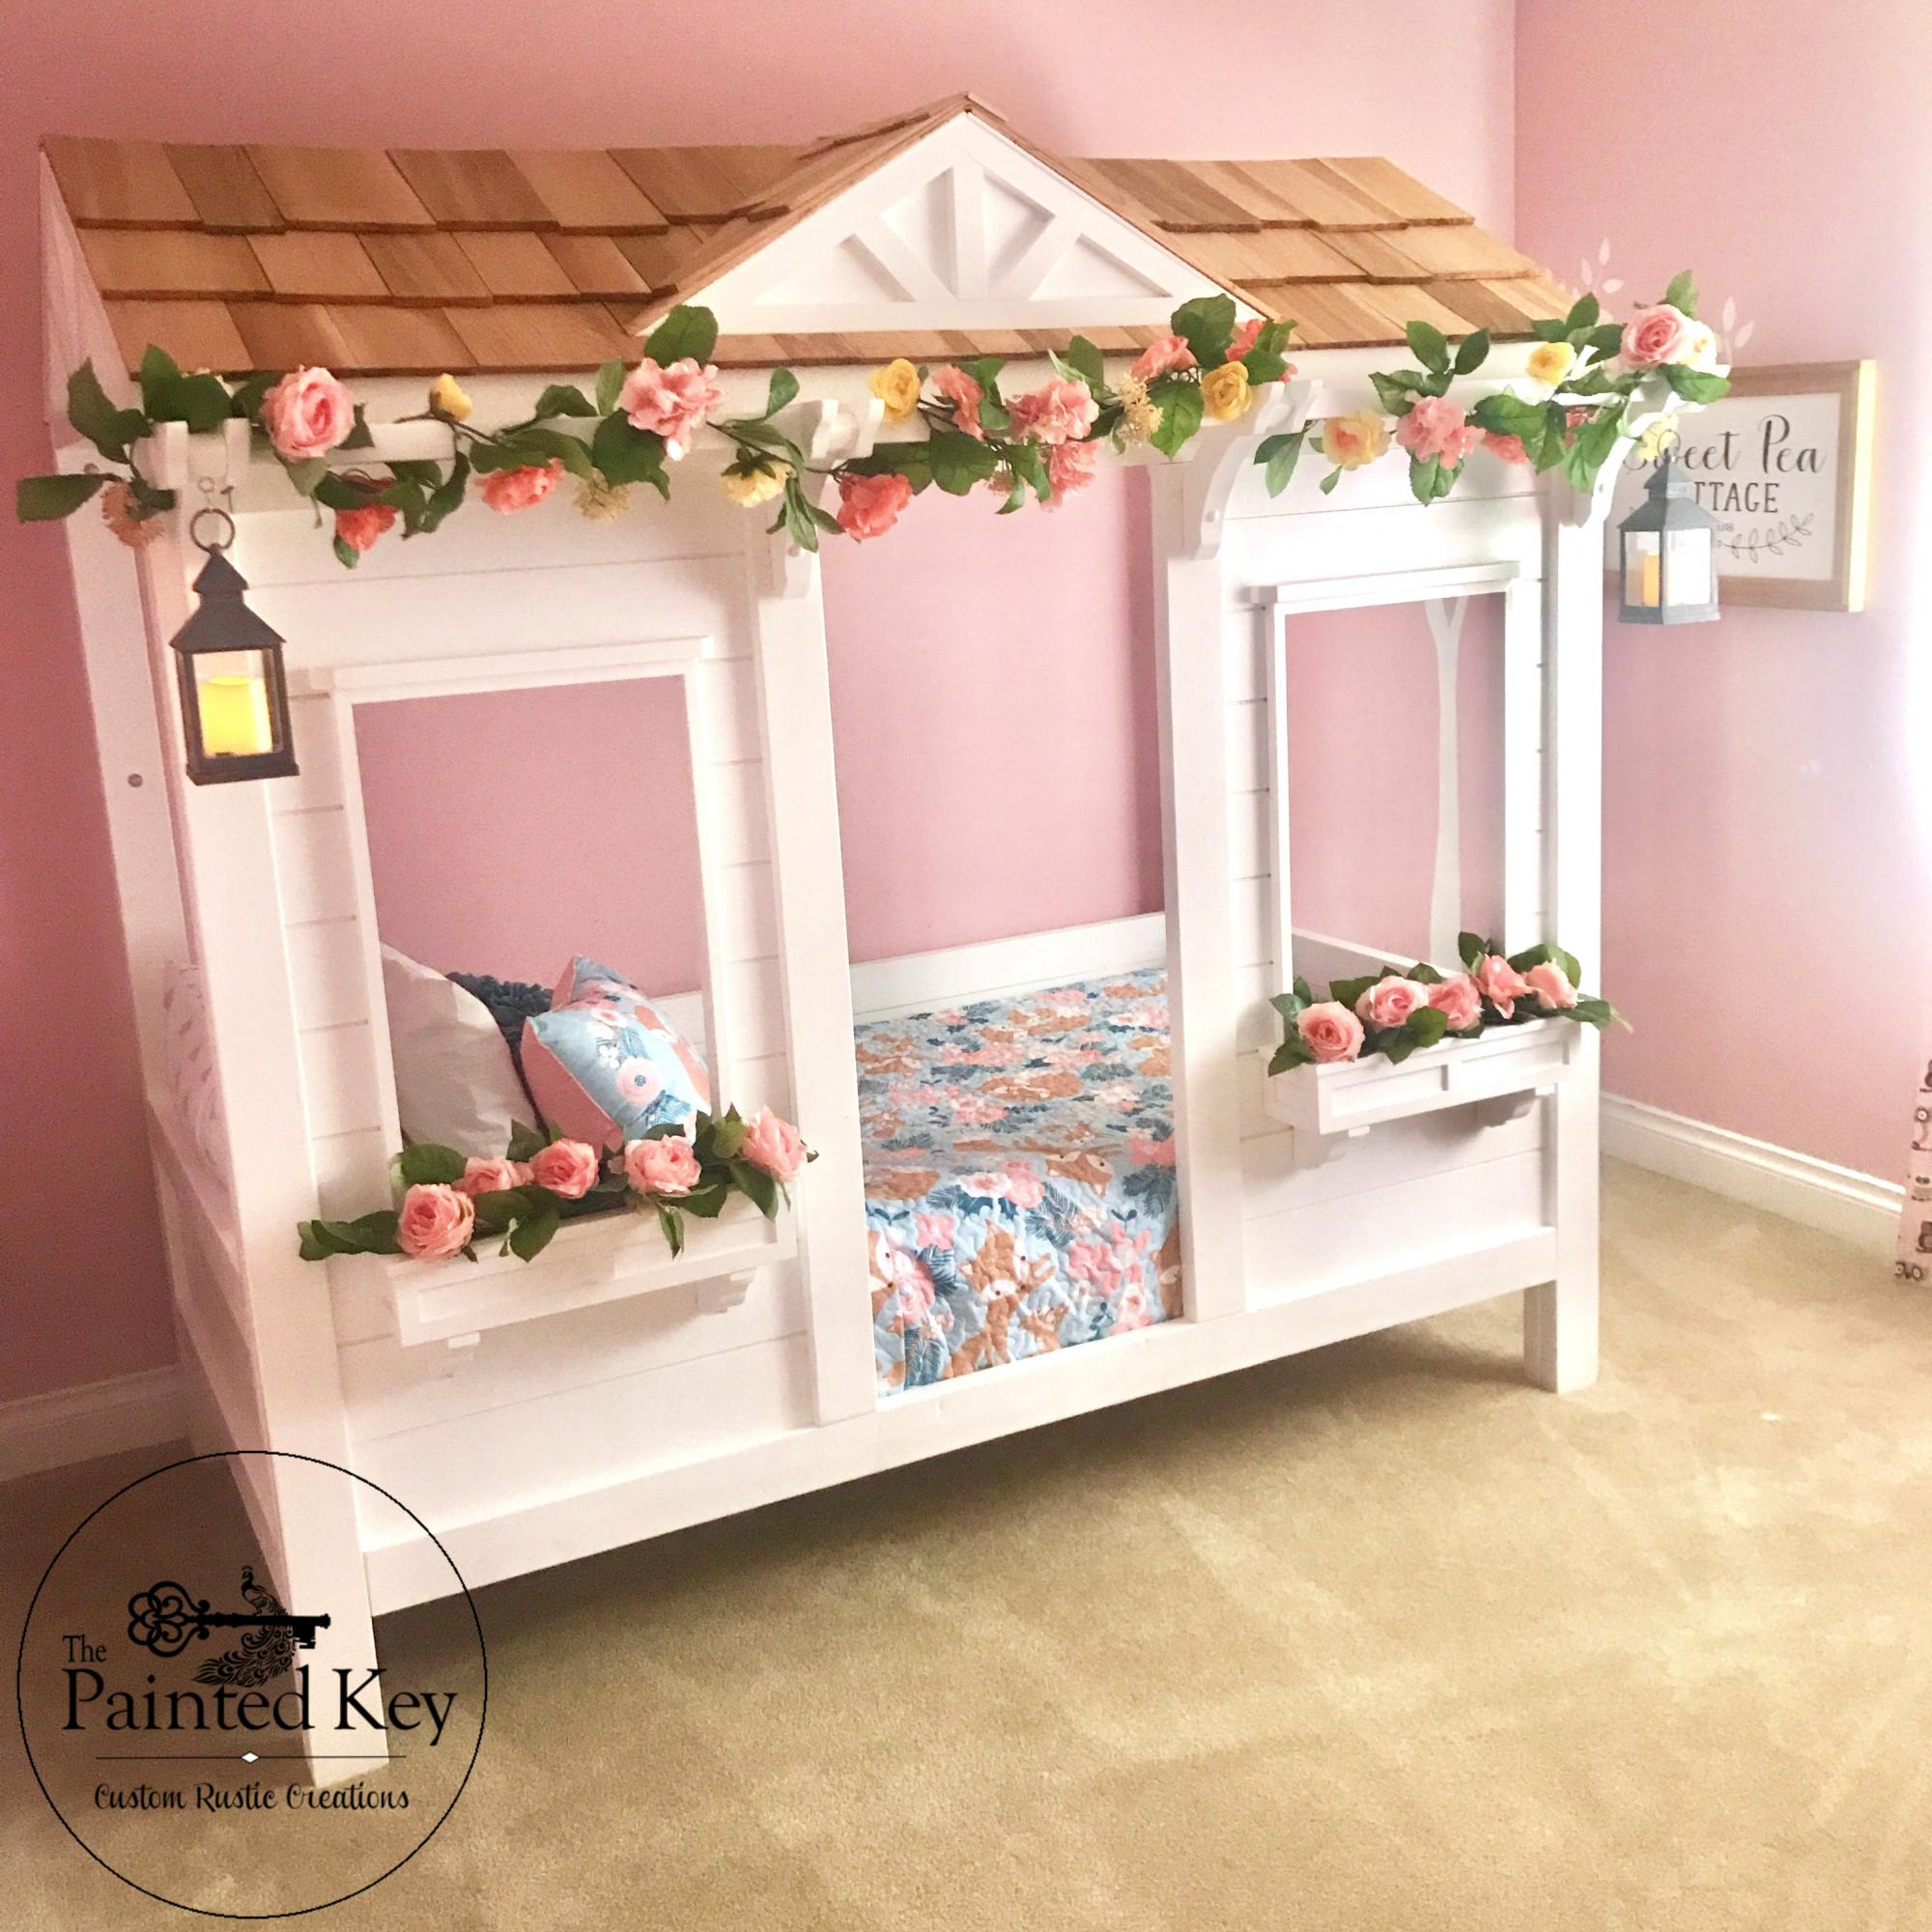
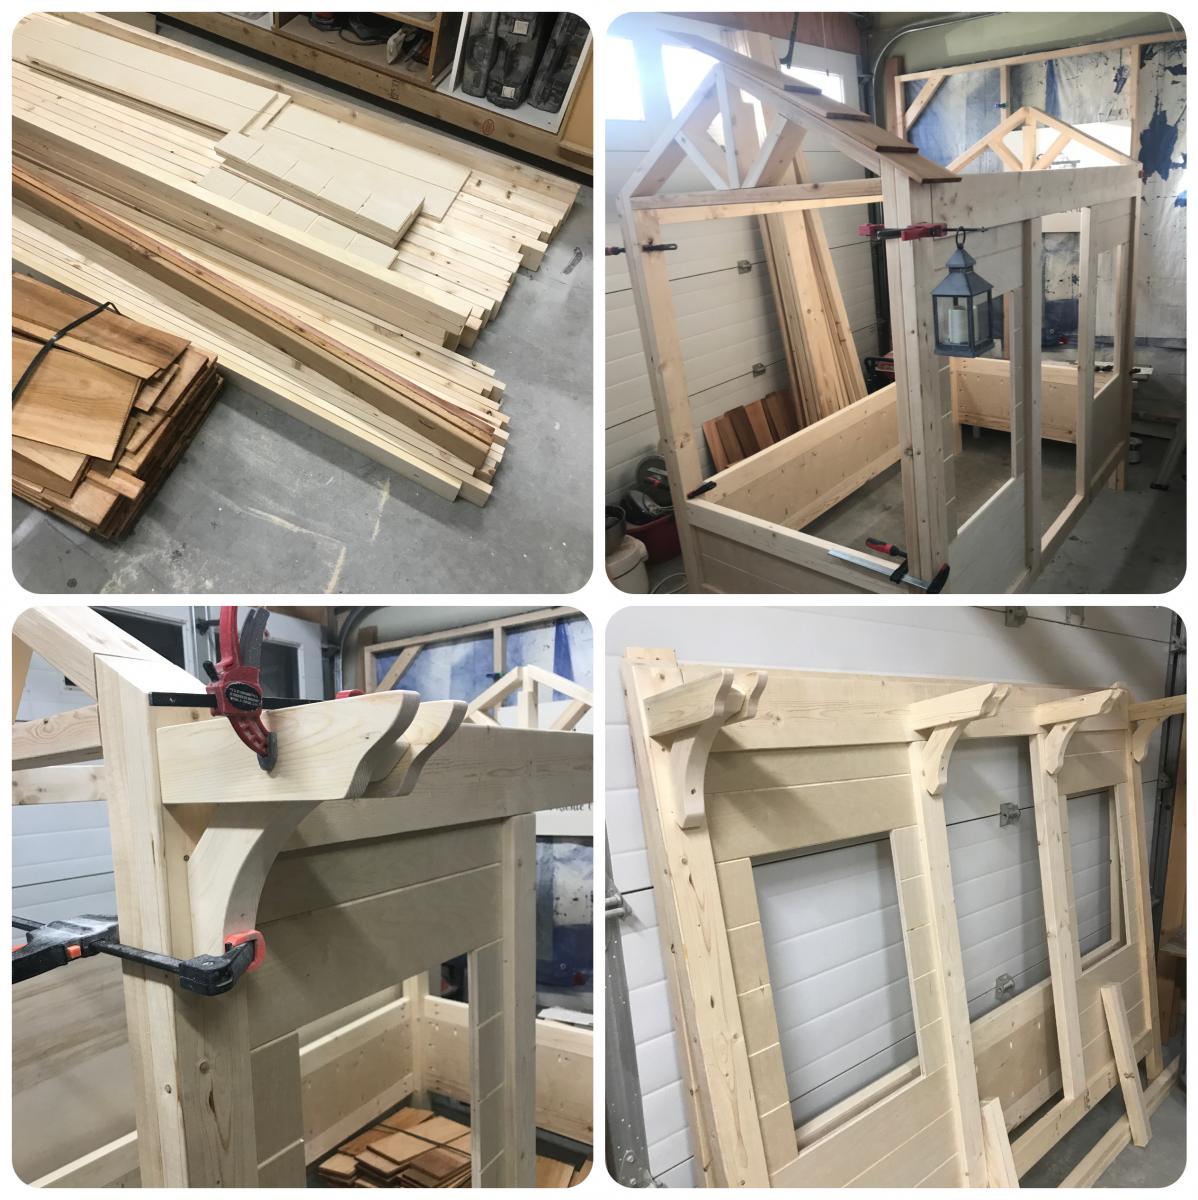
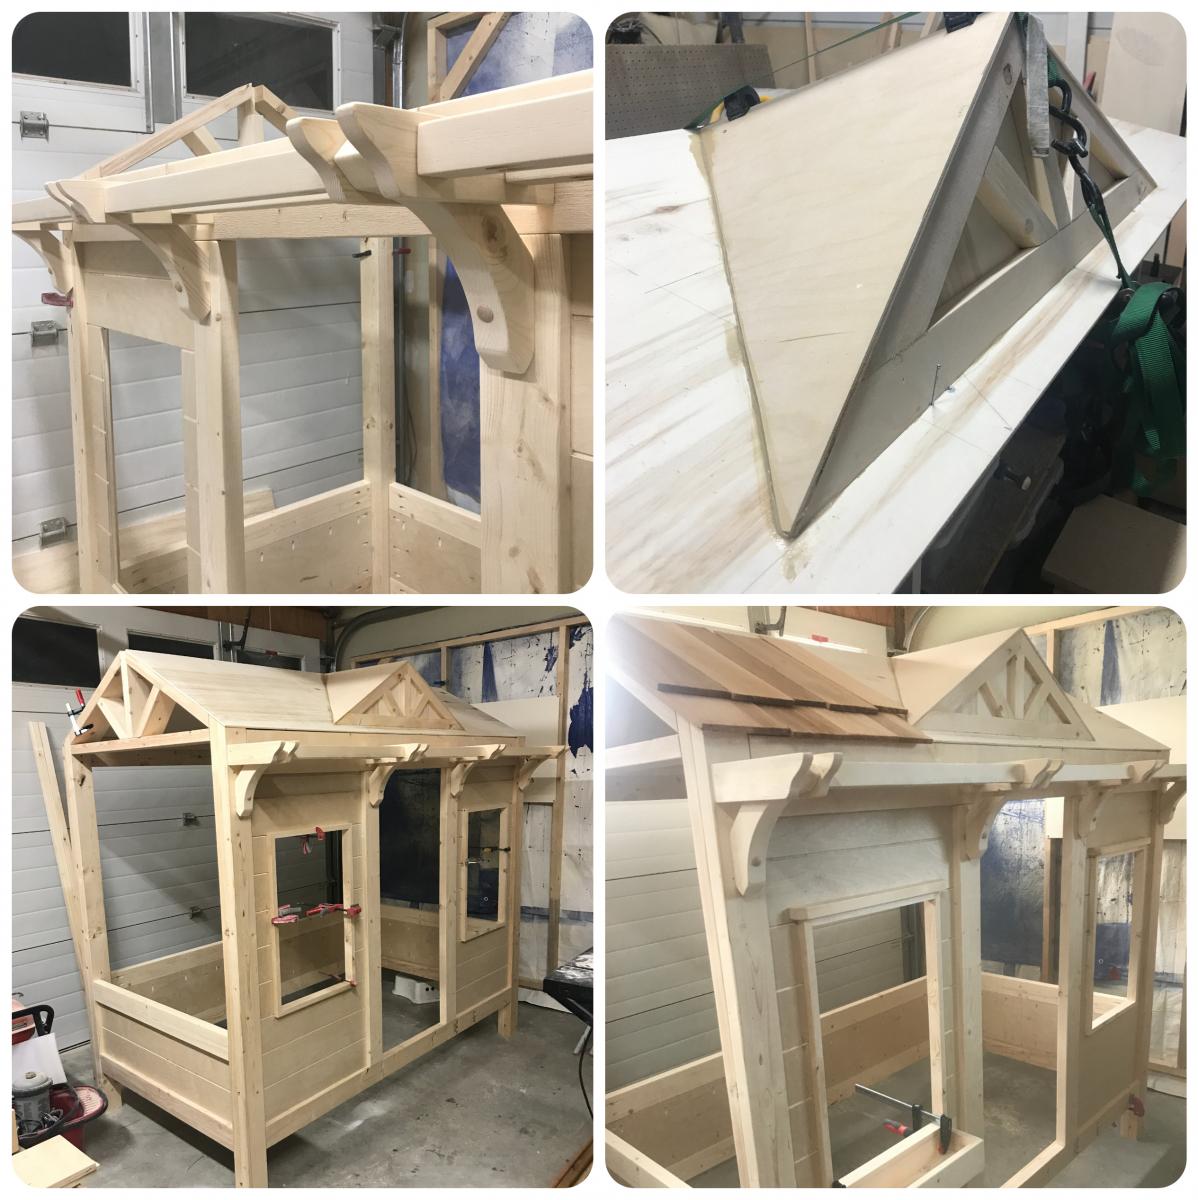
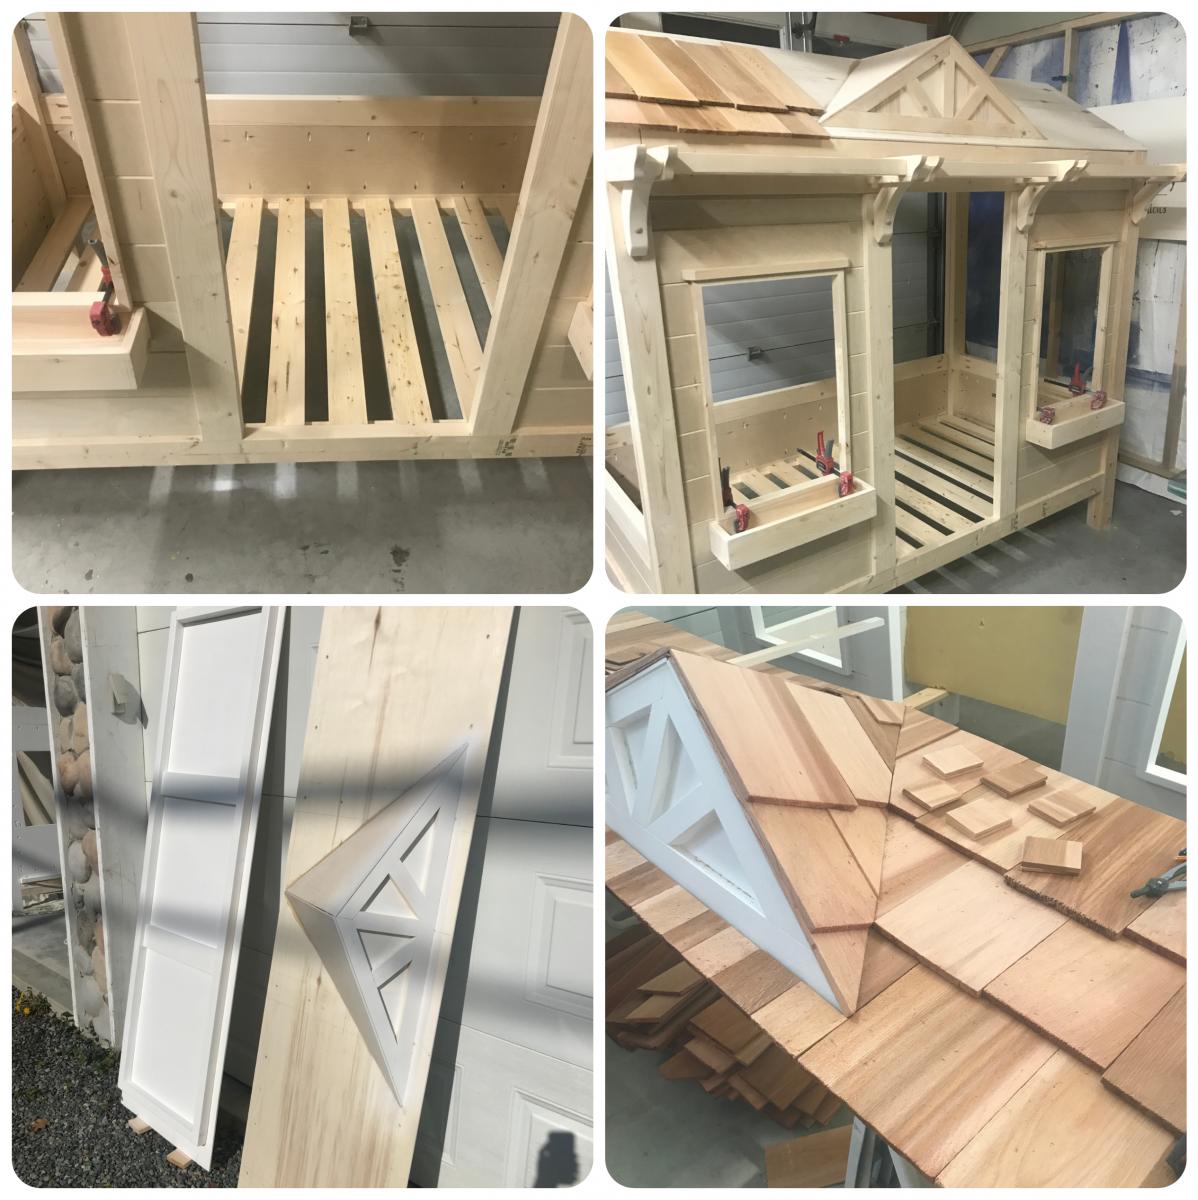
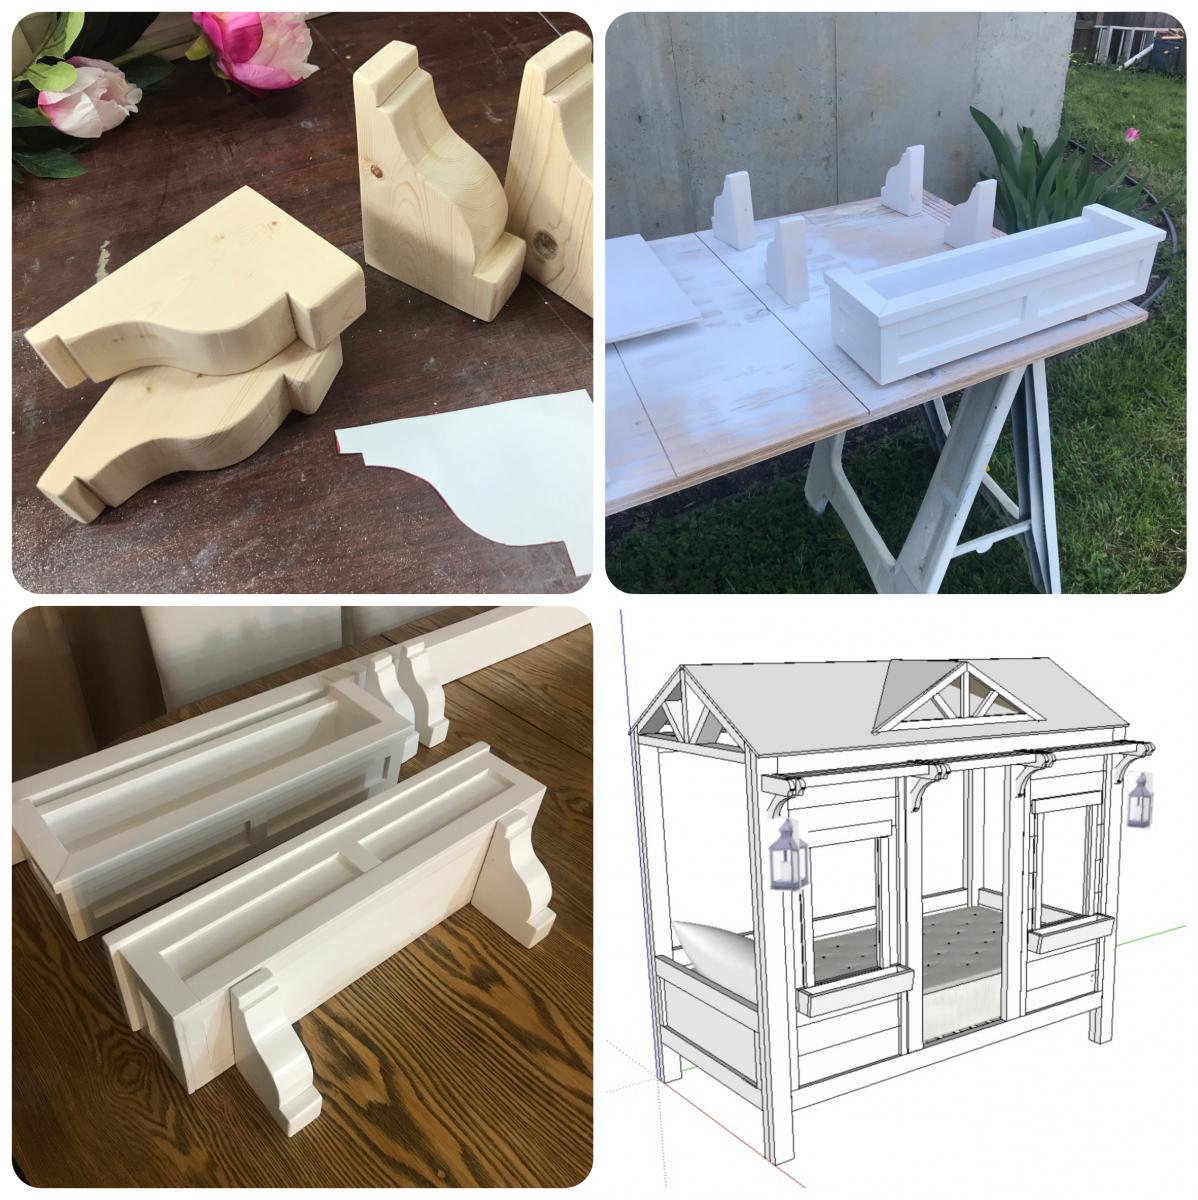
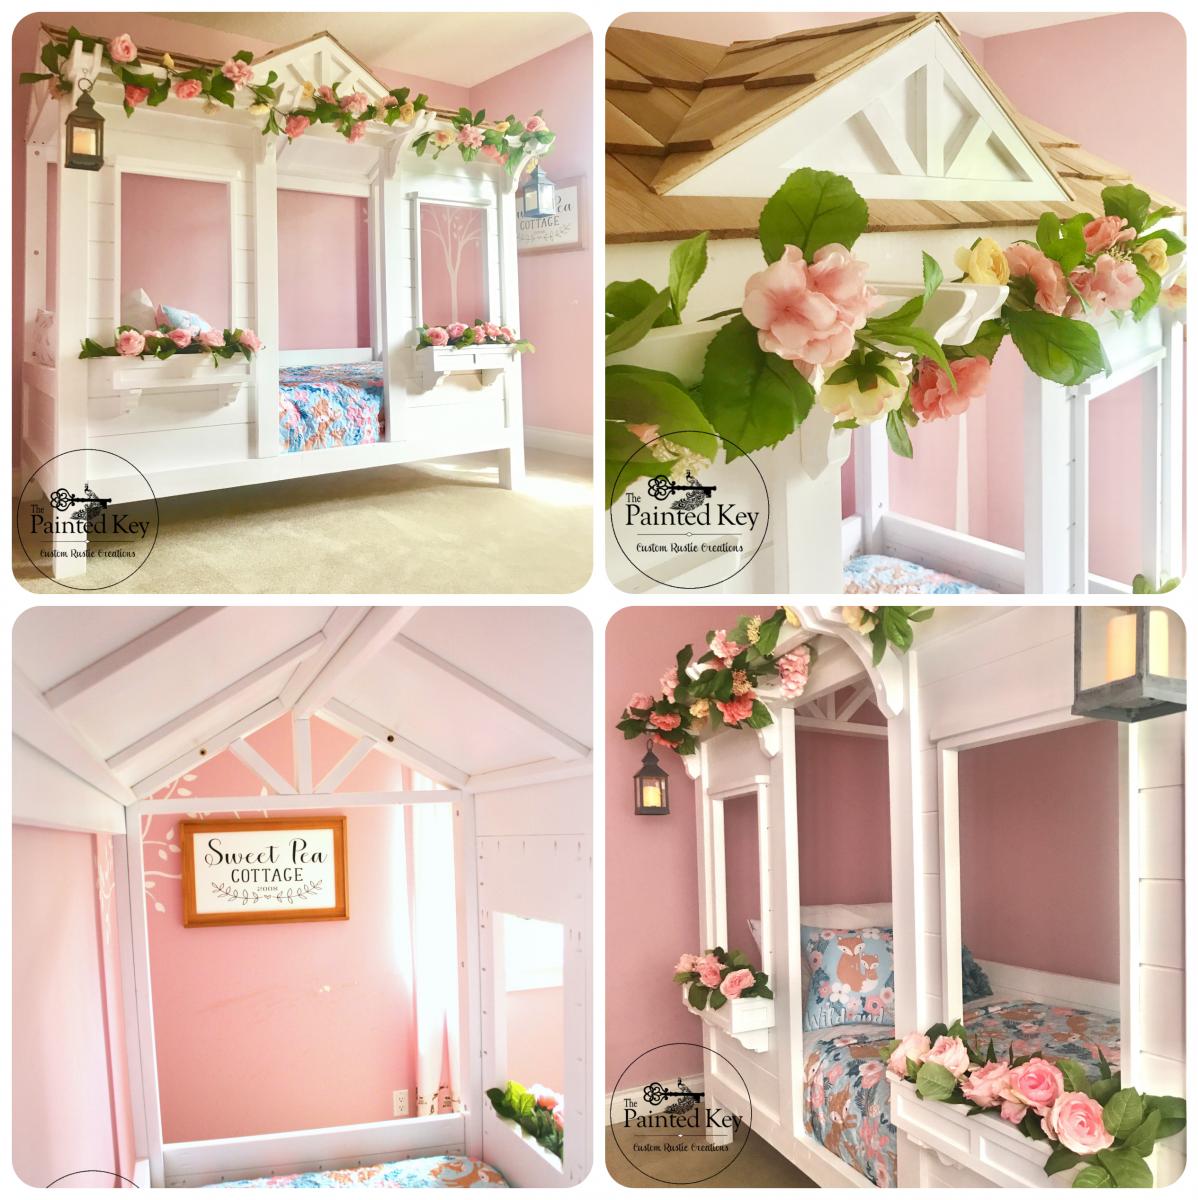
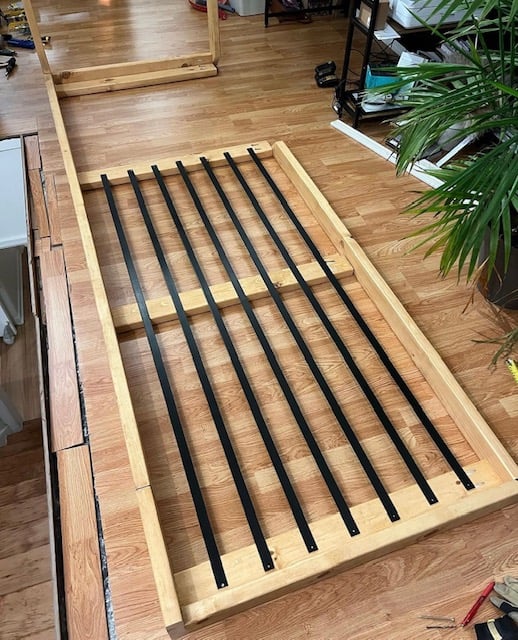
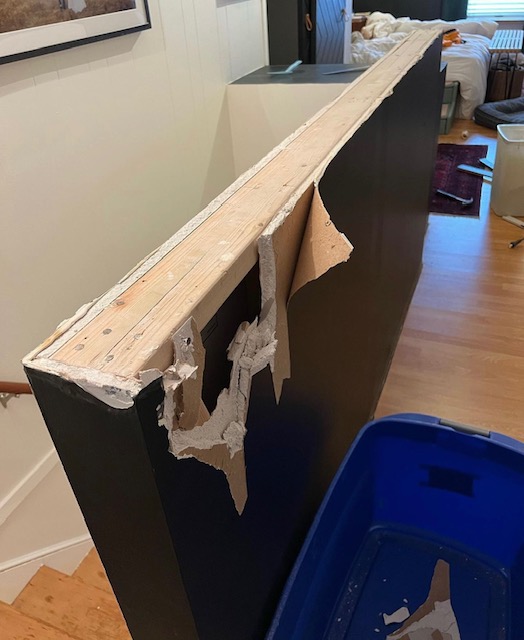
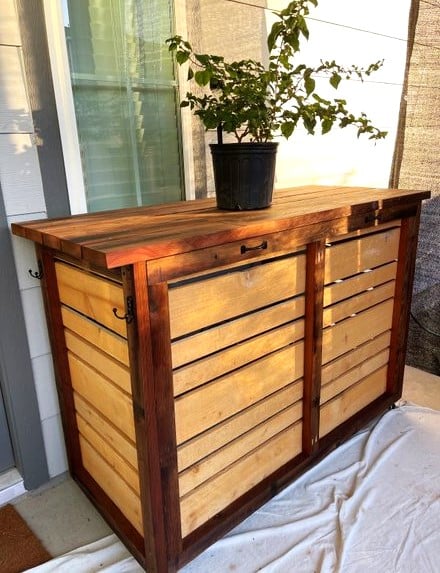
What's a mom to do when she can't choose between the cabin bed, the little cottage loft bed and the sweet pea garden bed? Head over to google sketchup and sketch up a set of plans incorporating favourite aspects of all three beds! This one had been in the planning stages for over a year and I’ve called it “Sweet Pea Cottage”. It took me about 3 months to build in my spare time and I couldn't be happier with how it turned out. Of course our daughter loves it as well! Who wouldn't want to sleep in their own little house bed! :) I used spruce and 3/4" purebond plywood for the main build. To give the plywood panels a planked look, I cut the front into various size rectangles so I could run them through my table saw using a 1/4" dado blade before assembling the pieces together with pocket holes. The roof panels and dormer are 1/4" plywood glued and screwed to a frame and then I used construction adhesive to adhere the dormer to the front roof panel as well as adhere the cedar shakes. Painted with Behr Pure Ultra White and topped with a satin polyacrylic. I left the cedar shakes raw but if I built it again, I think I would top them with some sort of flat or matt sealer as the rough texture makes dusting them a bit difficult. One of the first questions I get is "how difficult is it to make the bed?". Surprisingly it's not that hard. Because the bed is so open on each end and we have it set up in her room with access on three sides, it's easy to manoeuvre the mattress a bit to change the bedding.

Comments

April1360

Thu, 02/17/2022 - 08:15

I love this bed. I would like to make one for my Grand-daughter. Do you have plans for this cute bed? I just signed up today so I wasn't able to see the comment section. I'm sorry if this has already been asked.

Kentwood Bookshelf

Submitted by worrow on Tue, 08/11/2015 - 17:33

I loved this from Ana's site so much we tacked one. Please note I glued, screwed and dowel ed the holes. I hate kreg jigs. We also made ours taller to add an extra shelf.

Estimated Cost
$90.

Provincial stain and triple coat poly
Estimated Time Investment
Weekend Project (10-20 Hours)
Finish Used
3m triple coat in 1 semi gloss not pictured. My image is stain at this point
Recommended Skill Level
Beginner

Comments

Craftsman playhouse - in shades of blue

Submitted by richsea on Sat, 06/11/2022 - 21:58

I’ve been working on building up to this playhouse for a while. Just got the doors on and am pretty pleased with what’s my first project of any size. Built on top of a modified version of the playhouse deck with a to be added (hopefully) swing in front. Color selection by the end customer (who’s 8). Modified to add 12 inches for a 5’ doorway. Thankfully I caught that at the last minute for the kiddo. Still a menace if I forget to duck. But super roomy once inside.

Comments

Seasonal And Holiday

8x10 Shed - Built by Julia Eliopoulos

I made your 8x10 shed! Turned out so well, thank you for the amazing plans.

Julia Eliopoulos

Built from Plan(s)

Comments

Cute corner desk

Submitted by Anonymous (not verified) on Sun, 09/11/2016 - 07:55

This 2x2 desk base was the perfect size for our 6' exchange student. He needed plenty of room width and length wise. We went with stain in Kona. More time was spent staining then building.

Estimated Cost
$20
Estimated Time Investment
An Hour or Two (0-2 Hours)
Finish Used
It is the base for a corner desk
Recommended Skill Level
Starter Project

Miter Stand and Rolling Storage Carts

Submitted by danicarby on Sat, 04/29/2017 - 11:21

I'm so happy that I found the plans for Ana's miter stand and rolling carts!  It was just what I needed for my garage shop... so everything can be organized and stored compactly but things can pull open and expand when I have a project (which is all the time, actually).

The actual miter stand was super easy to build - the carts took a few days working non-stop (when the kids permitted).


I made a few obvious changes from the plans:

-made deeper shelves on one of the carts

-added drawers on one of the carts

-added ped board on the end caps of miter stand


Something I didn't consider before building this was the slope of our garage floor.  There's a 3" difference from one end of the legs to the other so I had to use riser blocks to get everything perfectly level.  Unfortunately there's no way to level the carts as they aren't stationary but they slide in/out just fine.


I'd recommend this build to everyone!  Check Home Depot clearance often for deals on plywood!

Estimated Cost
It's hard to say as I used wood I had on hand, tried to buy clearance, etc. I'm estimating $200.
Estimated Time Investment
Week Long Project (20 Hours or More)
Finish Used
None
Recommended Skill Level
Intermediate

Comments

Simple Outhouse

I built this outhouse to go with a dry cabin I'm working on, and also as an emergency backup for my house. I used treated lumber on the base/deck and splurged on T-111 for the siding. I wanted to use greenhouse polycarbonate for the roof, but found a piece of metal roofing in my shed that was exactly the right size so I used that instead. I thought about doing a fancy cutout on the door but ended up going with a half moon because it was easy. I'm thinking about cutting out stars of different sizes all over the rest of the door to let in more light. I'll trim and stain it next summer.

Built from Plan(s)
Estimated Cost
$450 - I used T-111 which is $40/sheet here in Alaska. I also used treated lumber where recommended and stainless steel screws.
Estimated Time Investment
Weekend Project (10-20 Hours)
Recommended Skill Level
Beginner

Comments

CH

Mon, 01/13/2020 - 15:25

WHAT HAPPENS TO THE 'STUFF' THAT YOU DEPOSIT IN THE TOILET?  I DIDN'T READ ANYTHING ABOUT DIGGING A PIT/TREATMENTS, ETC.  PLEASE LET ME KNOW.  THANK YOU!  CH.

OUTDOOR SOFA

Decided to build Ana's outdoor sofa for our Master Balcony and love the results. I was a bit impatient to finish the build and therefore did not take the time to use pocket screws for a more finished result, (which I will do next time). Regardless, I love how the sofa turned out and would reccomend for anybody to build. The cheapest outdoor cushions I could find were from Ikea and we spent around $160.

Built from Plan(s)
Estimated Cost
$100 BUILD, $160 CUSHIONS
Estimated Time Investment
Afternoon Project (3-6 Hours)
Finish Used
OUTDOOR STAIN
Recommended Skill Level
Beginner

Curved Bench

Submitted by stevez8420 on Sat, 08/08/2015 - 13:41

I followed your idea but i think my bench is a touch smaller. I decided to add arm rests on each end, I kept the top beverage ledge or "Bever-ledge" as I call it and ofcourse I added rope lighting along the underside. This was my first ever DIY project.

Estimated Cost
150
Estimated Time Investment
Weekend Project (10-20 Hours)
Finish Used
I used a Cedar Tone semi-transparent finish which turned out a little more orange than i though but it still looks good!
Recommended Skill Level
Intermediate

Tall Bedroom Dresser

Had a blast with this project and am getting more confident with drawer slides. I built a matching dresser that is much shorter and wider. It can be found here: http://www.ana-white.com/2018/08/DIY_furniture/bedroom-dresser

Estimated Cost
$150-$200
Estimated Time Investment
Weekend Project (10-20 Hours)
Finish Used
Varathane Weathered Wood Accelerator, Varathane Poly
Recommended Skill Level
Advanced

Comments

hutchingslv

Thu, 08/12/2021 - 15:35

Any way to get a copy of these plans? I really like the look and want to give it a shot. Have to make a few of these if all goes well for all my boys.
Thanks

Outdoor Grill Station

Submitted by Anonymous (not verified) on Tue, 09/05/2023 - 09:21


This rolling bar was inspired by Ana White's plan.  It is used as a bar and conceals an electric smoker and a grill.  I added handles for moving and some hooks on the sides.  I stained the salvaged 2 X 6 's and brushed on clear oil based poly on the new Cedar fence boards.

Billie

Mudroom Closet Makeover

Submitted by Anonymous (not verified) on Thu, 01/21/2021 - 07:10

The concept of hidden boot storage at the back is genius!!! I knew as soon as I saw your plan that I needed that in this space! Thank you so much for what you do!

Finish Used
Bench seat was wood conditioner, minwax early American, minwax weathered oak. Then finished with shellac. The coat hooks are from Amazon. The ring pull is from Lee Valley.

Comments

Simple Outhouse

Submitted by Anonymous (not verified) on Thu, 04/20/2017 - 12:26

I had my nephew build this outhouse for our new 70 acre lot - no neighbours in sight so I had him put in an acrylic window (with a view).  I left off the deck and had him put the boards tight together so 'critters' didn't get in as easily. I made a sign for above the door - 'Waste Management' for a touch of humour.  The plans were easy to follow and I love it.  Thanks, Ana.

Built from Plan(s)
Estimated Cost
Approx. $300 for material and $250 for my nephew's labour.
Estimated Time Investment
Weekend Project (10-20 Hours)
Finish Used
sealer
Recommended Skill Level
Beginner

Comments

Drawer bases turned banquette

I took Ana's open base and drawer plans, added a few inches to the height (so that the base trim on the storage units would clear the base trim on our walls), and put them together to create a banquette-style bench with tons of storage underneath. We use the drawers for our family board games and photo albums.

Estimated Cost
$100-$150
Estimated Time Investment
Weekend Project (10-20 Hours)
Finish Used
Sherwin-Williams Pro-Classic in semi-gloss followed by Minwax Polycrylic.
Recommended Skill Level
Beginner

3 Tier Planter

Submitted by ranlim on Thu, 05/18/2017 - 21:24

Love this planter. Used quality pine. Perfect size for the balcony! I use it for fresh herbs... i have have other people wanting one too!

Estimated Cost
17
Estimated Time Investment
An Hour or Two (0-2 Hours)
Finish Used
Special walnut
Recommended Skill Level
Beginner

My Little Princesses Playhouse

Submitted by sanmaurais on Tue, 05/07/2013 - 17:00

This was the first thing I have ever built, and I loved making the playhouse! I took pictures of every step I did! It was very rewarding to see the look on my girls faces with it was done!! They absolutely love it!!! Thank you for posting the plans.

Estimated Time Investment
Week Long Project (20 Hours or More)
Recommended Skill Level
Starter Project

Full size Murphy Bed

Submitted by Hartung26 on Wed, 06/26/2013 - 20:07

Used the plans for the twin bed, just added the difference in mattress size to the measurements. Pretty simple really. Used a cam lock centered above the door and a sawtooth picture hanger on the inside as a locking mechanism.

Estimated Cost
$275
Estimated Time Investment
Week Long Project (20 Hours or More)
Finish Used
WinMax English Chestnut
Recommended Skill Level
Intermediate

Comments

spiceylg

Thu, 06/27/2013 - 12:16

Been thinking of building one of these. Yours looks beautiful, nice job!

campbelllsara

Tue, 09/30/2014 - 14:16

Hello,

I have been scowering the internet... I too would like to have my murphy bed raised off of the ground and be a full size murphy bed.  But everytime I try to do "adjustments" and get "creative" it ends in disaster.  I am better at following instructions.  Is there anyway that you could give me the exact measurements for your fullsize bed and let me know how it is that you propped the bed up at the end?

[email protected]


Thank you.

Back