Community Brag Posts
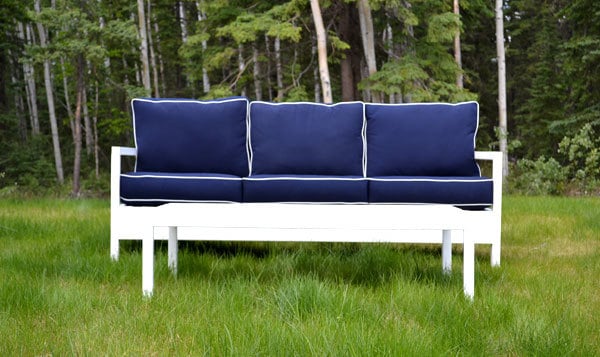
Outdoor Sectional (modified park bench)
This is a modified version of Ana's park bench. Had a large deck, with plenty of room for a sectional.
I basically built two benches. One with an extended back (to create the back for the side of the second), and modified the front leg to sit under the frame, to allow the second bench to sit flush. I used lag bolts to attach them together on the seat base. Using lag bolts allows it to be easily taken apart for moving.
Built from Plan(s)
Estimated Cost
$100
Estimated Time Investment
Day Project (6-9 Hours)
Finish Used
Finished with Minwax Espress Polystain.
Recommended Skill Level
Intermediate
Comments
Raised Garden Bed Planters and French Tuteur

I built some French Tuteur’s for the garden.
Fresh and ready for my new raised beds.
Built from Plan(s)
First adirondack chair!
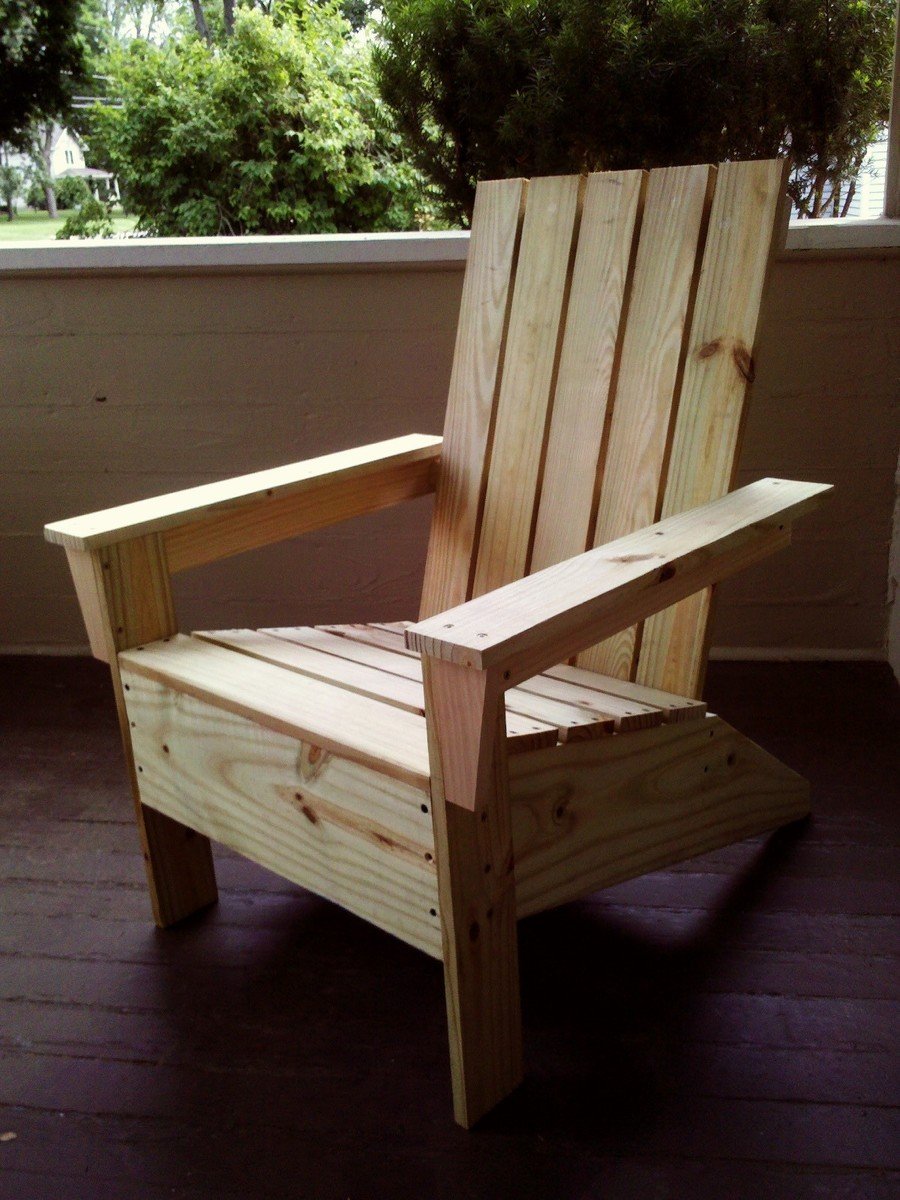
Got a chance this weekend to do our first (good!) woodworking project. Love the chair, gotta head back to Menard's to get some more lumber for chair #2!
Built from Plan(s)
Estimated Cost
$35
Estimated Time Investment
Weekend Project (10-20 Hours)
Finish Used
Haven't finished it yet--probably going to go with a light stain.
Recommended Skill Level
Starter Project
Kitchen Island
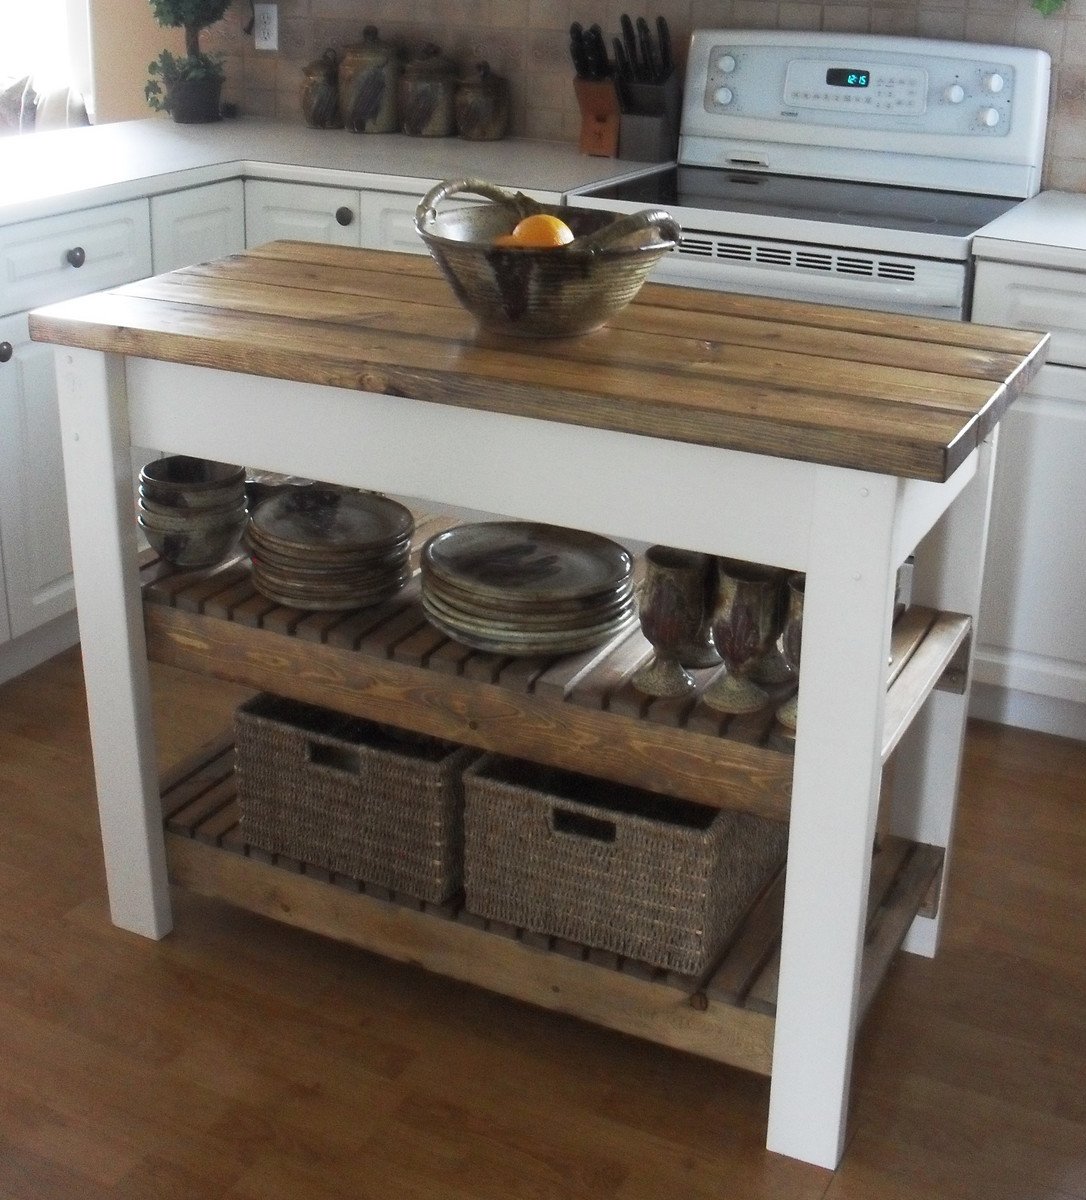
The plans were easy to follow. I modified my island to fit my space and cut it down to 44 inches in length.
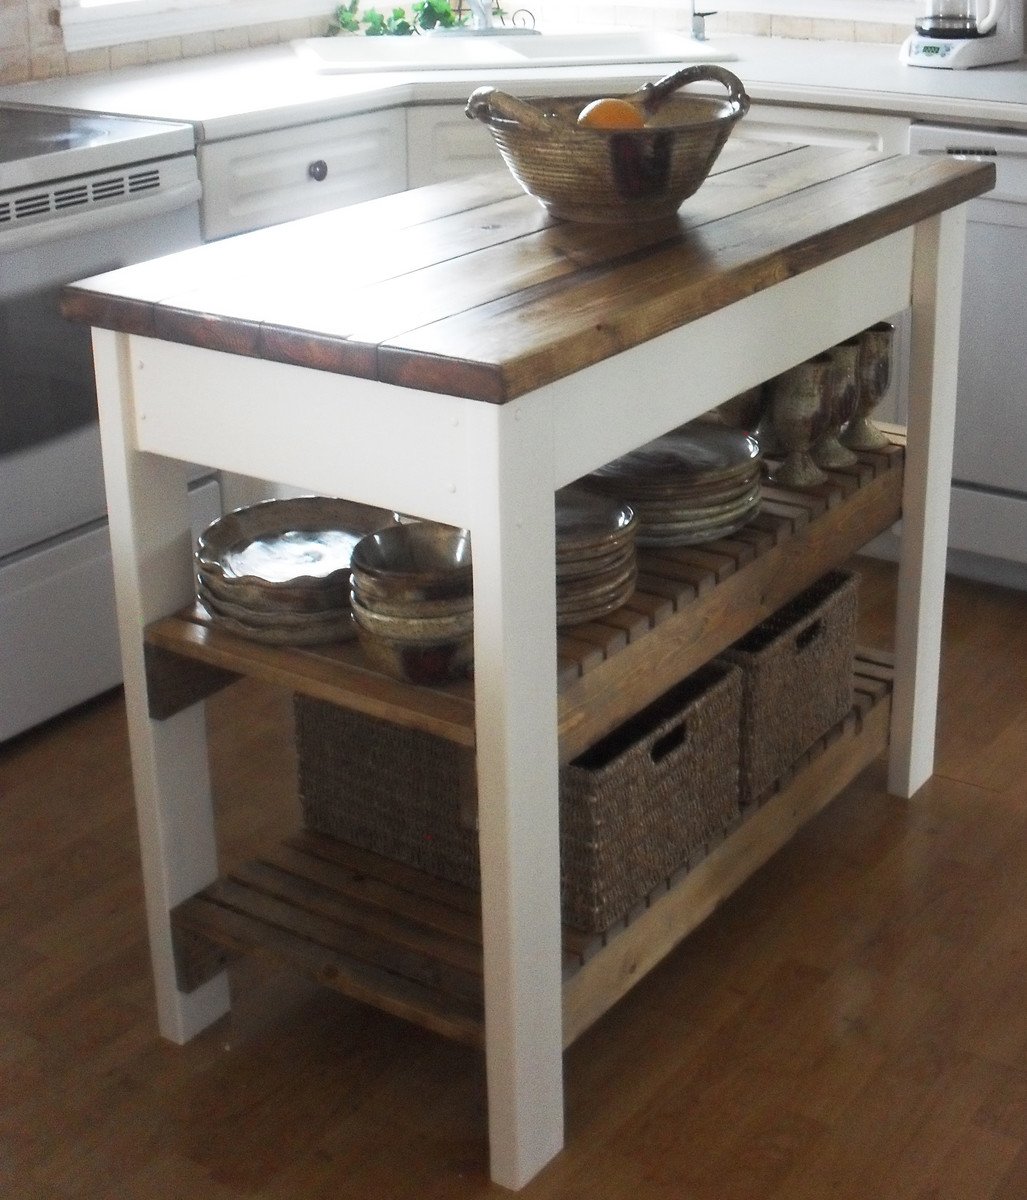
Built from Plan(s)
Estimated Cost
The entire project cost $47.00.
Estimated Time Investment
Day Project (6-9 Hours)
Finish Used
I stained the top and shelves with Watco Danish Oil in dark walnut and then used a satin finish varathane for only the top to protect it from spills, etc. The sides and legs were painted with an interior latex paint called "Sandbar" from Home Hardware.
Recommended Skill Level
Beginner
Comments
Fri, 07/22/2011 - 14:13
i was looking for THE PERFECT
i was looking for THE PERFECT ISLAND.. thank you so much for posting this. love it and can't wait to start building it. where did you find the shelves?
Mon, 10/31/2011 - 15:33
Shelving support
Your island is gorgeous, and I love the modification you made to the original plans on the shelving support! I would like to know what size the boards are that you used so that I can duplicate. Thank you!
Tue, 02/07/2012 - 19:43
I would think it would be
I would think it would be basically the same build, just add brackets to support the extra wood.
Mon, 03/05/2012 - 15:20
Small Kitchen Island
I want to make this Kitchen Island but if can't find the Supply List. Would you mind posting it or emailing me please! This will work perfect in my Kitchen
Mon, 03/05/2012 - 17:46
Small Kitchen Island!
Wow! Just a wonderfully simple project! I can figure it out by looking at it. I have a piece of Rock Maple Counter Top 24"x6'that needs legs. I'll probably use 4x4' for legs, six of them. But the shelves will be just like this. Thank you!
Mon, 03/05/2012 - 17:50
Small Kitchen Island!
Wow! Just a wonderfully simple project! I can figure it out by looking at it. I have a piece of Rock Maple Counter Top, 24in.x6ft., that needs legs. I'll probably use 4x4s for legs, six of them. But the shelves will be just like this. Thank you!
Mon, 03/05/2012 - 18:59
I have enjoyed what I have
I have enjoyed what I have seen so far. You are an awesome designer.
Mon, 03/19/2012 - 11:57
Do you have instructions on
Do you have instructions on how to build this? It's awesome!
Wed, 04/04/2012 - 11:58
How To Find The Instructions
Just click on the link for the instructions. It's under the heading 'About This Project' titled as 'From Plan: Easy Kitchen Island Plans'.
Click where it says 'Easy Kitchen Island Plans'. When you hover your cursor over the words, you will see that is a hyperlink.
Sun, 05/20/2012 - 06:48
I love your island and I also
I love your island and I also have a small kitchen...would you happen to know the sizes of the boards you used? Thanks
Wed, 07/25/2012 - 14:31
Could you send how you made this
Yours looks so different and so much better then the one that show how to make it, how did you do it? I really would love to build it but have no idea how...
Thanks so much!
Wed, 08/15/2012 - 13:08
Gorgeous and perfect!
This island is perfect. I love the shelves and the size. Any chance you could send me the dimensions of this island and details on how you did the shelves? Great job!
Wed, 12/31/2014 - 07:37
Modifications to original plans
Hi, this is my first time building anything. I really like the modification made to the original plans. I like the legs facing the other way. I can't figure out how to modify the cuts on the sides and front and back supports for the top to adjust for turning the legs the other way. Are there modified plans. LOL I need instructions, I’m not quite there yet on doing it myself. Thank you
Sat, 06/06/2015 - 18:33
Material
Hello, i love this island but maybe i missed it. What kind of wood is everyone using? Frosting said $47 but that could only be for pine right? Are people using pine to build this? I would like it to look just like the picture. Any help would be appreciated! thanks!
Fri, 08/14/2015 - 14:34
How Di I get these plans
I wnat to kow how much wood and what size I need ans the saws i need to build this project
Fri, 08/14/2015 - 14:35
How do I get these plans
I need to know how much wood and what size wood and also what kind of saws do I need for this job
Fri, 08/14/2015 - 14:35
How do I get these plans
I need to know how much wood and what size wood and also what kind of saws do I need for this job
Donated bed

I made another one of these bunk beds for a family near my community. This time I made all cuts from longer boards 16' + The boards had less nknots, which required less sanding and came out better!
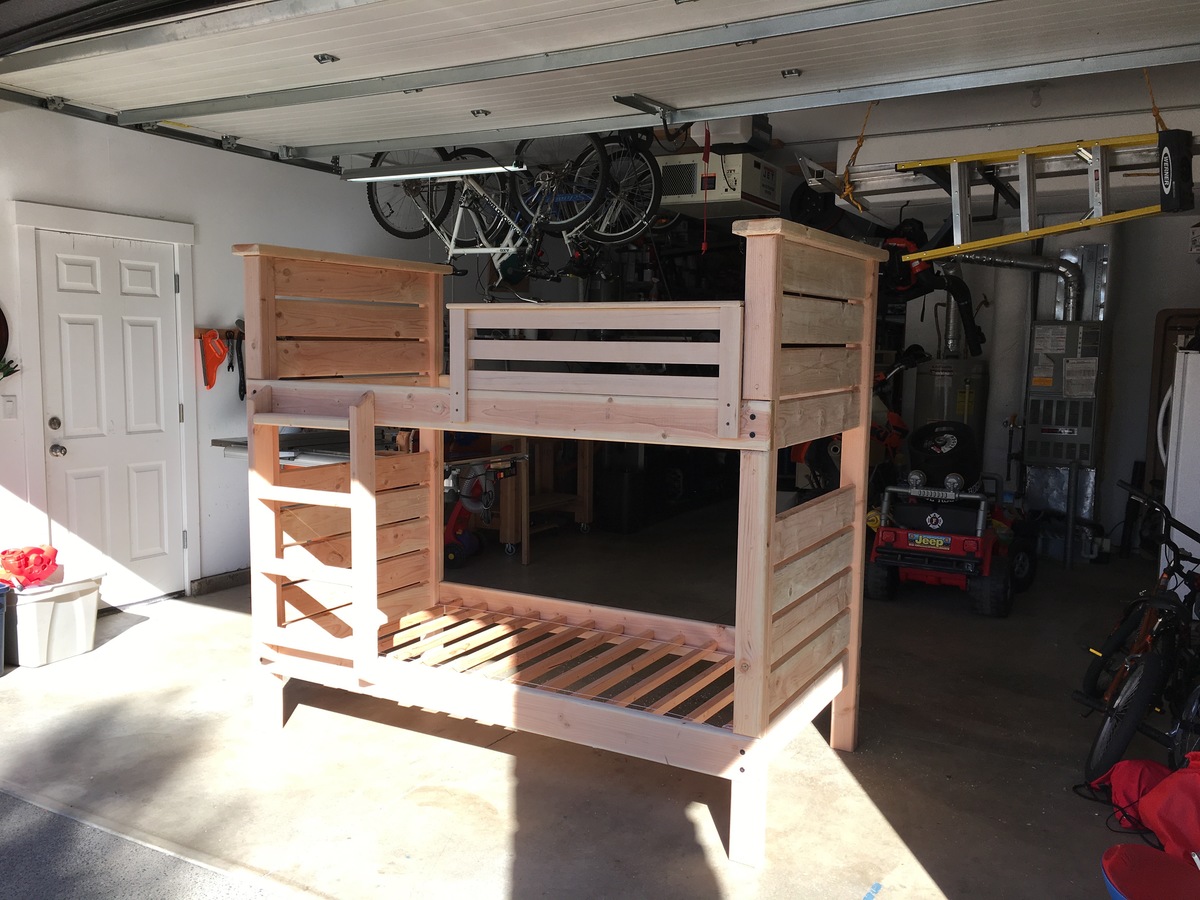
Built from Plan(s)
Estimated Cost
220.00
Estimated Time Investment
Weekend Project (10-20 Hours)
Finish Used
Watco Medium walnut (2 coats)>
Recommended Skill Level
Beginner
Comments
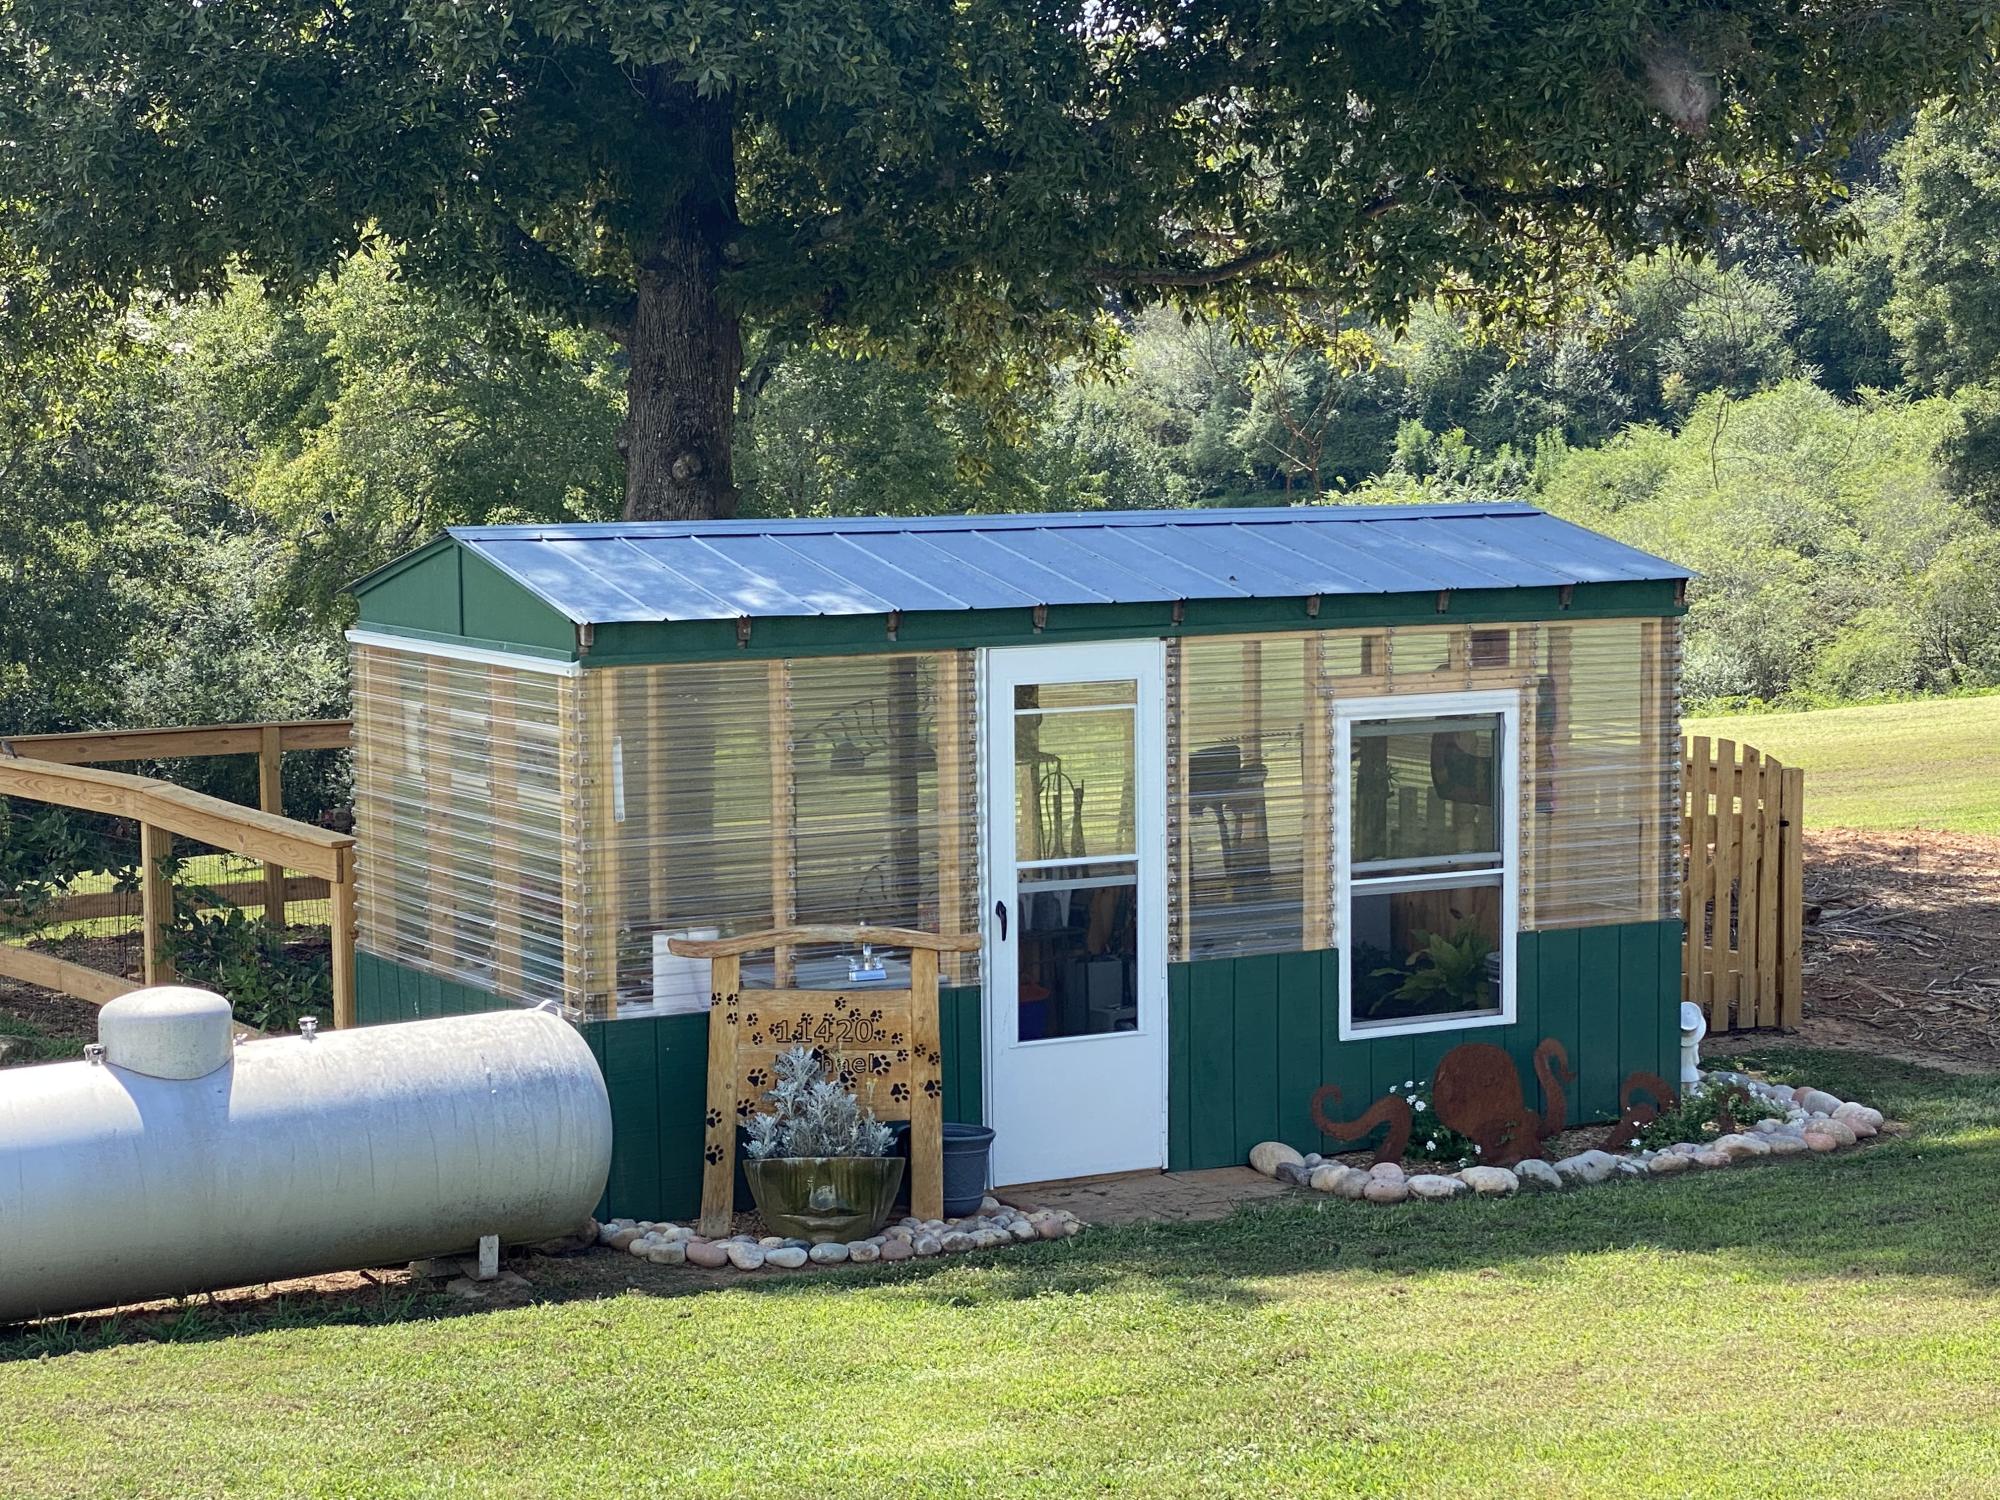
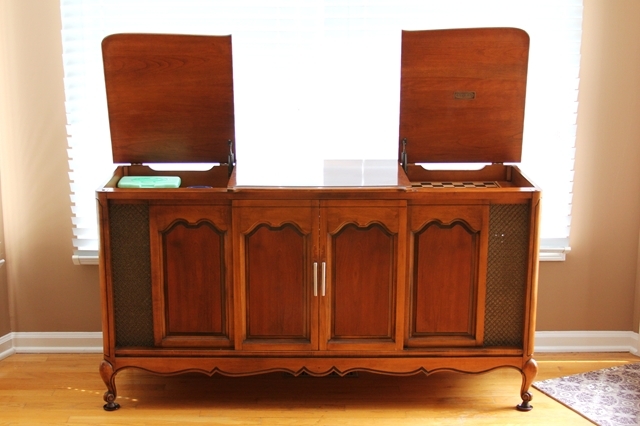
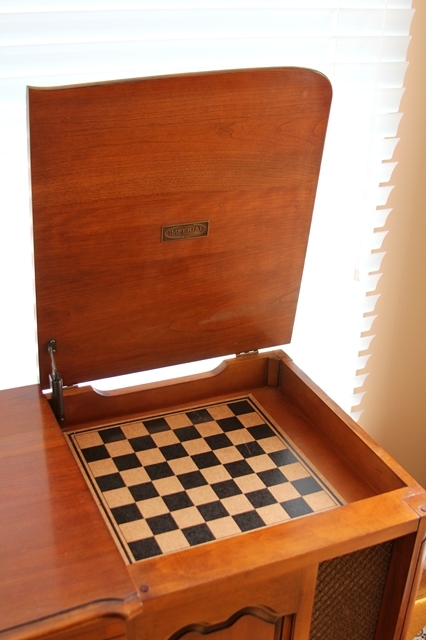
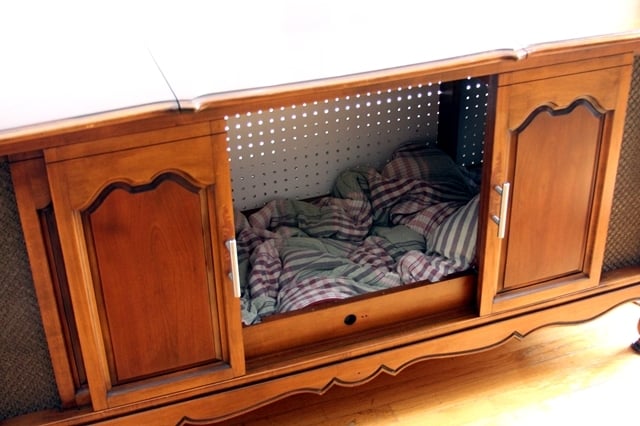
Indoor Dog Kennel
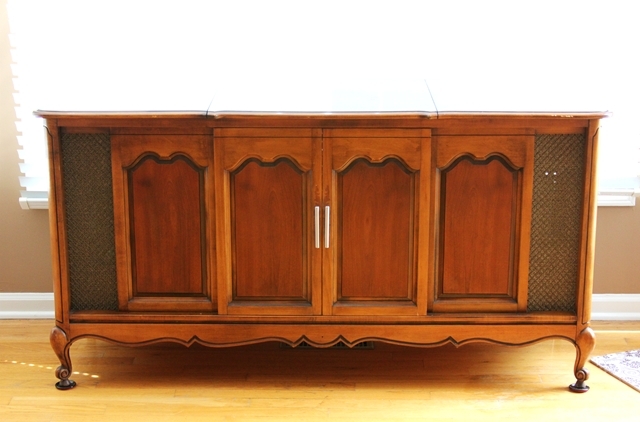
I love my dogs, but their wire kennels were an eyesore. Removing them completely was not an option, but I was tired of looking at them. I went back to my first-ever rehab project, and took it one step further to create a one-of-a-kind castle for my pups.
The original piece of furniture was an old console-style TV cabinet. Sliding doors on the front revealed the TV, and two lids on top contained the tuner and a turn-table.
Armed with screwdrivers, hammers and a dremmel, all components were removed form the cabinet, leaving just the shell. (PLEASE be sure you remove all sharp, potentially dangerous, screws, staples and what-not’s from the inside of the cabinets, to avoid injuring your pet! The dremmel allowed me to cut off and grind down stubborn screws.)
To cover the holes in the top cabinets, I used old checker boards. The cubbies are now a great place to store dog treats and leashes.
OPTIONAL: The back panel of the cabinet I used had holes from the TV components. I elected to replace the back board with a new sheet of peg board. (The peg board allows for much-needed ventilation.) In order to get the size perfect, I traced the old back onto the new and marked the original screw holes.
I vacuumed the inside to remove all construction debris and polished the exterior with Pledge. Then, I inserted an old comforter into the kennel, and stood back as my two pups launched themselves into their new abode.
The doors can stay open during the day for them to enter at their own will, and close for bedtime. And my eyes no longer hurt.
Estimated Cost
Cost of Cabinet (will vary)
Estimated Time Investment
Afternoon Project (3-6 Hours)
Finish Used
I did not elect to change the finish, but it could be painted to match any decor if you want.
Recommended Skill Level
Beginner
Comments
Thu, 08/11/2011 - 18:41
Dog kennel
This was such a great idea. I love the old console. I love to build but I love it so much more when I can use old wood or repurpose parts of old furniture and industrial pieces. I feel creative. The checker boards are great. Do you have a blog?
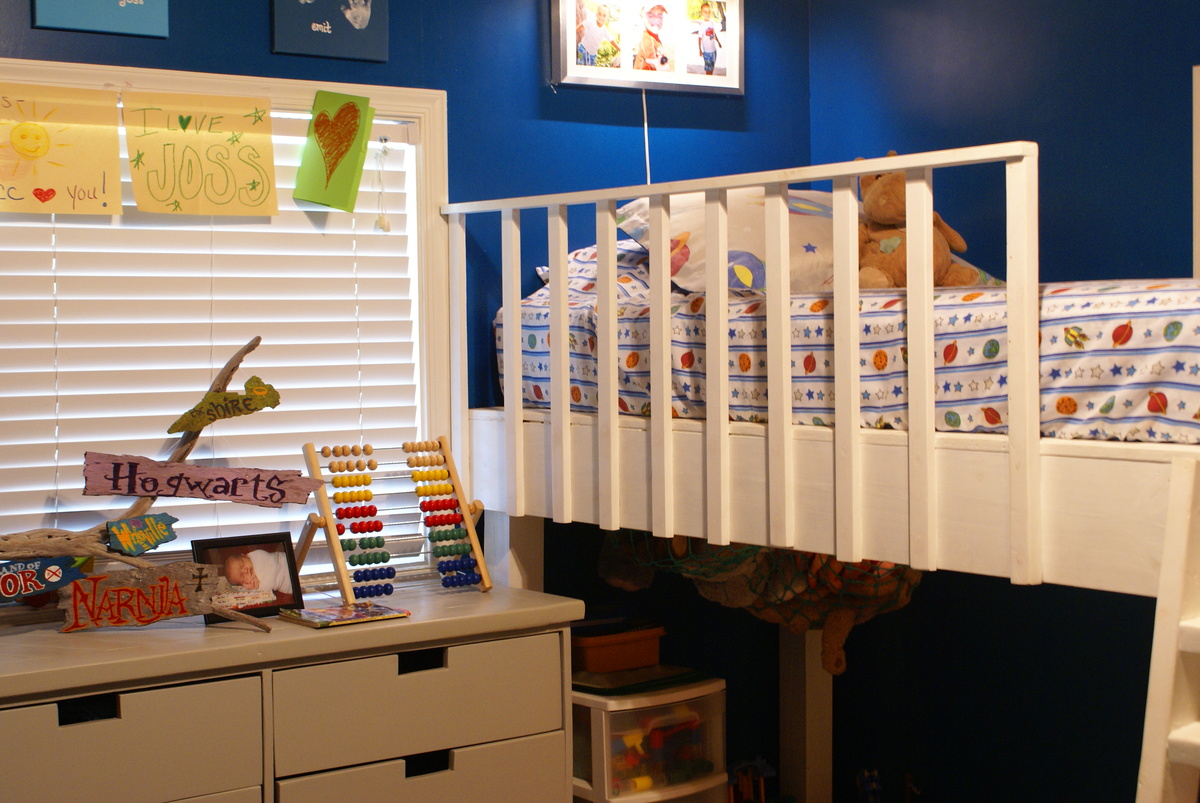
Double Loft Bed
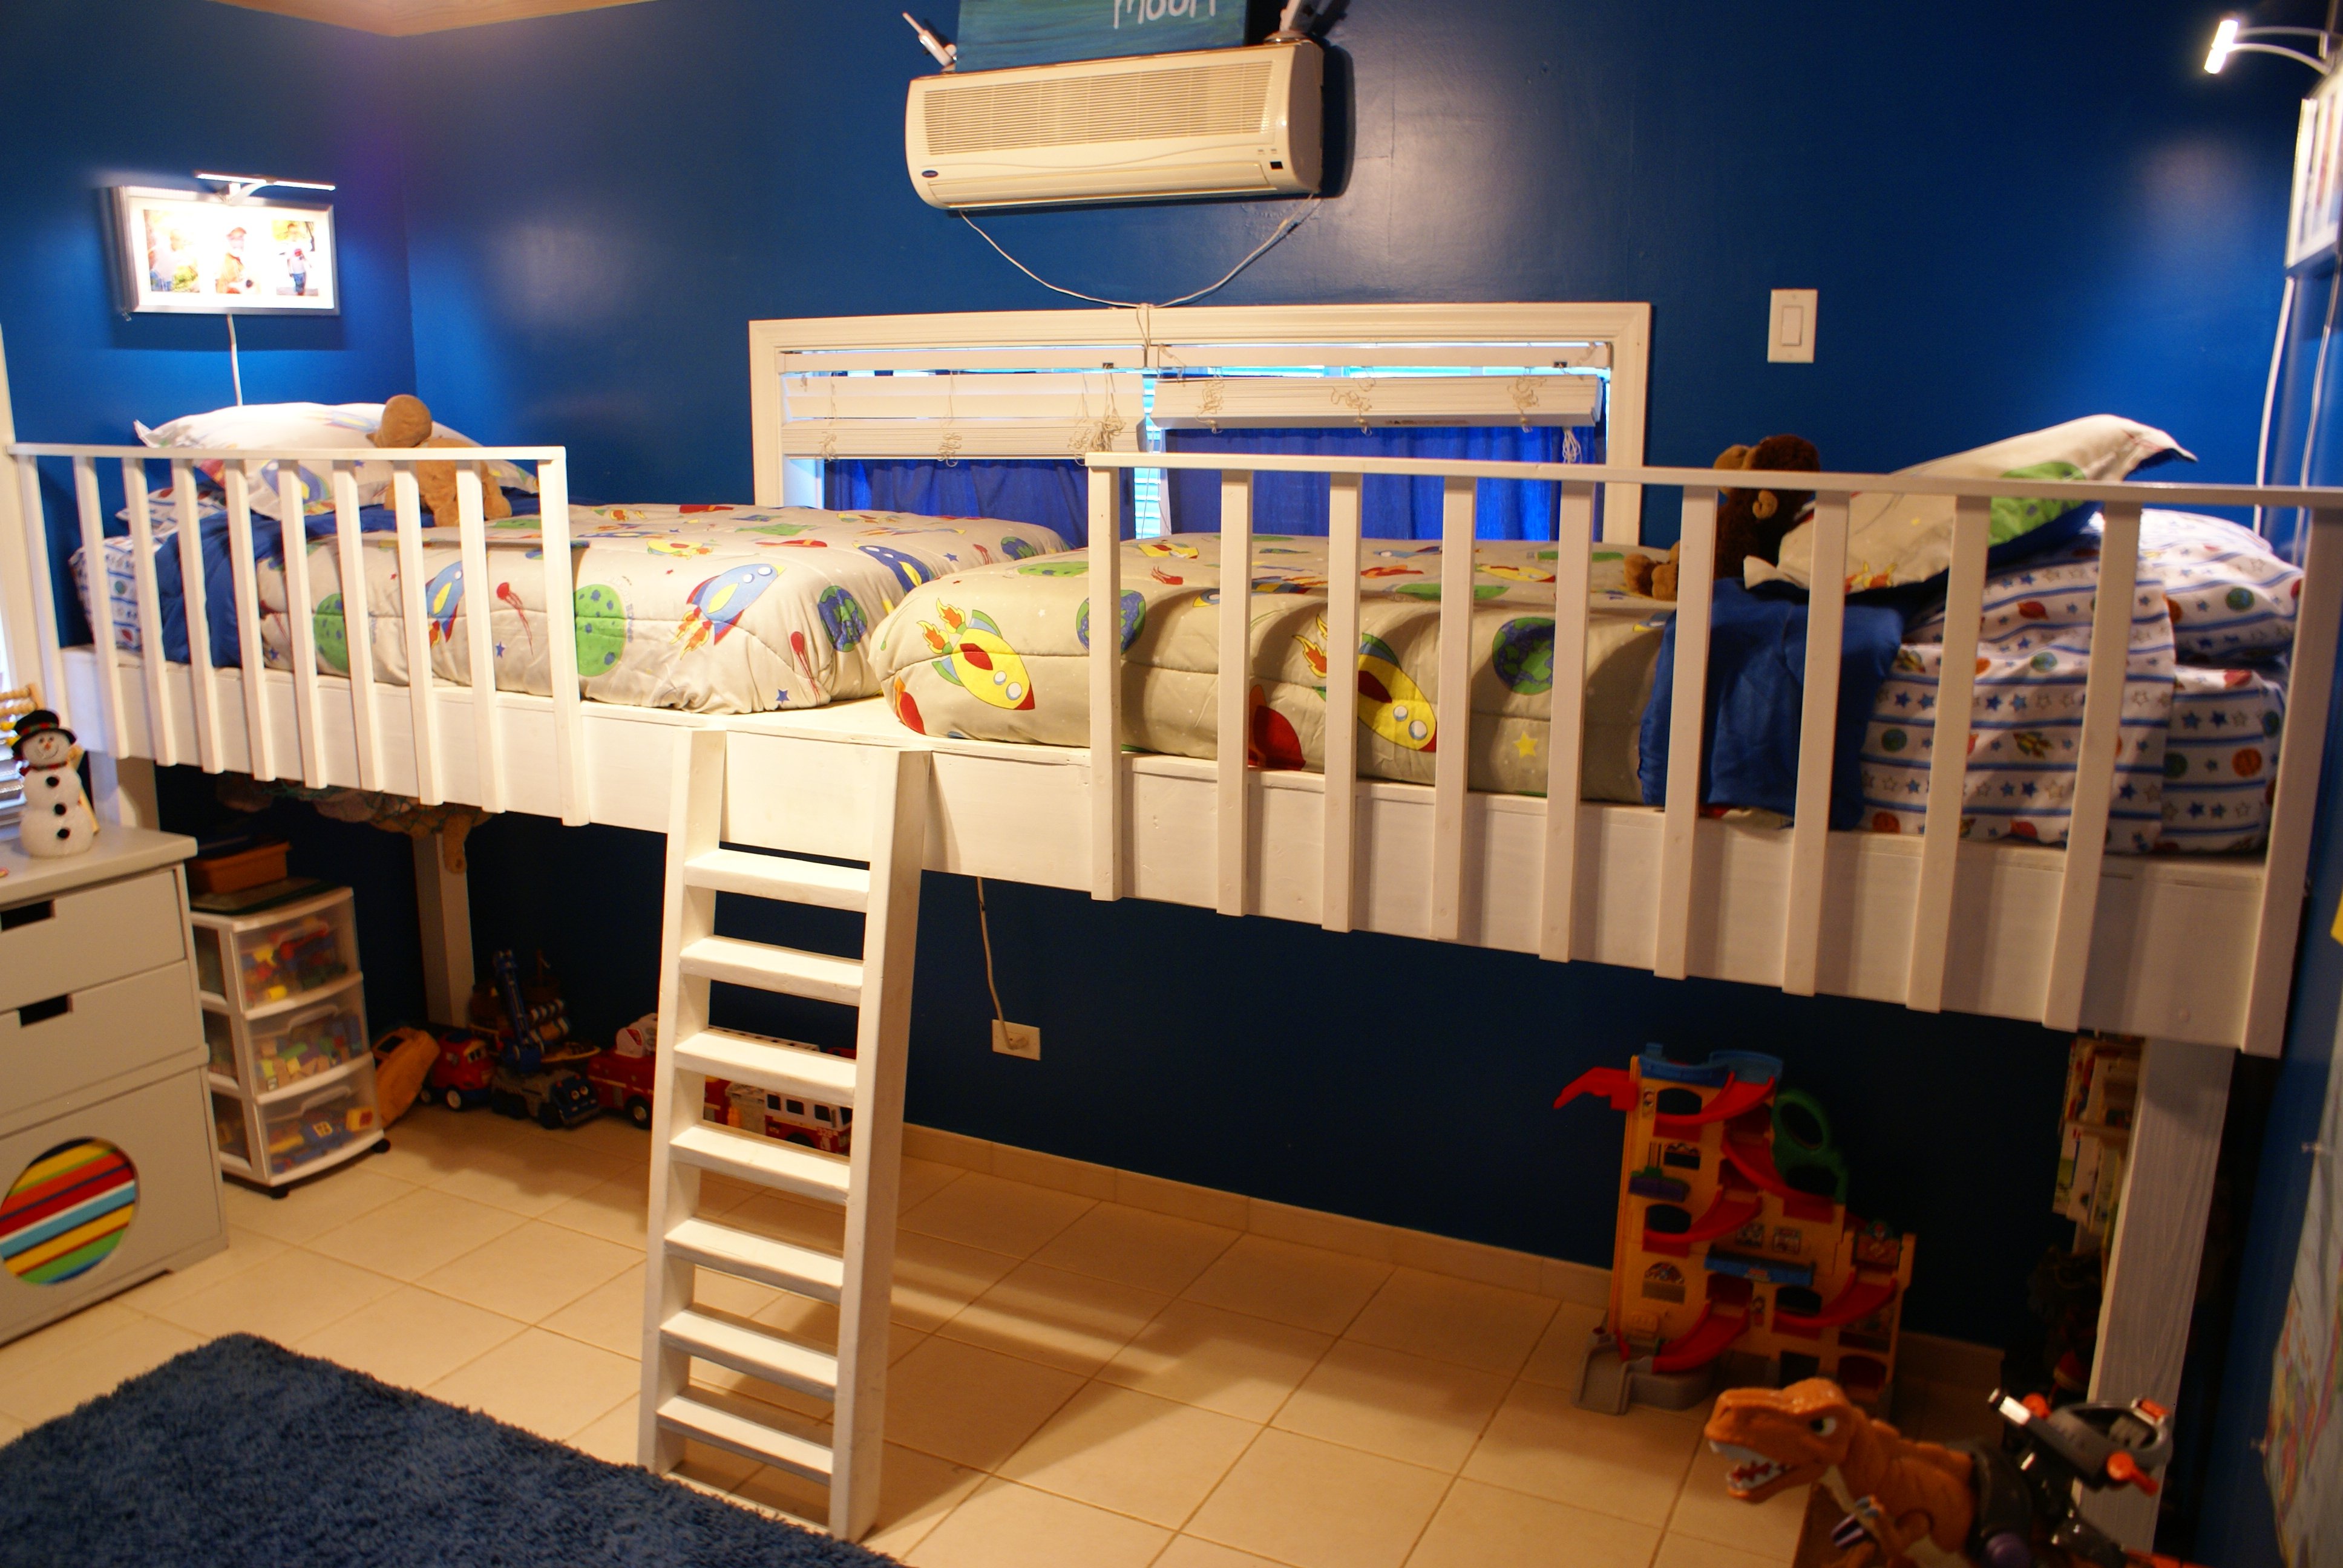
I saw the idea for this bed on Pinterest originally. It linked to a blog that had the step by step plan (http://www.thehandmadehome.net/2011/08/how-to-build-a-loft/). However, I would have never even approached the idea or project without a few of Ana's plans under my belt first. I have gained so much confidence in my building on this site, and will always be a HUGE fan here :) Thank you Ana for all the fantastic plans you continue to share!
I still want to finish out and make the under bed area more fun and creative with curtains and such, but we LOVE having the full floor in the room for our play area. My boys absolutely love their bed!!
Estimated Cost
Less than $150 (a little higher than usual because of where I live)
Estimated Time Investment
Afternoon Project (3-6 Hours)
Finish Used
The hardest part about this project was lifting the bed platform up onto the legs in order to secure them in place. We built it with very little room to spare against the wall, and it made it very tricky to get up into place with some of the window frames and such. Be sure to have friendly neighbors or friends helping out when you get to that part, and lift with your legs...not your back ;)
Recommended Skill Level
Intermediate
Comments
Wed, 10/02/2013 - 13:07
Looks great!
I'll bet the boys are thrilled with this. It's great to have that extra play room!
I am curious, though, how the center of the loft bed is supported.
In reply to Looks great! by sgilly
Wed, 10/02/2013 - 18:38
Support
Hey Sue, I went and found the old link to the plans for this and added it to the brag post. Or here it is also: http://www.thehandmadehome.net/2011/08/how-to-build-a-loft/ Underneath is a bunch of 2x4's spaced to support the platform, but the big 2x8's are the main strength. They are monsters! We've had a bunch of kids and adults up there for story time, and never once has it felt unstable or wobbly. Hopefully the link will help. It has way more photos that I have here.
Thu, 07/28/2016 - 15:47
The ladder
I am going to attempt to make this bed in a couple of weeks for my daughters. The handmade home directions only show the rope ladder. We want to make the ladder similar to your pictures above. Could you tell me how you made yours please and thank you?
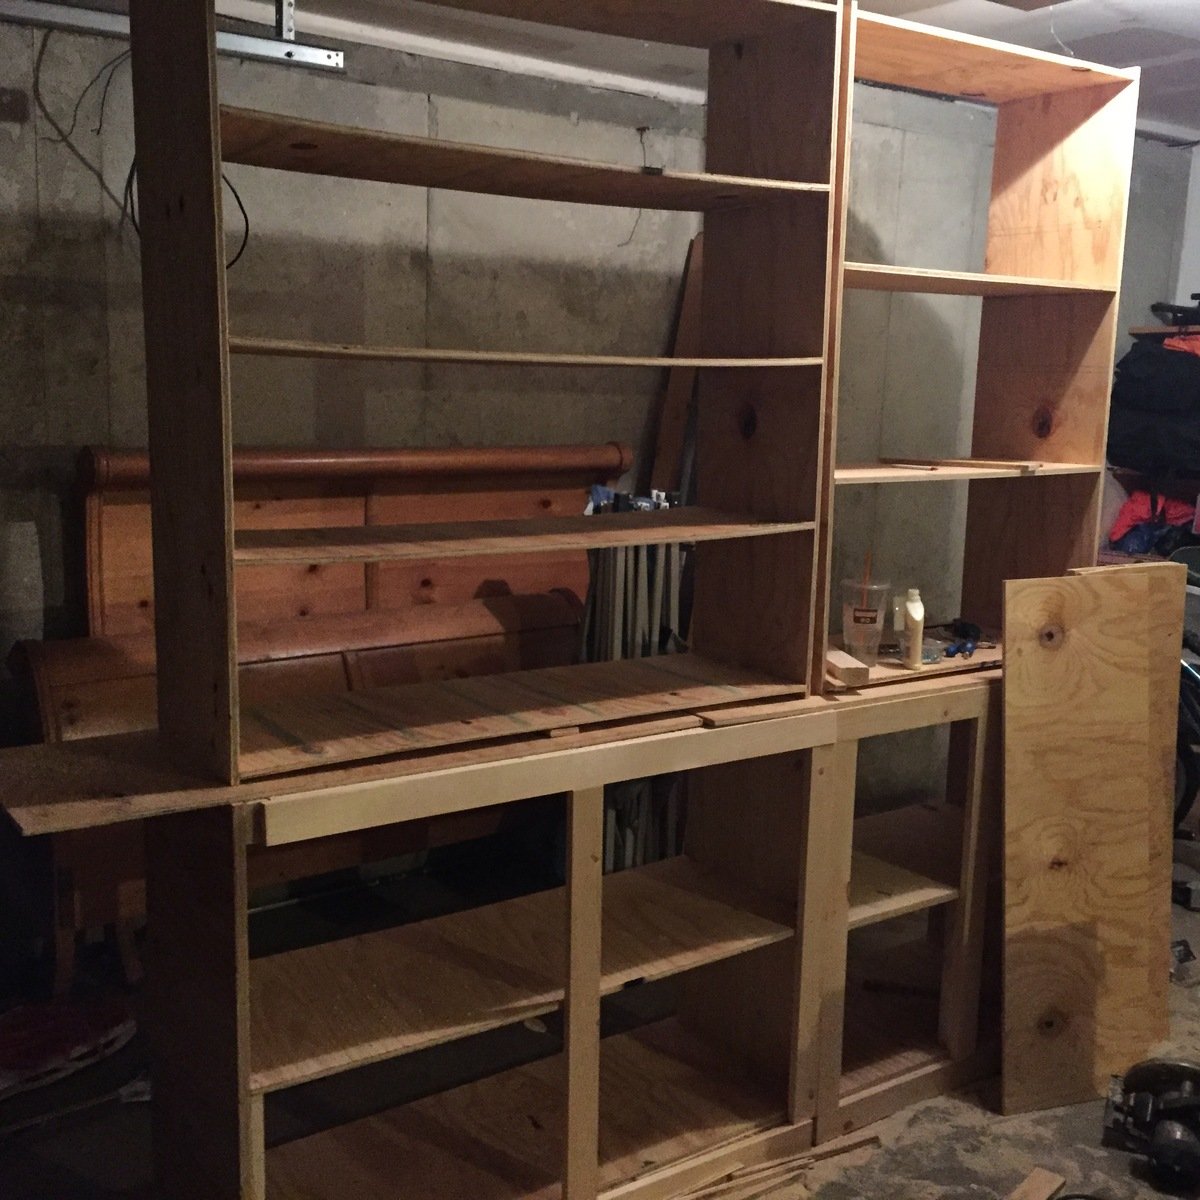
Love my new built ins!
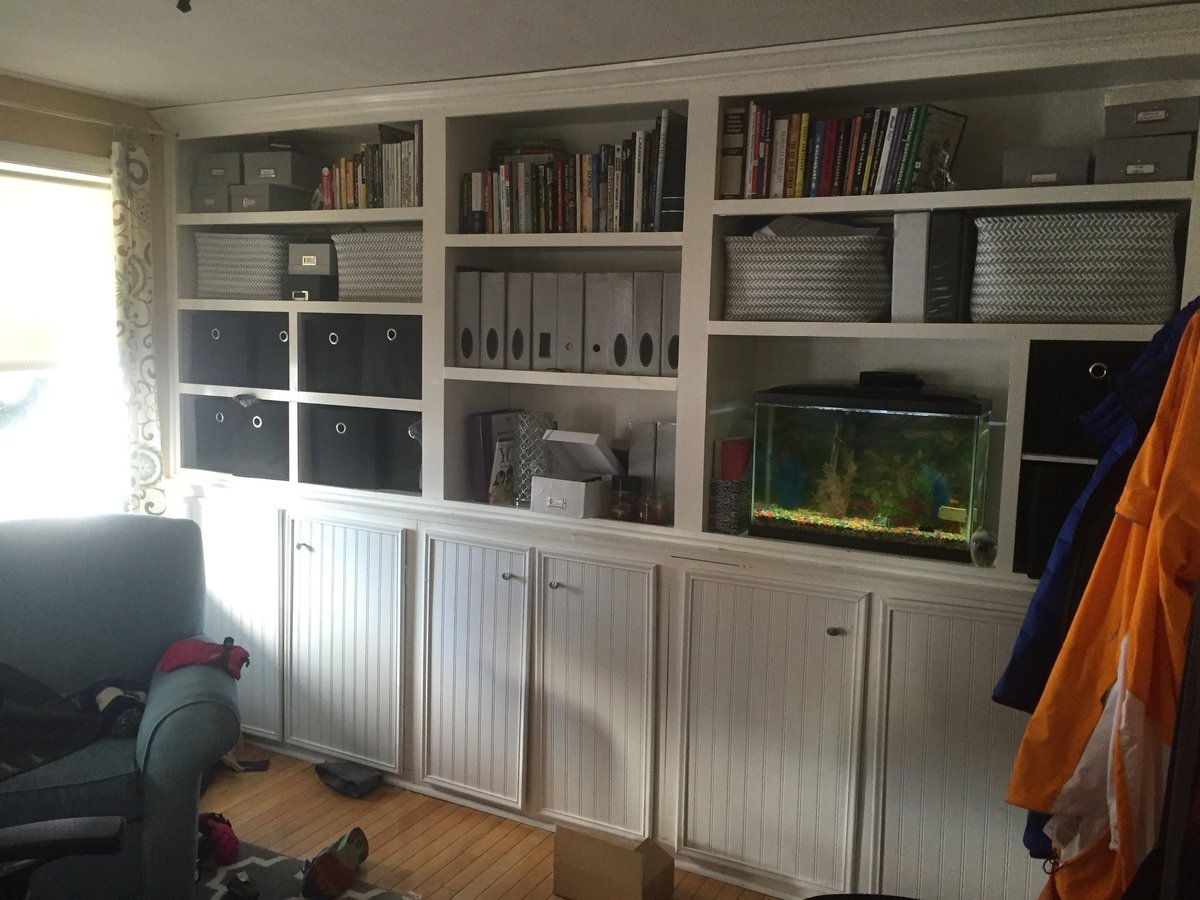
built ins for my office-based on basic bookcase plans, and pieces from rustic bookcase plans. I got a kreg pocket hole jig for this one- best money ever spent!!! My husband didn't think I could do it but I did! ❤️❤️❤️
Built from Plan(s)
Estimated Cost
$500
Estimated Time Investment
Week Long Project (20 Hours or More)
Recommended Skill Level
Intermediate
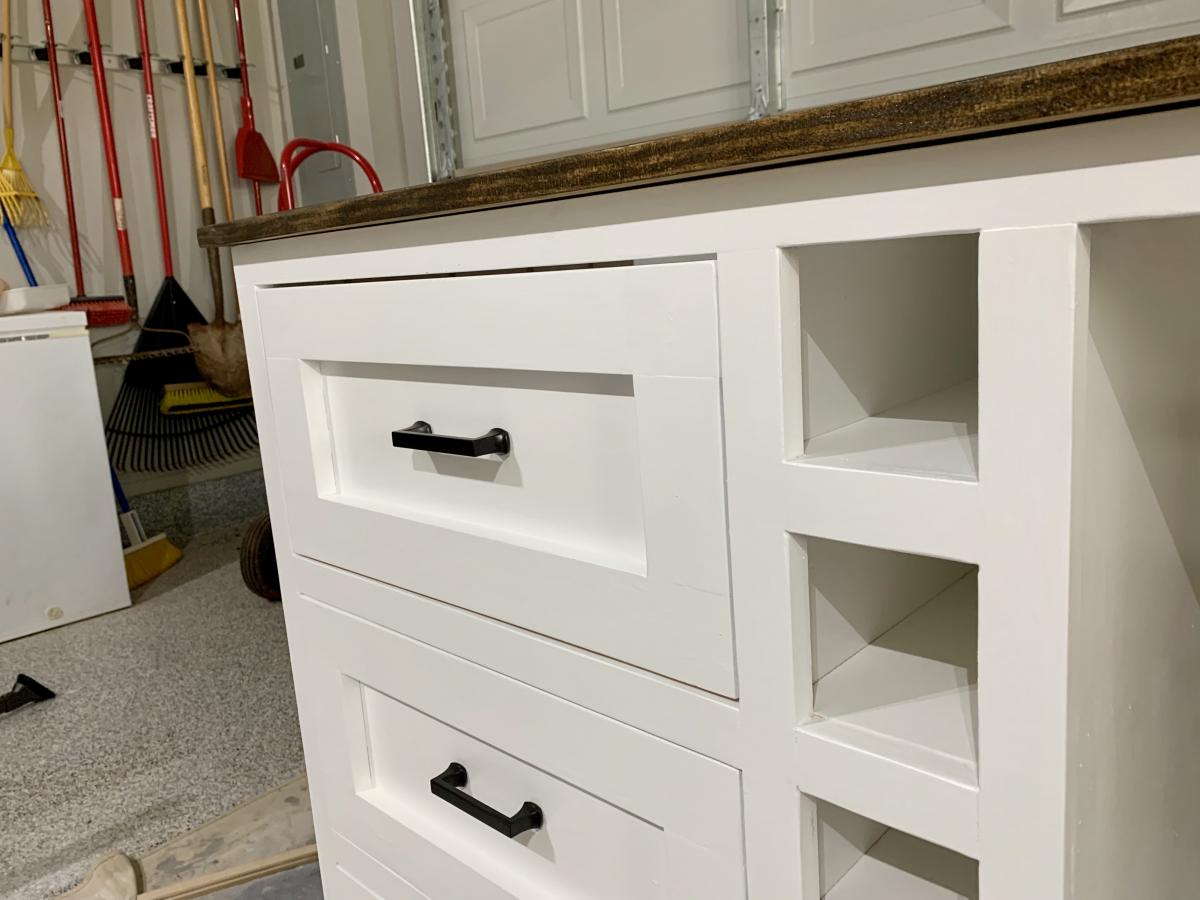
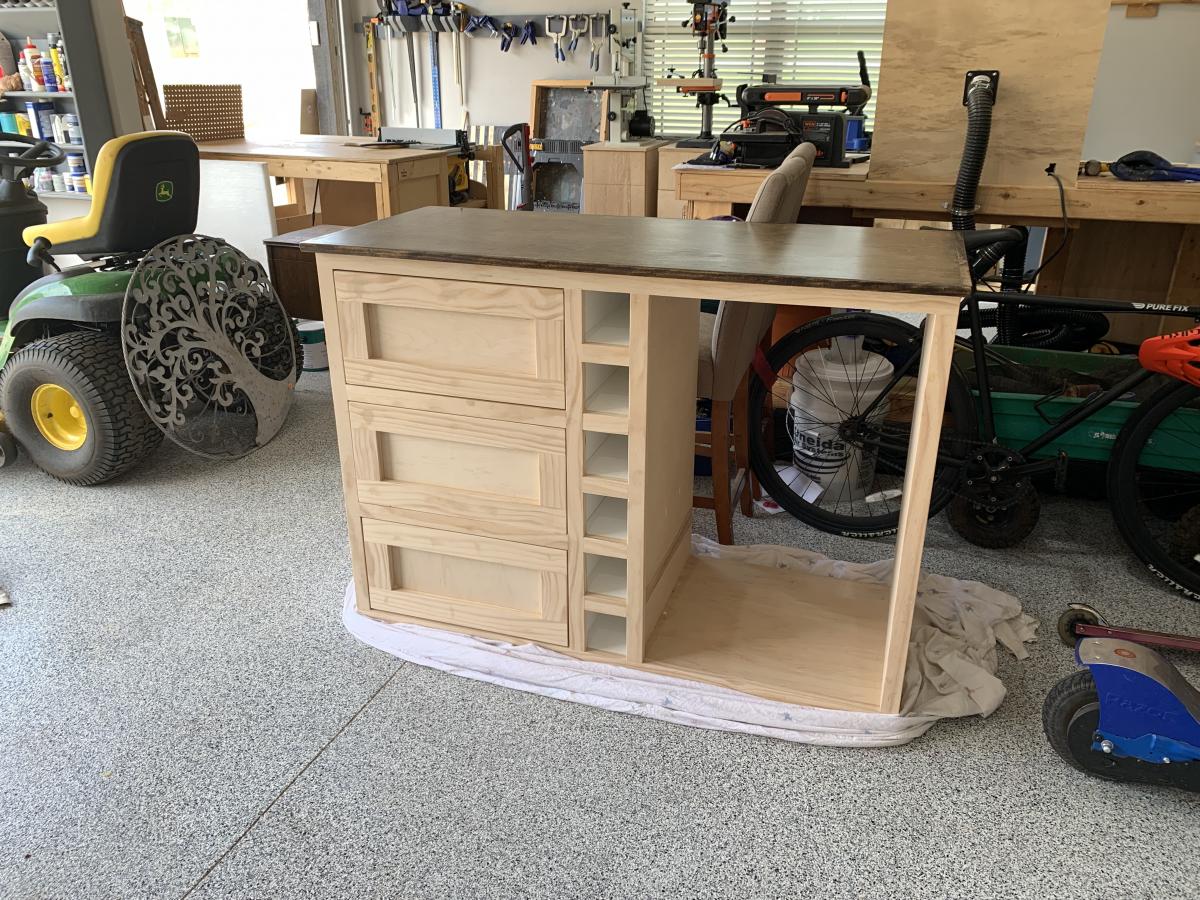
Coffee Bar with Built-In Beer Fridge and Wine Storage
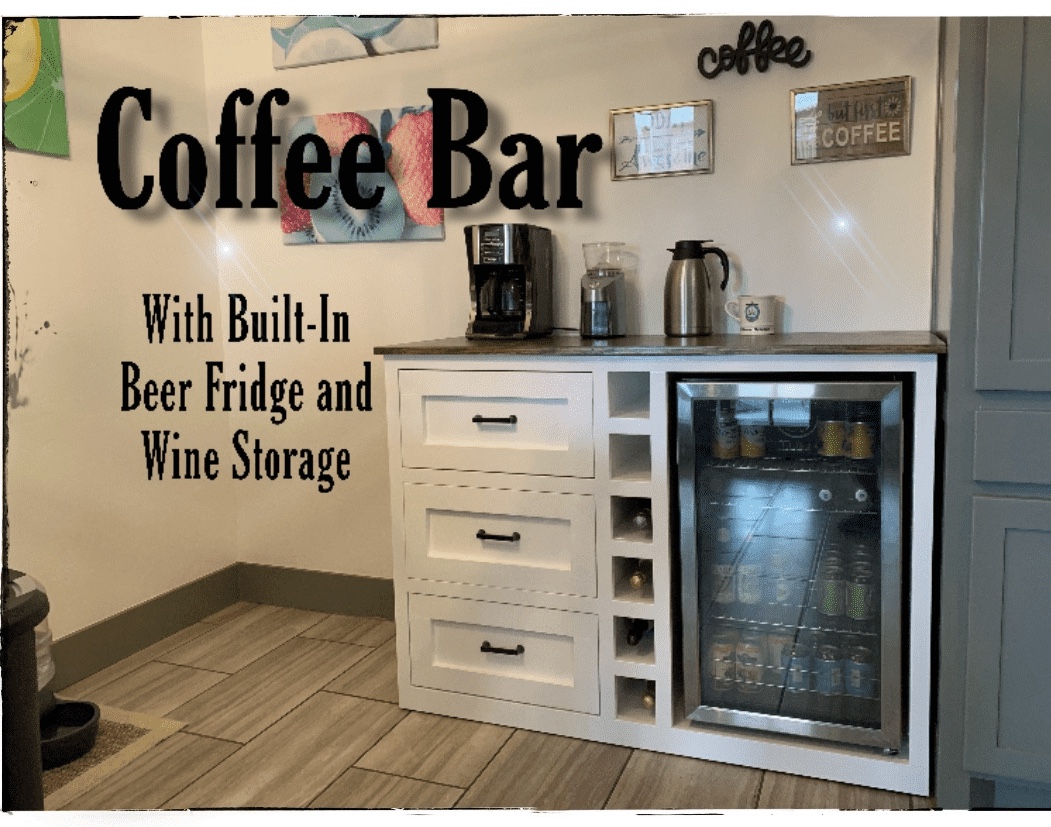
We made a beverage station for the corner of the kitchen!
Estimated Cost
$250
Estimated Time Investment
Day Project (6-9 Hours)
Finish Used
Semi-gloss white paint and Dark Walnut stain
Recommended Skill Level
Intermediate
Comments

Mon, 07/08/2019 - 10:46
We didn't use a plan for…
We didn't use a plan for this but, if someone wants to build it, check out the linked YouTube video.

Tue, 07/09/2019 - 11:11
Amazing! Thanks so much for…
Amazing! Thanks so much for adding a brag post and linking to your video!
Fri, 07/31/2020 - 09:43
Hello! Was looking to see if…
Hello! Was looking to see if this is something you would be interested in building for us? We are in love with this project but don't have the tools or means to do it ourself..
Can talk about pricing / size etc.
Thanks!
Twin over Full Bunk Beds
I wanted my kids to have more space in their shared room, but I did not want to pay a ton of money for a new bunk bed. My husband and I found a plan for this bunk on Ana-White and fell in love with the design. It turned out so great that we will still be using it in our next home whether it's needed or not. We did change a couple of things on the plan that we didn't care for. The first is that we added a side rail for safety. Secondly we also traded the 1x6 boards on the head and foot boards for 1x4s on the top but kept the 1x6s on the bottom.
Built from Plan(s)
Estimated Time Investment
Weekend Project (10-20 Hours)
Finish Used
Stain: Colonial Maple and polyurethane.
Used a sponge brush to apply stain and dry cloth to wipe off. Used a brush to apply poly.
Used a sponge brush to apply stain and dry cloth to wipe off. Used a brush to apply poly.
Recommended Skill Level
Intermediate
Comments
Mon, 01/09/2012 - 17:39
Repyl: Guardrail
With pocket screws on the bottom and then one screw through the 1x4s into the post before the 2x4 on the top goes on. And then the 2x4 is screwed onto the 1x4 and post with trim screws.
Wed, 03/28/2012 - 13:02
Re: price
Cost us about $300 and over an entire weekend of time spent on this project.
It's not for beginners. My husband has had many many years of experience in carpentry and woodmaking.
Good luck to you.
Also, he changed a few things in the plans we found in order to make it look better.
Thank you
Jillian
Wed, 03/28/2012 - 12:59
price
Cost us $300.00 to make and almost non-stop making it for the whole weekend. And then stained for hours.
This is with many years of experience in construction and woodmaking.
This is not a beginners project and then expect it to look amazing.
My husband changed these plans a bit to make it look better than the other ppls that we've seen on here.
But, good luck to you and make sure to have plenty of room and time.
Also, we had to make this bed in 10-15 different pieces and put together in the bedroom we wanted it in. There is absolutely no way it will fit otherwise.
Jillian
Sat, 10/25/2014 - 22:25
Full/Twin over Queen?
I don't see how you could put the fill/twin over a queen since the queen is longer. Obviously you could spin the queen around and make it an L-shape but then you are looking at a different build.
Sat, 10/25/2014 - 22:28
Love the modifications you made!
I really like the look of this ... I'm going to try to replicate!
What does the bottom of the guard-rail look like? Did you space out your slats a little more than the original design? I like the 2x4 topper instead of the 1x6.
Sat, 02/28/2015 - 16:46
Not Impressed with Design of this Bed
We made this bed over the course of a week, both of us have extensive experience in woodworking and building. Ours is very wobbly on the long axis. We had a friend who is a structural engineer come in and take a look. He offered suggestions to shore it up and nothing really worked. The 3/4" overlap is not enough to secure the side rails, imo, and we used a variety of brackets to make it not wobble, to no avail.
This bed is coming apart in a few weeks and will be stored. If it is ever used again, it will be as two separate beds. I spent about $400 on this. My son never felt safe sleeping on the top bunk and has slept on the bottom exclusively.
Just my $0.02.
HERB GARDEN PLANTER

This project was a super easy and fun build that I made for my mother's herbs. In total I spent probably around $12 in material, and only spent about 2 hours building it. Came out great!
Built from Plan(s)
Estimated Cost
$12
Estimated Time Investment
An Hour or Two (0-2 Hours)
Finish Used
none
Recommended Skill Level
Beginner
Comments

In reply to wood used by jfwoodworking
Tue, 04/26/2016 - 14:13
Thanks!!
Being that its going to be holding moist soil, and inevitably warping some, I didn't want to waste too much money on better wood, so i went with cedar fence boards (5 1/2") for this build. It DID move around a little when I first watered, but everything has held together fine, and I defiantly think it will add to the "rustic" look for my herb garden planter. i will try to upload some pictures as it "ages"
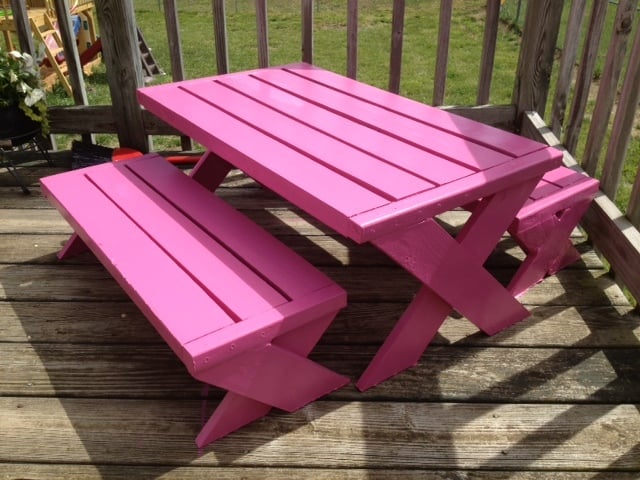
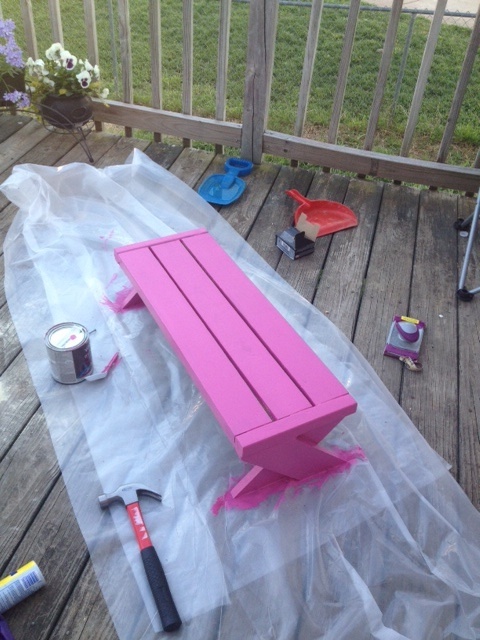
Kids Modern Picnic Table
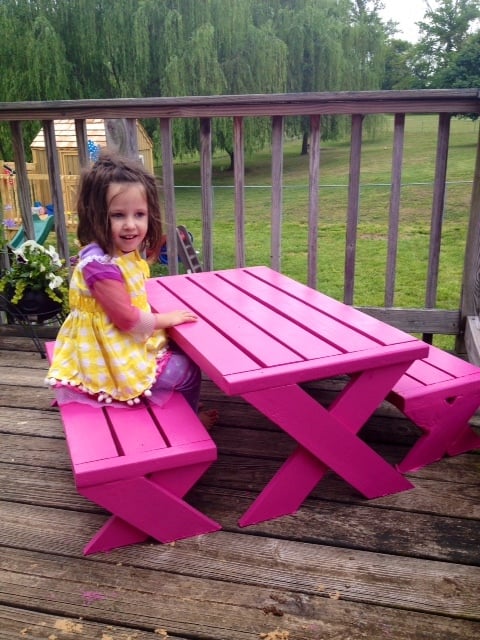
This is my very first wood working project! I know its not perfect and I learned from my mistakes. I found a miter saw at a garage sale and after three hours of plugging it in and unplugging it, I finally worked up the courage to make it make a noise! Then I eventually worked up the courage to cut wood lol! I'm pretty proud of myself for building something and I am going to continue practicing until I can make really cool stuff!
Built from Plan(s)
Estimated Cost
$20
Estimated Time Investment
Afternoon Project (3-6 Hours)
Finish Used
Valspar, Quart Size, LA218, Fuchsia, Duramax, Exterior Semigloss, Base 4 214-4.75, 113-31.75, 105-3.63, 115-2Y7
I used 2 coats
I used 2 coats
Recommended Skill Level
Starter Project
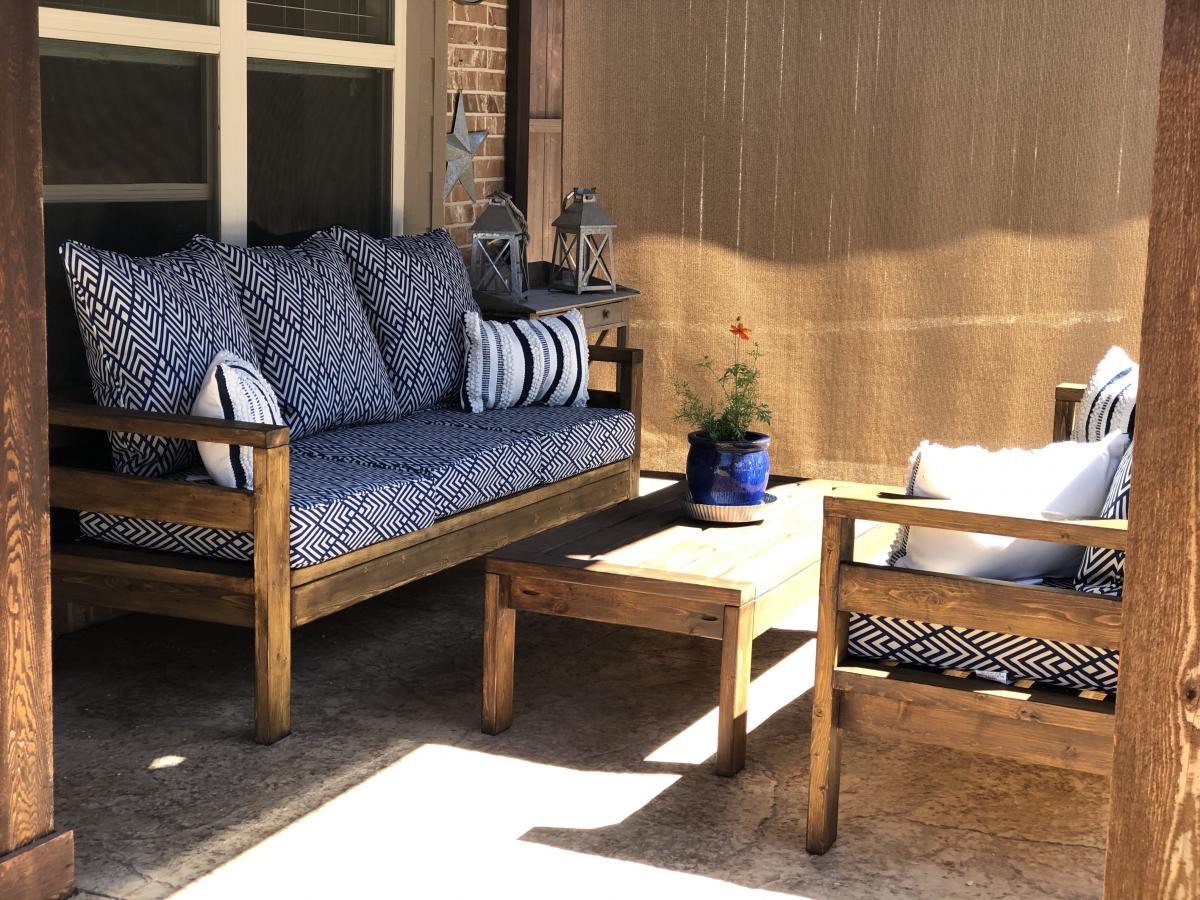
Outdoor sofa and coffee table
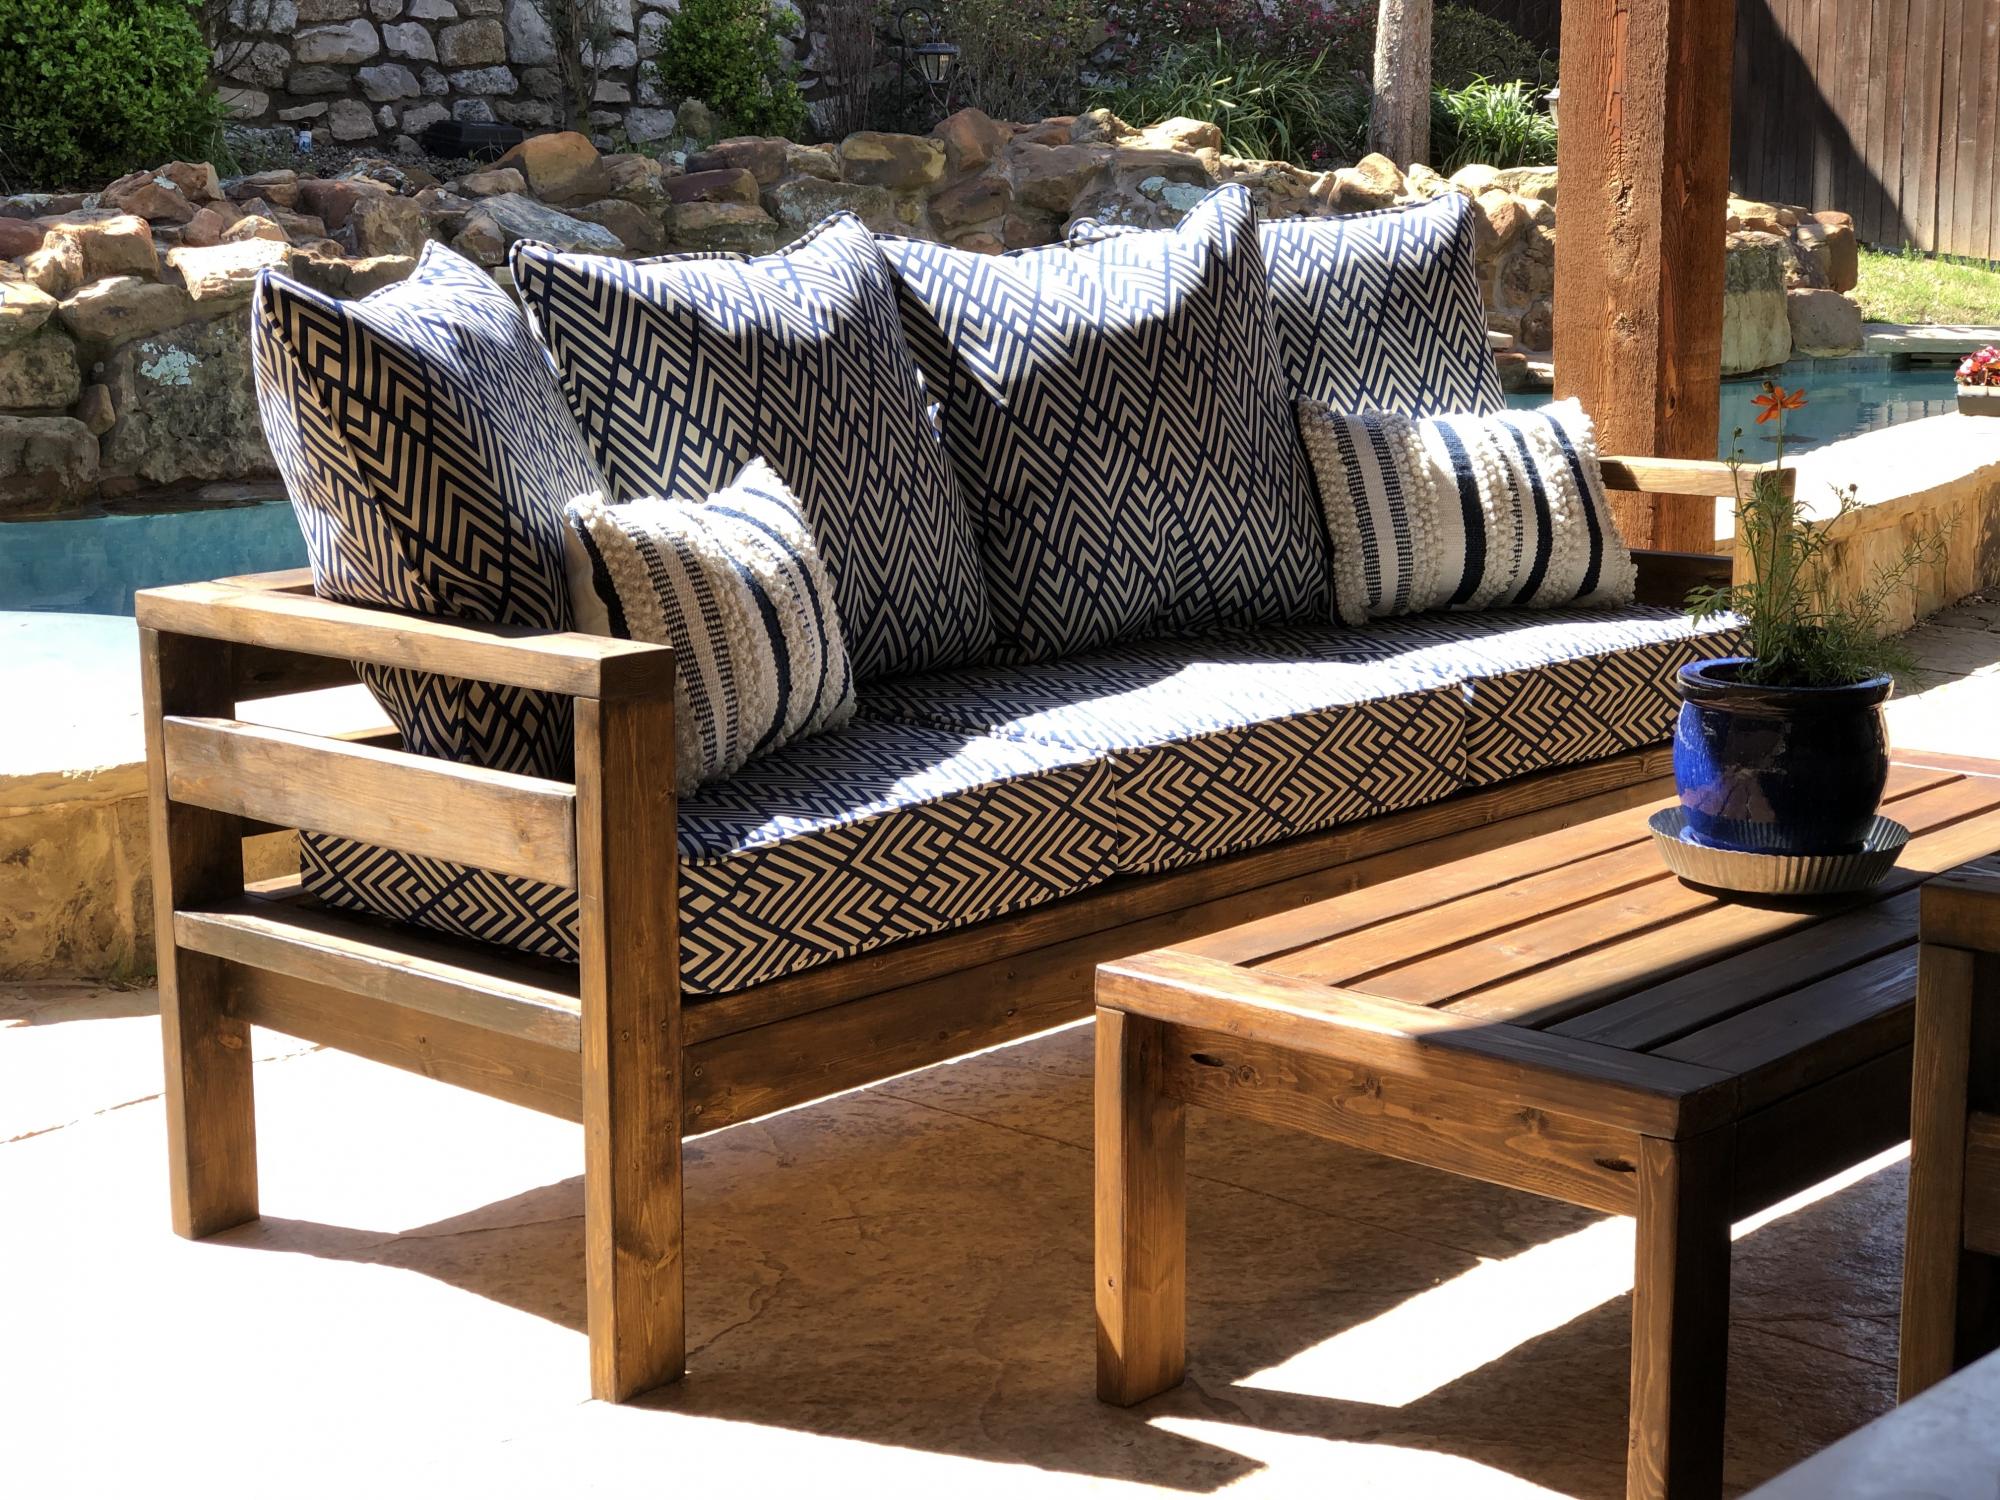
We LOVE our new patio set! Total cost of 2 sofas, coffee table and cushions: $530
Cushions B&G Retro Diamonds Deep Seat cushion set purchased from Walmart.
Thanks for sharing the plans!
Built from Plan(s)
Estimated Cost
175 wood & screws
Estimated Time Investment
Weekend Project (10-20 Hours)
Finish Used
Olympic Elite - American Chestnut - semi-transparent
Recommended Skill Level
Beginner
Comments
DIY Wood Shed
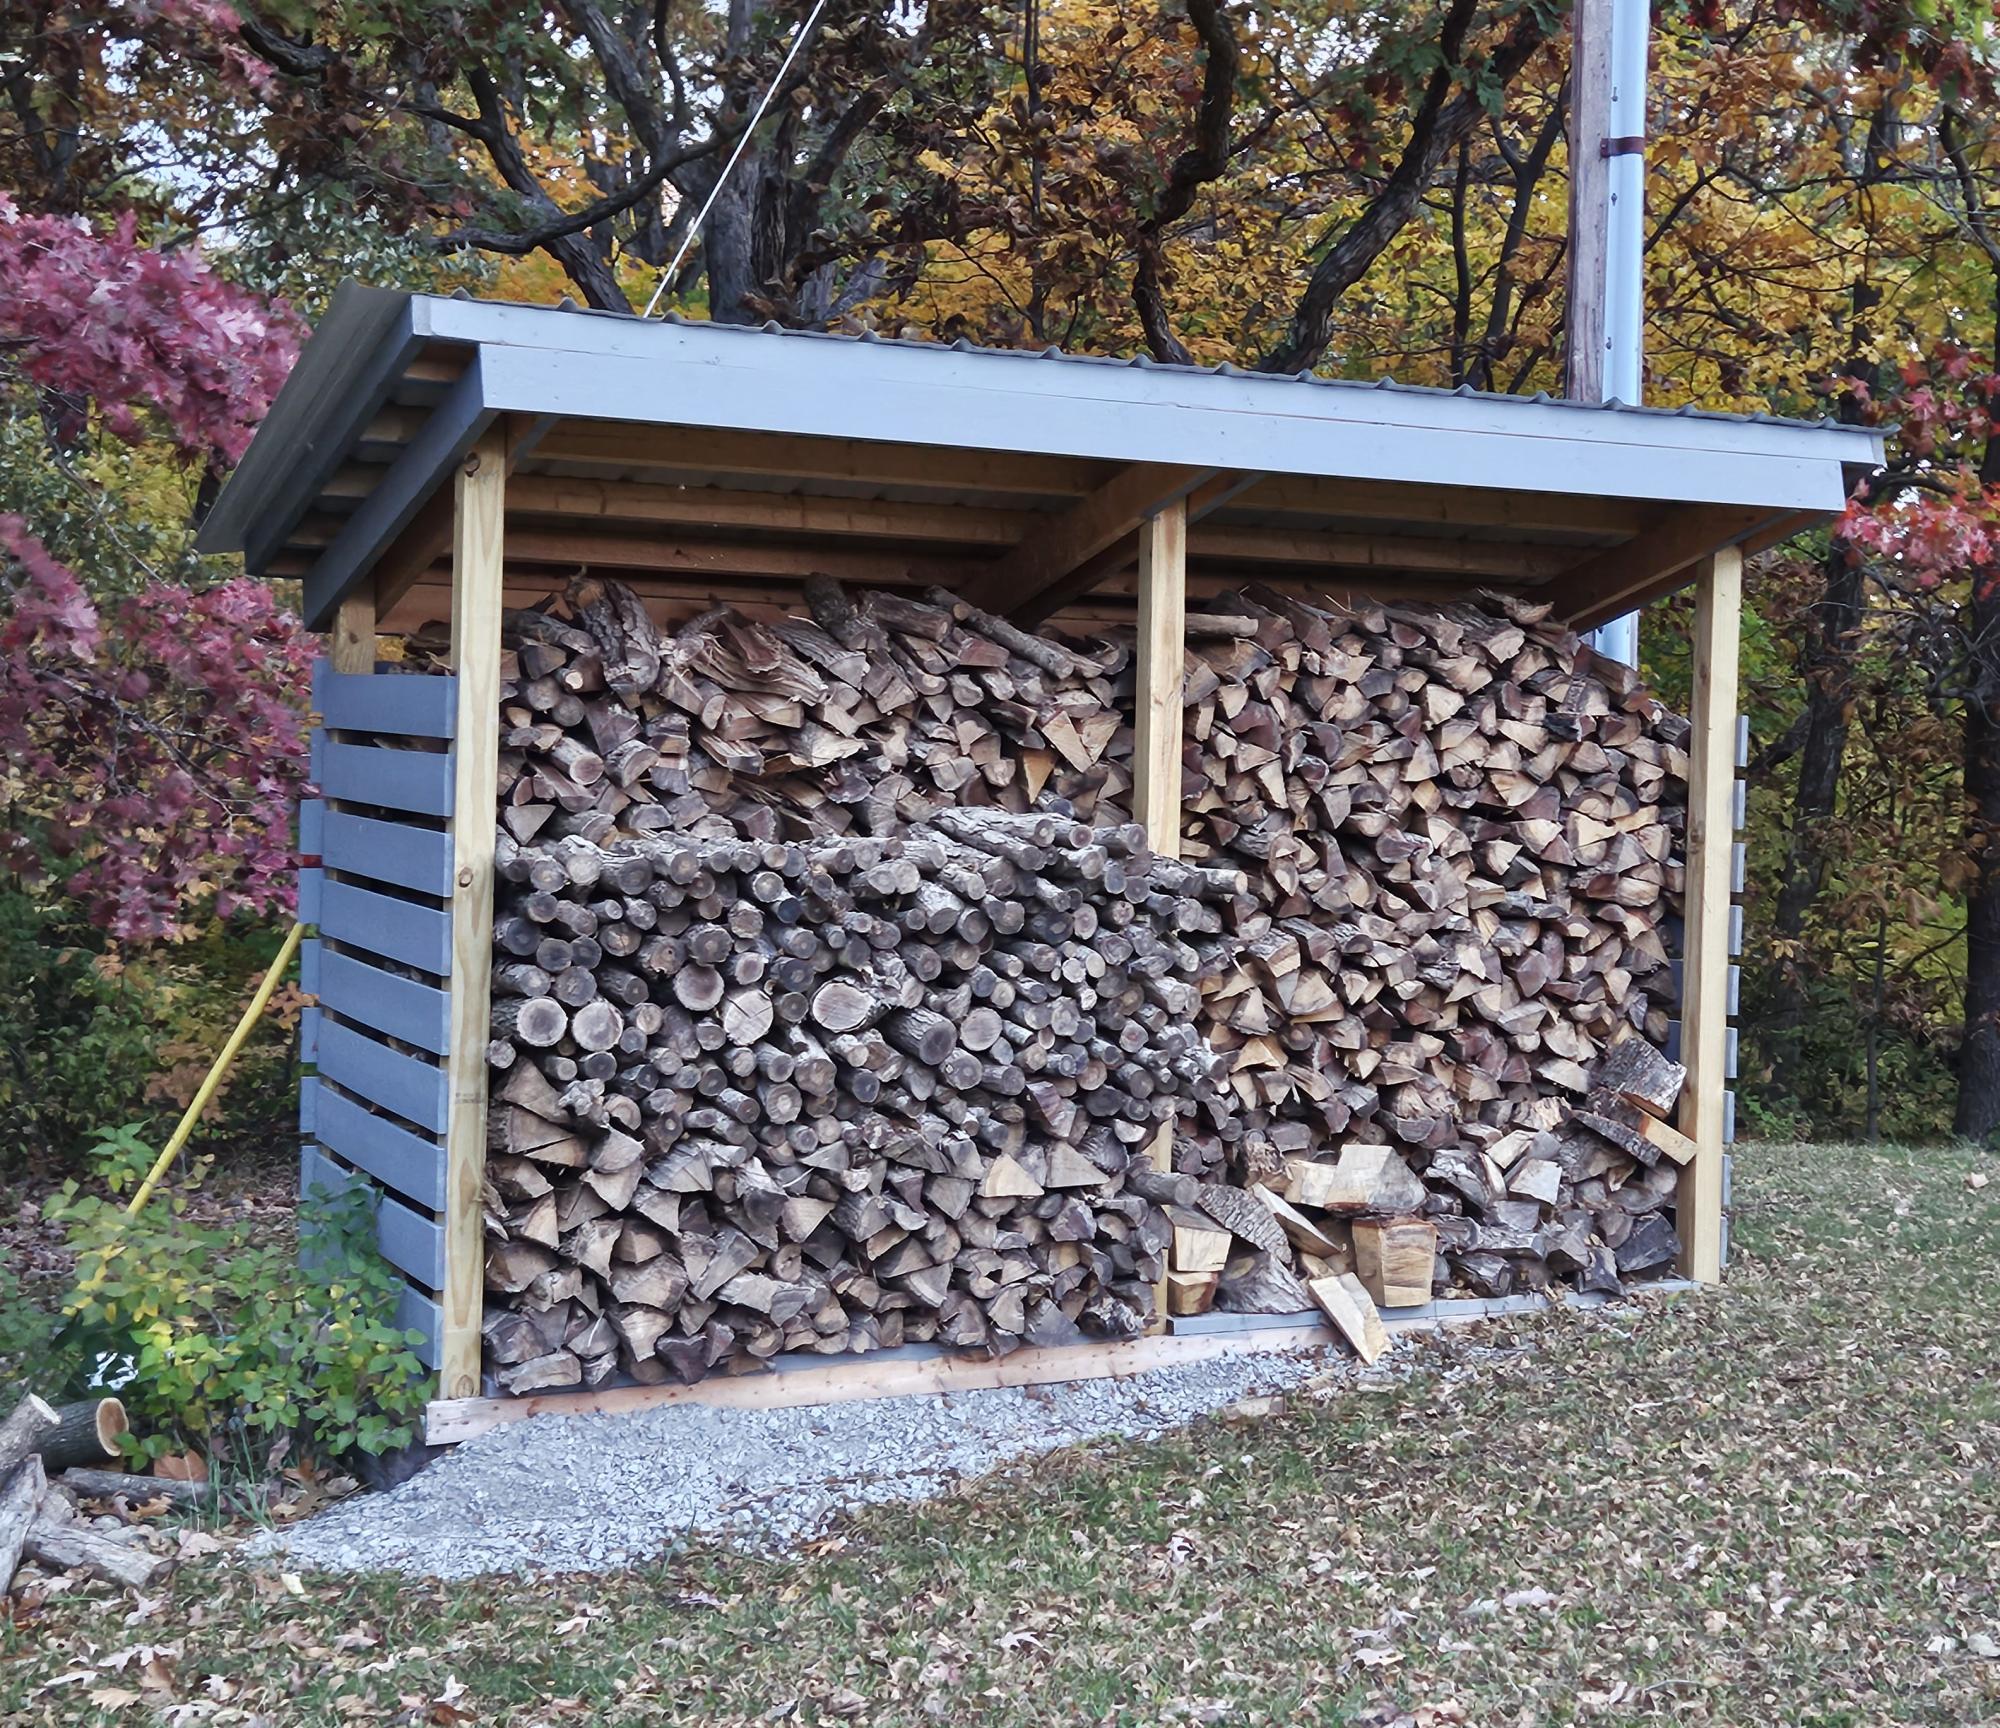
I am a mathematics teacher in Central IL. I teach a class called Geometry in Construction. I had my math students build this wood shed in pieces at the school, then I brought it home and put it together with a few of my son's friends. The students enjoy a math class that gets to go to the wood shop to apply their math skills to a wood working project. I am proud of my students hard work and dedication.
Shari Bruyn (I'm old, so I do not have Instagram or a blog page. lol)
Built from Plan(s)
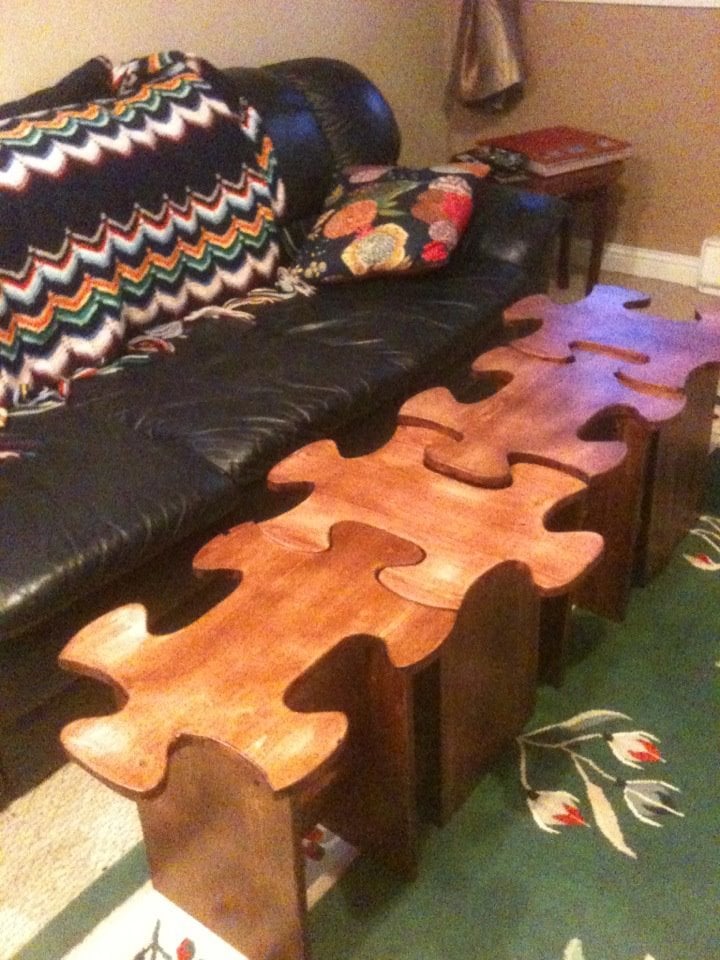
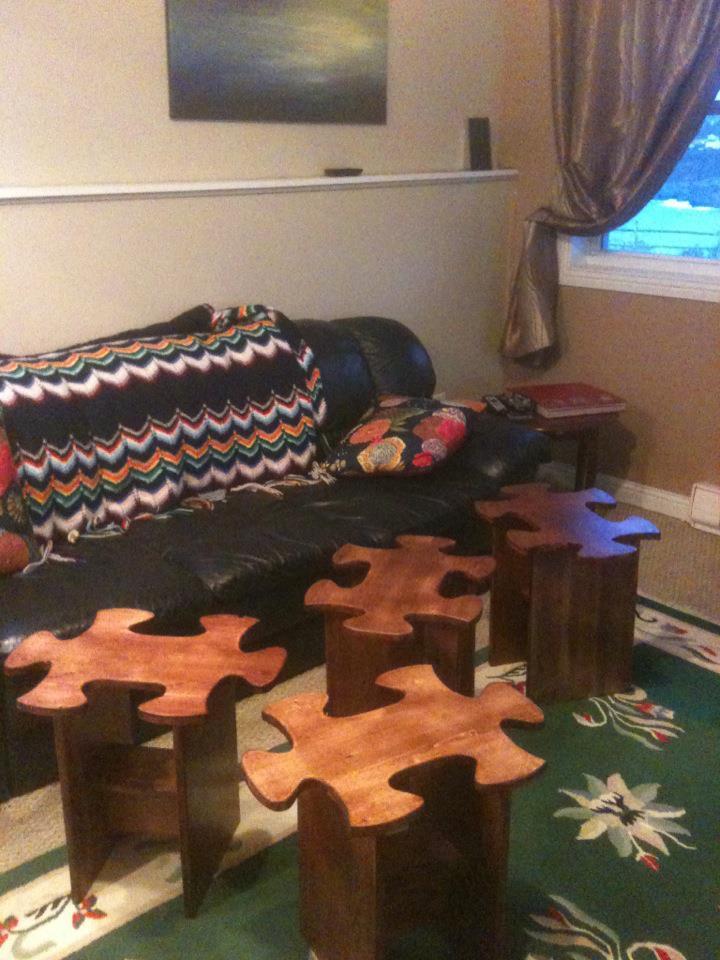
Jigsaw Puzzle Table!
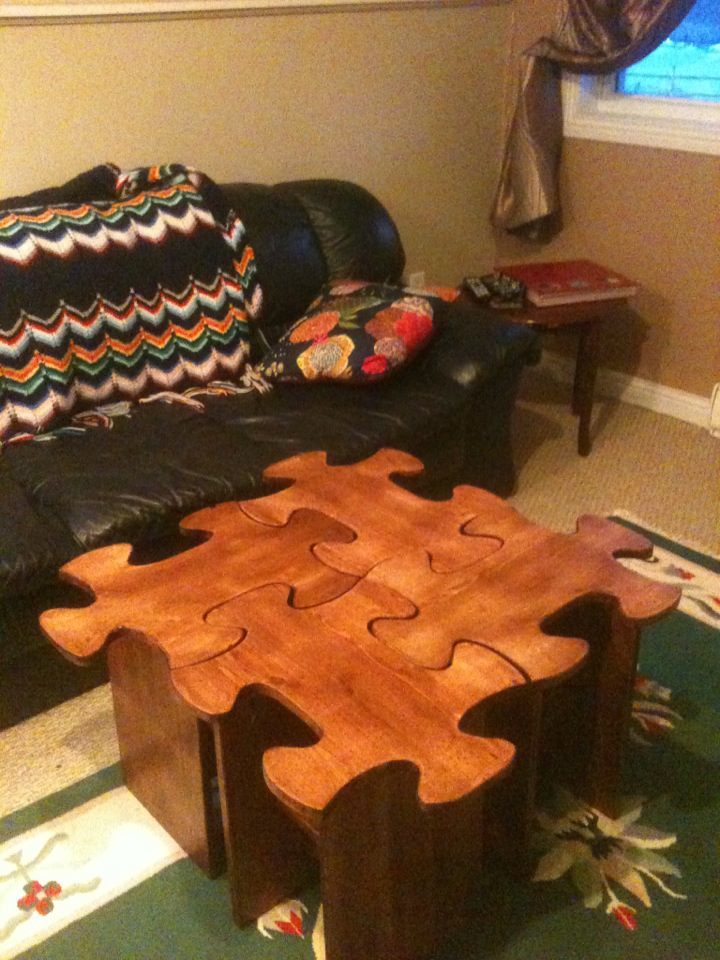
I was super inspired by the "iTable" which I am also going to build... but combined the idea with an idea I saw in a fancy home decorating magazine (a jigsaw puzzle stool).... took a lot of fiddling to come up with a 'universal puzzle piece' but in the end it worked out!
Built from Plan(s)
Estimated Cost
$150
Estimated Time Investment
Week Long Project (20 Hours or More)
Finish Used
Polyurethane stain, spray satin varnish
Recommended Skill Level
Intermediate
Comments

Fri, 05/25/2012 - 05:49
Holy Moly!
That is so cool! Beautiful job. Looks like those curves too lotsa patience, something I seriously lack. Thanx for sharing.
Fri, 05/25/2012 - 13:10
Love your creativity and
Love your creativity and project!!!!! So awesome!!!

Sat, 05/26/2012 - 06:29
Thanks!!
Yes, it took ALOT of fiddling to get a universal puzzle piece template made up -- I was sorta copying one I found (google "Vector Puzzle") but had no way to blow it up so huge. Even after I cut them out, I ended up doing a lot of sanding to make the joints work, but it was fun! If you want, Sue, you could mail me an envelope and I'll trace one for ya!
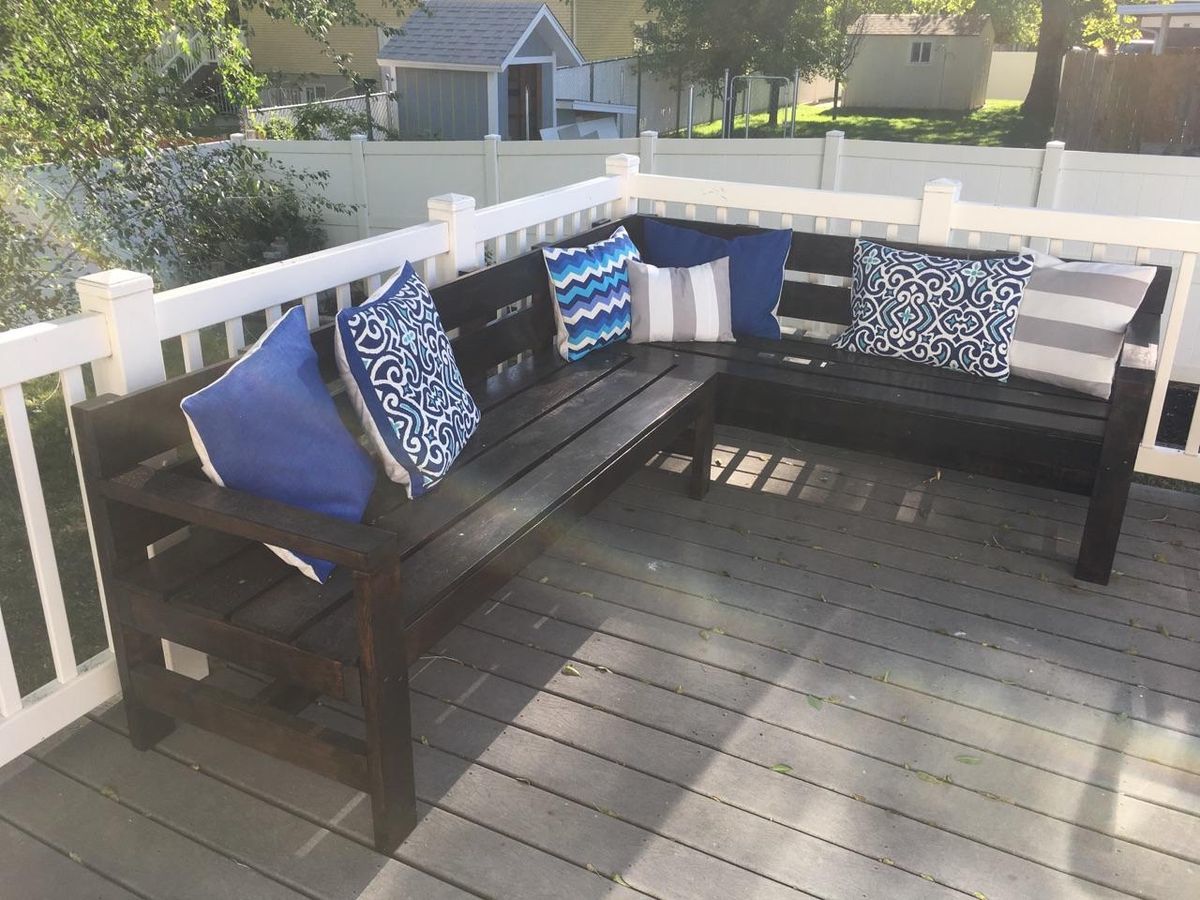
Outdoor Sectional
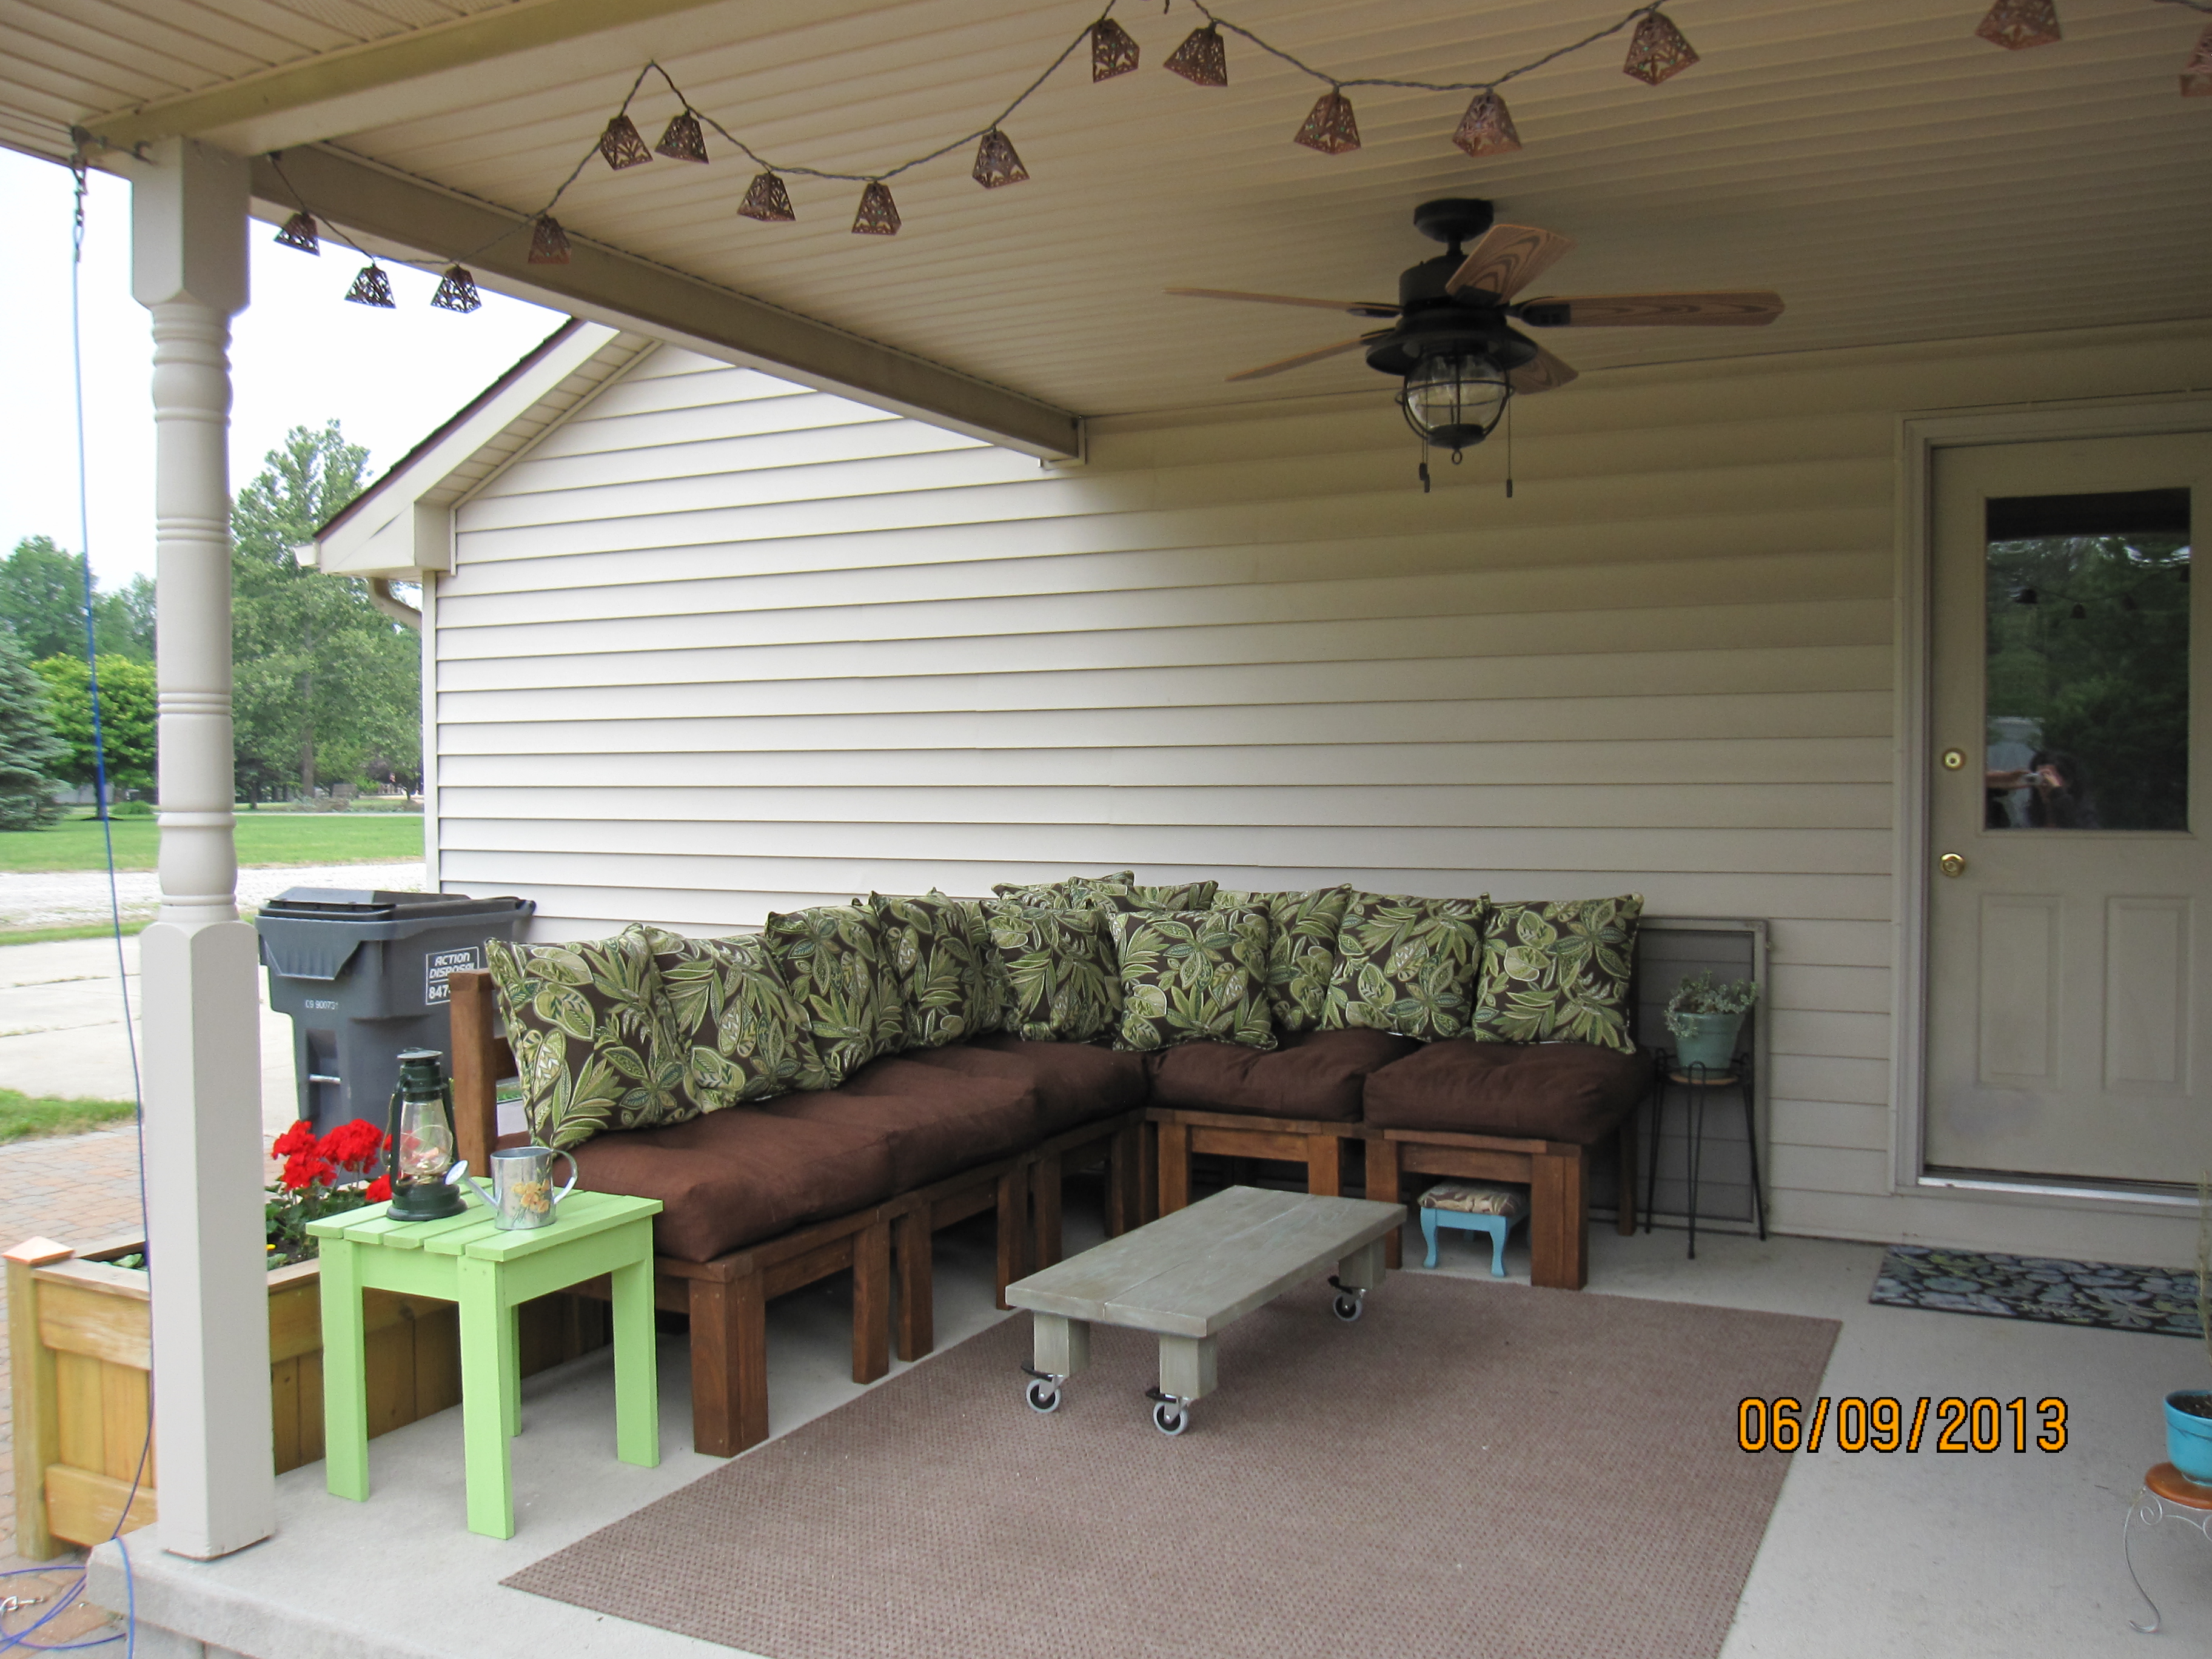
We chose to use 2x4 construction because we simply needed a sturdier build. Enough said. :) I wanted to use cedar, but when we went to the lumberyard, they didn't carry 2x4s in cedar, just 1x4 and said it was hard to find. Being that I had wanted this built by Labor Day and it was already July, we bought the pressure treated wood. I know, I know, chemicals galore. We worked on it a little at a time. We modified it for a higher back, but now I wonder if that was needed, because although the cushions are deep they do go down some when you sit on them. Ah well, we are still happy with it. Because of the higher back, we opted to just use the armless section on the end, however we might build a modified arm later on. We'll see how it goes.
Built from Plan(s)
Estimated Cost
$358 = $148 wood, $210 cushions (Costco)
Estimated Time Investment
Weekend Project (10-20 Hours)
Finish Used
Not sure what brand or color. It's from Menards.
Recommended Skill Level
Beginner
Comments
Sat, 07/14/2012 - 08:04
So proud of my talented
So proud of my talented sister. Love to see more. My cat Keko is still loving his bed
In reply to So proud of my talented by Debbie Gregory (not verified)
Sat, 07/14/2012 - 11:24
Thanx
Aww, thanx Deb!
Sat, 07/14/2012 - 14:47
Very nice work, hey I’ve been
Very nice work, hey I’ve been sitting on and eating off treated lumber for years ( Maybe that’s what is wrong with me LOL )
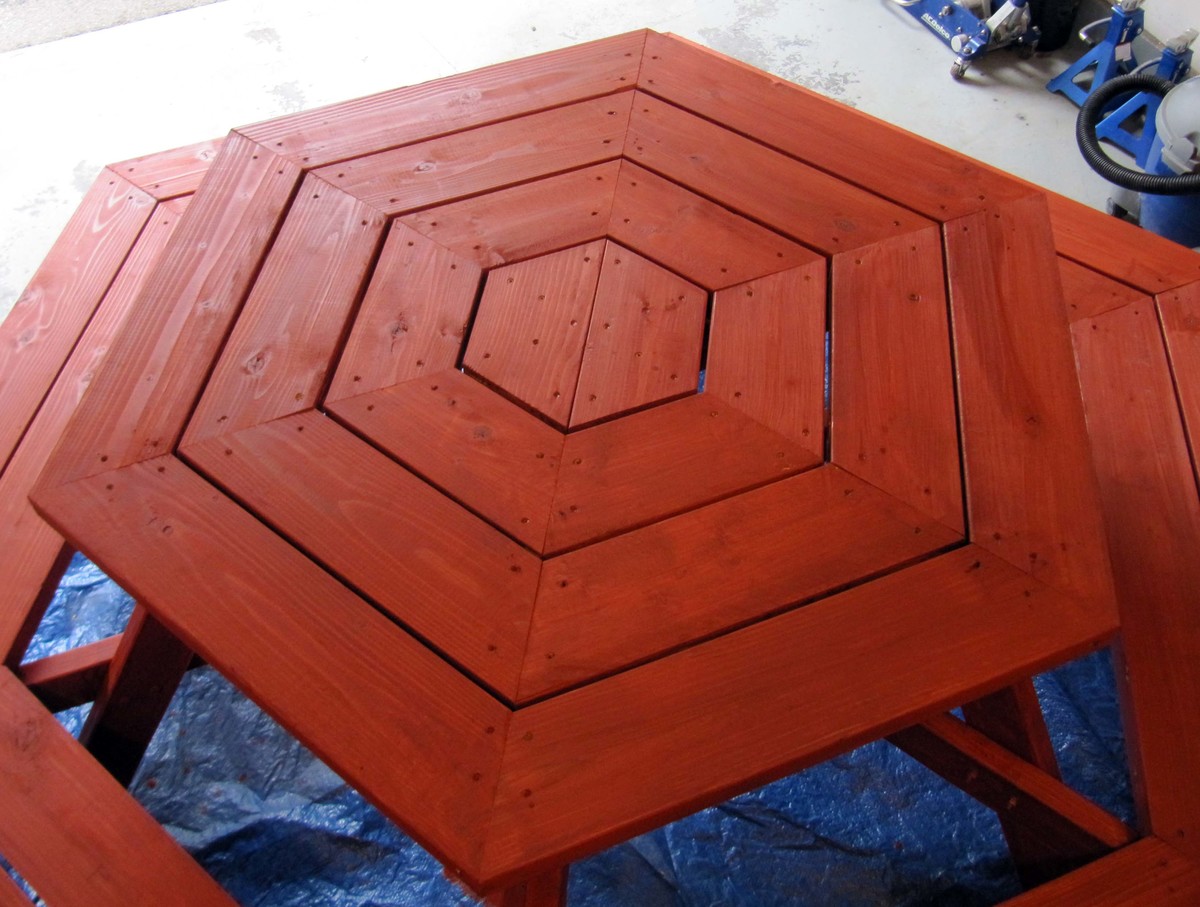
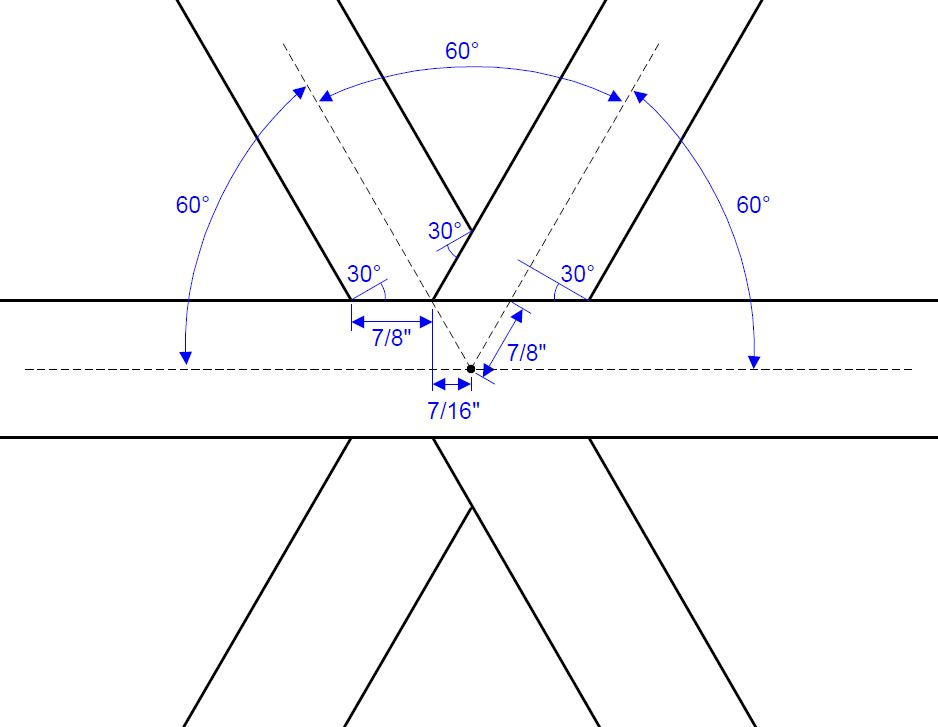
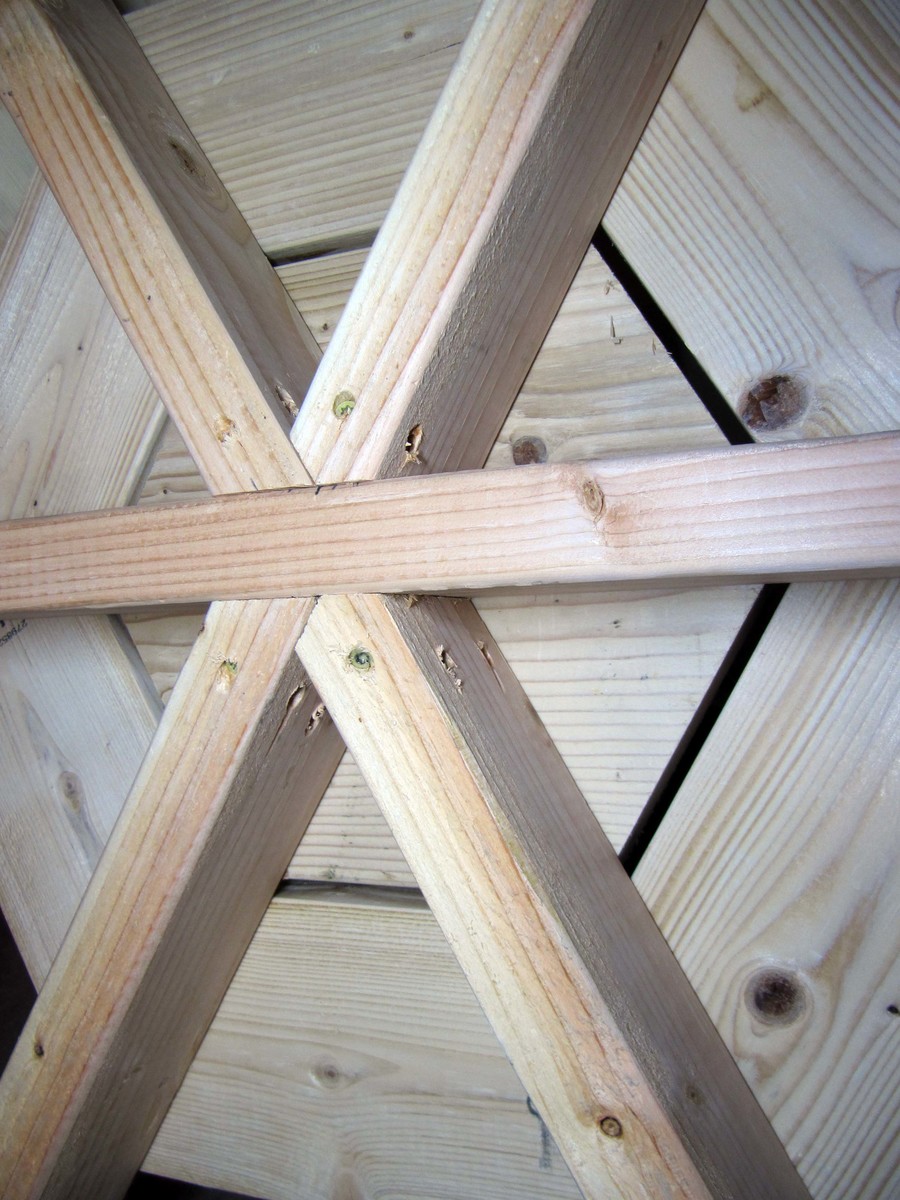
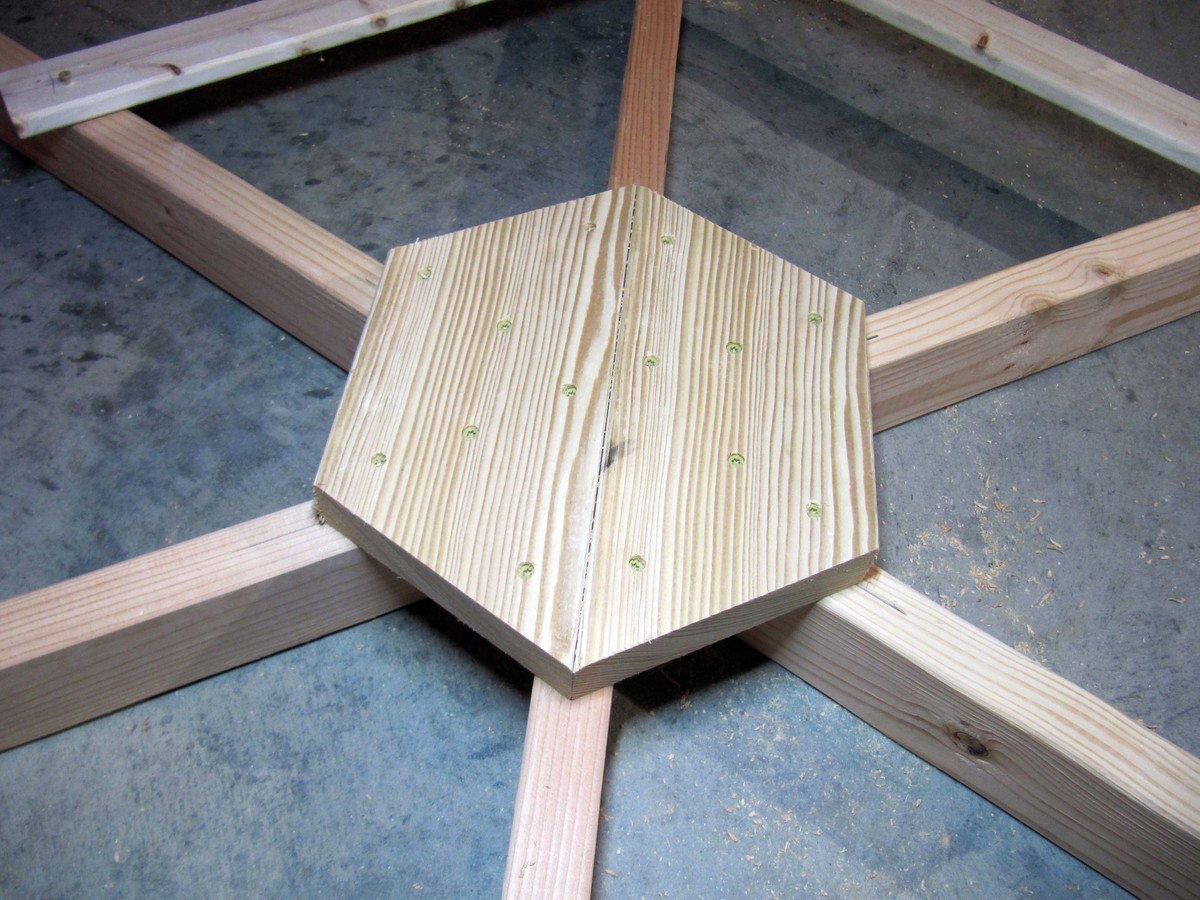
Hexagon Picnic Table
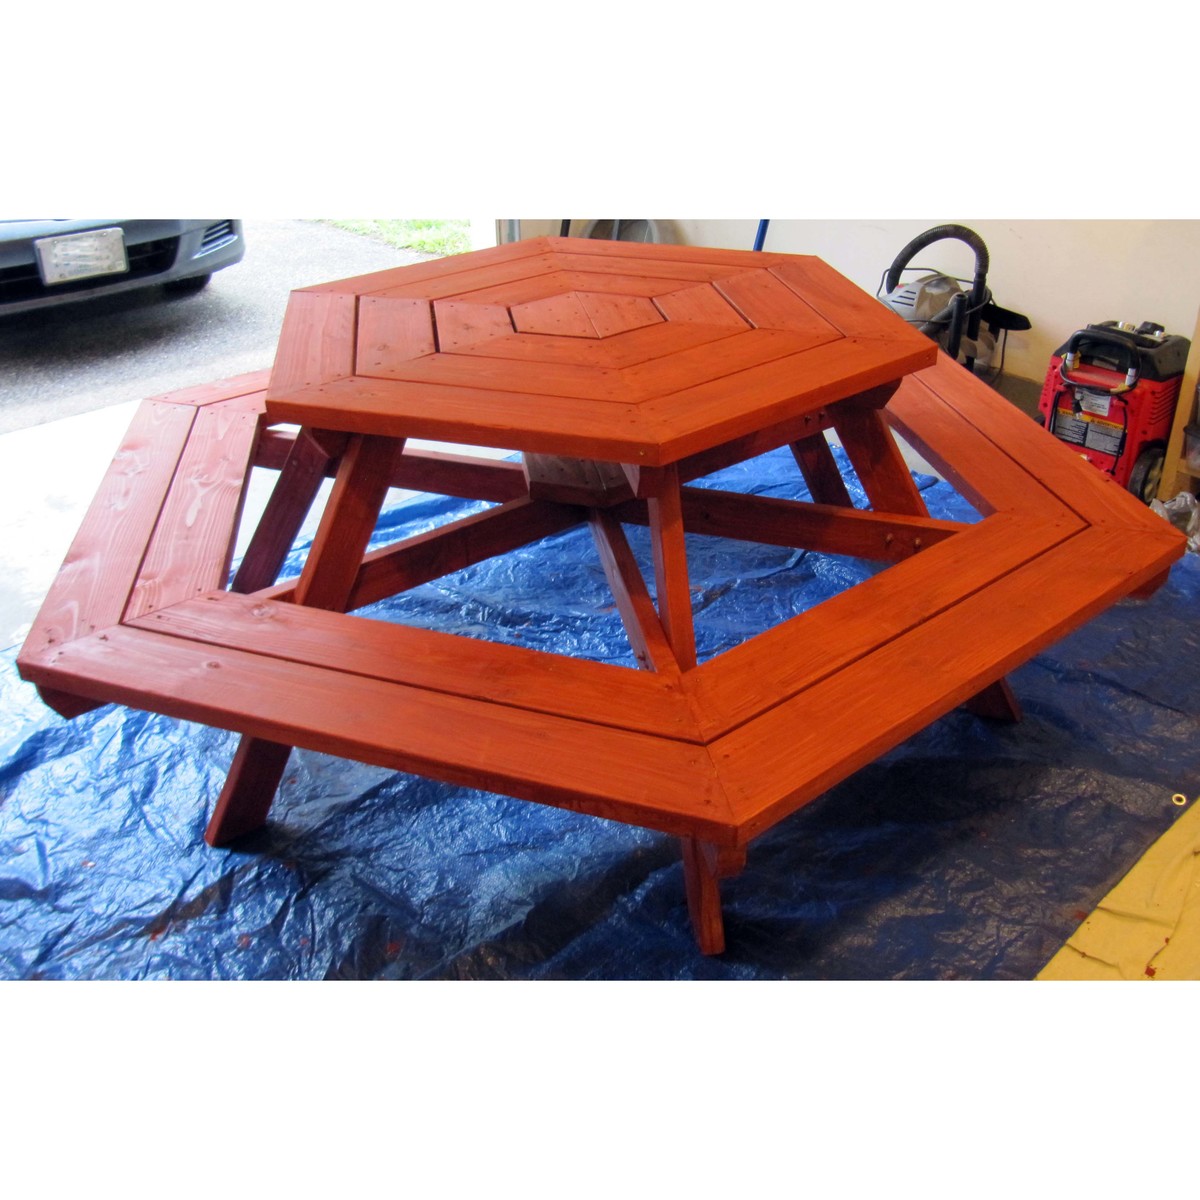
Thanks for the plans. My little brother from Big Brothers Big Sisters and I made this table and had lots of fun doing so. We made a few modifications which might be useful to others:
1. We modified the center joints (at the lower and table level) so that one 2x4 could continue across the entire diameter of the table for greater strength (see pictures for details).
2. As recommended we extended the seats out 4". This made it very comfortable to get in and out.
3. We started the center with 2 pieces of 2x6 rather than 6 with the thought being that this would help strengthen the center of the table. (see pictures for details).
4. We added a stiffener at the center 6-way joint on the lower level to help really strengthen that center joint. This was made out of 2 pieces of 2x6 as shown in the pictures.
Thanks,
John
Built from Plan(s)
Estimated Cost
$80
Estimated Time Investment
Weekend Project (10-20 Hours)
Finish Used
Semi-transparent Redwood Stain
Recommended Skill Level
Intermediate
Grandy sliding door console
We needed a new TV stand, so me and my boyfriend picked out this plan. We worked on it together. It took us about a week. Barn door hardware is pricey, so we made our own hardware with steel stock and garage door pulleys.
Built from Plan(s)
Estimated Cost
$250-300
Estimated Time Investment
Week Long Project (20 Hours or More)
Finish Used
Dark walnut top
"Porpoise" by Sherwin Williams for base
"Porpoise" by Sherwin Williams for base
Recommended Skill Level
Intermediate
Comments
Coop and run for Six
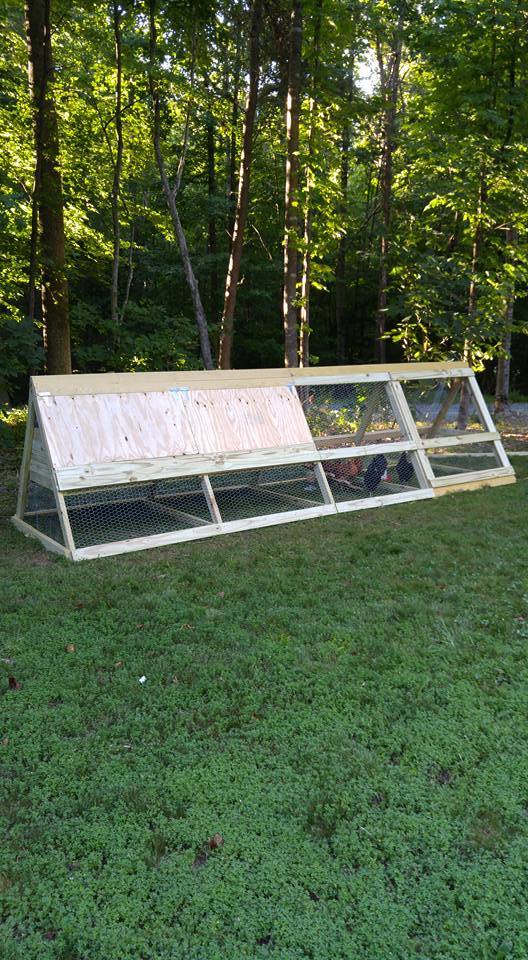
We wanted our chickens to have plenty of room for when we ere not home and could not let them free range in the yard. One of the six was a rooster-- and long story-- but we don't have him any more-- so 5 chickens now enjoy this coop/run. It cost about $300 in supplies. It is 16 feet long.
Built from Plan(s)
Estimated Cost
$300
Estimated Time Investment
Weekend Project (10-20 Hours)
Finish Used
unfinished
Recommended Skill Level
Intermediate
Comments
My city farm

My friend and I bought all of the materials for about $350. We started Friday afternoon and he worked most of Saturday on it. The plans were super helpful! My four little silkies are enjoying their new home.
Built from Plan(s)
Estimated Time Investment
Weekend Project (10-20 Hours)
Finish Used
Sherwin Williams exterior paint in Alabaster. Lots of pumpkins and mums from Lowe's.
Recommended Skill Level
Intermediate
Comments
Mon, 10/03/2016 - 10:01
Amazing Farmhouse Style Chicken Coop!
You and your friend did an amazing job! I love the cedar roof and white paint - so farmhouse chic! Thank you so much for bragging, love seeing your project! Ana
Seasonal And Holiday
Comments
Ana White Admin
Sat, 02/05/2022 - 21:39
WOW.
That is amazing!
Ana White Admin
Sat, 02/05/2022 - 21:39
WOW.
That is amazing!