Community Brag Posts

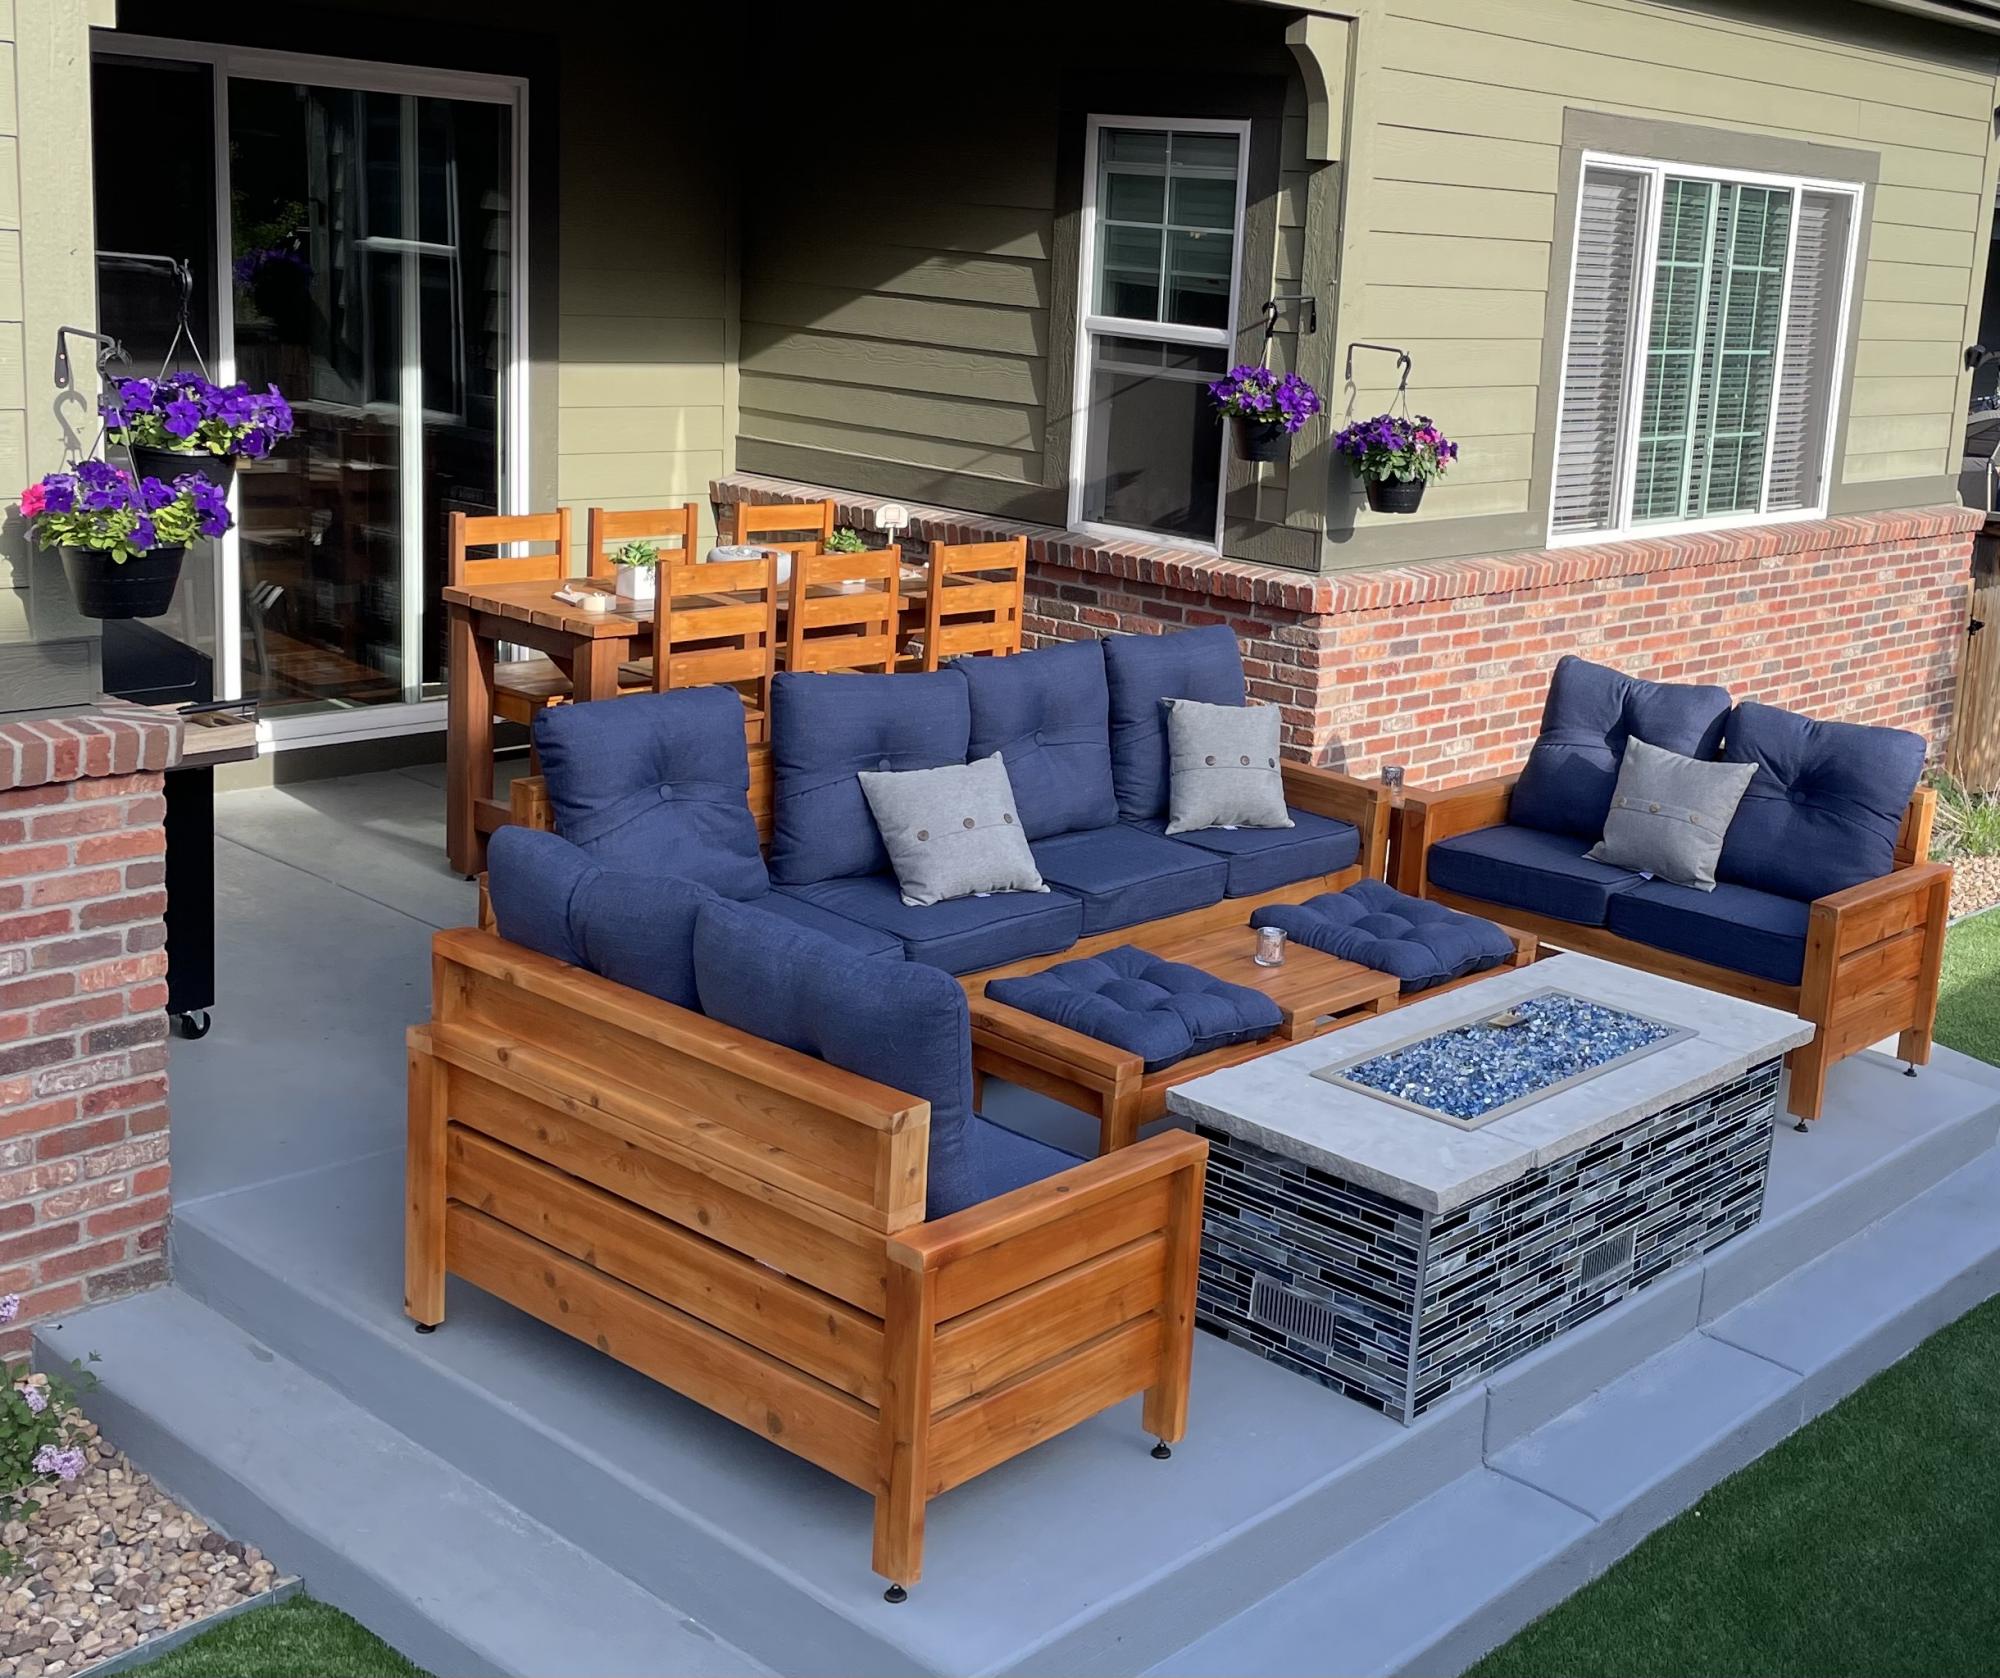
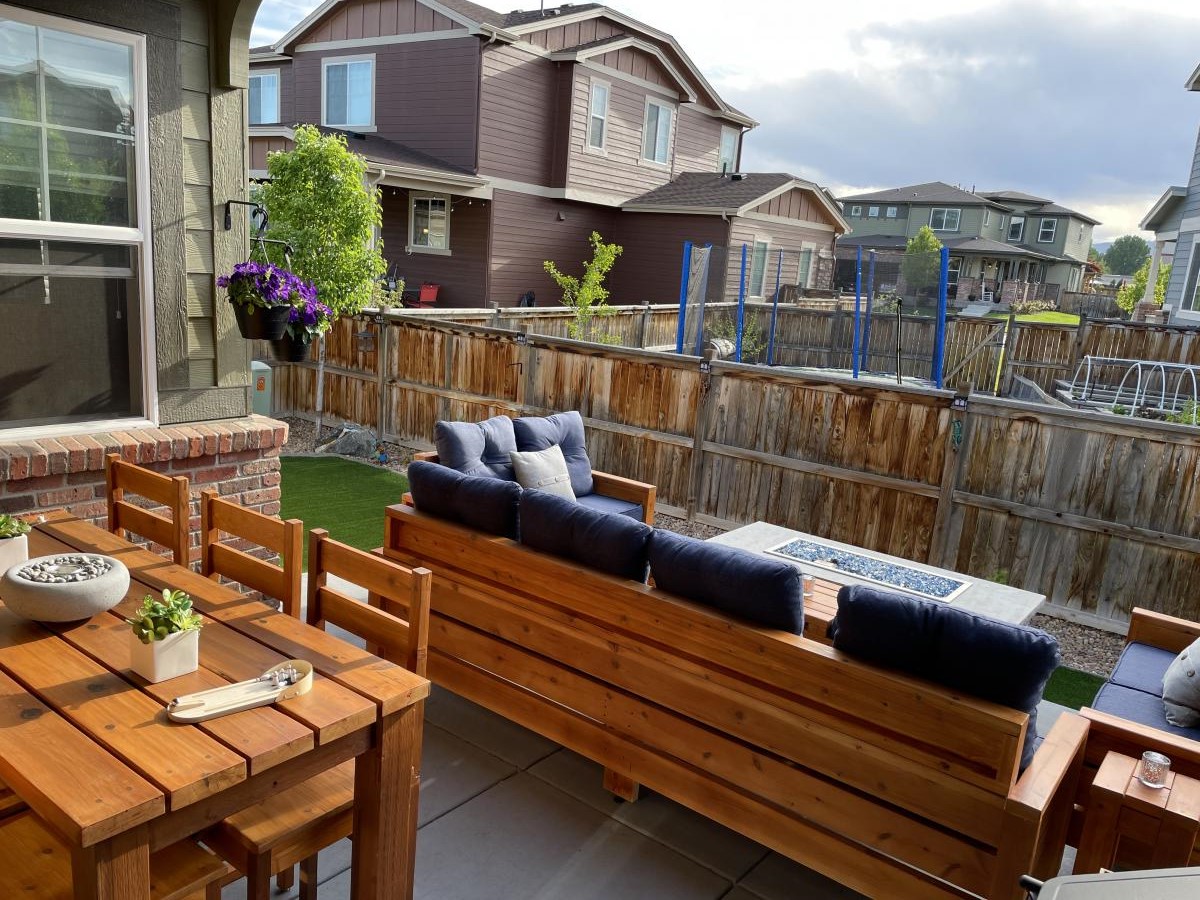
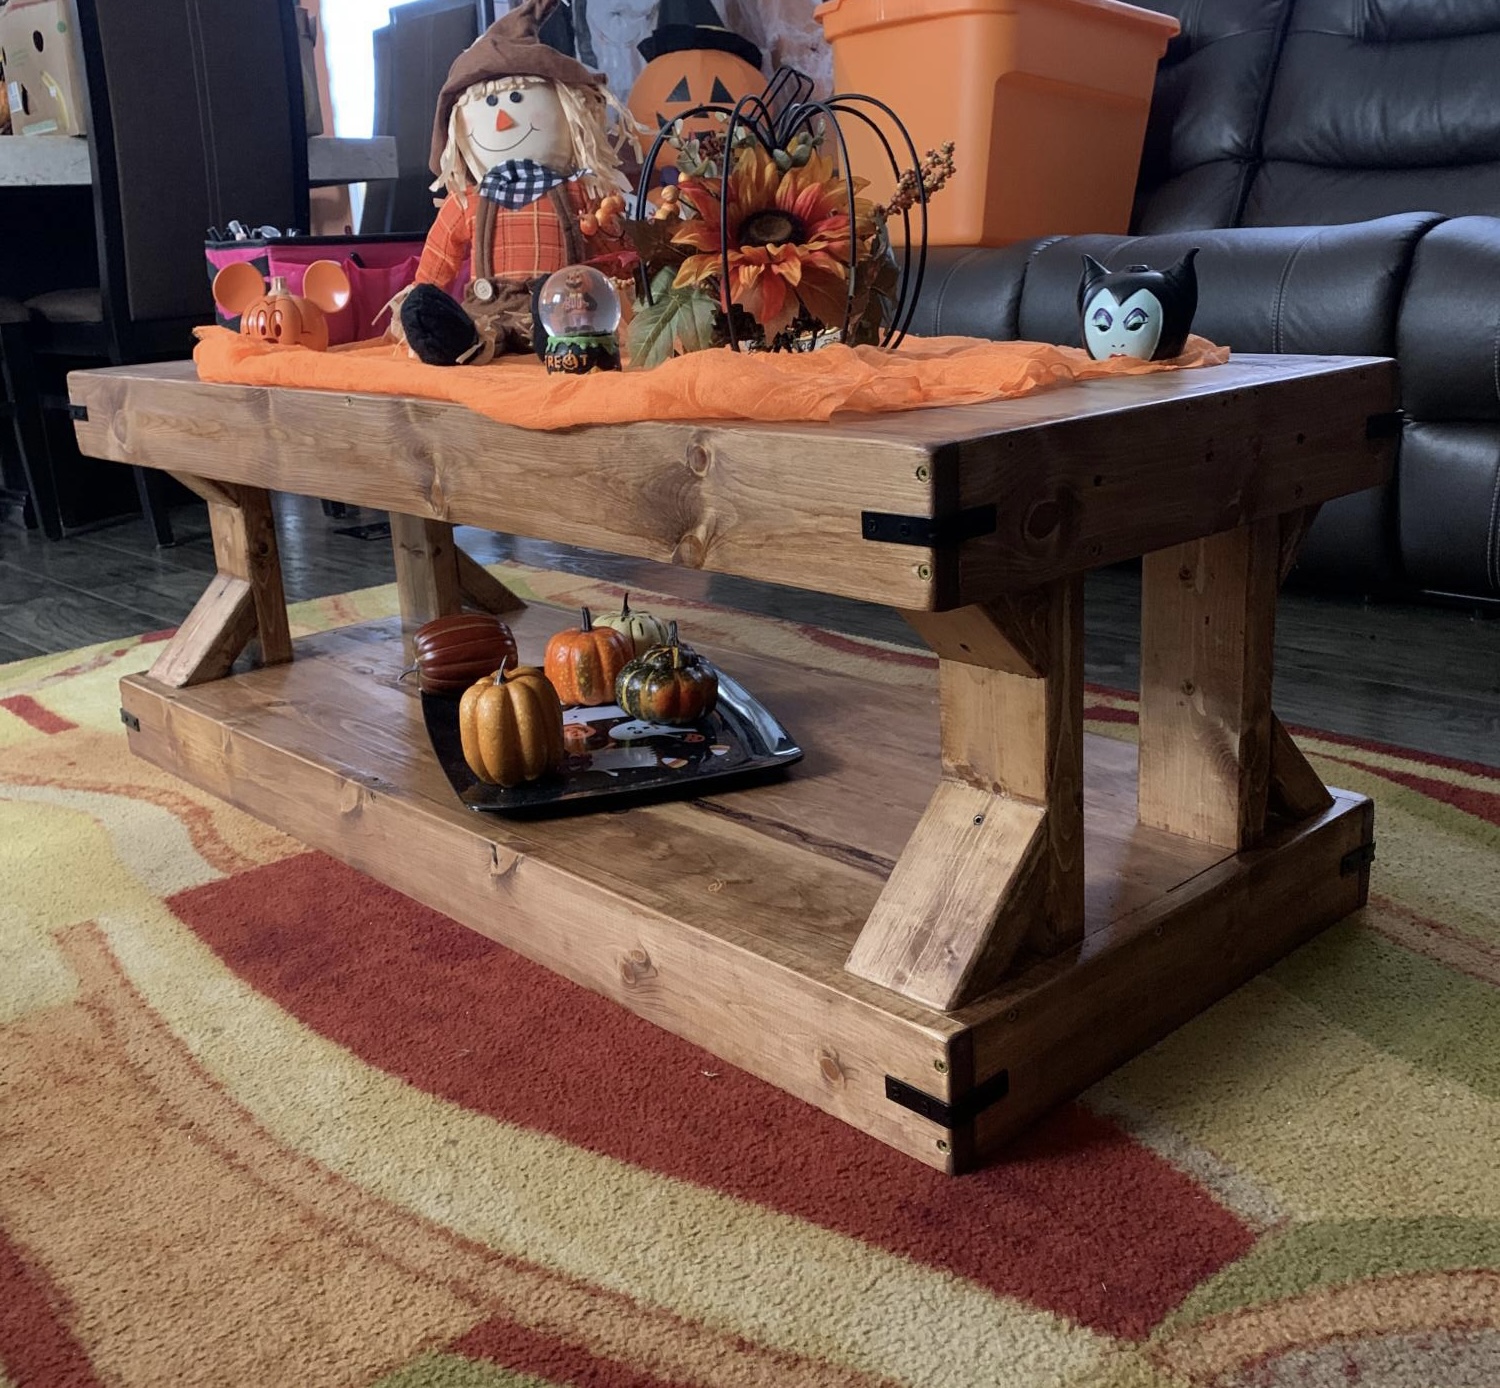
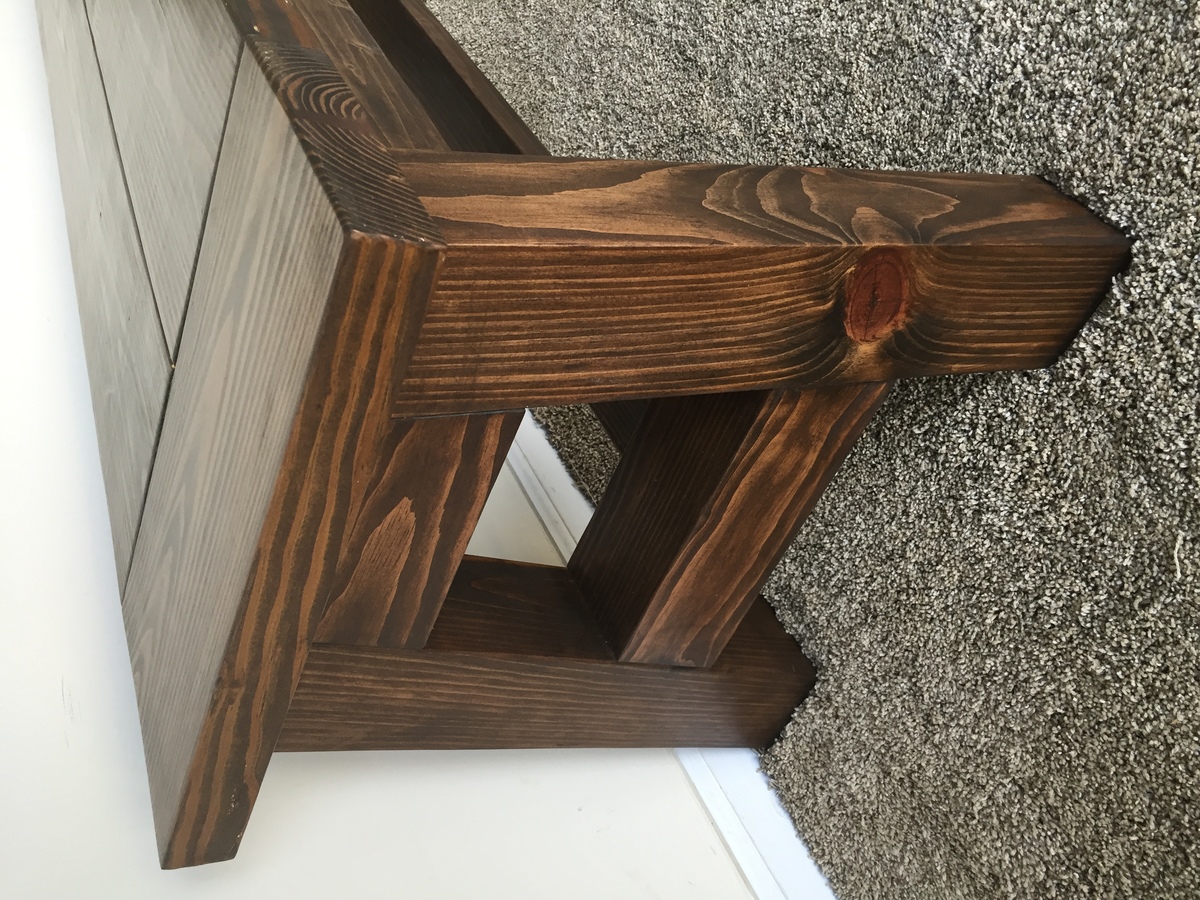
Better Than I Hoped!

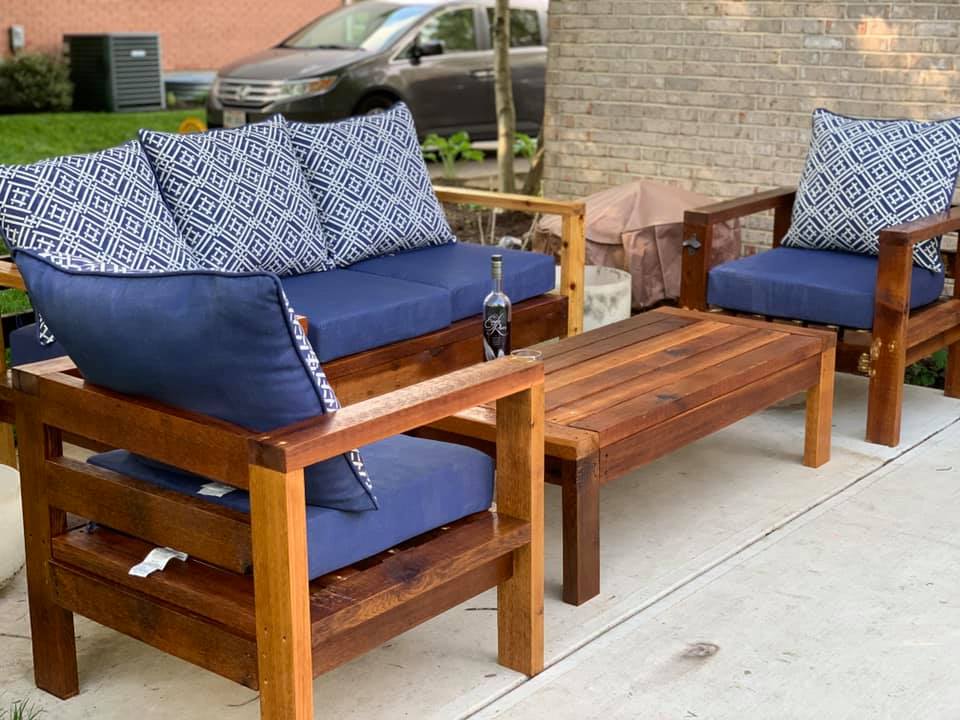
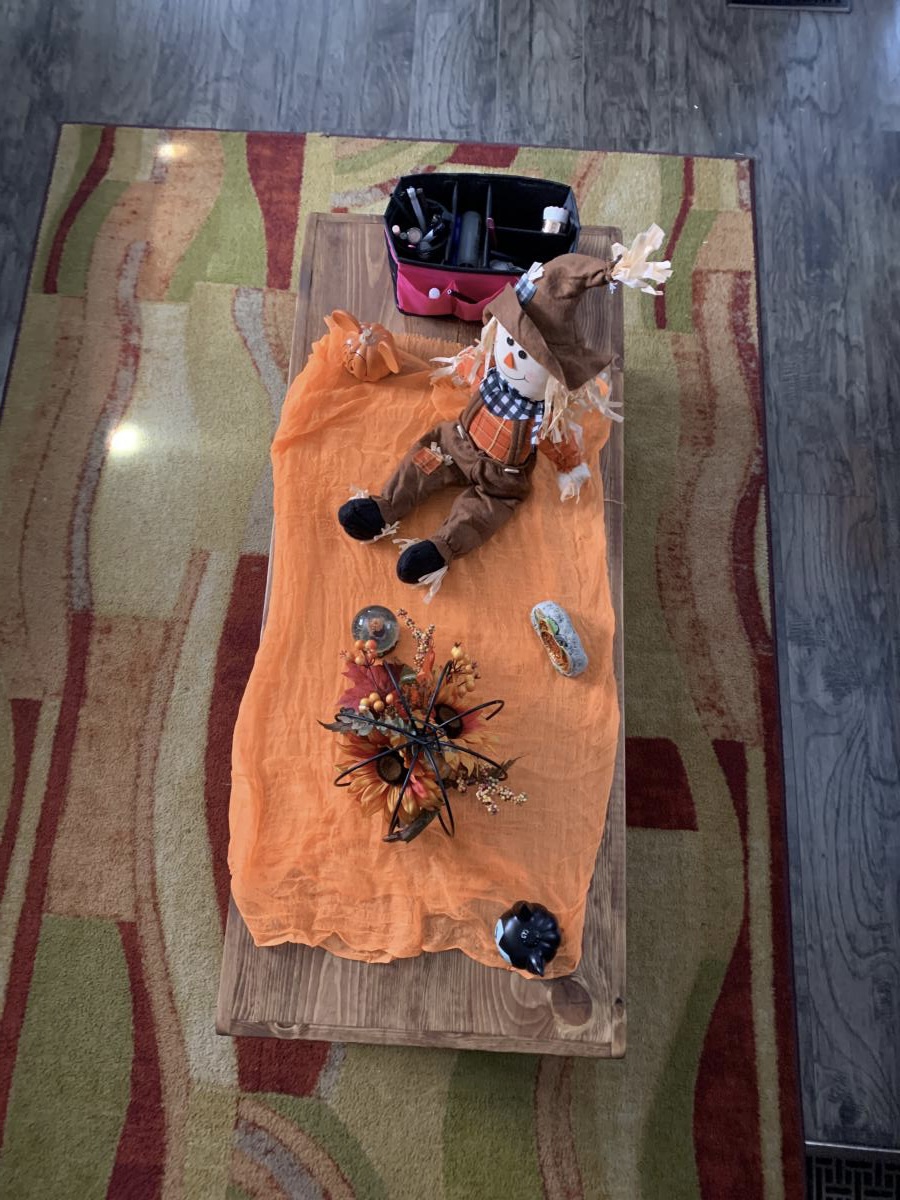
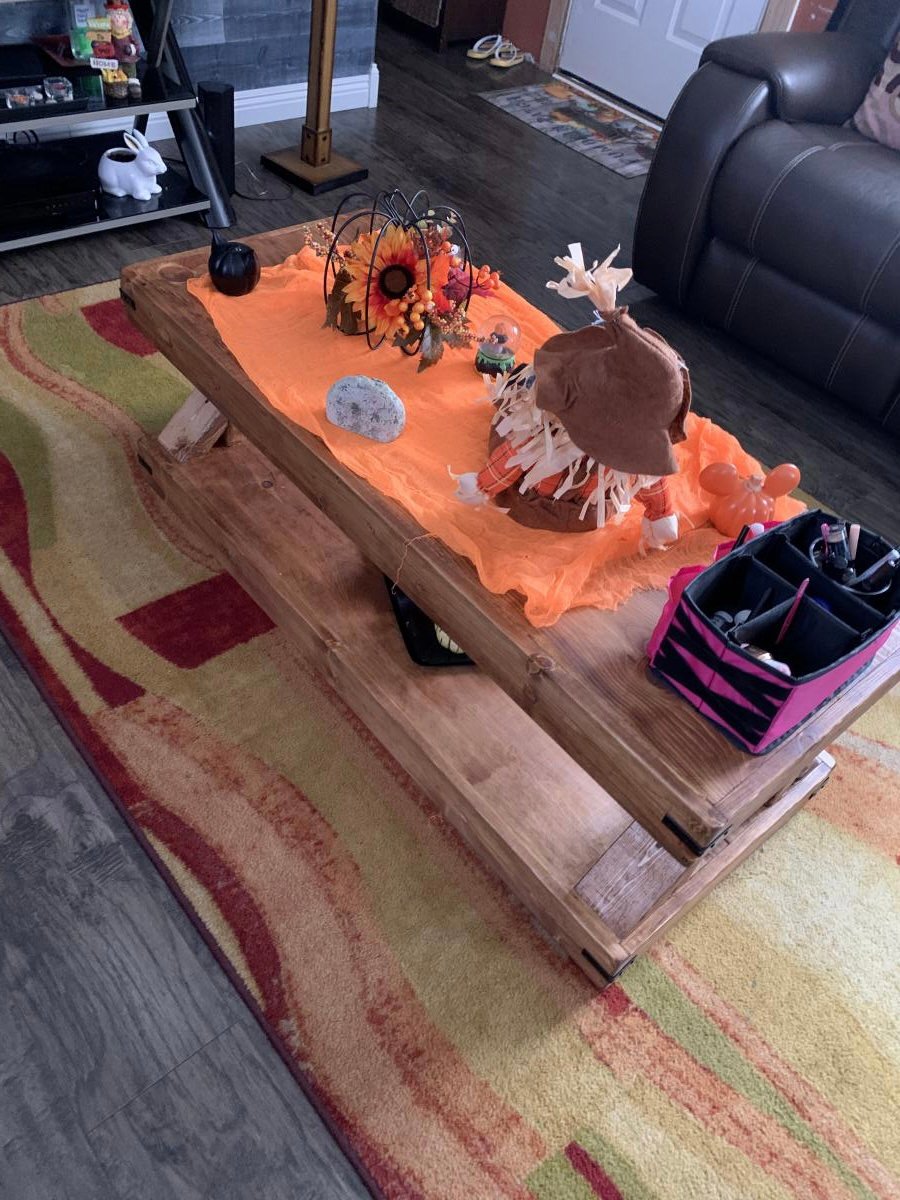
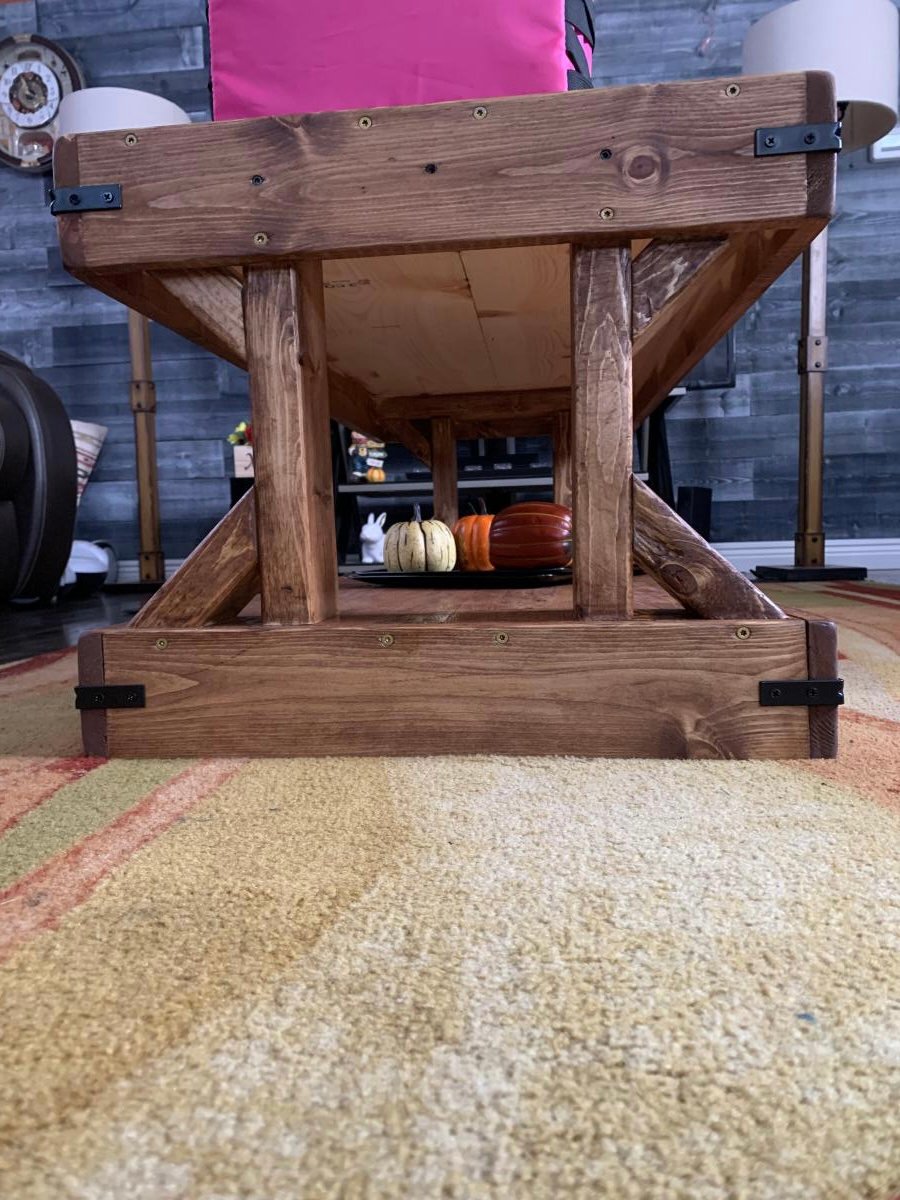
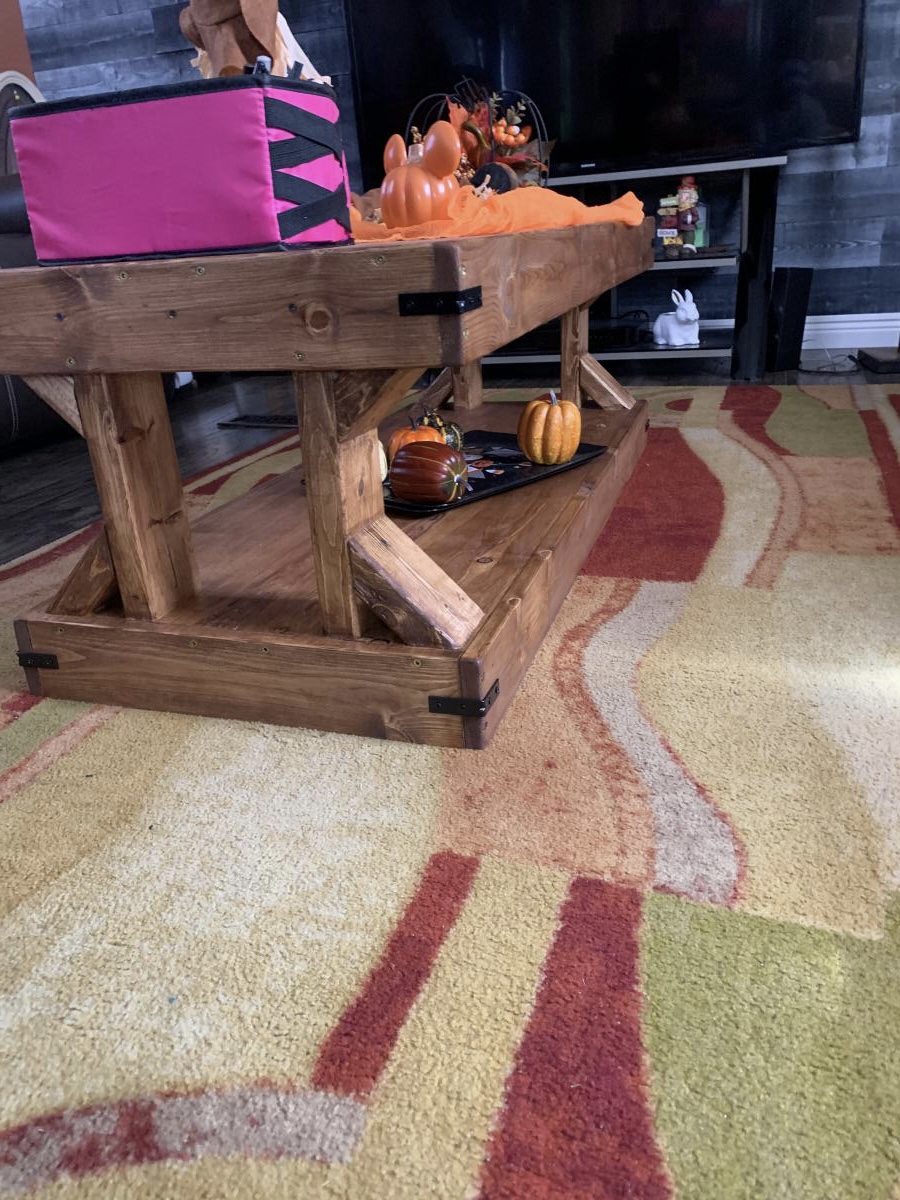
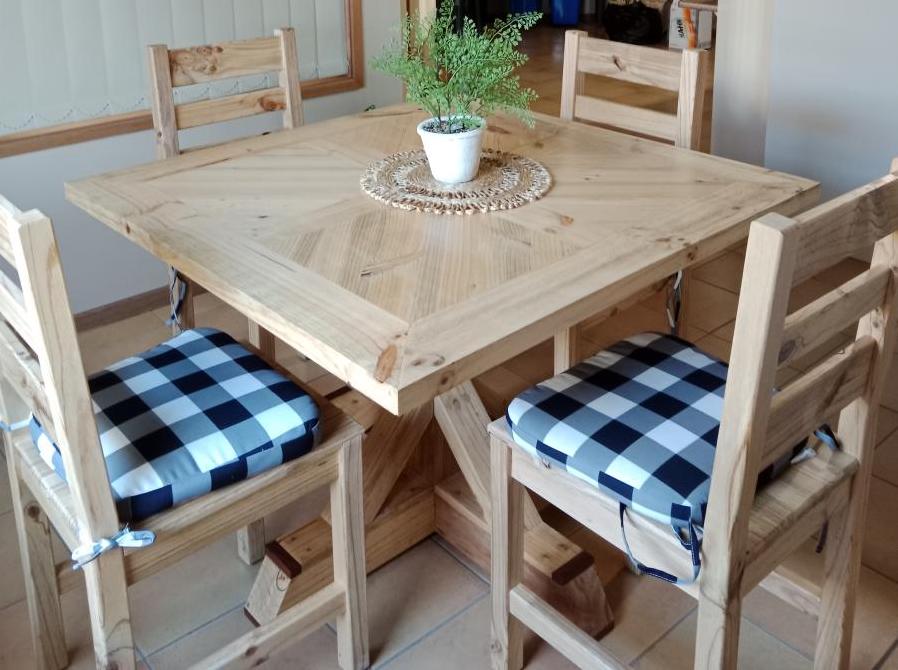
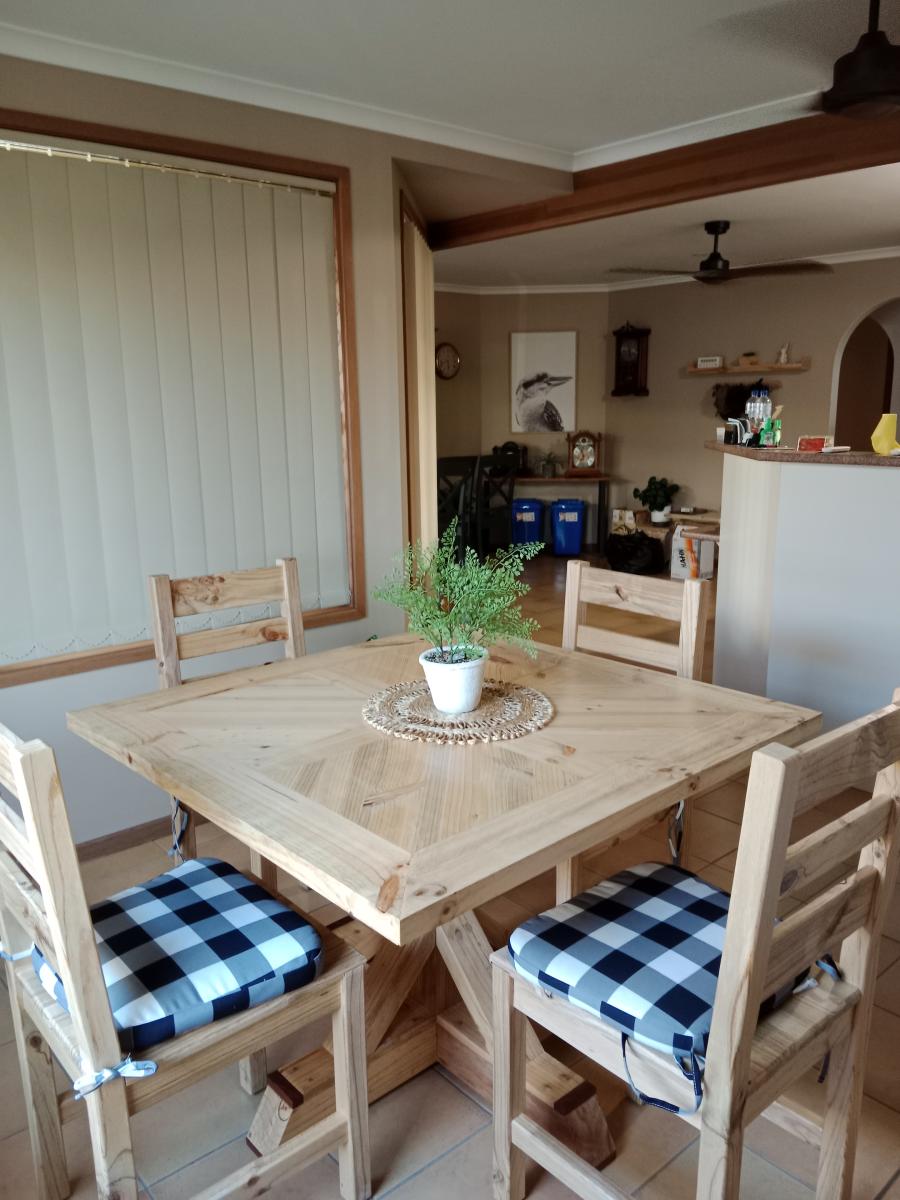
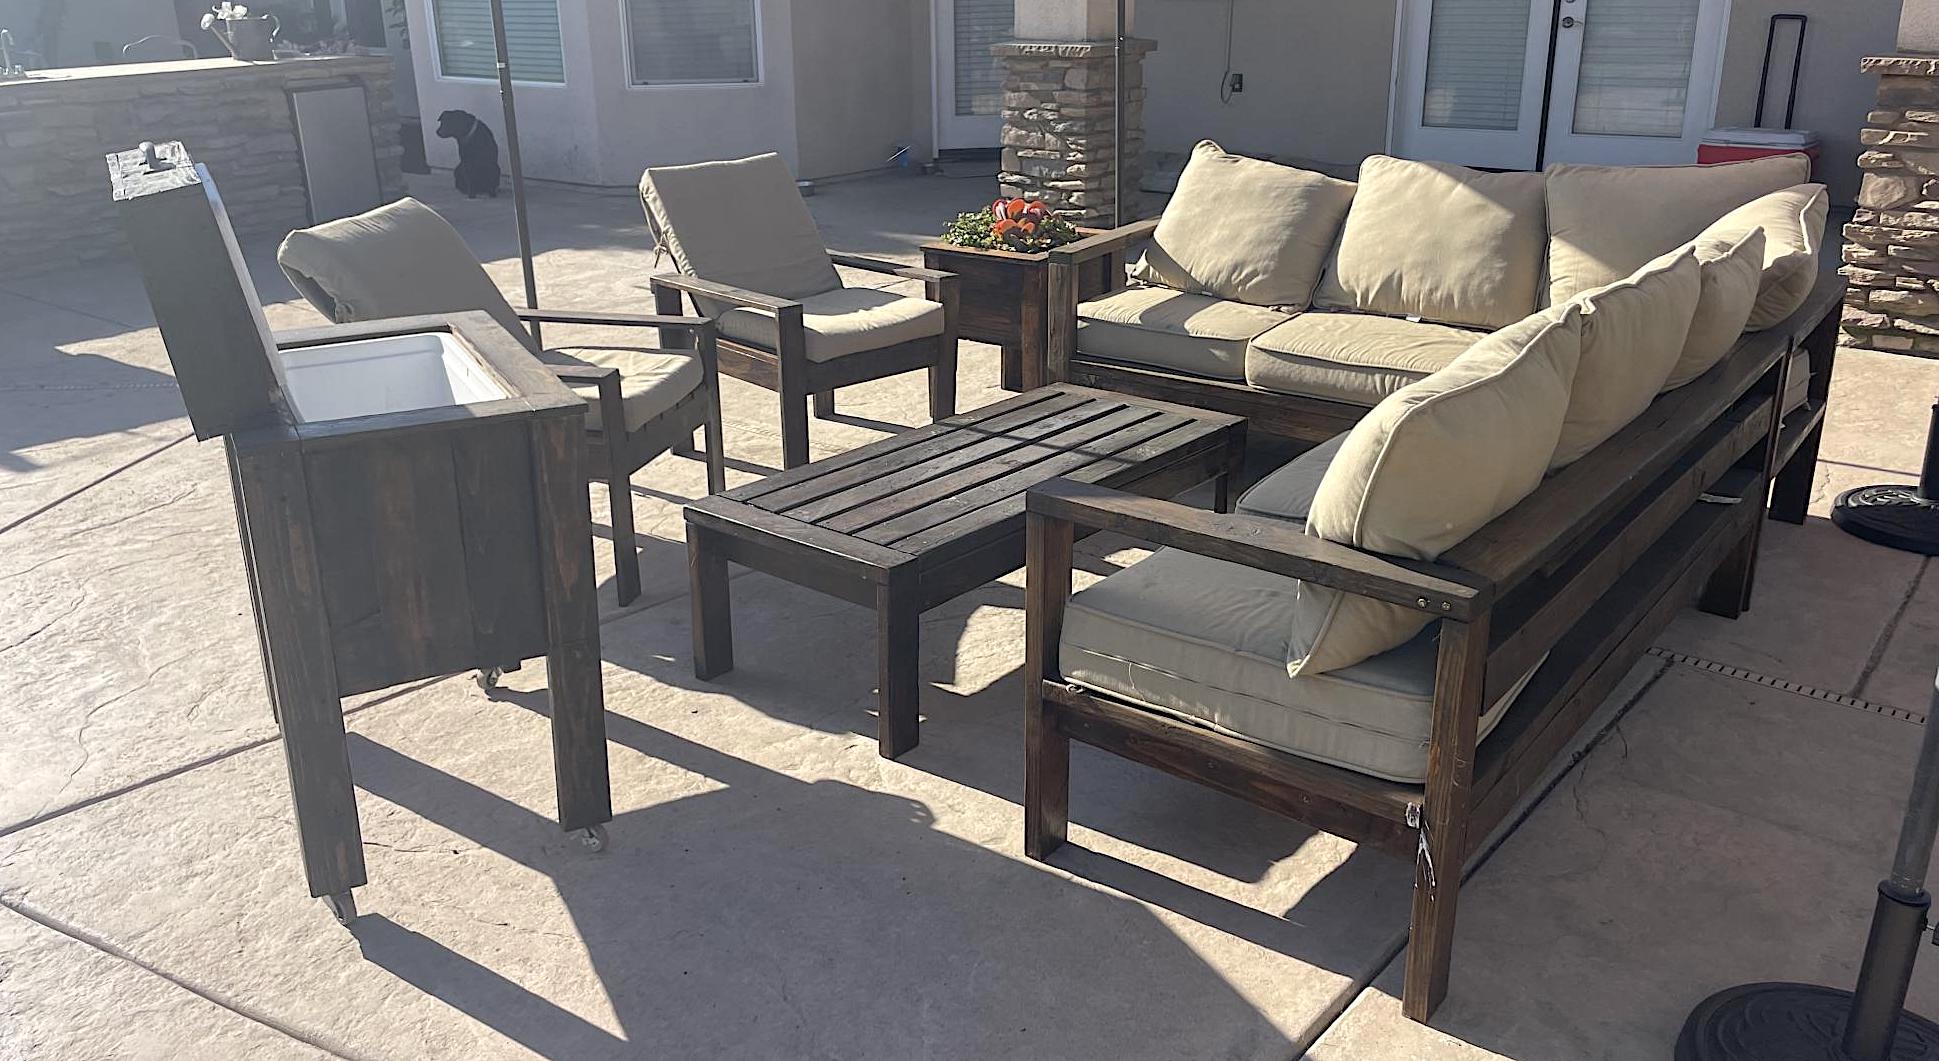
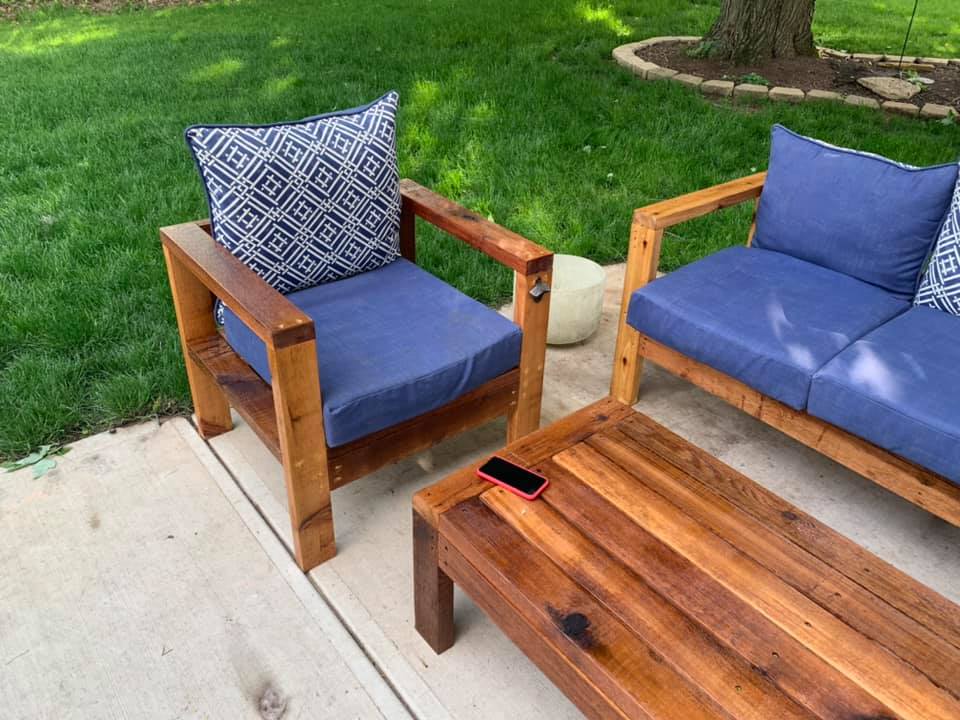
Been working from home for the past two months due to the health crisis. To stop from going crazy from being at home with my wife and four kids, I decided up pick up a hobby - here's where my homie Ana enters! I didn't want the sectional for my patio, but certainly the couch, chairs and table. The only mistakes had were my own (using wood putty, not sanding it well), but the plans were spot on. The only real issue I ran into was the cedar wood I used wasn't 1.5 x 3.5, but 1.75 x 3.5. This caused me to make additional cuts were I otherwise would not have needed it. Other than that, just remember to make the longest cuts first... I ended up needing to buy about five additional boards because it.

Estimated Cost
$350 (I used cedar, which is much more expensive)
Estimated Time Investment
Day Project (6-9 Hours)
Finish Used
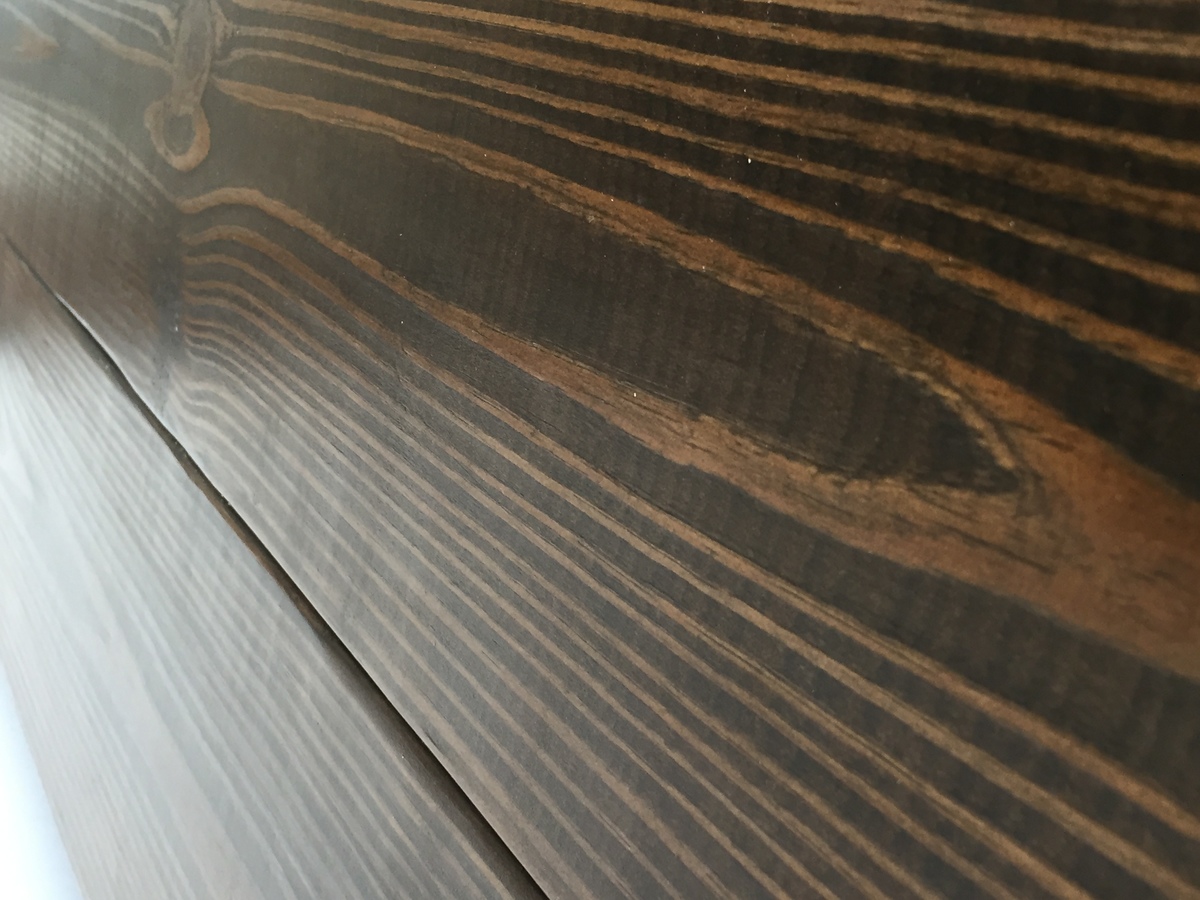
Minwax Spar Urethane, clear
Recommended Skill Level
Beginner
Seasonal And Holiday

$1.18 Bird Feeder

Submitted by jaime19861 on Mon, 05/26/2014 - 11:11

I have been trying to attract more birds. I built and put up some more birdhouses, added a bird bath, and wanted to add some more feeders. I found this quick and easy plan and I had to build it.

This took me less than an hour to build. I bought my picket from Menards when it was on sale for $1.18. That's not a bad price for a bird feeder!

You can see the steps I took to build this on my blog.
http://jaimeofalltrades.blogspot.com/2014/05/make-bird-feeder-for-under…

Built from Plan(s)
Estimated Cost
2.00
Estimated Time Investment
An Hour or Two (0-2 Hours)
Recommended Skill Level
Starter Project

Comments

jessehawks

Sun, 03/01/2020 - 17:05

I can tell just from looking at this wood it was treated with a copper based chemical (note the green/blue blotches) while cedar is a good natural resistant wood these can sometimes be treated a well check for those greenish blotches around the Heartwood lines, chemical won't penetrate the tree sap in the wood and builds up along these lines. *I've worked in the pressure treated industry as a chemical tech for 3 years, and industry as a whole for more than 7.

Farmhouse Queen Bed

Submitted by frmoody on Tue, 07/28/2020 - 17:35

I have built two of these modern farmhouse beds. One from the original farmhouse bed plans and one from the updated plan. This bed was basically the original plan but with the headboard and footboard built with horizontal boards. I did not like the revised farmhouse bed plans and the sides were way to heavy and more complex than they had to be. The were also supported only by pocket screws but I did block underneath each end to add more support. For the slats I also purchased #1 prime 1 x 4's as opposed to construction grade. They were nice and smooth and no need to sand or paint.

Estimated Time Investment
Week Long Project (20 Hours or More)
Finish Used
Customer just wanted a very light white finish so I used a diluted white paint more as a wash and then a couple of coats of matte varathane.
Recommended Skill Level
Intermediate

Comments

mmade

Sat, 02/20/2021 - 21:02

I love this! It’s exactly what I want. It’s like the mix of Ana’s two different farmhouse bed plans. I like the horizontal boards instead of the vertical and I didn’t want the ledges on the side trails. Thanks for showing me the way. :)

Kids Toy Outdoor Storage Box

Submitted by MattCad on Sat, 08/01/2020 - 20:28

First time making anything half decent and it turned out ok. Followed the Cedar Box plans with a few adaptations. I live in regional Australia so used different materials, also extended the length. Used an app on the phone to convert the measurements to as close as I could. Worked out well, a few teething issues but does the job.

Estimated Cost
70 AUD
Estimated Time Investment
Day Project (6-9 Hours)
Finish Used
Intergrain Merbau Stain
Recommended Skill Level
Beginner

Comments

New Computer Desk - From Seaten Console

Submitted by DIYER_MD on Sat, 09/06/2014 - 18:10

I used the Seaten Console Plan as the basis for this project.  I made the legs longer to raise the desk up to the height of a computer desk.  I also added extra sections to the top to proved extra storage areas for books, etc.

Built from Plan(s)
Estimated Cost
$150.00
Estimated Time Investment
Weekend Project (10-20 Hours)
Finish Used
Olympic One Black Paint with Stained Top (Rustoleum)
Recommended Skill Level
Intermediate

Comments

booksnotbombs

Sat, 09/06/2014 - 18:30

Did you build this to be the height of a standing desk? It looks great either way! I am looking for a good plan to modify. I like the staging of Ana's website on the monitors. :)

DIYER_MD

Sun, 09/07/2014 - 08:26

No, it is still a regular height desk.  The legs are actually 28 1/4 inches.  This makes the desk right at 29 inches.  I set the monitors up on the top because I like them a little higher and it frees up the desk space.  It makes them comfortable viewing for me.  I appreciate your nice comments.  If you want a nice but simple desk, this is the perfect plan.  I started building this one right after I saw it on the site.

Double Pedestal Farmhouse Dining Table

I based this build on the Triple Pedestal Farmhouse Table found on this site.  I fell in love with the table and I just had to build one!

This table is only 72" long, so I ended up removing the third pedestal.  I also removed the decorative apron that is pictured in the original plan.  I also added a picture frame border using 2x4's with 45 degree angles on the corners. I think I like how this look turned out! I kept the legs the same size as the original plan called for.

This entire build took me about a day and the staining process another 2-3 days. I stained the table top using Varathane's American Walnut stain and I painted the base using an off-white milk paint. But before painting the base, I stained the corners with the same American Walnut stain so that when I was ready to add the distressed look, I could simply just sand the paint until the stain appeared through the white.

Visit my facebook page for more of my builds!
www.facebook.com/simplyrustik

Built from Plan(s)
Estimated Cost
Approx. $140
Estimated Time Investment
Weekend Project (10-20 Hours)
Finish Used
Varathane American Walnut;
Varathane Satin Oil Polyurethane;
Limestone Milk Paint (from Homestead House Paint Company);
Recommended Skill Level
Beginner

Comments

Outdoor Entertaining Space

Submitted by ikeymedesu on Sun, 05/30/2021 - 06:09

A 2-month long project to create an entertaining space in our small backyard. I started with a dining set for 6, then went on to seating around our firepit. I actually doubled the size of the Modern Outdoor Loveseat and built a 4-seat couch (added a center section for support. I also built 2 loveseats, 2 small side tables, and took some creative liberties to design a coffee table/foot rest combo. The major modification I made to the couch and loveseats was adding a back for some additional height. This really improved the comfort when leaning back. Had a great time completing this project! When lumber prices come down I'll continue the build. (2 pictures keep uploading and converting to an upside down image - no idea why, but sorry for the weird view)

Estimated Time Investment
Week Long Project (20 Hours or More)
Finish Used
Behr Premium Transparent Natural Cedartone Weatherproof
Recommended Skill Level
Intermediate

Comments

Ana White Admin

Sun, 05/30/2021 - 09:58

Love the coffee table foot rest, would love to see more of the outdoor table as well! It all looks amazing and came together perfectly! Thank you for sharing, check out our Facebook page, just shared!

Seasonal And Holiday

DIY Wooden Toy Truck

I built a wooden toy truck using a leftover 1x4 board in my garage.  For this build I used Ana White's plans for the wood wheelie cars.  This was a quick and easy project  and my first project using my scroll saw. Not too shabby for my first go at toy making.  However, I am not happy with the finished toy.  If I did it all over again, I would take my time with the finish.  Also, the driver was not perpendicular to the truck's body when I created the holes for the axles, so the truck leans slightly. My son does not seem to notice its flaws, so I will try to overlook them as well!  Check out the blog link for more project details!

Estimated Cost
I had most of the supplies on hand. I had to purchase a wood dowel and some wooden wheels, so no more than $5.
Estimated Time Investment
Afternoon Project (3-6 Hours)
Finish Used
Acrylic Craft paint sealed with Mod Podge (Matte Finish)
Recommended Skill Level
Starter Project

Green House

Submitted by Anonymous (not verified) on Thu, 07/13/2017 - 08:31

I built this amazing green house following your plans!  My wife and I moved our family from the city to an amazing 5 acre homestead out in the country here in Wisconsin. We are super happy that we will be able to keep our new garden going longer!  Thanks so much for the plans!

Built from Plan(s)
Estimated Cost
We spent about $800 for the frame and plastic panels. Then we spent another $250 for the reclaimed barnwood siding. We found the door at a reclamation site for $25.
Estimated Time Investment
Week Long Project (20 Hours or More)
Finish Used
I followed Ana's plan pretty closely. This was the first building I ever built from scratch. It was a little difficult to get the foundation level. But I figured it out. I used pressure treated 6x6s on top of gravel. I was able to screw the actual walls down to the 6x6s.

I'm actually building a second building from these plans to use as a chicken coop. Once it's done I will post photos.
Recommended Skill Level
Intermediate

Comments

Seasonal And Holiday

Simple Outhouse

I built this outhouse to go with a dry cabin I'm working on, and also as an emergency backup for my house. I used treated lumber on the base/deck and splurged on T-111 for the siding. I wanted to use greenhouse polycarbonate for the roof, but found a piece of metal roofing in my shed that was exactly the right size so I used that instead. I thought about doing a fancy cutout on the door but ended up going with a half moon because it was easy. I'm thinking about cutting out stars of different sizes all over the rest of the door to let in more light. I'll trim and stain it next summer.

Built from Plan(s)
Estimated Cost
$450 - I used T-111 which is $40/sheet here in Alaska. I also used treated lumber where recommended and stainless steel screws.
Estimated Time Investment
Weekend Project (10-20 Hours)
Recommended Skill Level
Beginner

Comments

CH

Mon, 01/13/2020 - 15:25

WHAT HAPPENS TO THE 'STUFF' THAT YOU DEPOSIT IN THE TOILET?  I DIDN'T READ ANYTHING ABOUT DIGGING A PIT/TREATMENTS, ETC.  PLEASE LET ME KNOW.  THANK YOU!  CH.

Coffee table

Thank u so much Ana for making this possible

Comments

Printmaker Sideboard

I purchased the Restoration Hardware Printmaker Sideboard but unfortunately we had issues with the delivered product so returned it. We then came across your plans online and my husband decided to build it for me instead. Our sideboard is all simple pine from Lowes, basic drawer slides and antique brass handles from Lee Valley. My husband adjusted Anna's plans and created 12 drawers more like the Restoration Hardware piece as we really like drawers for storage. We built it over about 5 weekends. It was a very ambitious project for our first but my husband was truly the brains and Braun of the process.

Built from Plan(s)
Estimated Cost
$450
Estimated Time Investment
Week Long Project (20 Hours or More)
Finish Used
Light sanding (wanted a rough finish), 80 grit then 120 grit, only enough to smooth splinters etc.
1 coat Old Masters Provincial Gel Stain applied with sponge brush
Saman Dead Flat Clearcoat
Recommended Skill Level
Intermediate

Comments

dmcarwin

Mon, 07/15/2013 - 10:45

I am super impressed!! Way to go! I have always love this piece!

MWarder

Wed, 10/02/2013 - 14:43

LOVE LOVE LOVE this console! You did an amazing job! I'm going to have my husband help build us something similar. Wondering what size antique brass handles you used? Thanks:)

Antique Quartersawn White Oak Dining Table

This is a solid, quartersawn white oak 5-legged dining table. It was originally built in the late 19th or early 20th century. The table was in need of a refinish. The massive turned and fluted legs were full of cracks, chips, and splits.

I took the table completely apart and began stripping and sanding. The legs were re-glued where needed and clamped. I filled the cracks, splits, and and chips with wood filler, sanded, and repeated until I was happy with the results. I replaced some bracing and replaced the screws where needed. Heavy duty casters were added. They have brakes/stops that can be locked to keep the table from rolling on a hardwood or tile floor.

Once the final sanding was completed, I applied 2 coats of Minwax Dark Walnut stain with a foam brush. I wiped down after each coat after waiting 10-15 minutes or so. After drying I began applying Minwax Fast Drying (oil based) polyurethane. The table received 3 coats and the top received 6 coats. I hand sanded with 220 grit sandpaper between coats.

After applying the final coat of poly to the top, I allowed it to cure 48 hours. I then hand sanded the top very lightly using 400 grit paper. I did the same using 0000 steel wool. I then added a few drops of dish soap to a cup of water and wet sanded with the 0000 steel wool. I used a circular motion to remove any scratches. I then wiped down the table and buffed out two coats of Johnson Past Wax with an orbital buffer. It resulted in a super smooth finish.

I am very happy with the results. By the way the table if for sale ($600) and is located in Evansville, Indiana.

Estimated Cost
$80
Estimated Time Investment
Week Long Project (20 Hours or More)
Finish Used
Minwax Dark Walnut Stain (2 coats) and Minwax Fast Drying (oil based) polyurethane.
Recommended Skill Level
Beginner

Double Inset Bookshelf Doors

Submitted by dholubar on Wed, 08/21/2013 - 07:08

You made this project look so simple that I just had to try it. However, to suit my needs I had to make a few alterations to the plans. I had a set of bi-fold doors that were in need of replacement and I thought inset bookshelf doors would be the perfect way to replace them. This project was easy enough for me to do it myself and I am really new to the DIY game but I did have some help. I really love the way they turned out. You can read all about my my adventure at http://heresalittletmi.blogspot.com/2013/08/bookshelf-doors.html

Built from Plan(s)
Estimated Cost
$120.00
Recommended Skill Level
Beginner

Cedar Shed

Submitted by jean on Sat, 08/31/2013 - 10:09

Thanks for the shed plans, I've been looking all over for something like this. I used 3/8" ply wood for the back wall to save money but spent what was saved and more on the shingles and stain/seal. I made the shed exactly 6' wide and 4' deep to fit the 6 2'x2's patio slabs.
The entire project took about 2 weeks to complete and cost about $700. We pay more in Canada but at least I finally got the shed I wanted.

Built from Plan(s)
Estimated Cost
~$700
Estimated Time Investment
Week Long Project (20 Hours or More)
Finish Used
Olympic Honey Gold Toner Exterior Stain for the walls and Olympic Clear Waterproofing Sealant for the roof.
Recommended Skill Level
Beginner

Dining chairs for X based pedestal table

Submitted by Anonymous (not verified) on Mon, 03/06/2023 - 10:15

I made the 4 chairs to complete the dining suite. The table was made from the X based pedestal table plan.

The timber was all cut from 200mm x 50mm pine sleepers and finished with Cabots clear finish.

Comments

Back Yard

Submitted by Anonymous (not verified) on Mon, 05/15/2023 - 08:32

This is my homemade backyard inspired by plans from Ana. Used Ana's previous post to build all pieces. Stained in Mission Oak and bought pillows from Lowe's. Succulents from a local nursery.

Coffee Table
2 piece lounge
2 chairs
Ice chest
Planter Box

Comments

DIY Farmhouse TV Console

This was the second piece of furniture that my husband and I ever made. We had built a coffee table that had a lift up top so that we could eat dinner on the couch and store all of our board games. Once we tackled that, I thought we could conquer the world (even though the table was pretty basic). So when my now-husband was about to move into his first apartment without a roommate and I saw it as an opportunity to decorate my own place (even though I wasn’t living there). Luckily,he agreed it was time to get rid of his tiny Ikea TV stand that was probably 2ft off the ground and not a great height for a TV, and agreed to build this awesome TV console with me. To this day, it’s still my favorite piece of furniture in our house.

Built from Plan(s)
Estimated Cost
500
Finish Used
dark walnut

Comments

Bench with A Frame Ends

Submitted by AndyH on Tue, 03/29/2016 - 17:54

Bench made with A frame ends. 5 feet long, 17 inches high and 14.5 inches wide.

Estimated Cost
$30
Estimated Time Investment
Afternoon Project (3-6 Hours)
Finish Used
Varathane Kona and three coats of satin protector.
Recommended Skill Level
Beginner

Surprise Master Closet Makeover!

Submitted by ferbit on Mon, 03/26/2012 - 13:28

After over a year of other projects, I finally had the chance to completely redesign our master closet! I used EasyClosets.com to come up with the design again. :)  I still have a few more tweaks here and there, but I absolutely love it! I surprised my husband for his birthday by doing this project while he was on a business trip. :)

Other than mounting these boxes to the studs, this project was built exclusively with my Kreg Jig. I drilled all of the adjustable shelving holes with a nifty Rockler Jig-It shelving jig - wish it had been the Kreg shelving jig, but I bought mine before Kreg came out with theirs. The Rockler one works great - I just love Kreg's stuff so I'm sure theirs is awesome too.  ;)

I begged Kreg to let me buy their new circular saw rip cut product early for this project, but they said no.  :-(  Bummer because I saw Ana using hers and was so jealous!  I had to rip all of my plywood the old fashioned way on the floor with my circular saw and lots of clamps.  Yuck!

This time around, I used birch plywood.  I used white pre-drilled melamine for both of my daughters closets (brag post here), but I didn't like working with that stuff.  Too sharp, slippery and HEAVY.  I did our spare bedroom closet with pine 1x12 boards a few months back. I think I liked working with the pine best..

After a few months, I purchased a bunch of Closetmaid Fabric Bins/Drawers and they look so good!

Estimated Cost
$300
Estimated Time Investment
Weekend Project (10-20 Hours)
Finish Used
none
Recommended Skill Level
Beginner

Comments

ferbit

Mon, 03/26/2012 - 18:00

My husband has more room on his side of the closet so his boxes are 16.5" deep. I think that's a bit too deep, but I was trying to use existing wood that had already been cut for shelving on that side. Heavy to hang though. :)

On my side of the closet, the depth is 14.5" deep.

The rods are awesome! Super cheap at The Container Store. You buy them in 2-foot, 3-foot or 4-foot lengths and they cut them on site for you. I posted hyperlinks to the rods and the rod hanging hardware on one of my other brag posts. Love them!

felicia (not verified)

Sat, 11/10/2012 - 17:23

Your closet looks great. How did you get the unit to float on the wall?

Rhea

Thu, 05/16/2013 - 15:00

The closet is amazing. Yesterday I finally took off the builder installed shelf and dowel. Took a while, still need to patch up the drywall. I am now research to get the closet renovation started. I have tons of questions.
I understand that the shelves itself were attached by kreg jig holes. How do I hang the shelves on the wall?

jyothianil

Tue, 11/19/2013 - 06:47

Yours closets are awesome. Can you please advice as i am a newbee.

White closets: For the white closets we buy the regular plywood from Home depot and then do primer and paint. Can you please advice on the primer and the paint I should use to make it white color.

Wood closets: I like the wood color closets. Do we need to do any polish. What sheets should we buy in home depot to make wood color closets. What are our options for wood color closets

Thank you

ferbit

Thu, 11/21/2013 - 11:16

Rhea, take a look at Ana's kitchen cabinet plans and look at how she braces them along the back. That's what you screw through into the studs. To make it easier, I screwed in a scrap 2x2 into the studs at JUST below where I wanted the closet shelves to go (sort of like a temporary shelf). Then I carefully set the closet box on my temporary shelf and screwed it into the studs.

Also, if you click on my username, I explain how I hang them in a bit more detail in one of my daughter's closet makeovers. :)

ferbit

Thu, 11/21/2013 - 11:24

Hi jyothianil,

I have done both actually. I did both of my daughter's closets using pre-peg-hole-drilled white melamine from HD. You can get it in two widths and it saves you a ton of time not having to drill all of those holes. A few things to consider... Melamine is HEAVY and a total pain to work with. The edges are sharp after being cut and it slips everywhere when trying to kreg-jig it together. But it's DONE once it's put together...

On two other closets, I just used ripped sheets of birch plywood or 1x12 sheets of pine. I didn't finish mine, but I probably should have. It doesn't snag the clothes, but it does create dust. If I had at least put one coat of poly on, it would have eliminated a lot of the dust that collects on the clothes.

If you want to paint them white, I would just use some sort of primer and any white paint. It's all personal preference, but I would get semi-gloss or gloss white paint because it won't show fingerprints and clothes will slide on and off the shelves easier.