Community Brag Posts
End tables to match the Media/Wine storage cabinet
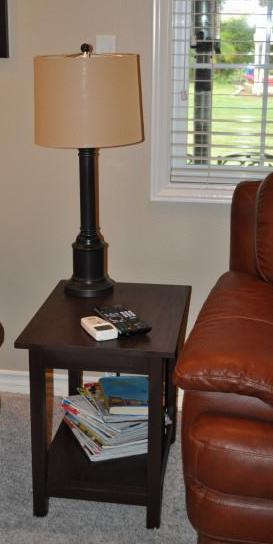
Just want to thank you, Ana, for the wonderful plans and this site. I'm still so surprised that I was able to build something that looks so nice and is so functional. Since stumbling upon your site I've been able to put aside my fear of the "big" tools and do something that I've wanted to do for years. Since the media/wine cabinet I built for my daughter, using leftover material I built these end tables to match. She and my son-in-law are pleased, too.
I've got a couple more projects in progress right now for my son and my other daughter is putting her list together - I'm just so happy to be doing this!
These tables are similar to the narrow cottage end tables, but without the drawer.
Built from Plan(s)
Estimated Cost
Maybe $10 for both because I used mostly scraps
Estimated Time Investment
Afternoon Project (3-6 Hours)
Finish Used
I painted it using Spray paint in Espresso. I did put two coats of semi-gloss spray poly on it.
Recommended Skill Level
Starter Project
Comments
Thu, 07/14/2011 - 16:31
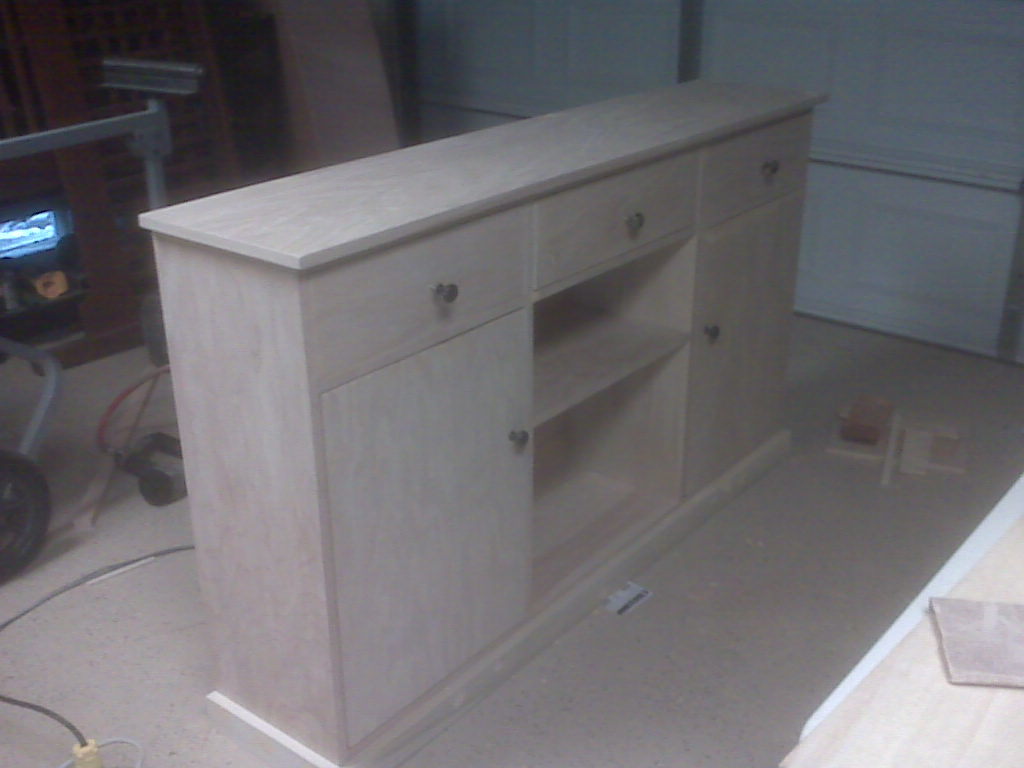
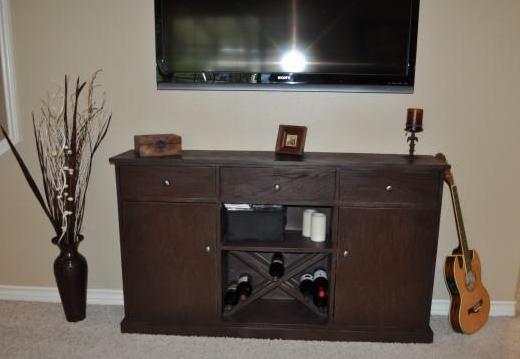
Nice job! I am interested in
Nice job! I am interested in this console as well. I am scared of drawers and cabinet doors though! Were they that bad?
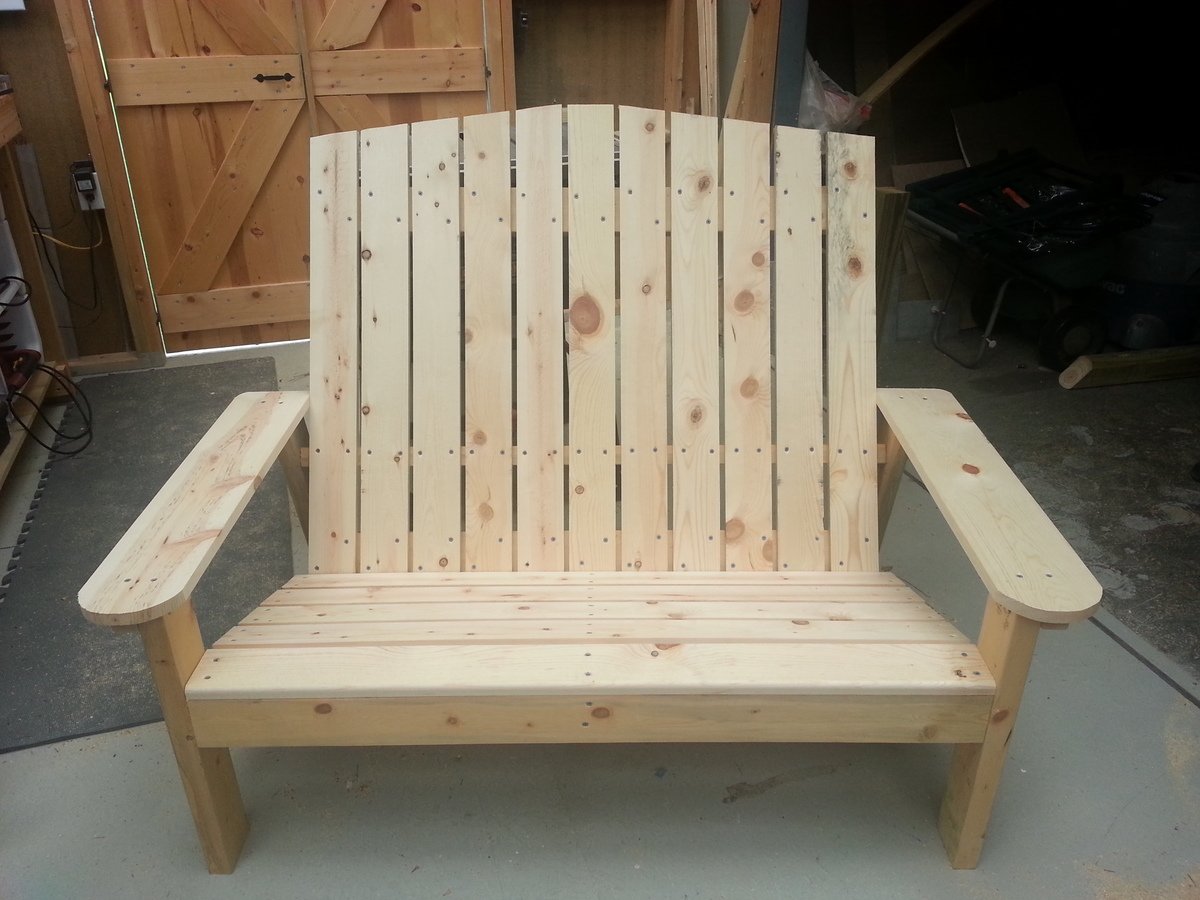
Backyard seating
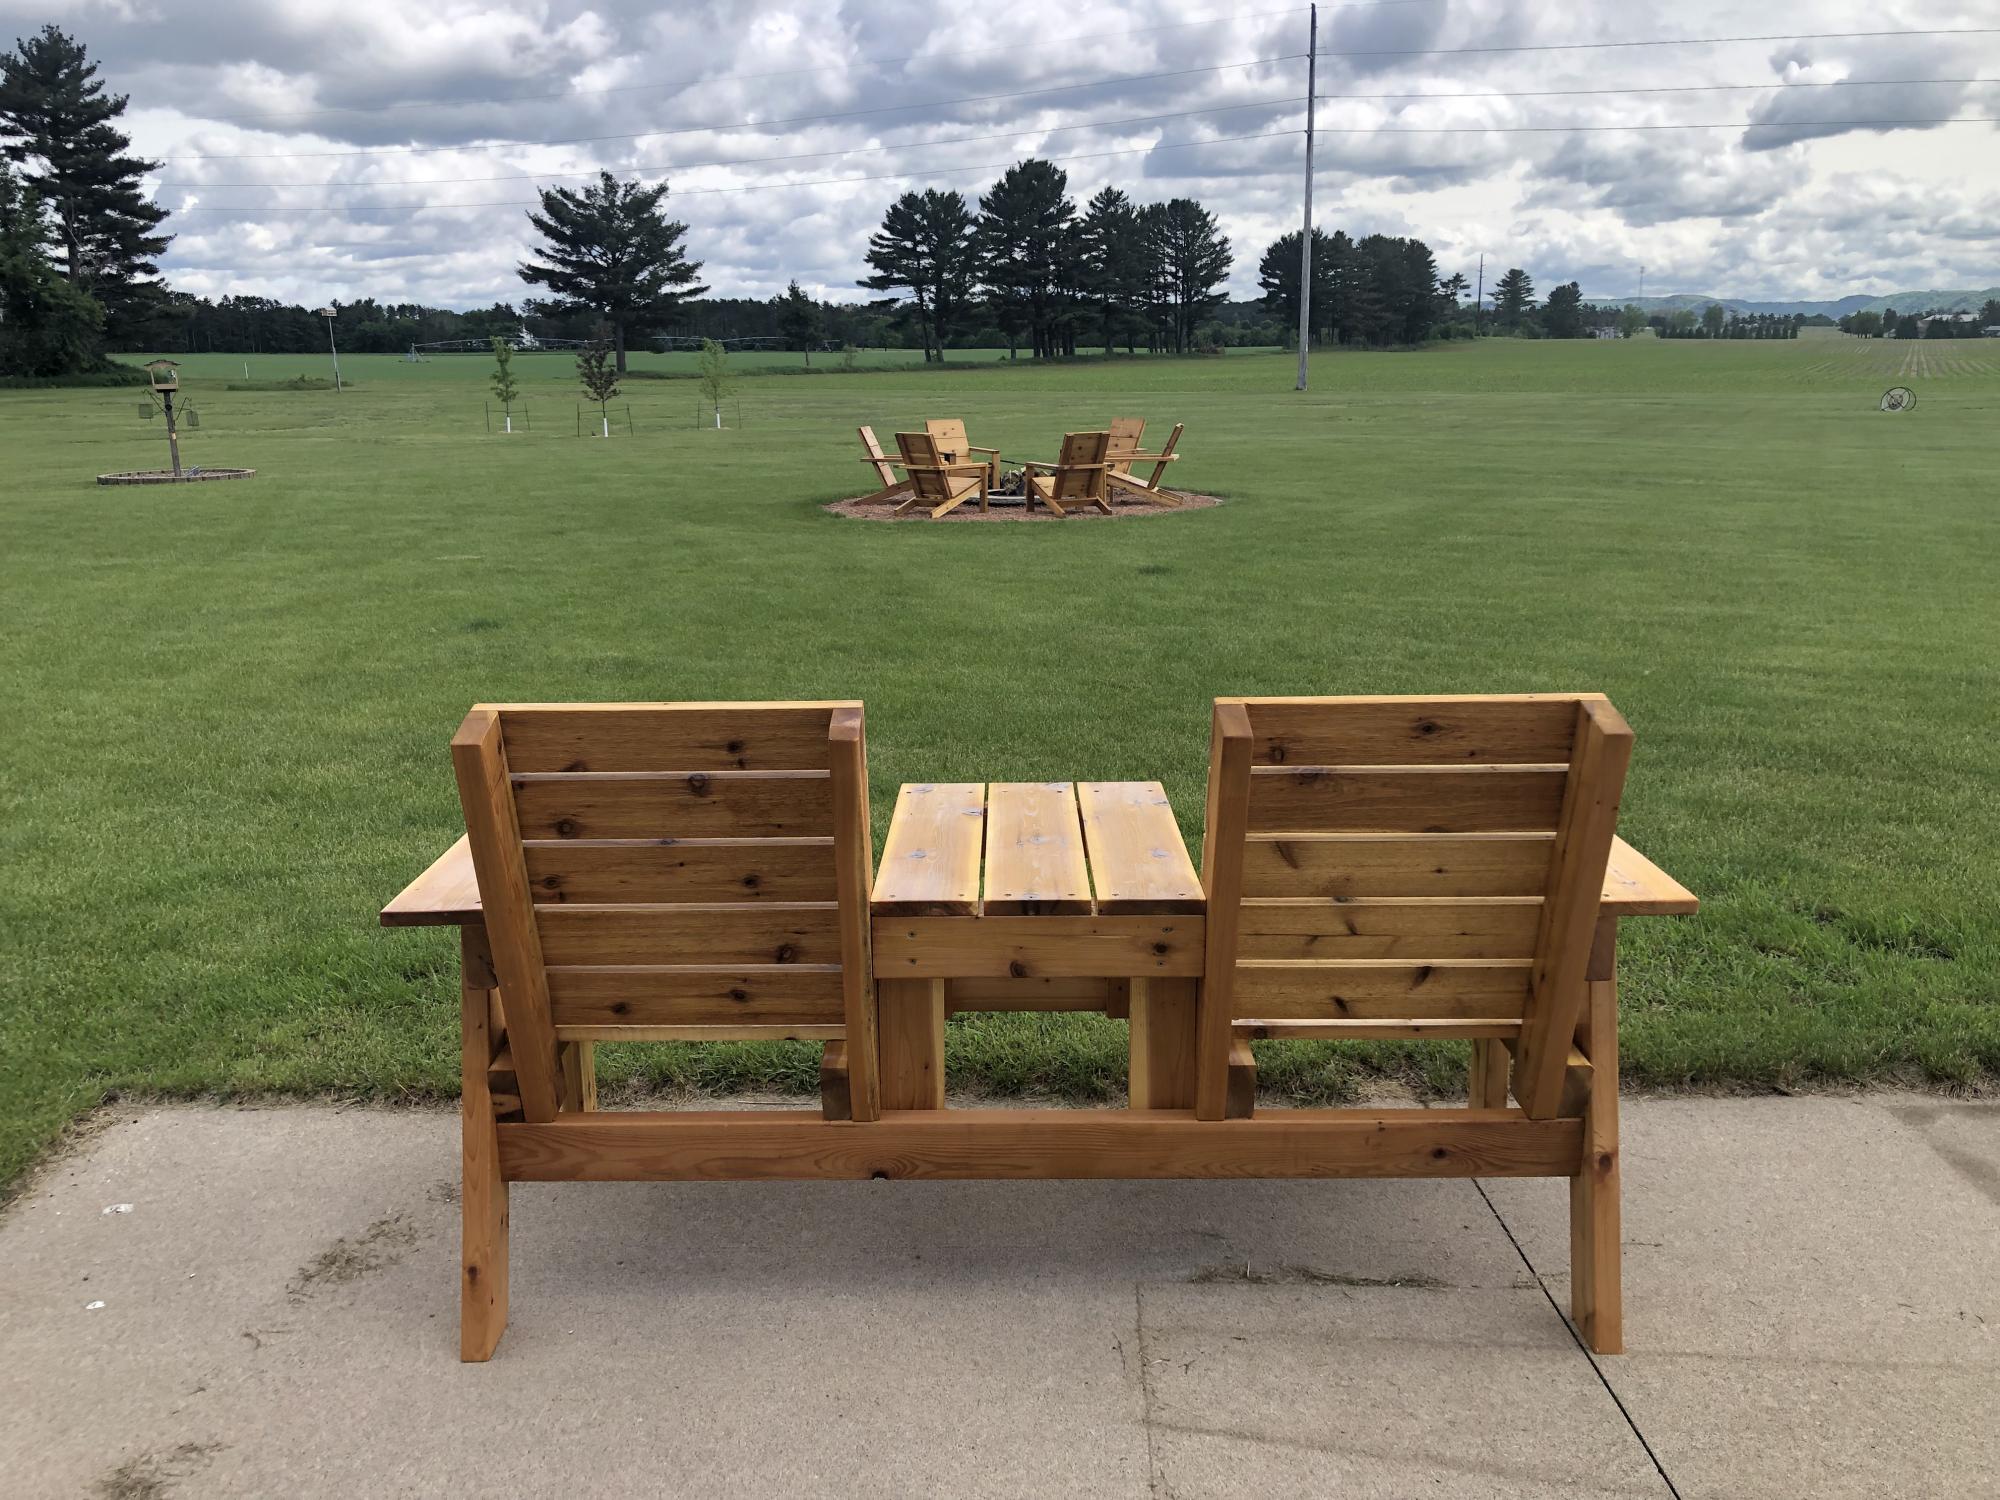
We needed some additional seating in the backyard so I built 6 Adirondack chairs for the fire pit and the bench using the plans that you have shared on Facebook. They turned out really nice and so far they have been a big hit!!
Thanks!!
Comments
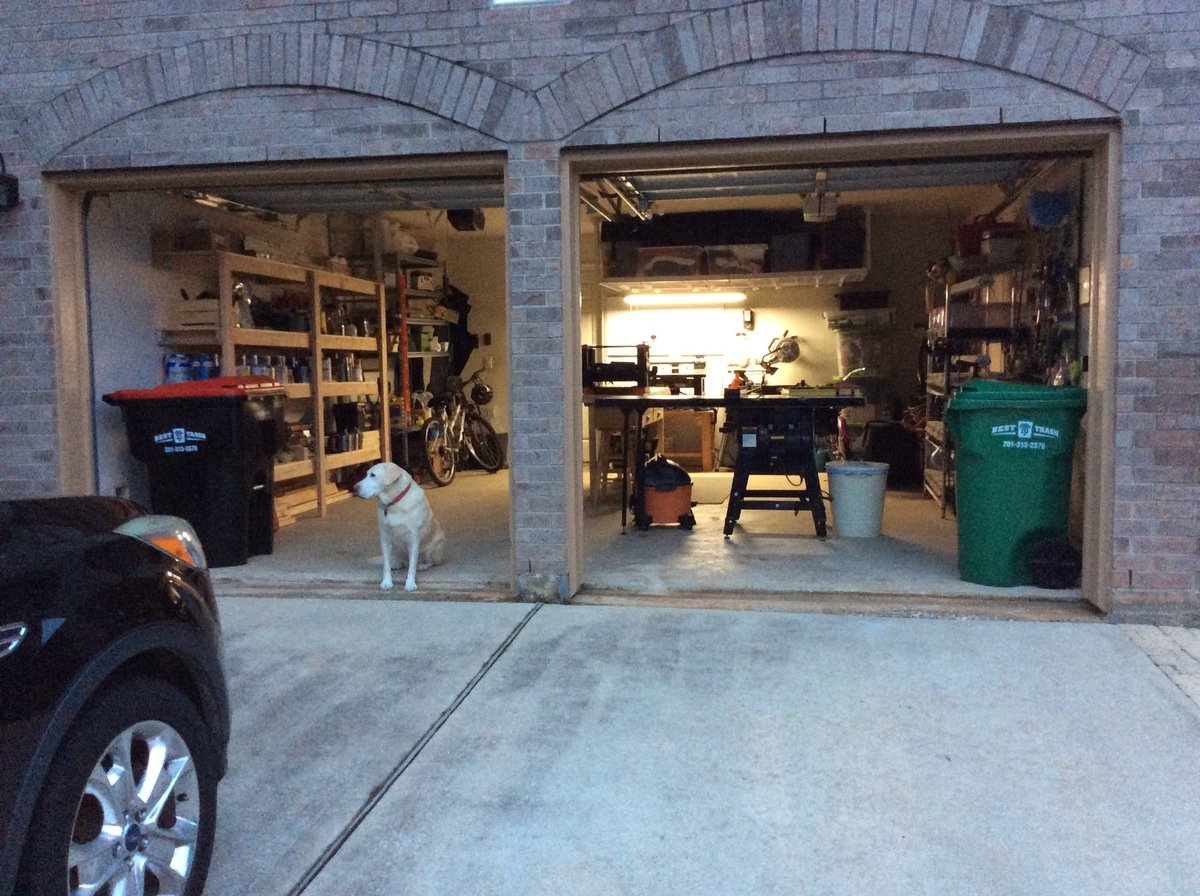
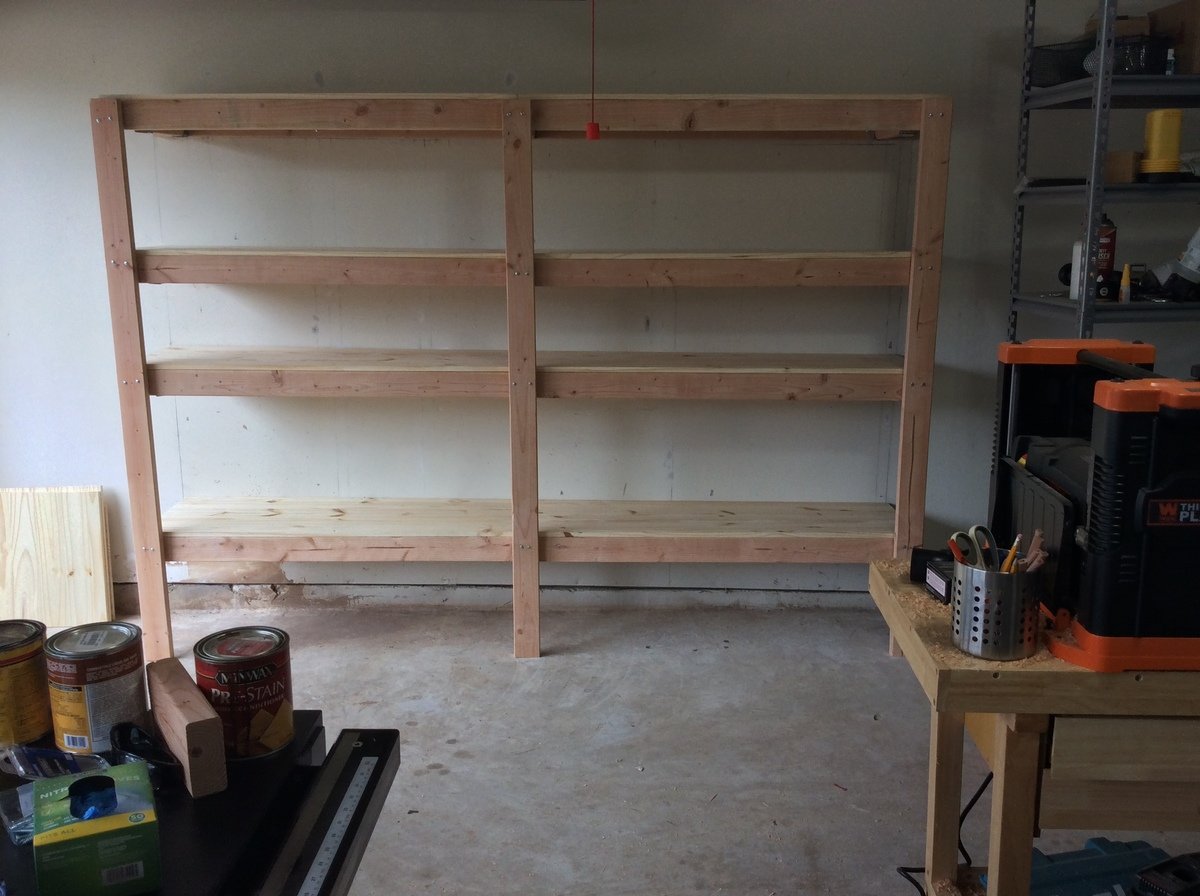
Garage Shelves
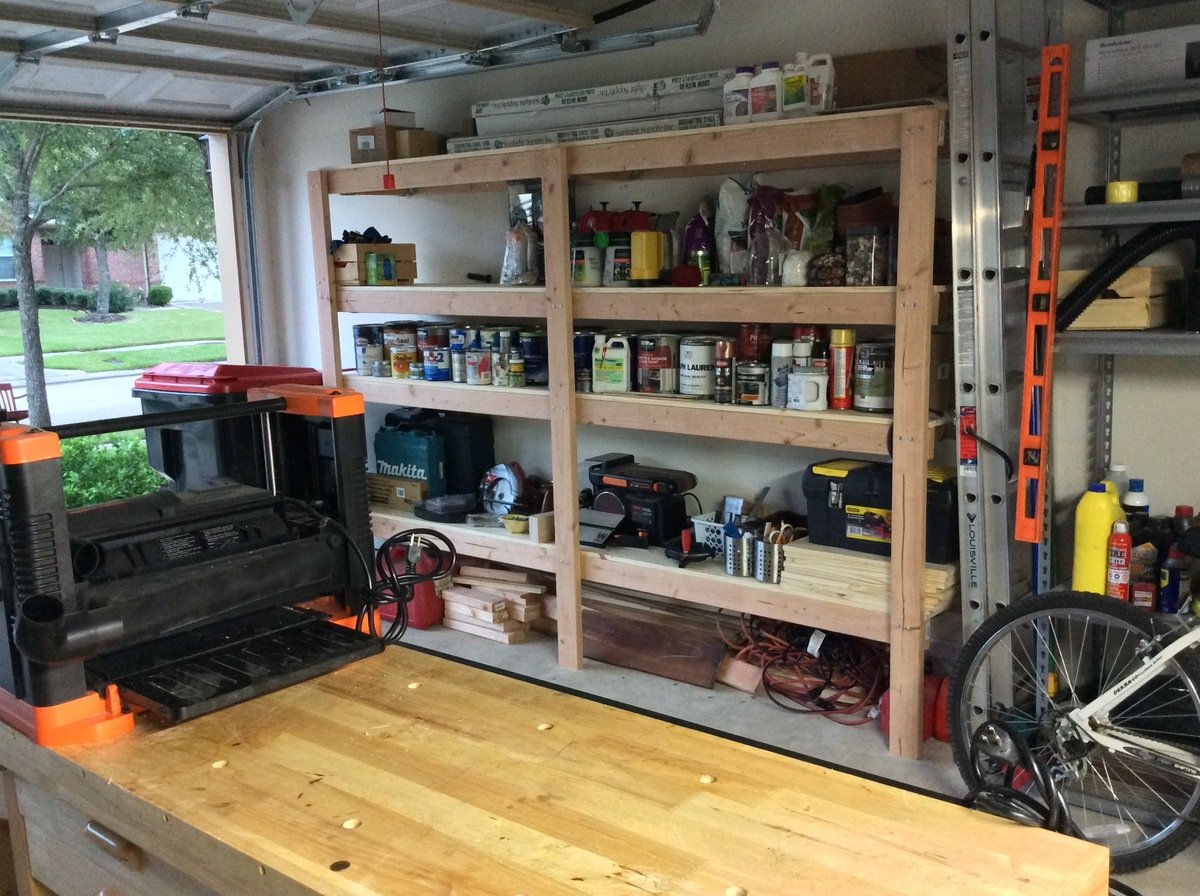
This was a pretty easy project, but I had to adjust the vertical legs to accommodate the sloping garage floor. I drew a horizontal line for the top edge then measured to the floor at the spacing I wanted the vertical legs. I used these measurements to cut the three vertical legs. It’s level and straight, even though my garage is sloped.
Built from Plan(s)
Estimated Cost
$300
Estimated Time Investment
Week Long Project (20 Hours or More)
Finish Used
Garage shelving
Recommended Skill Level
Beginner
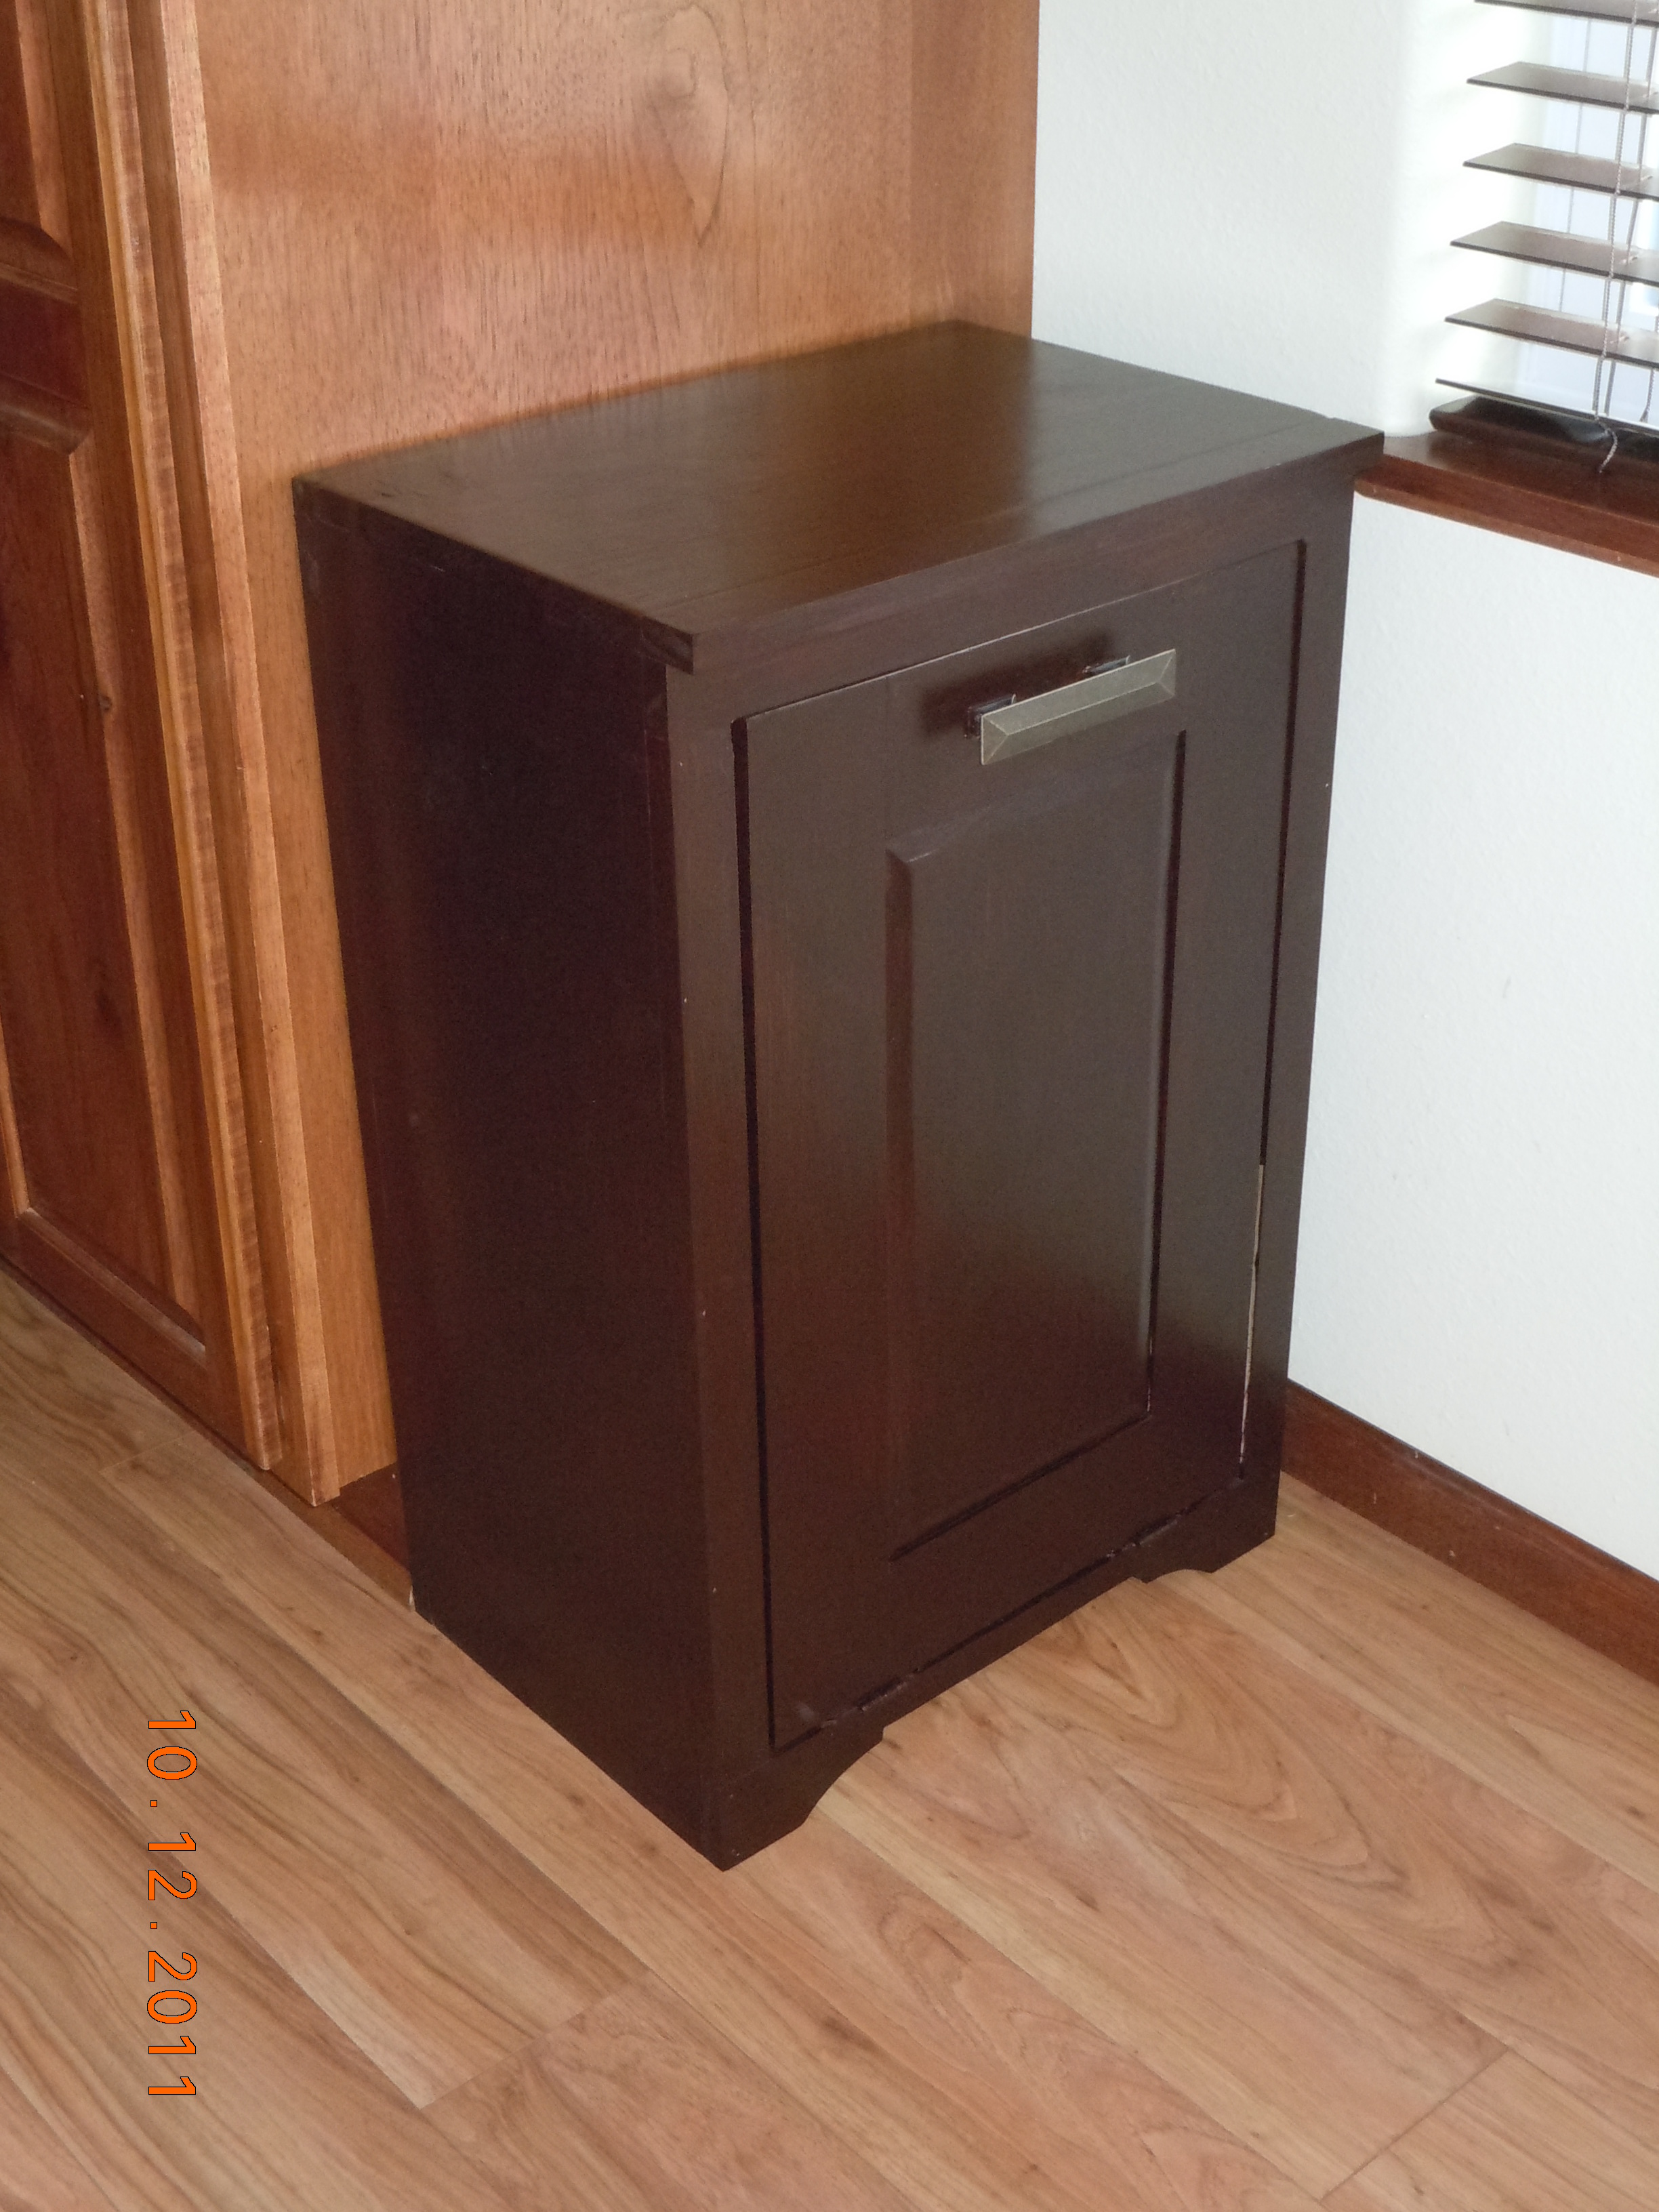
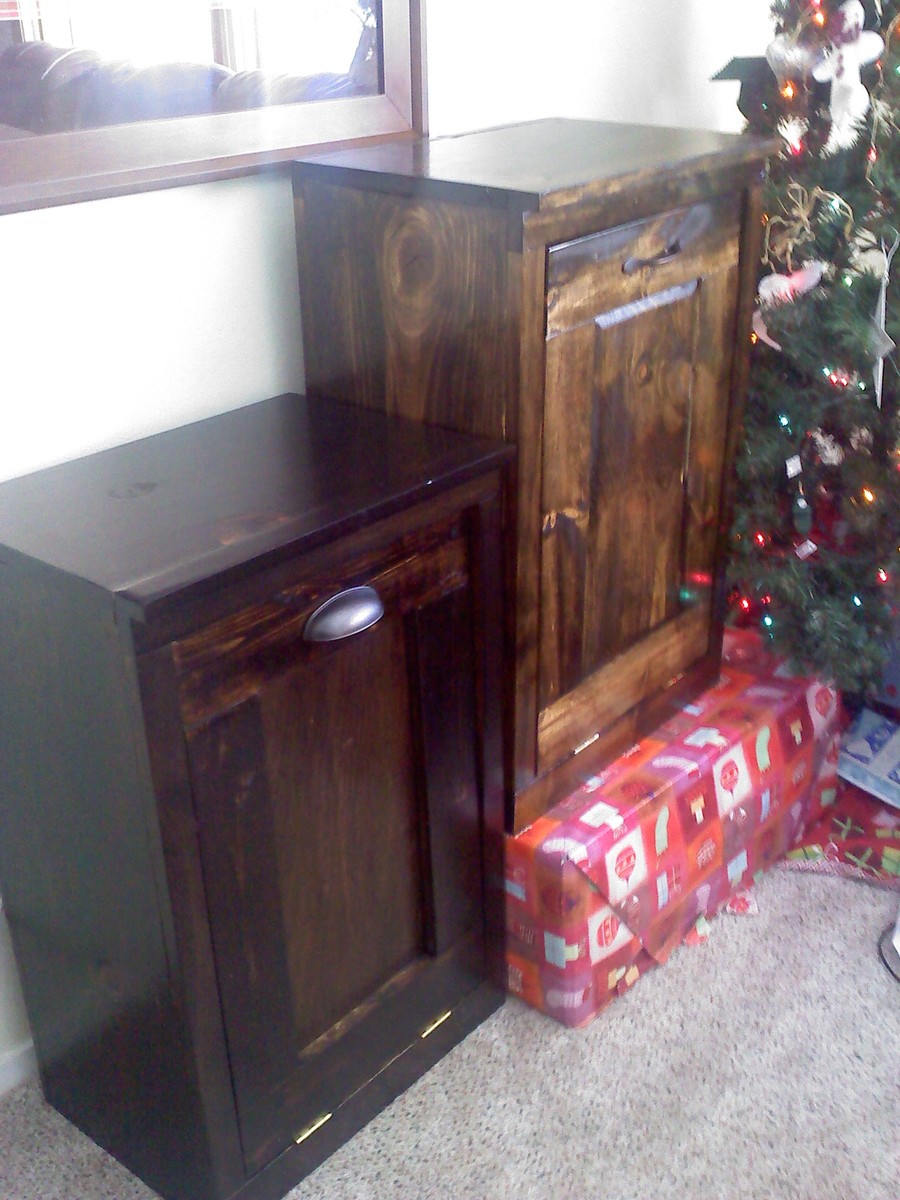
I couldn't be more happy about a garbage can!
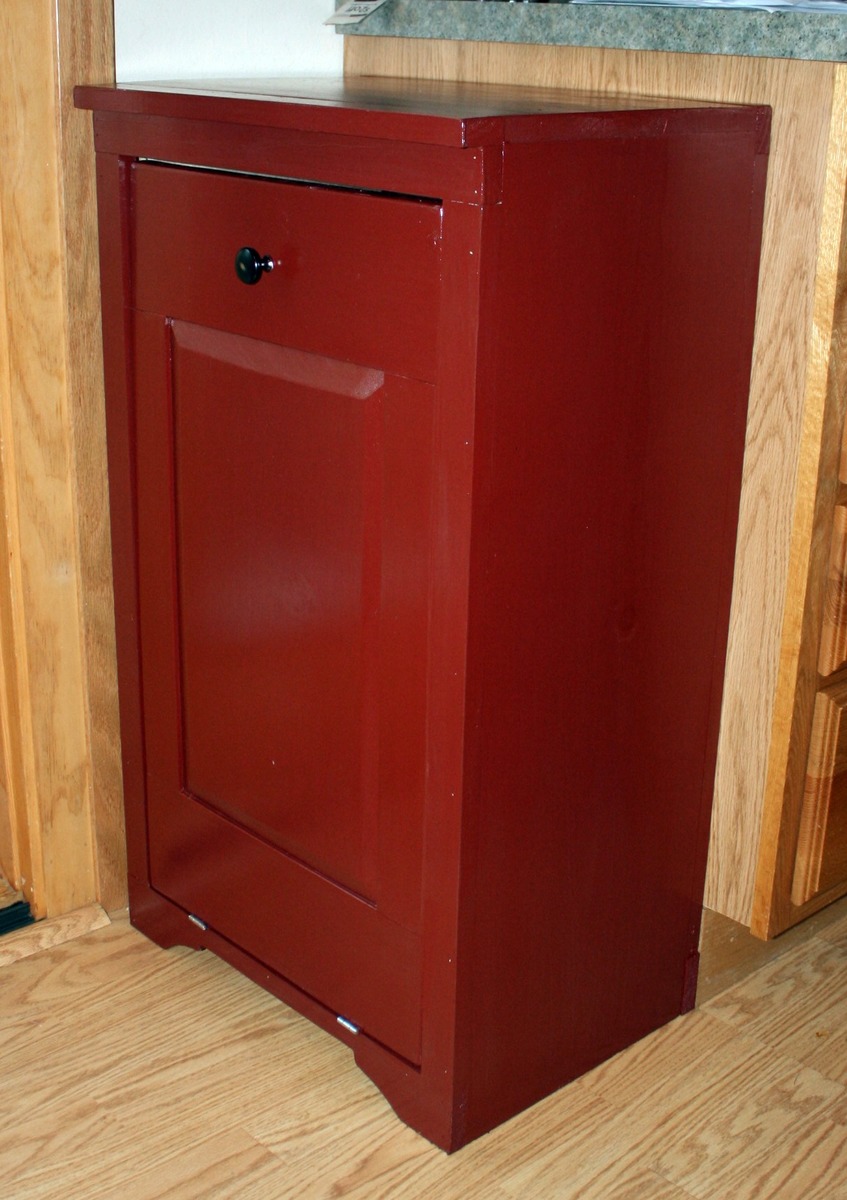
I started this project thinking that I would put in a rental home we were working on. But after I completed it I couldn't part with it.
I found the plans to be easy to follow! I watched the videos and tackled the raised panel doors. I wanted to add some height so added a few inches just in-case. I couldn’t bear the thought of completing this project and my garbage can not fitting. So I did use 1x6 for the rails and found it didn't look too bad.
I put a lot of thought about what color and finish I wanted. I thought about distressing it but couldn’t decide on the color or technique. So I decided on Color Place paint that I had left over from another project. I am going to find a spray paint that matches and do the inside.
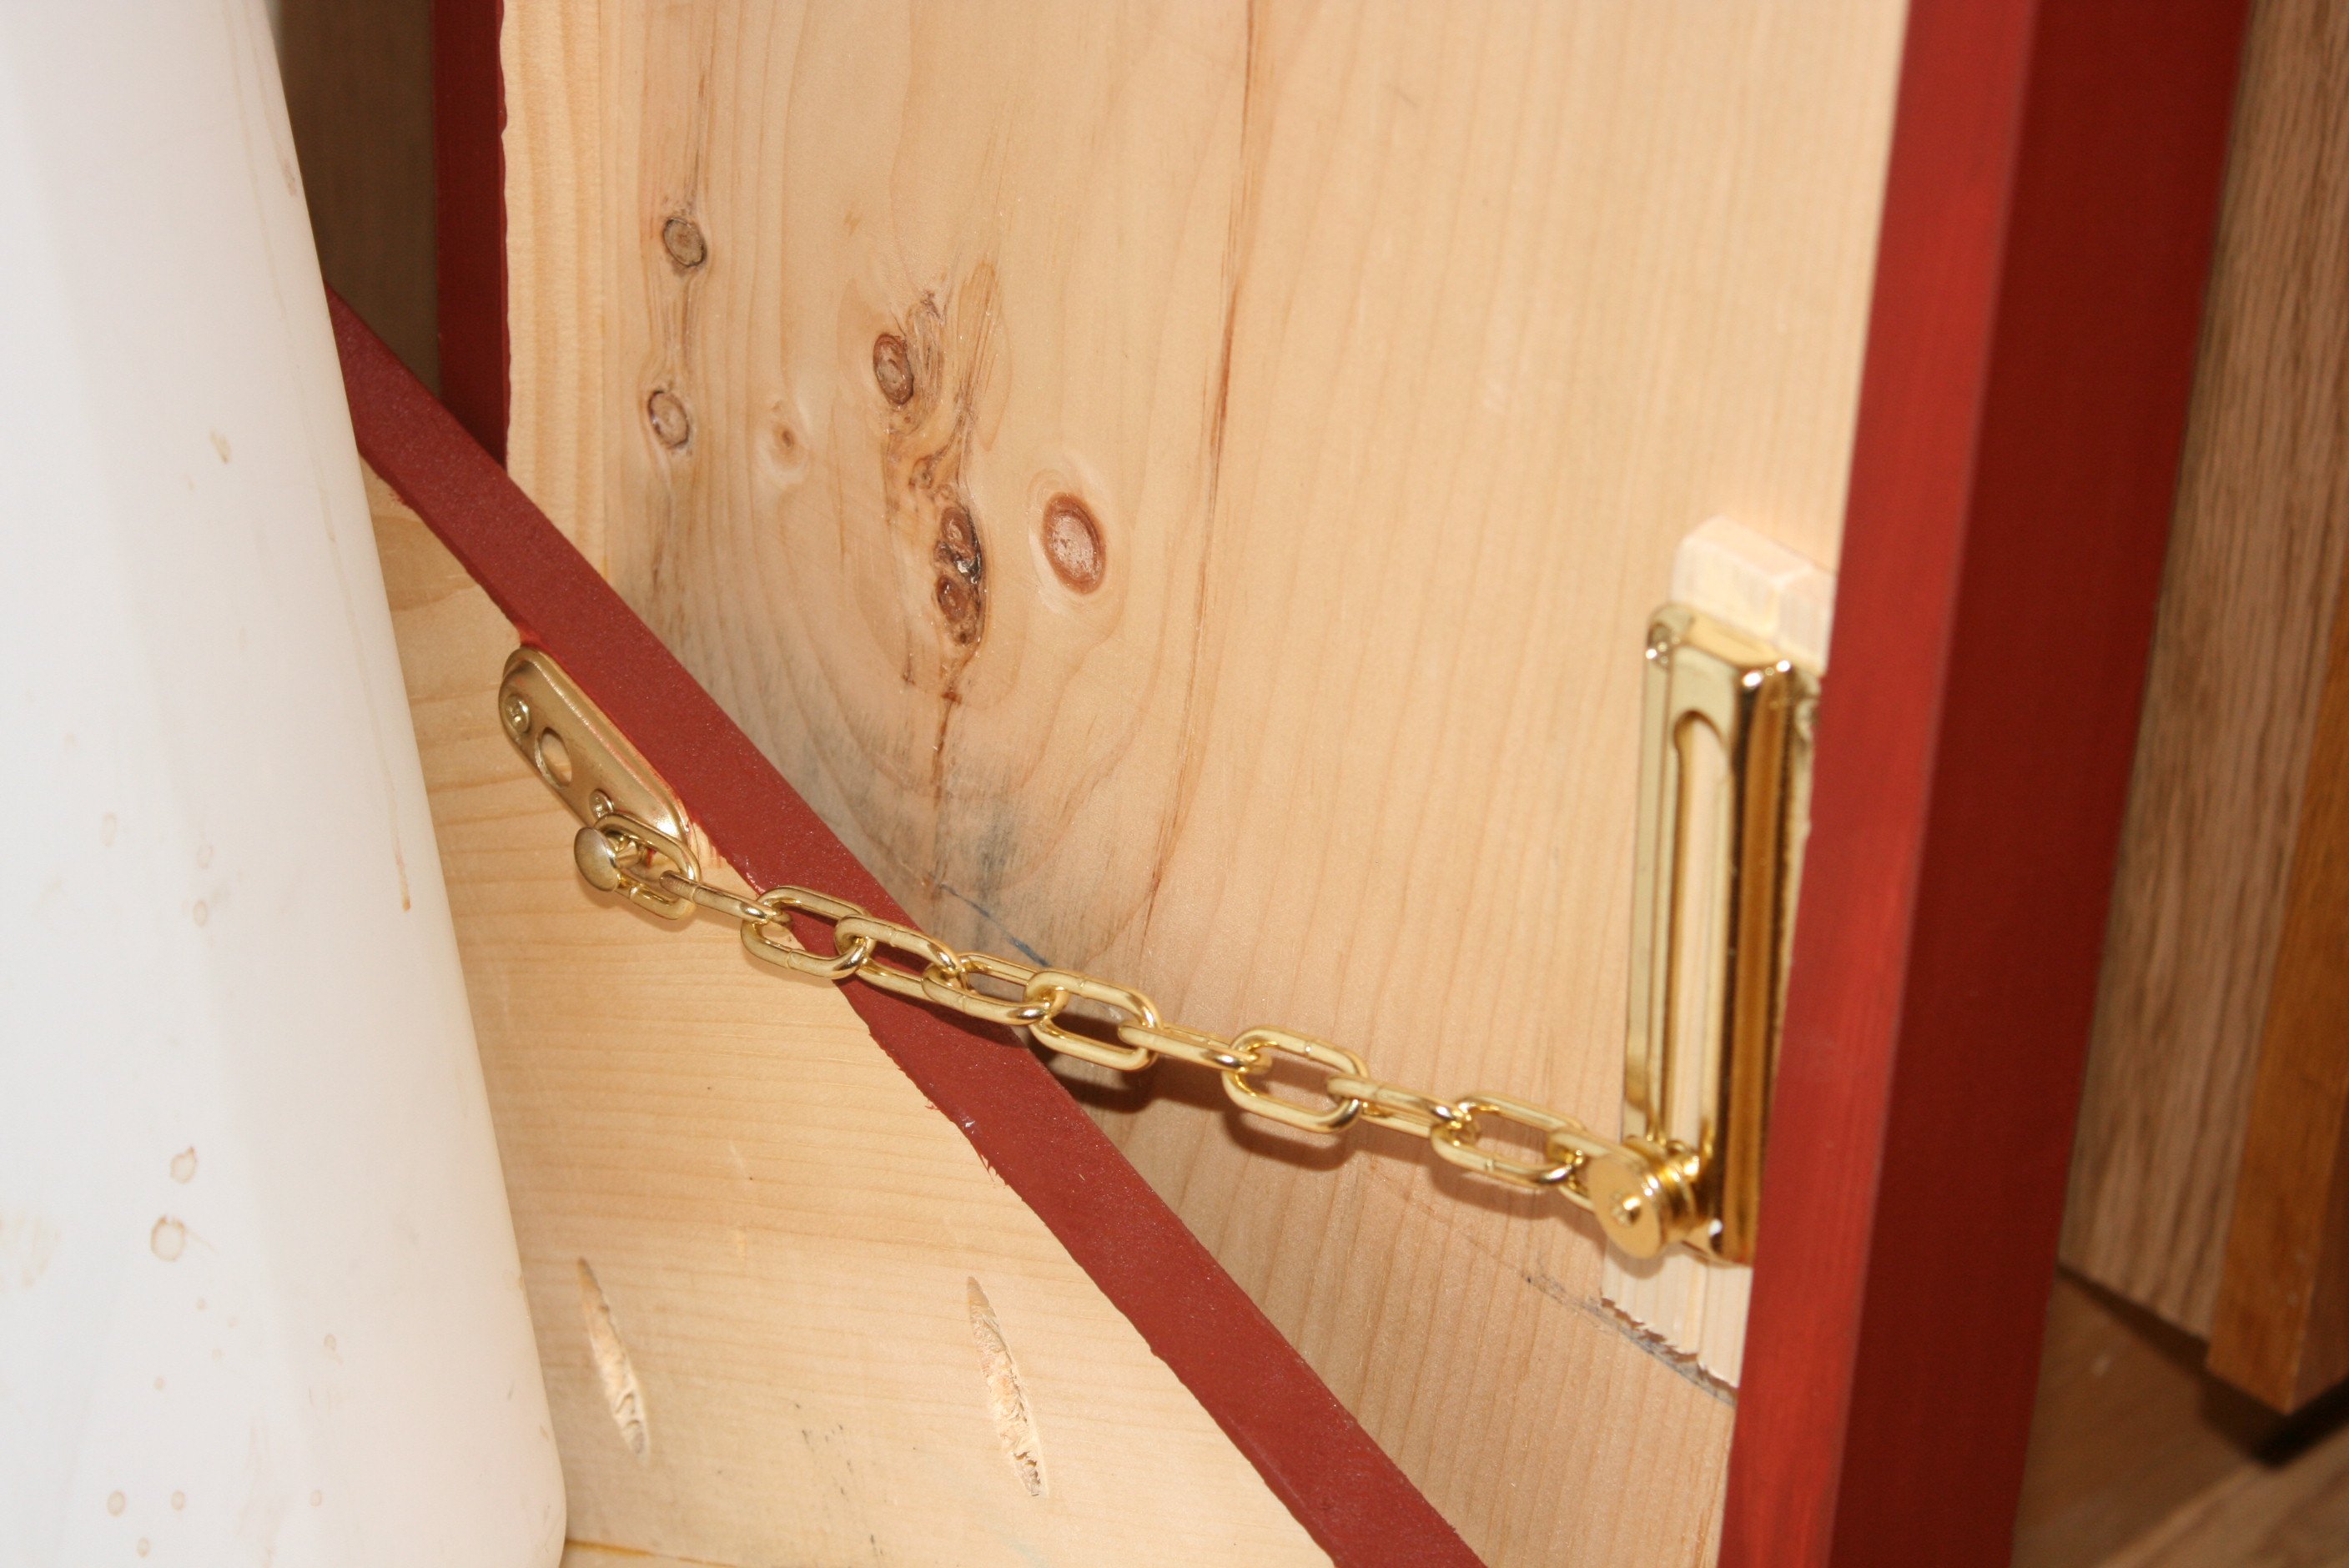
I choose an oil rubbed bronze knob that I had left over from a kitchen remodel, added a magnetic closure as well as a door safety chain. I have lots of little hands and toes that I don’t want getting smashed. I like the idea that if I want to open it all the way for cleaning all I have to do is unhook the safety chain.
Over all I am so pleased with how it turned out. It keeps the garbage and smell in and curious fingers out! My kids love to put stuff in the garbage now!
I spent a weekend with a visiting friend and made one as well as completed two more for Christmas gifts.
Thanks Ana
Built from Plan(s)
Estimated Cost
$30-35
Estimated Time Investment
Afternoon Project (3-6 Hours)
Finish Used
2-3 coats-ColorPlace-Redwood semi-gloss exterior
1 coat-Minwax-Polyurethane-Semi Gloss
1 coat-Minwax-Polyurethane-Semi Gloss
Recommended Skill Level
Intermediate
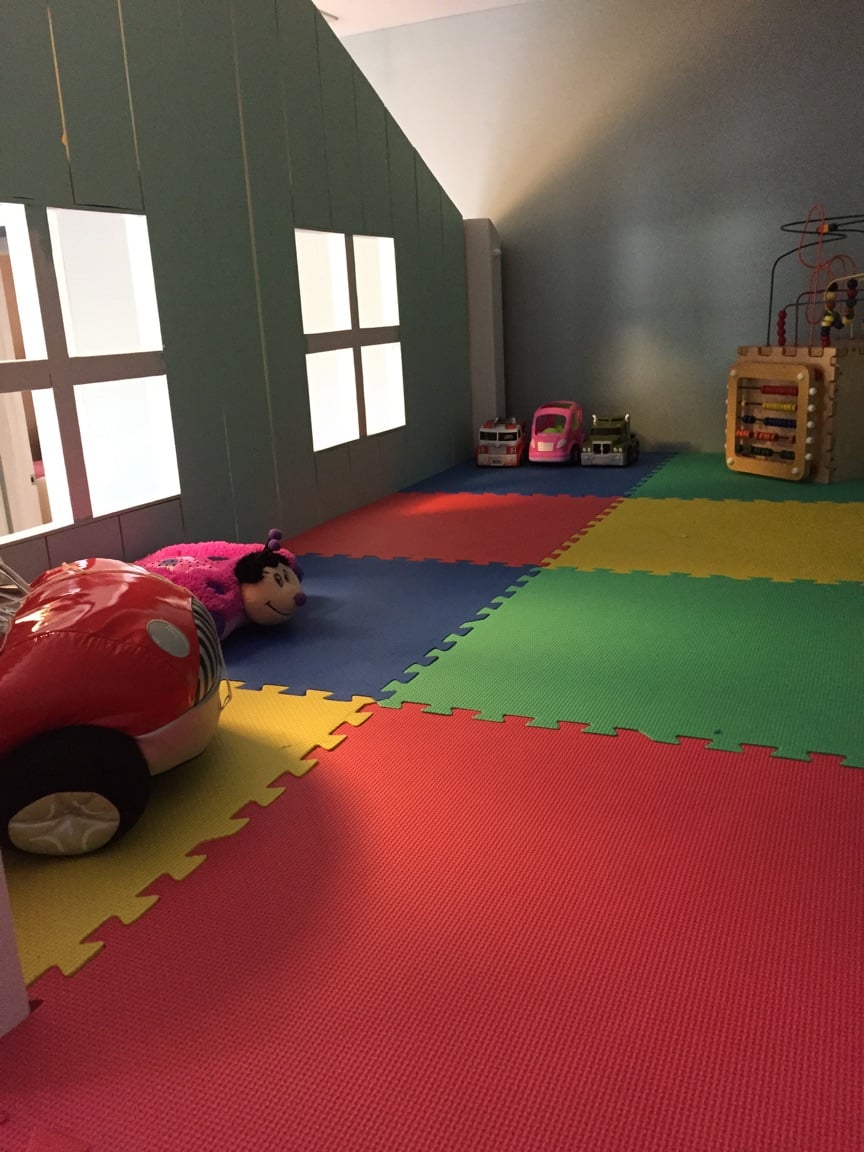
clubhouse loft
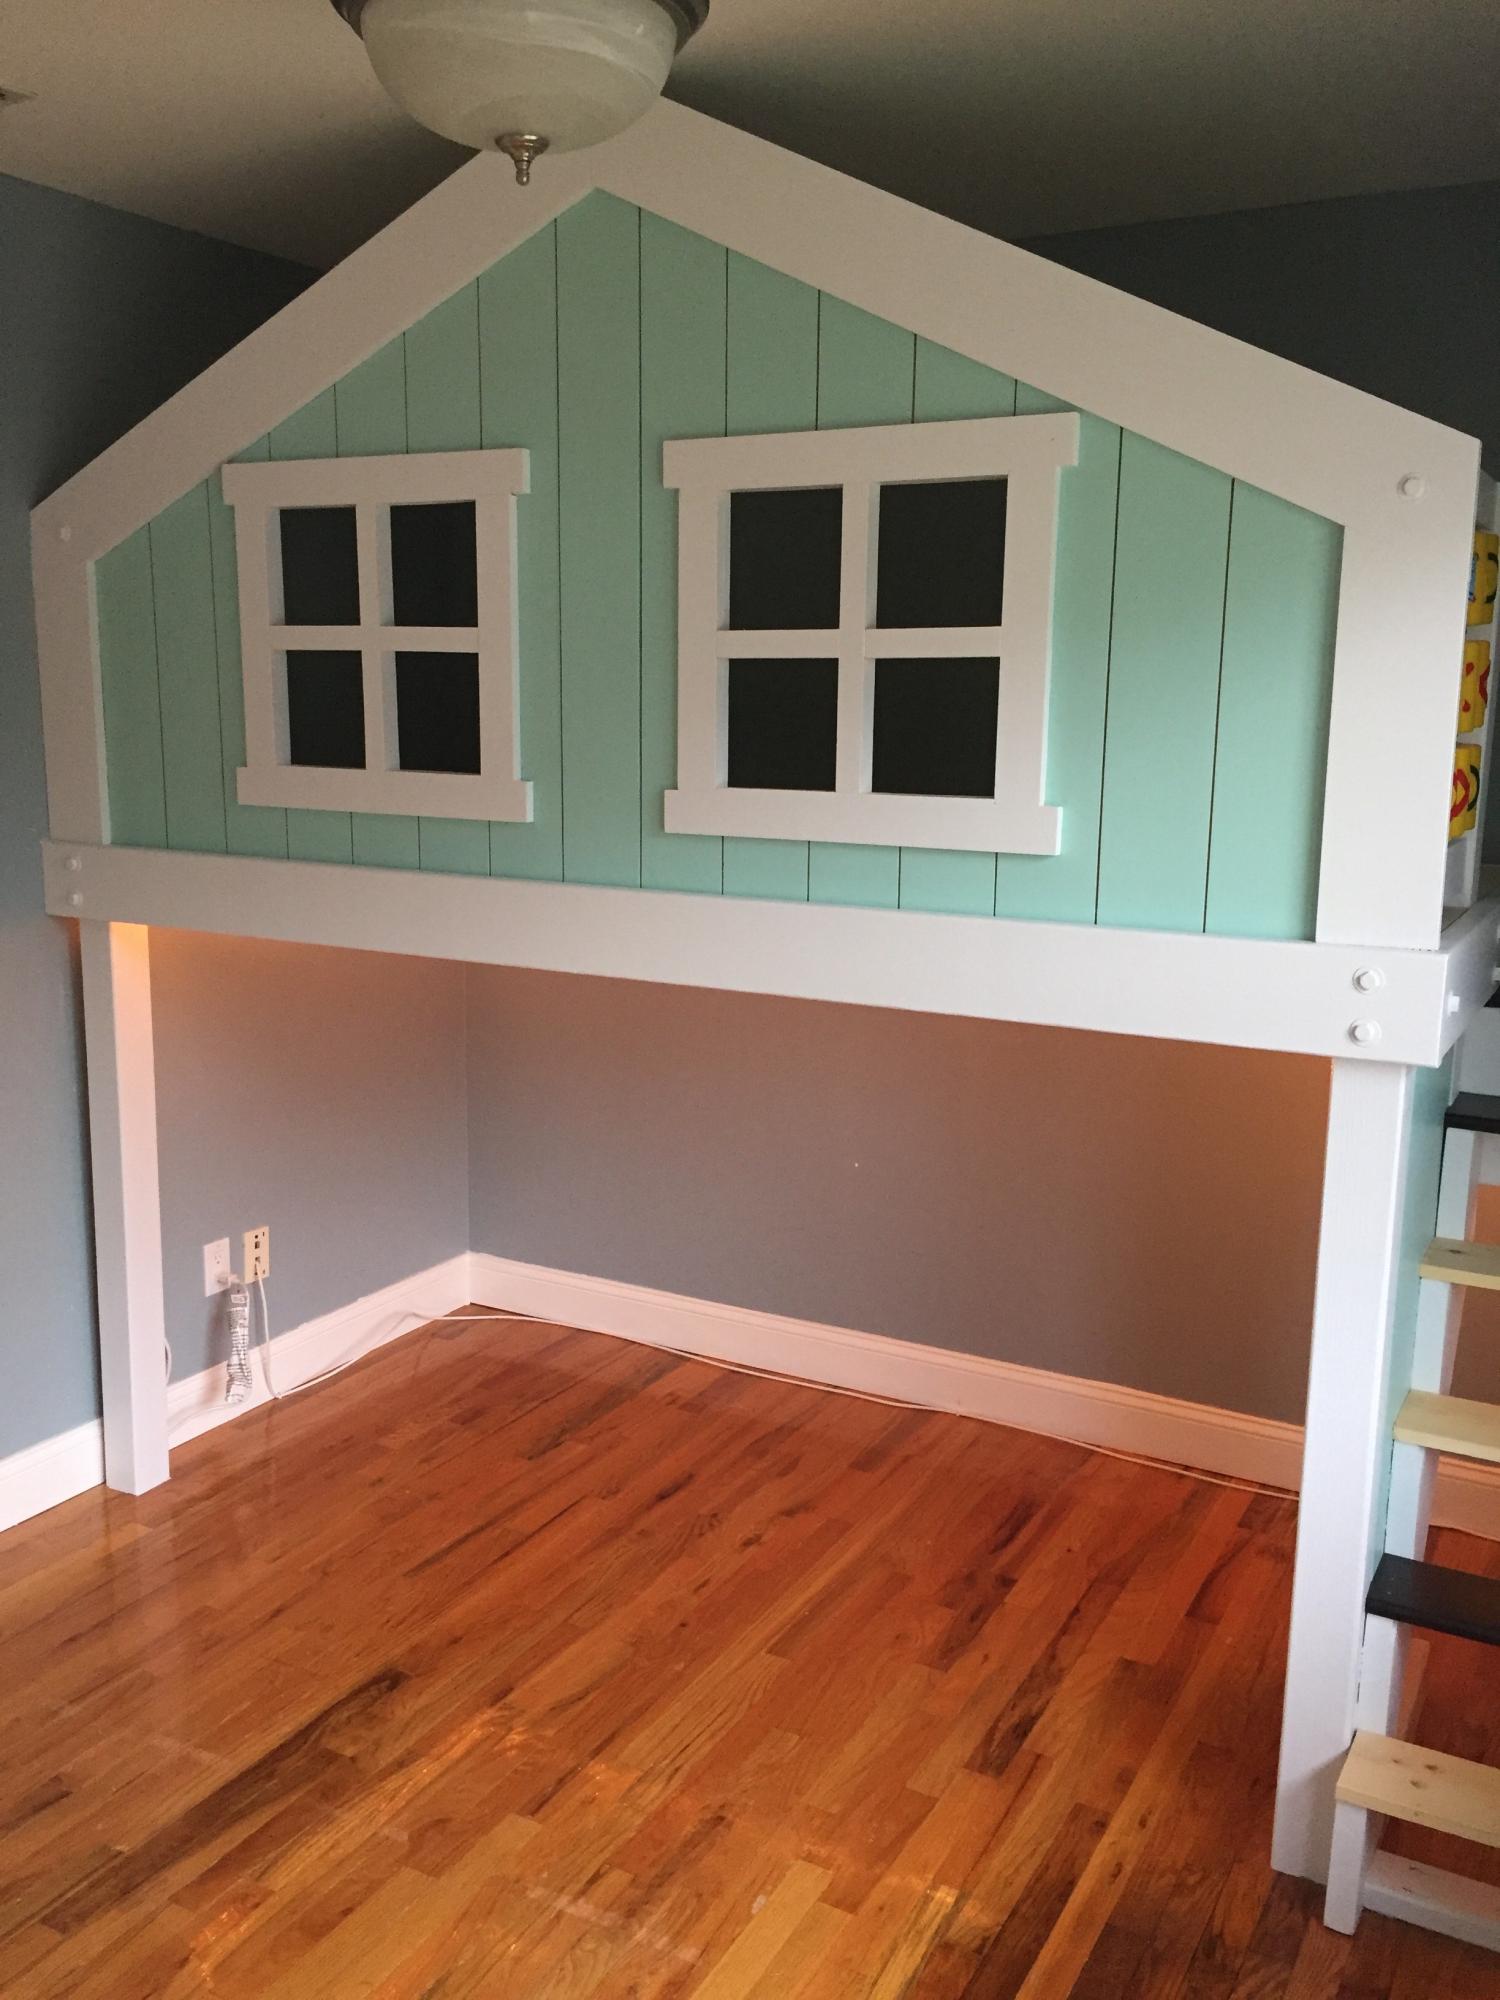
This is just a loft I made for my kids. I didn't want to spend over $1500 at PBK for a twin bed size bunk bed. the size is 4x8 enough for them to have fun.
Built from Plan(s)
Estimated Cost
350
Estimated Time Investment
Week Long Project (20 Hours or More)
Recommended Skill Level
Intermediate
Deck furniture

We used pine for the chairs and table and stained with Cabots black exterior deck stain and sealed with polyacrylic.
Built from Plan(s)
Comments
Corner Cupboard
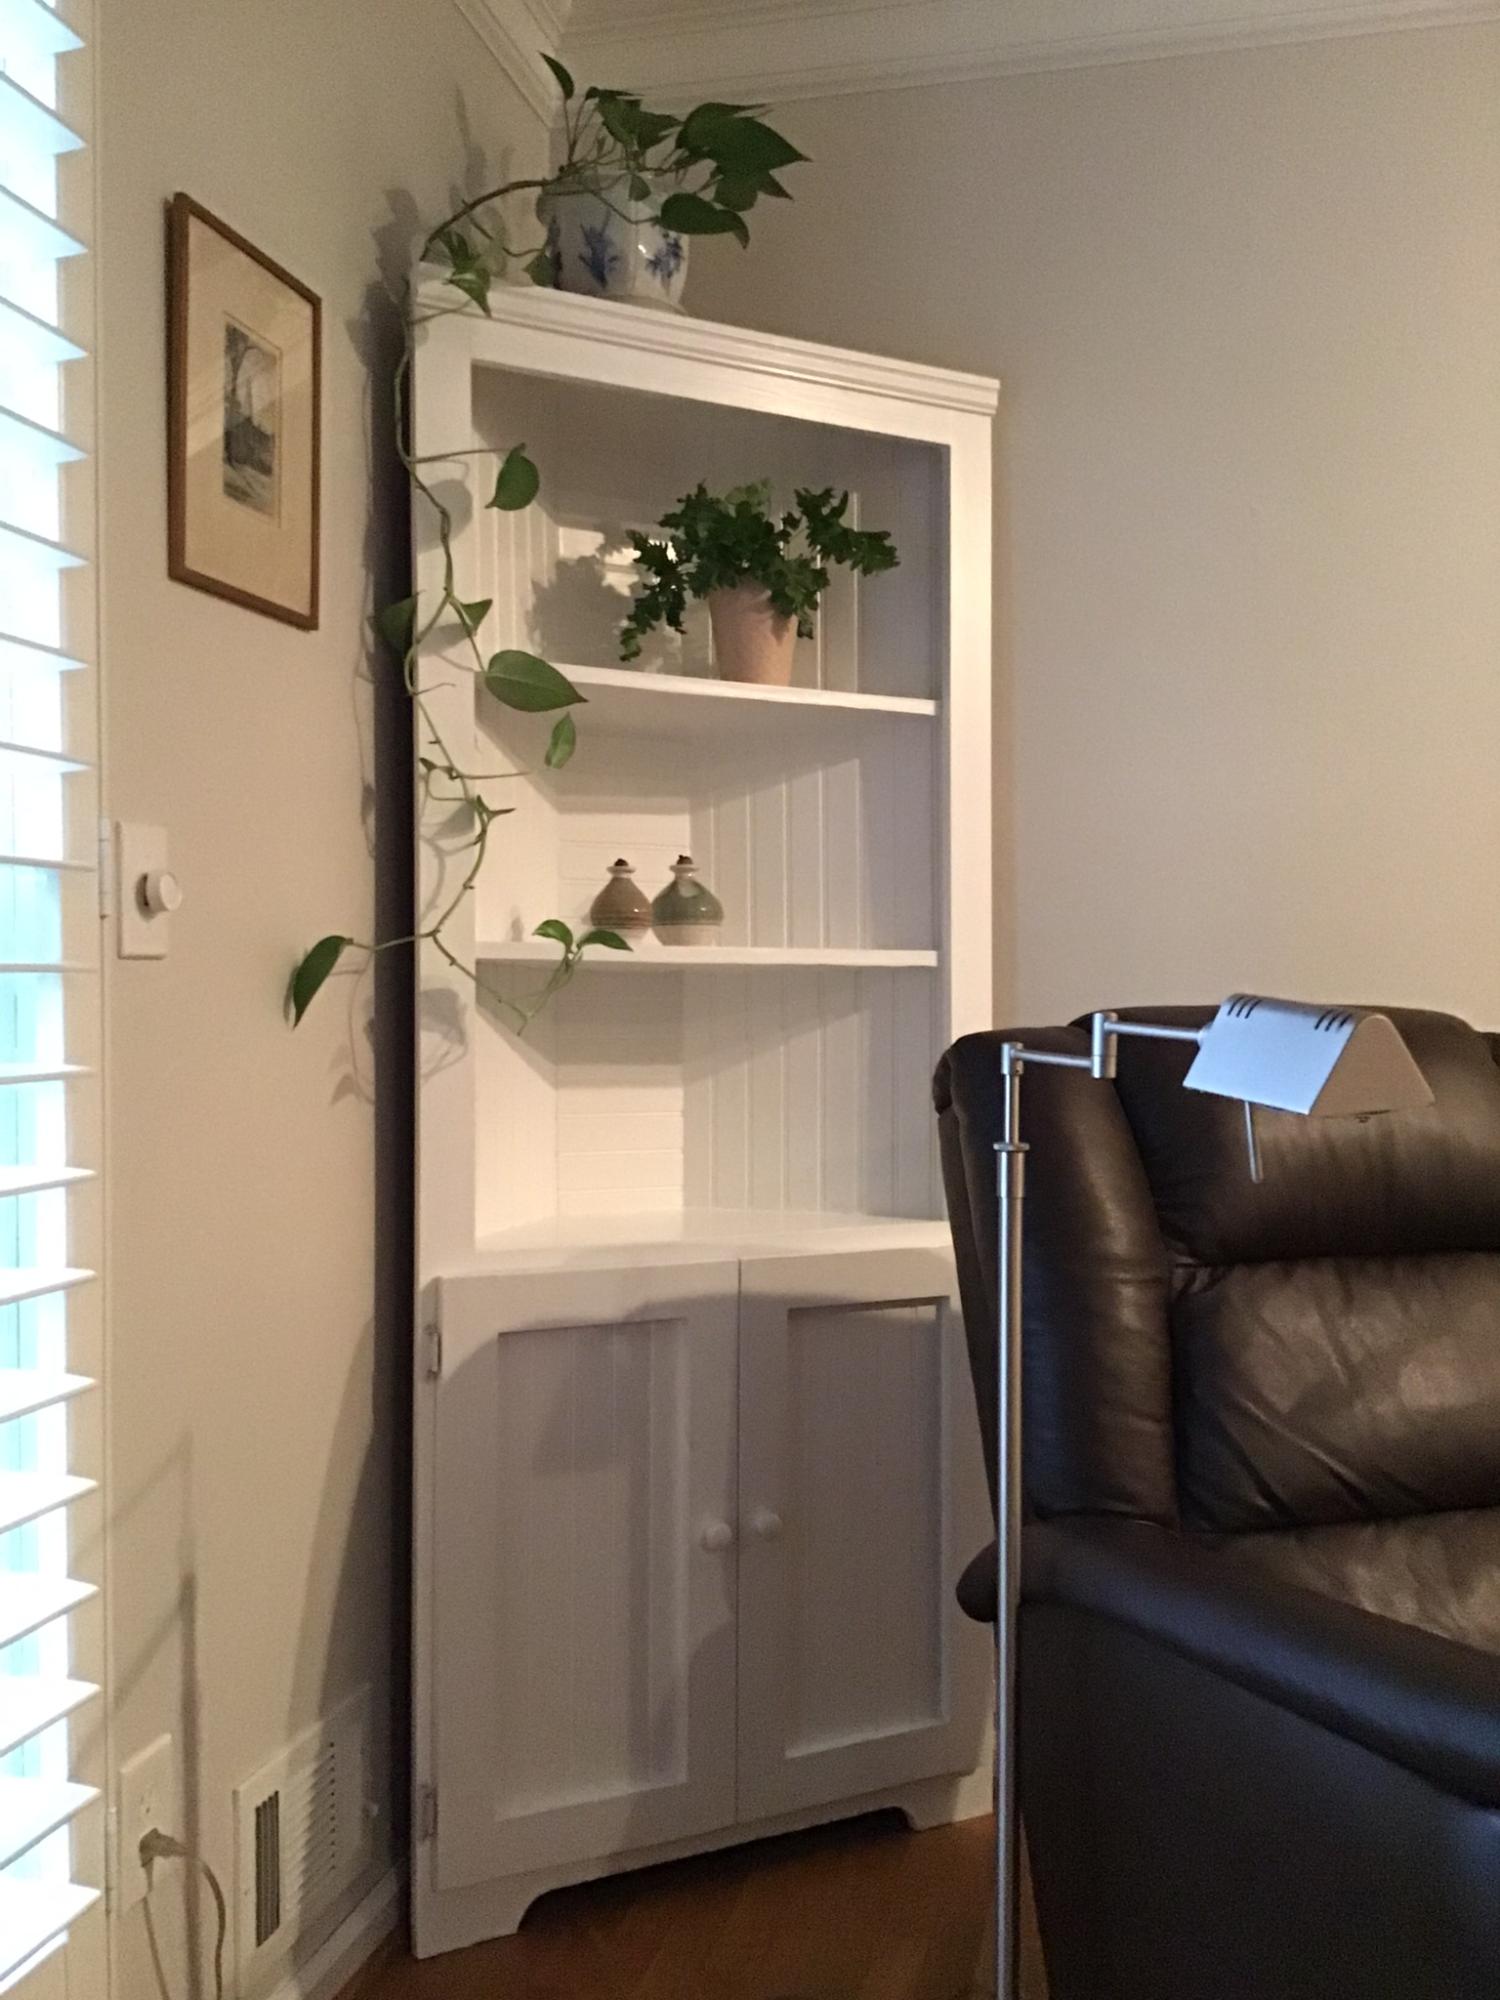
Finally I have made a project that is nice enough for our living room. Now I am so i spired to build more!
Built from Plan(s)
Comments
Sat, 11/26/2022 - 14:48
Wonderful corner storage!
Beautiful job on your corner cabinet, thank you so much for sharing!
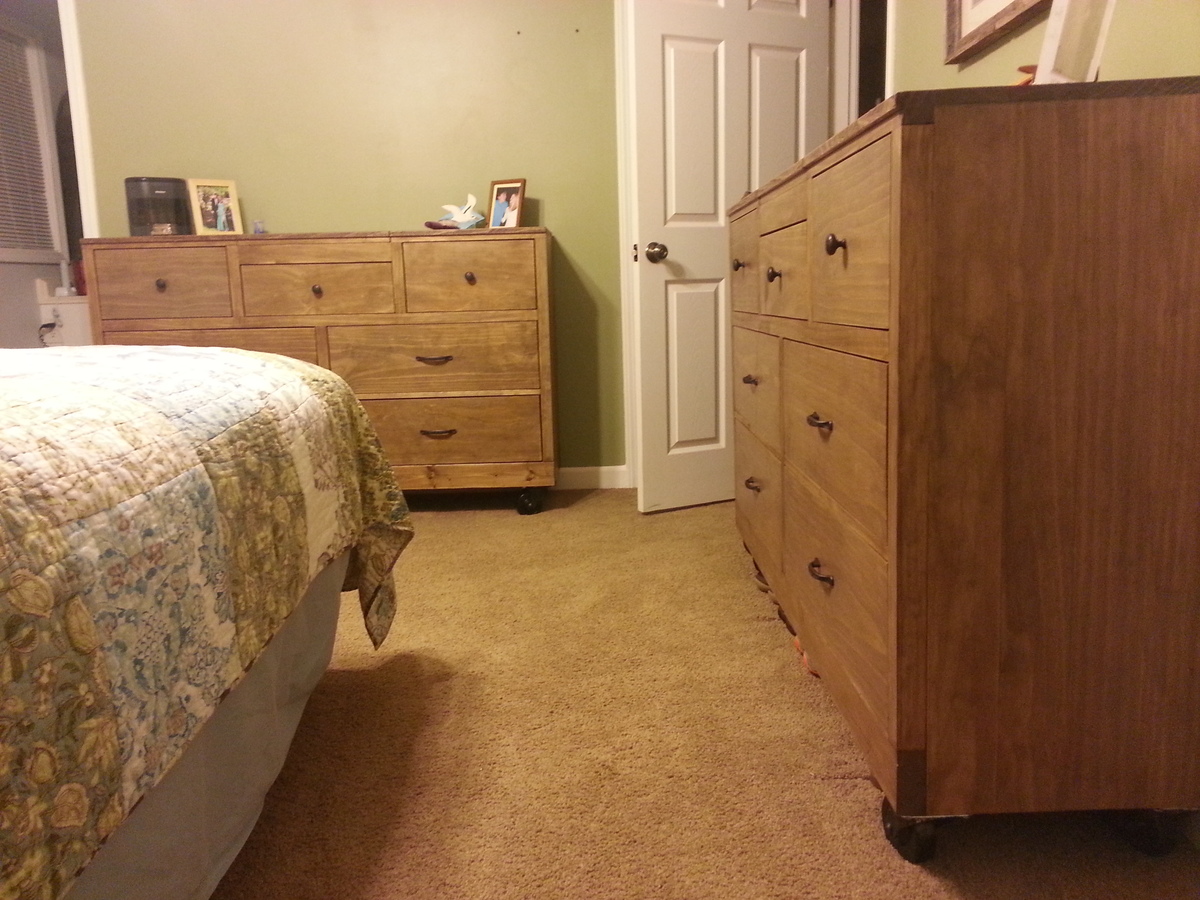
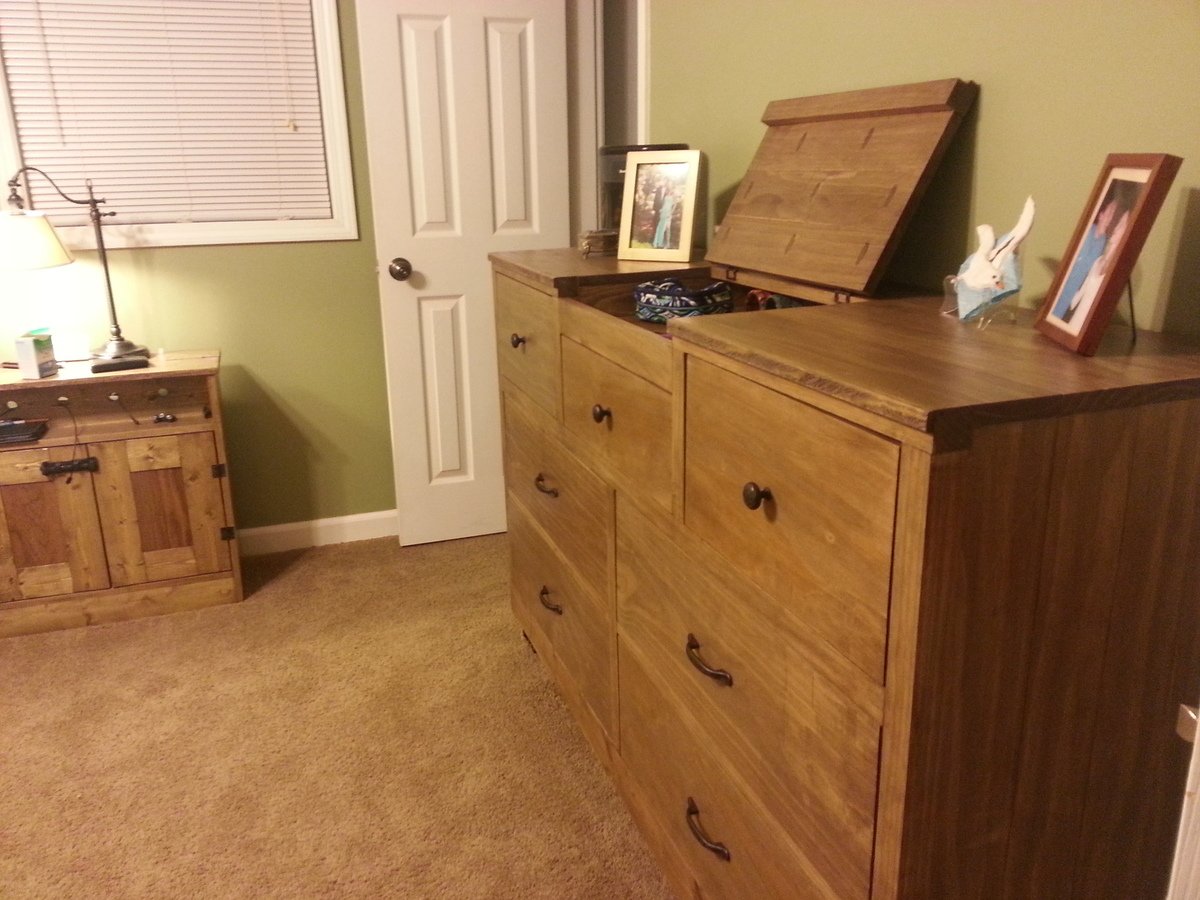
Rolling Dressers with Flip-up Compartment
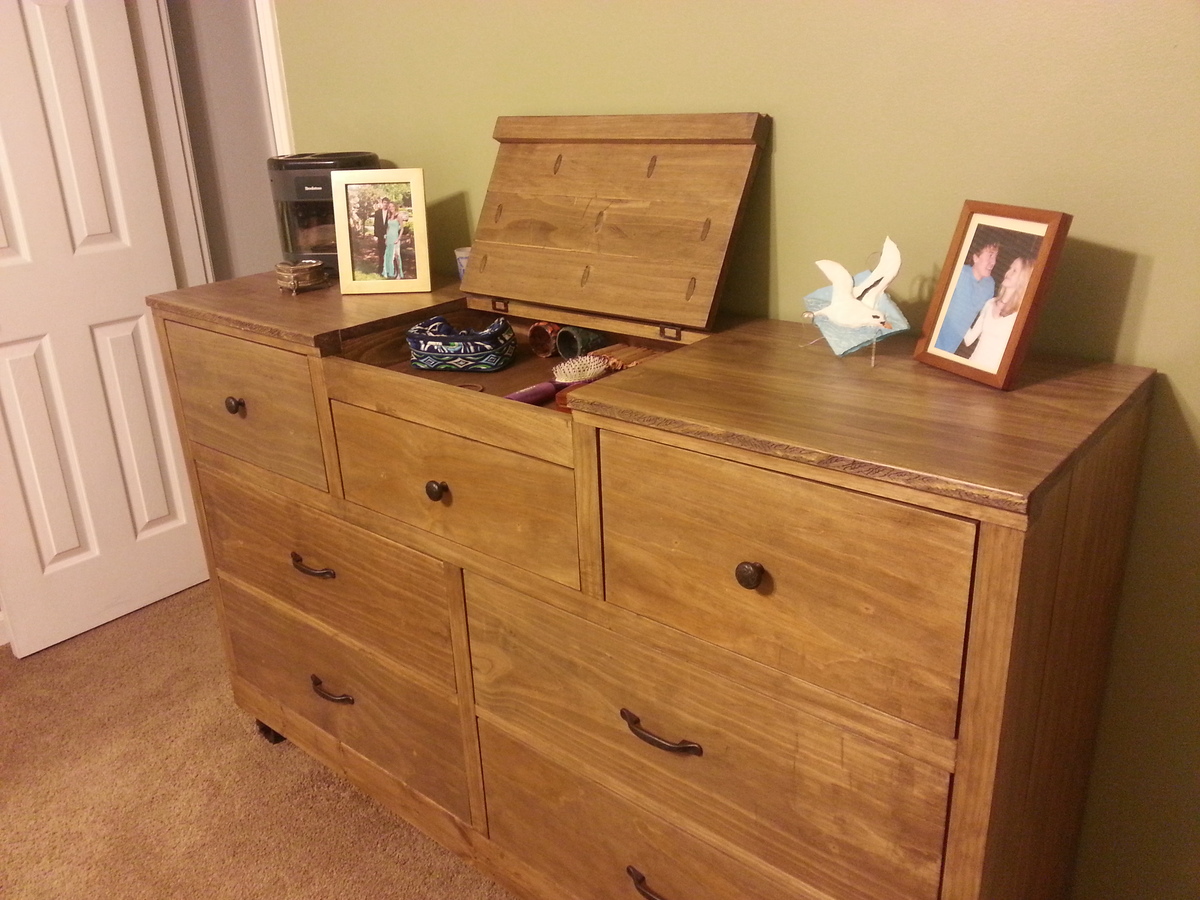
New dressers to match the nightstands. I modified the plans to make three smaller drawers up top and added a flip-up compartment for small stuff like jewelry, hair brushes and trinkets etc. It was fun to get more creative.
I made two at the same time so the wood and stain would be more consistent. However, in hindsight, I will never do any project that requires me to make 14 drawers at the same time again. I also used planked 1x4s instead of plywood for the sides and tops for looks. This made the dressers about an inch or so narrower. I used 2x4s instead of 2x2s for the bottoms of the frames to beef it up and reduce deflection, and also did not use braces in the back.
Wood -> $245/dresser
Hardware -> $ 150/dresser
Strain -> $20/dresser
Built from Plan(s)
Estimated Cost
$415/dresser
Estimated Time Investment
Week Long Project (20 Hours or More)
Finish Used
Wood conditioner -> 1 coat of Miniwax oil based stain in Weathered Oak -> 1 coat of Miniwax oil based stain in Special walnut -> 2 coats of Polycrylic
Recommended Skill Level
Intermediate
Comments
Sat, 10/05/2013 - 18:59
They are stunning! Amazing
They are stunning! Amazing job!! I love the charging nightstand in the background too, my dream bedroom!
Classic Farmhouse Bed - by Leslie
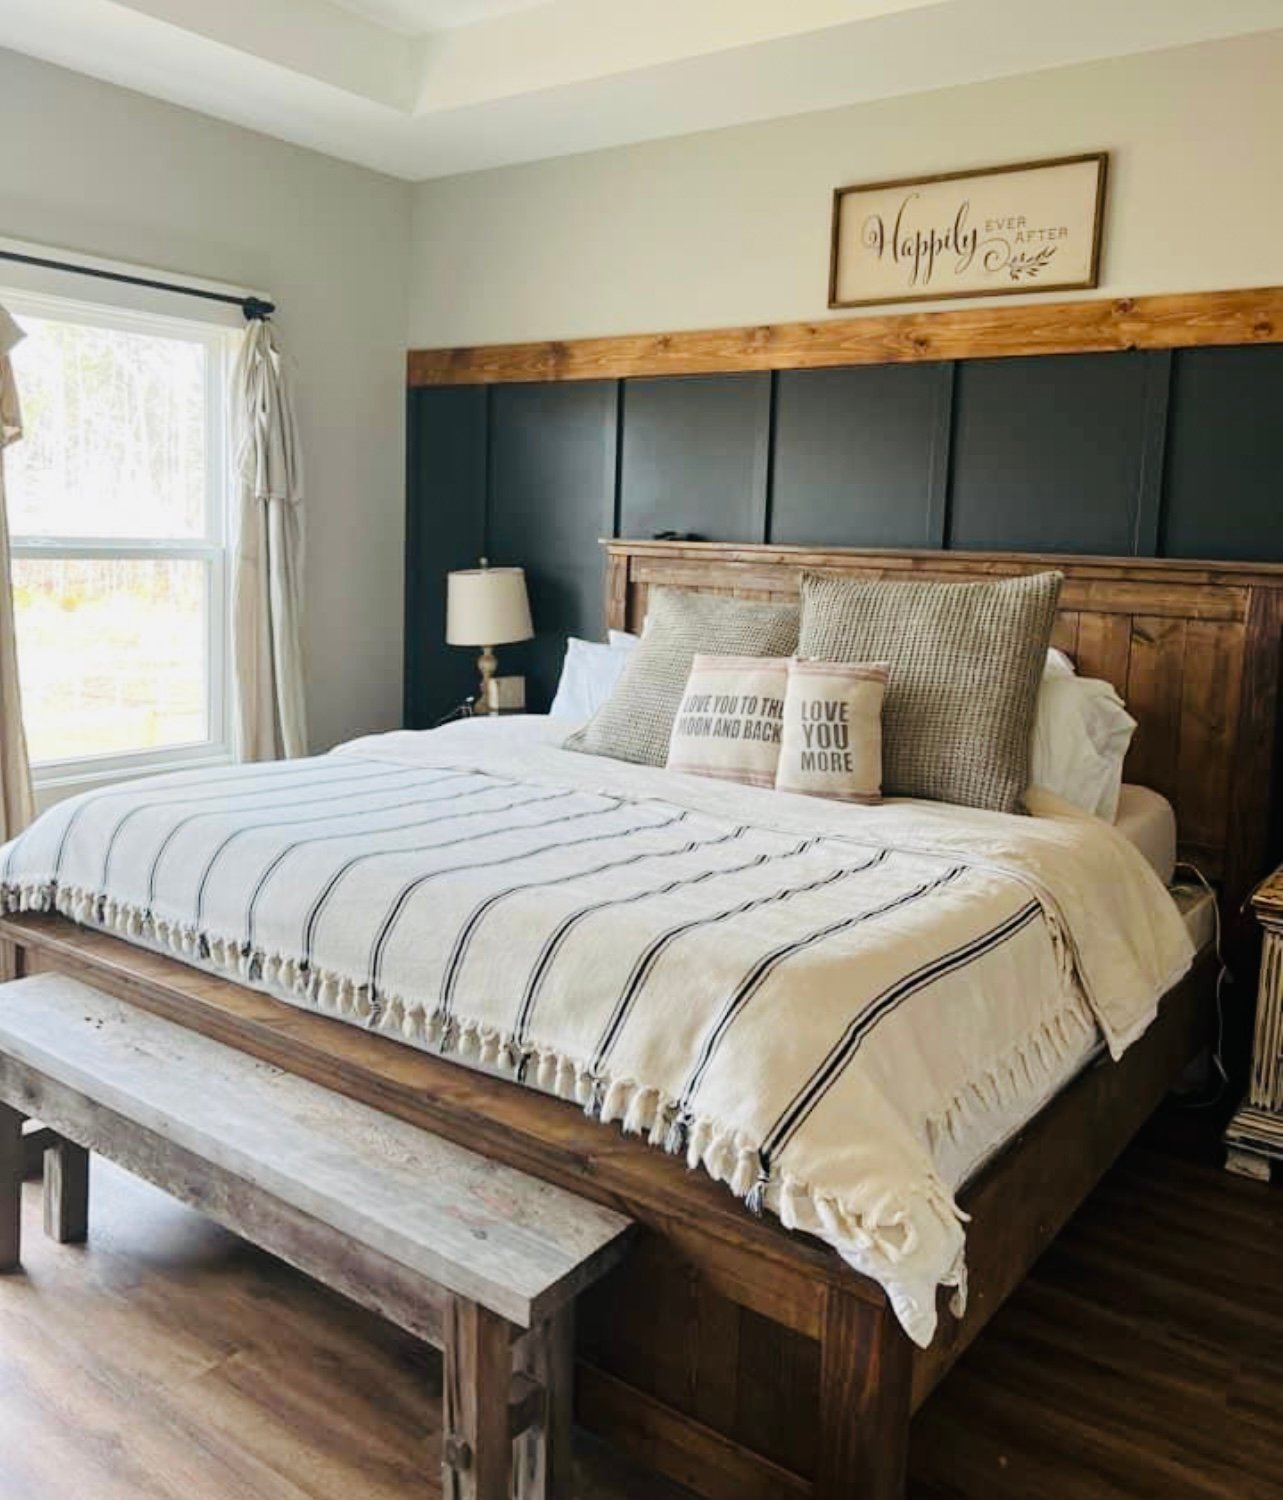
Beautiful bed build. shared by Leslie.
Built from Plan(s)
Banquette Bench Before and After
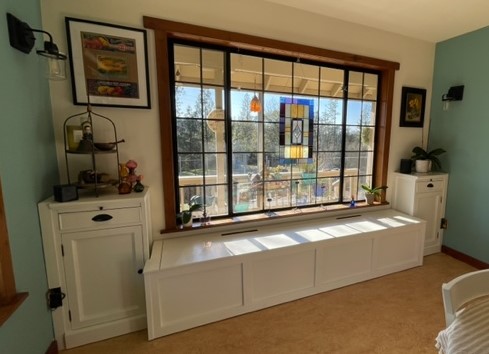
Thank you for the awesome banquet plans! The banquet will have cushions added and be a nice place to put an extra table for the kids at holidays. It is also amazing storage.
Built from Plan(s)
Rustic Farm Potting Bench
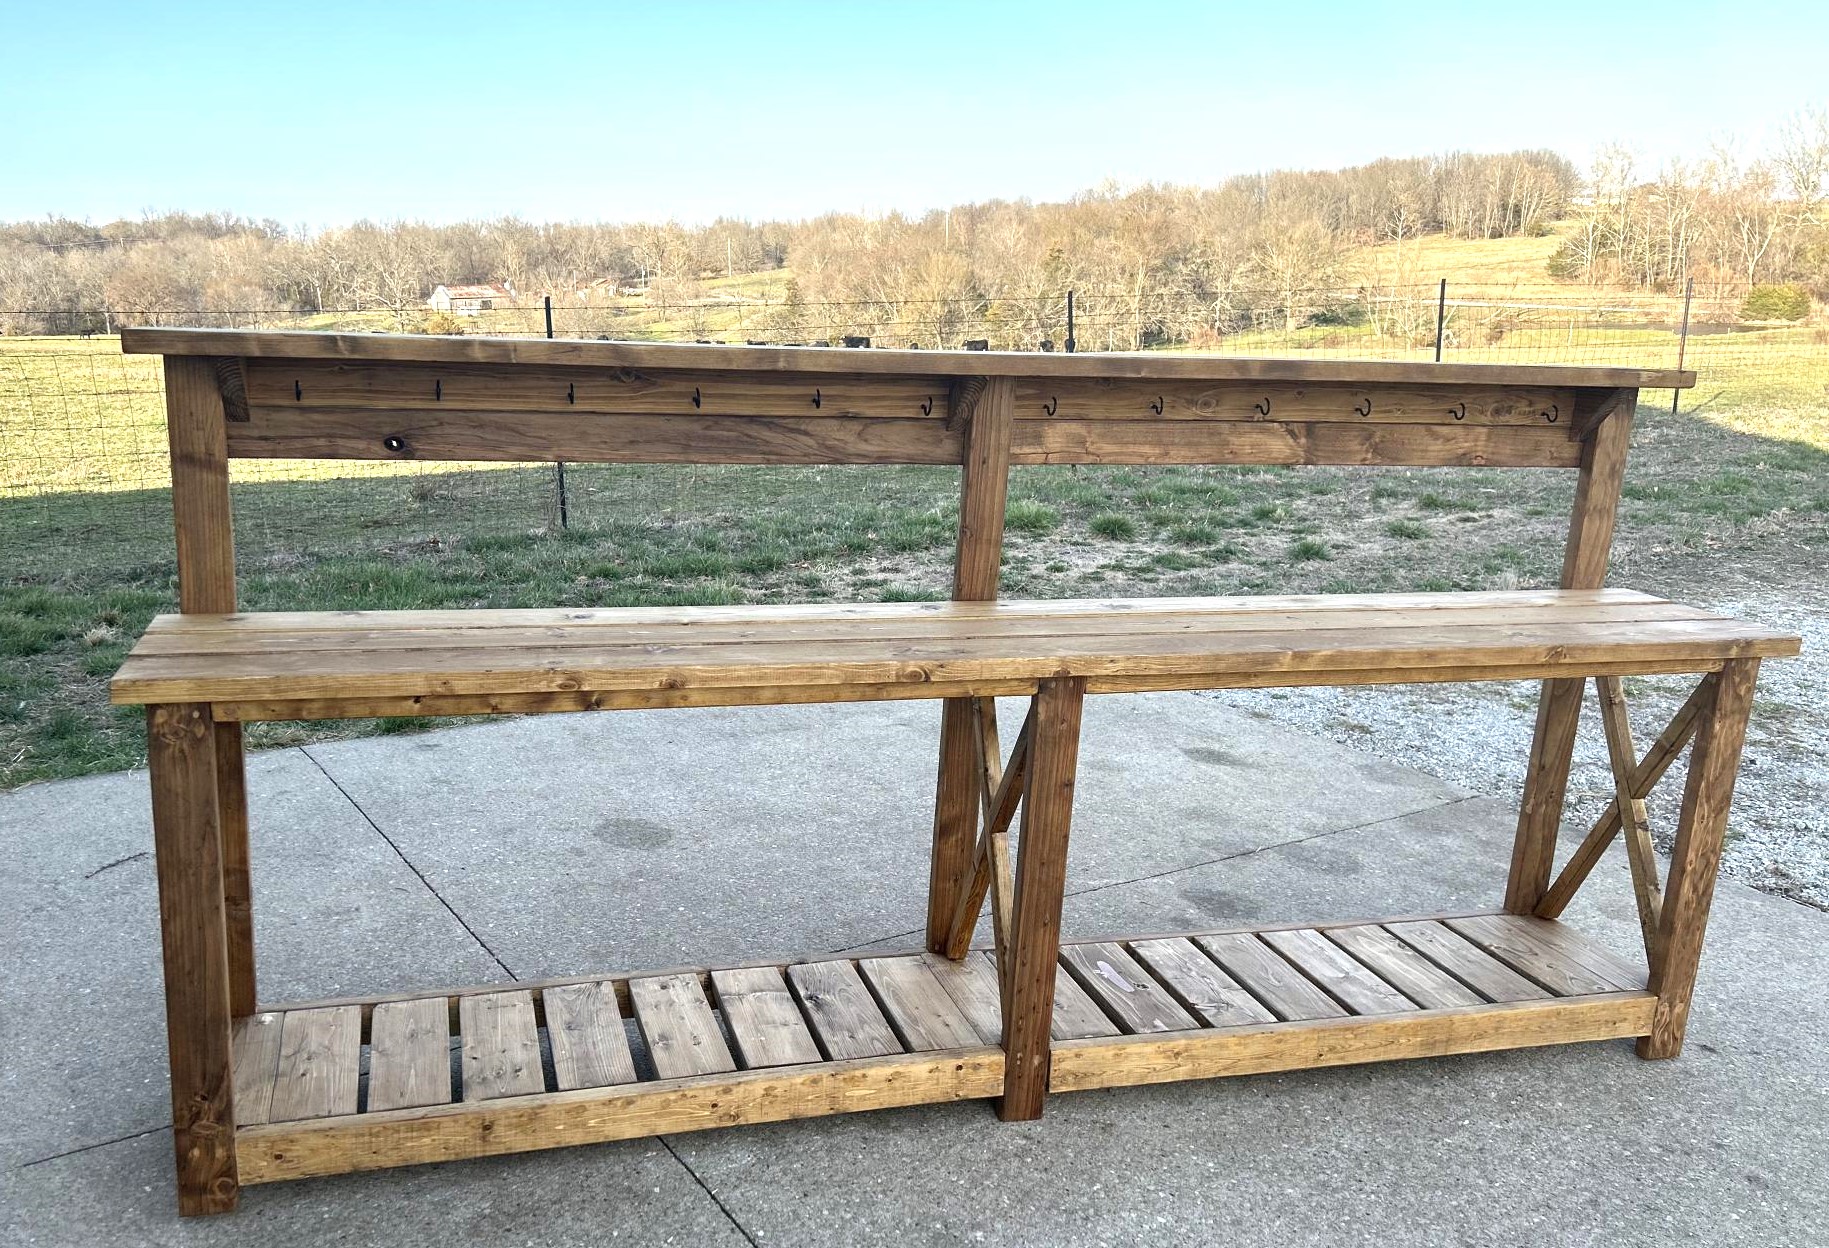
I built this 10’ long potting bench to fit into a 12’ barn stall. It fills the need to have a work surface plus room for storage on top and underneath. The hooks provide a place to hang my many hand tools and my Bluetooth speaker.
Built from Plan(s)
Comments
Fri, 03/10/2023 - 12:19
WOW-Amazing!
This is such a great idea for a house stall! Thank you for sharing that it can be done.
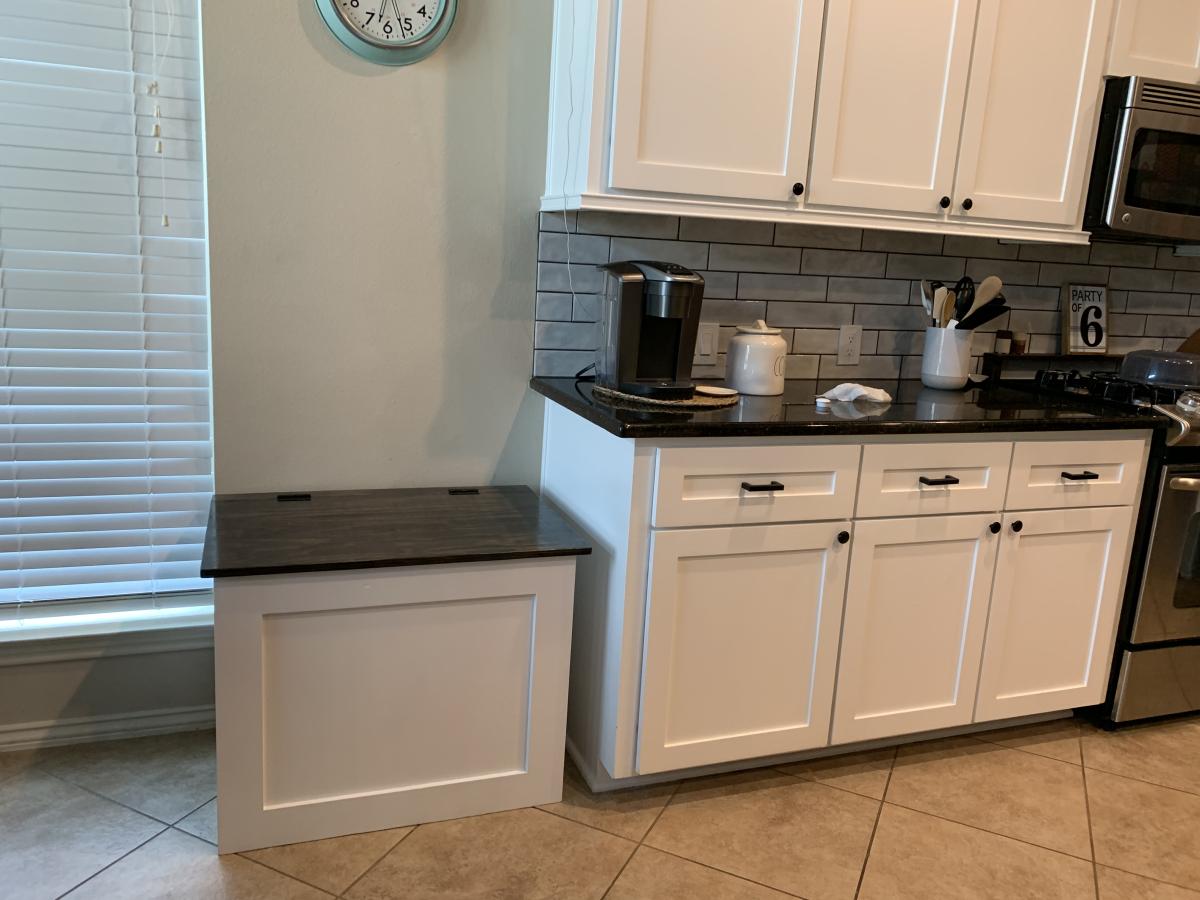
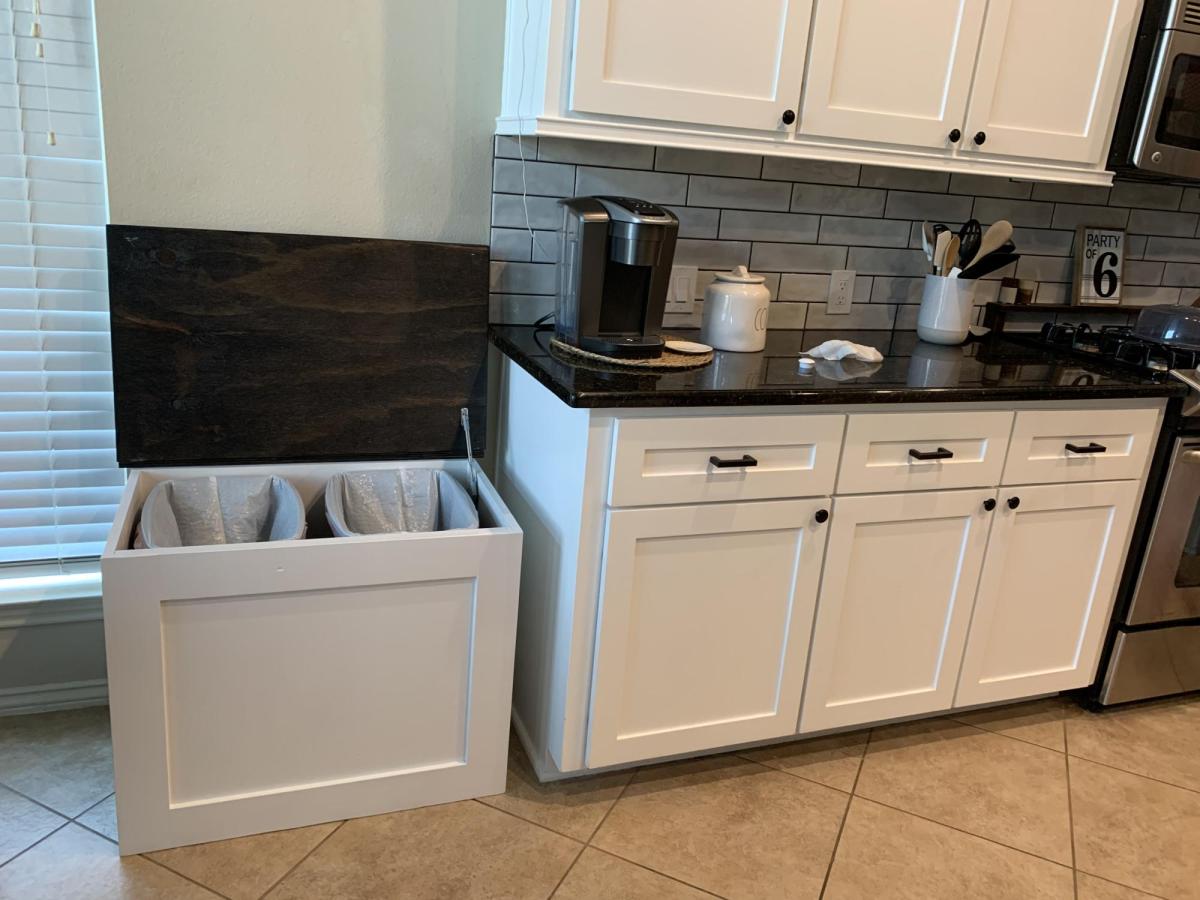
Double trash can cabinet
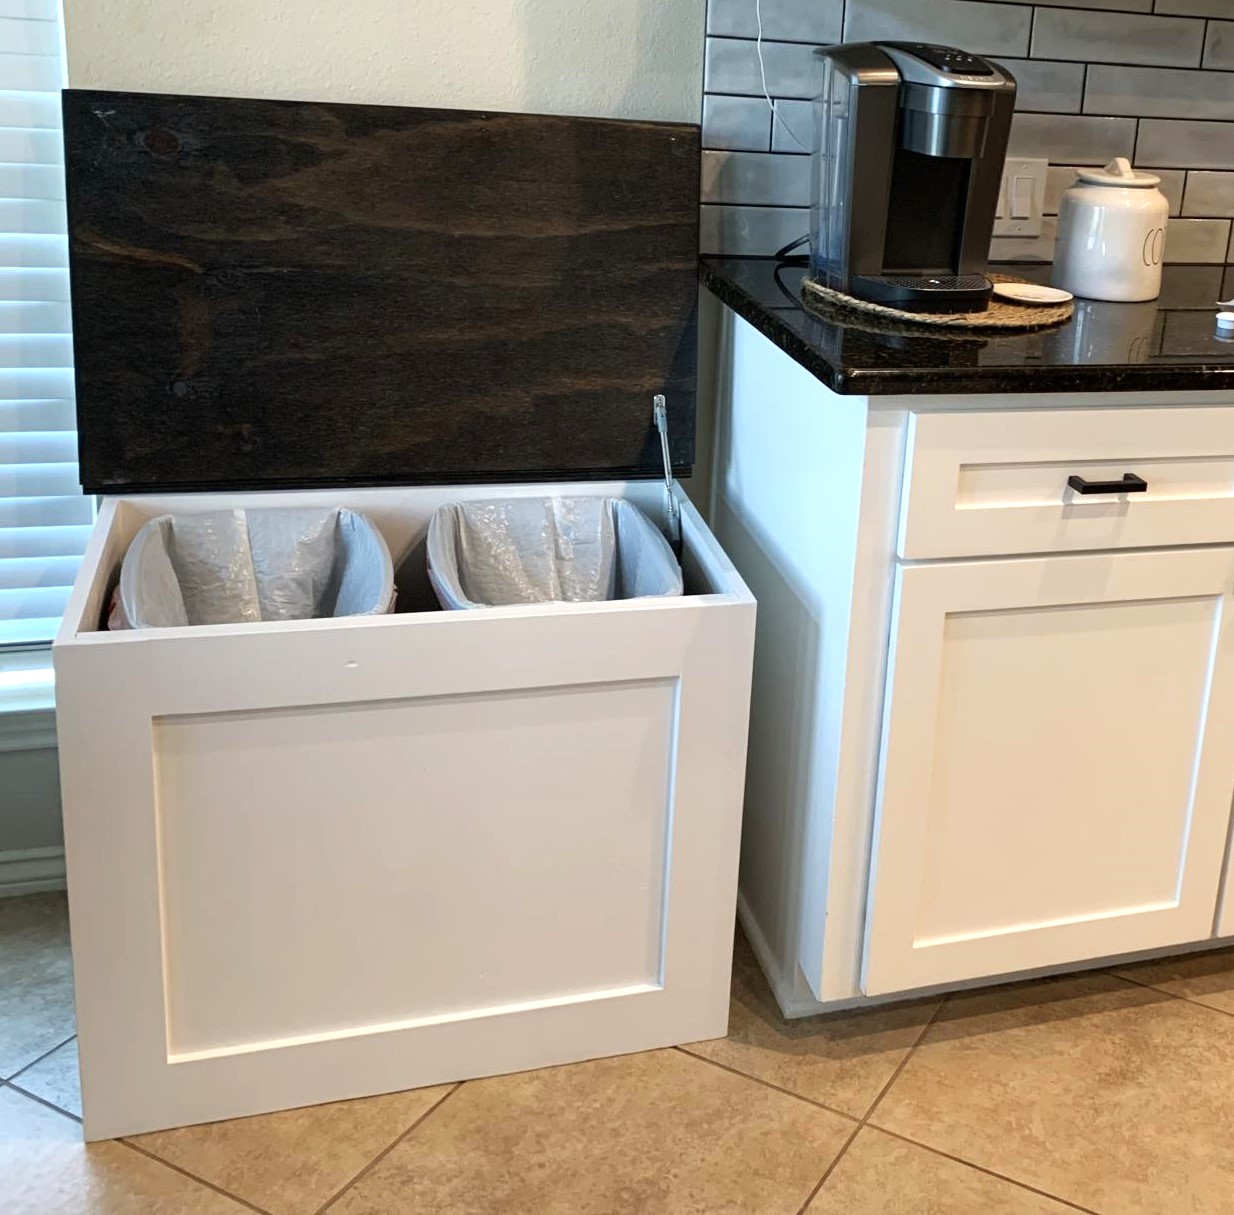
Double trash can cabinet made of plywood. Included soft close hinge. Holds 2 13 gallon cans.
Built from Plan(s)
Comments
Fri, 05/05/2023 - 07:24
Nice Trash Bin!
So much better than a regular garbage can! Thanks for sharing your version, it looks fabulous.
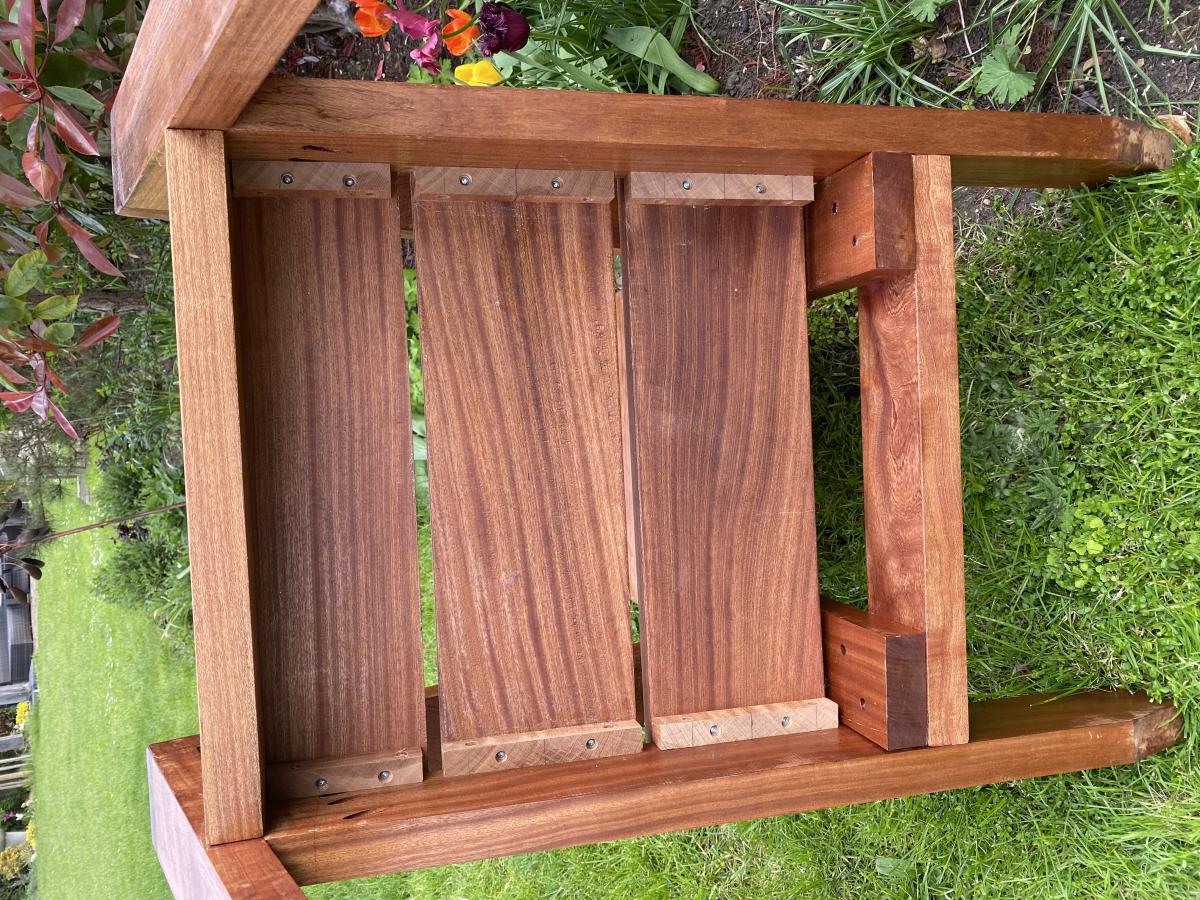
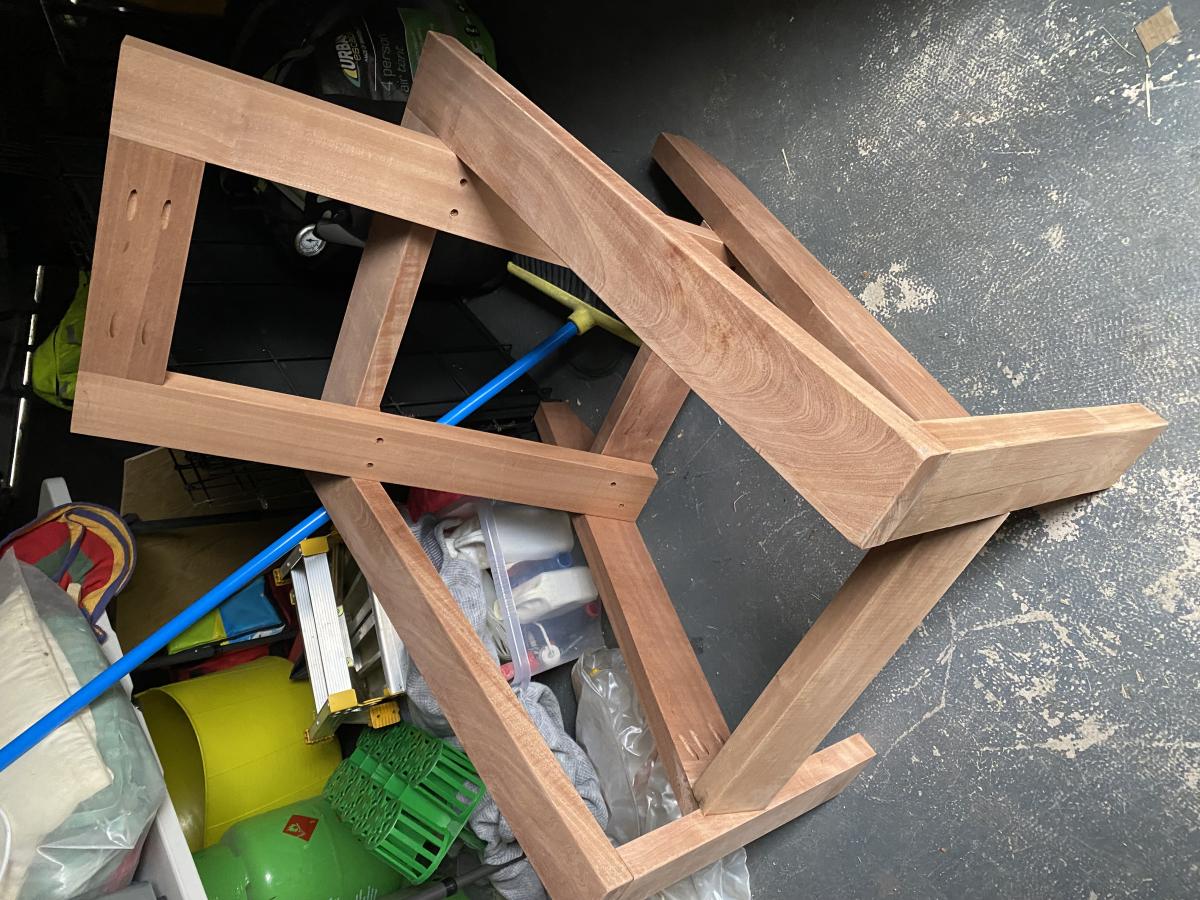
Upmarket hardwood Adirondack
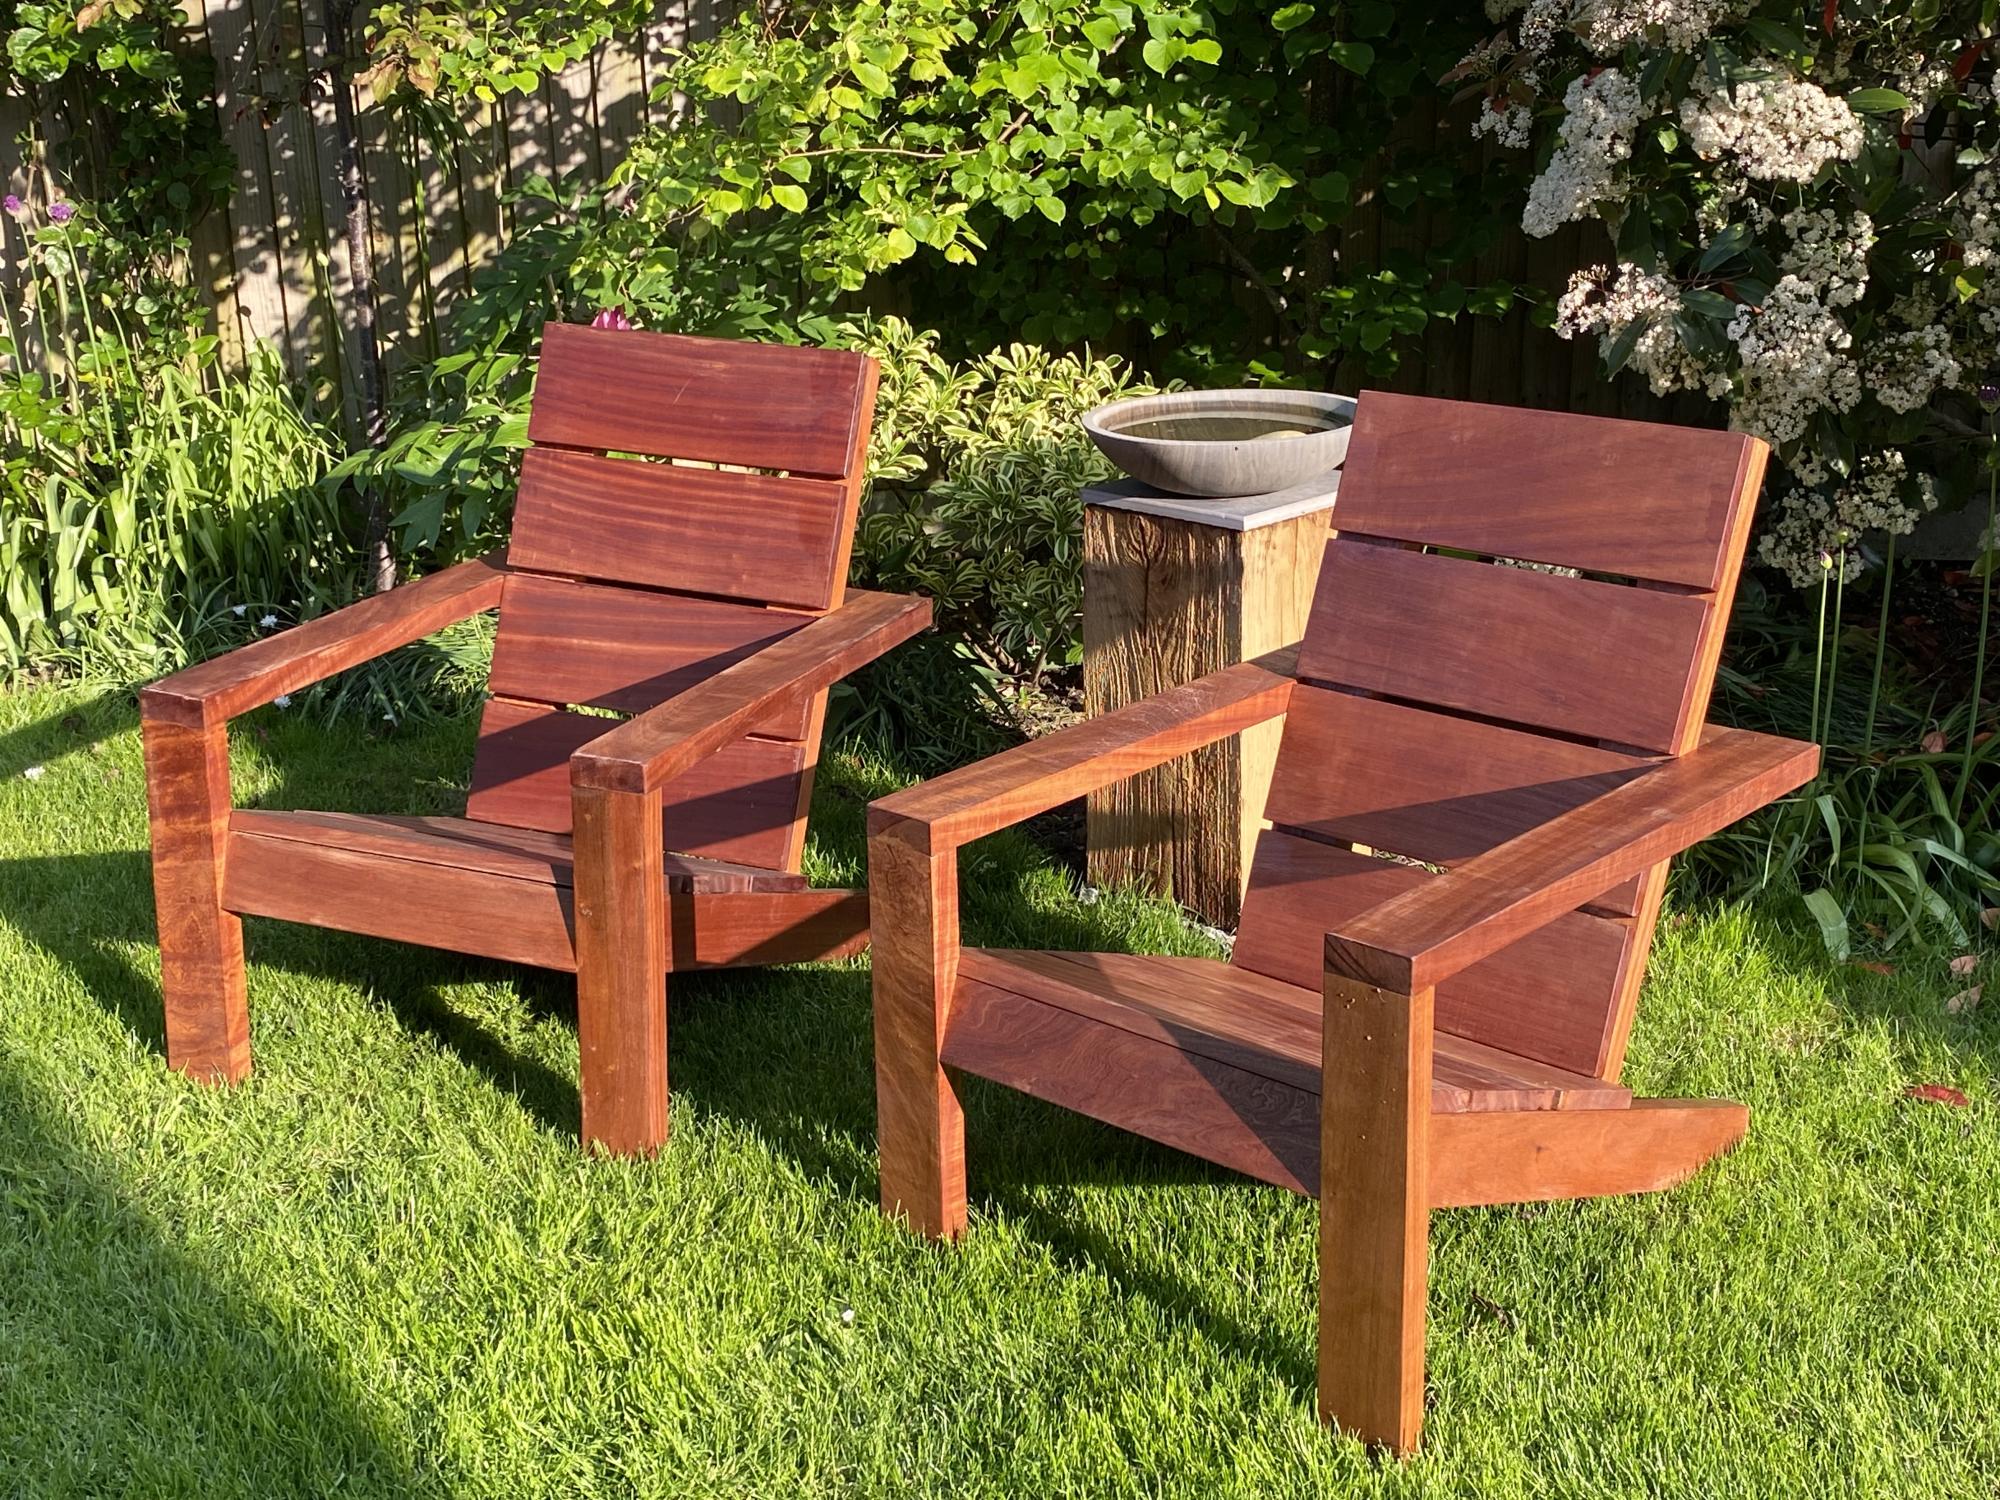
Loved design so decided on hardwood and no visible screw heads….. took a while but loved the result
Built from Plan(s)
Comments
Club chair
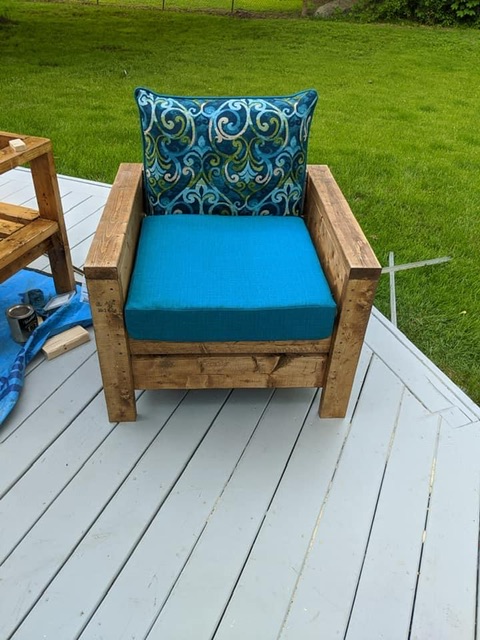
I needed patio furniture and happened to come across Anna White’s site. It is a great beginner’s project. I was so happy with how they turned out.
Built from Plan(s)
Comments
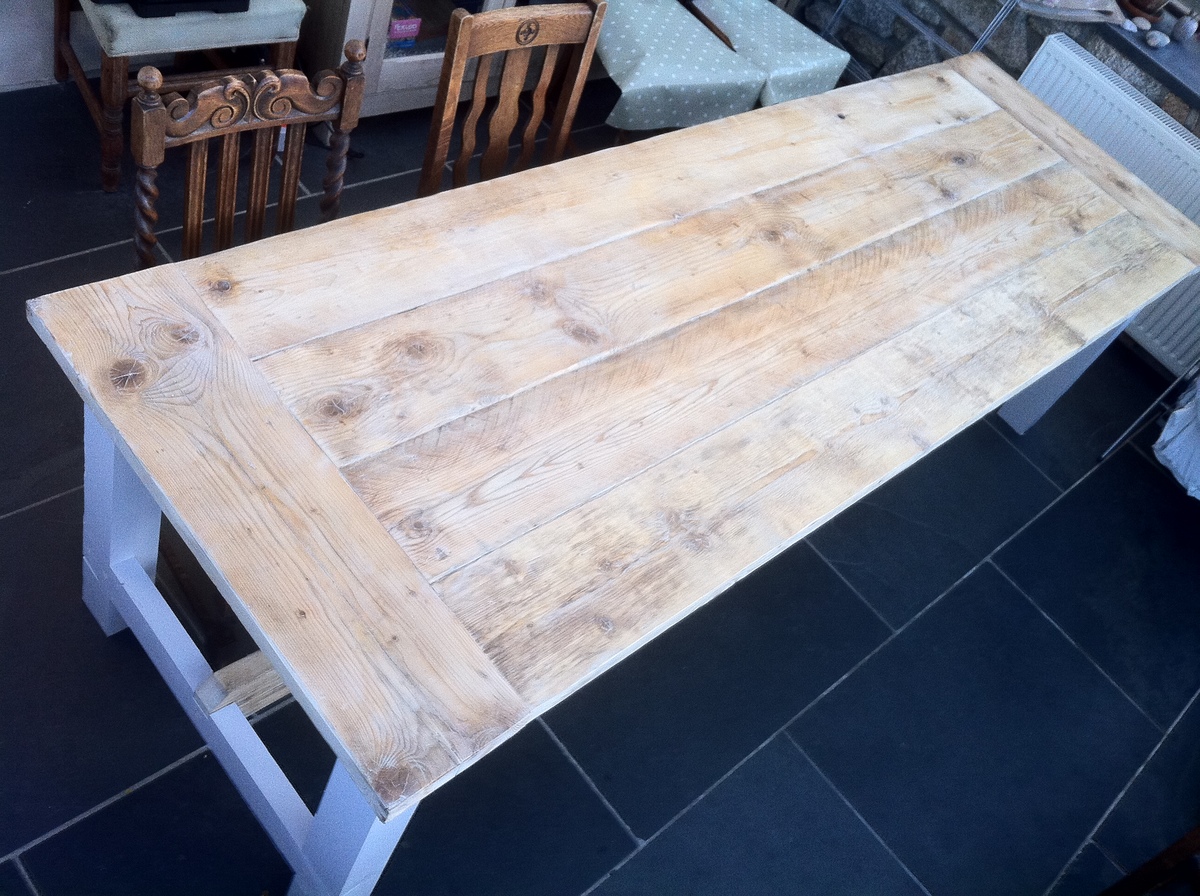
reclaimed timber farmhouse table - first build
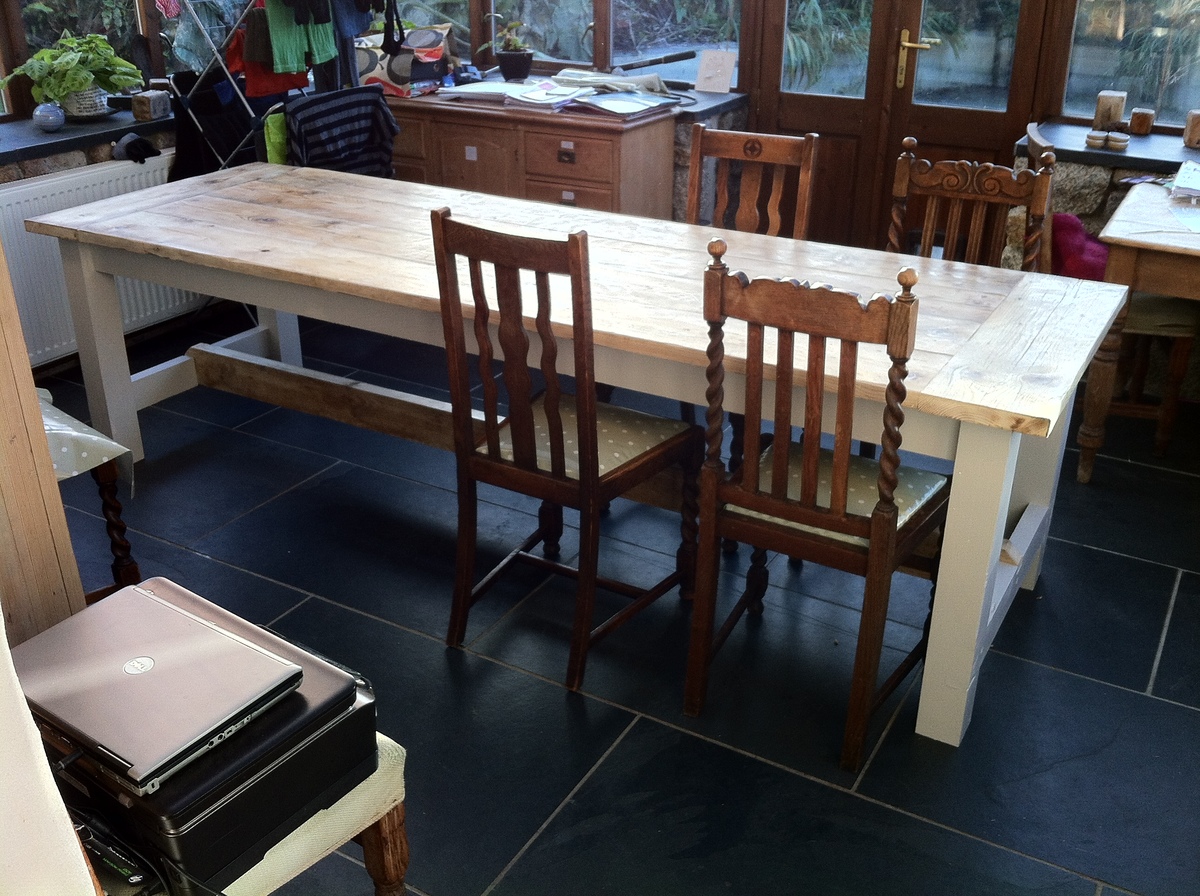
wanted a big table for christmas, this is over 8 foot, and we couldn't afford a table like that so having seen the site thought i'd try and build one. thanks for the plans absolutely great
first project, no real woodwork experience but competent diy-er
made mainly out of reclaimed wood, the top and side apron are made of old scaffold boards and the main brace a chunk of wood form my neighbours shed.
i did have to buy some 2x4s for the legs and the cross braces
sides painted and the top waxed, looks a bit patchy in the photos but the finish is good.
all in all cost about £70
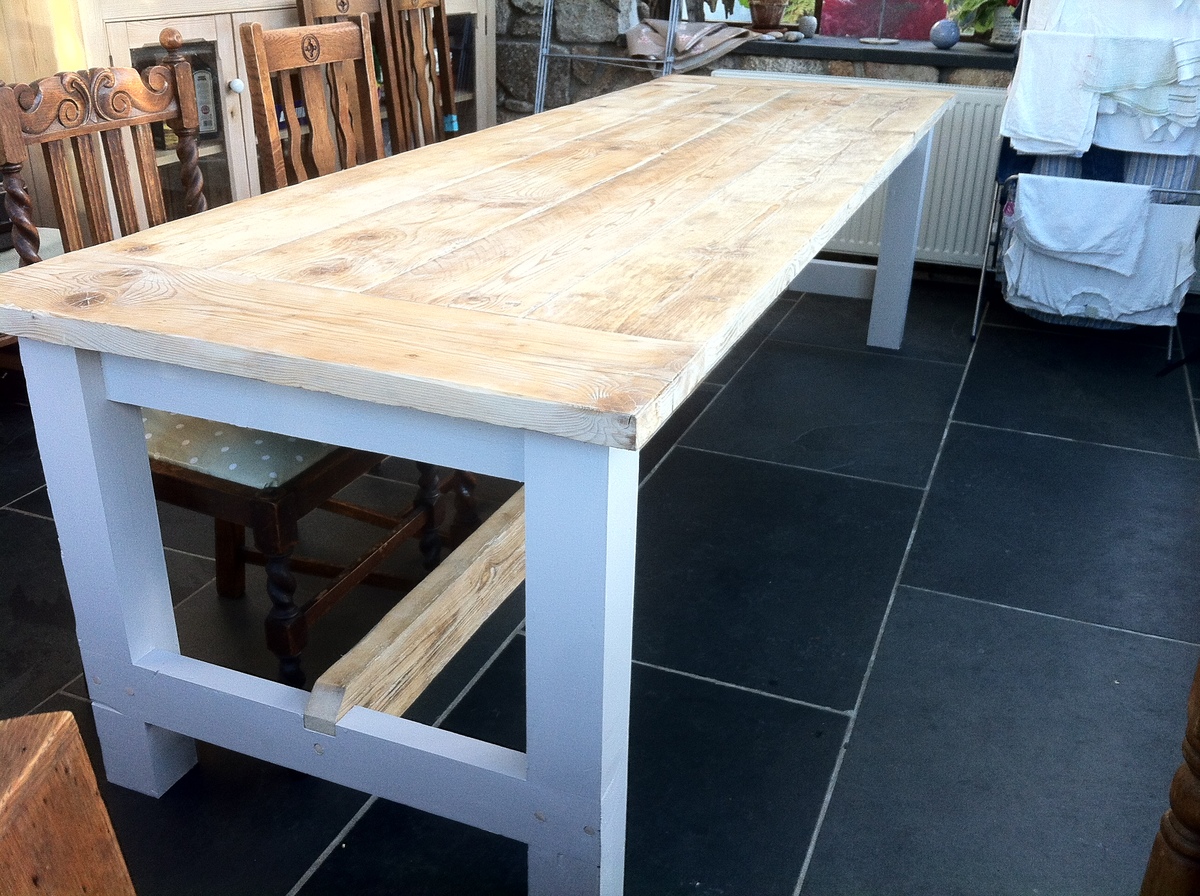
Built from Plan(s)
Estimated Time Investment
Week Long Project (20 Hours or More)
Finish Used
paint and wax
Recommended Skill Level
Starter Project
Simple jig to save time and increase accuracy

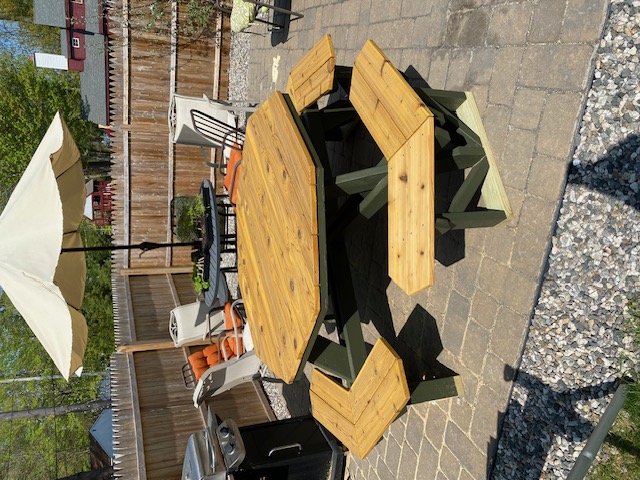
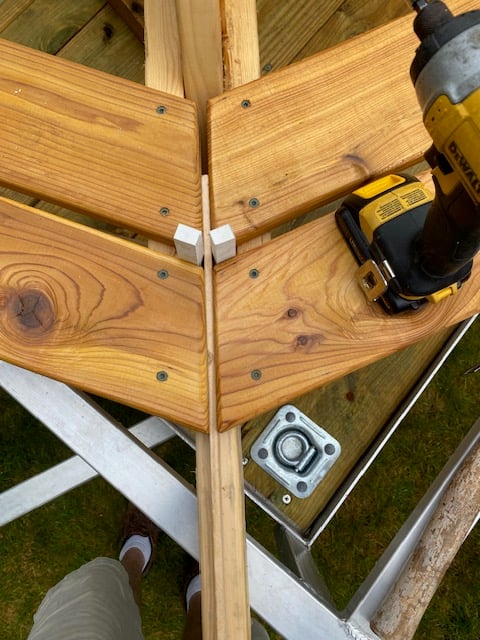
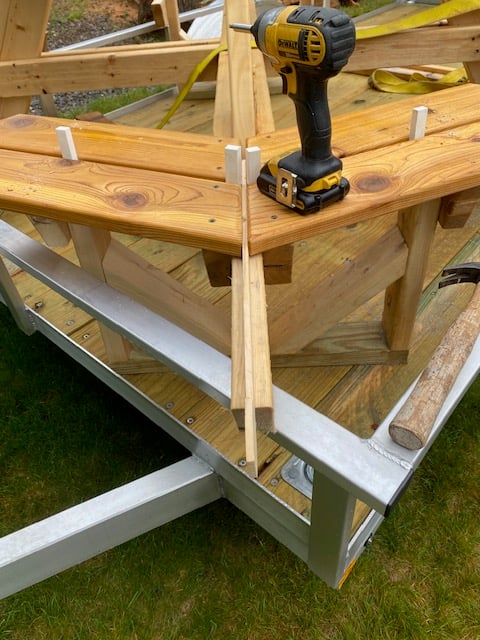
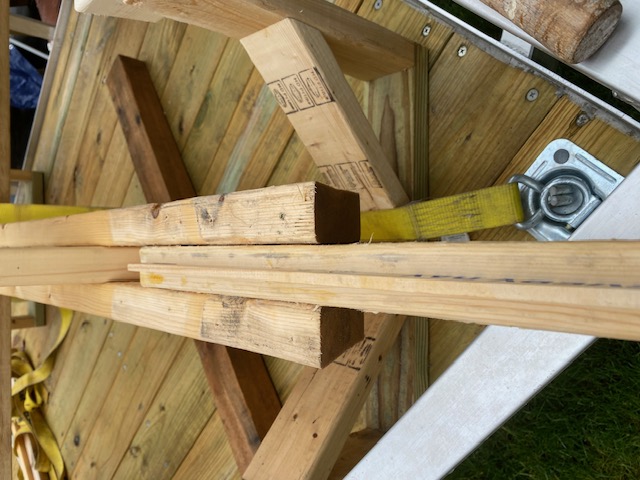
I downloaded the plans for the octagonal table. I have made several and used a few different woods, made a few minor design changes as well as creating a routine and using a jig or two. This jig fits in between the two boards that form the seat support frame. I used a large paint stick and a scrap piece of 2 x 4. Using a table saw, I cut a groove in the 2" edge, approximately 1/2" deep, this took two passes (pass it through, turn it and pass again), a slight adjustment and another two passes. Insert the paint stick and seat all the way down. Place jig between seat support frame, might be a little snug or use a clamp to hold in place. Adjust so just the paint stick sticks up enough to separate seat boards. With seat boards against the jig, it forms the perfect angle/guide to match cuts. I also used 1/2" spacers to create consistent spacing. Love the various plans you make available as well as your videos.
Built from Plan(s)
Comments
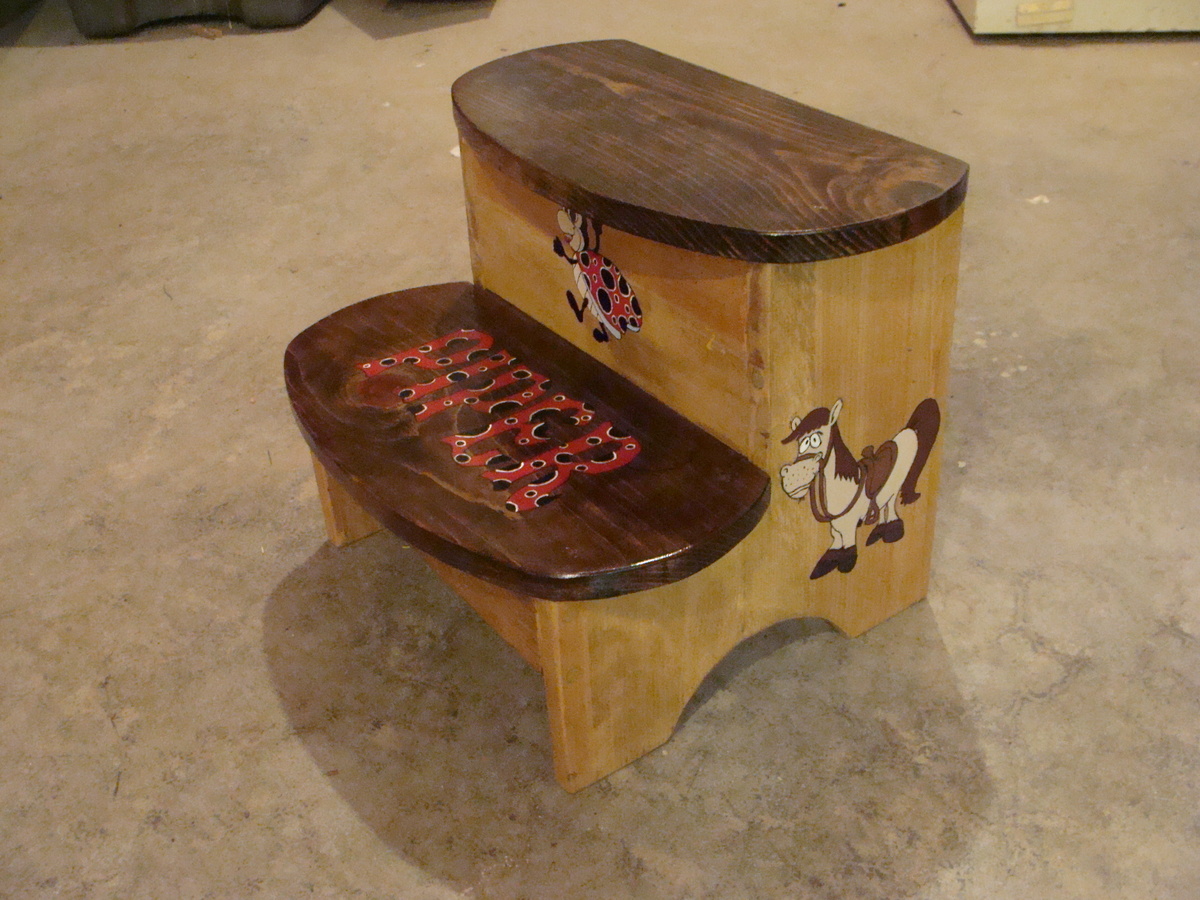
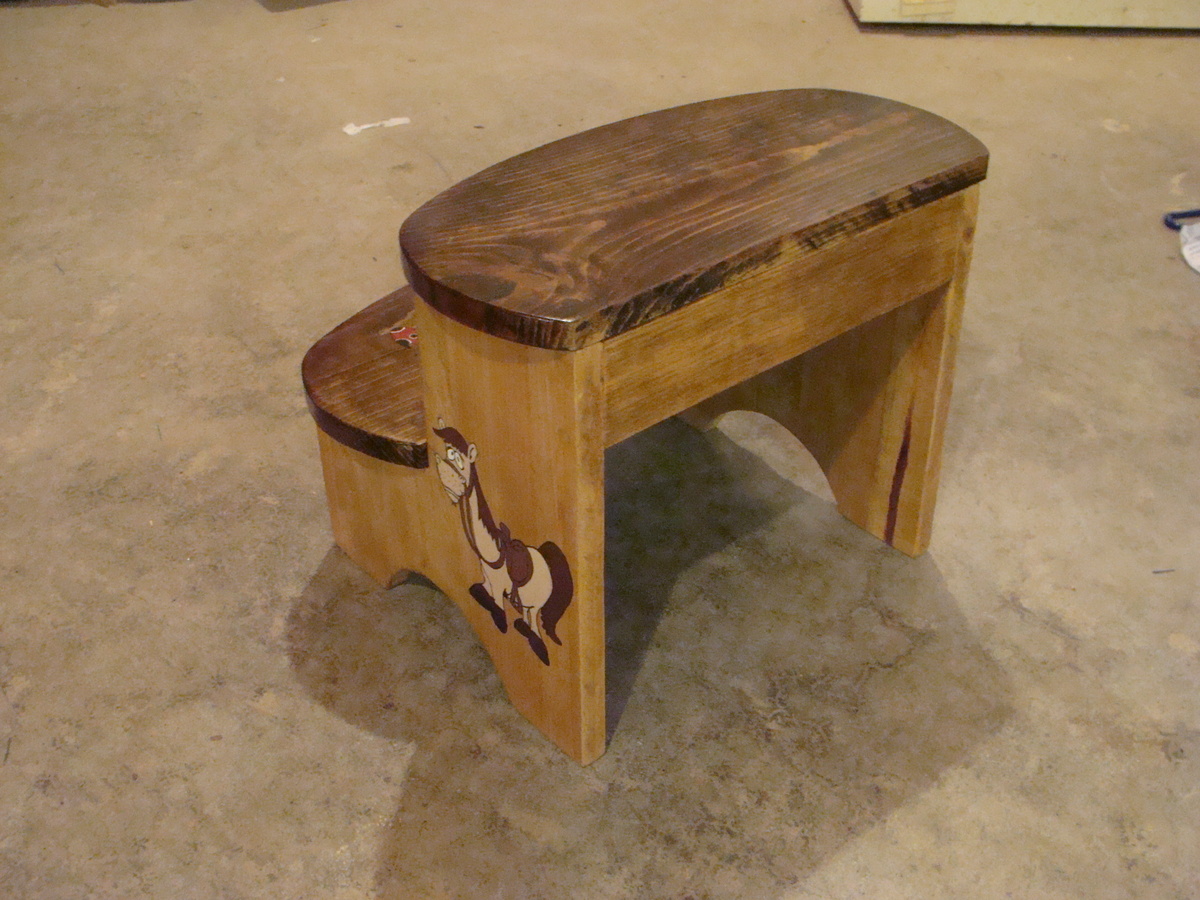
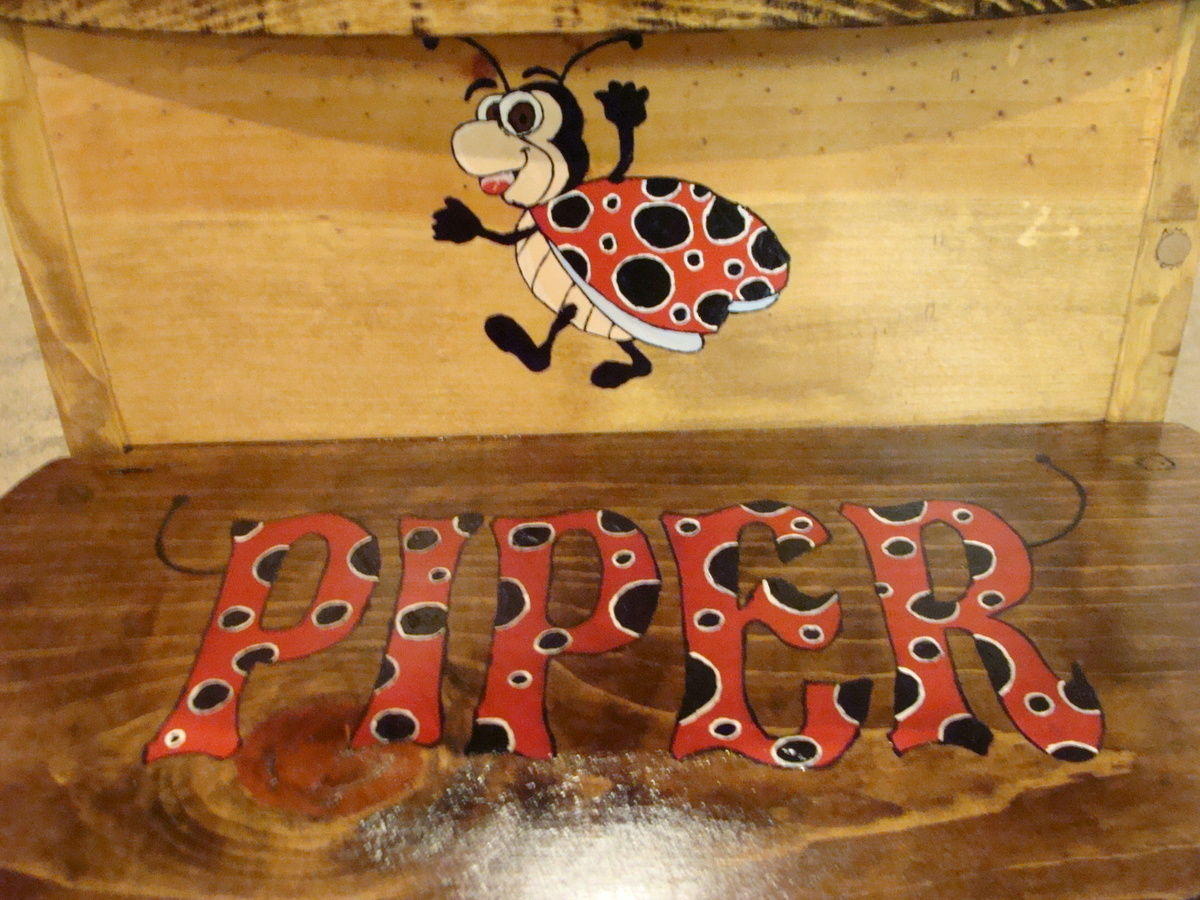
Kids Step Stool
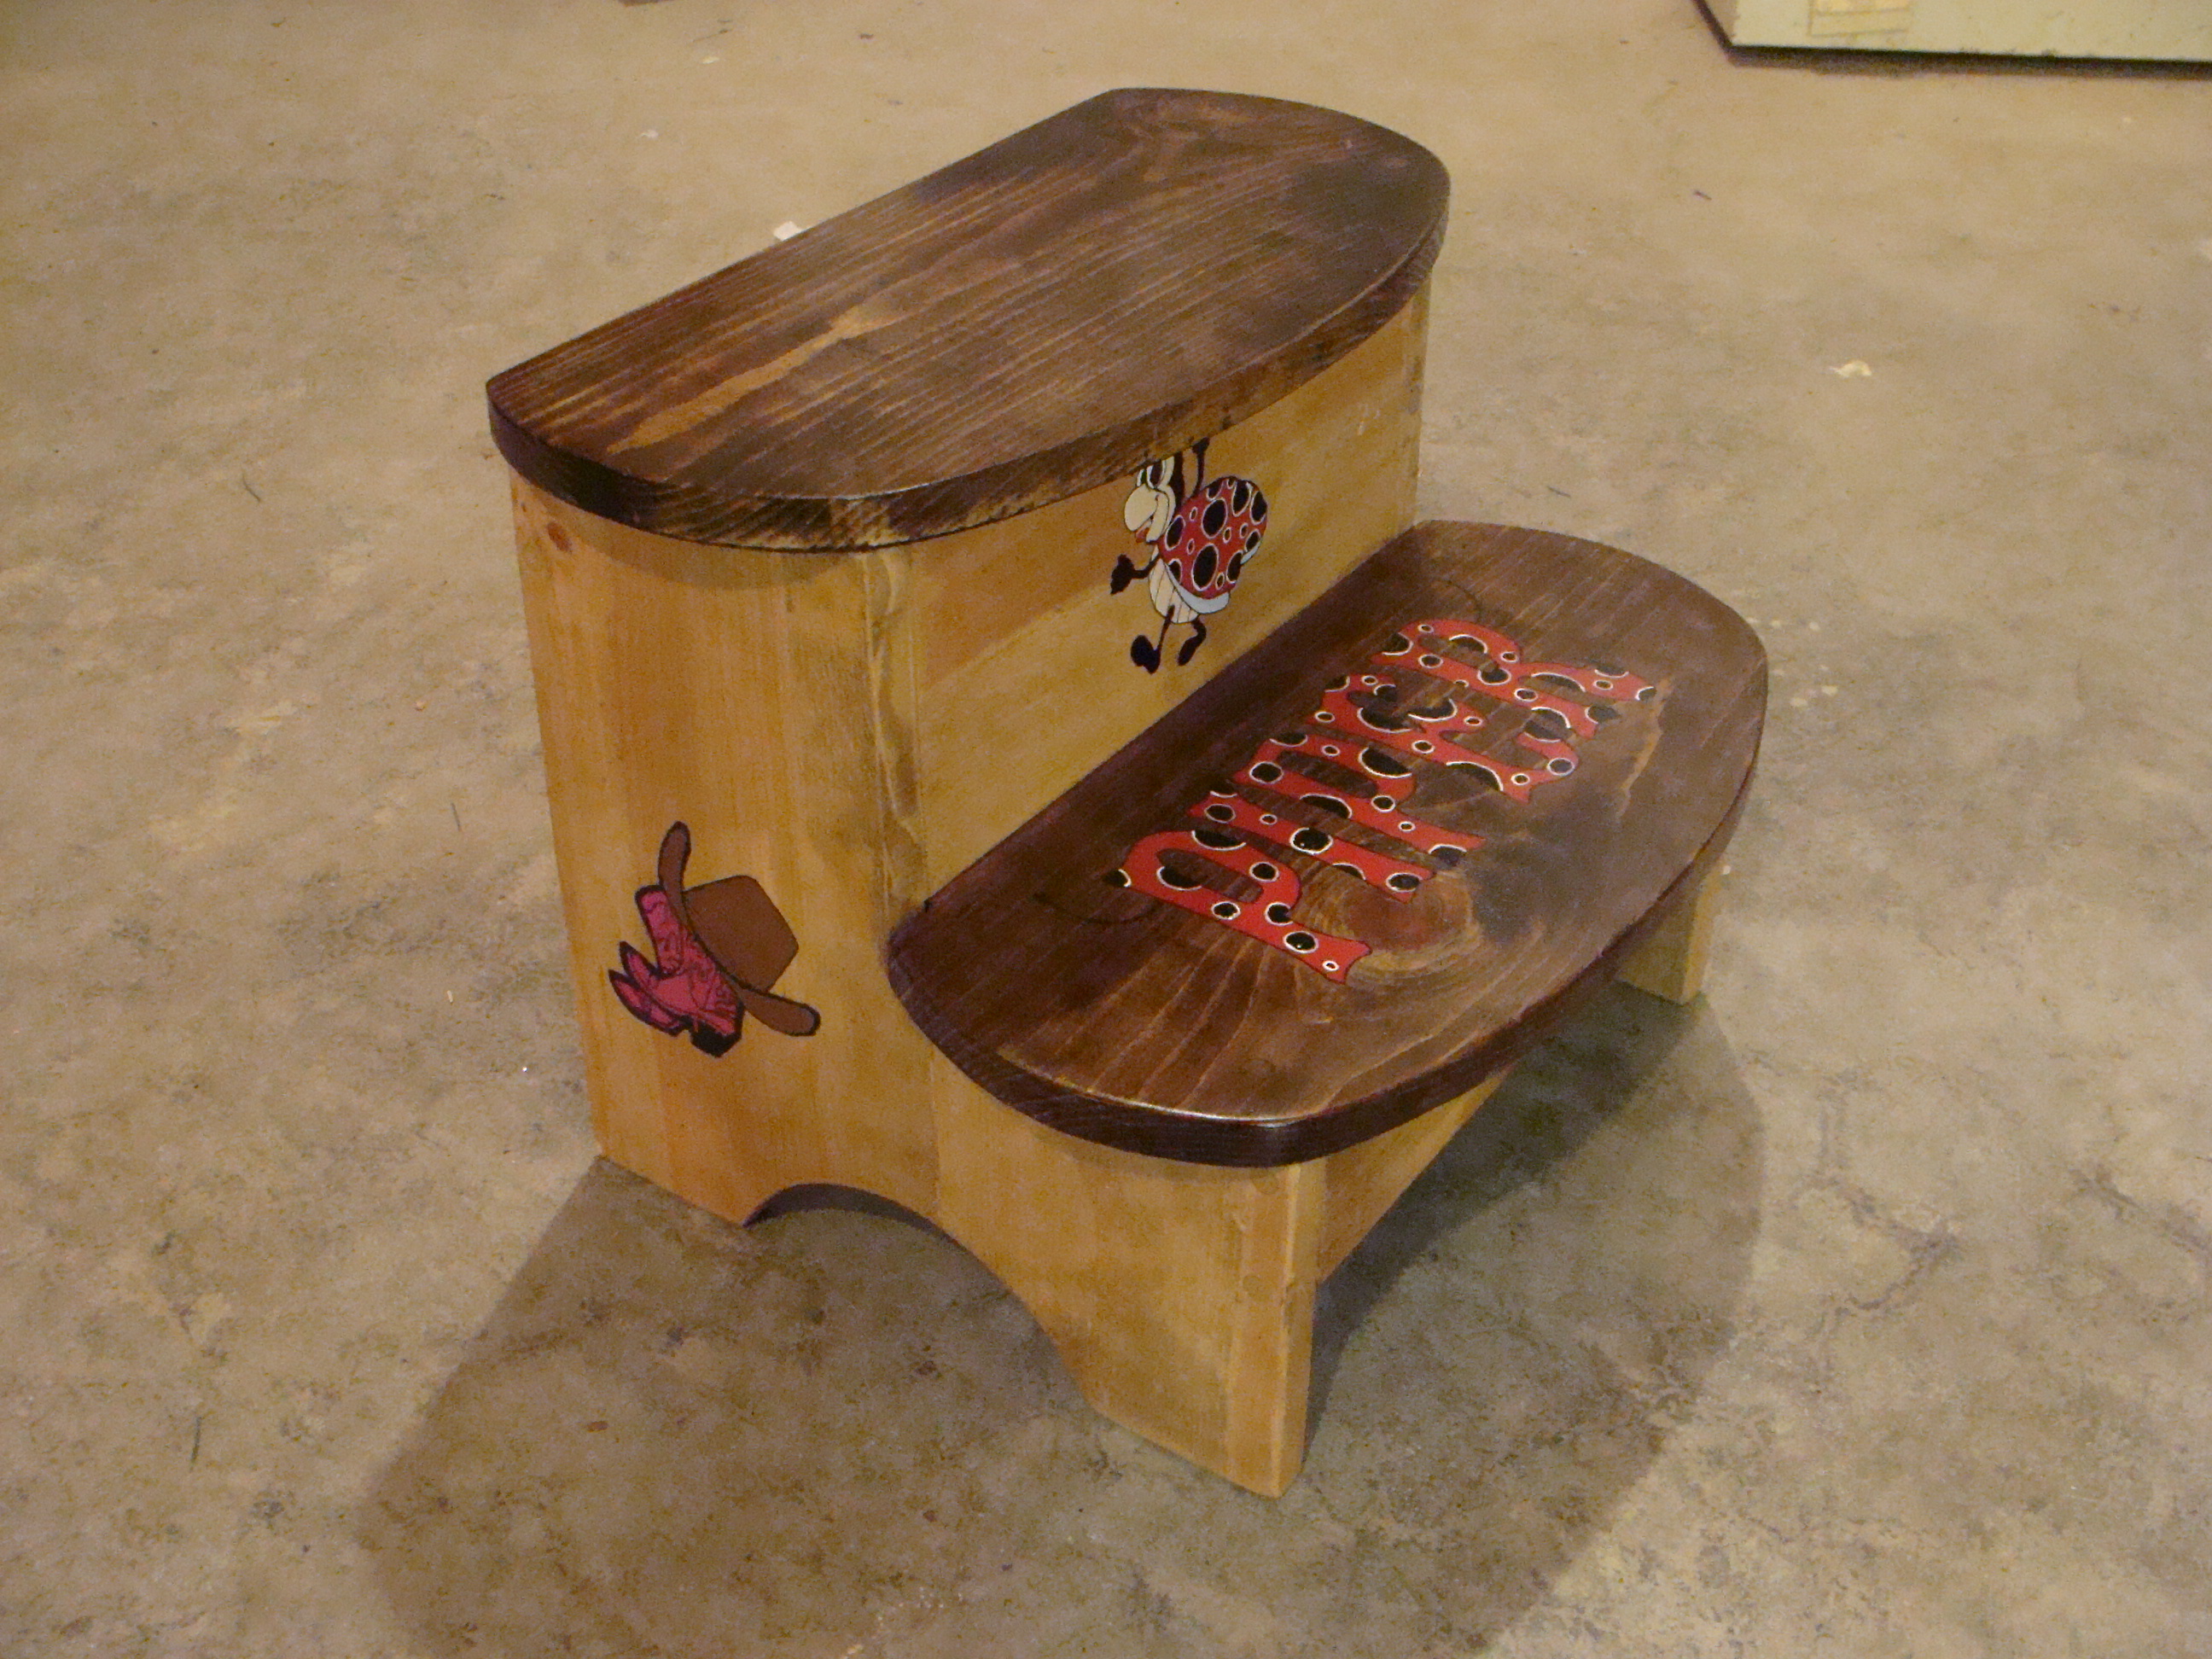
My sister wanted a step stool for her grand-daughter via her daughter-in-law. Like our mother and grand-mother before us, we stood by the sink with our hands in the wash water "helping" with the dishes. She asked it I could build a stool. After searching through several plans, I came across this vintage step stool and changed it up a little for the personal touch. I added the cartoon characters to fit with my great-nieces theme and she now has something that she can "brag" about as she grows.


Built from Plan(s)
Estimated Cost
Less than $20.00
Estimated Time Investment
Afternoon Project (3-6 Hours)
Finish Used
Minwax Oak stain, Minwax Provincial stain, latex paint for cartoon characters and 2 coats of Minwax Polycrylic. When using stain, I prefer to wipe on with old rag or t-shirt, it seems to cover better. As far as with the acrylic, I use a foam brush going with the grain whenever possible.
Recommended Skill Level
Beginner
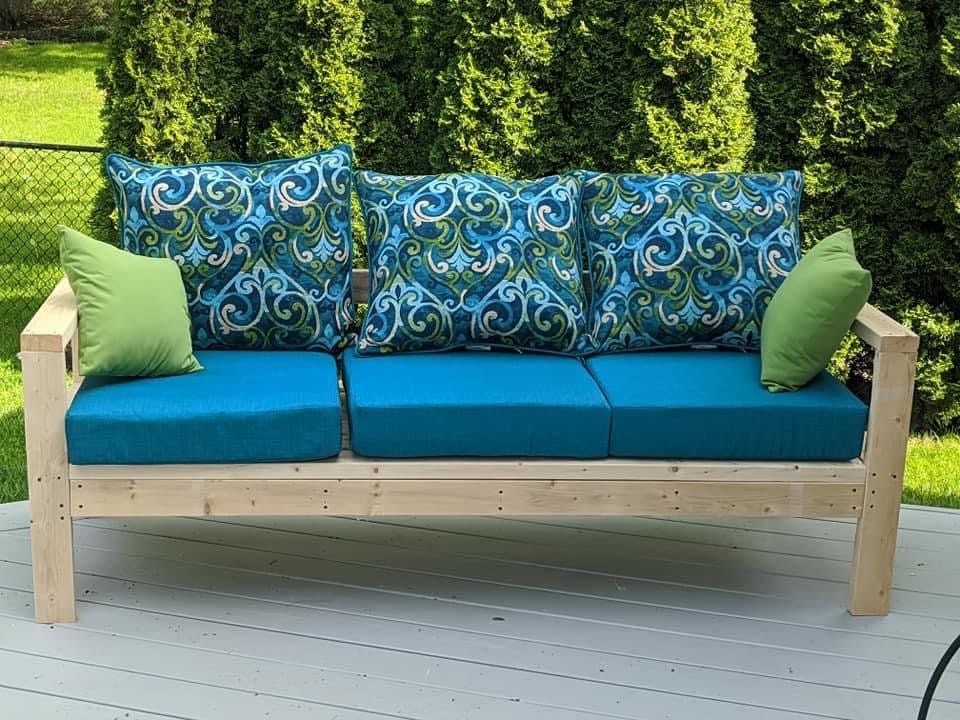
Patio furniture
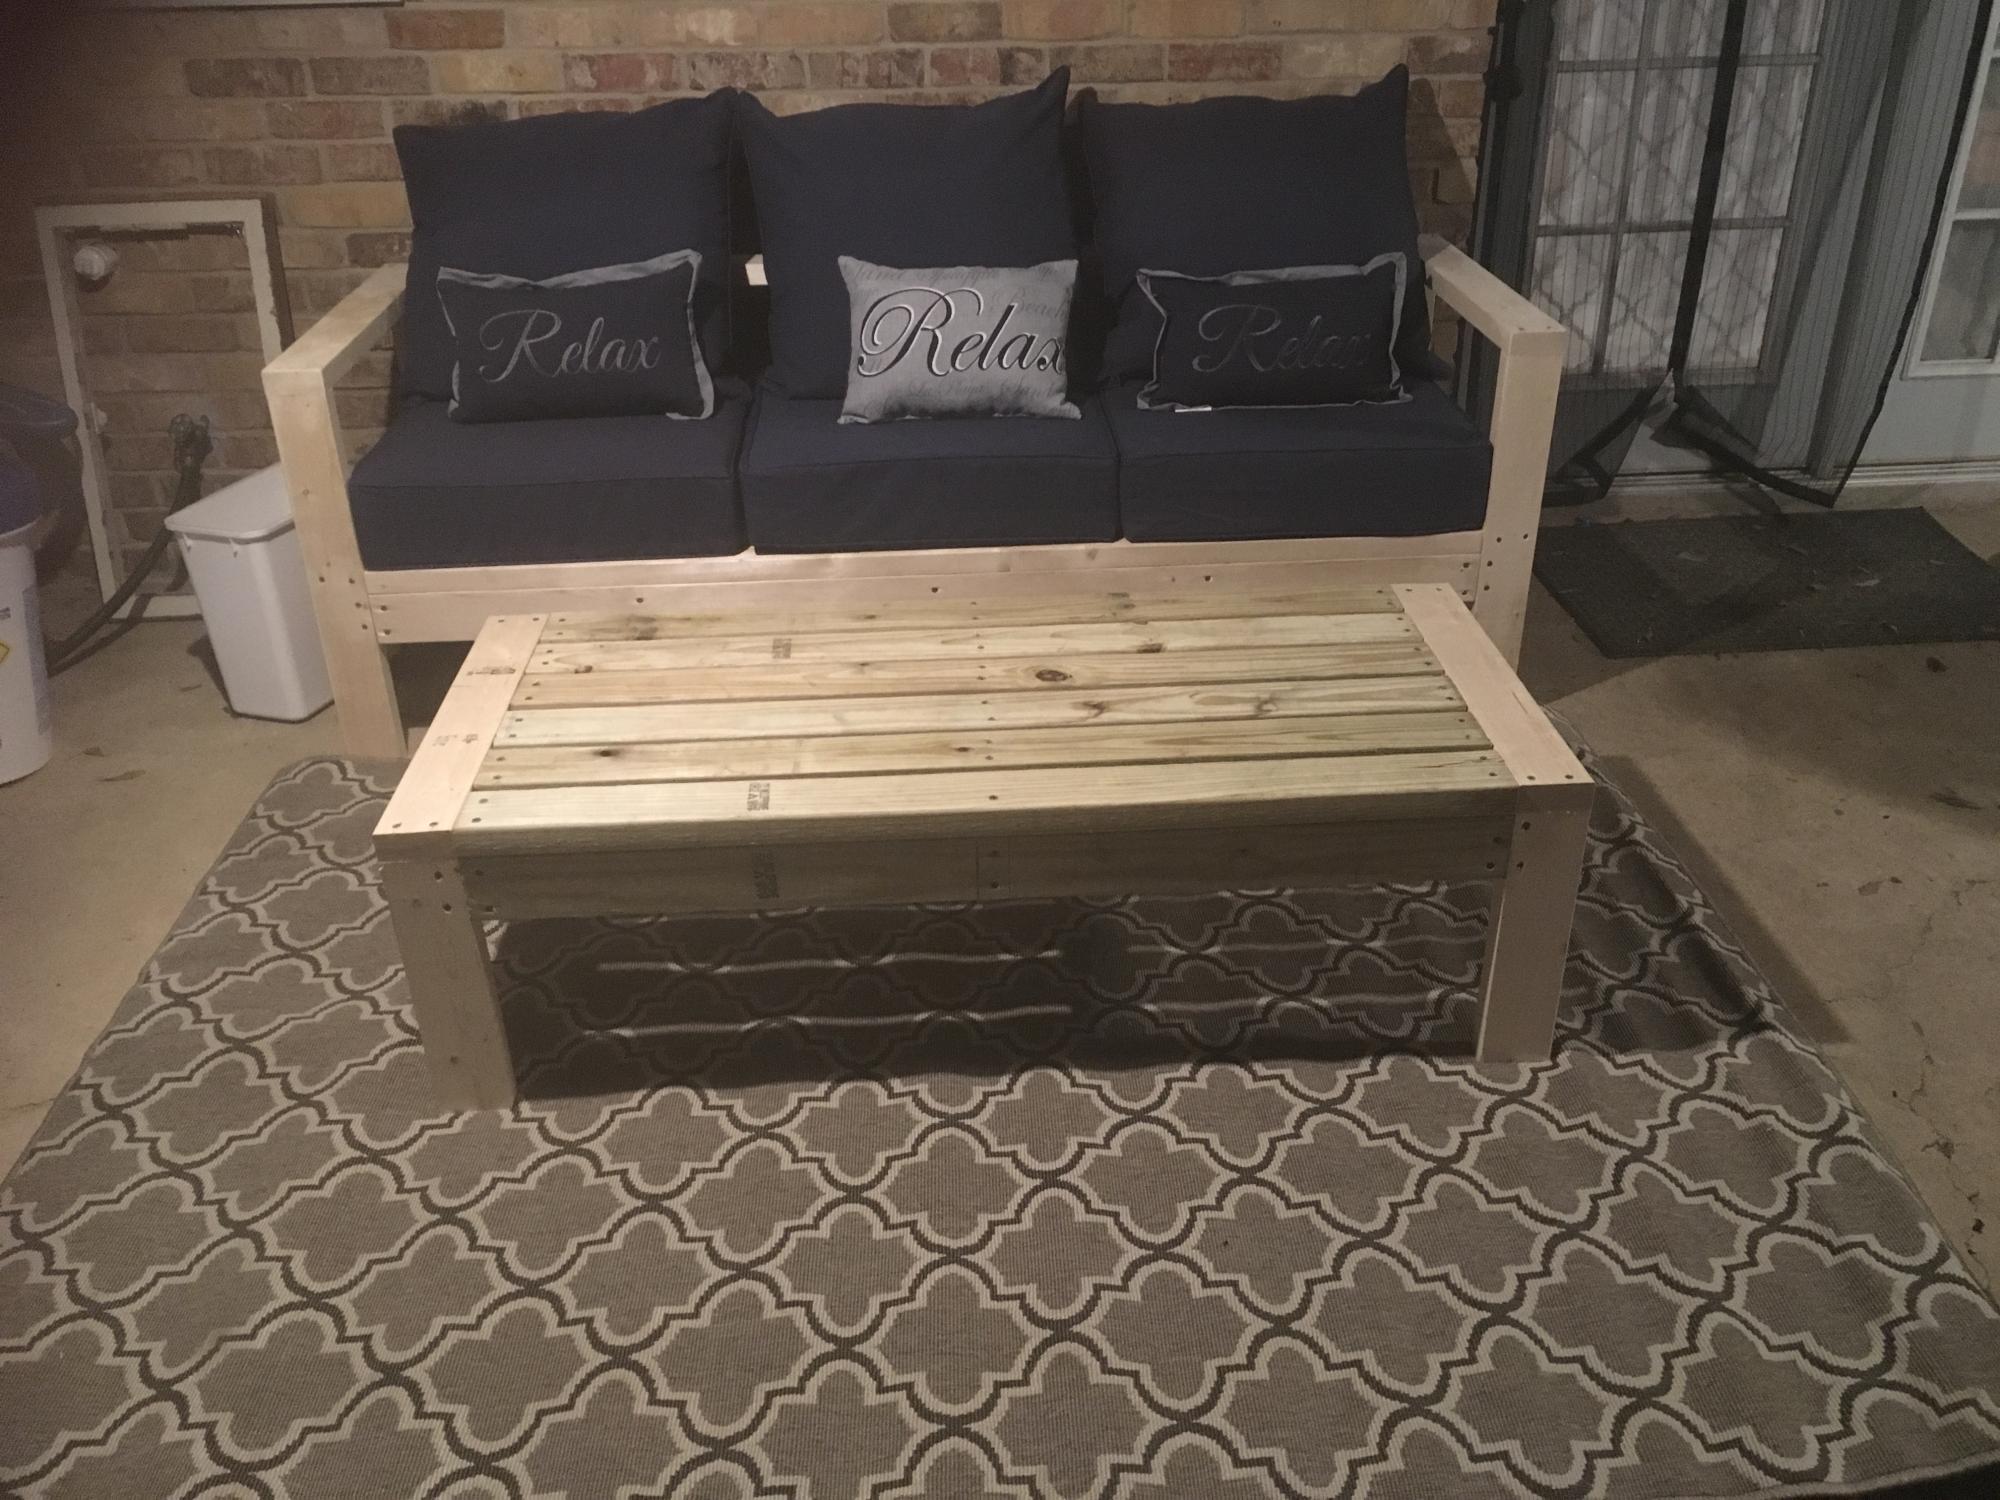
We modified Ana’s plans only slightly and we love our outdoor furniture we are going to make a second couch and a couple of chairs as well!
Built from Plan(s)
Estimated Cost
$50, with cushions $165
Estimated Time Investment
An Hour or Two (0-2 Hours)
Recommended Skill Level
Beginner
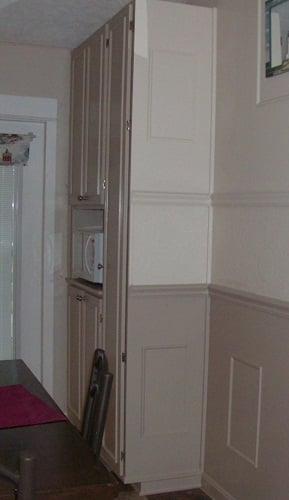
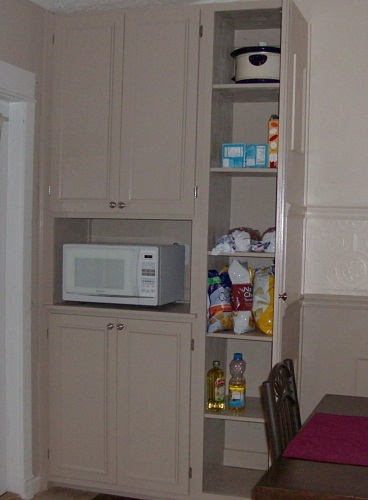
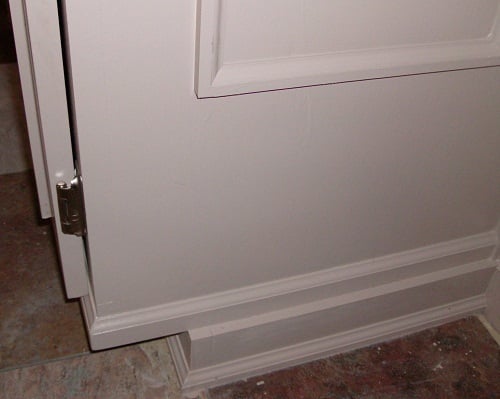
Pantry Cabinet
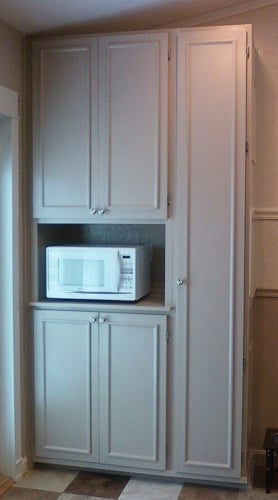
Pantry cabinet, with lots of room, Ana-inspired. We combined ideas from the Momplex kitchen, simple armoire, and benchmark storage, and we are super pleased with how this turned out. We built it in 2 pieces, attached together and then secured to the base and wall studs so it’s a ‘built-in’. Then we added lots of trim and painted to match the dining room. The opening at the left is large enough to fit pretty much any size microwave, and there’s a dedicated outlet behind it in the opening. The shelves are spaced wide enough apart for tall cereal boxes, tall bottles, and chip bags to stand upright. Overall finished cabinet size is 48" wide and 95 3/4" tall. This took us several days to complete. Since the doors are tall and kind of heavy, we added the Blum cabinet door dampeners from Rockler (these things really work!). Ana, thank you so much for the inspiration. I don’t think we would have tried this if it wasn’t for you. We love our new pantry!

Built from Plan(s)
Estimated Cost
$600
Estimated Time Investment
Week Long Project (20 Hours or More)
Finish Used
Ace Royal semi-gloss in Wishbone (front and bottom side), and in Crushed Peanut (upper side). We did 3 coats, sanding in between coats.
Recommended Skill Level
Intermediate
Comments

Sat, 07/21/2012 - 07:44
Beautiful!
It looks amazing! What a great idea to add it as a built-in. Nice modification for the microwave.
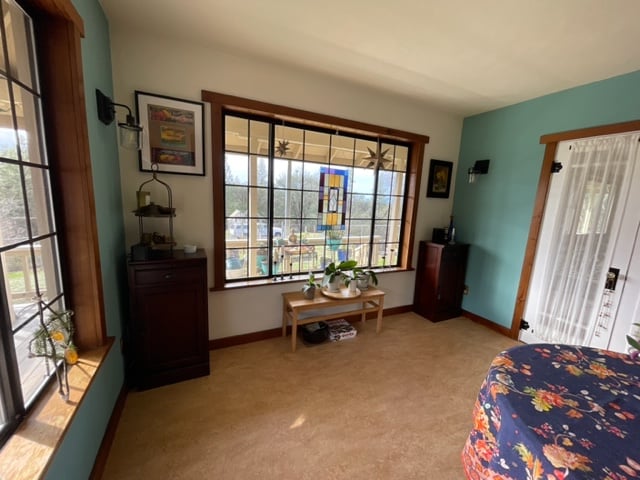
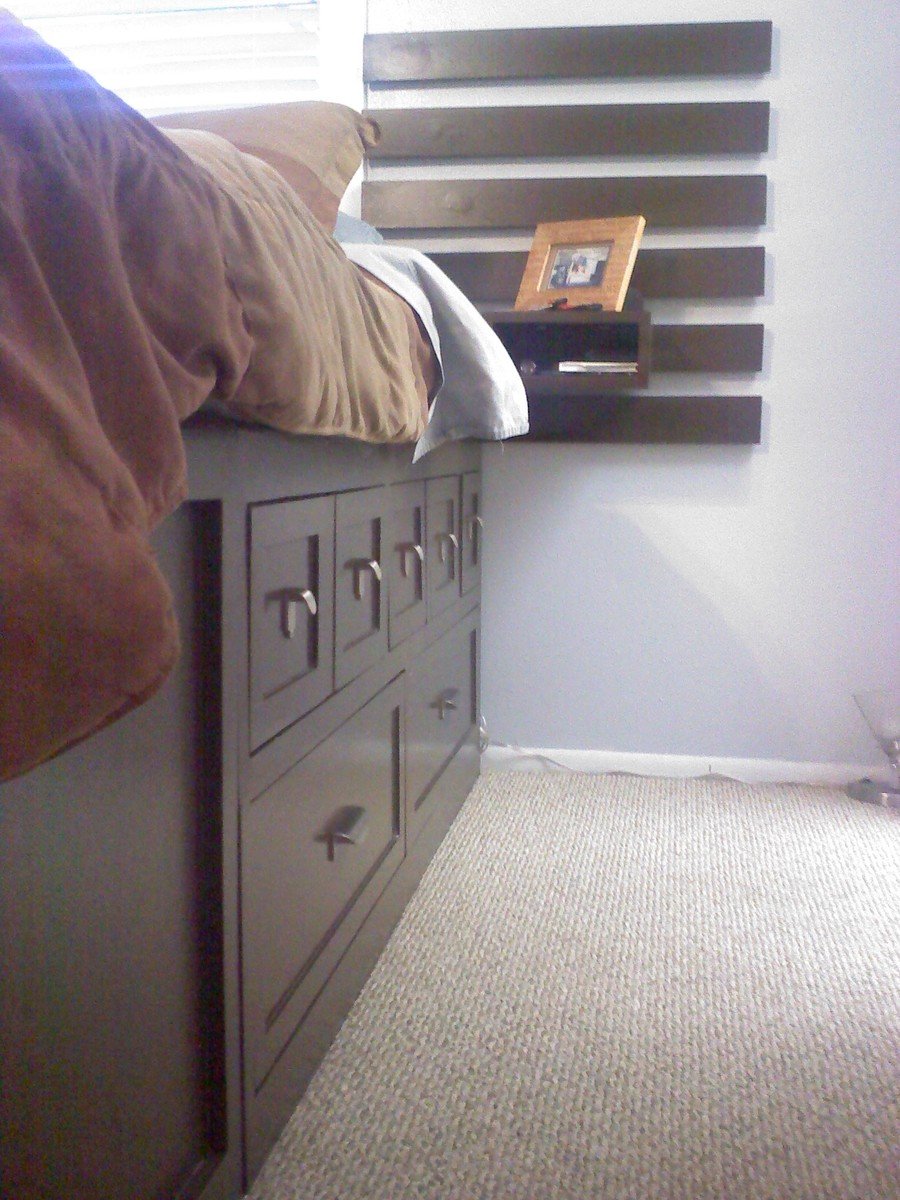
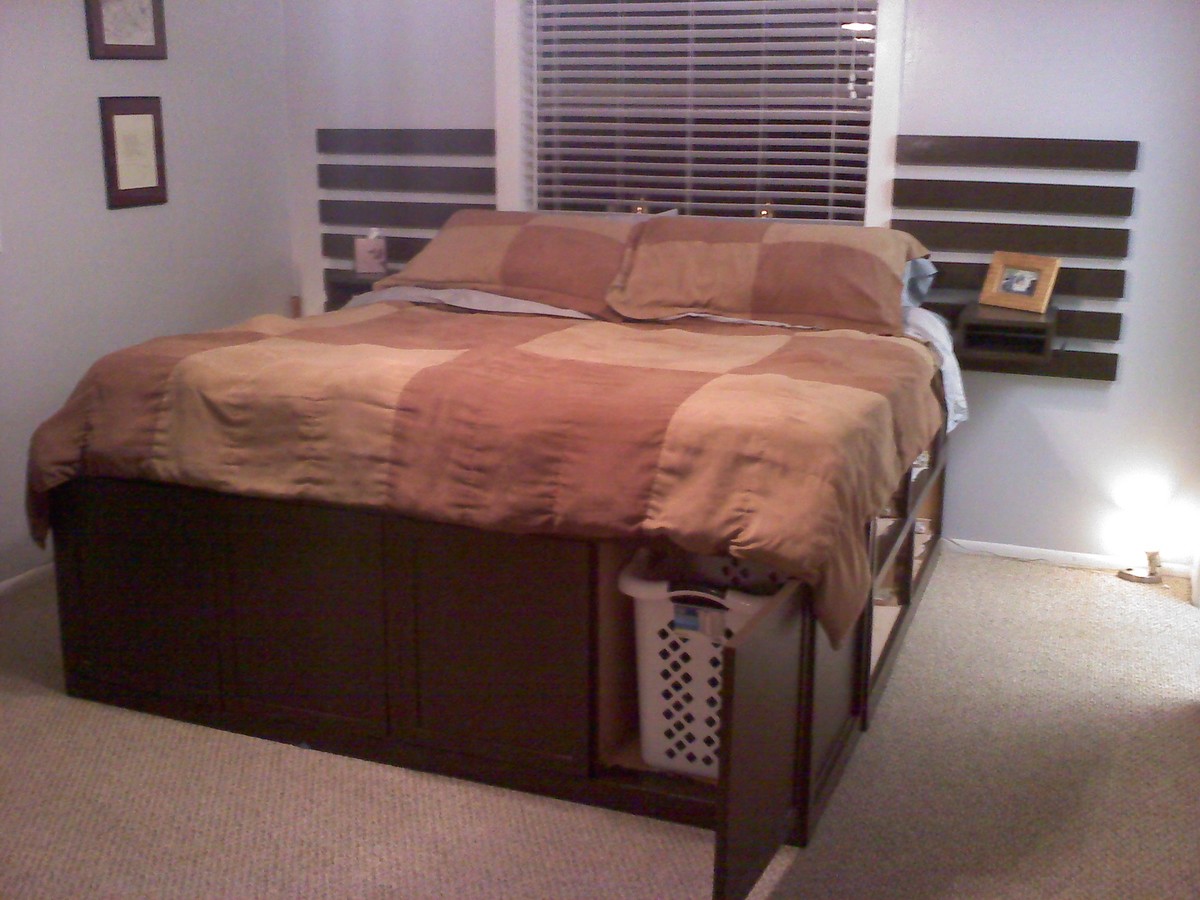
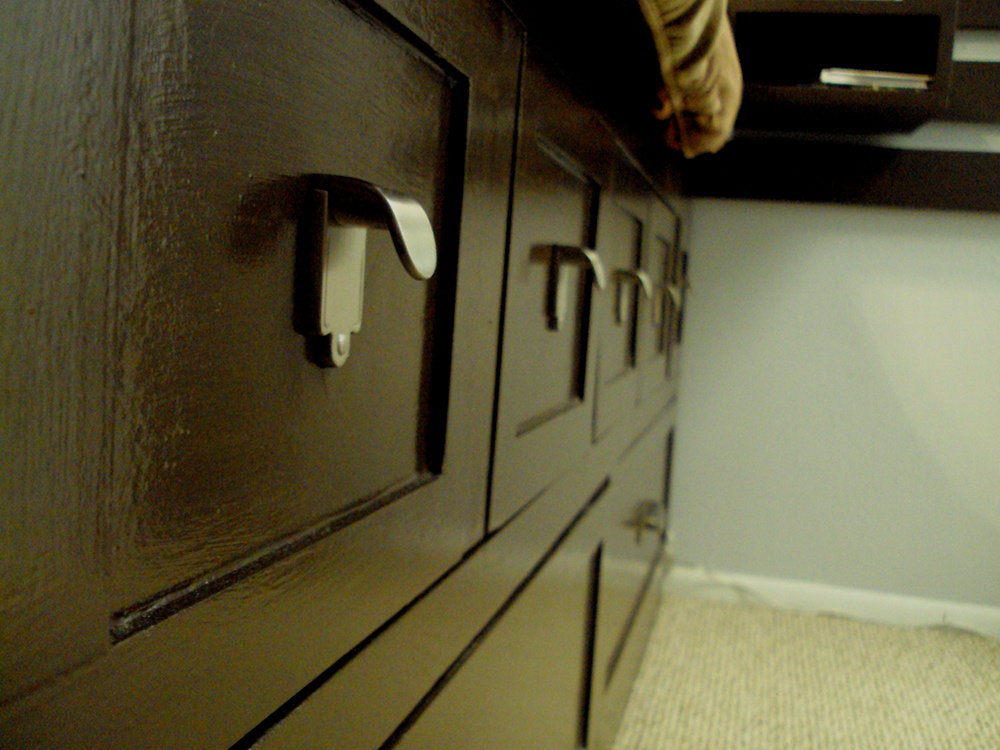
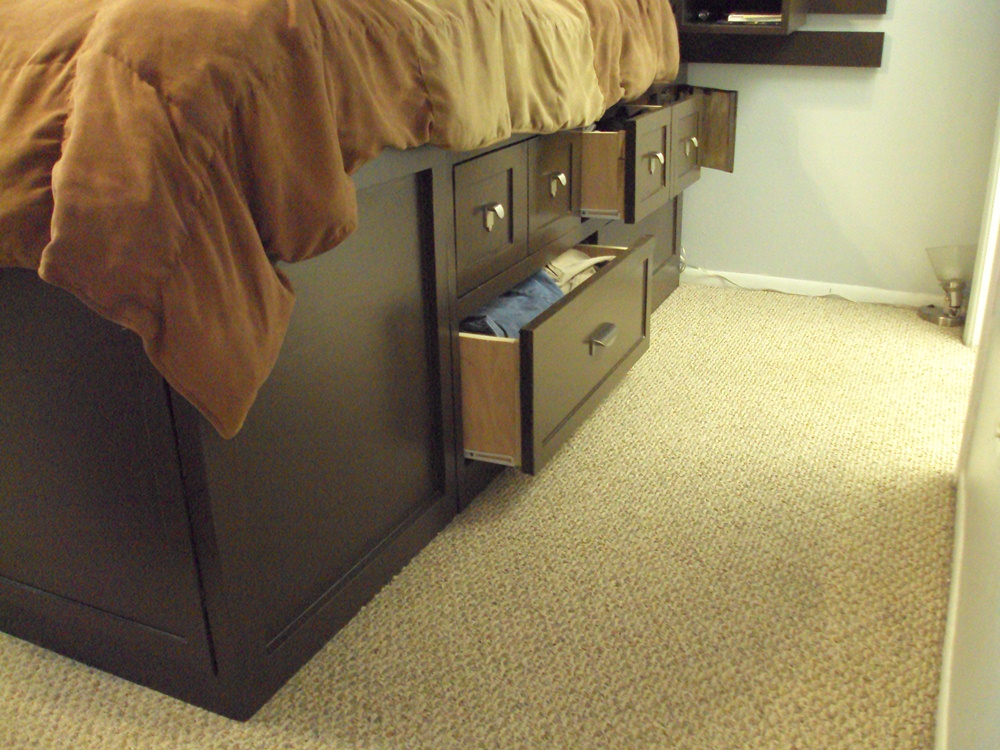
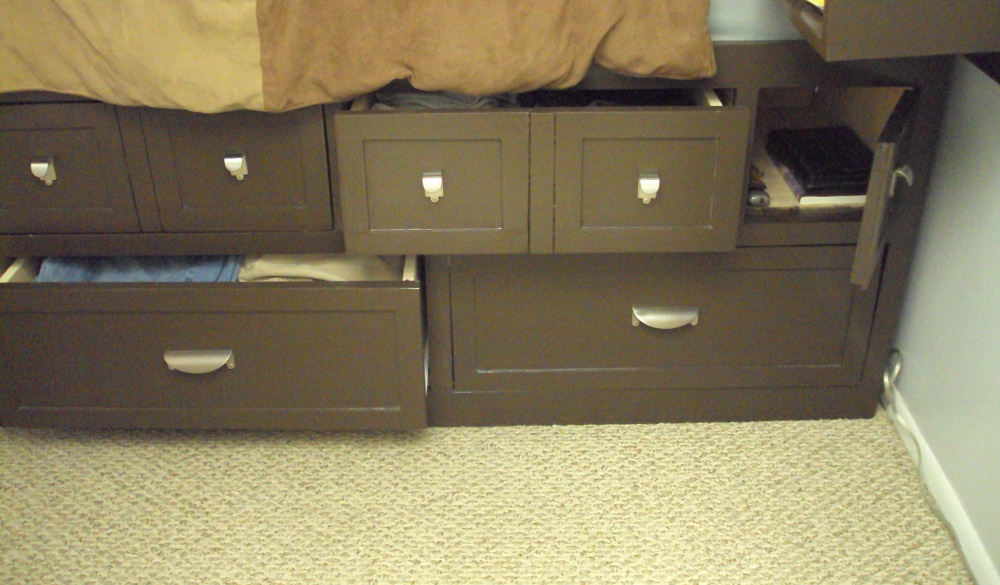
King size Storage Bed - Highly Modified
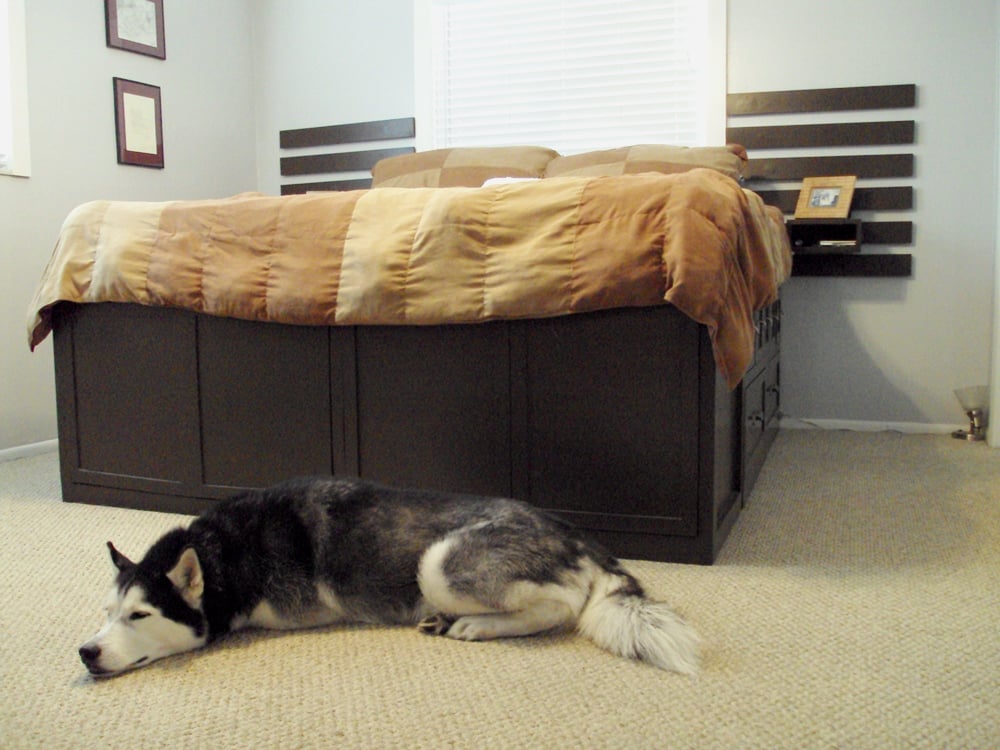
In an effort to gain some space in our home, I decided to build up. The Bed is tall (not a problem for us) but not too tall. The added heigh allowed for an extra 2 LARGE drawers on each side and an additional storage space we refer to as the "cubby." This last space has a pop open latch insted of a drawer due to the side table above them. The cabinets at the foot of the bed have the same pop open latch system and house 4 large laundry bins.
The bed feels incredibly solid and I've already had several compliments from friends. One of the best came from a rather neat and organized contractor friend of ours who's home decor is wonderful. He asked where I bought it. My response: Lowes , in a pile of lumber :)
The time it took to build this was months, due to only working a night or two a week after my toddler went to bed. It could easily be week project.
Built from Plan(s)
Estimated Cost
less than 700
Finish Used
Chocolate Brown paint with Polyacryllic over.
Recommended Skill Level
Intermediate
Comments
Mon, 03/19/2012 - 17:33
Absolutely stunning!
This is wonderful. You created practical beauty. Great job!


Wed, 03/21/2012 - 14:35
Measurements...
I did...
But today is my first chance to start playing with sketchup. I'll see if I can put those together for you. In the meantime. Here's some numbers to look at. Remember, the bed is TALL, but my wife and I are both around 6 feet.
Each side cabinet is 60 inches wide by 20.5 deep by 22.5 tall (to the platform itself). The entire bed is 77.25 wide at the base, with trim.
Mon, 09/07/2015 - 10:30
Platfrom Bed
First of all......
Amazing work!!! This is exactly what I am looking for to make for my daughters BDay. She has a small bedroom. I have never been afraid to take on a new project. Saying that I will be having the lumber company cut all the pieces for me. It will house all her clothes/shoes and hamper.
Please tell me that you have the dimensions for this platfrom bed.
Sat, 04/30/2016 - 22:05
Measurements
Great job. Do you have the measurements for this bed. If so can you email them to me, [email protected]. Thanks
Wed, 04/18/2012 - 10:36
thank you
Thanks HK
Having the laundry hampers on all sides is quite doable. Email me if you want [email protected] and let me know what types of hampers you are thinking...how many... do you need doors... how tall...what materials you want to use and what size bed. I can help you with the design/modification.
Thu, 06/28/2012 - 14:05
Absolutely gorgeous!
I love the modifications you have made! I want my husband to make me this same bed that you have done. With our 3rd baby arriving in 2 months I really need the space that our clothes are currently occupying. Have you been able to make up plans for this bed? If not, do you have a list of measurements and supplies needed to make this?
Mon, 07/16/2012 - 21:12
Awesome Storage Bed!
Hey BJ,
This is the other BJ (or as Greta would term it, "chick BJ")! I was looking at this site, and saw a picture of the bed you made, with the caption "BJ D made this." So I clicked on it, and it showed a picture of you, and I was like, "Hey, I know that guy! That's the guy that married my best friend! And that's their daughter! Wow, small world!"
Anyway, I was thoroughly amused, and also, I really like the modifications you made on the bed. I'm totally stealing some of your ideas when we make our new bed frame!
-BJ
Fri, 04/18/2014 - 15:18
Sketches
Hi, I emailed you, but just in case you don't still have that email or it doesn't go through to you. Did you ever make plans for your modifications? If so, I would love to see them. My email is [email protected]
Thank you!
Comments
Mokman88
Sat, 05/03/2014 - 19:40
Actual plans for this
Actual plans for this loveseat/bench are not showing unfortunately :(