Community Brag Posts

Annie E

Submitted by Anonymous (not verified) on Sat, 11/12/2016 - 22:38

Our fireplace only had a  granite surround and was lacking personality. The wall that our fireplace is built into is kind of a strange size and all of the mantle kits won't fit our fireplace. It wasn't until I ran across Ana's plans that I knew this was exactly what I wanted around our fireplace!  We adapted the plans a little bit, and created a ladder up the sides of the fireplace  to attach the front plate onto. I couldn't be more thrilled with how it turned out 

Estimated Cost
$100
Estimated Time Investment
Weekend Project (10-20 Hours)
Finish Used
Semi-gloss paint to match kit trim
Recommended Skill Level
Beginner

Comments

Patio furniture

Submitted by Anonymous (not verified) on Sat, 08/01/2020 - 07:29

Built this amazing patio set using Ana White’s design. Just added extra back supposed to prevent the cushions from falling over. Very sturdy set!!

Estimated Cost
$120
Estimated Time Investment
Weekend Project (10-20 Hours)
Finish Used
Exterior finish in a dark walnut color
Recommended Skill Level
Intermediate

Queen size farmhouse bed

Submitted by ltodd on Wed, 10/10/2012 - 19:10

I made the farmhouse bed and I love how it turned out.

Estimated Time Investment
Week Long Project (20 Hours or More)
Recommended Skill Level
Beginner

Comments

SZahn (not verified)

Thu, 10/11/2012 - 13:37

That looks wonderful!! I love the finish!!! I would love to see a few more pictures as this is one beautiful build. What color paint did you use? Keep up the excellent work, your providing inspiration!

SZahn (not verified)

Thu, 10/11/2012 - 13:37

That looks wonderful!! I love the finish!!! I would love to see a few more pictures as this is one beautiful build. What color paint did you use? Keep up the excellent work, your providing inspiration!

ltodd

Sun, 10/14/2012 - 19:20

Thank you. I used Rust-Oleum flat black oil enamel. I have not actually attached it to the bed frame yet. When I do, I will add some more photos.

Our outdoor sectional

Submitted by djsaffer19 on Sun, 08/03/2014 - 19:45

We wanted a sectional for our patio but did not want to pay the high price so I went out and built it. Used scrap 2x4 from construction sites and Thompson Waterseal to finish. Cushions and pillows purchased on sale from Old Time Pottery

Estimated Time Investment
Week Long Project (20 Hours or More)
Finish Used
Thompson Waterseal
Recommended Skill Level
Intermediate

First dresser

Submitted by Anonymous (not verified) on Tue, 11/15/2016 - 14:53

Hey guys, this is my first time posting to Ana White, although I have used and loved her plans for some time now!  This project took me 4 days and $330 to build and it was the first time I've been brave enough to try a dresser.  It turned out a little rickety but it suits my needs.  If you want to see the entire project from start to finish, visit the album on Imgur at http://imgur.com/a/HGZmA.

Built from Plan(s)
Estimated Cost
$330.85
Estimated Time Investment
Weekend Project (10-20 Hours)
Finish Used
Valspar Signiture. I wouldn't recommend this again though.
Recommended Skill Level
Advanced

Big Kids Picnic Table

Loved your plans for this and built a table for my 4 year old grandson who could destroy a box of rocks if given the opportunity! I was able to get by with (5) 2X4's instead of the (6) called for in the plans which was even better since I've now got an extra one for the next project. I used pocket hole screws, #8 x 2-1/2" exterior grade screws, and some Thompson's Water Seal and everything turned out even better than expected! Virtually no "scrap" to absorb either. Thank you for sharing your plans - I'm looking at those for the full-size version for someone that has asked if I could build one for him!

Built from Plan(s)
Estimated Cost
$30 - $35
Estimated Time Investment
Day Project (6-9 Hours)
Finish Used
Thompson's Water Seal Natural Cedar

Dress Up Station

I came across your plans Ana for this dress up Station. My Daughters 2nd birthday was this month and I thought this would be a perfect gift. Your plans were so easy to follow and it came out perfect...she loved it! I'll definitely be back for more do-it-yourself projects from you.

Thanks so much for the inspiration!

Estimated Cost
$50
Estimated Time Investment
Weekend Project (10-20 Hours)
Finish Used
Spray on Primer and 2 coats of Spray Paint (Apple Green)
Recommended Skill Level
Beginner

Levitating Acrylic & Whiteboard Coffee Table

While we are programmers by trade, my roommate and I have spent the past three months creating Do-It-Yourself furniture, crafting 16 pieces in total. After planning, drafting, and modeling in SolidWorks, we were able to furnish our entire apartment.

Our works are of steel construction and are both unique and modern DIY projects. While the furniture was created for our own personal use, we wanted to share our unique designs and allow others the opportunity to enjoy the pieces as much as we do.

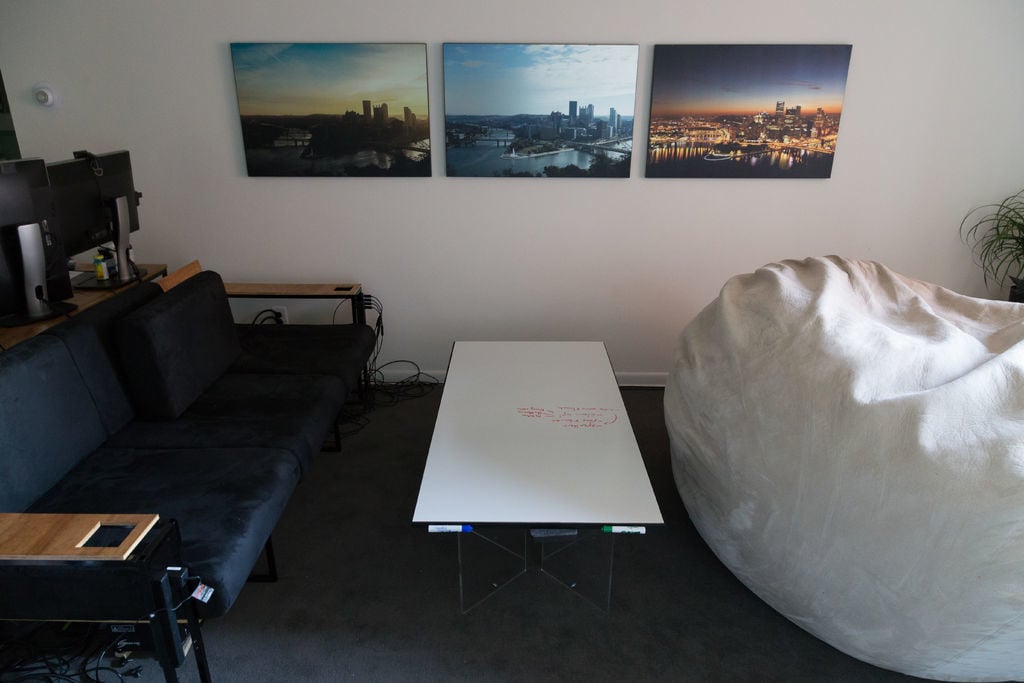
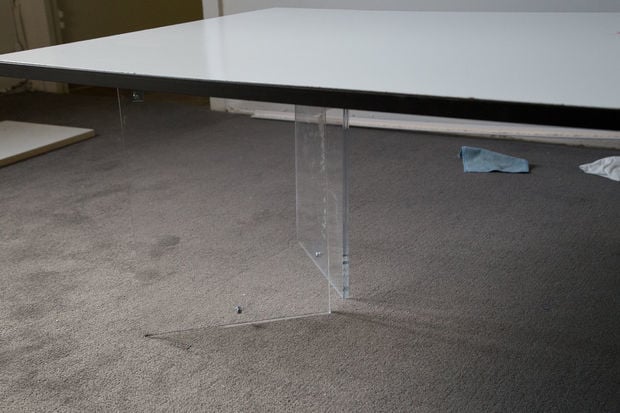
Here's how to build a "levitating" coffee table with acrylic legs, that doubles as a whiteboard! We made it at TechShop Pittsburgh, and a full BOM and assembly guide is available here:

http://bit.ly/X0mJzd

Check us, and our projects, out at http://fabricate.io/ and at http://toddmedema.com/

Follow us on Facebook at https://www.facebook.com/fabricateIO

If you have any questions, please feel free to let us know!

Thanks,

Todd

Materials Required:

27.75"x55.75" Panel board (which is whiteboard coated)
27.75"x55.75"x0.5" Plywood
Black spray paint (highly recommended: black powder coat paint)
8 pieces of 24"x12" clear acrylic sheet (thickness can vary, but at least 0.2")
2x56" and 2x28" lengths of 3/4"x3/4"x1/8" steel angle (stock #A1343418)
Acetone and a rag to clean the steel
12 steel corner braces (other places will be cheaper - these match our laser cutter file holes)
Wood glue
At least 32 wood screws, #8 1/2"

Tools Needed:

Laser Cutter
Miter cold saw
Table saw
Drill press
Powder gun and oven for powder coating (or other painting method)

Prerequesites: You'll need to know how to...

Use a laser cutter
Drill holes with a drill press
Retain your appendages when using a cold saw and table saw
Not electrocute yourself with the powder gun (optional, but always helpful)
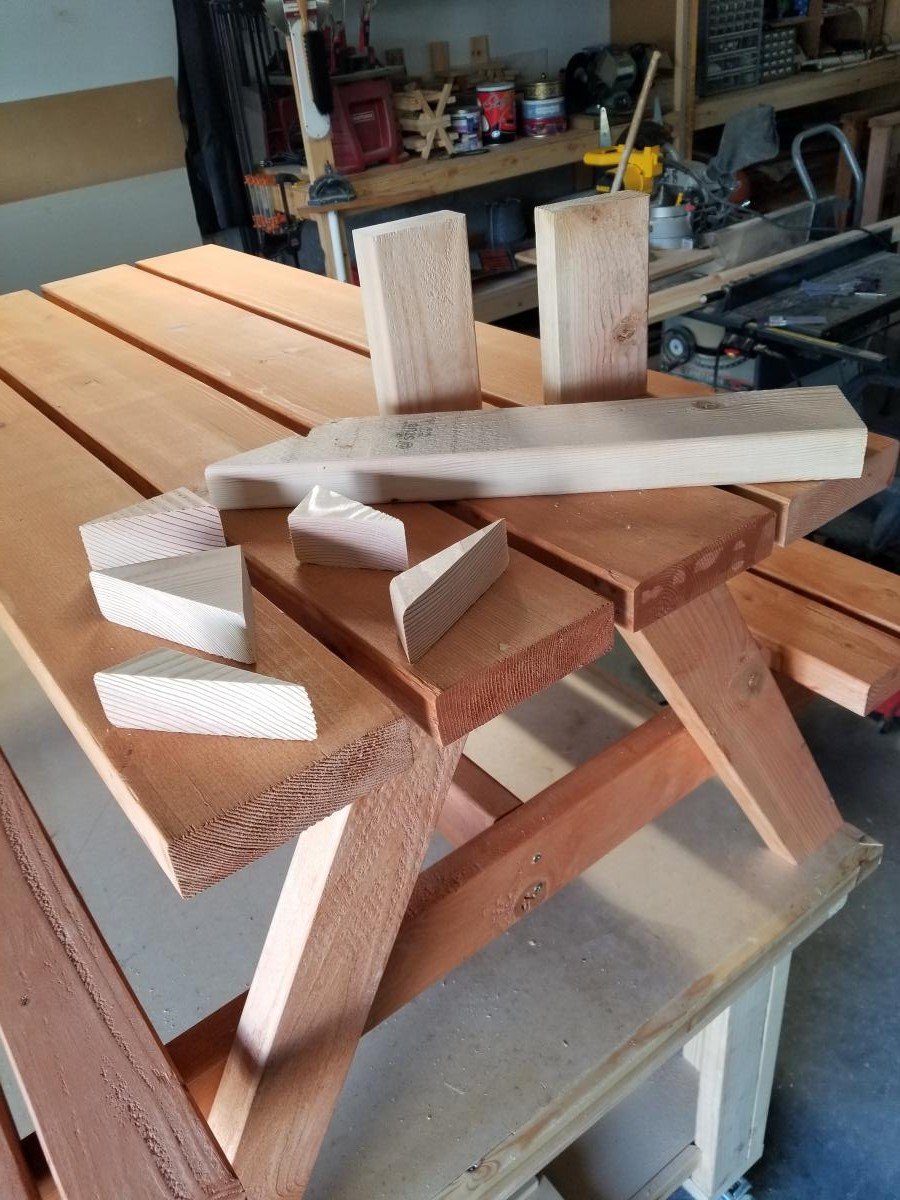
Step 1:
The first step in building your own levitating table is to cut and drill the acrylic. We attempted hand-cutting the acrylic for the legs, and swiftly realized there was no easy way to get a good finish. Enter the Trotec Speedy 300 laser cutter!

For each piece of acrylic, we cut out the attached vector design. The eight finished pieces were bolted together in pairs for extra strength, resulting in four stable legs.

The laser cutter settings we used were maximum frequency (5000Hz), speed 10, and power 50. You will have to adjust this depending on the acrylic thickness, color, laser cutter power, etc.

To ensure a nice finish, you'll want to make a few test cuts with your acrylic material to ensure everything looks as you expect. We also recommend placing some scrap plywood or other standoff between your acrylic part and the bottom grating, as this lets the smoke and vapors through and keeps the soot from adhering to the acrylic.

For those unfamiliar with laser cutters, we encourage them to visit TechShop and take the SBU, or refer to an online guide such as StumpChunkman's Instructable - both of these are excellent for teaching
the basics.

If you don't have access to a laser cutter, we'd recommend using a table saw to ensure a straight cut. Make sure you keep the protective plastic cover on during the cut to keep surface scratches to a minimum. It's also recommended to drill a very small pilot hole first and expand your bit size slowly, as acrylic can crack very easily when drilled. Step 2:
With the legs done, it's time to start cutting the steel trim! We were planning a huge furniture project with square steel channel and angle, so we had exactly the lengths we needed for this project. MetalsDepot is a great online supplier for this kind of steel channel, and Home Depot probably has some in supply if you want a local source.

Before doing anything with the steel, take some acetone and a rag and get scrubbin'! Clean steel accepts spray paint or powder coat much more readily, and the coating lasts for longer without flaking off. It takes some time to remove the black grease on the steel, but we found acetone (or alternatively mineral spirits) does a pretty good job cleaning it off. After a few minutes, the steel should look roughly the same, but your fingers shouldn't be dirtied when picking up the steel channel. For the absolute best coating, you can also sand-blast the metal (conveniently, TechShop also has a sand blaster)

Next, cut it down to the proper size - use a miter cold saw or a horizontal band saw to cut two 56" lengths and two 28" lengths. Then, set up the saw to cut at 45° and miter the edges so that they'll fit flush together when mounted to the table edges.

We'll need some drill holes to mount the steel angle to the plywood underside of the table. We suggest drilling in with a #18 bit, about 2.75" in from the very tip of the miter cut on each end for all pieces.
If you use a screw size other than #8, refer to this table to choose a good clearance hole size. Don't forget to debur the holes with a deburring tool for a nice finish!

Finally, it's time to make this steel look awesome. If you chose to use spray paint, take your steel outside and hang each piece with a coat hanger or other stiff wire using the holes you just drilled. Apply several light coats, waiting a few minutes between coats - once the steel is the color you want it, let it dry for another hour before handling it.

If you're looking for an even nicer finish, we highly recommend using a powder gun and powder coat paint. We used TechShop Pittsburgh's powder room and enormous annealing oven to do the job, but you can always get started with your own powder coating setup!

Step 3:
Now that we have the channel ready to mount, we need to cut the wood and wallboard down to proper table size.

This is relatively straightforward - if your pieces aren't the right size, just measure out a 22.75"x55.75" rectangle in both the plywood and the panel board and use a table or circular saw to cut it. The two pieces should line up together when laid flat.

Since the metal L channel isn't a perfect right angle - it has a bit of a curve on the inside - expect to need to sand down the bottom edges of the wood to get a tight fit. Doesn't need to be pretty, just needs to let the metal sit flush!

Step 4:
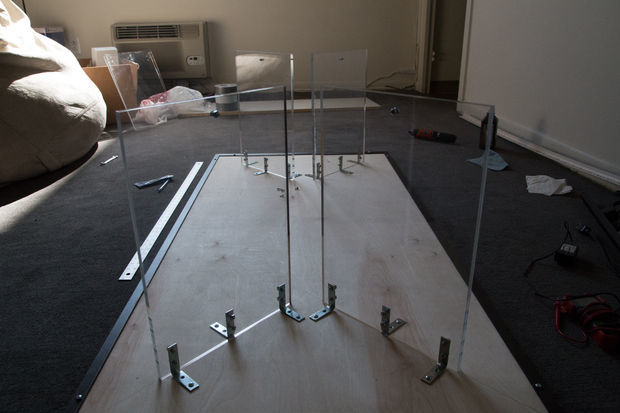
It's time for the final step: assembly.

Secure each set of two leg pieces together with a machine screw, and mount the angle brackets to the top using more machine screws as in the diagram.

Next, take the plywood and lay it flat. Position the steel channel around it, then secure the channel into place with #8 1/2" wood screws.

We'll need a bit of quick dimensioning to get the diagonal legs secured properly. Measure halfway between the inside faces of the long steel channel (13.25" from a side by our measurement), then mark in the same distance along that center line. Draw a line from each of the two closer corners to this intersection, on both sides.

Now, mount the acrylic legs with more #8 wood screws using these lines as handy 45° guides.

Then, all there's left to do is turn it over and attach the top surface. Apply some wood glue liberally to the top surface of the plywood, and then place the panel board on top with the white side facing up. Leave the glue to cure overnight, and then...

Step 5:
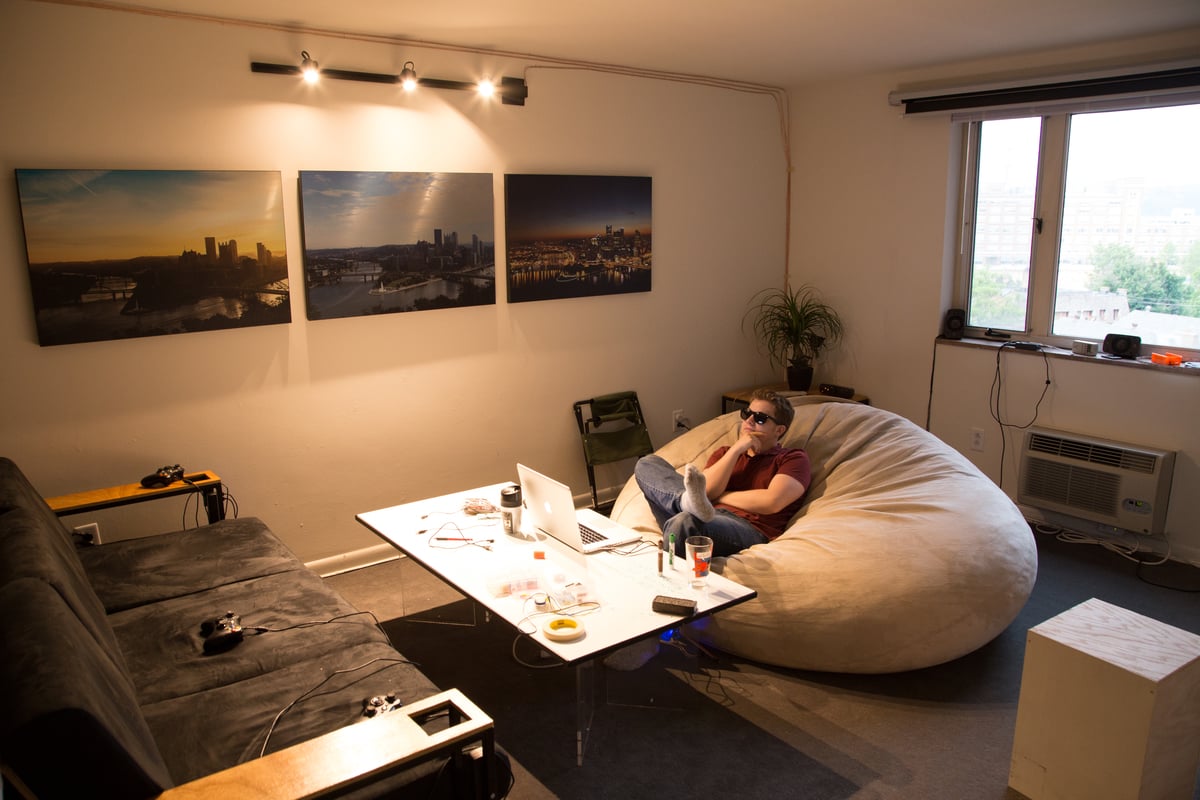
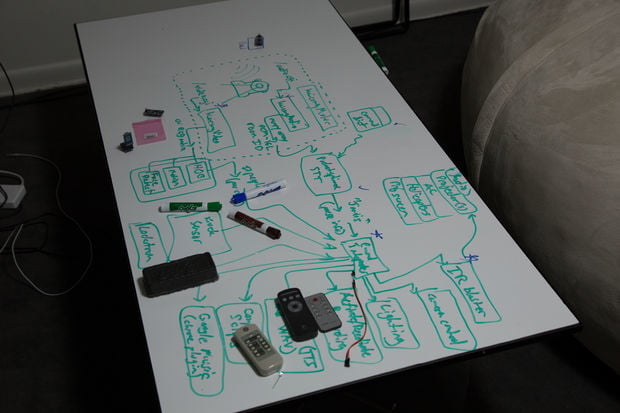
You've just made a professional-quality, levitating coffee table whiteboard! Our whiteboard table has seen many adventures during the last few months, as:

A dining surface
A table for card and board games (including some D&D)
A leg-rest for watching movies on the couch
And despite three months of abuse, it's maintained its quality and stability.

But most importantly, it's received a bit of an upgrade:

LED lighting

That's right - for about $20 (the lights plus a power supply), you can upgrade your fancy coffee table into an even fancier under-lit table. The "floating" effect is much more pronounced, and it's a great centerpiece during parties!

Estimated Cost
~$220
Estimated Time Investment
Day Project (6-9 Hours)
Finish Used
black spray paint
whiteboard top
Recommended Skill Level
Beginner

Comments

Camp Grandma

Wed, 08/06/2014 - 07:10

Very cool table. Hope you don't mind if I tuck your clever idea away for a future project. And whiteboard you can spill or write or draw on - brilliant!

booksnotbombs

Wed, 08/06/2014 - 07:14

Wow. So, this is FAR outside my beginner woodworking skill level since it's not even made of wood (well, the top might be--I didn't click through to the plans). However, I just wanted to say I LOVE it. Your living room looks so cool! It especially looks awesome with the lighting on. Also, that beanbag chair looks like the comfiest thing ever.

Bedroom to walkin closet

Submitted by Jonesey on Fri, 11/18/2016 - 21:55

Bedroom conversion to walk in closet.

Inspired by Ana White we turned a spare bedroom into a walk in closet.  We ripped up the old carpet, polished the concrete floors and built over 30 feet of custom closet.  We also added two shoe racks and a linen closet.  The shelves are 90" tall and that enabled us to double up on the hanging pipe.

Thanks to all here on Ana White for the inspiration!


Estimated Cost
$800
Estimated Time Investment
Week Long Project (20 Hours or More)
Finish Used
Clear polyurethane
Recommended Skill Level
Intermediate

Comments

Loft Bed

Submitted by melleemak on Sun, 10/21/2012 - 08:51

This project took a little more time than expected. Being new at this I'm definitely not efficient yet. Sanding and staining took the longest. Though the plans said to put it together in the room then sand and stain, we chose to stain it outside then put it together, so to avoid the mess in the room (renting and couldn't risk it!). That worked well for us. We also added 5 inches to the height so some day it could be converted into a full bunk bed. For some joints we should have used 2" screws rather than the 2 1/2" suggested in the plans, some of the screws went all the way through to the other side.  We used key hole plates to attach the stairs to the platform to make it easy to take apart and put together. We also adde 45 degree braces to support the extra height and an extra brace around 3 sides of the bottom which will one day be the frame for the bottom bunk. It worked really well. The boys love it!

Estimated Cost
$100
Estimated Time Investment
Week Long Project (20 Hours or More)
Finish Used
Minwax 2 in one Bombay Mahogany
Recommended Skill Level
Beginner

Wall Hanging Cabinet

Submitted by ananda on Thu, 08/07/2014 - 20:25

This cabinet is made of our local Torrey Pine: “the rarest pine species in the United States, an endangered species growing only in San Diego County and on one of the Channel Islands”-Wikipedia. It has special meaning to us because we love hiking at the Torrey Pine State Reserve! And the purple one is poplar, which I used on the sides.

The design is inspired by early American jelly cupboards and shaker cabinets. We wanted an open cabinet with shelves so we can see and appreciate those pretty bowls and potteries we love. We also love the charming country style of those primitive furniture pieces.

The entire post is here- http://www.apieceofrainbow.com/diy-make-a-wall-cabinet-from-scratch/

Estimated Time Investment
Week Long Project (20 Hours or More)
Finish Used
tung oil
Recommended Skill Level
Intermediate

Farmhouse Kitchen Table

Submitted by Anonymous (not verified) on Tue, 11/22/2016 - 18:28

This Farmhouse table and bench were made, stained, and painted over the course of two weekends. This makes a great project for a beginner woodworker to cut their teeth on.  You can make something fantastic while learning various woodworking techniques (i.e. joinery, planing, sanding, and staining). The chairs were purchased separately at the At Home store for $150 each. 

Estimated Cost
$150
Estimated Time Investment
Weekend Project (10-20 Hours)
Finish Used
Special walnut stain and 3 coats of satin clearcoat on top. The legs are stained, then painted with spun cotton paint (behr), then scuffed for a Farmhouse look, and finally sealed with 2 coats of satin clearcoat.
Recommended Skill Level
Beginner

Chicken Coop

Submitted by Elloh on Tue, 08/11/2020 - 11:05

This was my biggest build yet and these plans along with being able to see a few brag posts with modicifactions made this project less intimidating. I extended the coop in order to add a walk in door. The drop down doors on both sides will give plenty of access and help with cleaning. I've added door latches to all the doors since putting it in place. My dad provided the cedar so that greatly reduced my costs. This project took about six days to complete. The fun part was getting it out of my carport : ) This was built for my daughter's chickens and she is thrilled with it. So am I! Thanks for the plans Ana!

Estimated Cost
Hardware, screws, hardware cloth and plywood - around $150

Simple and Elegant Stool

Submitted by Jake on Tue, 10/23/2012 - 08:36

This is the second of the Simplest Stool design I retrieved from Ana's site and built. I love the stool for its ease of construction and beautiful lines. Get your measurements spot on and it goes together in a flash. I did use a 15 inch diameter project round for the seat. I built it upon the request of a friend so they have to finish it. Lots of PHs in this small stool so I wish that Kreg or someone would produce PH inserts that easily fit where you have 11/4 inch ph screws.

Built from Plan(s)
Estimated Cost
Seat $7.50, Legs $4, 1x2 $6 plus misc or about $20 or a little less.
Estimated Time Investment
Afternoon Project (3-6 Hours)
Finish Used
None, but if I were to do it I would paint the support a white satin and stain the seat a semi-dark gunstock or a really nice golden oak. Do them separately and then make the attachment.
Recommended Skill Level
Beginner

Husky farmhouse table

Submitted by Dhoppe on Sun, 08/10/2014 - 20:11

My first DIY project that I built as a wedding present for my soon to be wife. Got my inspiration from Ana White's husky farmhouse table. I made the table a 4'x4' top and a counter height 36".

Built from Plan(s)
Estimated Cost
$165
Estimated Time Investment
Weekend Project (10-20 Hours)
Finish Used
Minwax dark walnut base stain sanded, minwax classic gray stain, then paint and sand to finish the base. Table top is two coats of minwax classic gray with three coats of minwax fast drying polyurethane.
Recommended Skill Level
Starter Project

Mid century dresser

Purchased a dwell studio mid century dresser, and only the legs arrived. The company let me keep the legs since the dresser was out of stock, but I had it in my head that I wanted that dresser so decided to replicate it! These were my first drawers ever and getting the inset spacing perfect was challenging but fun! 

Built from Plan(s)
Estimated Cost
200
Estimated Time Investment
Weekend Project (10-20 Hours)
Finish Used
Minwax water based wipe on poly, American decor maxx gloss paint in white.
Recommended Skill Level
Intermediate

Outdoor side table

Keeping budget with wood projects, made side table for outdoor fire pit area.

Estimated Cost
$25
Estimated Time Investment
An Hour or Two (0-2 Hours)
Finish Used
Legs and braces=rosewood stain
Top=honey pine
Recommended Skill Level
Starter Project

Chunky Leg Bed

Submitted by thehallway on Fri, 10/26/2012 - 08:46

I built this bed for my sister's new house. I used aspen for the visible boards and furring strips and regular lumber for the rest. The only change from the original plan is that I used 1x6s for the legs so it would sit higher off the floor.

I painted it with Rustoleum Painter's Touch Metallic in Oil Rubbed Bronze and I really like how it turned out. I didn't use any primer, so you can almost see the wood grain which gives it the illusion of being stained. It also has a metallic sheen in the right light, but it's very subtle. The only downside is the metallic gives it a rough texture. I contemplated putting a couple coats of poly over it, which I may do later.

*Picture was taken with her old full size mattress

Estimated Cost
~$200 including headboard
Estimated Time Investment
Day Project (6-9 Hours)
Finish Used
Rustoleum Painter's Touch Metallic in Oil Rubbed Bronze
Recommended Skill Level
Intermediate

Comments

Francoise

Fri, 10/26/2012 - 19:44

Looks so gorgeous, the combo of headboard and frame, the chunky legs and the paint job is attention grabbing. It's a cohesive whole.

Sweet pea bunk bed

My husband and his father-in-law made this bed together for our daughter. It took about 3 months working every other weekend. My father-in-law is an engineer and he modified the bed so we could more easily assemble and disassemble it to get it up the stairs and into her room. My mother in law painted it, added the flowers and made the roof shingles out of craft foam sheets.

Built from Plan(s)
Estimated Cost
$200
Estimated Time Investment
Week Long Project (20 Hours or More)
Recommended Skill Level
Intermediate

Comments

booksnotbombs

Wed, 08/13/2014 - 11:55

What a lucky daughter you have! How old is she? I'm 28, and I'd LOVE to have this bed! ;) You can tell a lot of work went into this and the details. Great job.

White Bunk Beds

Submitted by Anonymous (not verified) on Tue, 11/29/2016 - 21:51

This was a pretty straightforward project. The building itself was simple and quick, although the sanding and paint took a while. I wish I had sanded before putting the boards together to make a cleaner look. The bolts had to be awkwardly close to the edge to avoid the 2x6s on the headboard and footboard, but it ended up working ok with some serious pre-drilling. I used 9 1x3 slats to create the platform for each mattress (18 total). It would probably be better with 12 so they are closer together. 

Overall, the bunk bed is super sturdy (and heavy!) and the kids LOVE it. 

Estimated Cost
$200
Estimated Time Investment
Weekend Project (10-20 Hours)
Recommended Skill Level
Beginner