Community Brag Posts
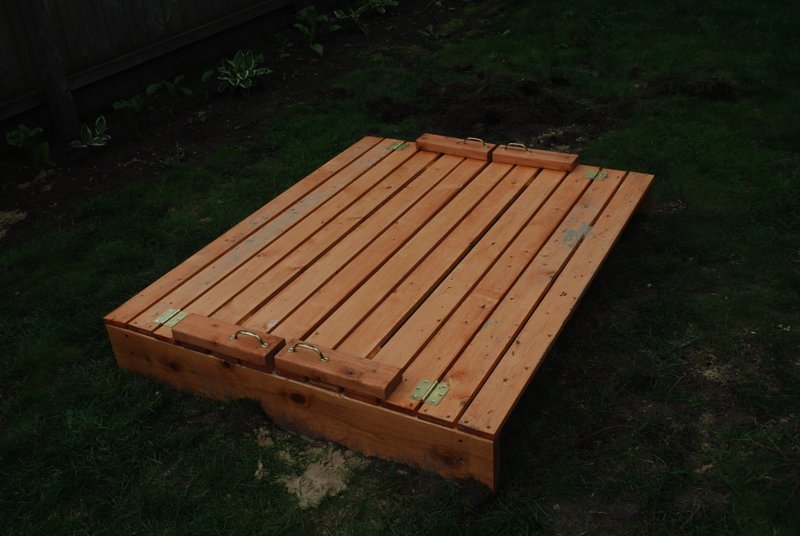
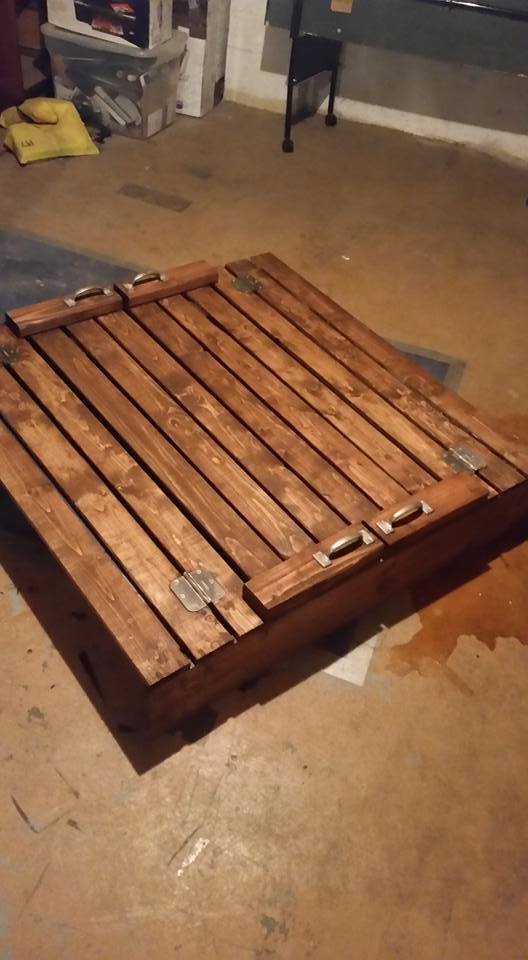
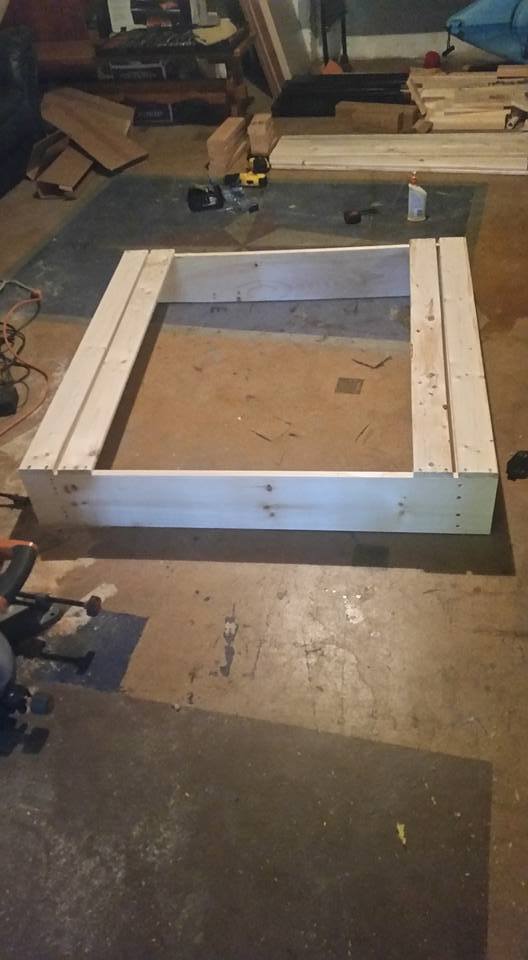
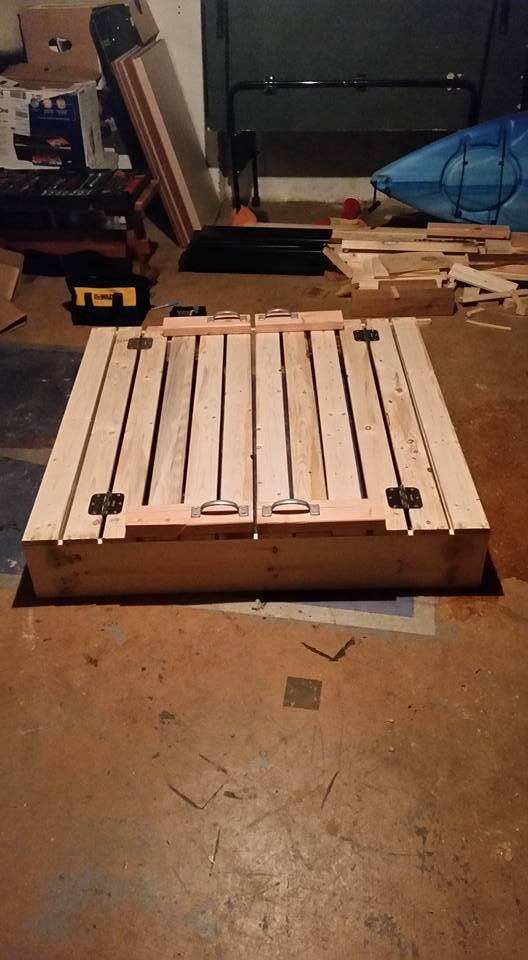
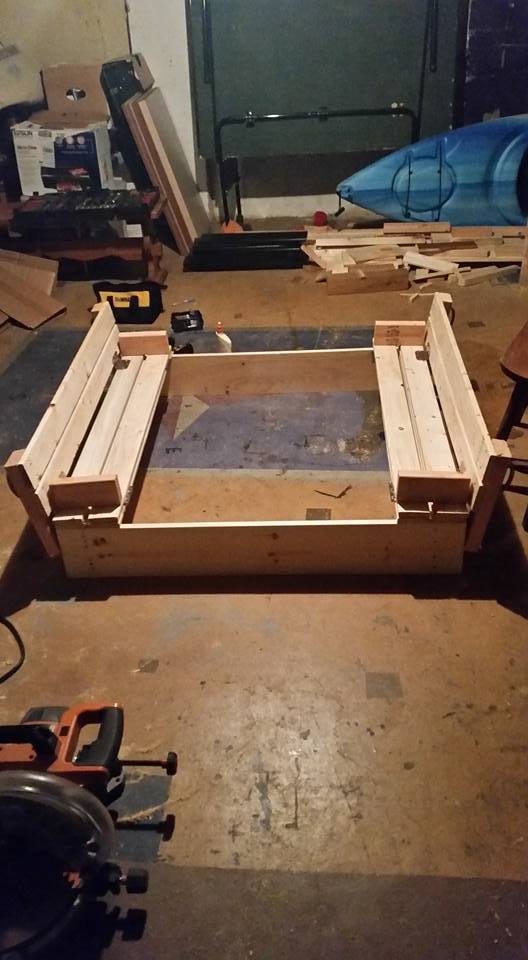
Sandbox with Benches
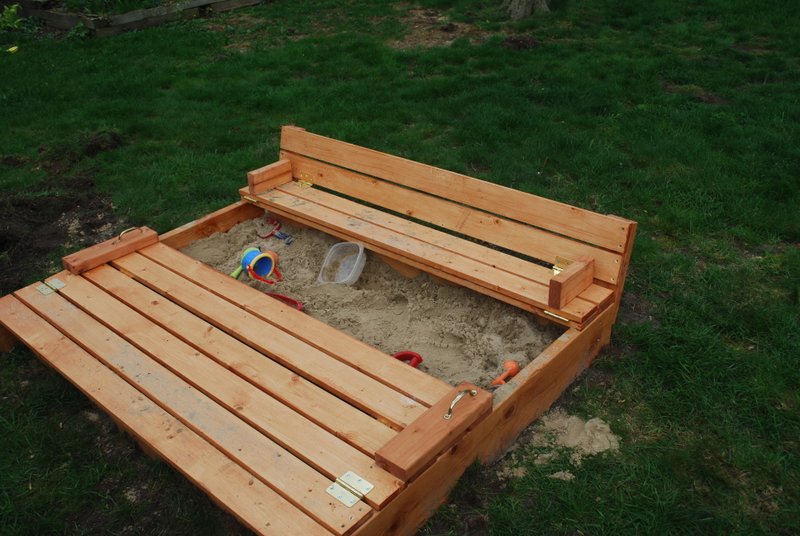
For the last year we have been kicking around making a sandbox. We really needed a cover and really wanted seats. So this worked out perfect. We did modify the plan a little to make it just a little bigger. It is 4' x 5' instead of the 4'x4' called for in the plans. Very easy to build...we have very little building experience and pulled it off. We did dig out the grass where the box was going to sit and stapled 2 layers of landscaping fabric to the bottom of the box frame. We also sealed the main box frame with a little silicone to minimize sand leakage.

Built from Plan(s)
Estimated Time Investment
Day Project (6-9 Hours)
Finish Used
Miniwax Polystain (Stain and Urethane in one) in Pecan color
Recommended Skill Level
Beginner
Comments

Mon, 05/07/2012 - 05:32
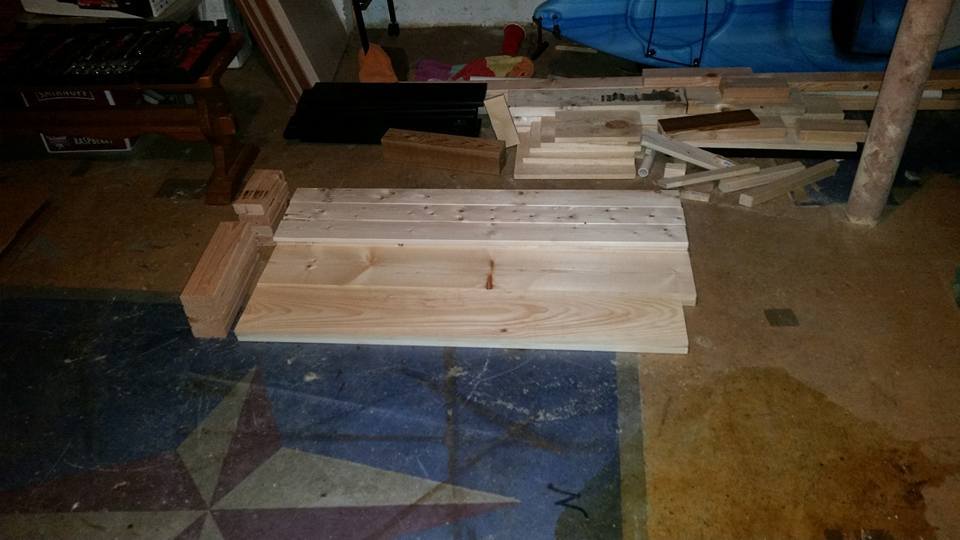
Widening
Thanks. There are the same number of 1x4s on the top they are just longer. I was worried about the benches sagging because of the increased length and was prepared with scrap 2x4s to add support under the first two boards if needed but it doesn't seem to be a problem. We only widened it to 5' though...I think at some point that extra support would be needed.
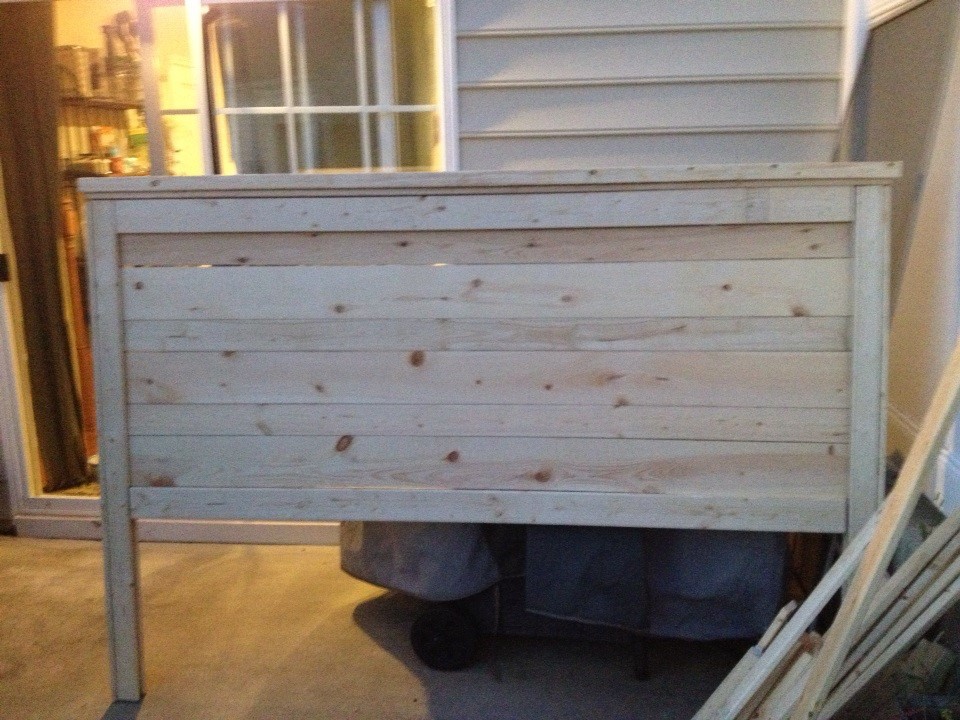
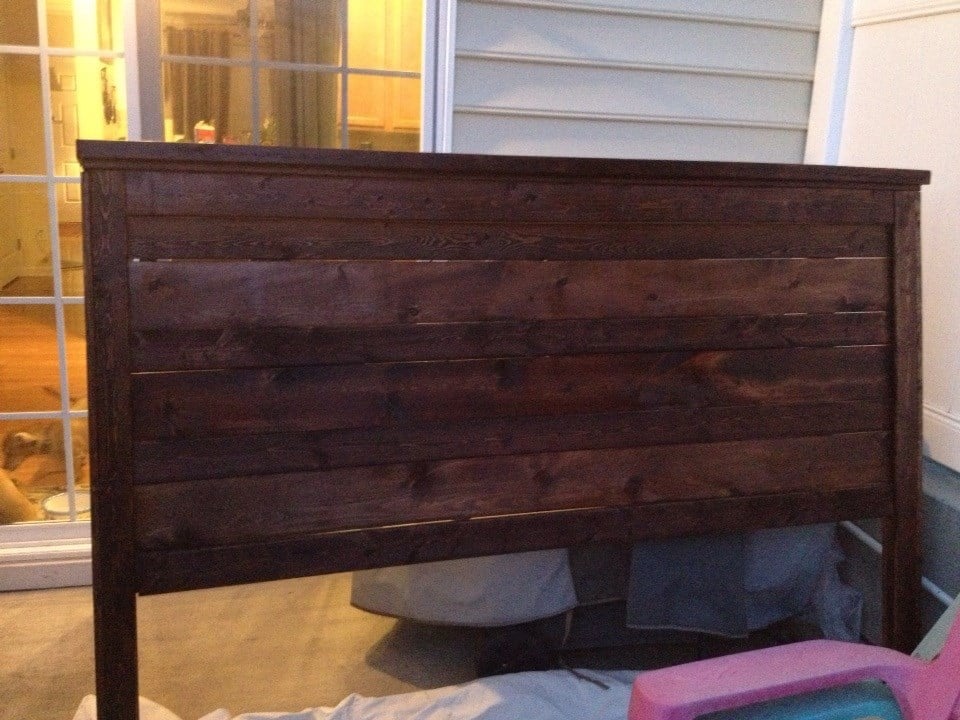
Headboard
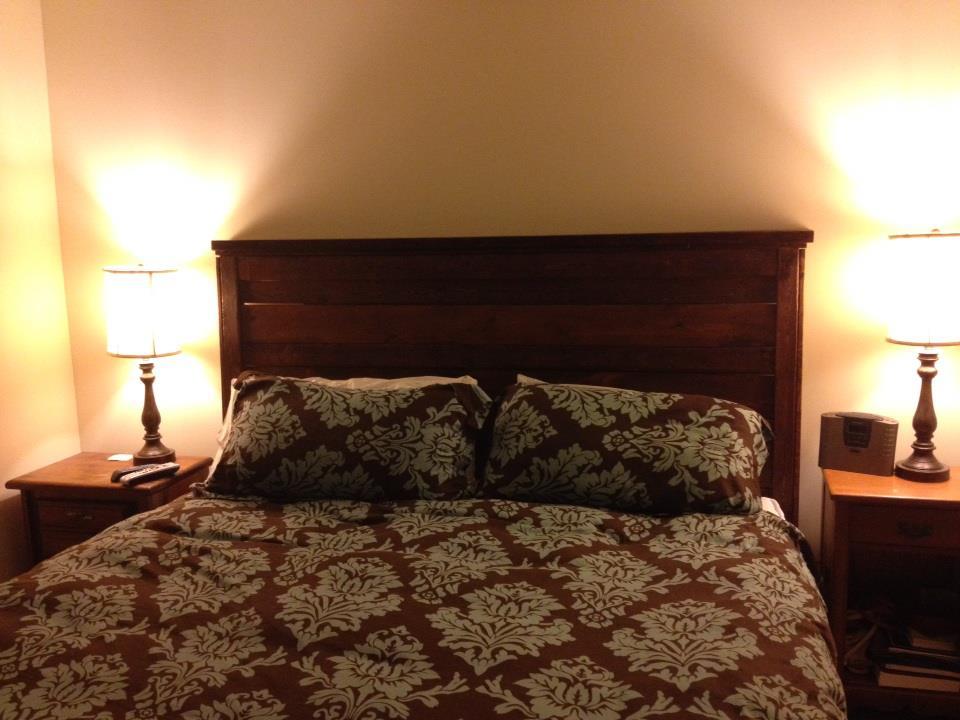
2nd project - added some additional supports on the back with scraps & fixed a bowing issue. We've had it in the bedroom since October 2013 & love it (especially the price tag)!
Built from Plan(s)
Estimated Time Investment
Afternoon Project (3-6 Hours)
Recommended Skill Level
Beginner
Sandbox
I followed Ana White's instructions to a tee and things turned out great! I chose a dark brown wood stain and used an exterior Helmsman Spar Urethane for protection. Because the sandbox will always be outdoors, I ended up putting 5 layers of urethane on it.
I also attached a tarp (not seen in the pictures) to the bottom to hold the sand in. This way the sandbox can be dragged if you want to move it's location.

Estimated Cost
I bought all of my wood from Home Depot, as well as the wood screws, brushes, stain and spar urethane, so it ended up being a little bit more than I expected. All in all, it was around $125, but it could definitely be made cheaper if you have wood already on hand or the screws, brushes, stain, and urethane readily available.
Estimated Time Investment
Weekend Project (10-20 Hours)
Recommended Skill Level
Intermediate
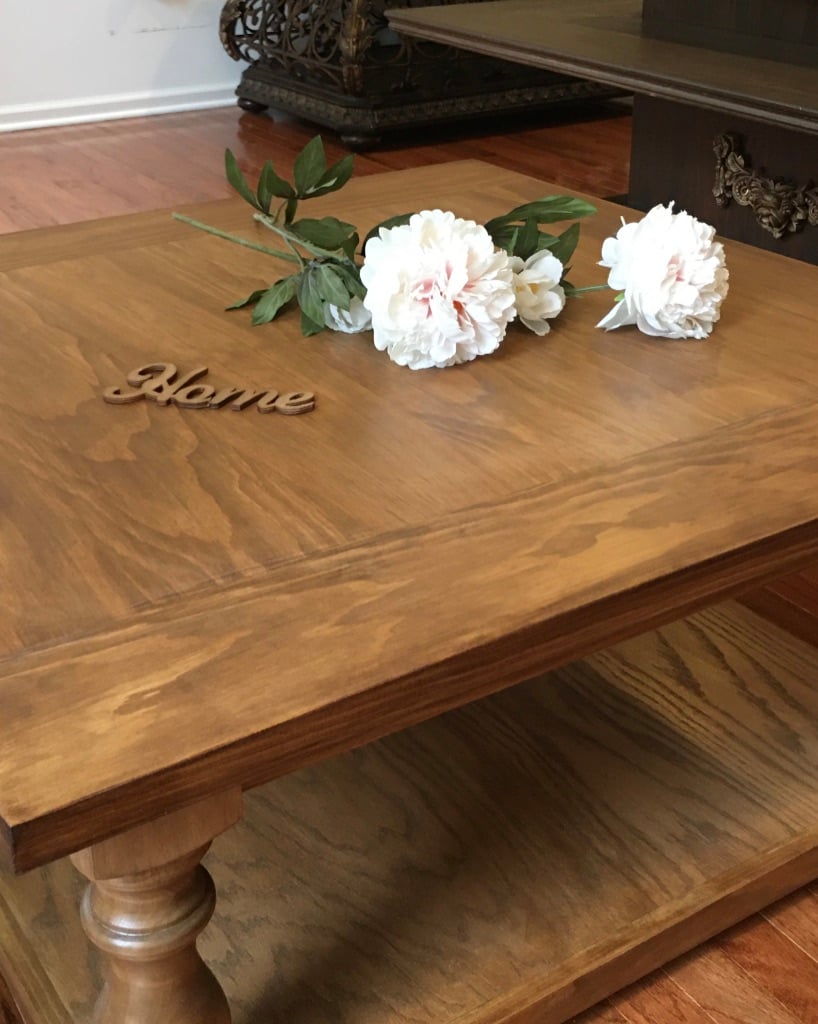
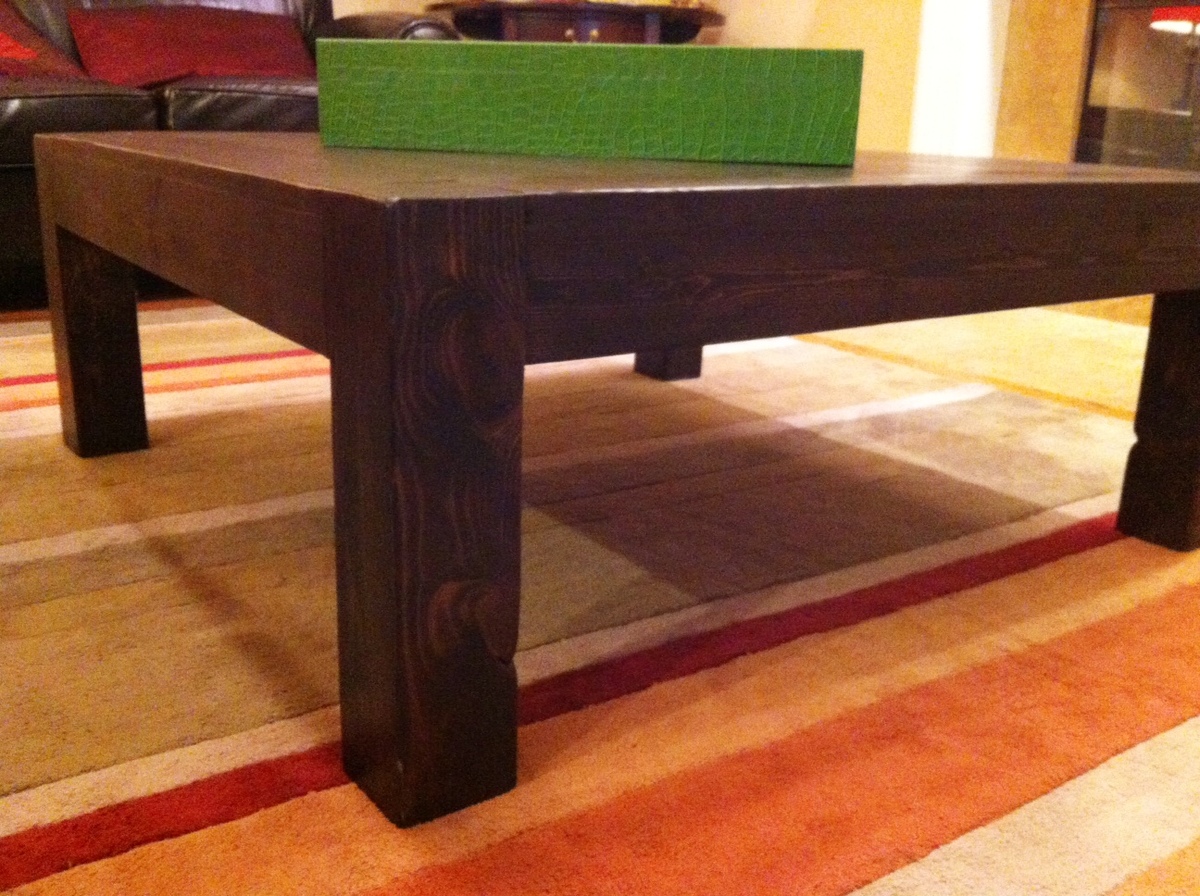
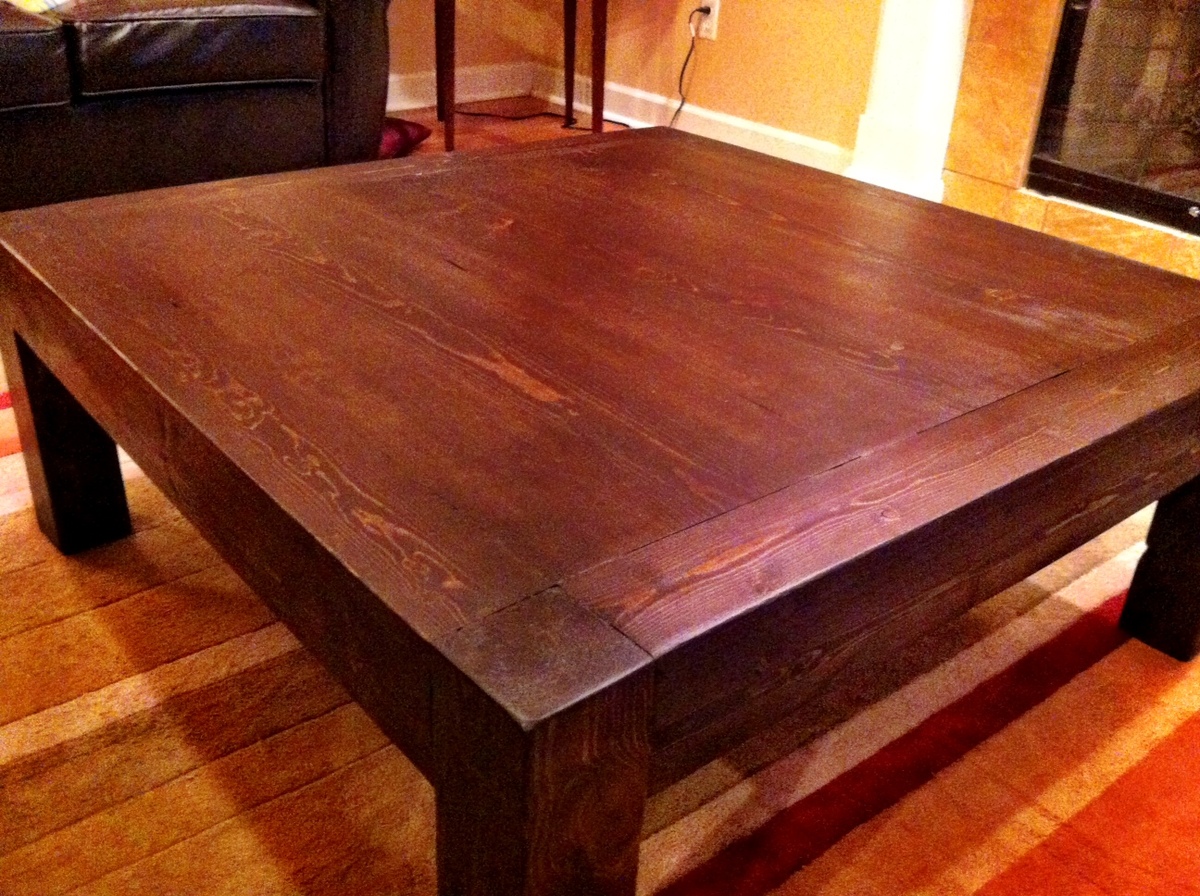
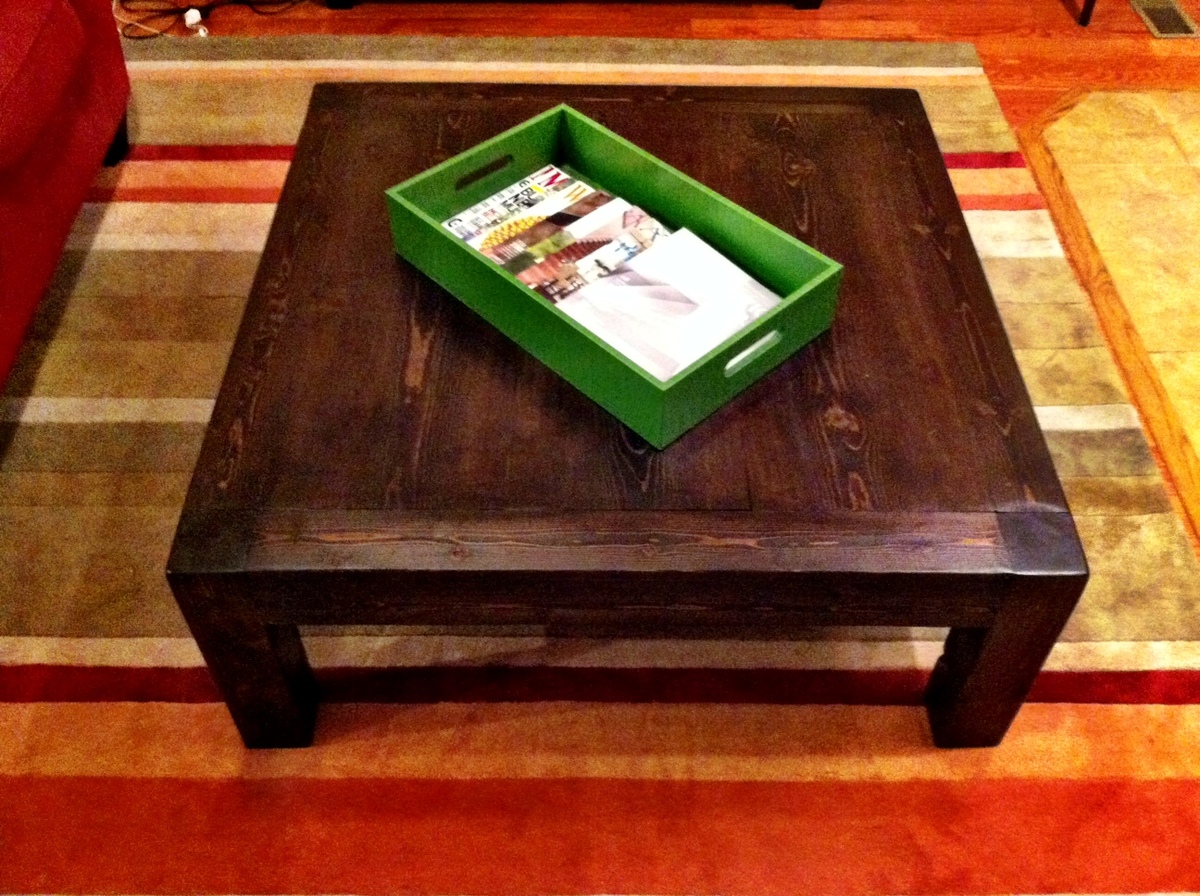
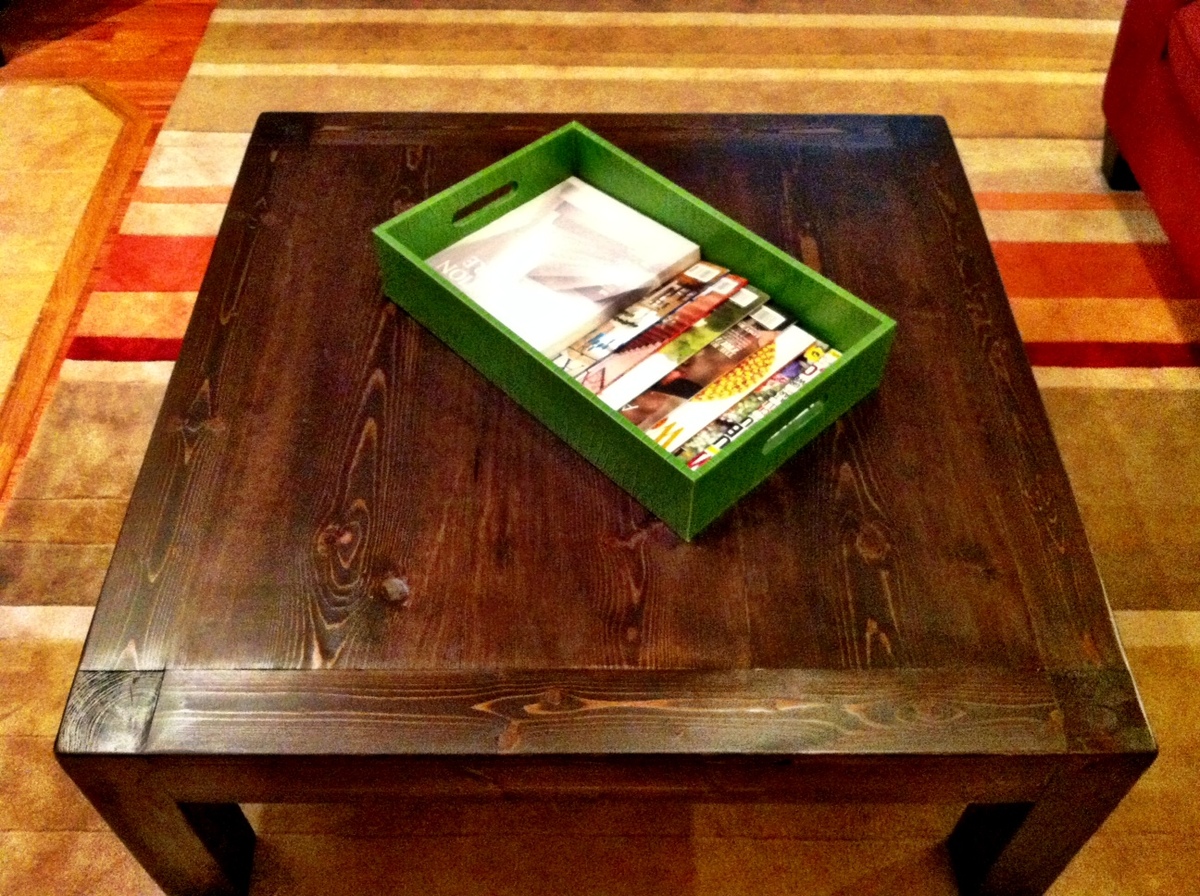
Corona square coffee table
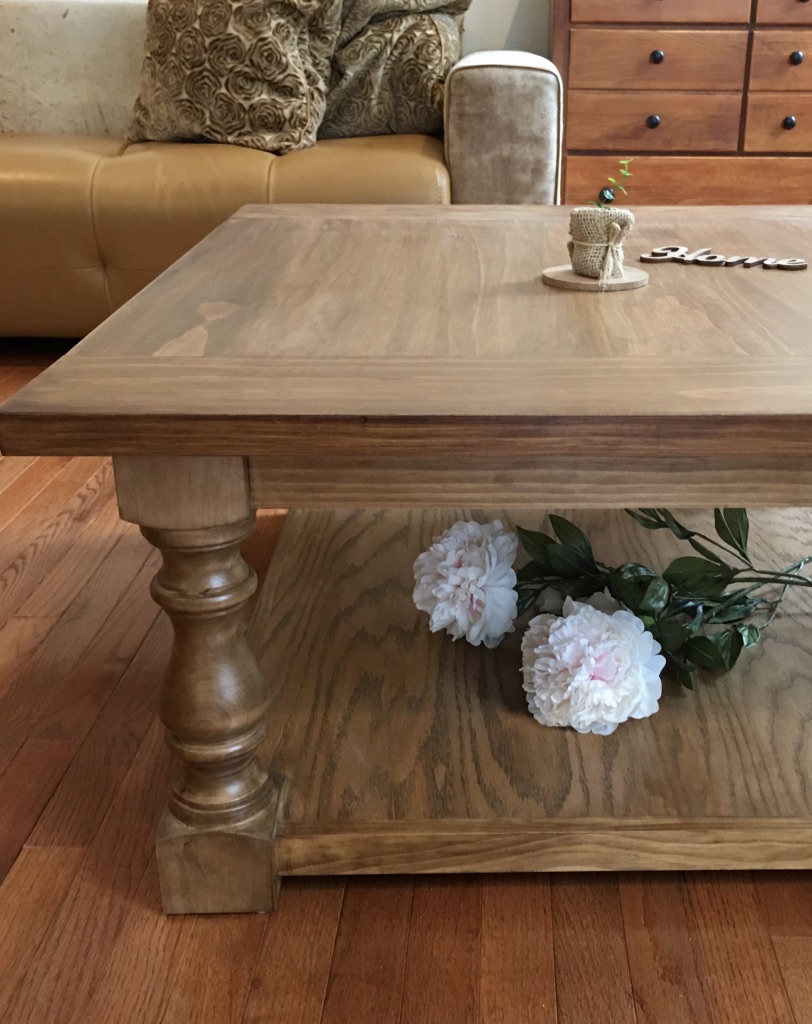
Farmhouse style wood coffee table with gorgeous balustrade legs, 38" x 38", 18" high. Stained antique oak, sealed for long life...
Built from Plan(s)
Estimated Cost
under $200
Estimated Time Investment
Weekend Project (10-20 Hours)
Finish Used
General Finishes water based stain antique oak, flat water based poly.
Recommended Skill Level
Intermediate
Large rustic bench
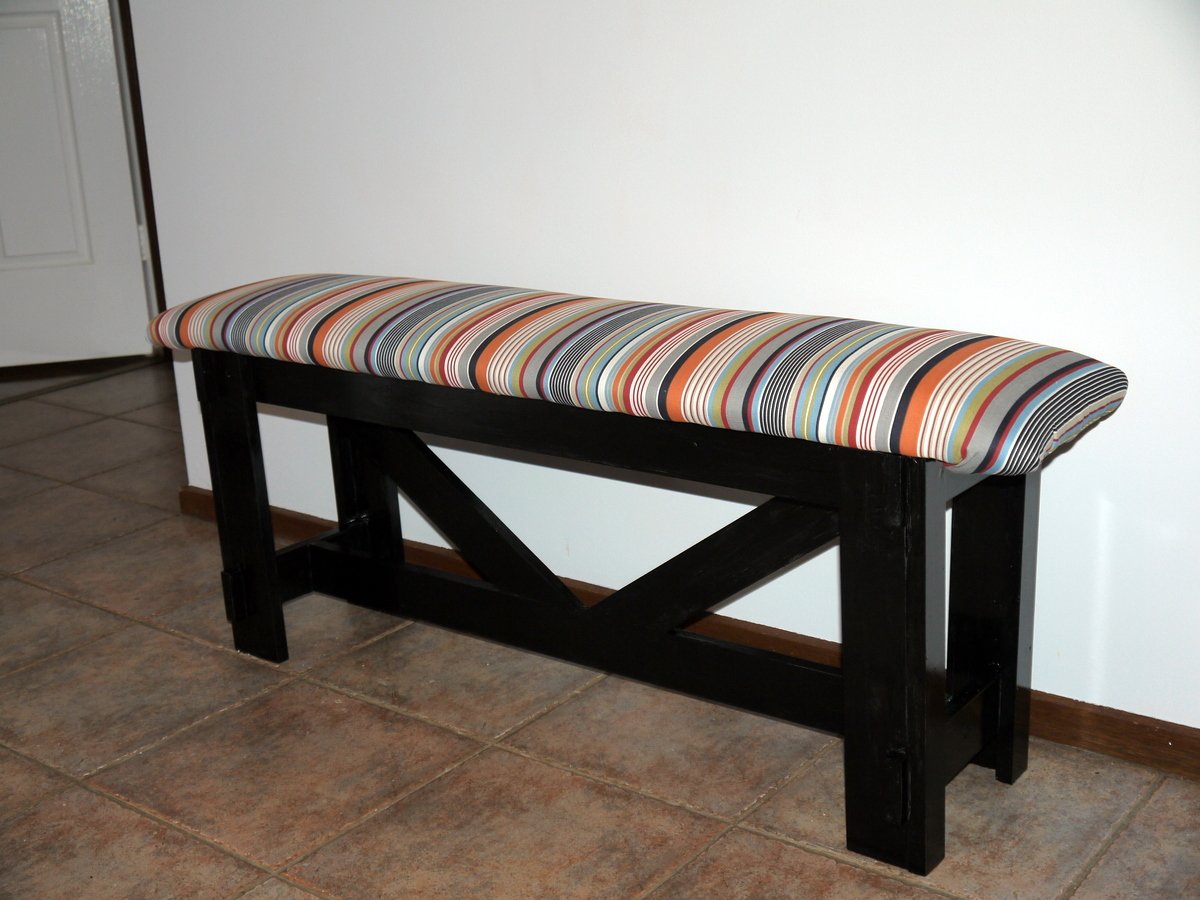
This is the first woodworking project I have done since high school (16 years ago!) and it's more ambitious than anything I attempted then!
It was easier than I thought on the whole, although I got a bit baffled by Australian standard timber sizes being totally different from USA ones. (The guy at the timber yard was all "One WHAT by two WHAT?") And because I couldn't find a 1x12 longer than 47 inches, I had to make the bench slightly shorter. I didn't anticipate how incredibly hard that would make it to calculate the cross support angles. (It's not just trigonometry, because there are multiple possible solutions).
It was the first time I've tried to upholster anything, too, so it's a bit wrinkly at the corners, but I'm happy with it.
I think the painting took the longest. I built the bench in one afternoon, but I had to do four coats of paint (and one of primer), each of which took nearly 24 hours to dry, so it took forever to finish.
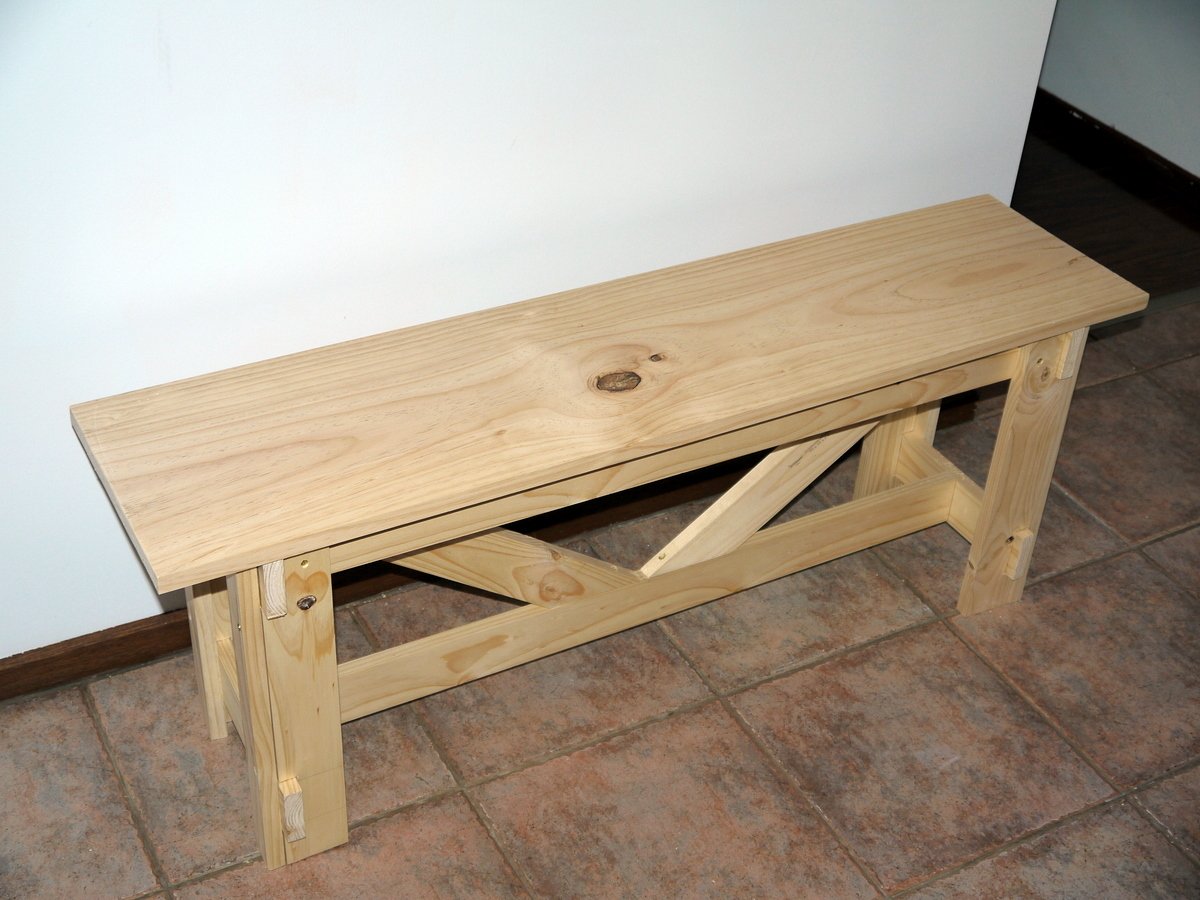
Built from Plan(s)
Estimated Cost
$70 ($30 for the wood; $25 for fabric and batting; $10 for paint; $5 for screws and sandpaper)
Estimated Time Investment
Weekend Project (10-20 Hours)
Finish Used
Black acrylic "enamel" paint. Four coats over one coat of water-based primer. Upholstered top with upholstery fabric and batting, using a stapler gun.
Recommended Skill Level
Starter Project
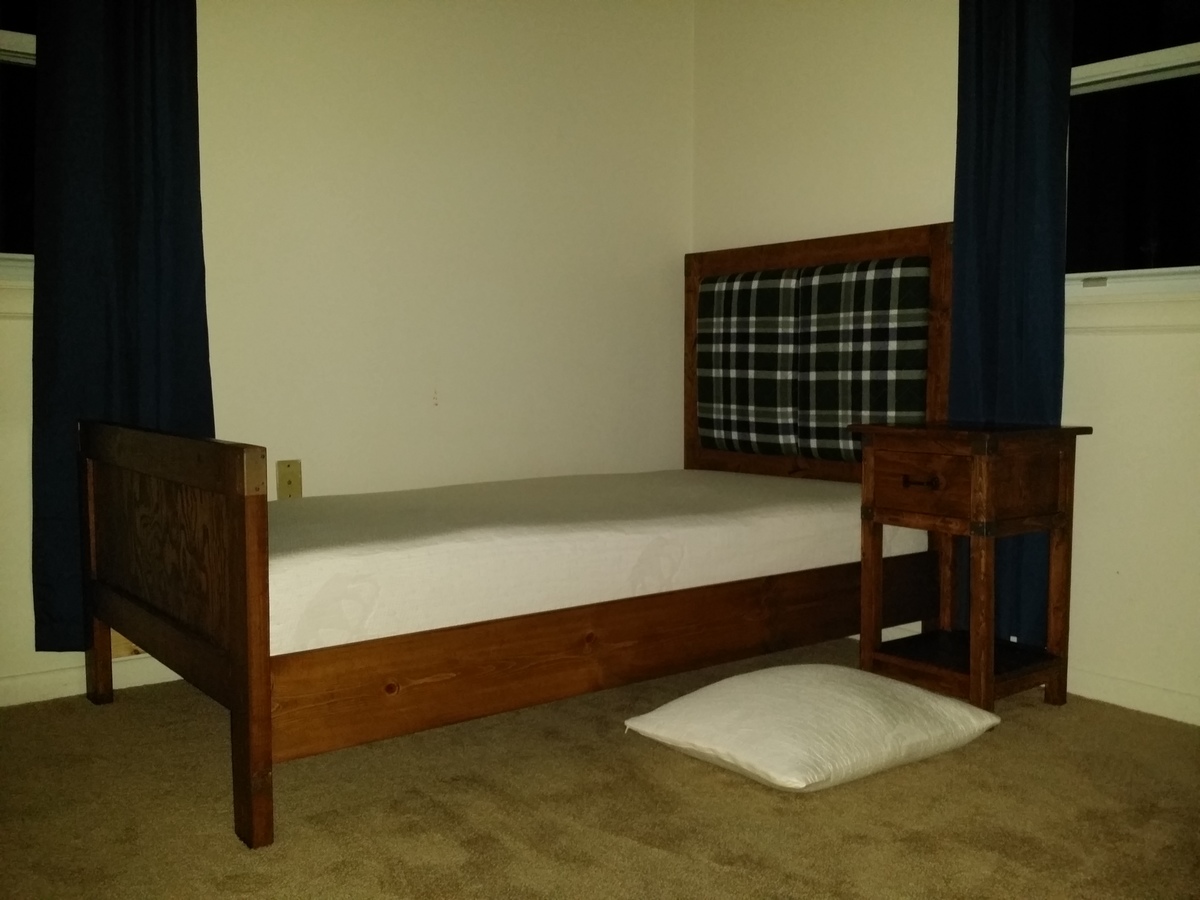
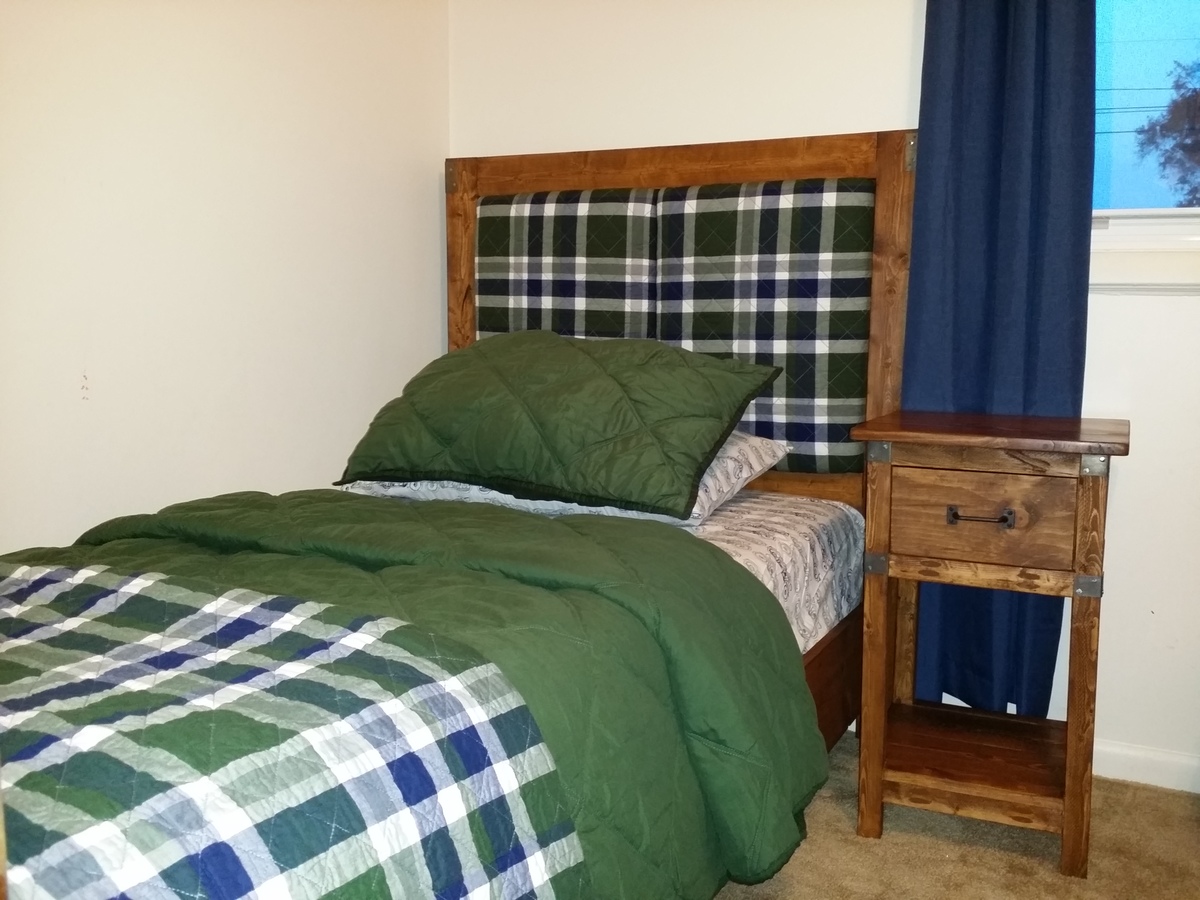
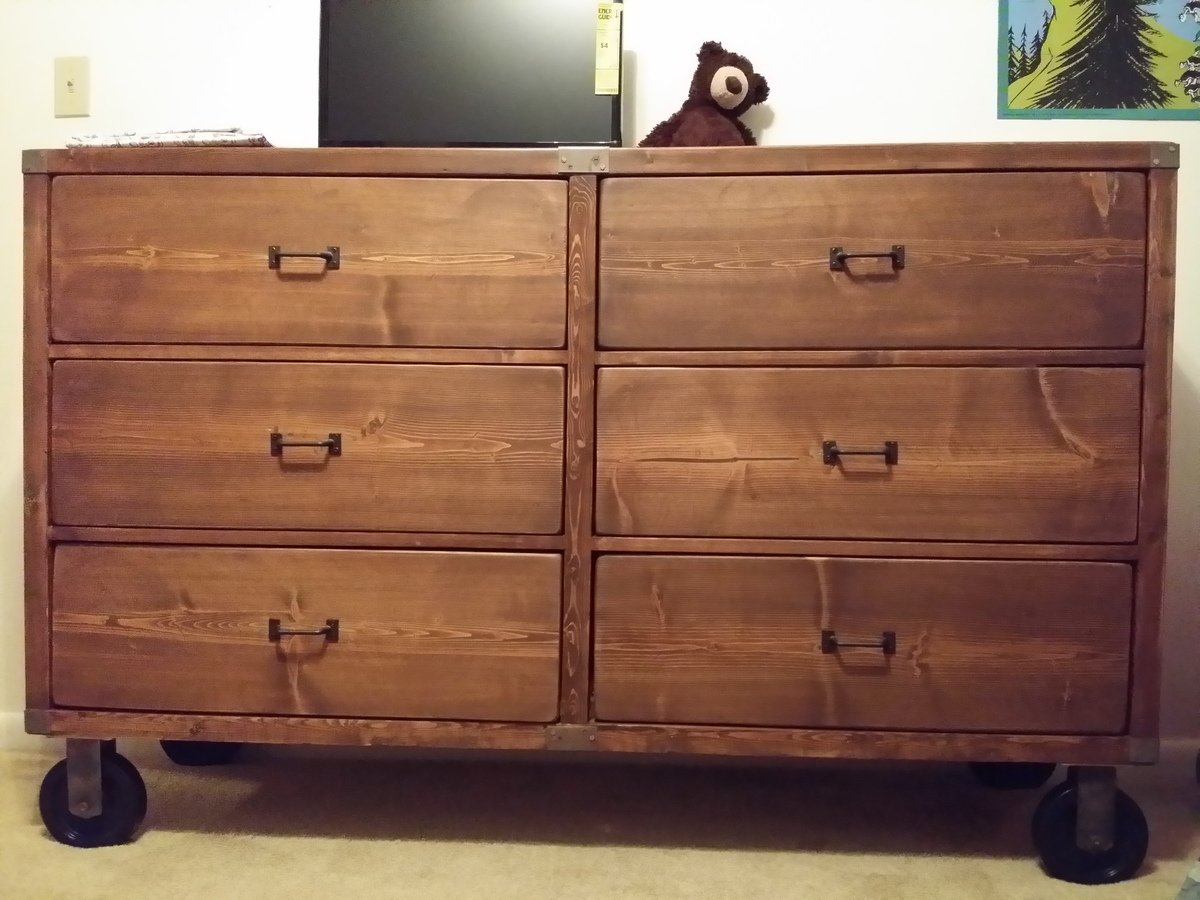
Rustic Twin Bed with Upholstered Headboard (Matching Nightstand & Dresser)
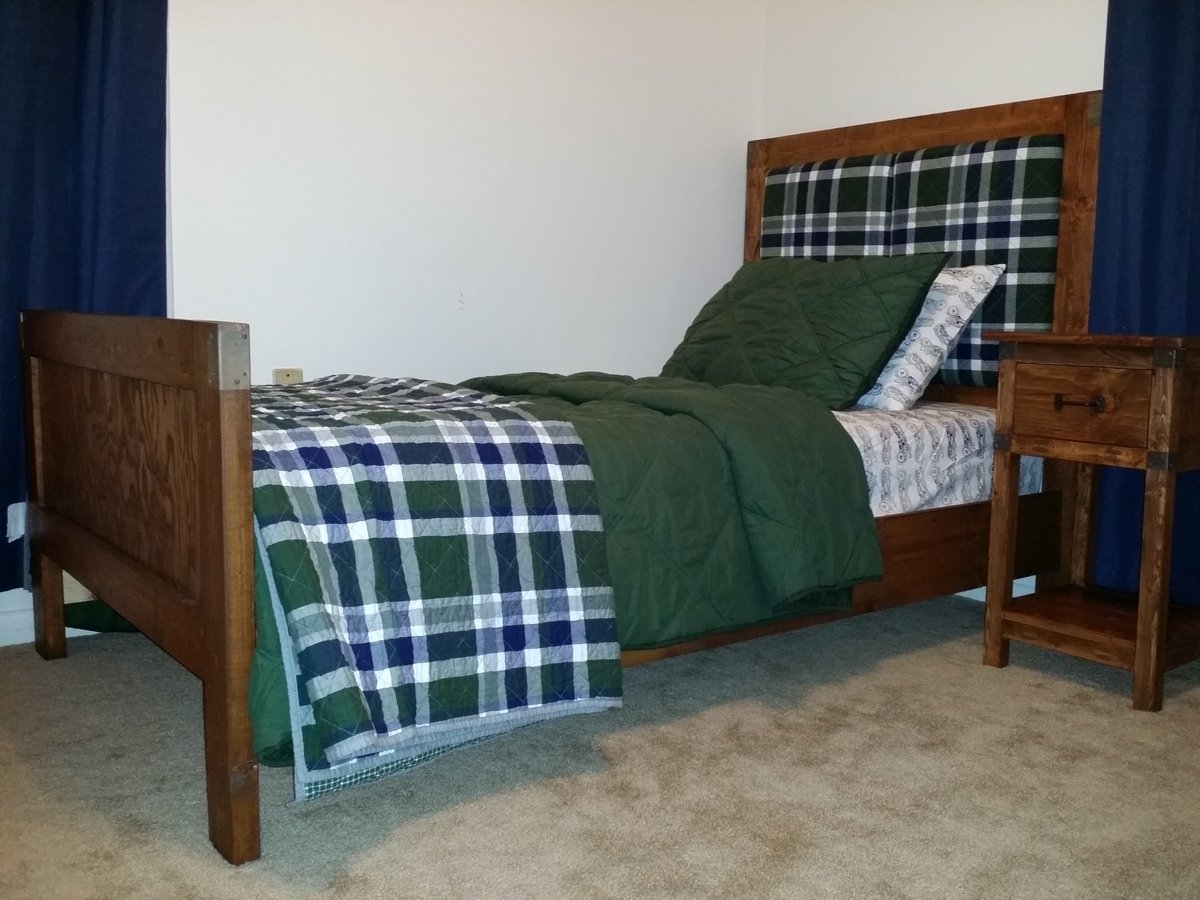
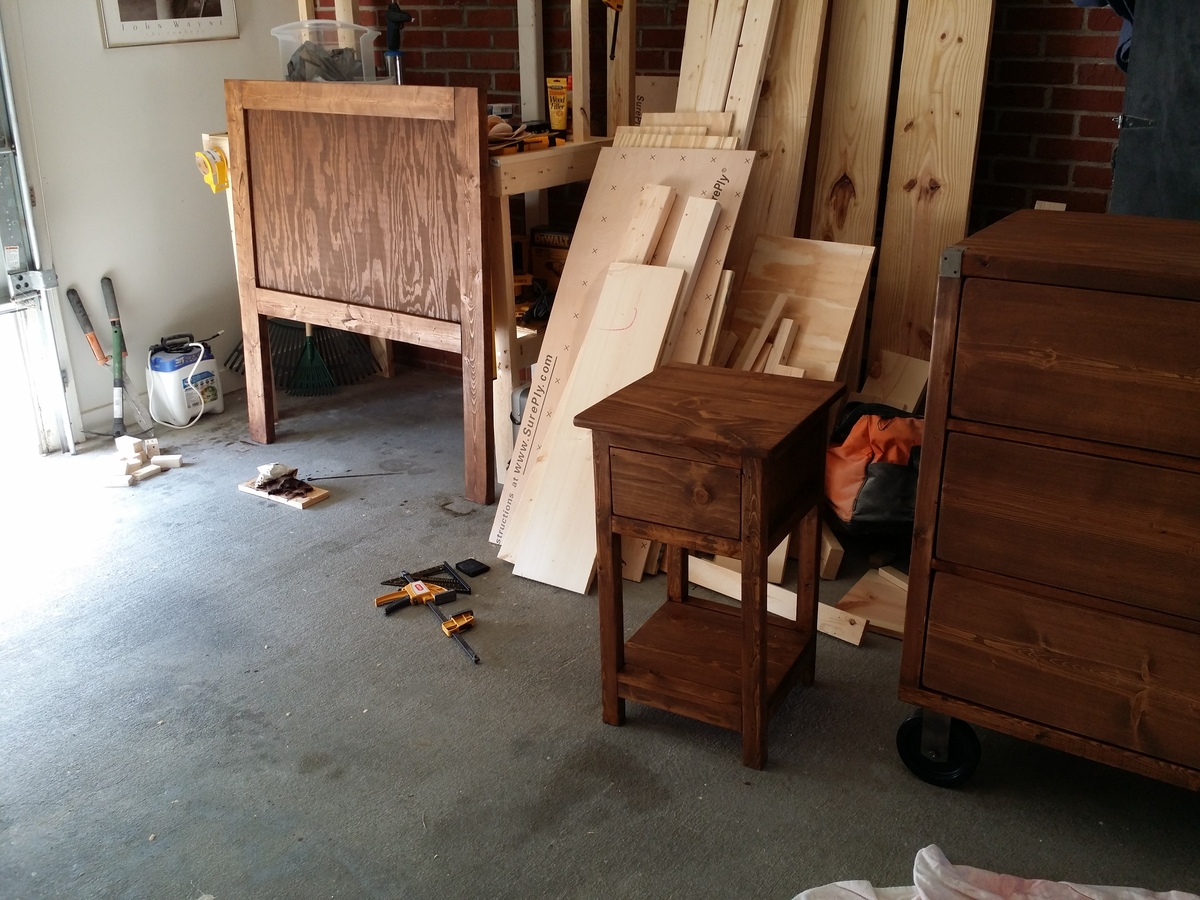
I started my son's bedroom set back at the beginning of January and have finally finished! I began by building the matching dresser (http://ana-white.com/2014/02/rustic-dresser-and-bedroom-set) and then started the bed only a week ago. The night table was taken from http://ana-white.com/2011/06/mini-farmhouse-bedside-table-0 - I had built it over the summer, but I couldn't get my pocket holes on the inside of the table because my drill wouldn't fit, so I wasn't going to use it.. until I realized it was the perfect little bedside table for a two year old who might destroy it anyways!
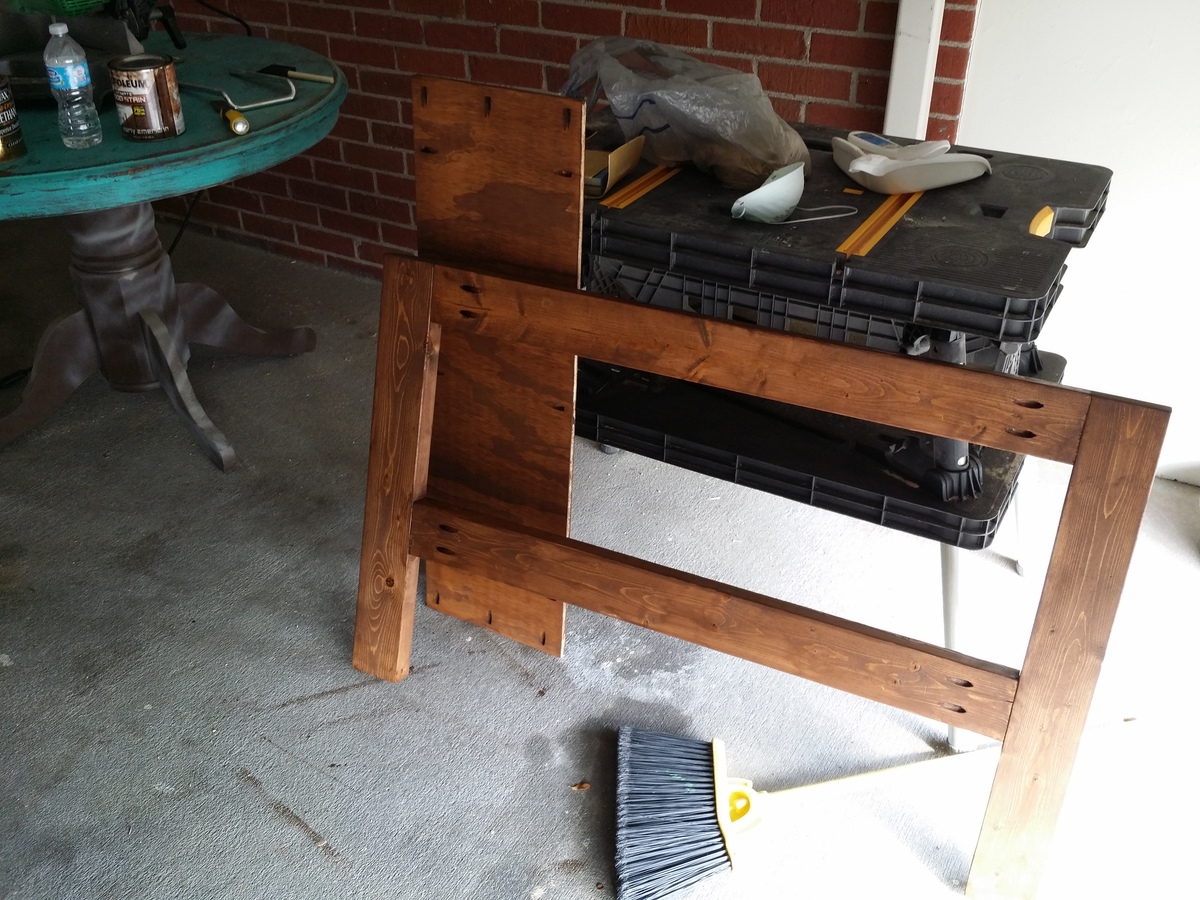
Back to the bed... I just had this vision of what I wanted my son's room to look like after seeing the rustic rolling dresser plan, and I stumbled on the Emme Twin bed plan. It was kind of perfect, but I didn't like the whole "window" look on the headboard. I still may add a divider on the foot board, but haven't decided yet. Regardless, so I envisioned something else with the same concept of the Emme twin bed. Building it exactly the same way without the dividers, I ordered the clearance shams from pottery barn that matched his new quilt and bought another piece of half inch plywood. I cut it in half and left about a quarter inch on each side of each piece of plywood to accommodate the fabric in between the 2 by 4s. I added one inch of foam and a couple layers of batting, matched up the two shams side by side, folded them each around the batting and foam, and stapled them. They fit perfectly into the headboard with some 1 1/4 or 1 1/2 inch screws (There is a gap from the fabric on the back, so your screw needs to account for that. You could put like a 1x4 onto each panel to screw through, but I placed the back plywoood attached to the 2x4s too far in, so it would have made the panels "float" and I wanted the fabric of the panels flush to the back plywood) holding them to the back plywood attached to the 2x4s. I wanted the padding on the back of the headboard because I always hear my son slam his head into the wall when he's sleeping and i just wanted to make sure he wasn't hitting the dividers that were on the EMME twin bed.
The bed was so easy to build, stain and finish. It turned out exactly how I had envisioned it. I had to lower the side rail 2x4s because I bought a ten inch memory foam mattress (You can see the foam mattress and pillow rising in the picture!) and didn't want it coming above the headboard, but now I don't think I'll need a guard rail since he is so close to the floor! The 2x4s sit 5.5 inches up from the bottom of each leg. I also added quite a bit of length to the foot board legs because I wanted the footboard to come above the mattress. I wish I had realized that there was much nicer plywood at Lowes, but when I asked, they told me "this is all of the plywood we have" and I got stuck with the ugly stuff.. I will fix the footboard with some nicer looking plywood, but it's good enough for now!
Built from Plan(s)
Estimated Cost
$50 for wood, added $30-$40 for the upholstered part, including the shams
Estimated Time Investment
Day Project (6-9 Hours)
Finish Used
Minwax Early American
Minwax Plyurethane, one coat and sanded, one coat of light wood minwax furniture wax to follow
Minwax Plyurethane, one coat and sanded, one coat of light wood minwax furniture wax to follow
Recommended Skill Level
Beginner
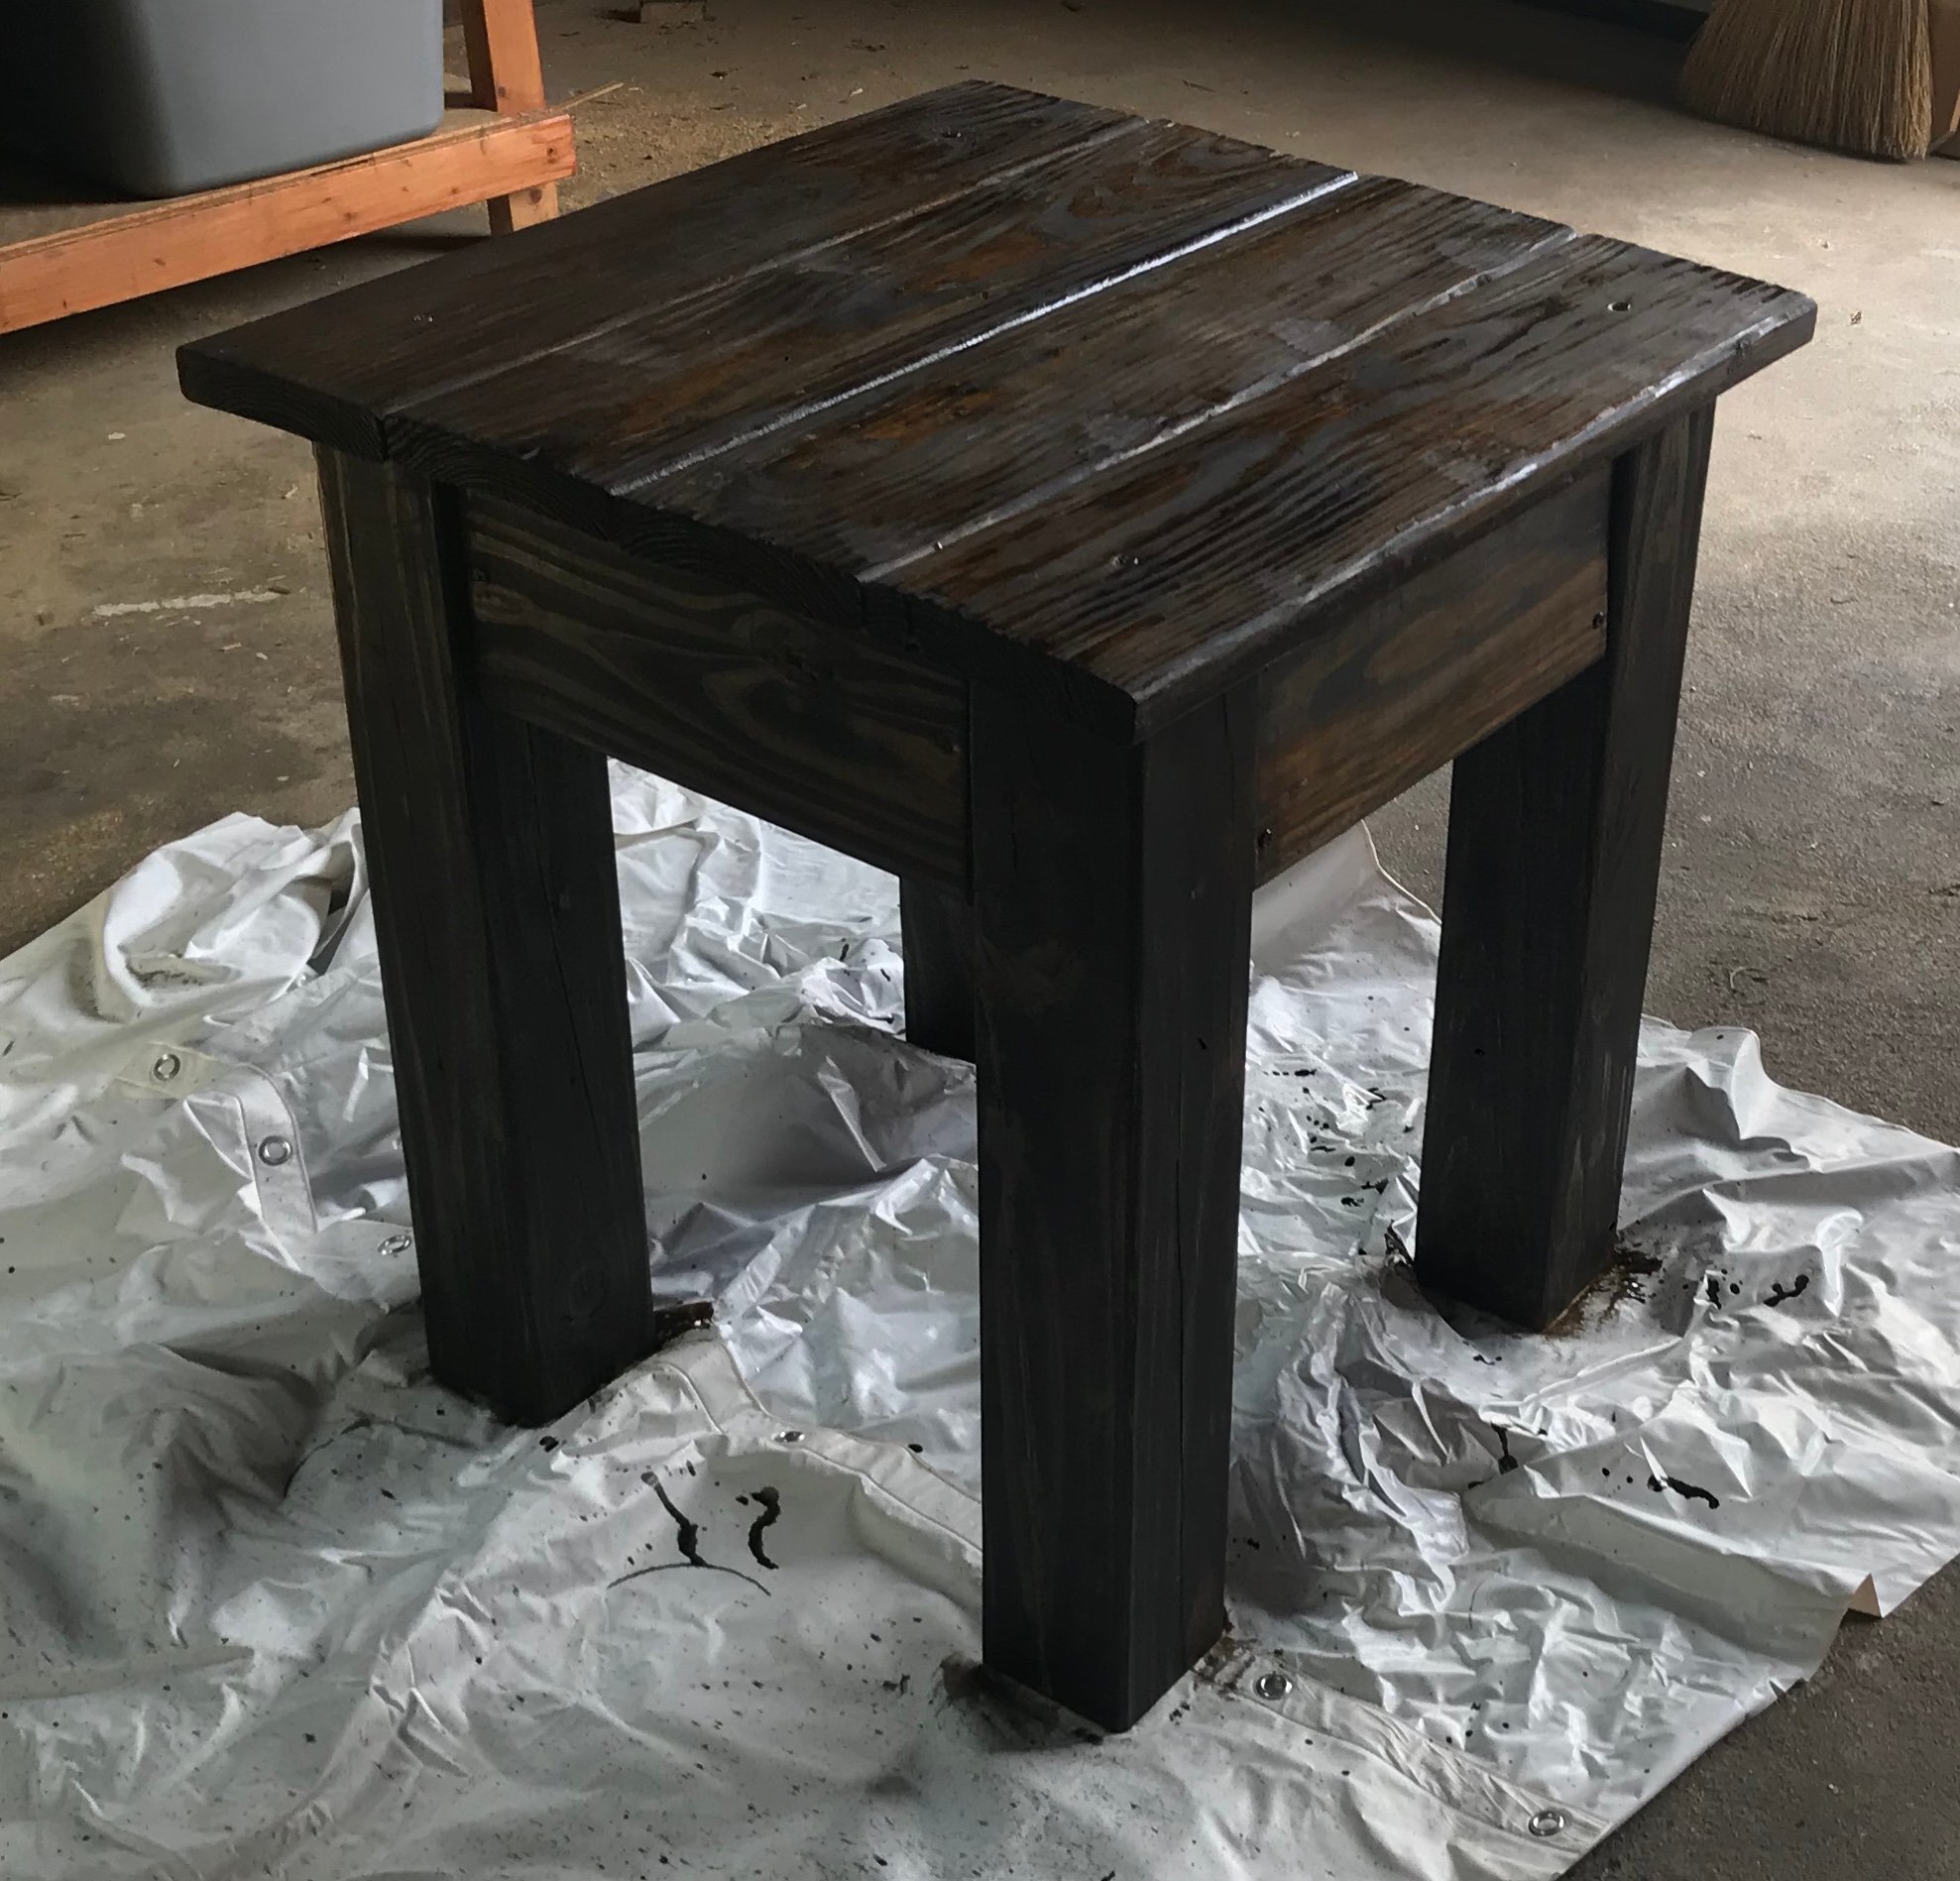
Porch End Table
I made this little end table for my daughter-in-law to accompany the porch bench I made for her about 2 years ago. It's a simple little table but it does have one unique feature. My son and daughter-in-law cut down a large old cedar tree from in front of their house and gave me the wood. I thought it might be nice to build something for them from the tree so aI milled several pieces of the tree and let them dry in my shed for about one year. It took a while to run the wood through the planner to get it just right. I used the wood for the table top and the wood grain looks just beautiful. In fact, I'm just now leaving to their house on Bainbridge Island to give them the table. I know she'll love it!
Estimated Cost
$0.00 I used scrap wood for the legs and apron and cedar from their tree for the top. I had paint on hand.
Estimated Time Investment
Week Long Project (20 Hours or More)
Finish Used
Rustoleum Spray Paint ... Satin
Recommended Skill Level
Beginner
Airbnb Picnic Tables by the Lake
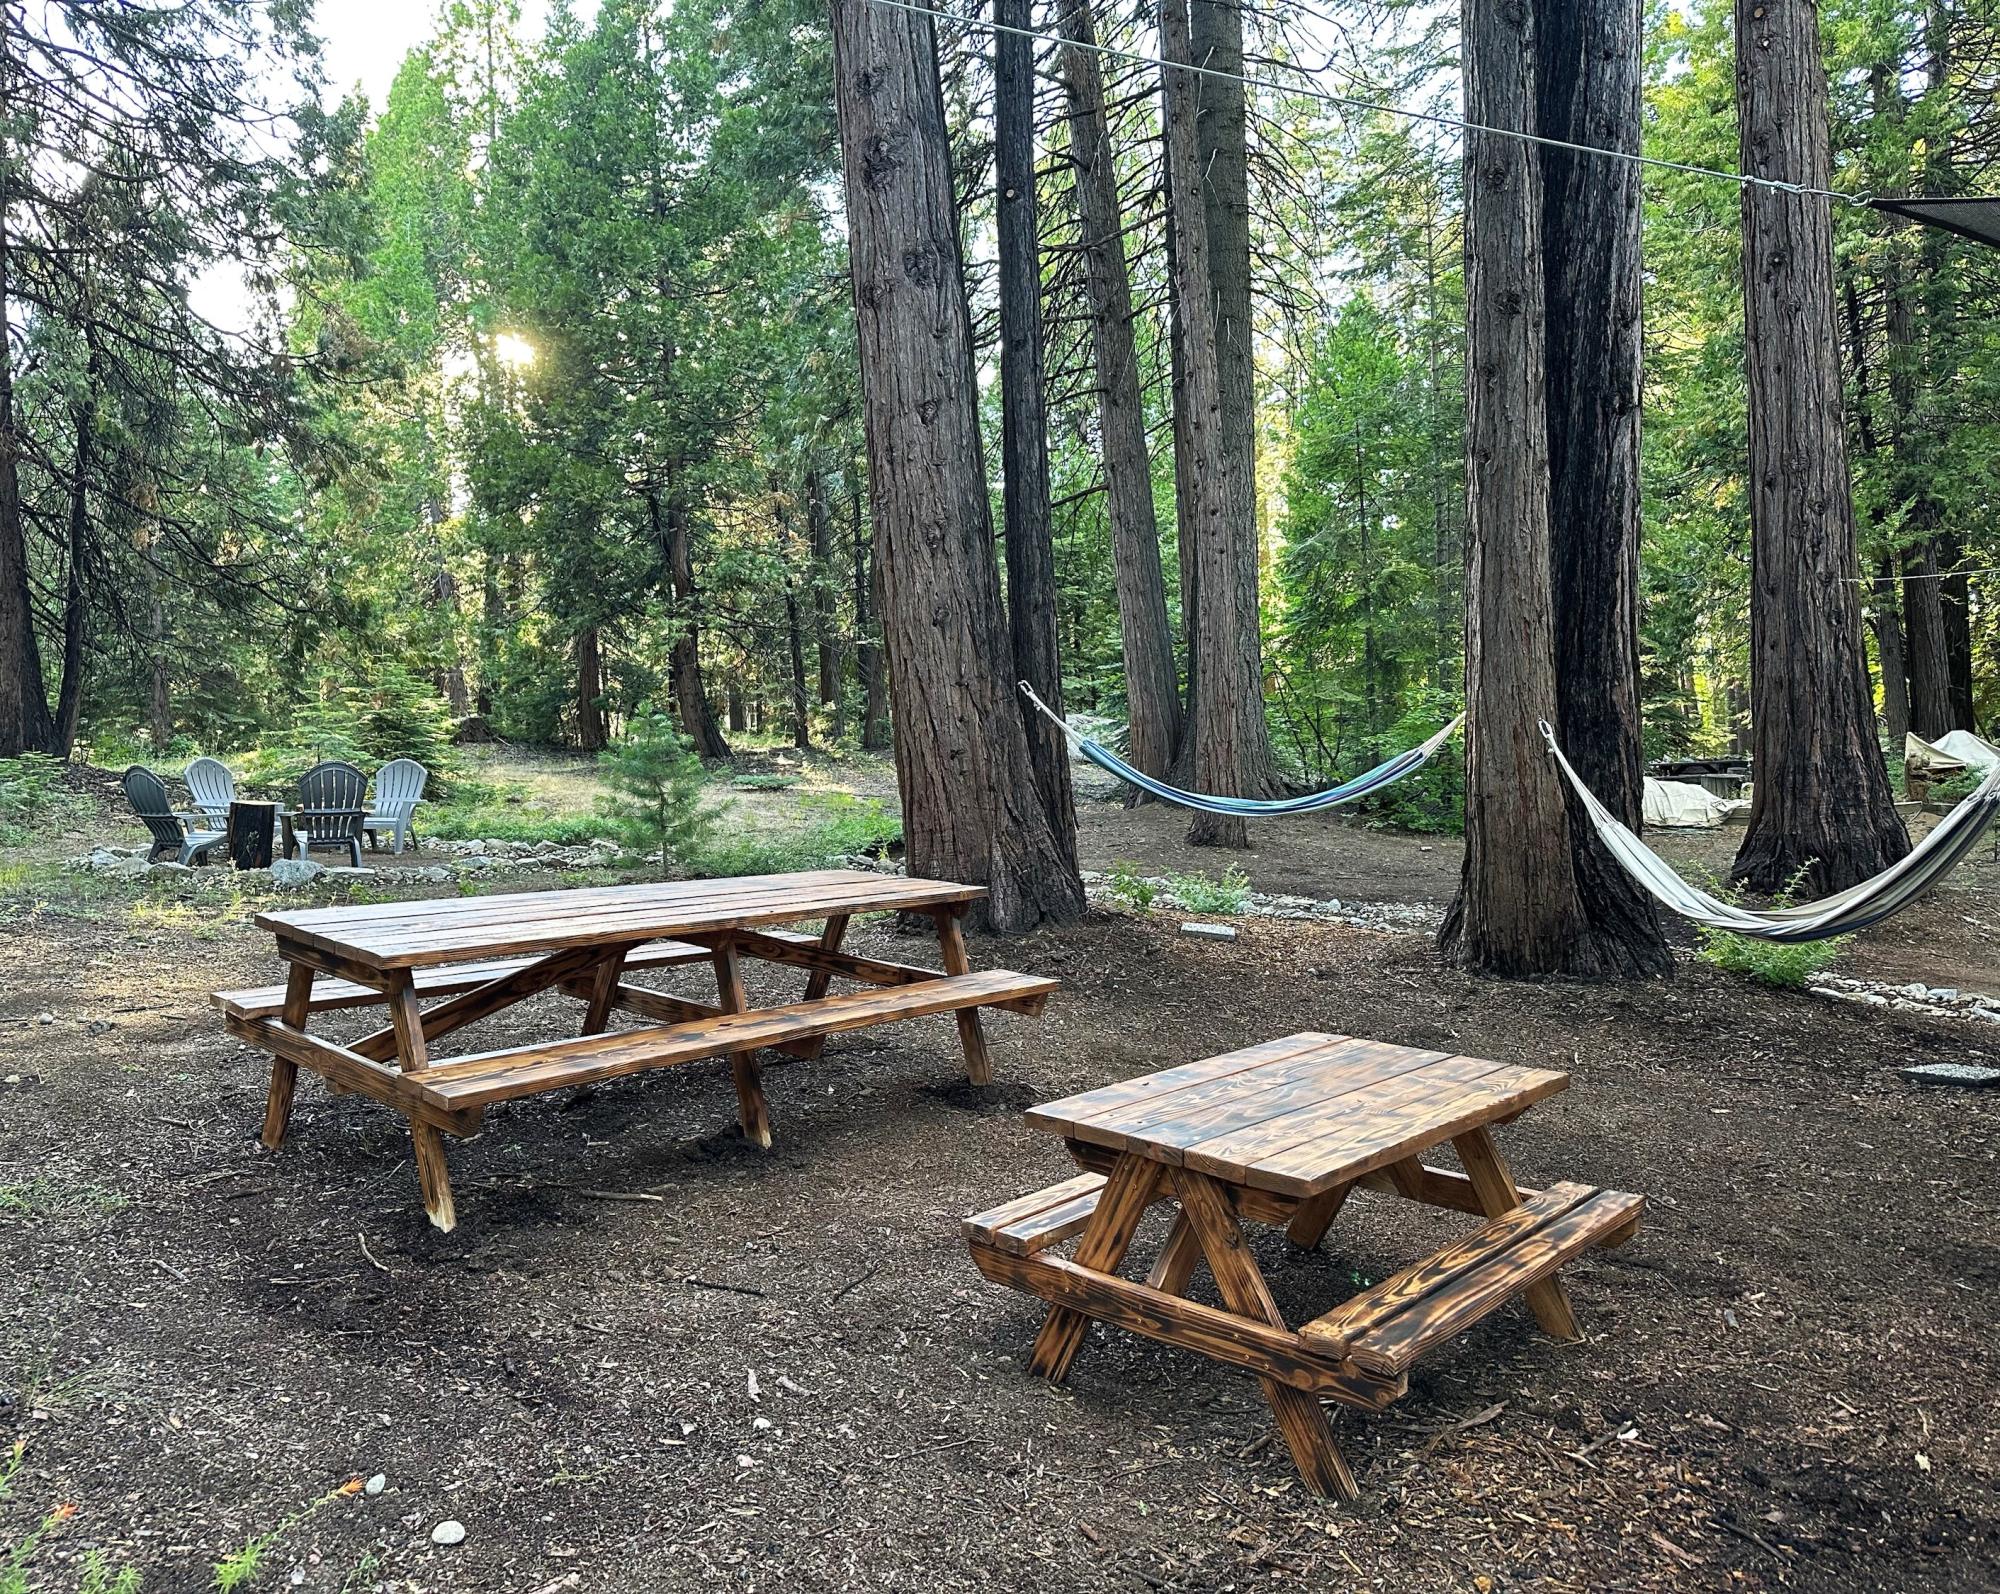
We have an Airbnb at a nearby lake. We built the large and kids picnic tables so our guests can enjoy the outdoors!!
Elaine Freitas
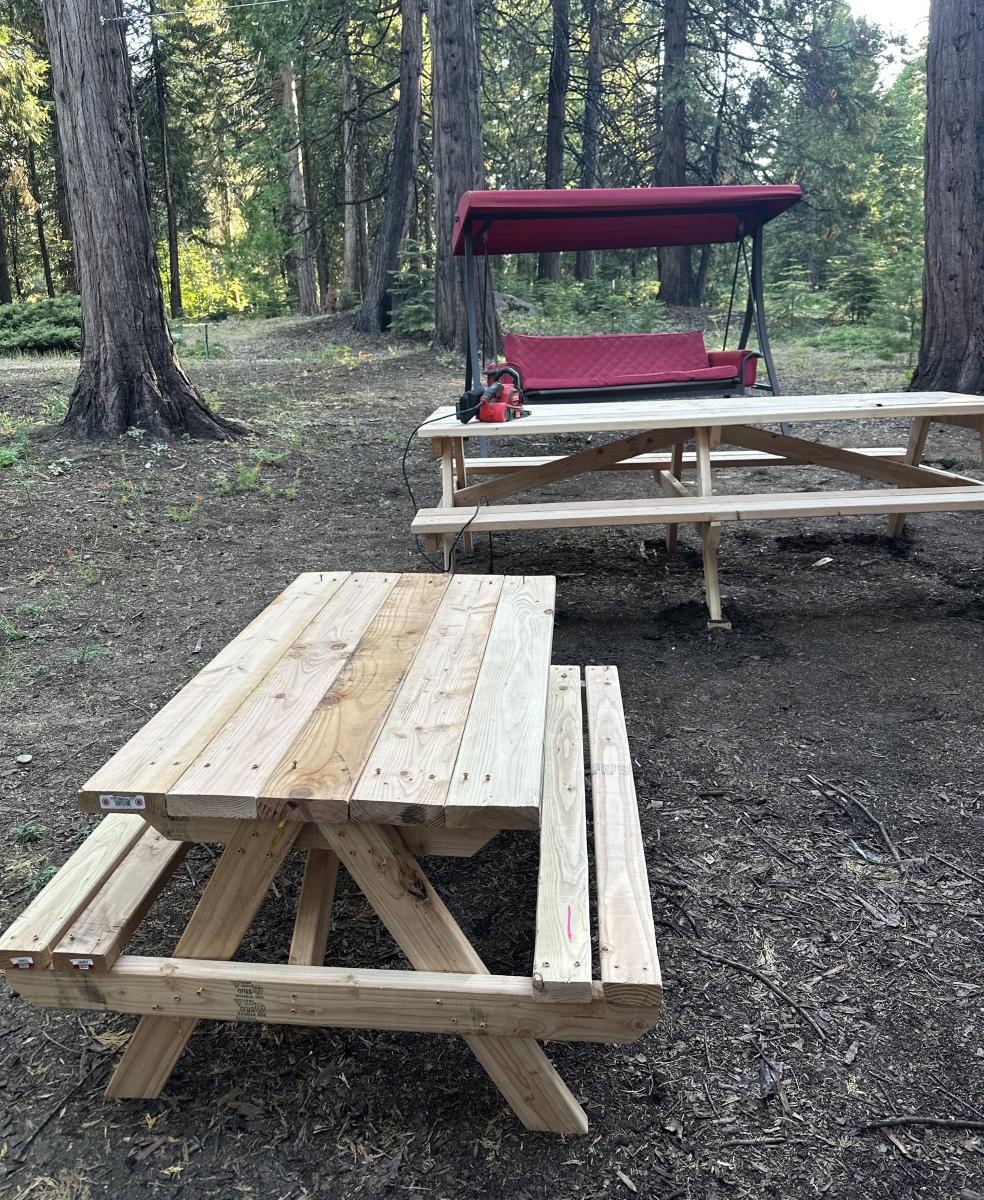
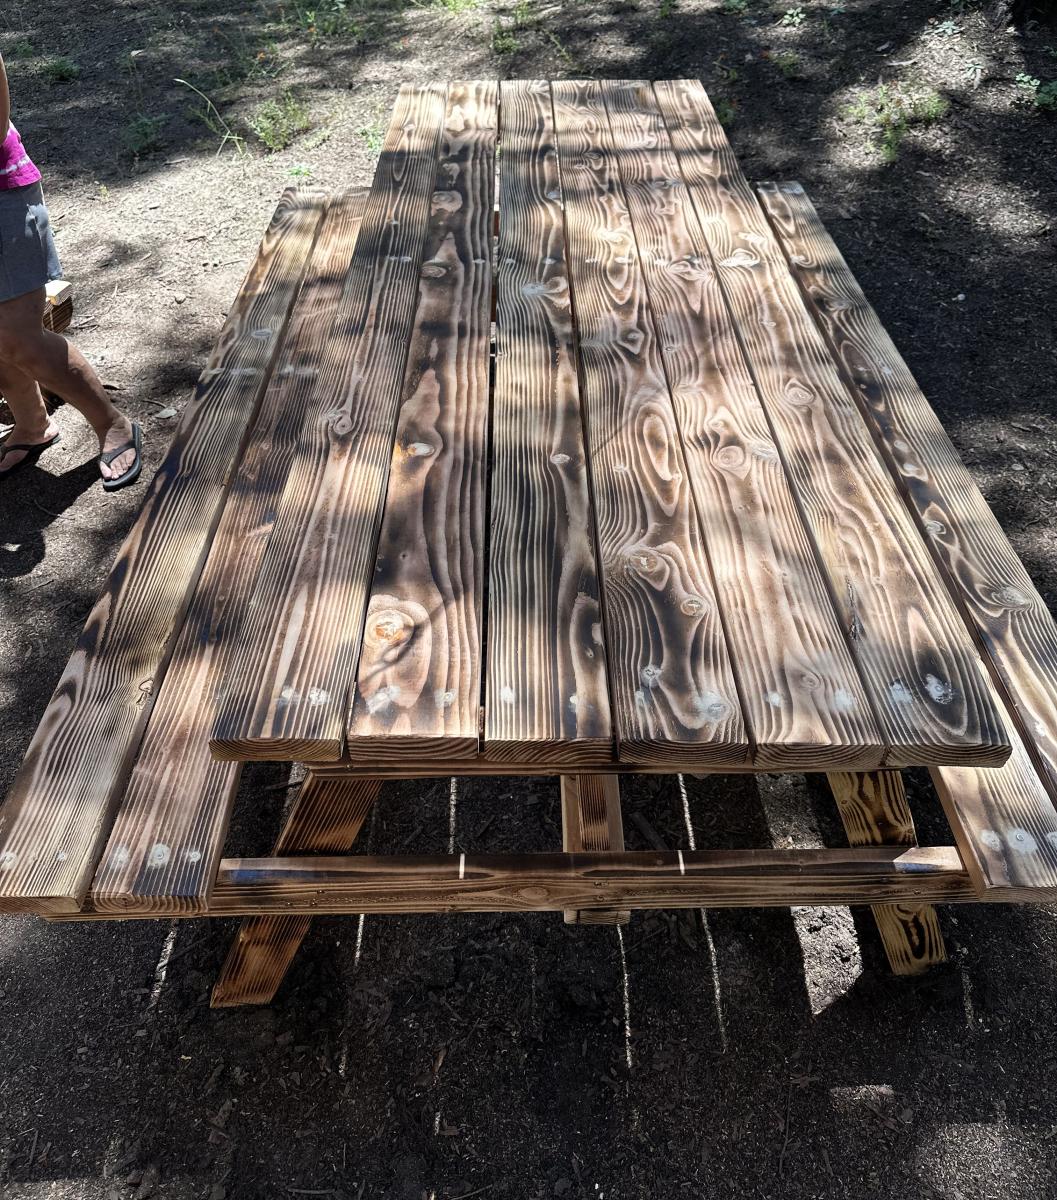
Built from Plan(s)
Farmhouse Table
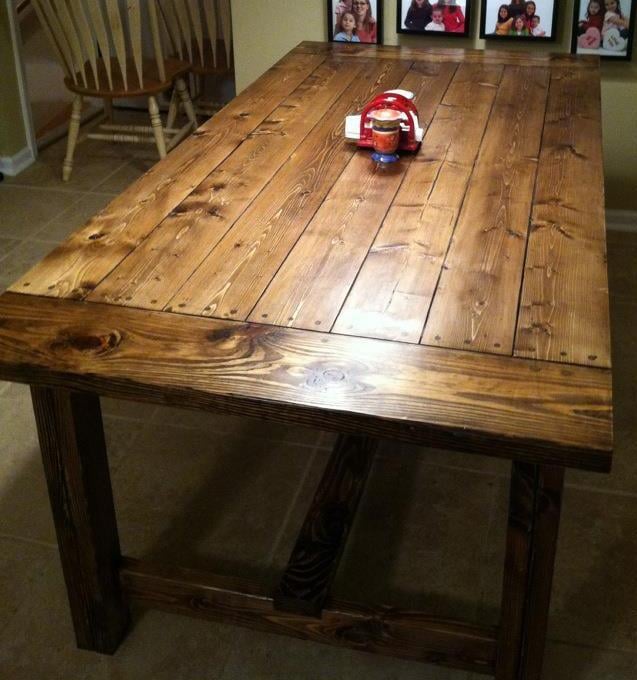
Farmhouse table from plans. Shortened length to 6.5 feet to fit our area. Good plans.
Built from Plan(s)
Estimated Cost
$90
Estimated Time Investment
Day Project (6-9 Hours)
Finish Used
Minwax oil-based Dark Walnut with two coats of brush-on poly all around. One additional coat of brush-on poly on the top followed by one coat of wipe-on poly.
Recommended Skill Level
Beginner
Comments

Sun, 06/10/2012 - 16:30
well done!
Love it. Planning to make one for our new house once we get settled.
Mon, 07/30/2012 - 12:40
Love it!!!
Great job!!! On my list to make and I too will be making it to fit my dining area. Love the stain!!
Wed, 11/07/2012 - 09:06
Filled Screw Holes
I ALSO Love the "Filled" hole look! I'm going to be building this table this weekend, any suggestions on getting that look?
Fri, 02/15/2013 - 07:21
Plans for this table
New to the site, can anyone help me get to the plans for this table? I love everything about it.
Fri, 02/15/2013 - 10:40
Plans for this table
Just go to the blue bar above Ana's picture at the top of the page where it says "plans" and type in the kind of table you're interested in. Prepare to drool over all the gorgeous furniture and projects!
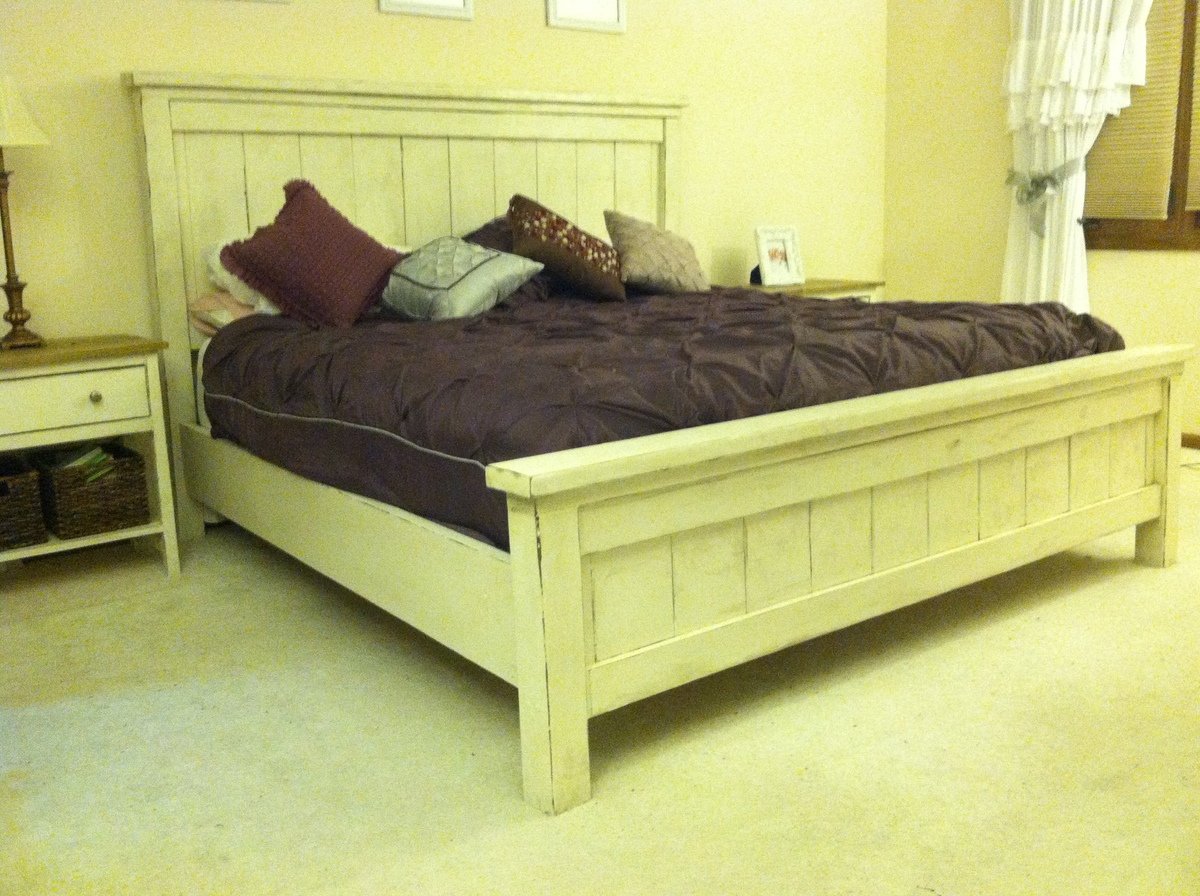
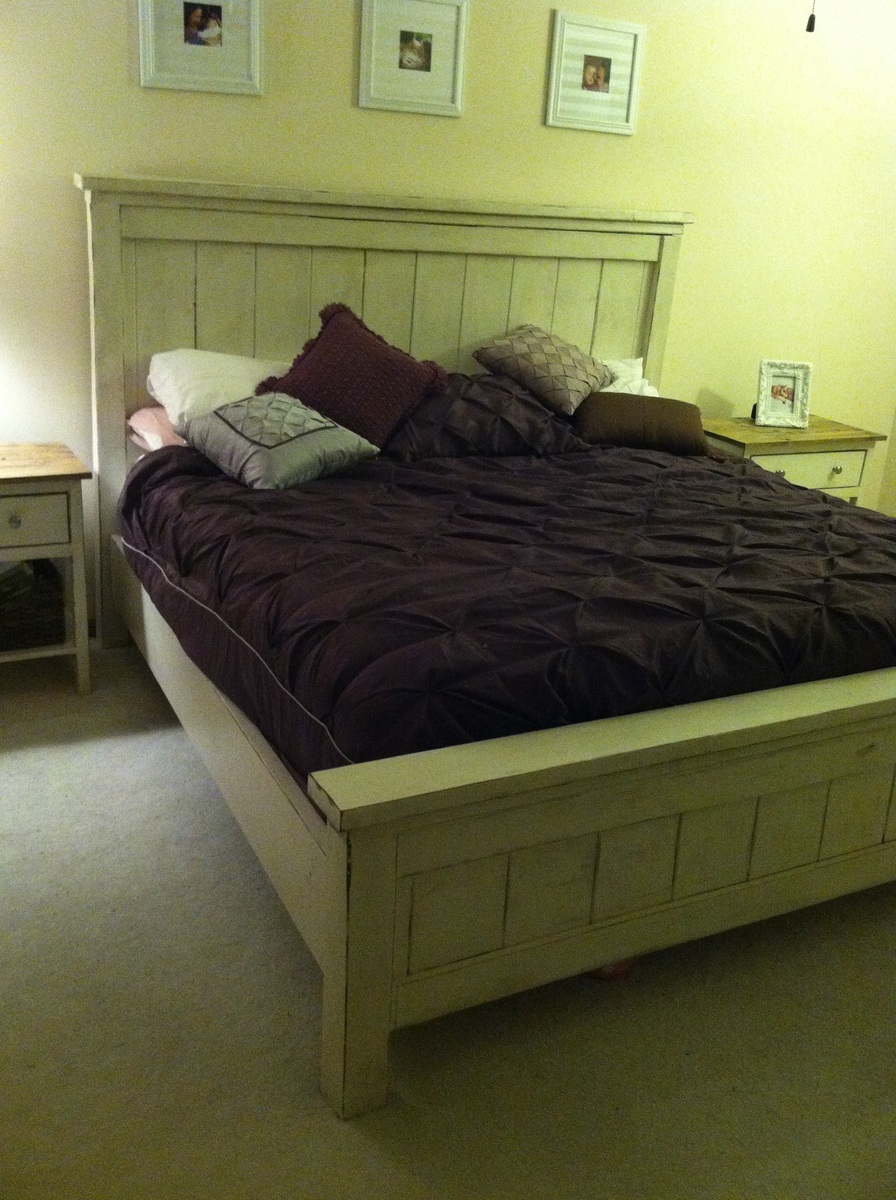
Farmhouse King Bed
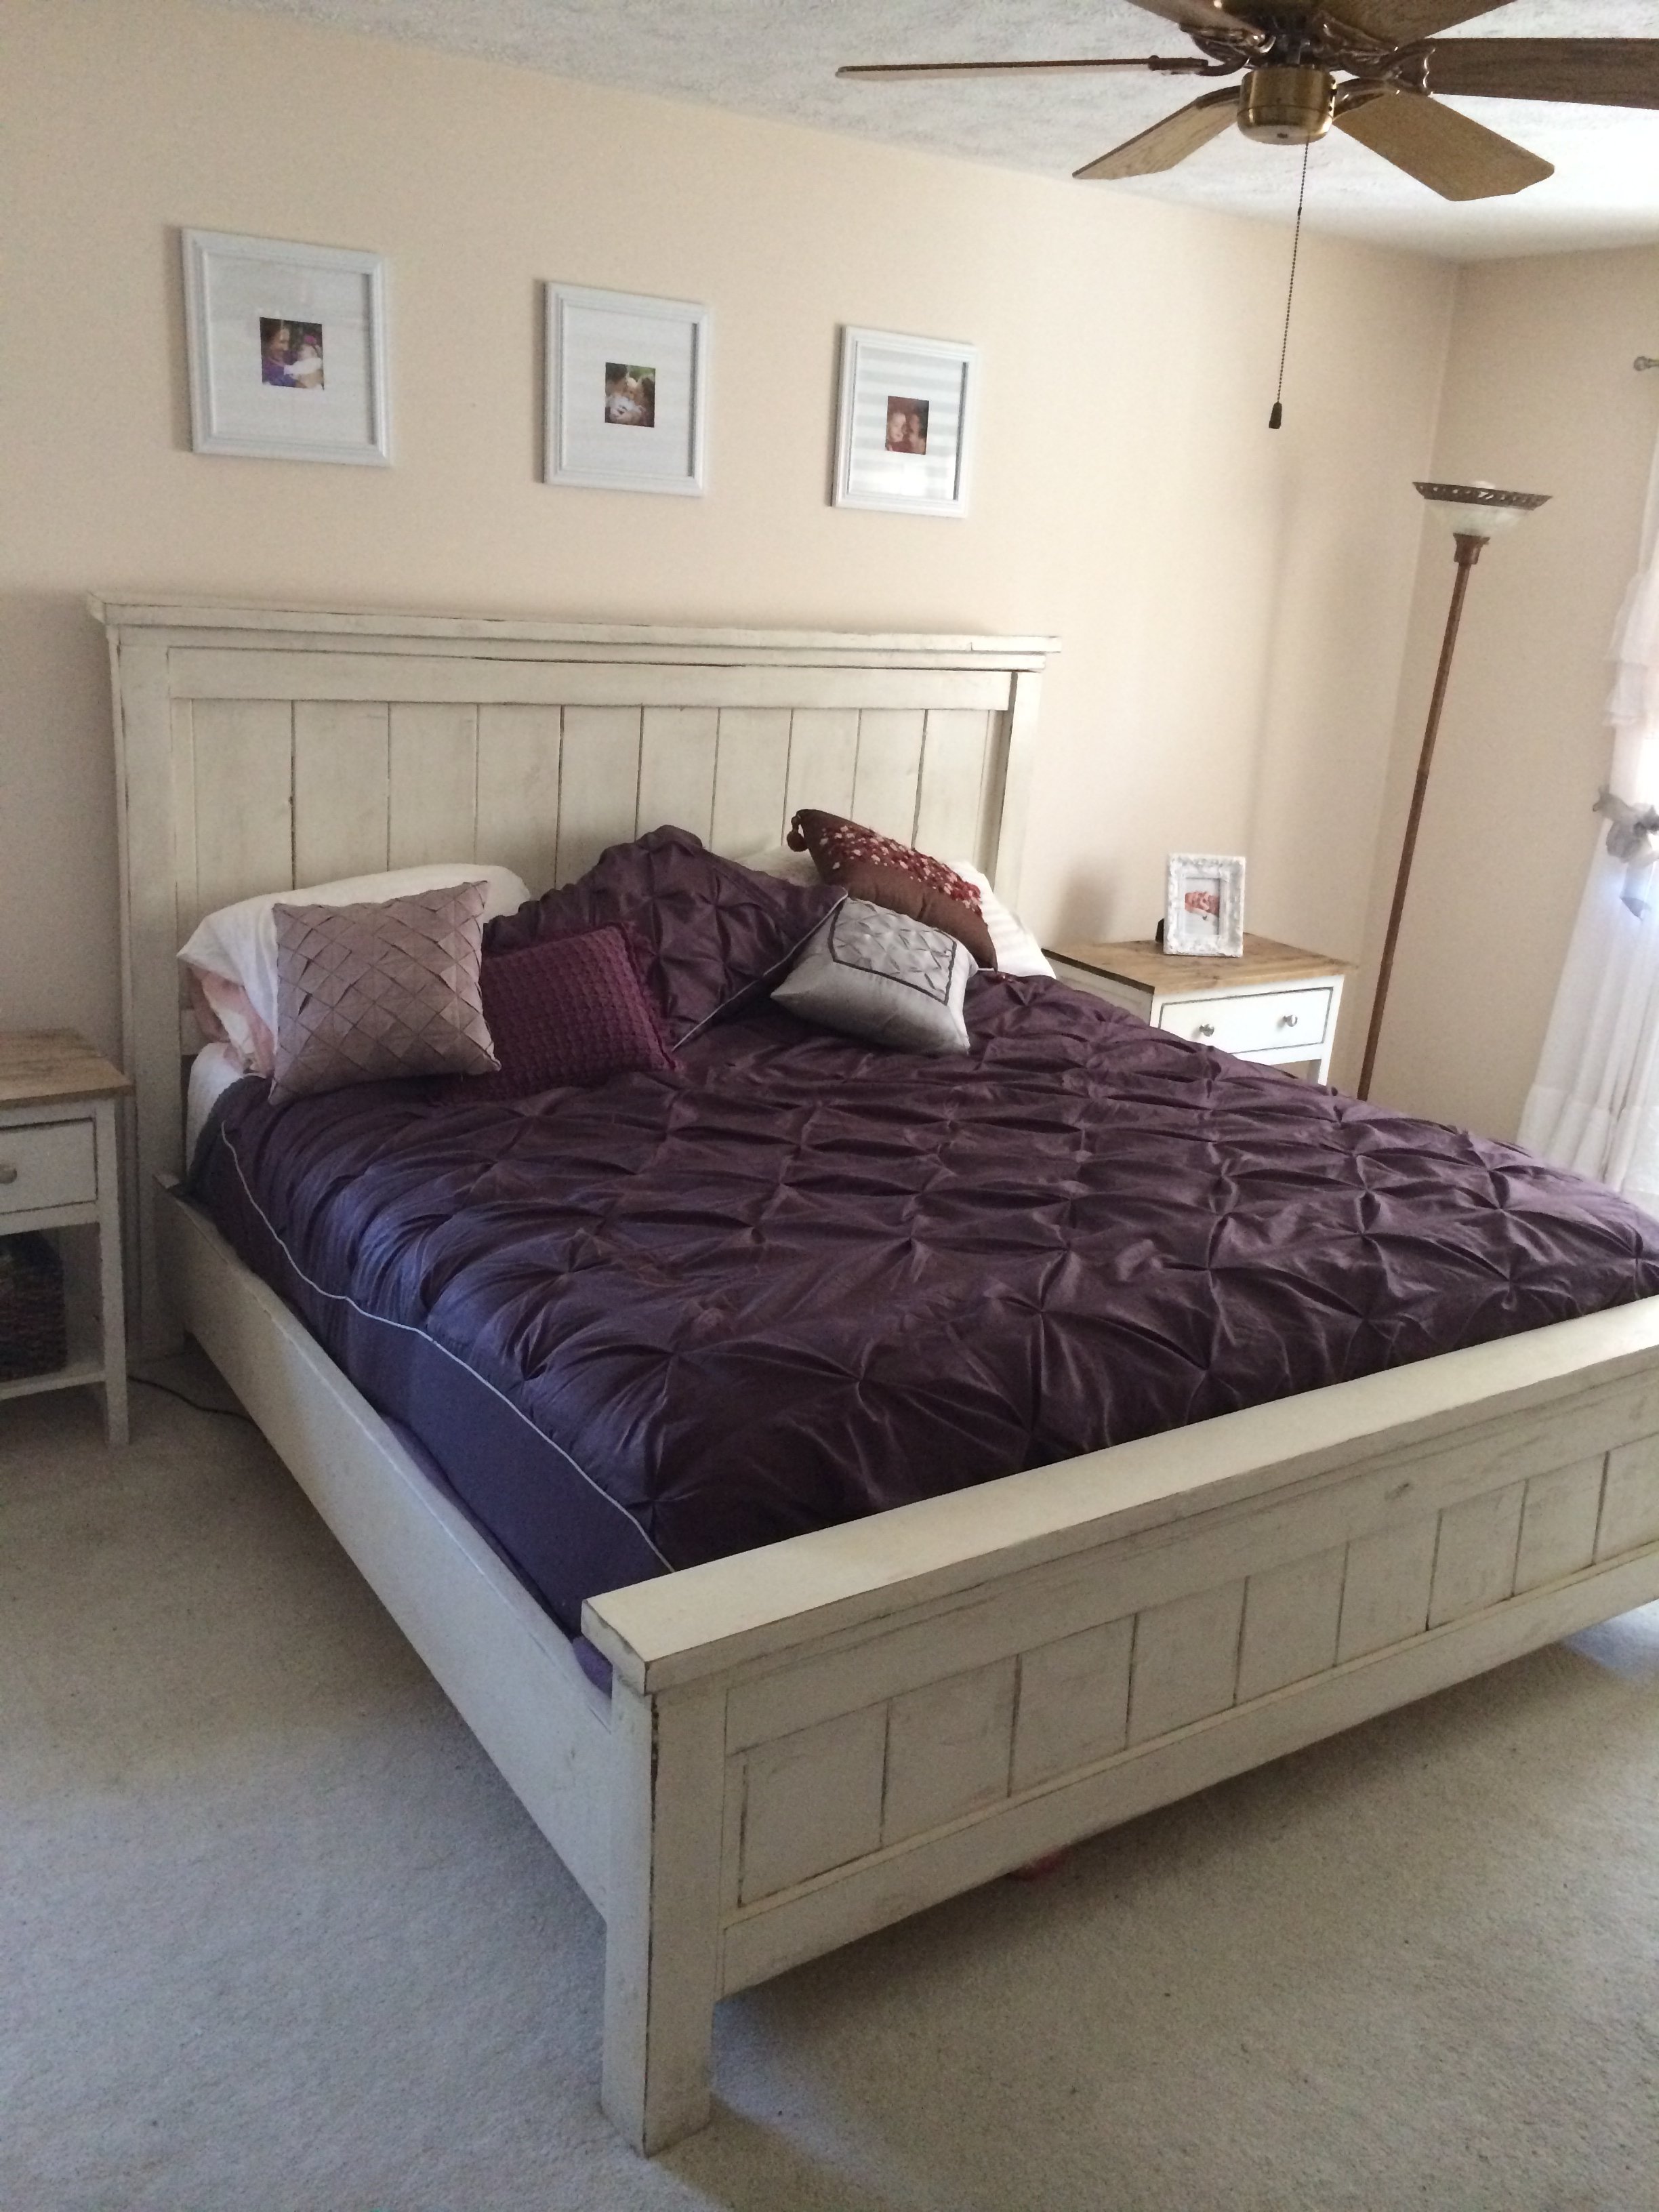
My wife has always wanted a king sized bed. While my hobbyist woodworking skills are not (yet) to the point where I can create the mahogany sleigh bed she has always dreamed of, I think she has enjoyed the farmhouse bed that I built for her X-mas present. We bought a new gel mattress for the bed, which sits on a few sheets of plywood over a frame of 2x4s. While we have no current plans to move anytime soon, using some of the advice of commenters/posters, I constructed our bed and frame with bed rail brackets and hanger joists that will allow us the option to disassemble/reassemble it in the future.
Built from Plan(s)
Estimated Cost
250
Estimated Time Investment
Weekend Project (10-20 Hours)
Finish Used
Behr off-white #1873 paint distressed with Minwax Special Walnut stain
Recommended Skill Level
Beginner
Comments

Sat, 04/22/2017 - 13:35
Farmhoue Bed
What did you ue to connect the bed rails to the Headboard and Foorboard.
I am at a loss.
Thu, 04/27/2017 - 18:57
Bed rail hardware
Janie, I ended up buying some bed rail hardware with the idea that I might someday disassemble the bed: http://www.rockler.com/surface-mounted-keyhole-bed-rail-brackets
if you want to do it cheaper, joist hangers should work.
Patrick's Beach Cottage Dresser -
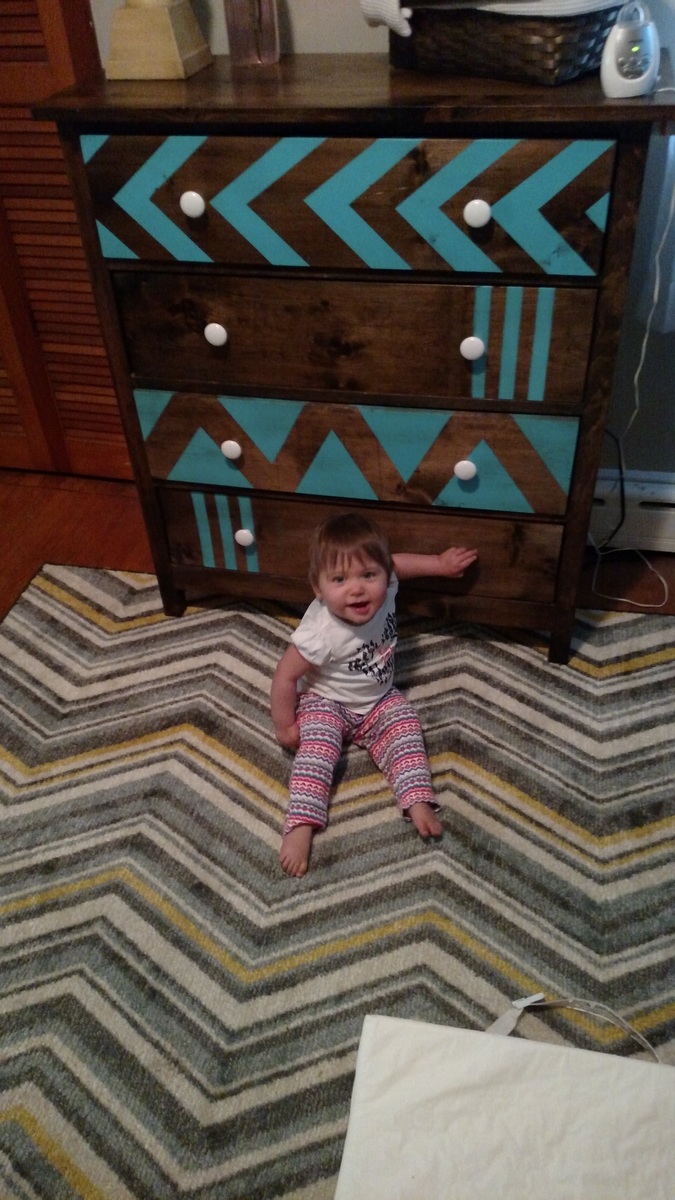
Loved making this dresser, and it works awesome in my baby girl's room.
Built from Plan(s)
Estimated Cost
$100
Estimated Time Investment
Week Long Project (20 Hours or More)
Finish Used
Walnut Stain Finished
Teal Spray paint
Water-based poly
Teal Spray paint
Water-based poly
Recommended Skill Level
Intermediate
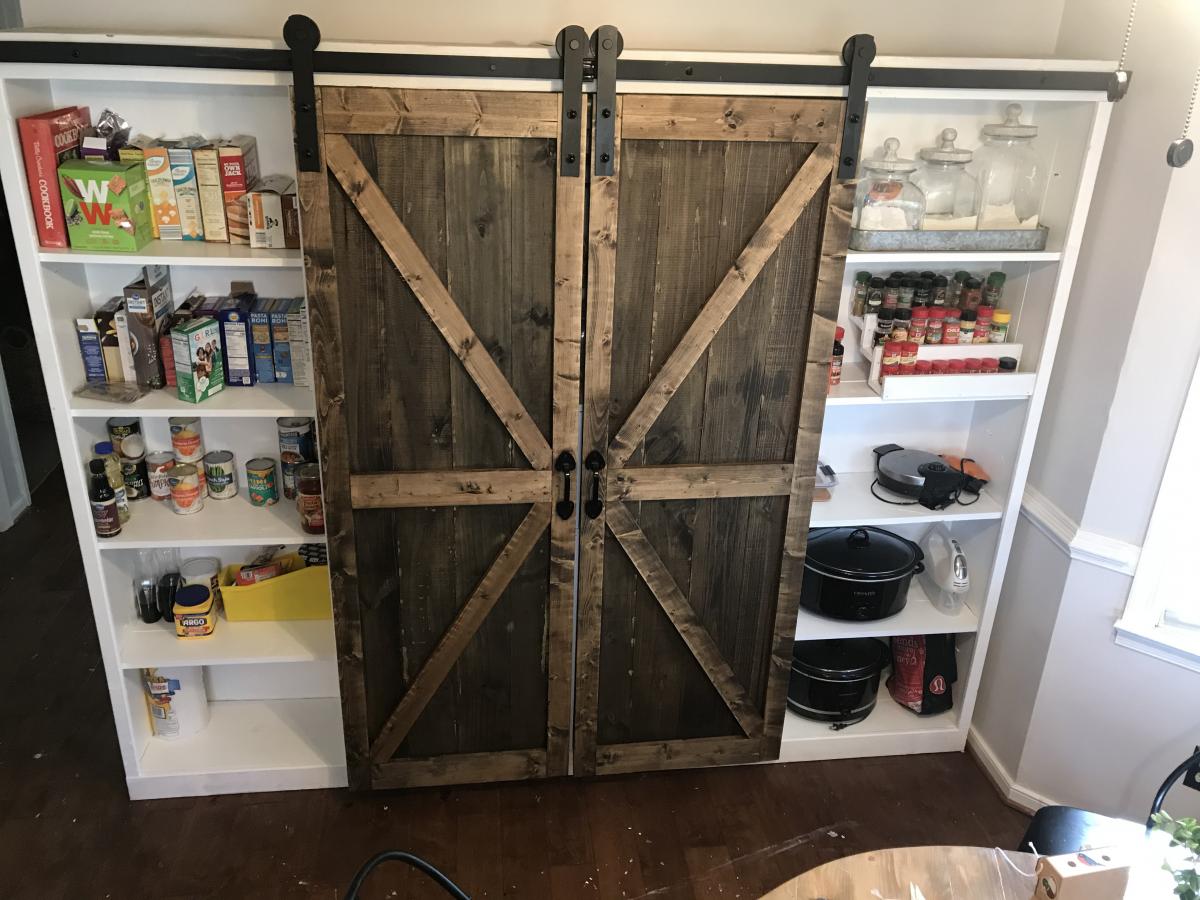
DIY Barn door Pantry/Coffee station
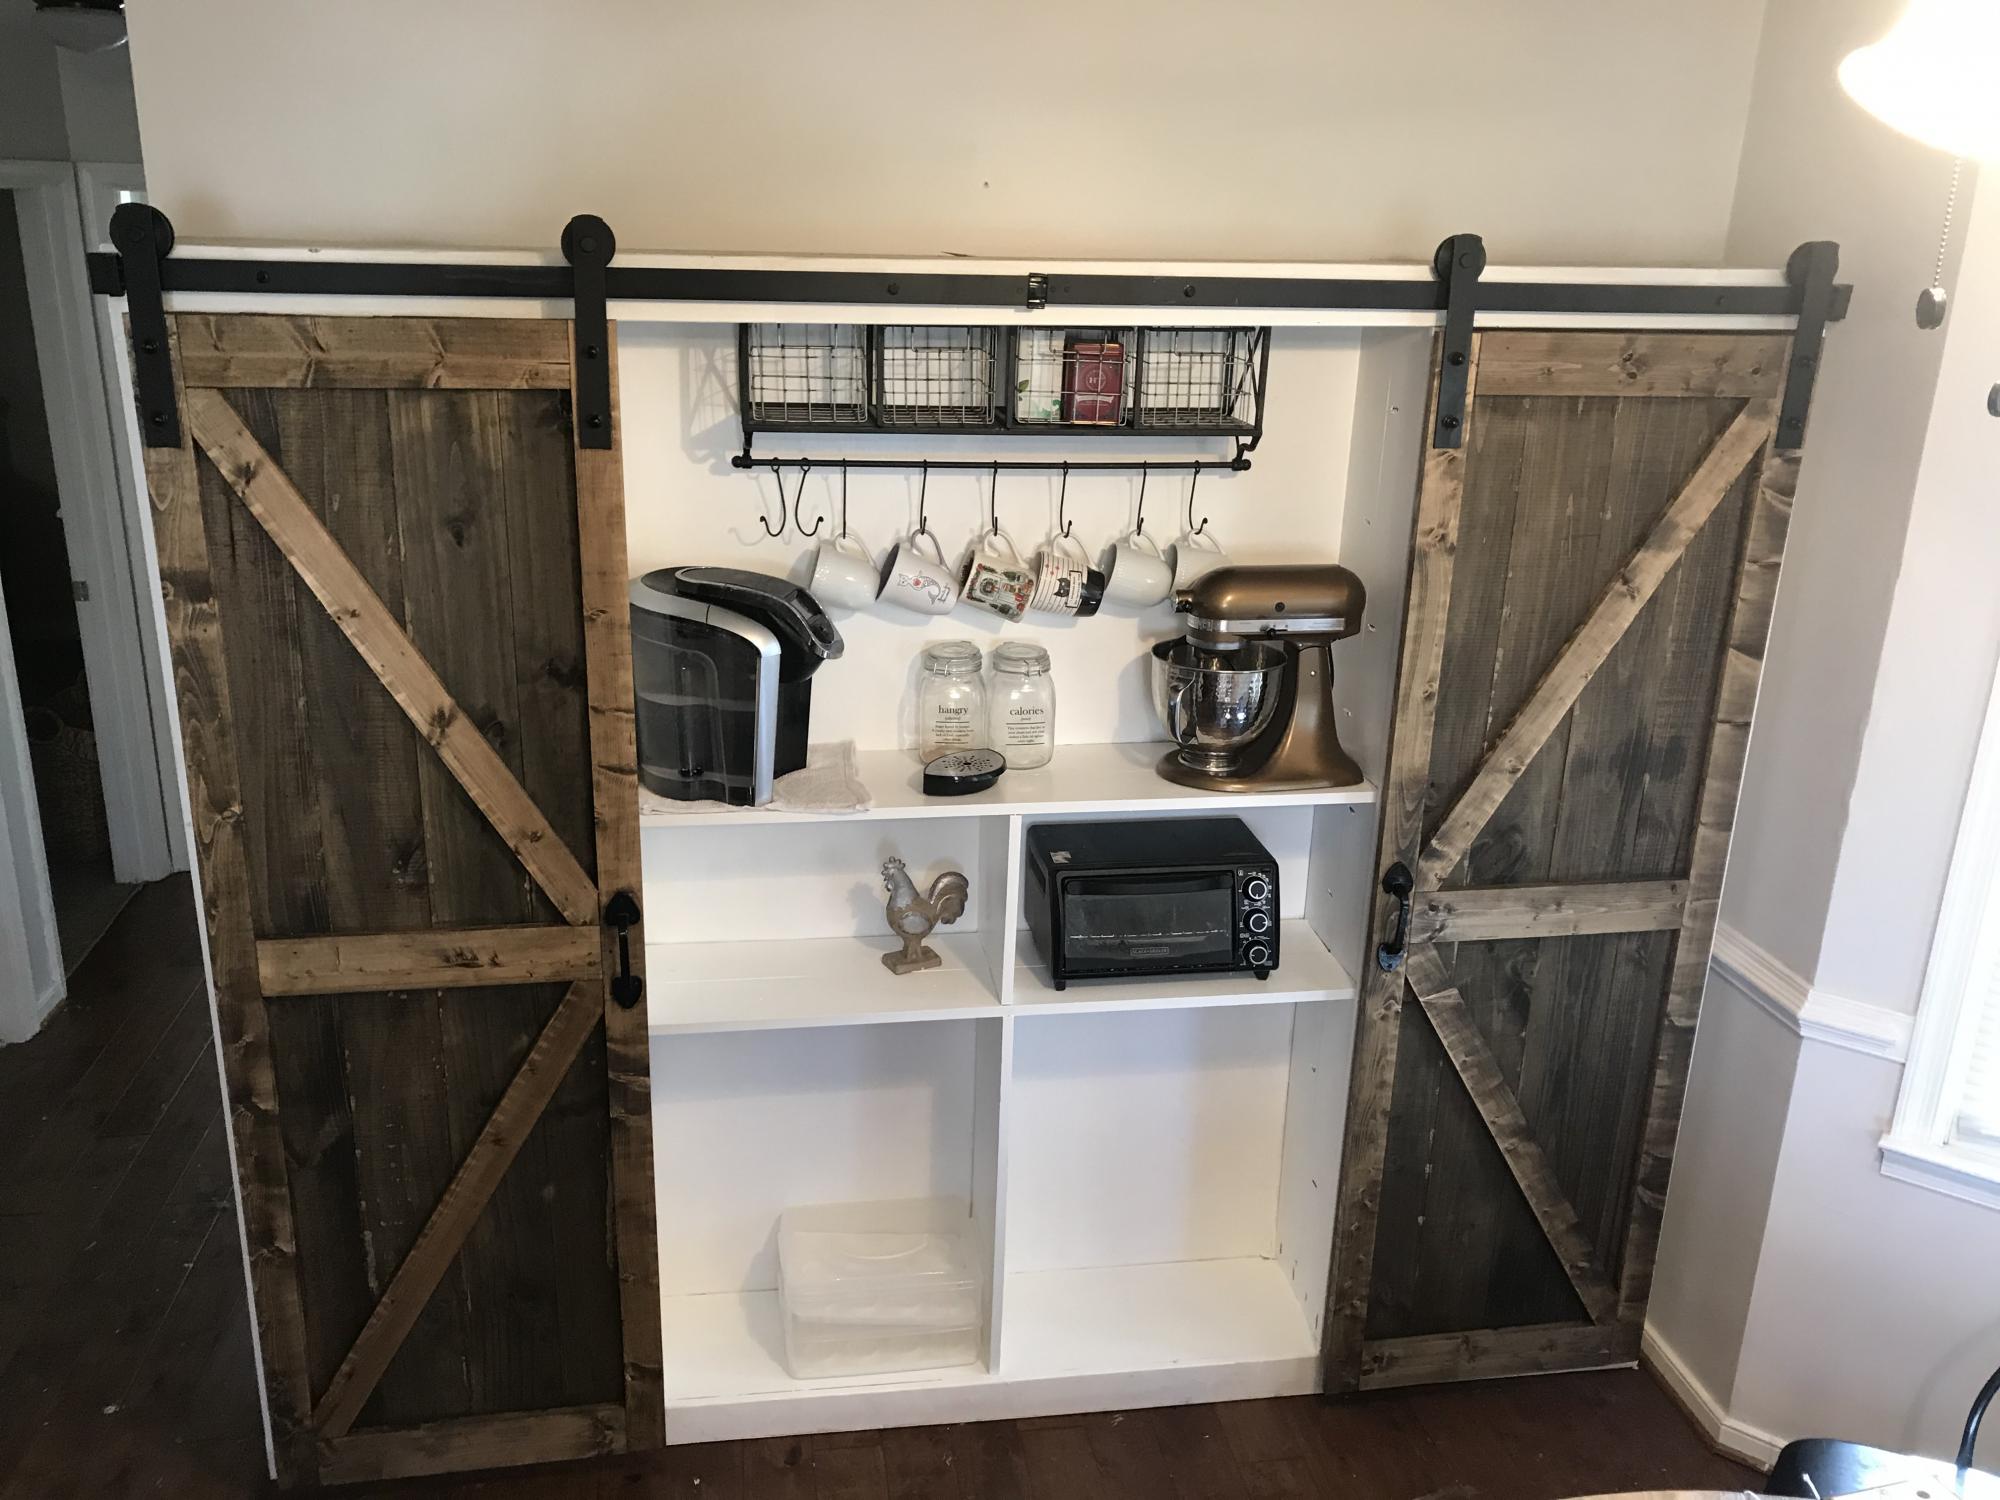
My wife has been asking me to build her a pantry since we bought our house last year and I finally got around to doing it. I used the Barn Door Entertainment center plans as inspiration but Instead of using the 1x12x8ft lumber suggested I used 1x6x8ft boards connected with pocket holes to save on costs. The Barn door hardware is the SMARTSTANDARD 8ft heavy duty (double door) which I purchased on Amazon for 73$.
Built from Plan(s)
Estimated Cost
$350-$450
Estimated Time Investment
Weekend Project (10-20 Hours)
Finish Used
Paint: Behr Plain White paint and primer
stain: Varathane classic dark walnut.
stain: Varathane classic dark walnut.
Recommended Skill Level
Intermediate
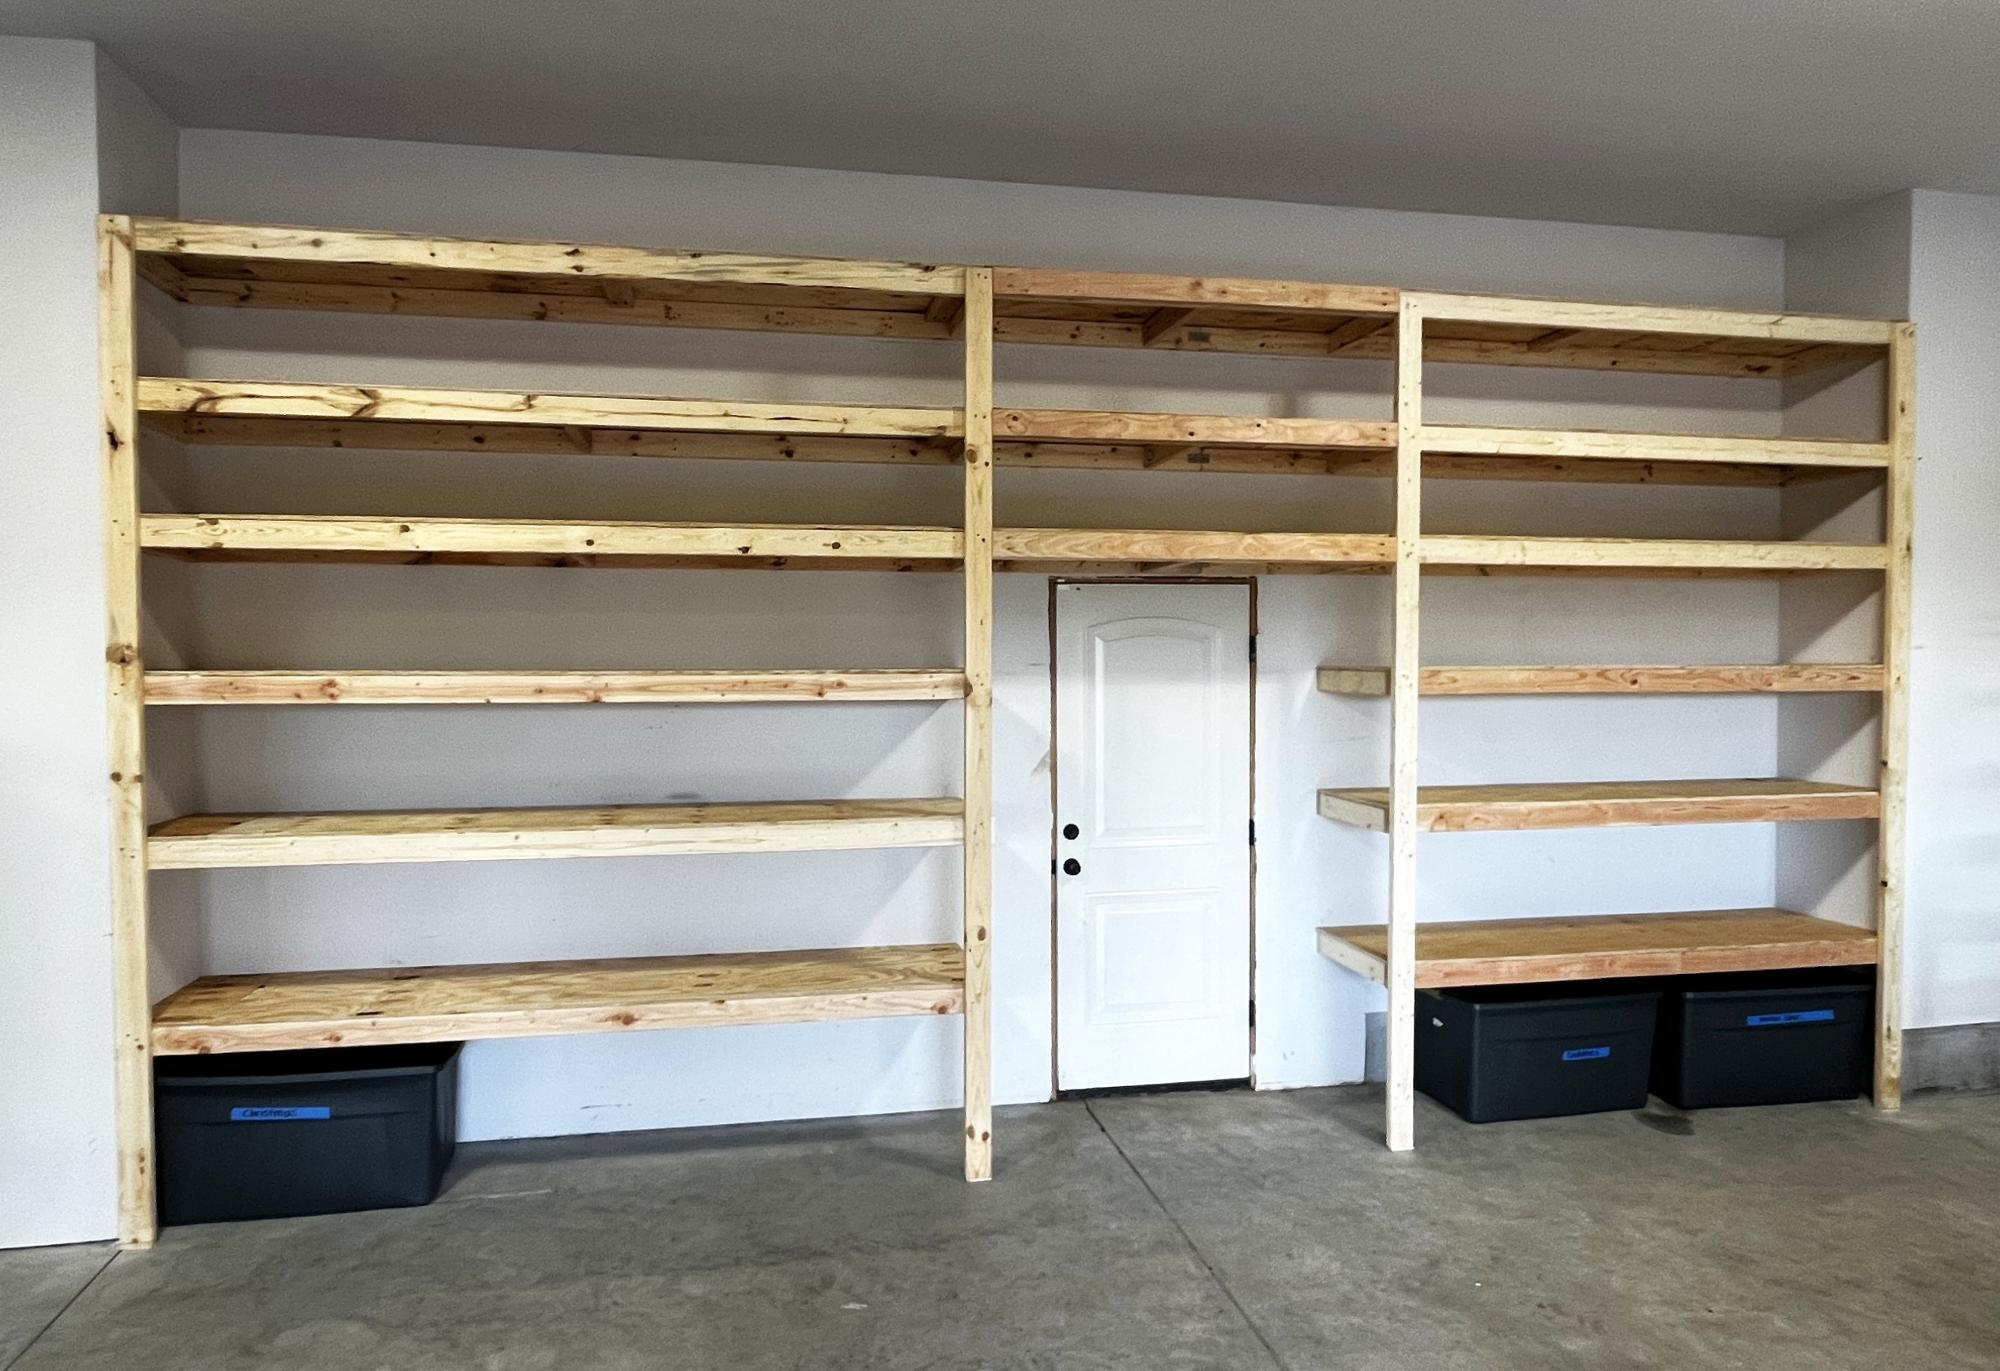
Corner Workbench
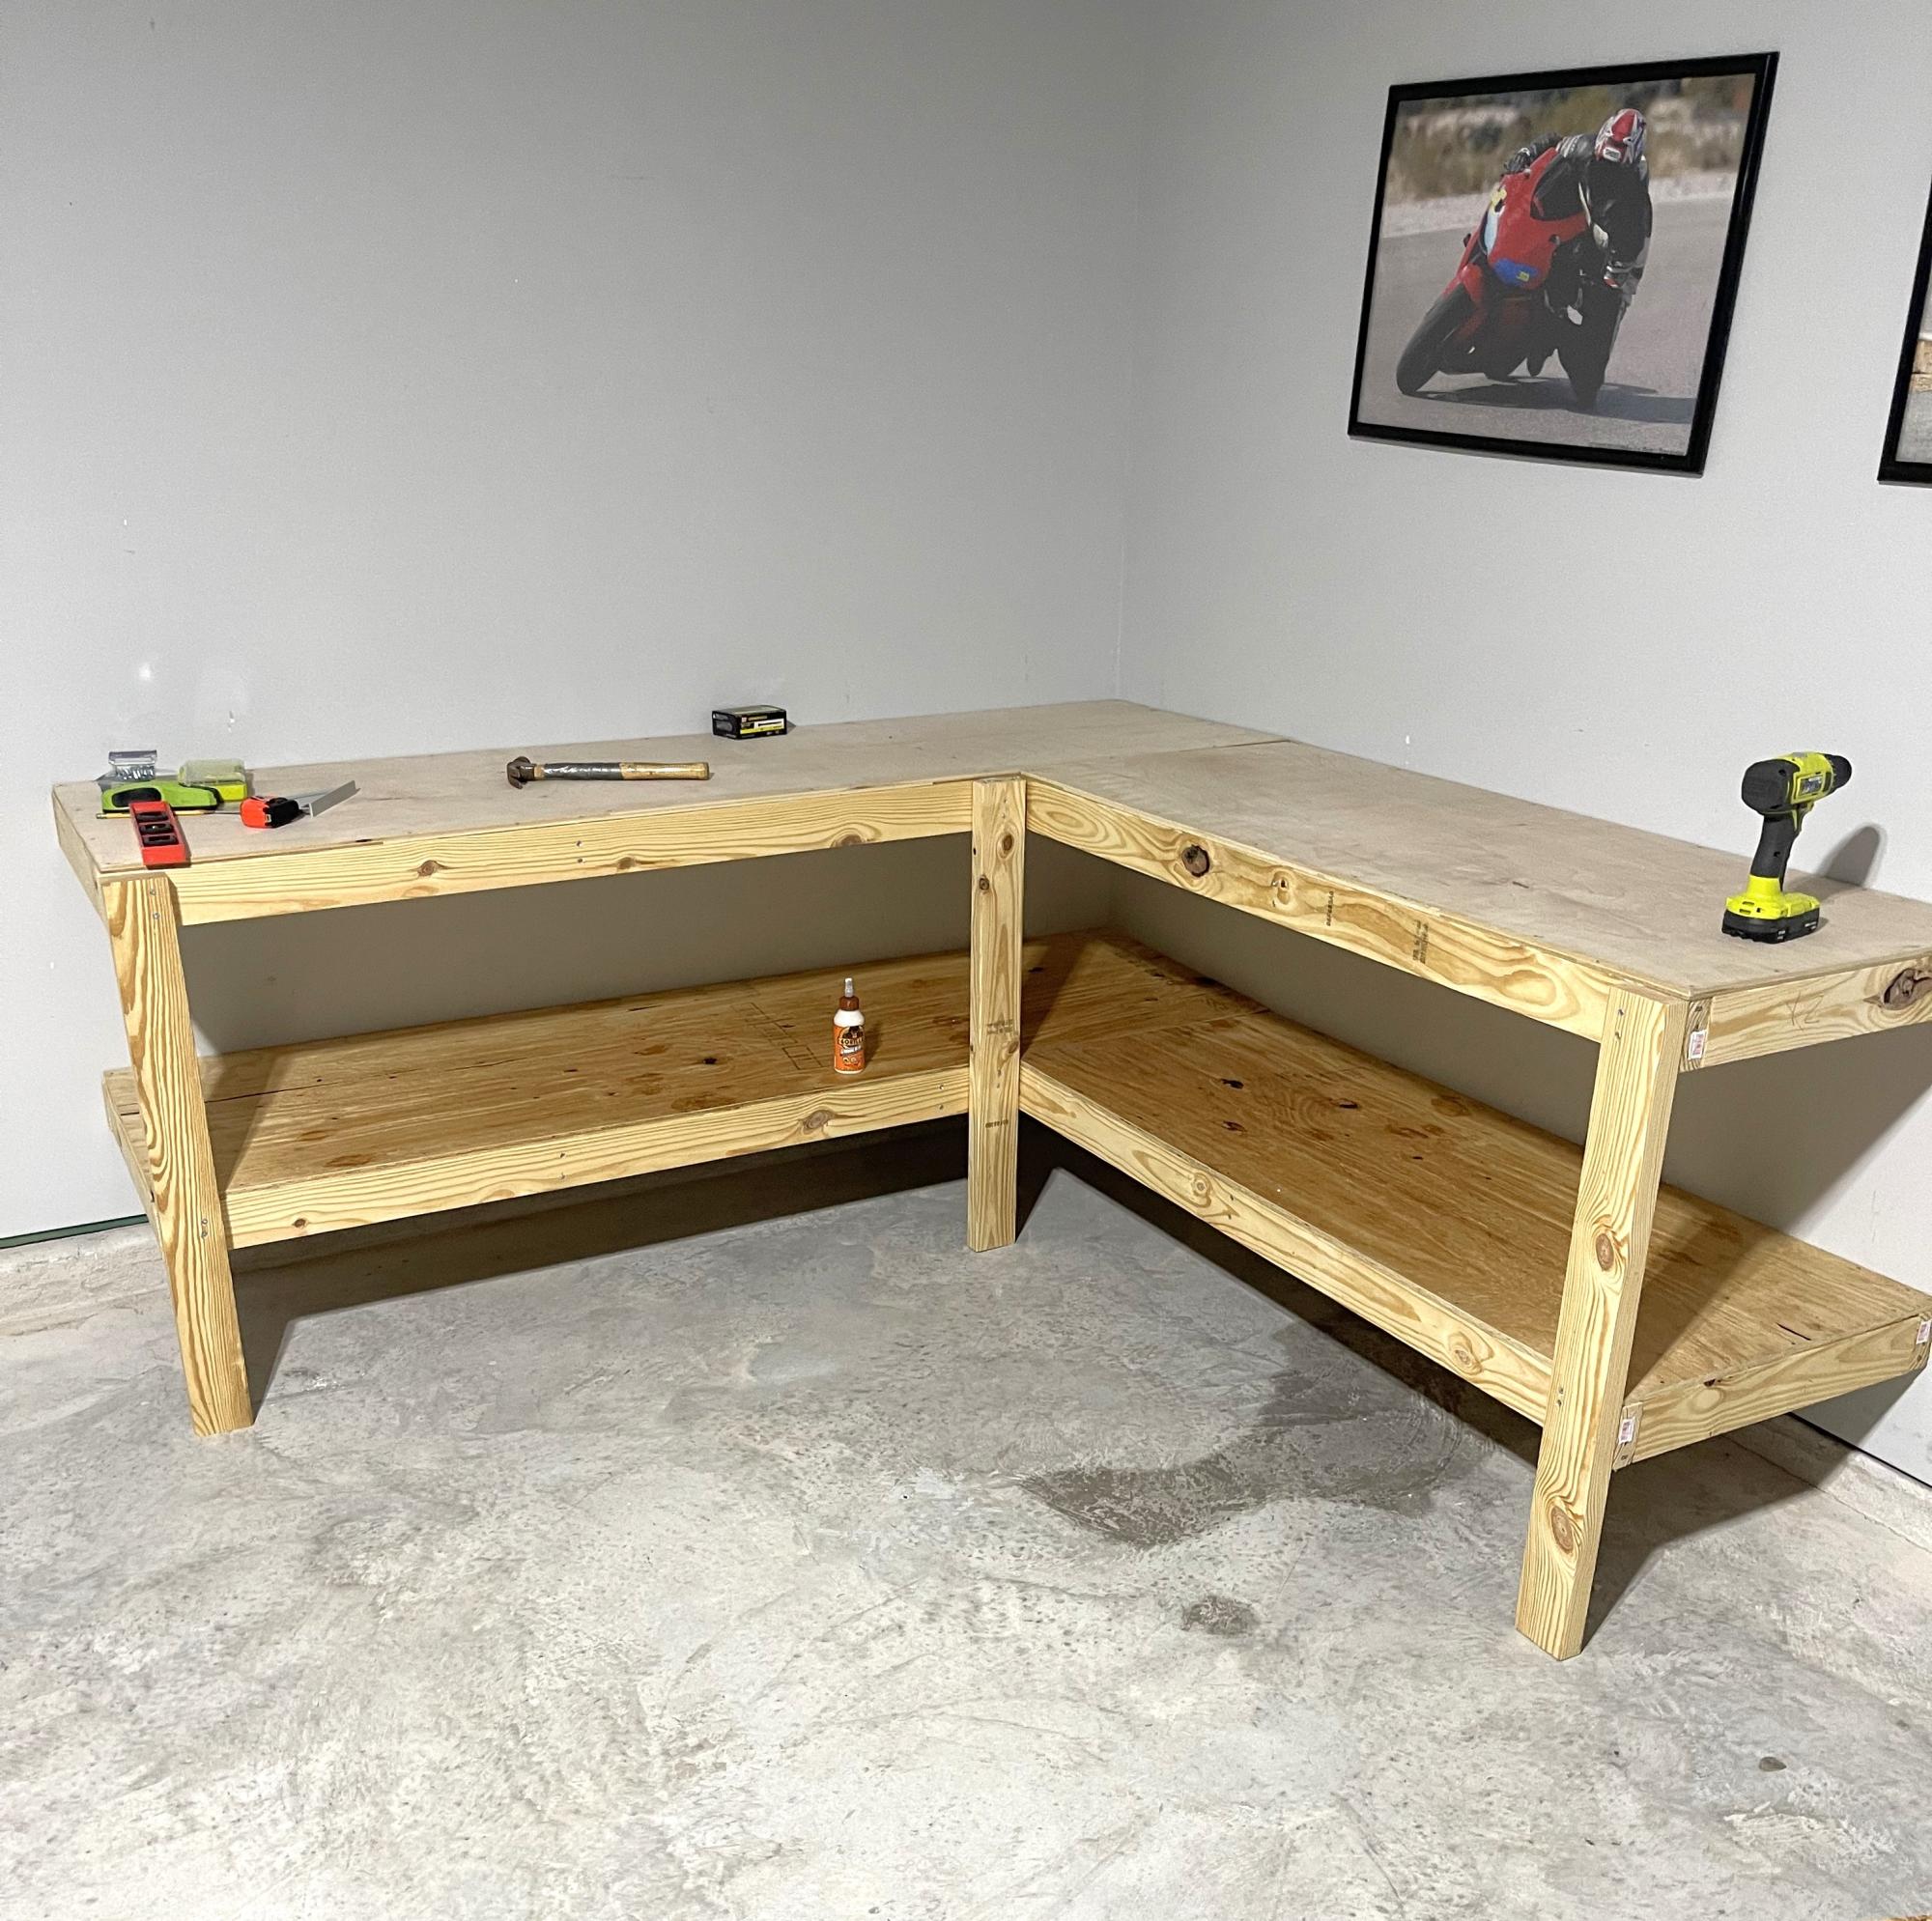
Awesome and easy build! Thank you!
iCoffee Table
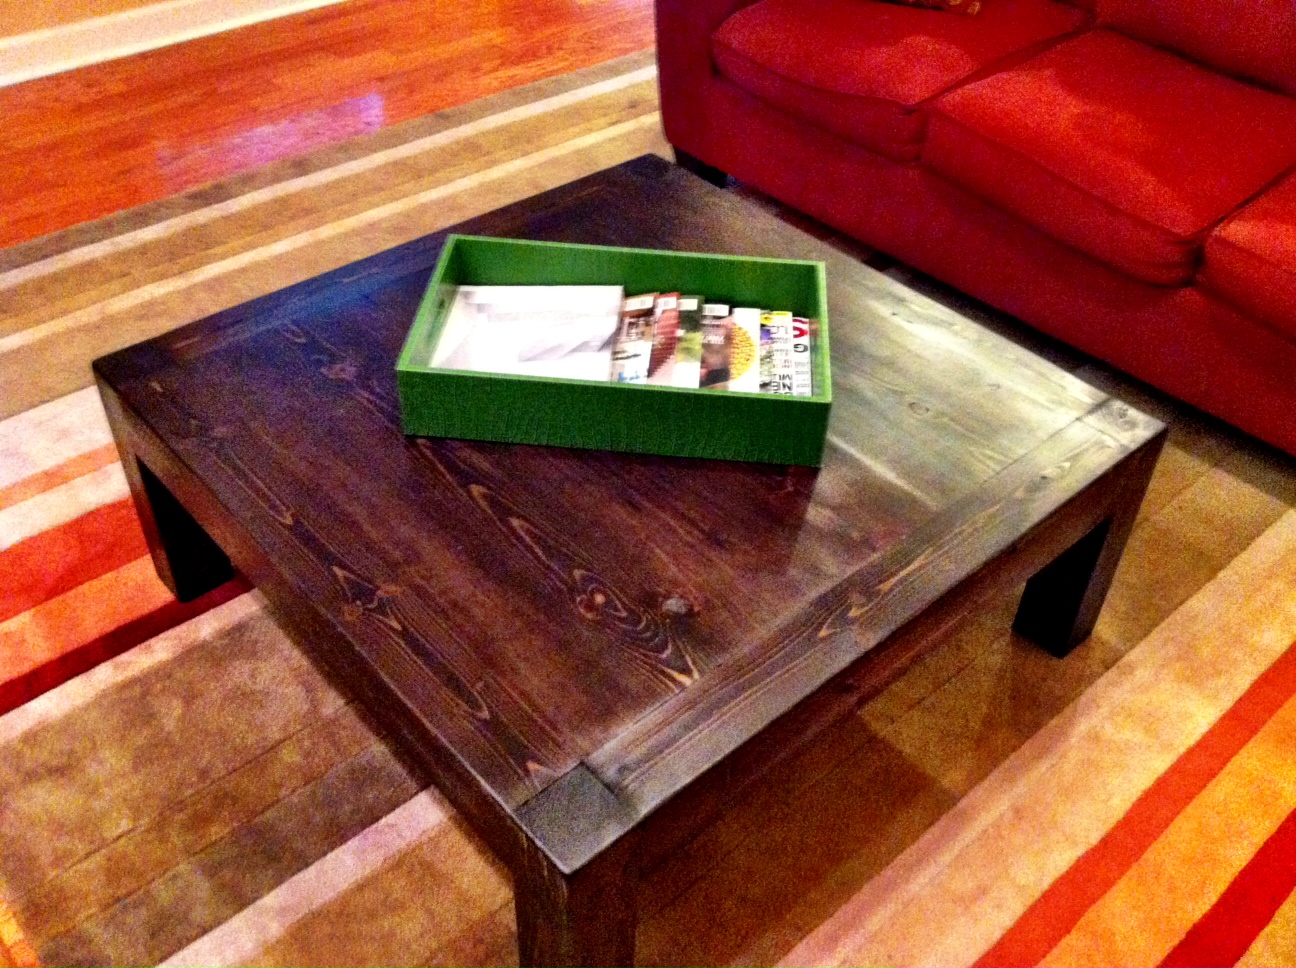
See post on blog: http://www.atouchofarkansas.com/2012/05/icoffee-table.html
Built from Plan(s)
Estimated Cost
$70
Estimated Time Investment
Weekend Project (10-20 Hours)
Finish Used
Rustoleum Kona
Recommended Skill Level
Beginner
Chalkboard Shelf Memo Board
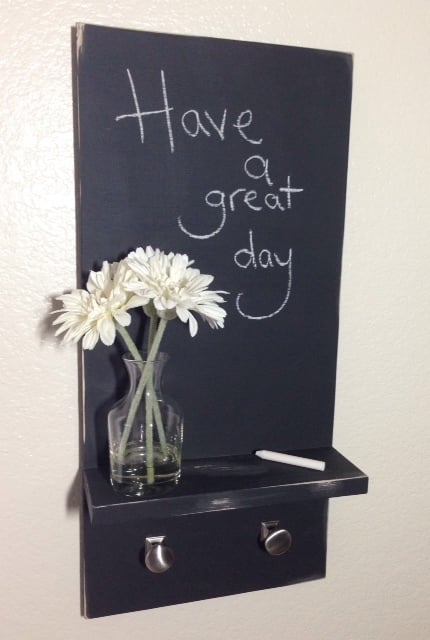
This was my first "build" and was a lot of fun. Very quick and very easy. I'm so happy with how cute it turned out!
Built from Plan(s)
Estimated Cost
$18.00
Estimated Time Investment
Afternoon Project (3-6 Hours)
Finish Used
I marked 3-6 hours only to account for drying time of the chalkpaint. I cutting, sanding and assembly went very quickly.
I used Rustoleum chalkboard paint from Home Depot along with some brushed nickel knobs that I got from Home Depot.
I used Rustoleum chalkboard paint from Home Depot along with some brushed nickel knobs that I got from Home Depot.
Recommended Skill Level
Starter Project
Great couch!
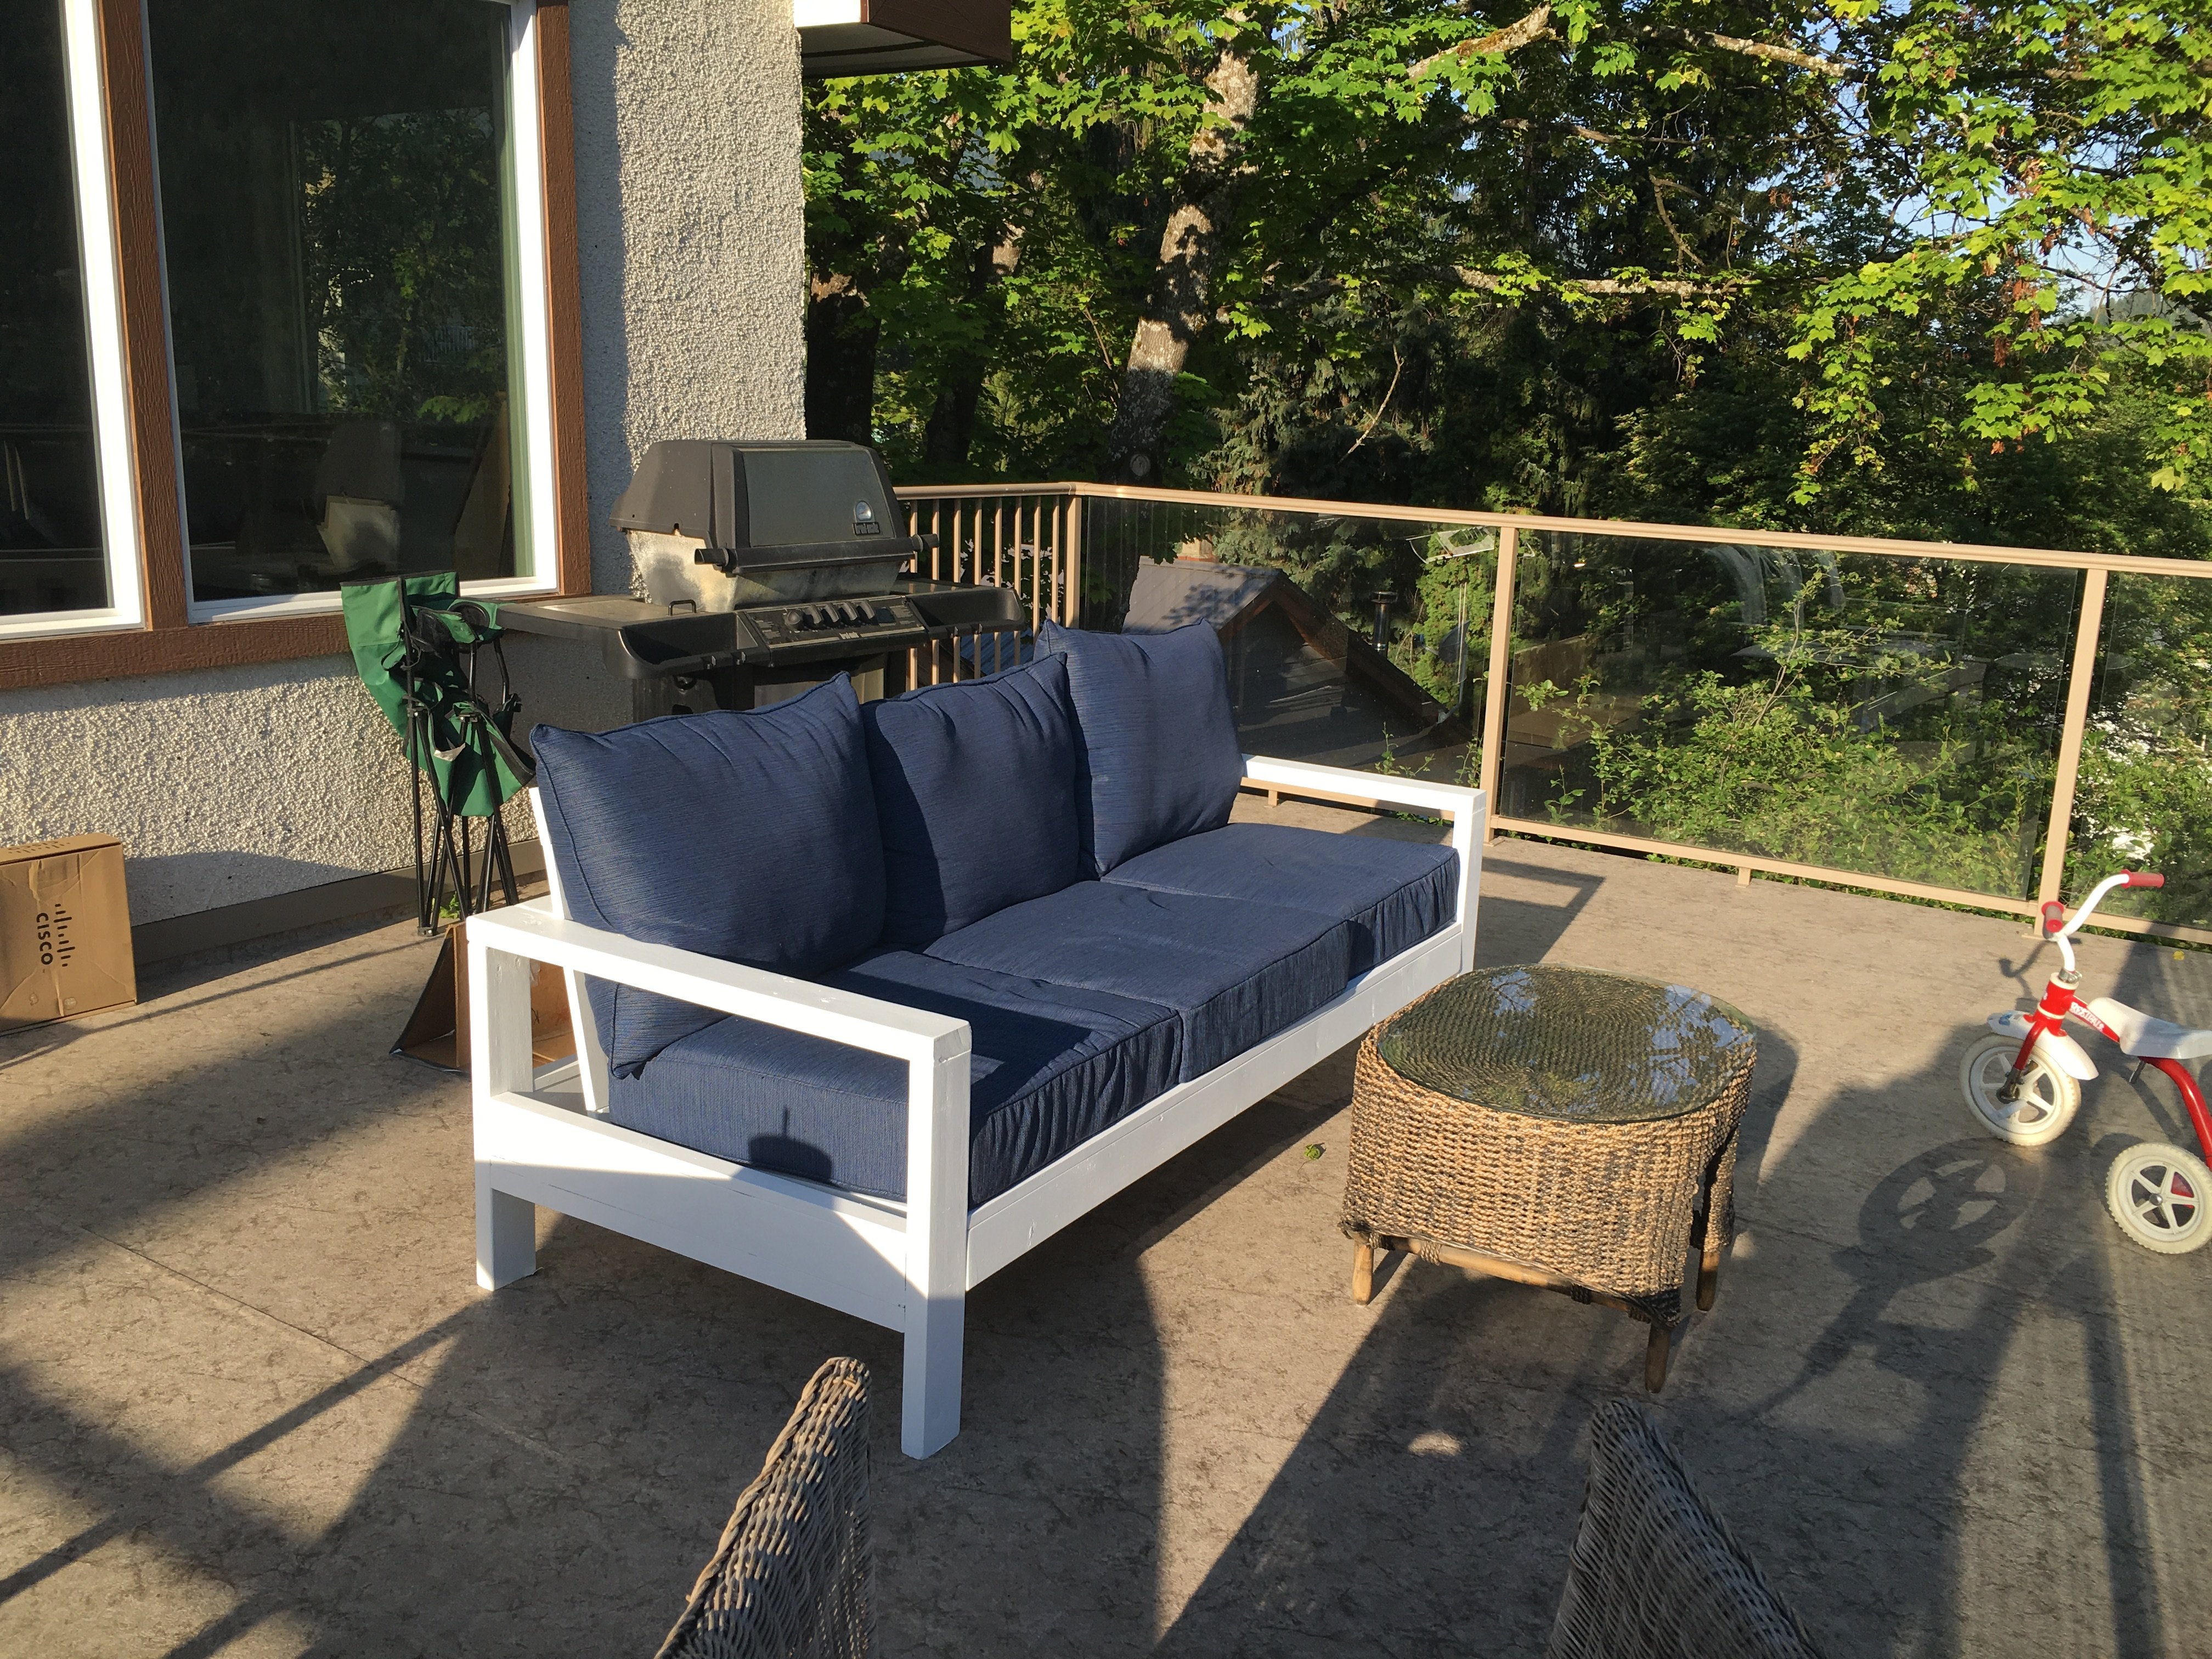
Biult this for my outdoor patio. Got the cushions from Lowes.ca for about $80 each.
Built from Plan(s)
Estimated Time Investment
Week Long Project (20 Hours or More)
Finish Used
Primer then an outdoor white
Recommended Skill Level
Starter Project
Nailed it!
I only work with reclaimed/junk wood and this has literally been the most rewarding thing I've ever done. I absolutely love these projects! can't thank you enough for sharing plans- and for free! (I also made a chair but it won't let me upload a pic.)
Estimated Cost
$10 for nails
Estimated Time Investment
Afternoon Project (3-6 Hours)
Recommended Skill Level
Beginner
Storage Bunk
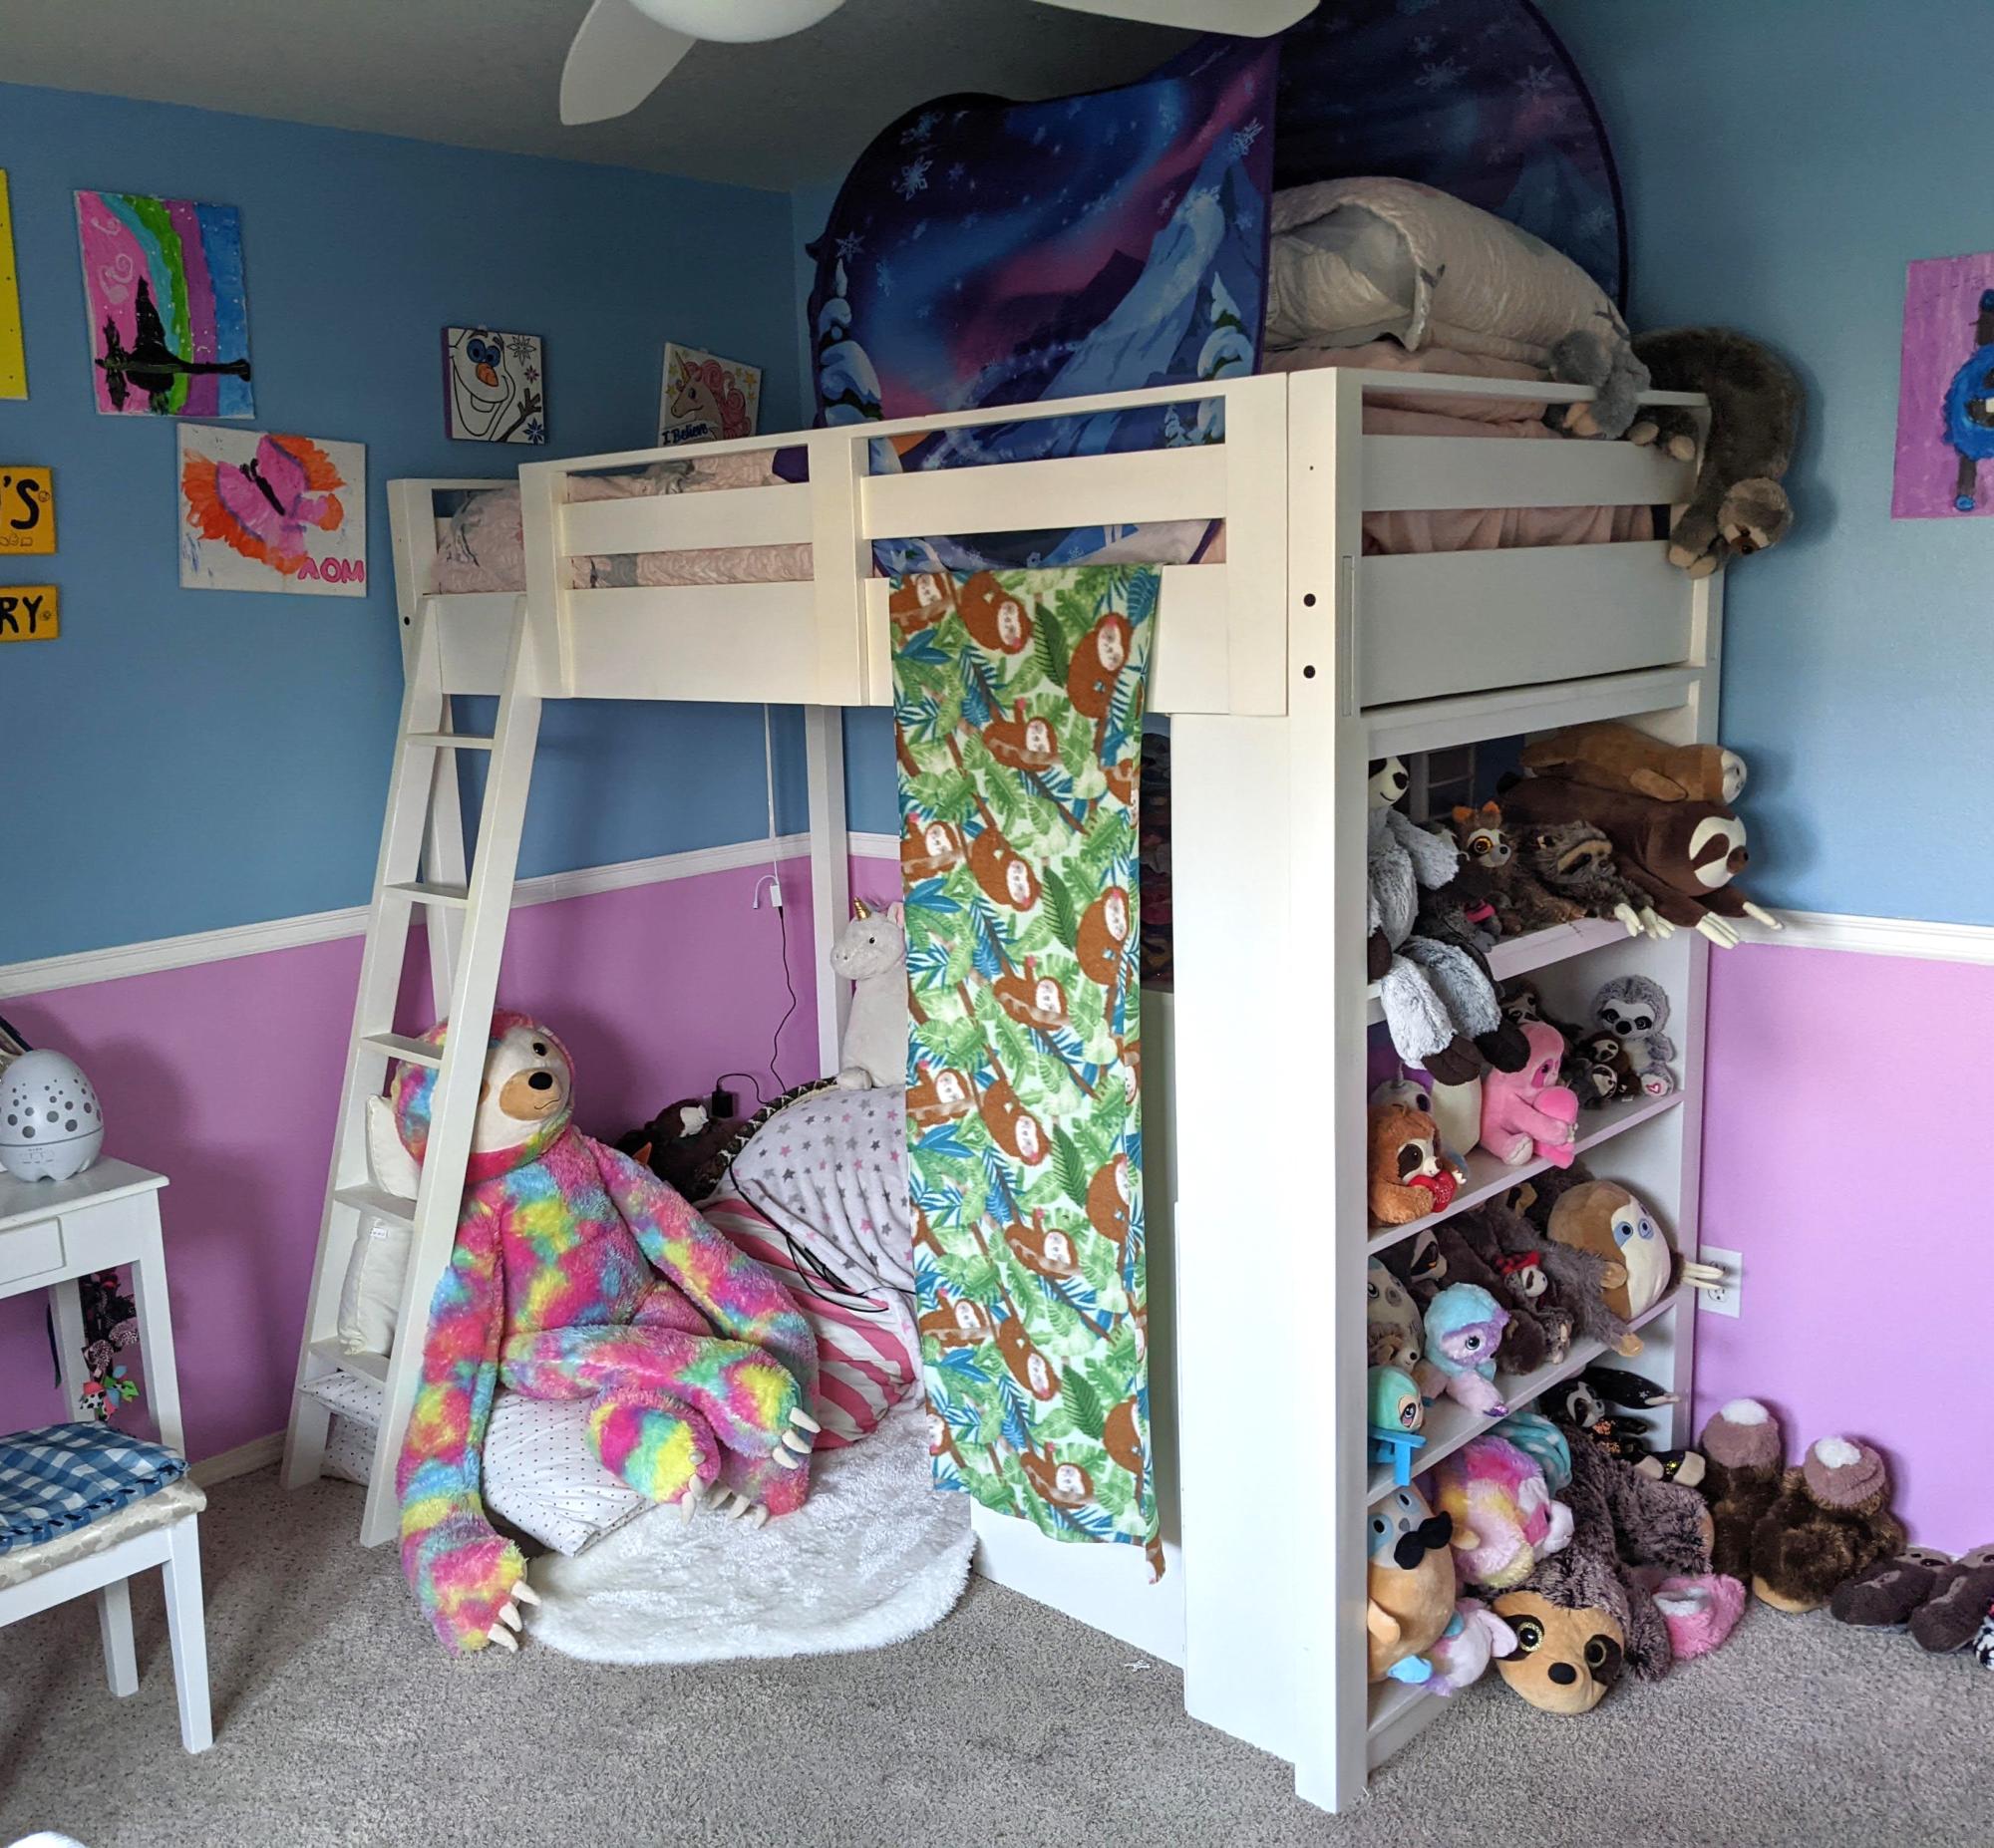
I finished this a while back for my granddaughter. I modified the side rails so it could be disassembled and reassembled in her bedroom.
Built from Plan(s)
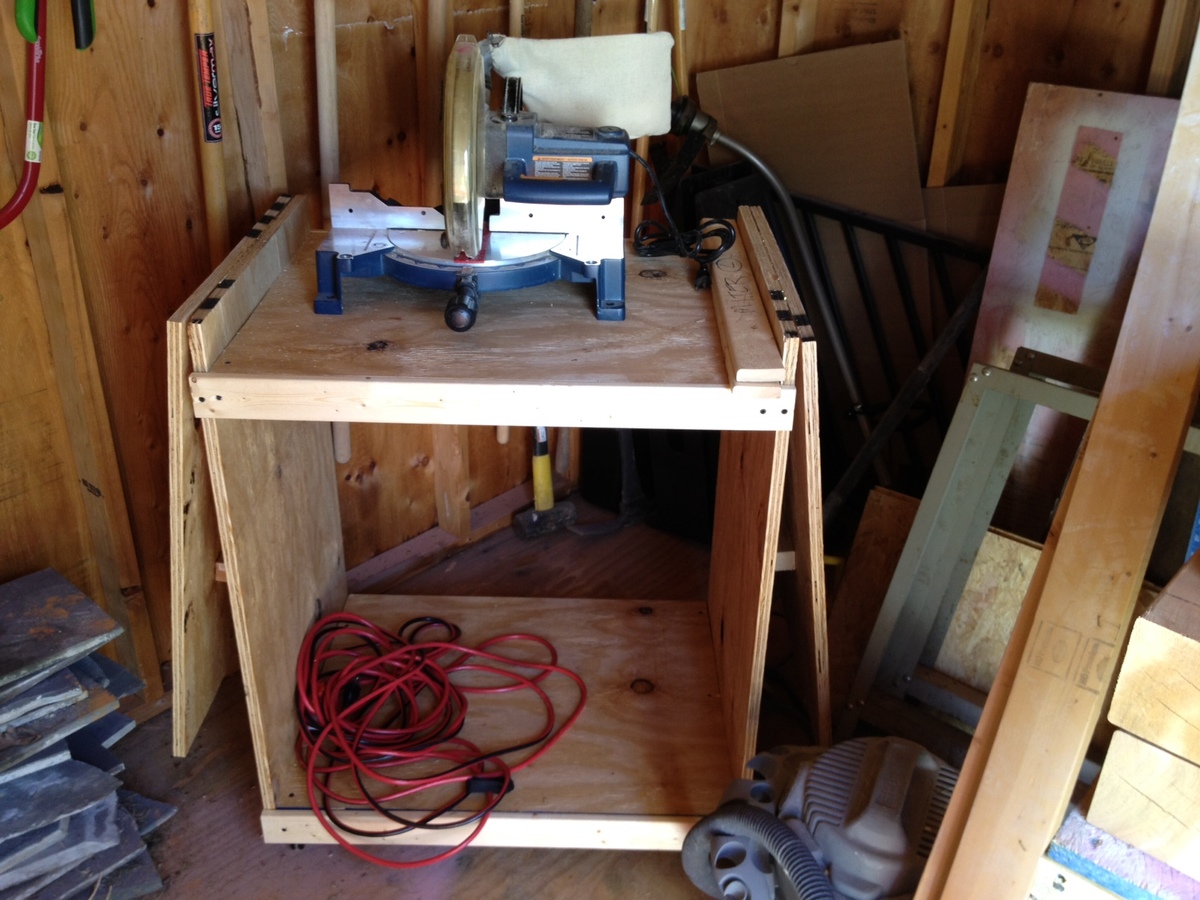
Miter Saw Cart
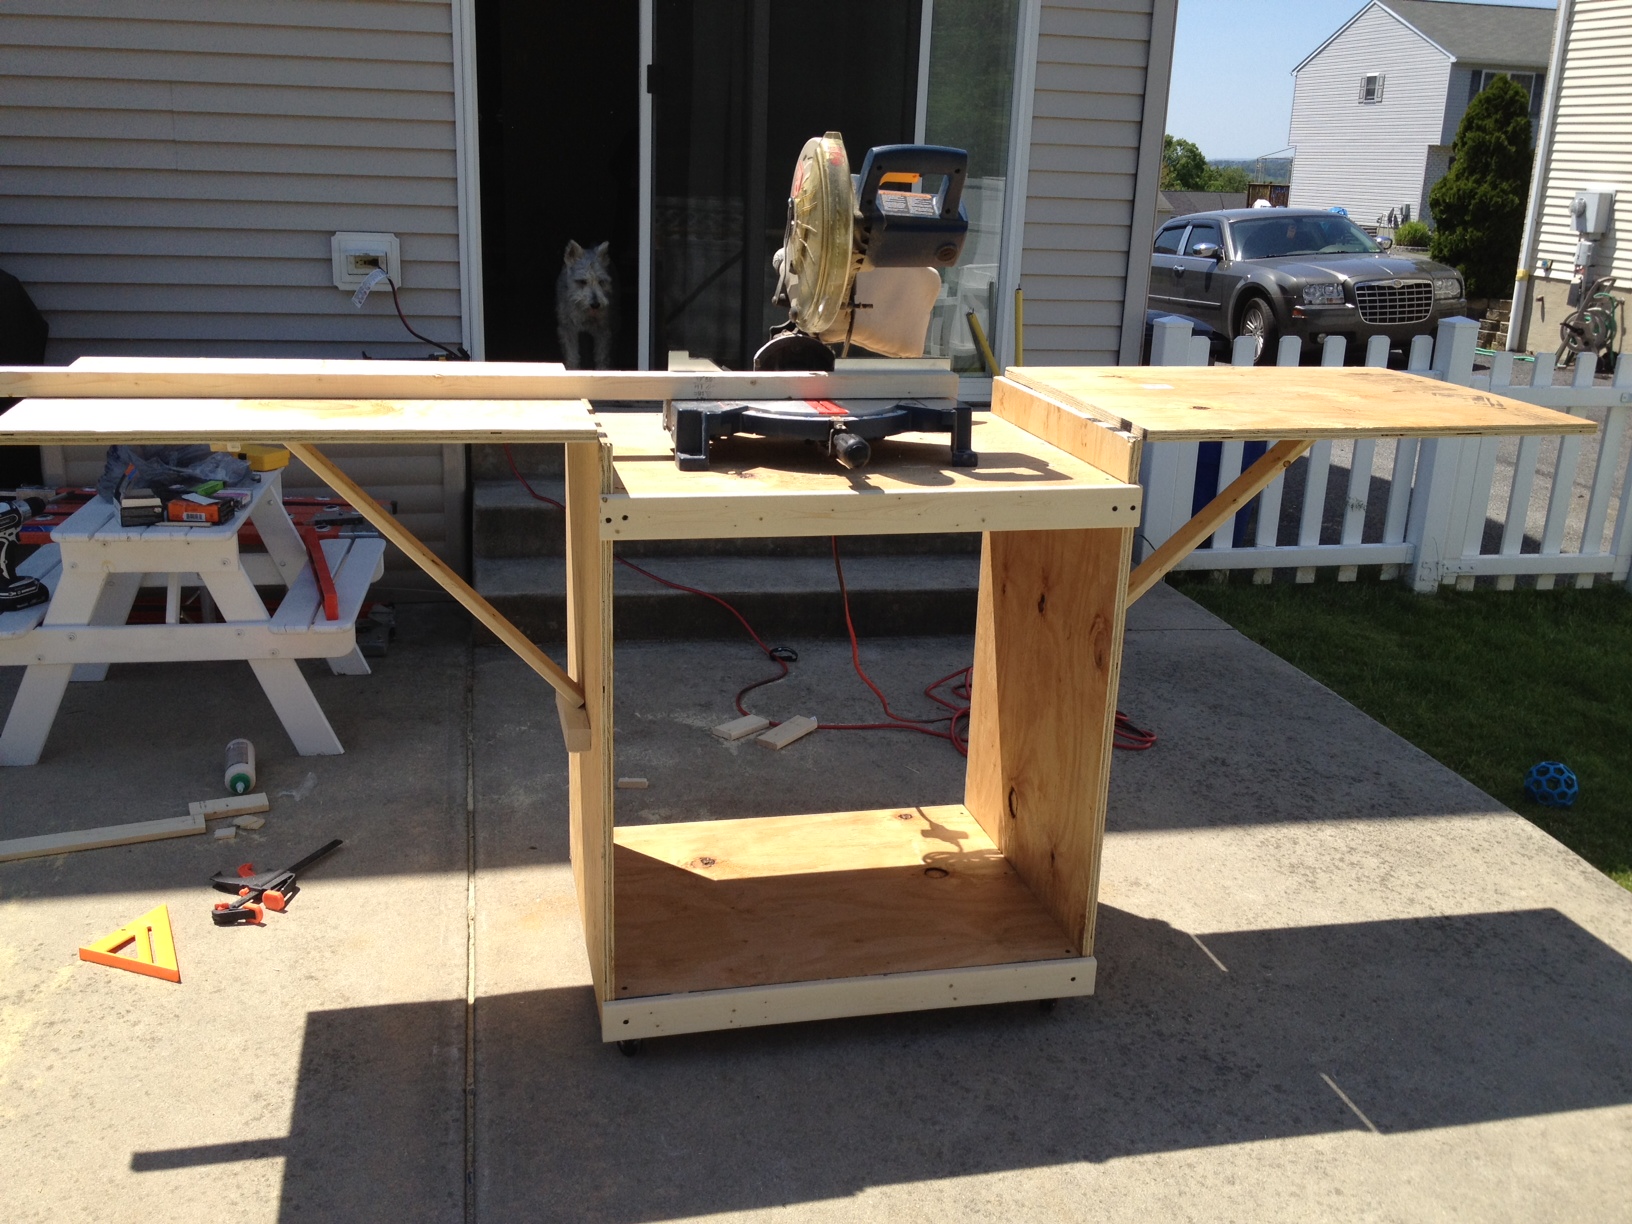
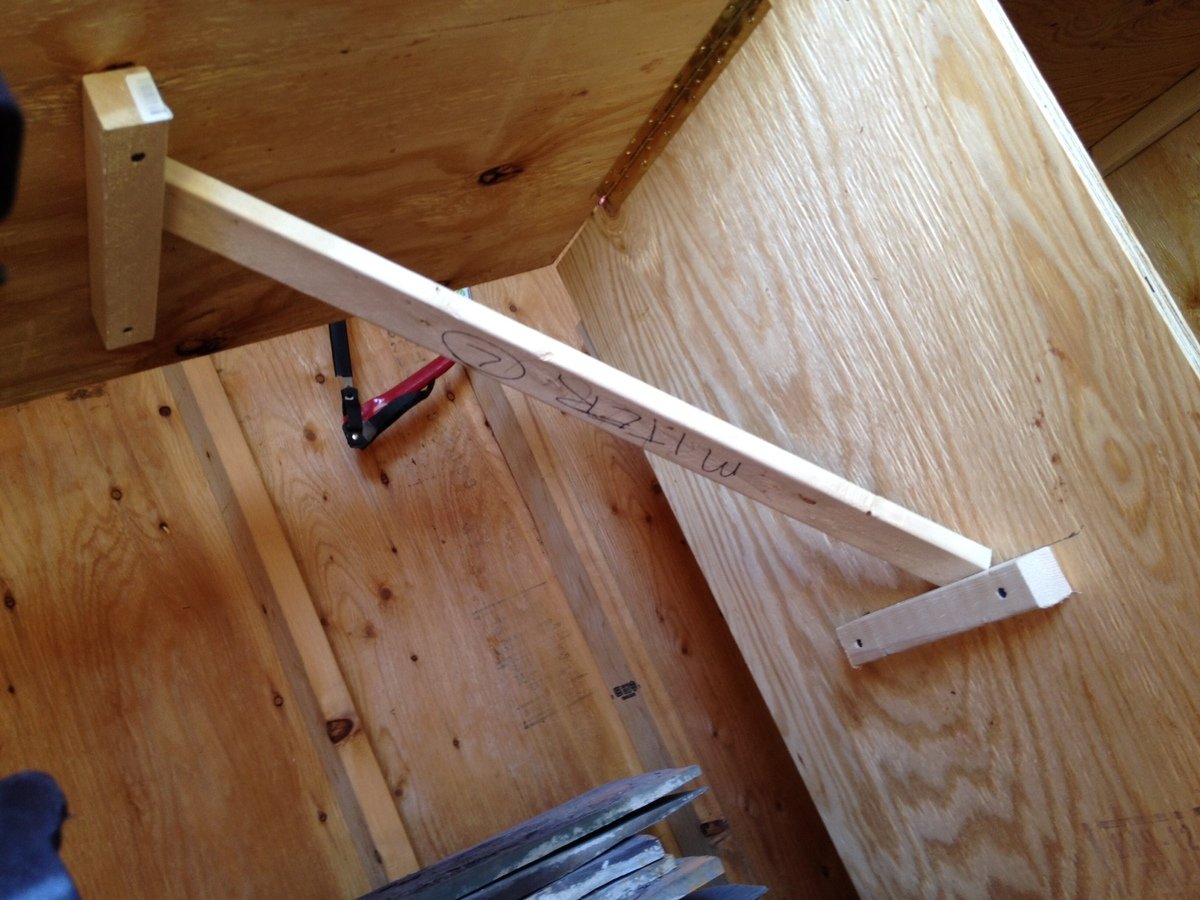
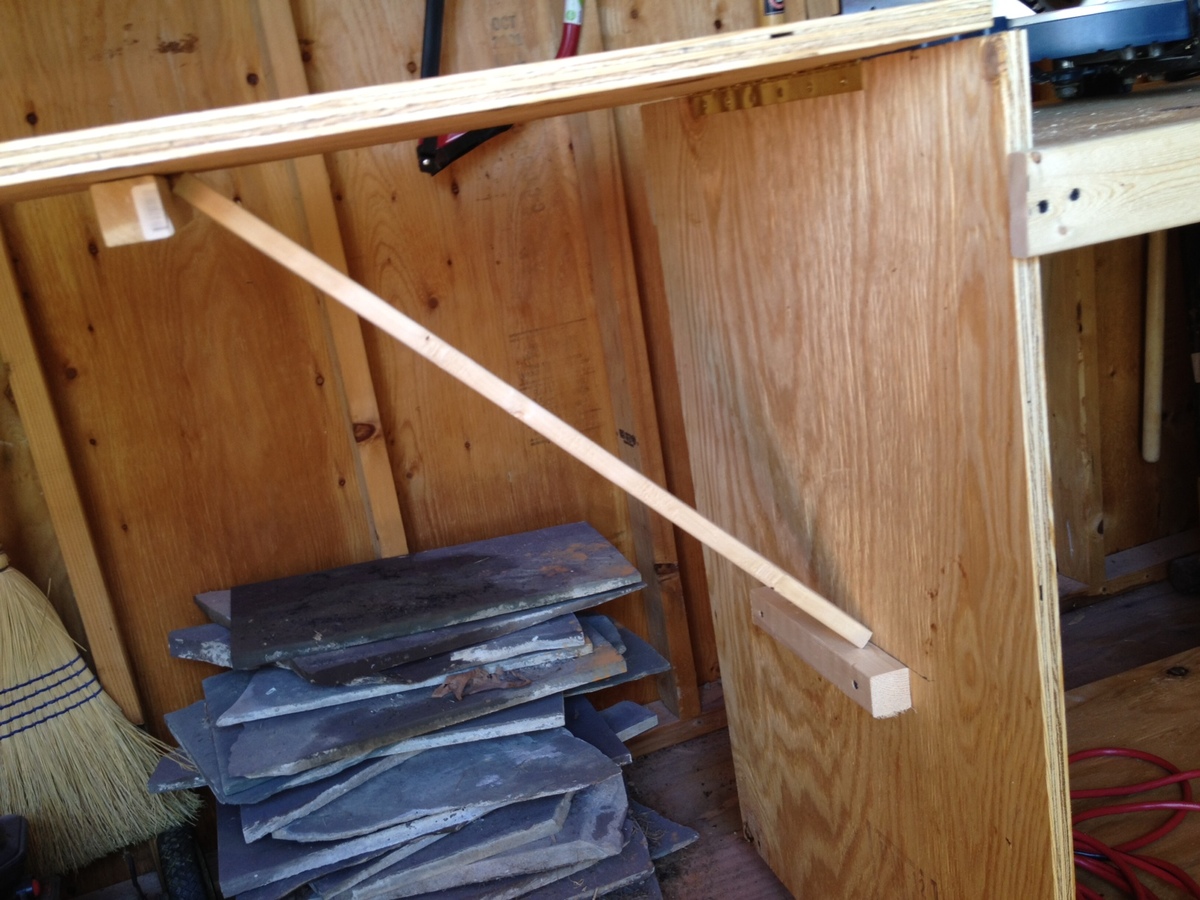
Coped the design almost to the "T." I loved this design because I only have a small shed to work out of and this stand for my miter saw was much needed.
The major difference between the original and my design are the folding arms. I was working within a very small budget and couldn't afford the fancy folding arms so I was able to do a little creative thinking and decided to go with a removable piece of 1x3 that is wedged under the arms with a block installed on the "leaf" and the main table. I used the old pythagorean theorem to figure out how to make it a level 45 degrees. With a little playing around I have both arms completely level and the stand is perfect!! I am excited to get some other projects on the way now that I have somewhere other than the ground to work with my miter saw.
I didn't use any pocket holes, but am picking up a Kreg jig set from someone this upcoming week and am looking forward to putting that into some use on my next projects!
Built from Plan(s)
Estimated Cost
30 bucks or so
Estimated Time Investment
Afternoon Project (3-6 Hours)
Finish Used
None
Recommended Skill Level
Beginner
Comments
Fri, 05/18/2012 - 18:26
Nice modification!
What a great way to save some money! If you have time, could you add a close up pic of how the 1x3 fits on the folding arm to hold it? Cute dog!
In reply to Nice modification! by Crystal @ 29 R… (not verified)
Sun, 05/20/2012 - 11:25
Added a few pics, let me know
Added a few pics, let me know if you want any others!!
Fri, 05/18/2012 - 19:04
I would like to see a close
I would like to see a close up too if possible. I am wanting to make the saw cart plus two more carts with the middle flush with the top so I can push the two together to use for a workbench. How much weight do you think your sides can hold the way you set them up?
In reply to I would like to see a close by stephanier (not verified)
Sun, 05/20/2012 - 11:28
I honestly am not too sure
I honestly am not too sure how much weight it would hold. I havent seen any bowing or pushing yet. I have used this so far to cut a piece of 4x4 12ft long made of cedar for my next project and didnt have any problems. I think if I need more weight holding strength, I think I would just change out the 1x3 and maybe use a 2x4 in there. I am also not a 100% sure how much weight the hinge can hold, maybe someone else reading these posts can be a little more helpful as far as that goes.