Frequently Asked Questions
Wood Questions
What kind of wood should I use?
Most of our plans use standard construction lumber like pine or fir. It's affordable, easy to work with, and easy to find. It's also rapidly renewing and biodegradable, so a great eco friendly choice!
Can I use hardwoods instead?
Yes—just keep in mind they're heavier, cost more, and can be tougher on tools and harder to join together and finish. I recommend not tackling a hardwood project until after you have built several softwood projects.
What if my boards are warped?
Choose the straightest boards at the store. You can often work around slight warps by cutting them into shorter pieces.
What wood should I use for outdoor furniture?
Use red-toned or pressure-treated 2x lumber for framing, and cedar or cedar fence pickets for the decking. Outdoor furniture should be built like a deck—your local home center can help recommend the right wood for your climate.
Will my wood move or warp after I build?
Potentially, especially in humid climates. Let your wood acclimate indoors before building. Once acclimated and kept in a stable environment, movement should be minimal. Remember, most houses are built using framing lumber - it's all about keeping moisture down indoors.
Cutting Questions
Do I need a miter saw?
A miter saw is great, creating fast, safe, and precise cuts, even for beginners. But most plans can be built with a circular saw and a straight edge. If using a circular saw to cut, take time to practice, and get good at making cuts, before cutting your project boards.
How do I get clean cuts with a circular saw?
Clamp your board, measure twice, cut slow, and use a sharp blade. This takes practice, so spend some time making cuts. I go through becoming proficient at freehand cutting in my course, it is worth taking if you want to master this skill.
Will the store cut my wood?
Yes—most stores will do rough cuts to help you transport your materials home. But from store to store, the quality of cuts could greatly vary.
Joinery Questions
What screws should I use?
We recommend star-head self tapping screws for framing, most common sizes are 2-1/2", 1-3/4". Pre-drill if close to the edge or you find your wood is splitting.
Do I have to use pocket holes?
Pocket holes are the cheapest, easiest and fastest way to do some joints - like edge to edge or a hidden fastener joint. There are other methods, but these can be time consuming and expensive. We recommend using pocket holes as indicated in plans for best results.
How do I keep things square?
Use a speed square and measure diagonals after each step. Always clamp joints before screwing to keep them tight and flush.
Finishing Questions
Stain or paint before or after building?
A quick sand before and a full finish after gives the best results. Pre-finish if you're doing two-tone or detailed finishes.
What type of finish?
Use oil-based or water-based stain. For paint, cabinet-grade latex or enamel works great. High use surfaces on indoor projects should get a coat of polyurethane, I recommend a Helsman or Spar or other flexible poly that won't crack or peel with wood movement. For exterior projects, use a finish suitable for exterior fences.
How to get a smooth finish?
Start with a well sanded project. Sand between coats (220 grit), wipe clean, and apply light coats with a foam brush or roller.
Plan Questions
Can I change the size?
Many people do, and that's the great thing about building your own furniture! But do keep in mind going bigger might mean more supports are required, and often plans are optimized for minimal material waste.
Are these beginner-friendly?
Yes—plans are written with simple tools and clear steps in mind, with every effort to make plans as simple as possible.
Can I sell what I build?
Absolutely! Just don’t resell or repost the plans themselves.
General Questions
What tools do I really need?
A drill, circular saw, tape measure, square, and a few clamps will get you through most projects.
Do I need a workshop?
Nope! A driveway or small patio is plenty to get started, just make sure you have a level place to work. If you find you are building several projects a year, creating a small workbench is a great way to store tools and have a dedicated workspace.
What if I mess up?
Wood filler, sanding, or flipping boards goes a long way. Mistakes are part of the process!
What can I do to make my projects look more professional?
Start with straight boards, make accurate cuts, clamp all joints, and line up everything neatly. Sand thoroughly, use a neutral finish, and apply it in light coats for a clean look.
I've never built anything before. Where should I start?
Start with a few smaller softwood projects to get hands-on experience. Or if you're tackling a big project, buy a little extra lumber and practice your cuts and joints first. If possible, work with someone who has a bit of experience.
Care & Maintenance
How long will my furniture last?
With good joinery and regular care, your DIY furniture can last for decades. I have pieces in my own home that are over 20 years old and still going strong! One of the best parts about DIY furniture is that it’s easy to repaint, refinish, or repair—so your projects can grow and adapt with you.
How should I care for outdoor furniture?
Lightly pressure wash or hose it down once or twice a year. Tighten screws and reapply finish as needed to protect it—just like a deck or fence. A little upkeep goes a long way in extending the life of your furniture.
How about indoor furniture?
Regularly dust or wipe with a damp cloth. If it starts to look worn, a light sanding and touch-up paint or stain can refresh it in no time. DIY pieces are meant to be durable and fixable—so don’t be afraid to give them some love now and then.
Want to Build with Confidence?
Check out my ebook: 12 Skills to Build Your Own Furniture
It walks you through the core skills every builder needs—measuring, cutting, joinery, and finishing—so you can build beautiful furniture that lasts.
Still Have Questions?
Email us anytime at help@ana-white.com and we’ll be happy to help!


Comments
Rebekah (not verified)
Tue, 10/26/2010 - 20:39
Love how simple and cute
Love how simple and cute these are! I will me making these this weekend for sure! Thanks so much for your endless inspiration. You're amazing!
Stephanie (not verified)
Tue, 10/26/2010 - 21:09
No. Freakin'. Way. JUST
No. Freakin'. Way. JUST today I was thinking of how I could build some crates for the house. But seeing as how I'm not even close to being a carpenter or anything related to it, I couldn't figure out how to do it. You posted those other crates with the solid sides on caster wheels, but I just wanted to use lathe strips and boards for a more rustic feel; pretty much EXACTLY like your plan. You are so totally awesome. And you're obviously a mind-reader.
Unfortunately I'll have to get to those after I finish my table (the farmhouse with stretcher) and benches...
Green Gracie Home (not verified)
Tue, 10/26/2010 - 23:35
I love these Ana...sometimes
I love these Ana...sometimes a "day off" is the most productive day! I can't wait and try these, because I definitely have the paper!
Amanda (not verified)
Wed, 10/27/2010 - 00:28
Lovely! These might be going
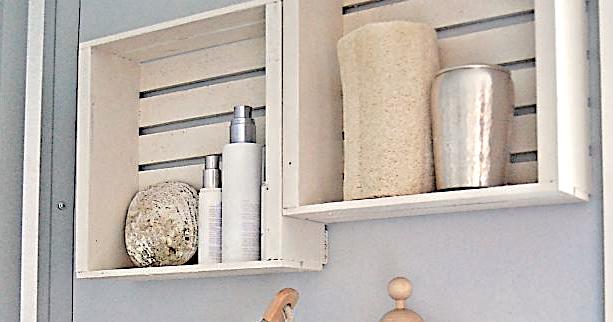
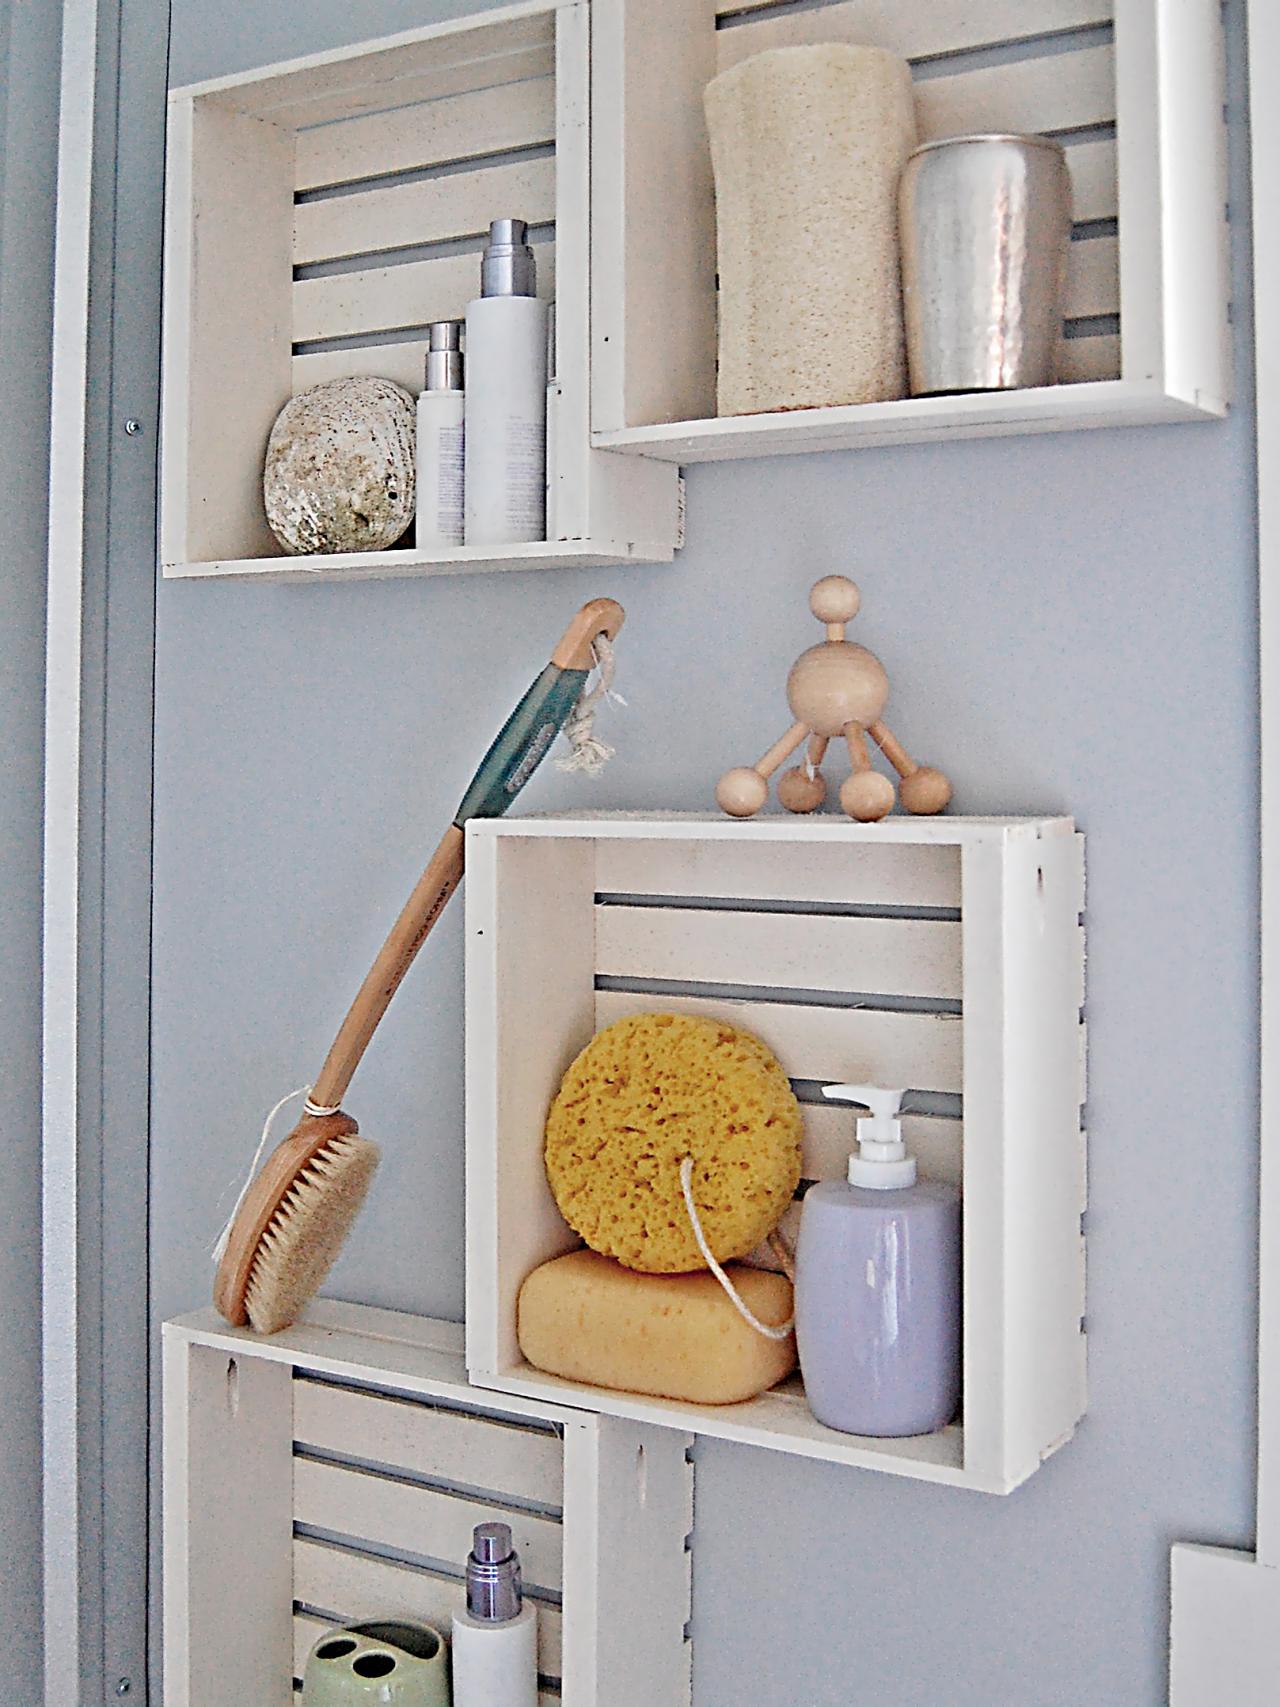
Lovely! These might be going up in my bathroom. It's between these and the floating shelves...
Michelle (not verified)
Wed, 10/27/2010 - 03:05
These are so cute!! Glad to
These are so cute!! Glad to hear that you enjoyed your day off!
Angel s. (not verified)
Wed, 10/27/2010 - 03:22
Love these! I could use some
Love these! I could use some in the bath for shelves and in the craft room for storage. THANK YOU for the link to the lathing strips, I have been wanting some and none of the local stores seem to have them, now I know where to find them! The hard part will be not using the all up in projects so I can use them on my loom.
Heather - Doll… (not verified)
Wed, 10/27/2010 - 03:24
Fun & simple project - thanks
Fun & simple project - thanks for sharing! :)
Beckie (not verified)
Wed, 10/27/2010 - 03:34
Lovely! What do you use to
Lovely! What do you use to hang them on?
Tracie (not verified)
Wed, 10/27/2010 - 03:37
That is soooo me! I think
That is soooo me! I think that is why you are so popular...your work is your passion---me too!!!! I made this!

Tsu Dho Nimh (not verified)
Wed, 10/27/2010 - 03:40
I envision Ana whirling
I envision Ana whirling around her place like the Tasmanian Devil cartoon.
Cute crates! Very cute.
Tsu Dho Nimh (not verified)
Wed, 10/27/2010 - 03:52
OH ... forgot! One of these
OH ... forgot! One of these cheap things will make those danged finishing nails easier to set. It also gets your fingers out of the danger zone :)
http://www.acehardware.com/product/?productId=1288962 (holds it and countersinks it - and it's way easier to hit then the head of a 3/4 finishing nail.)
http://www.micromark.com/NAIL-HOLDER,7356.html Just holds it.
And at the end of a long day of setting toe moldings into baseboards, your hands will not be cramped into claws, unable to pick up your cold beer.
Kristen (not verified)
Wed, 10/27/2010 - 04:03
Thank you for posting
Thank you for posting this--I've been pricing a finishing nail gun, but this is far more affordable for the time being. I'll be able to enjoy that beer now, after a day of projects!
Kristen (not verified)
Wed, 10/27/2010 - 04:06
Ana, when do you ever find
Ana, when do you ever find time for scrapbooking??!! Especially considering your day-off schedule :O)
Sydney (not verified)
Wed, 10/27/2010 - 06:56
Love them!!!! Are those kreg
Love them!!!!
Are those kreg holes on the side? Were these just oops boards or did you actually use a kreg on this?
Kim (not verified)
Wed, 10/27/2010 - 07:07
Do you think that nail holder
Do you think that nail holder countersink thing will help if your problem is nails bending while trying to hammer into plastic trim? That's the problem I am having.
Kimberly (not verified)
Wed, 10/27/2010 - 07:24
I LOVE these! I can't wait to
I LOVE these! I can't wait to make them! Adding them to my list of "To-make" things now!
nancy (not verified)
Wed, 10/27/2010 - 07:50
Thanks for sharing these
Thanks for sharing these cheap tools! :)
nancy (not verified)
Wed, 10/27/2010 - 07:51
Ana, you amaze me! Thanks for
Ana, you amaze me! Thanks for these awesome plans. :)
Anne (not verified)
Wed, 10/27/2010 - 09:08
Oh what a busy day you had
Oh what a busy day you had BUT sounds amazing and fun at the same time!!!
Tiff (not verified)
Wed, 10/27/2010 - 09:15
Just a quick question. Your
Just a quick question. Your 1x4's look like they have pocket holes in them. Yet, it doesn't look like they could be doing anything where they are. Were they just already in the scrap you happened to use for this project? Or, am I missing something?
Jamie M. (not verified)
Wed, 10/27/2010 - 10:56
LOVE THESE!! Thanks Ana.
LOVE THESE!! Thanks Ana.
Anson (not verified)
Wed, 10/27/2010 - 20:45
Hi Tiff, Yes, those pocket
Hi Tiff,
Yes, those pocket holes don't serve a functional purpose for this project. As you suggested, they are likely just there from a previous project that didn't come to fruition.
Tracie (not verified)
Thu, 10/28/2010 - 02:21
Had to share my incredibly
Had to share my incredibly old, and incredibly cool vintage shelves....cut with a hand saw---to not damage wood....

April (not verified)
Thu, 10/28/2010 - 03:13
Ana, you mentioned
Ana, you mentioned scrapbooking paper... Now all we need is a stand that we can slide our new crates into so we can label the outside of them with the color of paper that they contain :-) And I agree with Kristen. How on earth do you have time for scrapbooking with your building schedule?
Danielle Z. (not verified)
Thu, 10/28/2010 - 07:41
How did you hang these on the
How did you hang these on the walls, just normal picture hangers??
I was also wondering about the pocket holes. : )
Isabel Jenson (not verified)
Mon, 11/01/2010 - 07:56
I love these, they look so
I love these, they look so easy to make! I think I will be making these and stacking them the scrapbook paper idea! Maybe removing one of the sides, no? Is that a good idea? You are amazing!
Deb Weyrich-Cody (not verified)
Tue, 12/21/2010 - 05:50
Nice, clean finish with the
Nice, clean finish with the pocket nailing! Now that you're doing tutorials, this might be a good subject for those looking for more advanced technique?
Zaira (not verified)
Tue, 01/11/2011 - 11:04
love these, had to make them!
love these, had to make them! http://learnwithp.blogspot.com/2011/01/easy-peasy-crates.html
TayBaxter
Wed, 04/20/2011 - 12:05
love!!
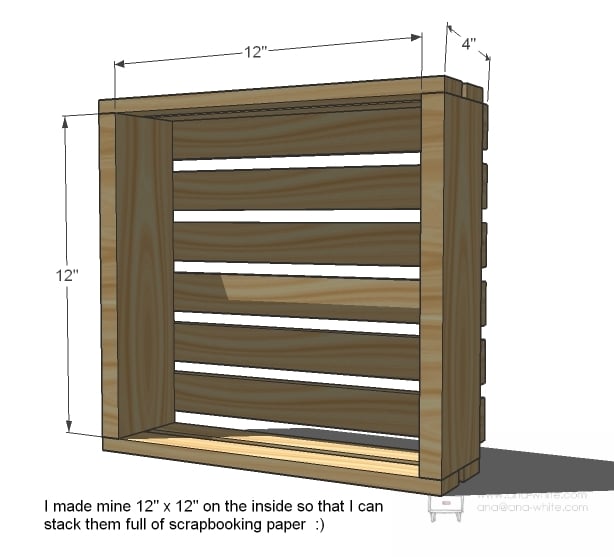
modified a little bit as i could find the right boards.. i bought a 2x6x8 kiln dried whitewood and 3 1x3x8 premium furring strip and 1 lb of nails. whole thing cost me $11.47! and i had enough to build 2. little larger than yours but beautiful none the less. saved me almost $300 bucks as apposed to pb! btw did a white wash finish, they look gorgeous!
Craig Sparks (not verified)
Sat, 05/05/2012 - 13:15
Started some of these today
Started on 4 of these today. Got all the wood cut, just gotta sand and paint and assemble. Perfect gift for mothers day.
Thanks for the great site Ana, it has helped me get going in woodworking.