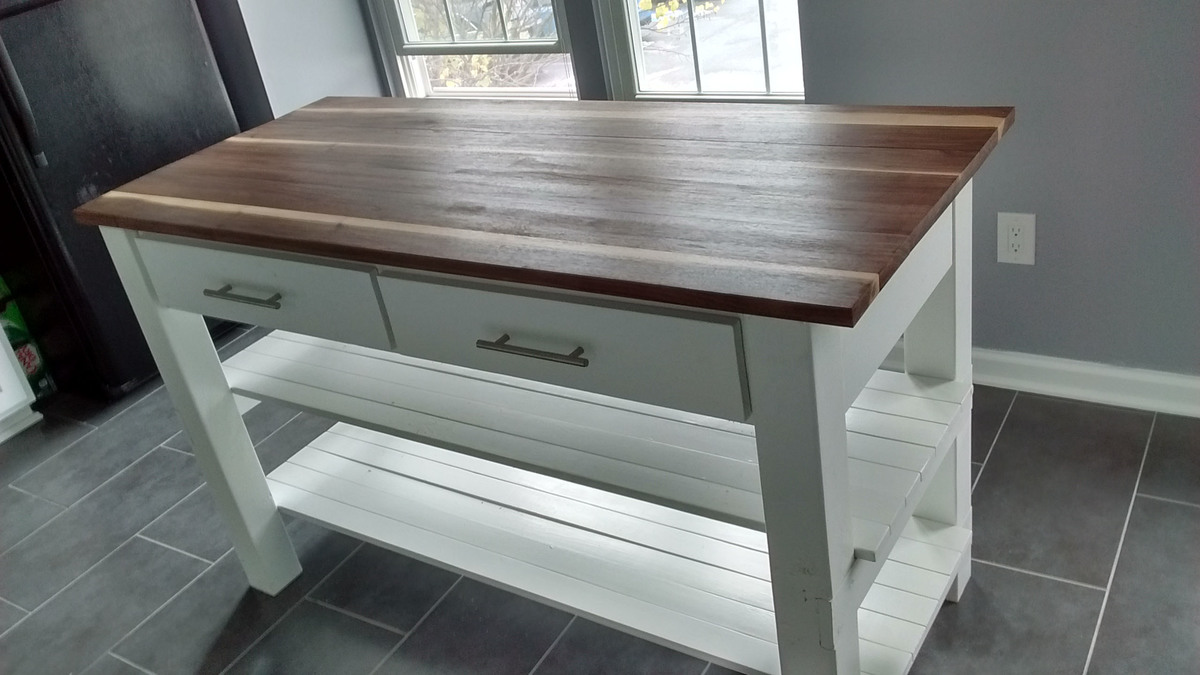
I used the plans from Michaela's kitchen island, but modified the top. Instead of 2x4s pine studs, I used black walnut boards a friend of mine had lying around. They were ~1x8" boards so I ripped them to ~4" width and ~60" length. They were a little warped so I glued and screwed them togther using a Kreg jig (best tool ever). This made a huge difference and there was only minimal gaps (1/16") between the boards. I ended up borrowing a belt sander from another friend to take out the 1/16"-1/8" lips in the boards. First time using a belt sander and it took a few minutes with 80 grit across the grain to get a level surface. Used 120 grit paper with the grain to smooth out the scratch marks from the 80 grit. Attached the top to the base with screws, finish sanded with 220 and 320 grit, cleaned up the dust with a tack cloth and then applied a few coats of polyurethane. For the drawers, I couldn't find 21" slides so I ended up modifying the drawers for 20" slides. Another fun and satisfying project!
used the plans for Michaela's Kitchen Island, more or less, but scrapped the top. Instead of wood, I went with a piece of Corian that I got very, very cheap at a local recycled building materials store. It was not that much more expensive than using wood, believe it or not. It's also easier to work with than wood, at least for this project. We even had enough left over for 2 large cutting boards. - See more at:
http://ana-white.com/2012/02/kitchen-island-w-corian#sthash.yUJ3fA16.dp…used the plans for Michaela's Kitchen Island, more or less, but scrapped the top. Instead of wood, I went with a piece of Corian that I got very, very cheap at a local recycled building materials store. It was not that much more expensive than using wood, believe it or not. It's also easier to work with than wood, at least for this project. We even had enough left over for 2 large cutting boards. - See more at:
http://ana-white.com/2012/02/kitchen-island-w-corian#sthash.yUJ3fA16.dp…
Estimated Cost
$200, includes cost of wood and hardware. The black walnut was free, but otherwise would be over $100.
Estimated Time Investment
Week Long Project (20 Hours or More)
Finish Used
Behr "Frost" semi-gloss paint for the base, Minwax Fast-Drying Polyurethane for the top. After cutting all pieces, but before assembly, I applied a coat of white primer to all base pieces. I then applied 2 coats of Frost semi-gloss. For the top, I applied coats of polyurethane with light sanding using "0000" steel wool between coats. Synthetic 2.5" bristle brushes were used for paint and polyurethane.
Recommended Skill Level
Intermediate

Comments
maggiekat
Thu, 11/05/2015 - 15:31
Gorgeous!!
I don't seem to have friends with stashes of black walnut lying around : D