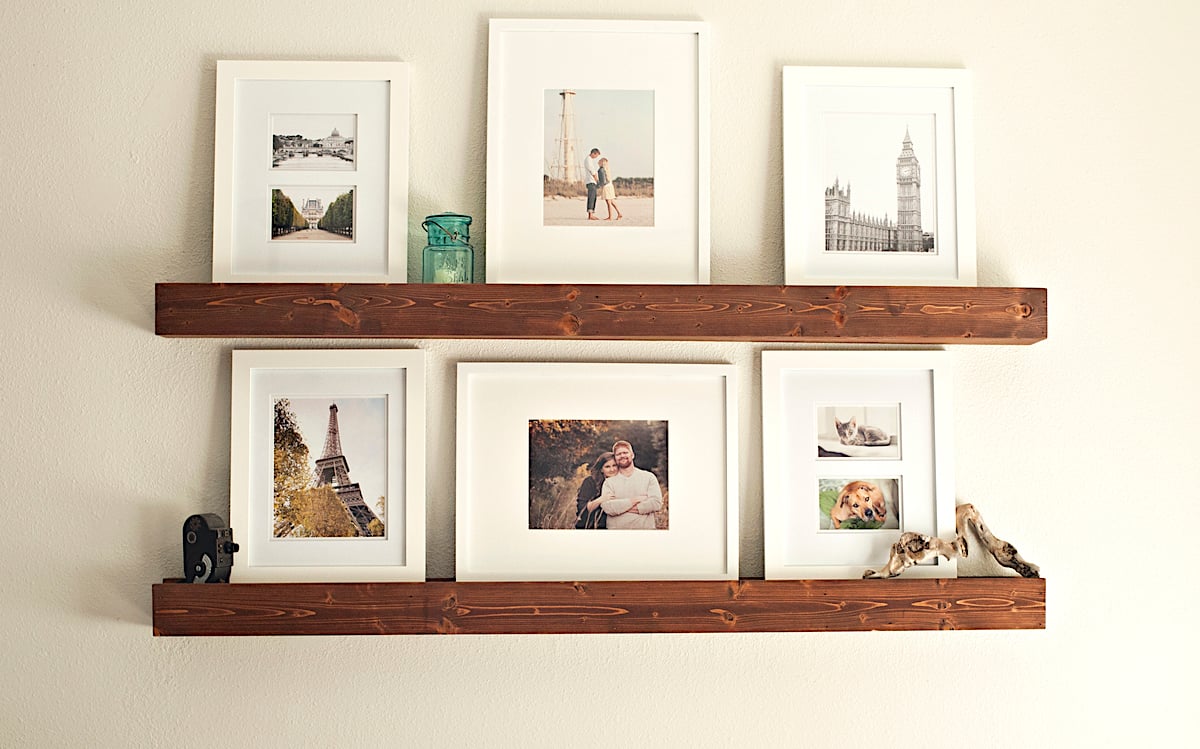


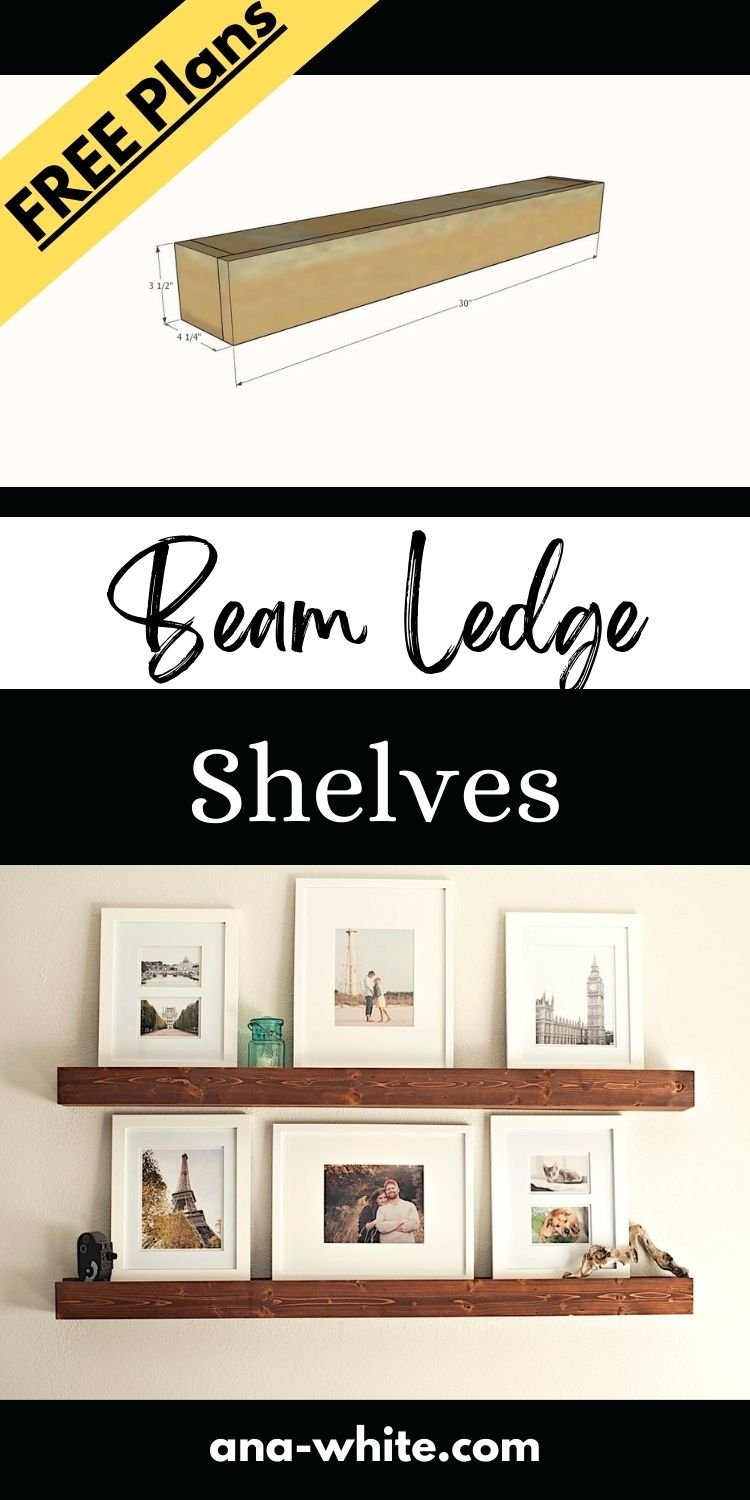
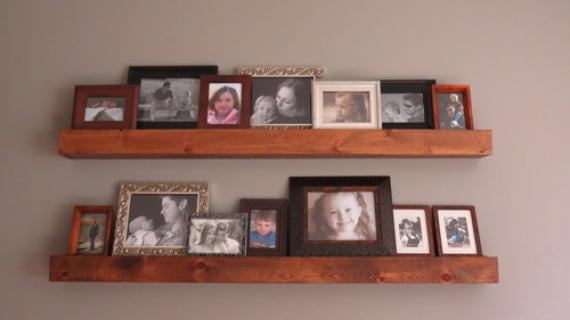
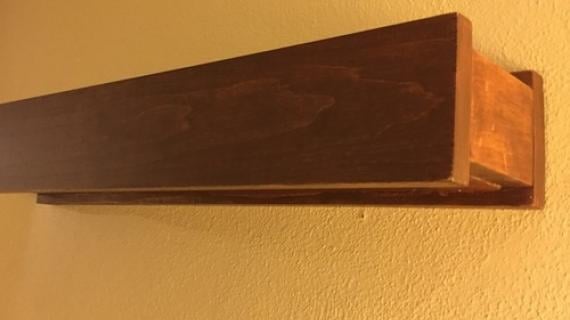
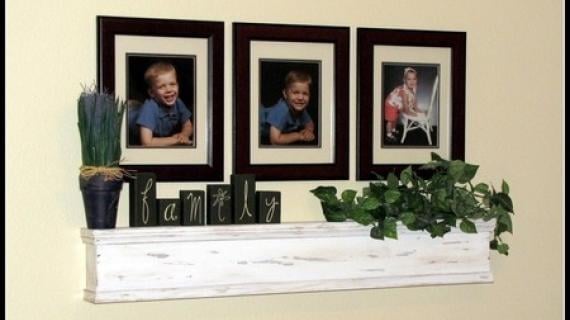
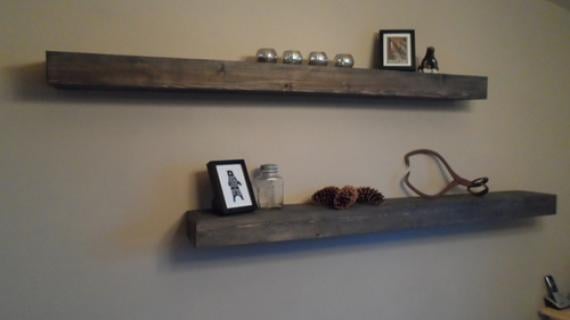
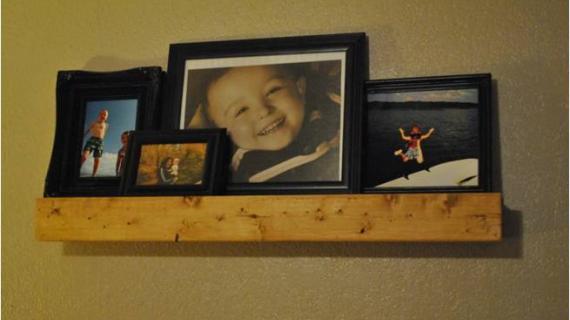
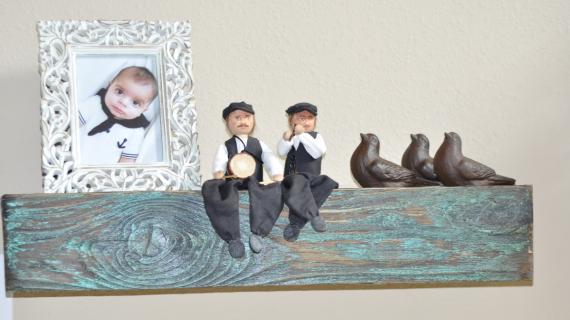
Build your own easy to build ledge shelves that look like beams. This is a great way to add a rustic wood element to any room. Perfect for frames, books, or small decor items! Easy to hang. Free plans by Ana-White.com
Pin For Later!
Preparation
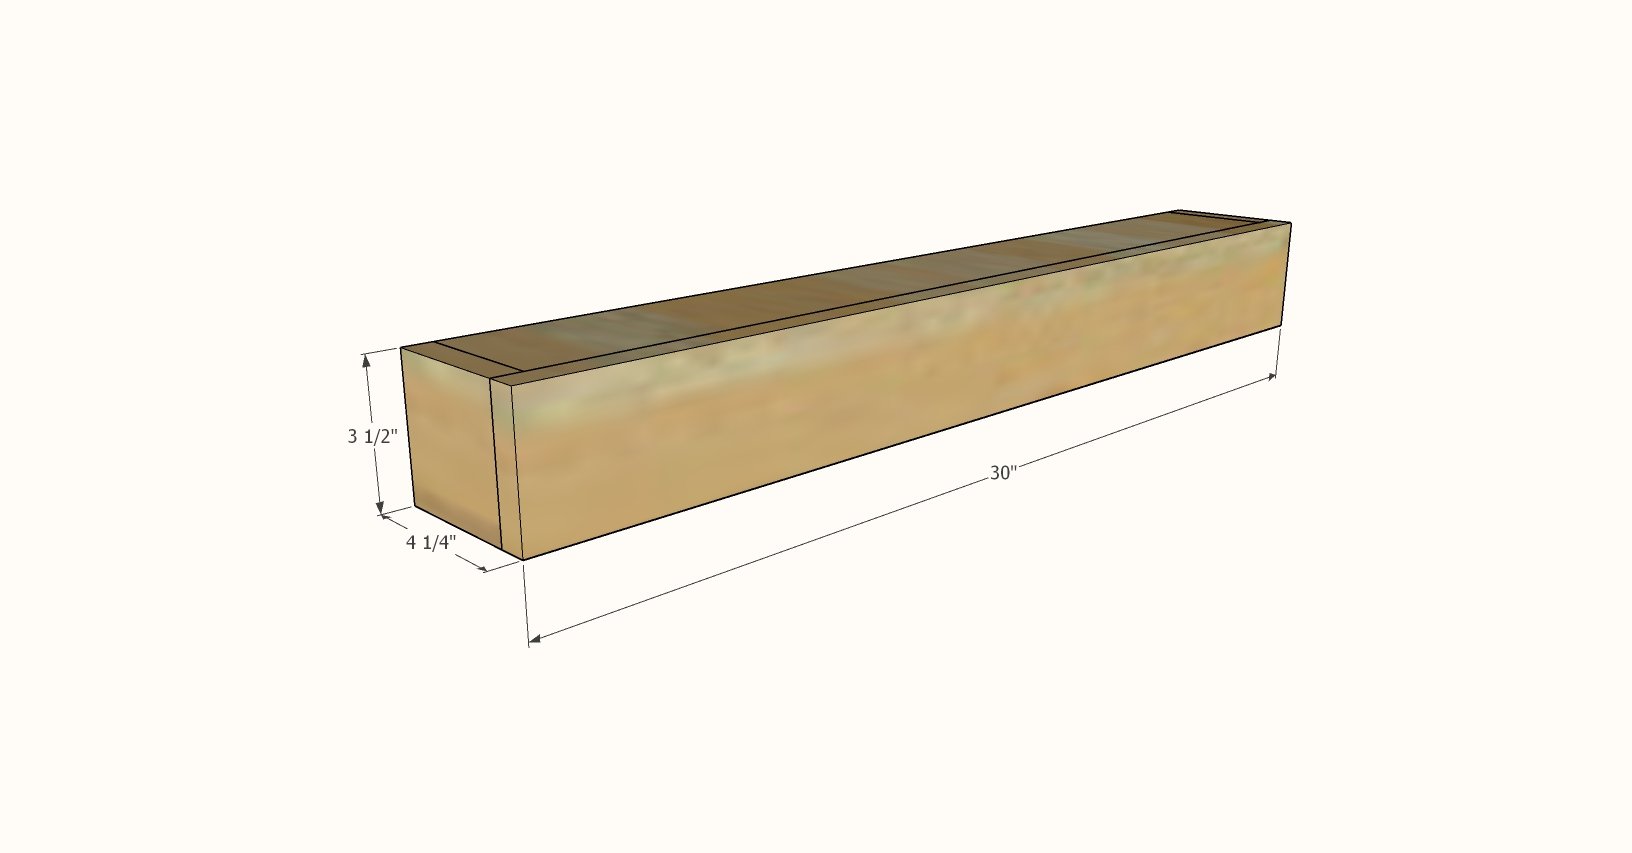
For 30" long ledge shelves as shown in this plan:
- 1 - 1x4 @ 8 feet long
- 1 - 2x2 @ 28-1/2" long
- 1-1/4" brad nails
- 3" long self tapping construction wood screws (SPAX or similar), recommend star bit (you'll need just two screws for hanging the cleat)
- 2" long self tapping construction wood screws (SPAX or similar), recommend star bit (you'll need four per shelf for hanging shelf on cleat)
1 - 1x4 @ 30" - Front (should be cut to fit after step 1)
2 - 1x4 @ 28-1/2" - Top and Bottom
2 - 1x4 @ 3-1/2" - Ends
1 - 2x2 @ 28-1/2" - Inside Cleat
Recommend cutting with a chop saw or compound miter saw, but can also be cut with a circular saw and straight edge.
To get a perfect fit, recommend cutting the front after the frame is built in step 1.


Instructions
Step 1
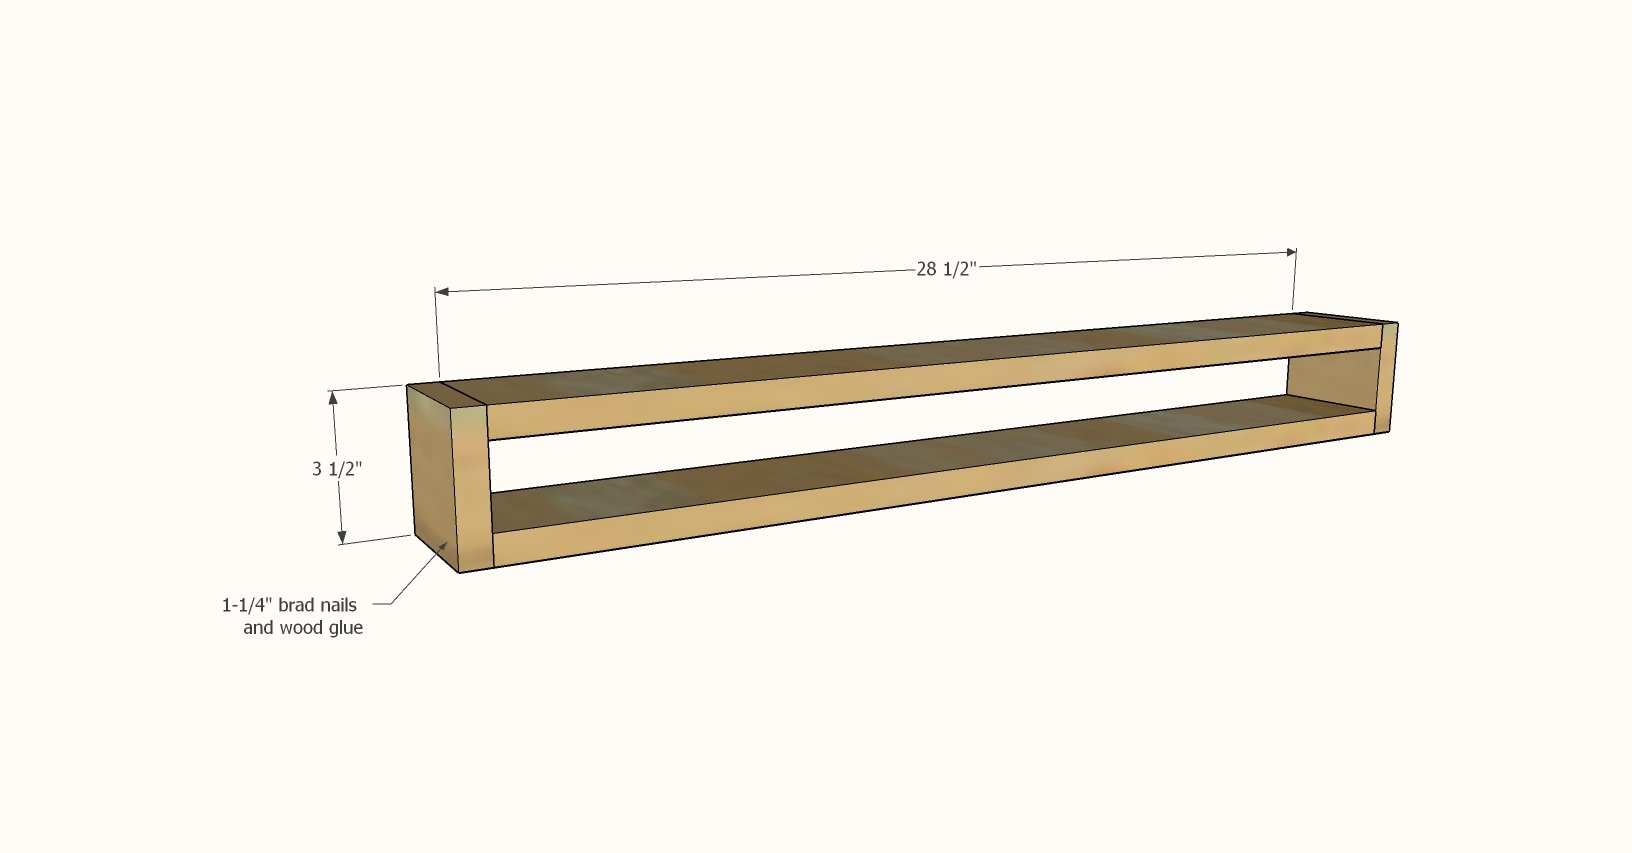
Attach the sides to the top and bottom with 1-1/4" brad nails and wood glue.
Step 2

Measure the front and cut the front 1x4 to fit.
Attach with 1-1/4" brad nails and wood glue.
Stain the outer frame at this step.
Step 3
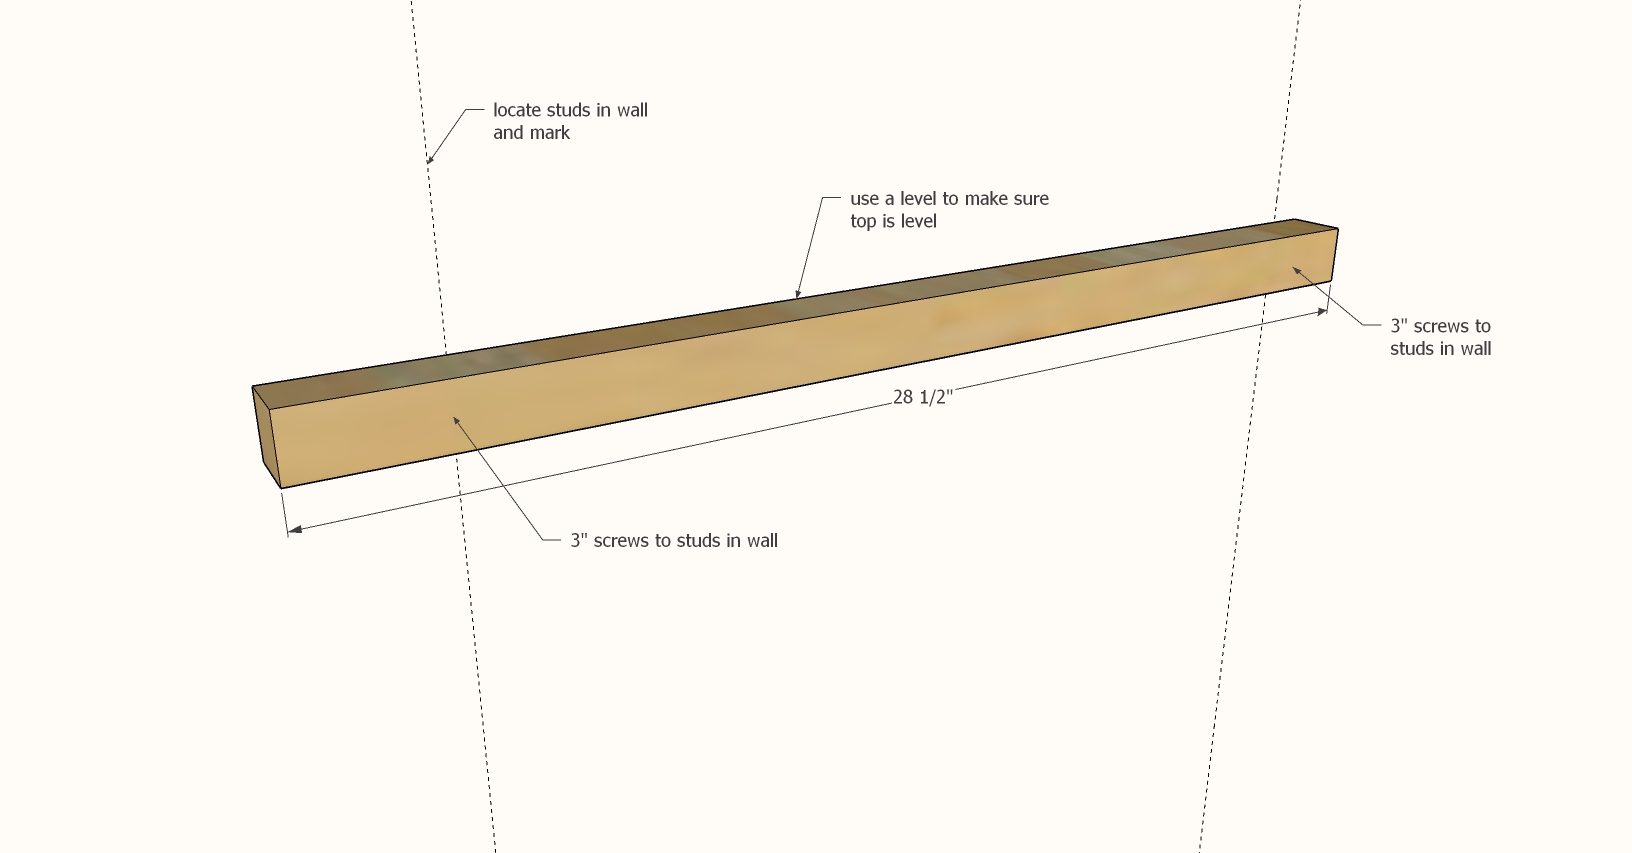
Locate studs in the wall in the desired location for hanging.
Attach one end of the 2x2 cleat to one stud with one screw.
Use a level to set the cleat level and add the second screw to the second stud.
For longer shelves, screw to additional studs in the wall.
Step 4
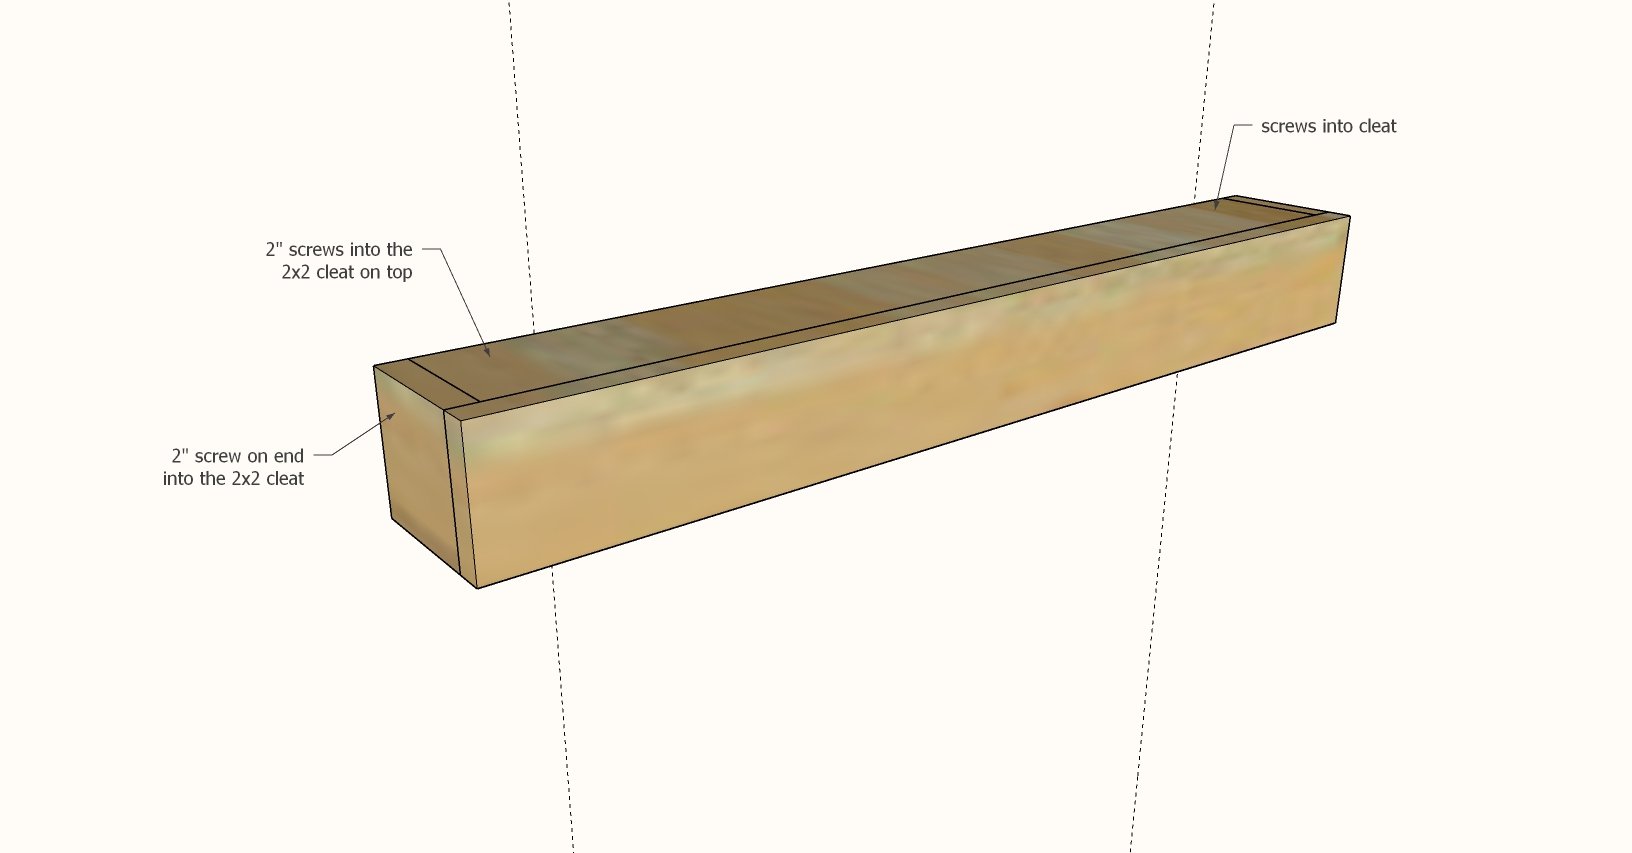
Set the outside shell over the cleat, and attach with the shorter screws through the top and sides to secure.
To remove, simply unscrew the outer shell and then unscrew the cleat from the wall.


Comments
A (not verified)
Wed, 09/29/2010 - 19:55
Brilliant! One more item on
Brilliant! One more item on my list of "to build". now I just need to find a place to hang them!
alexis (not verified)
Wed, 09/29/2010 - 20:03
These are fantastic! I can't
These are fantastic! I can't wait to build these!!!
Charles (not verified)
Wed, 09/29/2010 - 20:10
Great Idea... good look
Great Idea... good look without the weight. These will look great in our log cabin. I'm going to add a groove, or 'plate rail' so I can adjust the 'slant' of framed pictures. I will sand the top of the frame to make it easier to keep them dust free. Thanks for the idea, and of course the "easy to read" plans. BTW, my 12 yr old Grand-daughter is making two of your square bar stools from plans !
Hilary (not verified)
Wed, 09/29/2010 - 20:56
Love these. Finally I will
Love these. Finally I will get to use my jigsaw...I have no idea what to do with it!
virginia (not verified)
Wed, 09/29/2010 - 23:10
Simple is best, and this is a
Simple is best, and this is a simplicity at it BEST!
You knocked it out of the park with this one Ana!
Heather (not verified)
Thu, 09/30/2010 - 01:07
Love these!! Can't wait to
Love these!! Can't wait to make them :)
Alicia (not verified)
Thu, 09/30/2010 - 02:09
Omgosh, that is just the
Omgosh, that is just the greatest thing! And I am totally taking your whale silhouette :) My son is now begging me for some in his room!
Valerie (not verified)
Thu, 09/30/2010 - 02:55
No way! Oh my goodness I <3
No way! Oh my goodness I <3 it! I was wanting this very thing for above my sofa but I was going to go about it a tooootally different way. Um, the harder way. So a million thank you's for posting this. You just made my day. Thanks Ana!
Laura (not verified)
Thu, 09/30/2010 - 03:12
Here I had planned to make
Here I had planned to make the 'floating' shelves, but now I have to make a decision! argh!
Amanda (not verified)
Thu, 09/30/2010 - 03:38
OMG! This is EXACTLY what
OMG! This is EXACTLY what I've been needing for my kitchen! Anna, I love the stain you used too -- it is so rich!
Amanda (not verified)
Thu, 09/30/2010 - 03:39
Oops. Didn't mean to misspell
Oops. Didn't mean to misspell your name, Ana. :) I can't wait to do this as I have these scrap boards just sitting in my garage.
Michelle (not verified)
Thu, 09/30/2010 - 03:42
I LOVE these and will
I LOVE these and will definitely be making them soon! They are perfect for the look I'm going for in my living room!!
Heather C (not verified)
Thu, 09/30/2010 - 03:49
LOVE!!! Wow, Ana, you are so
LOVE!!! Wow, Ana, you are so impressive. Your blog is my favorite thing to go to every morning. Really gets me motivated to start the day and get things done so I can build!!
AMANDA (not verified)
Thu, 09/30/2010 - 03:50
Is it just me or does this
Is it just me or does this key hole thing not make since...I don't get how the head of the screw is going to fit into the small part. Once you put the head into the larger hole how will it slide into the smaller part without having the space for it to go into. Can someone please explain this to me???
megnstuff (not verified)
Thu, 09/30/2010 - 03:55
I love these. We were going
I love these. We were going to build the floating shelves for our basement family room, but maybe these would fit the decor a bit better. I love how rustic they look. They will go great with the Tryde table and the crate carts we plan on building. Can't wait to get started on all these projects!
Kristen (not verified)
Thu, 09/30/2010 - 04:14
Amanda, you got me to
Amanda, you got me to thinking about that. The answer? The shelf is not solid. The head of the screw will go into the empty space in the center. Just the shaft will slide up the keyhole and lock those shelves on the wall. I may just have to do these. Ana is brilliant!
Sunny (not verified)
Thu, 09/30/2010 - 05:06
If you were to use a 2 X 4
If you were to use a 2 X 4 scrap cut to 1" thick for the ends, you could have an end-grain look on the whole beam.
Liz (not verified)
Thu, 09/30/2010 - 05:15
The shelf is hollow. The
The shelf is hollow. The keyhole is made all the way through the 1x4. The screw head will go through the big part of the keyhole and as the weight of the shelf is placed on the screw it will snug up into the narrower part of the keyhole so that the head of the screw is on the backside of the 1x4. Maybe that helps?!?
Pam the Goatherd (not verified)
Thu, 09/30/2010 - 05:31
Amanda, the screw head fits
Amanda, the screw head fits through the bigger part of the hole, then the whole thing slides down on the wall a teeny bit so that the smaller part of the hole is around the shaft of the screw. That way the screw head is holding the box/shelf securely on the wall.
Karen Lynne (not verified)
Thu, 09/30/2010 - 05:43
This was the exact thing I
This was the exact thing I was thinking, so it's NOT just you! : ) Looking forward to seeing any responses. LOVE these shelves.
perumbula (not verified)
Thu, 09/30/2010 - 06:12
You push the shelf onto the
You push the shelf onto the screw so the head of the screw is actually all the way through the board. Then the shelf will slide down and sit only on the shaft of the screw. So the upper part of the keyhole only needs to be that wide.
Heather C (not verified)
Thu, 09/30/2010 - 06:48
@ Amanda, the head of the
@ Amanda, the head of the screw goes into the larger hole, then once the head of the screw clears the board, the shaft of the screw can slide up into the smaller part of the keyhole and the head of the screw (being inside of your shelf) will hold the screw in place so that it does not slip out. Hopefully that helps. :)
sewzanne (not verified)
Thu, 09/30/2010 - 06:59
Awesome. I love these
Awesome. I love these
Jennifer Wallace (not verified)
Thu, 09/30/2010 - 07:03
I was thinking the same thing
I was thinking the same thing until I thought about it. I'm not sure, but I think that you drill all the way through the board. The interior of the shelf is hollow. So The head of the screw goes through the big hole and out the other side of the board, then up to the little hole. The little hole is too small for the head to go through, so the shelf rests on the screw shaft.
Ana White (not verified)
Thu, 09/30/2010 - 07:13
Amanda, because the shelves
Amanda, because the shelves are hollow inside, the head of the screw fits behind the smaller part of the keyhole, and the shaft of the screw fits in the smaller part of the keyhole. makes for a nice tight fit without any hardware expenses.
Ana White (not verified)
Thu, 09/30/2010 - 07:14
Thanks Heather, didn't see
Thanks Heather, didn't see your comment before commenting. Also, make sure you holes are perfectly level so your shelves hang level.
Ana White (not verified)
Thu, 09/30/2010 - 07:18
Some other tips - I
Some other tips - I distressed slightly (wish I had done more) with the wire grill brush to create "scars" in the wood that hold more stain = darker blemishes in the finish. These were so fun and easy, good luck!
lisa (not verified)
Thu, 09/30/2010 - 07:24
Hi Ana, Love these. Can
Hi Ana,
Love these. Can you share more about what stain you used? Thank you!
Ana White (not verified)
Thu, 09/30/2010 - 07:30
Okay, just had to add a few
Okay, just had to add a few more notes.
If you use a 2x4 scrap for the end filler piece with the end grain showing, all the boards will have end grains showing. This will make the beam look like a true beam. The 2x4 can be any length, probably at least 2" to keep it from splitting apart.
If you choose to make yours longer, drill keyholes every 24" for support when hanging.
Loni (not verified)
Thu, 09/30/2010 - 16:42
I was totally just thinking
I was totally just thinking the same thing, except, I've already started buidling the floating shelves and I know as soon as I mention these to my husband he's going to say "no, finish what you started!" lol.
Loni (not verified)
Thu, 09/30/2010 - 16:48
I love these too! I think i'm
I love these too! I think i'm gonna make a long one for my living room to be a mock fireplace mantle since we don't have a fireplace.
But I had an idea, Would it work (and look good) if I wanted to use some 2x2's with 1x3's (or 3x3's with 1x4's) to make small shelves for decorative plates to sit on in kitchen?
Thanks so much!
Amanda (not verified)
Fri, 10/01/2010 - 00:28
OH!!!! HOLLOW! Right. Thanks
OH!!!! HOLLOW! Right. Thanks everyone! So now I have to ask....does anyone know how to get a keyhole slot made with a solid piece? There have been several projects that I want to fit flush with the wall and that's the only solution that seems right for it. However, I have no idea how to get it made! Any suggestions?
Sheela (not verified)
Fri, 10/01/2010 - 04:17
@Amanda re: keyhole in a
@Amanda re: keyhole in a solid piece of wood - I think you'll need to use a router with a keyhole router bit to create a keyhole hanger in a solid piece of wood. I love Ana's way of creating one through this hollow piece, but I can't think of a way to do a similar thing with a solid piece. Hope that helps.
Ginger (not verified)
Sat, 10/02/2010 - 03:25
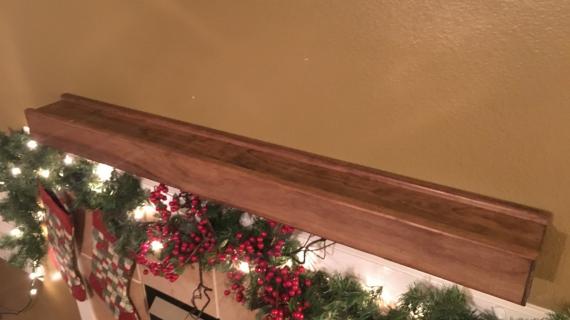
These are beautiful! Wonder
These are beautiful! Wonder if it would work (longer) as a fireplace mantel? We've been wanting a rustic beam look for that, but as you know those are pricey...hmmm, well if we go for it, I'll send a pic!
Ana White (not verified)
Sat, 10/02/2010 - 08:32
Ginger, that is a fantastic
Ginger, that is a fantastic idea! I can't wait to see your mantle.
Mandy (not verified)
Sat, 10/02/2010 - 11:18
OMG!!! i am super excited
OMG!!! i am super excited about these.. i was looking to get longer shelves to put up on the landing of my stairs and have a photo gallery there.. and these are PERFECT!!!! i am so excited i am off to lowes in about 30 mins.. YIPPY!!! (its like 2 mins from my house) Thanks ANA!!!!!!
Kristen (not verified)
Wed, 10/13/2010 - 18:10
Love, love, love this! Now
Love, love, love this!
Now if I wanted to turn this into a mantle over my fireplace (which we are completely overhauling), what would be the best way of securing it to the wall? I am thinking keyholes might not be enough.
Any suggestions?
Amy (not verified)
Fri, 10/22/2010 - 09:12
I just made one of these
I just made one of these shelves and am ready to start on the second. I love how easy this plan is for someone like me who is just a beginner! Thanks Ana - I love your website and am ready to tackle some bookcases for my daughter's room.
Heather S (not verified)
Wed, 12/22/2010 - 20:11
lol, me too! I'm in the
lol, me too! I'm in the middle of making 3 of the floating shelves and stumbled upon this. Now I don't know what to hang where!
Heather S (not verified)
Wed, 12/22/2010 - 20:20
Ana, how did you make the
Ana, how did you make the grain on the sides match up? I can't see any joint lines where the 1x2s would be. Gorgeous; I hope I can do the same!
Shannon (not verified)
Mon, 01/24/2011 - 14:33
Hey Anna, I made these a
Hey Anna,
I made these a couple of weekend ago. I followed the plans directly and then noticed when they were done that in your pictures you have the board extend down below the middle piece as well as above. In the plans it shows the boards all flush at the bottom. I like the look of them both ways, but I'm planning on doing some bigger ones that will look more like beams for our dining room, and I think I'll make them the way they are pictured instead of the plan. Thanks for the inspiration and the plans!!
Shannon (not verified)
Mon, 01/24/2011 - 14:38
Just a quick note before
Just a quick note before people start the project - in the pictures she has the front and back pieces extending down below the middle pieces as well as up. In the plans she has the bottom all flush. It's possible to do either depending on whichever view you prefer.
TheHLT
Mon, 09/20/2021 - 08:16
Offset measurements
Right.
I noticed that the front/end pieces were offset creating a lip for both front & back of shelf.
Glad you posted this as I asked her in a comment 🙂
Shannon (not verified)
Mon, 01/24/2011 - 14:40
sorry delete this one - i
sorry delete this one - i didnt think it was posting
erin (not verified)
Sat, 02/12/2011 - 10:58
hey ana! i love these
hey ana! i love these shelves, but have a question about attaching to the wall. we are buying a home with a brick fireplace without a mantle. i think this would be the perfect thing to make and use as a mantle, but i just don't know how to attach it to the brick. can i just screw into the brick and attach it as normal? do you have any suggestions?
Guest (not verified)
Mon, 11/28/2011 - 15:16
Stain
Hi Ana,
New to your site and really enjoying it.
As it pertains to this project - I'm wondering what you used for stain and whether or not you varnished it after? Same question again for the pallet beam.
Bernie
Jesse (not verified)
Wed, 02/01/2012 - 12:28
Keyholes for Barn Beam Ledges
Hey Ana,
I love a lot of your work. I plan on making some of your plans. I like the $10.00 ledges and I like these Barn Beam Ledges as well. I did want to ask a question about the keyholes. My understanding is that a keyhole starts with a hole large enough for the screw head to fit into, then undercuts the wood so that you are left with a slot large enough for the shaft of the screw and a groove beneath it large enough for the head of the screw, thereby securing the screw in place.
From your instructions, I do not see how you are accomplishing this. It would seem to me that the narrow part of your keyhole would sit right on top of the screw head or that the entire screw head can slide down that narrow section. Either way, that shelf could easily pop off the wall with out having the material present to keep the screw head from sliding out of the groove.
I know of two ways to accomplish this. The first is a keyhole bit for a router. The second may be more your speed. I saw it demonstrated at woodworkingformeremortals.com. This gentleman makes a large slot in his project piece the a laminates about a 1/8 inch piece on top in order to achieve an actual keyhole that secures the screw in place.
I just thought you might like to know. If you had 100,000 hits and 1% of those built this project, then you have 1000 people with a shelf in their home that will pop off the wall if it is nudged in the wrong way.
Other than that, keep up all the good work. You might also consider giving sketch up lessons on your website as well. Can’t wait to see what you come up with next.
Sincerely,
Jesse
Kelsey (not verified)
Mon, 04/23/2012 - 06:56
TOTAL NEWBIE - questions!
So I am totally new at all of this stuff..... be prepared.
I do not understand where to put in the screws? Are they exposed on the underside or are they at an angle?
And also, should I drill a smaller whole first then use the screw, or do you put the screw directly in?
Thanks so much!
jasminebernadette
Wed, 06/11/2014 - 12:17
Please help!
So I attempted this shelf, all went well up until I had to nail the 2 in nails into the wood, long story short it was extremely difficult to get the nail through and ended up splitting the board -_- I'm not sure what I'm doing wrong! I used hemlock for this shelf, I don't know if that is the problem, any advice would be very much appreciated!!!!!
In reply to Please help! by jasminebernadette
Lady Goats
Wed, 06/11/2014 - 13:28
Nails
Are you hand nailing the nails in, or using a nail gun? If you're hand nailing, you could try to predrill the beginning of the hole and hammer slowly. Try putting the nail a tad further from the edge of the board, if possible, and hammer it straight in. If you're using a nail gun, the pressure might be set too high on the compressor. Try lowering the PSI a tad (I usually have mine set to around 80 PSI, but it varies with the type/thickness of the wood). Hope this helps!