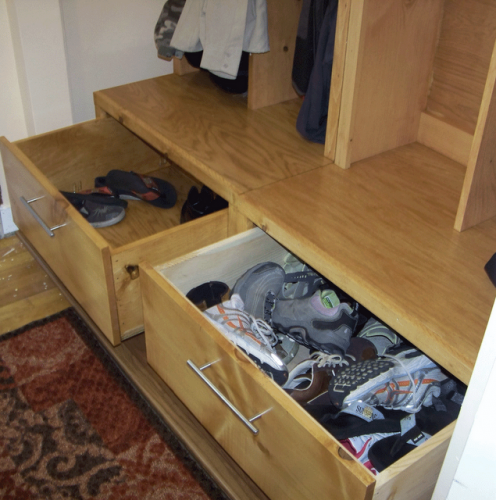


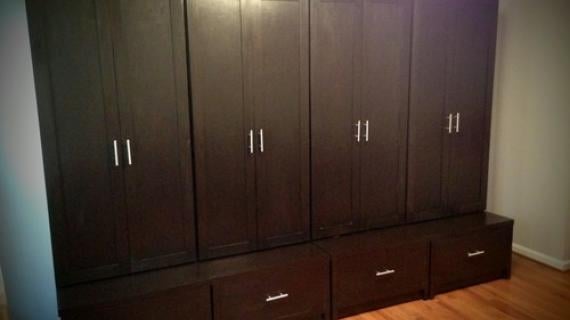
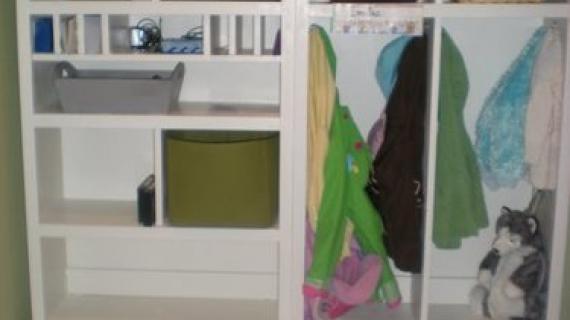
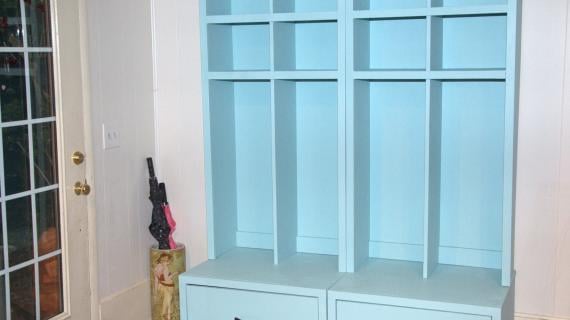
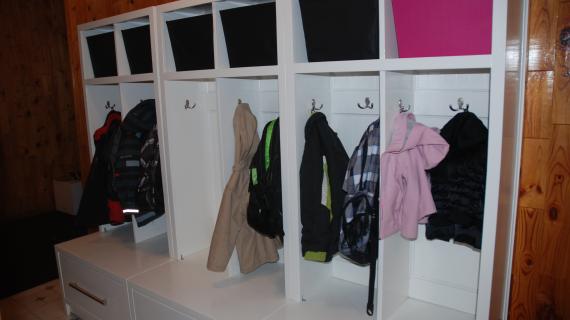
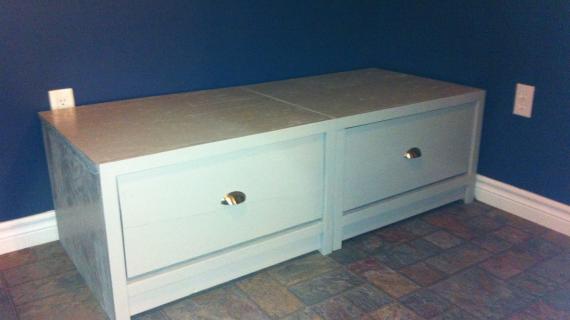
These drawers are huge! And this bench is designed not just for you to sit on, but also for locker hutches to sit on. Special thanks to one of our readers for sharing their photos.
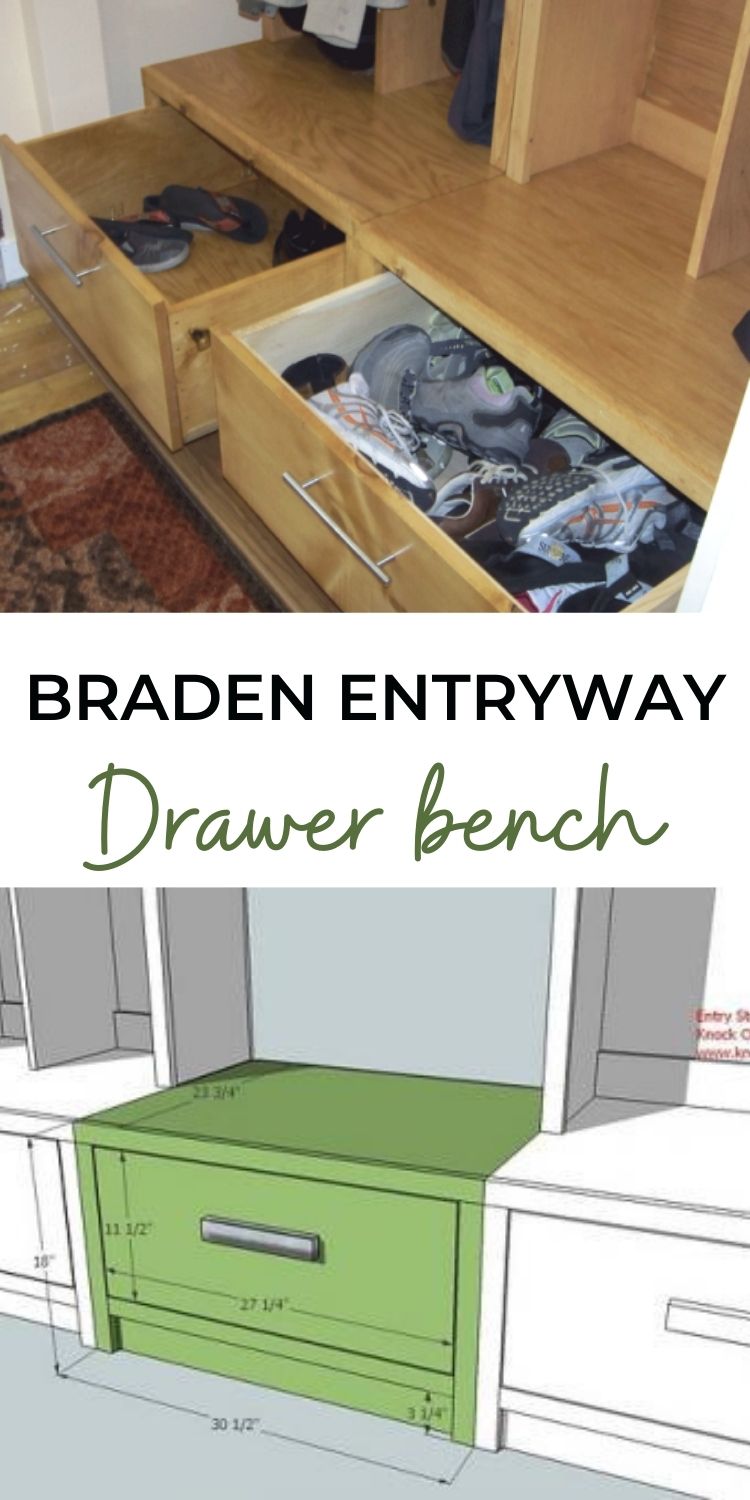
Pin For Later!
Preparation
- 1 - sheet of 3/4" plywood
- 1 - 1x4 @ 30"
- 1 - 1x2 @ 8 feet long
- 1 - 1x10 @ 10 feet long
- 1 - 1x12 @ 6 feet long
Cut List for 1 Drawer Bench
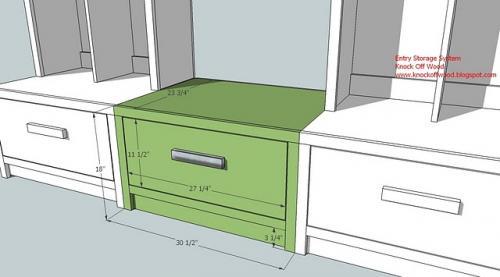
- A) 2 – 3/4″ plywood @ 23″ x 17 1/4″ (Sides of the bench)
- B) 1 – 3/4″ plywood @ 23″ x 28 1/2″ (Bottom of the bench)
- C) 1 – 3/4″ plywood @ 23 x 30 1/2″ (Top of the bench)
- D) 1 – 1×4 @ 28 1/2″ (Inset footer)
- E) 1- 1×2 @ 30 1/2″ (top front trim)
- F) 2 – 1×2 @ 16 1/2″ (Side trim)
- G) 1 – 1×2 @ 27 1/2″ (Bottom trim)
- H) 1 – 1/2 plywood @ 30″ x 18″ (Back of the Bench)
Drawer Pieces
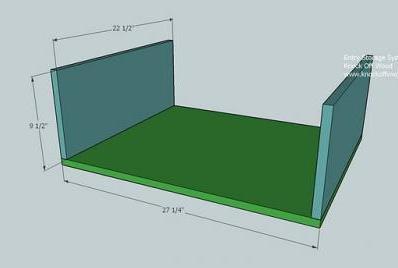
- I) 1 – 3/4″ plywood cut at 27 1/4″ x 22 1/2″ (Drawer Bottom)
- J) 2 – 1×10 @ 22 1/2″ (Drawer Sides)
- K) 2 – 1×10 @ 25 3/4″ (Front and Back of Drawers)
- L) 2 – 1×12 @ 27 1/4″ (Drawer Face)
Cut all your boards first. I recommend using a table saw to cut the plywood, as your cuts must be perfectly square. To get the most out of your plywood, cut as follows:


Whenever you are working with drawers, it is CRUCIAL to be absolutely square with all of your cuts. The drawer and the bench must be perfectly square or the drawer will not slide correctly. Make sure you cut your plywood square.
Instructions
Step 1
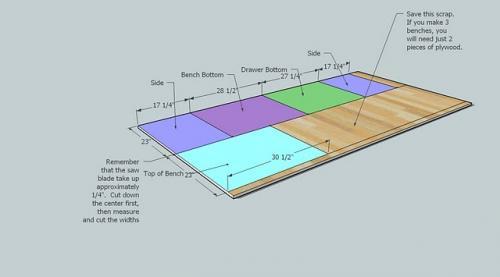
Don’t throw the scraps out! If you save your scrap and cut as shown above, when you make 3 benches, you will only need 2 pieces of plywood.
Step 2
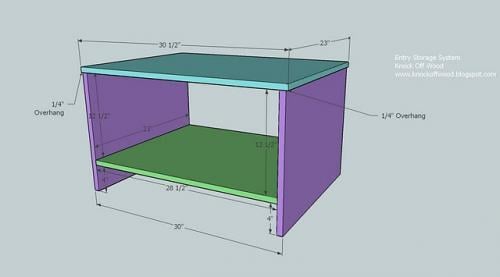
Use 2″ nails and glue to nail through the sides of boards A (shown in purple above) into the end edges of board B (shown in green above). Use the measurements in the above diagram to guide you.
Then use 2″ nails and glue to nail the top, C (shown in blue above) to the sides. Notice how C (blue) overhangs A (purple) 1/4″ on both sides.
Step 3
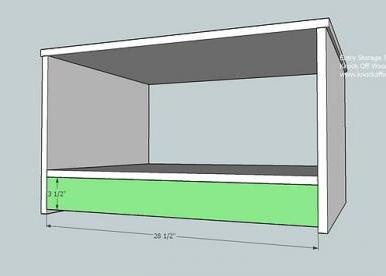
Nail in place board D, shown in green above, as shown above. Keep outside edges flush and use 2″ nails and glue to nail through boards A and B into the edges of D.
Step 4
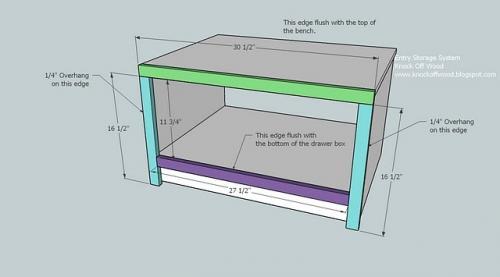
Begin by nailing board E (shown in green above) to the top and sides of the bench as shown above. Use 2″ nails and glue. Nail through the face of E into both the top edges and the side edges.
Then nail boards F in place, shown in blue above, nailing into the side edges and the bottom edge and also board D, as shown above. When nailing into D, use 1 1/4″ nails.
Complete the trimout by nailing board G, shown in purple above, to the bench. Use 2″ nails and glue to nail into C. Then use 1 1/4″ nails to nail into D as shown above.
Step 5
Step 6
Use 2″ nails and glue to nail through the bottom, I (shown in green above) into the edges of the sides, J (shown in blue above).
Step 7
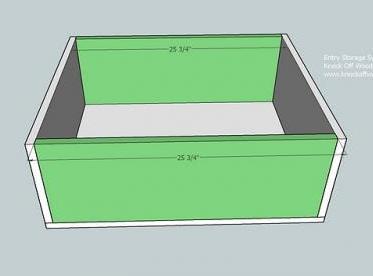
Place the fronts and the back in the drawer, as shown above in green, boards K. Use the 2″ nails to nail through the bottom of the drawer and the sides into the edges of K.
Step 8
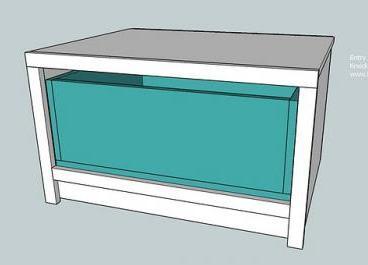
Attach the drawer slides and insert the drawer, without the face, as shown above. Push the drawer into the bench, as shown above.
Step 9
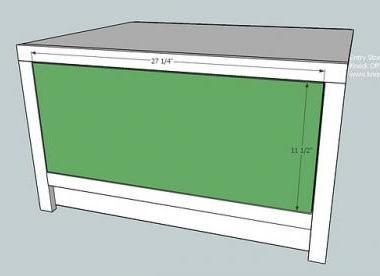
Set the drawer face on the drawer. Position until there is an even gap around the drawer face, approximately 1/8″. Use glue and 1 1/4″ nails to nail the drawer face to the drawer. Just add 1 nail to each corner. Then pull the drawer out (lean it toward you) and from the inside of the drawer, nail into the back side of the face. This will hide most of your nail holes. You may wish to mark out where your handle will be placed and avoid putting any nails in this area.


Comments
Julie G. (not verified)
Wed, 12/23/2009 - 03:33
Ana!This cutting layout and
Ana!
This cutting layout and the color coded directions are WONDERFUL!! You are going to turn me into a carpenter yet! Thank you!! I have so many plans for the New Year..but most of them include building things from your blog! Stratton daybed update coming next week!
Julie
Jori Hodgson (not verified)
Tue, 01/05/2010 - 22:19
Brilliant. Did you know you
Brilliant. Did you know you are brilliant? I heard of your blog from Be Different...Act Normal and I'm so glad I clicked the link.
I have a question for you on this project...I'm not seeing where the hutch plans are, just the drawer/bench plans. Am I missing something.
If you'd like to email me it's jori.hodgson@gmail.com. Thanks!
Pam (not verified)
Wed, 01/06/2010 - 14:13
I swear I am making this. OR
I swear I am making this. OR better yet, my husband will be making this while I recover from making the baby that is due in two weeks... But WOW! I SO want this, and I know exactly where it's going to go... I promise to take pictures and send them on when it's done.
Lindsay (not verified)
Sun, 01/24/2010 - 16:06
Hi Ana, We are in progress of
Hi Ana,
We are in progress of making this bench, and so far it looks awesome! We are getting ready to make the drawer, but we noticed in step 7 you say to attach the drawer slides. We didn't see anything about drawer slides in the instructions and don't know what kind to buy or where to attach them. Help!
Ana White (not verified)
Thu, 01/28/2010 - 08:15
You will need undermount
You will need undermount drawer slides, 21" long.
Doug (not verified)
Sun, 02/28/2010 - 05:18
Ana, I have 3 children
Ana,
I have 3 children (8,6,4). This system will give me some sanity when it comes to my organizing challenges. I cant wait to build it!
2 Questions...
Do you have a material list? Also, what type of finish hardwood do you recommend? Especially one that is more economical but still finishes nice. I plan on staining doing a distressed look so finish is important.
littlefish3 (not verified)
Tue, 05/11/2010 - 03:42
Hi Ana! We finished three
Hi Ana! We finished three sets of lockers/drawer benches this weekend (it took about two weeks of working here and there with three kids underfoot!) but we are SO delighted with them. It's like they sucked up everything in my mudroom and the kids think the drawers are the greatest thing ever.
We ran into one big snag though. The undermount drawer slide was a single slide in the center of the drawer which made the drawers way too wobbly. We ended up having to cut down the sides of the drawers and my incredibly patient husband modified the drawers for slides that mount on each side just under the drawer edges. They work great now. We went as "budget" as we could on the wood so it's a little bit warpy and rough and it makes me love them even more. I painted them high gloss white and i think they are perfect!!
We have also built the Madison book rack and the Bigger Kids Picnic Table. We are in the process of modifying an old coffee table into a Play Table and making the toy bins from leftover project scraps!! Will post photos very soon.
Thank you SO much for all the time and care you put into your blog. You have really changed my life (and my house)!
Jenn (not verified)
Sat, 10/23/2010 - 18:02
I'm having trouble finding
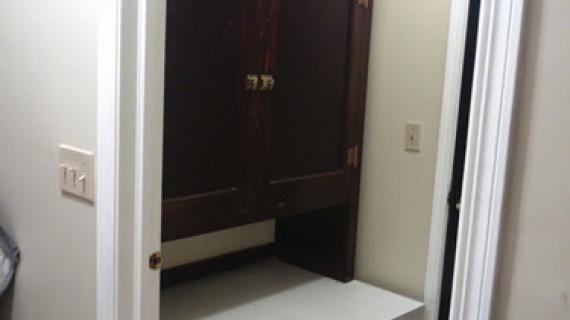
I'm having trouble finding the plans for the top part of this system. Are they labeled something other than Braden?
Thanks for all your lovely work! So nice that you share it with us!
jenn
Russ (not verified)
Mon, 04/04/2011 - 08:03
Made this in a weekend, but...
I was unable to find undermount drawer slides with any degree of effectiveness. Tried the big-box stores, no real luck. Could you alter the plans and post instructions on how to make drawer slides instead? It might be a great time/money saver. Or at least show the slides you meant in your comment above - perhaps with a link.
Also - very minor - on your cut list you have 2 drawer faces instead of one. I think most people working on this would catch that, but just FYI. It looks great when done!
Russ (not verified)
Tue, 04/05/2011 - 13:12
I purchased these drawer slides...
Blum Solo Concealed Undermount Slides For 21" Drawers 3/4 Extension 100# Class Cream
They were $11 for about $7 to ship. If you buy 3 sets (as the plans can make you 3 benches for 2 sheets of plywood), you save on shipping. My total for 3 came to about $42.
I will post here if they worked out or not. To look at them, go here:
http://www.amazon.com/gp/product/B0006HFB6K
In reply to Made this in a weekend, but... by Russ (not verified)
hillarylouise
Tue, 04/05/2011 - 14:00
drawer slides
I've used the silver (light-duty, I think) undermount slides that are carried at Lowe's and HD. Sorry I can't remember the brand. The slides are meant to be one single undermount, centered (like the comment above mentioned), but I measured from the center of the drawer and installed two per drawer, about a foot apart, and they are working well. They obviously have to be absolutely parallel or they won't work. The slides were not easy to install -- I messed up the first two and had to exchange them for new ones -- but once I figured them out, they worked out well. Just a bit of a learning curve.
Russ (not verified)
Mon, 04/11/2011 - 09:34
RE: Drawer Slides
I too purchased those single-undermount slides, but found them to be too much trouble. With no bottom face frame, you basically have to either invert them with many modifications, or build a small bottom face frame.
I opted to cut through dadoes into the bottom of the drawer and mount heavy duty slides per my previous post. They worked VERY well and look great. I am also confident on the strength.
affraham (not verified)
Mon, 10/08/2012 - 08:30
hi - ownage website and
hi - ownage website and projects!
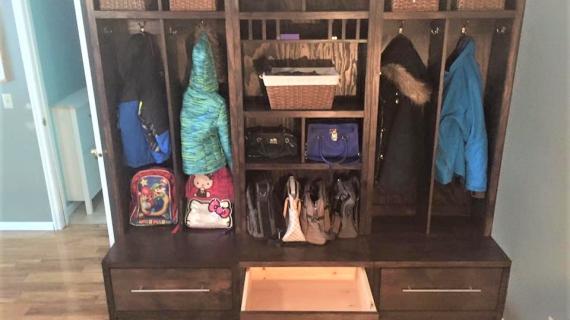
i would be glad to know which wood have been used at the bench picture with the open drawers above (shoes in it)
best wishes for your book release!
christian
AstralV
Wed, 02/26/2014 - 09:21
weight limit?
Hi Ana,
I am curious if you know how much weight these bases can hold on top? I have a long wall in my family room where I'd like to make enough of these to span the length of the wall. I also have 2 large Expedit shelves from Ikea (59" x 59") ikea.com says the weight of the package is 137 lbs.
Do you think I could stack the loaded up Expedit shelf on top of two of these Braden drawer bases and not destroy the bases? Just looking for your opinion, not a promise or guarantee :) -- Mary