

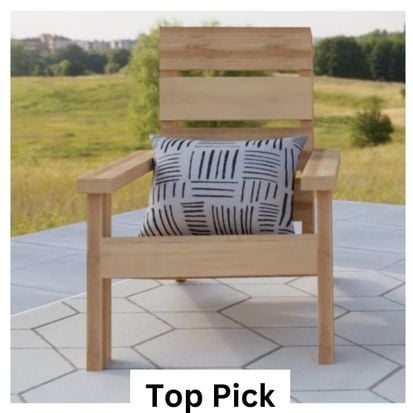
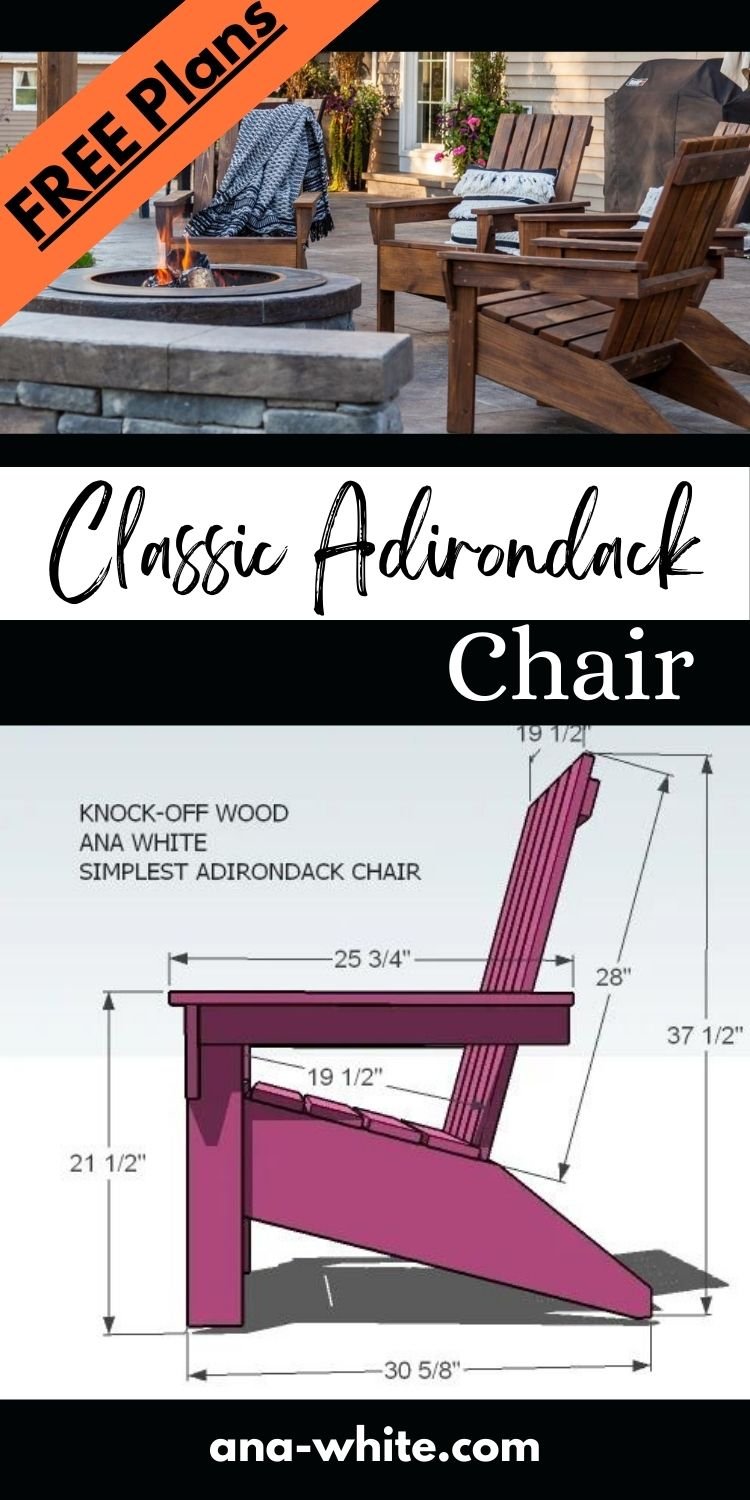
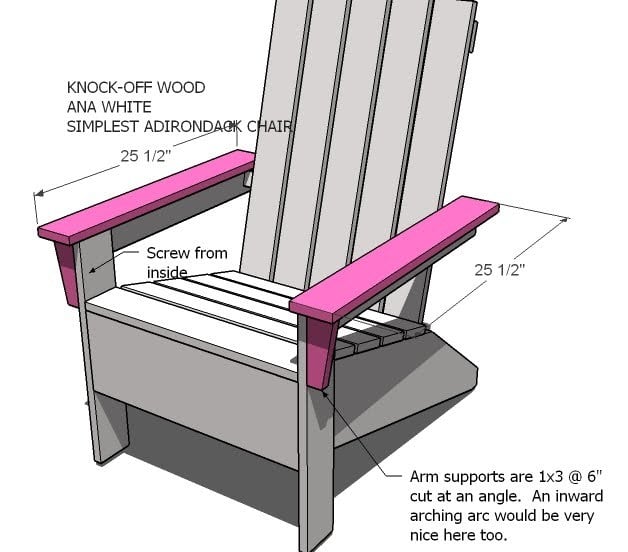
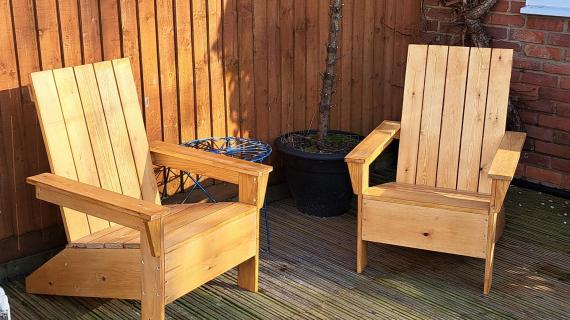
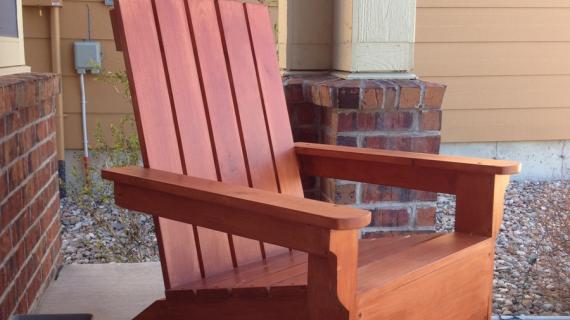
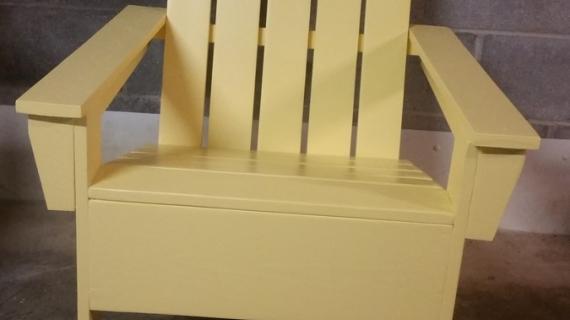
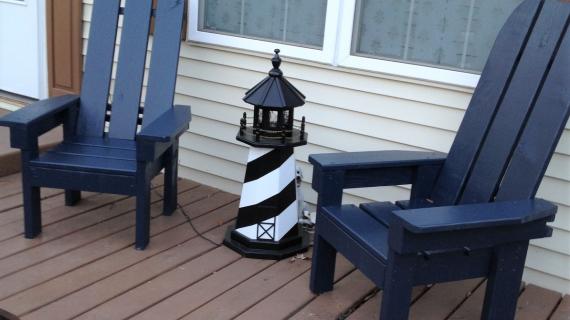
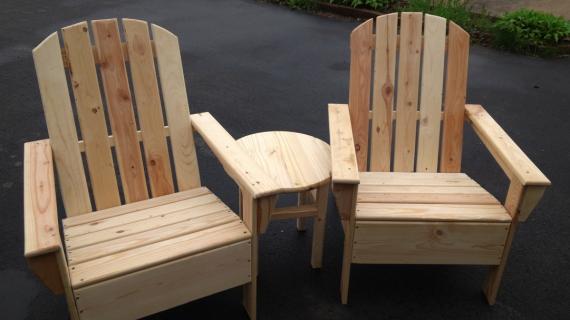
DIY adirondack chair plans from Ana-White.com
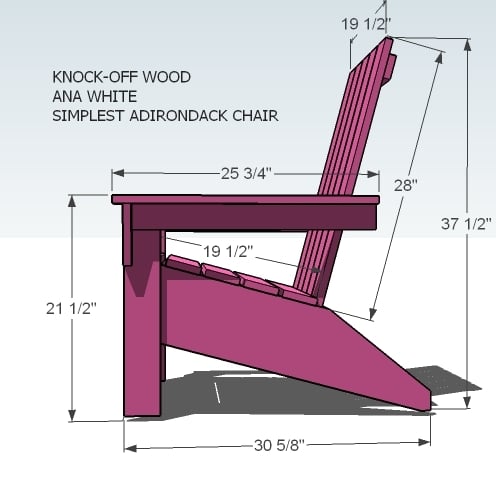
This plan features a more upright seating angle, more traditional styling, with a chunkier base.

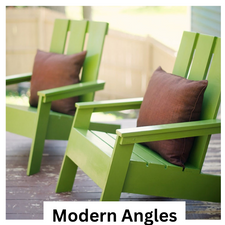
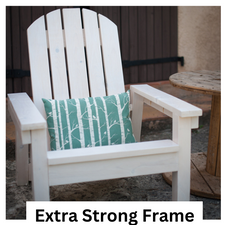
More Free Adirondack Chair Plans from Ana White

Pin For Later!
Preparation
- 1 – 1×8, 8′ Long
- 4 – 1×4, 8′ Long
- 1 – 2×2, 8′ Long
- 1 – 1×3 8′ Long
- 1 1/4″ Exterior rated star bit screws
- 2″ Exterior rated star bit screws
- Wood Glue
- 2 – 1×8 @ 32 3/4″ (Stringers)
- 1 – 1×8 @ 21″ (Front)
- 5 – 1×4 @ 21″ (Seat Slats)
- 2 – 1×4 @ 20 3/4″ (Front Legs)
- 2 – 1×3 @ 24″ (Arm Supports)
- 5 – 1×4 @ 30 1/2″ (Back Slats)
- 1 – 1×3 @ 19 1/2″ (Top Back Trim)
- 1 – 1×4 @ 19 1/2″ (Bottom Apron Back)
- 1 – 2×2 @ 22 1/2” (Center Back Support)
- 2 – 1×4 @ 25 1/2″ (Arm Rests)
- 2 – 1×3 @ 6″ (Decorative Front Arm Supports)


Instructions
Step 1
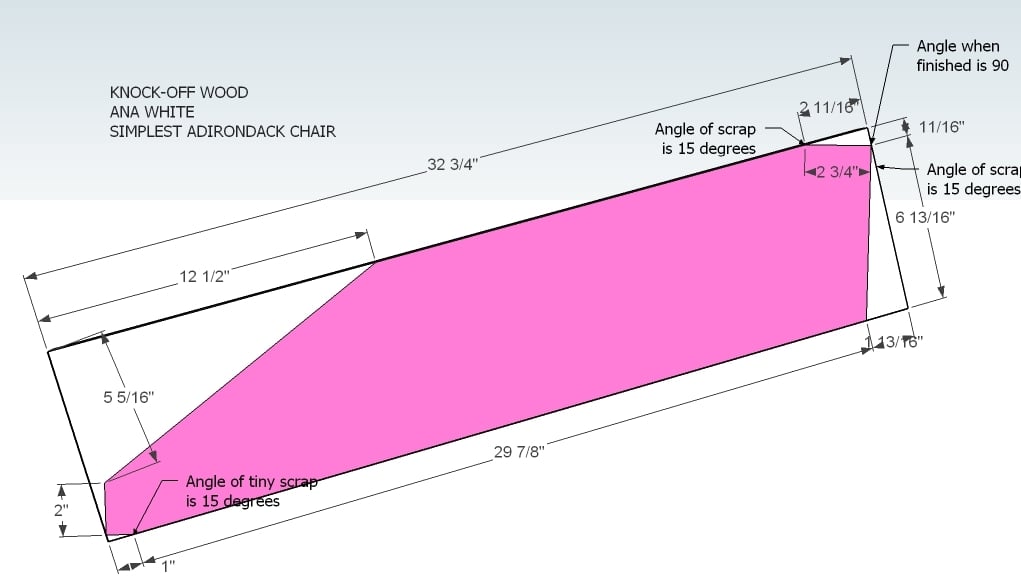
CUT YOUR STRINGERS
From the 1×8 stringers listed in the cut list, use a speed square and carefully mark out the cuts needed with a pencil on the board.
After all cuts are made, clamp the board down securely and cut off with a circular saw.
Repeat for the second stringer.
Step 2
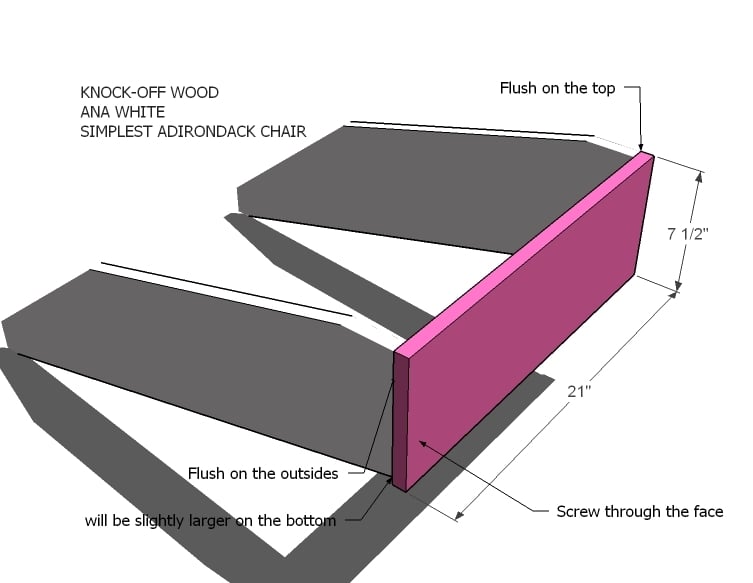
FRONT APRON Attach your front apron with 2″ screws and glue as shown above.
Step 3
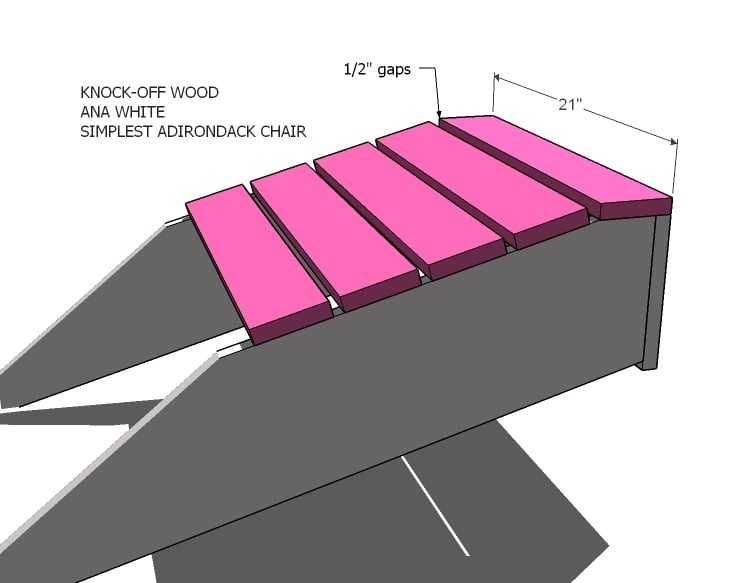
SEAT SLATS Lay your seat slats as shown above, starting with the first flat seat slat. Leave a 1/2″ gap between the slats. Screw down with 2″ screws and glue.
Step 4
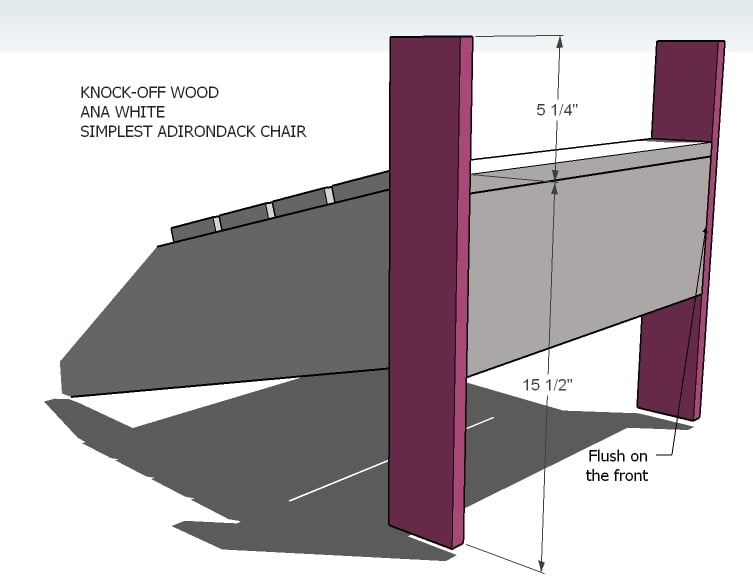
FRONT LEGS Use 1 1/4″ screws and glue to attach the front legs as shown above.
Step 5
Step 6
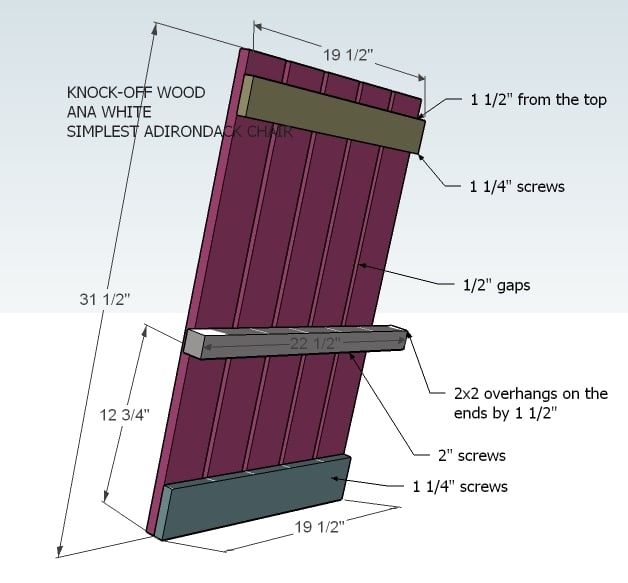
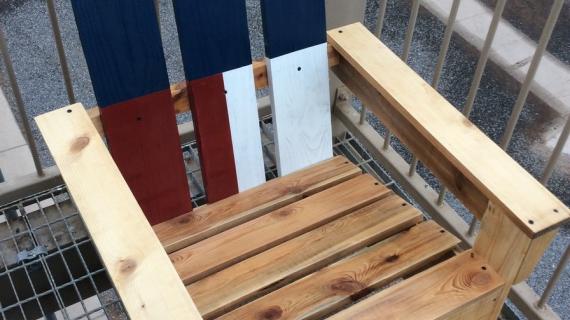
BACK Build the back as shown above.
Step 7
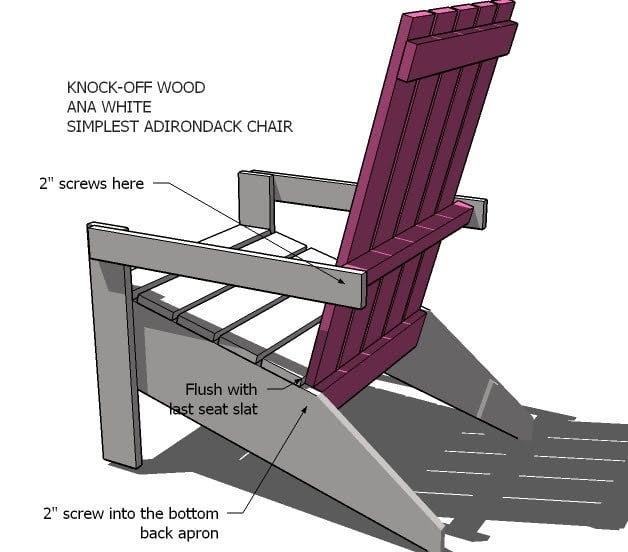
ATTACHING THE BACK Attach the back as shown above. This isn’t an exact science, I purposely choose to use a 1×3 for the arm supports and a 2×2 for the back support so that it would be super easy for you to get the back to line up just right with the seat and arm supports. You may want to enlist your neighbors assistance.
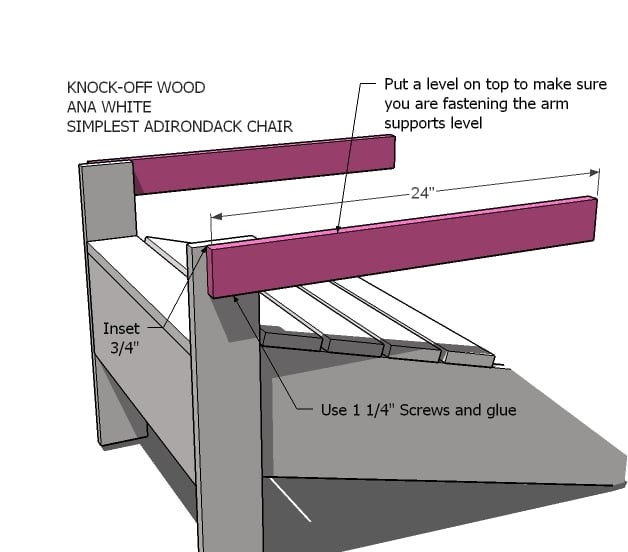
Step 8
ARMS & SUPPORTS Attach your arms with 2″ screws and glue. Then attach the arm supports.

Comments
teamshield (not verified)
Tue, 05/18/2010 - 13:31
Now the only question is
Now the only question is should I paint them in all different colors so everyone in the family can have their own shade?
Catherine Hans… (not verified)
Tue, 05/18/2010 - 14:06
Great plan Ana! Remember,
Great plan Ana! Remember, don't knock yourself out with a killer schedule. We will all be waiting whenever you can get to them! (you have some serious great Karma heading your way after all your generosity - remember us when you are rich and famous! lol)
Heather (not verified)
Tue, 05/18/2010 - 14:10
sounds good to me!! I'd
sounds good to me!! I'd rather have plans than brags any day anyway. :) The chair looks amazing!!!
Ange (not verified)
Tue, 05/18/2010 - 14:13
Thank you so much! But we do
Thank you so much! But we do recognize your job first is wife then mother....then furniture planner :) You're the best.
Cheryl (not verified)
Tue, 05/18/2010 - 14:44
Thank you for posting this,
Thank you for posting this, Ana!!! I was going to buy one of these one day, but now I just might build one!
Tanjia (not verified)
Tue, 05/18/2010 - 15:39
If you're 25 plans behind on
If you're 25 plans behind on posting then I'm 100 plans behind on building!! I've only finished the bigger kids picnic table and I'm working on the modern outdoor table. Wish I could build one thing every day! I have to keep reminding myself it's okay to take it one project at a time.
Leslie (not verified)
Tue, 05/18/2010 - 16:13
Ange had it right, Ana! Wife
Ange had it right, Ana! Wife and mom first - everything else comes after that. You rock! The fact that you do all this with no cost for the finished plans totally blows my crazy mind.
I'm thinking teal and red chairs myself! I'm loving this plan.
Thanks again!
Waner Family (not verified)
Tue, 05/18/2010 - 16:34
You're amazing! I just found
You're amazing! I just found you three days ago and have stayed up until 3am each morning obsessing over your site! We are moving to a new town in three weeks, and I CANNOT WAIT to start building once we get there! You are such an inspiration to women (and men) everywhere! Thank you for giving so freely of yourself, your plans, your time, and your inspiration!!
slp higgins (not verified)
Thu, 05/26/2011 - 20:24
too funny..
I think anyone who has ever come across Ana's site has had this happen to them.
The funny thing is, even 1.5+ years later, I still find myself obsessed, inspired and spend hours browsing.
Sophia Almejo (not verified)
Tue, 05/18/2010 - 17:01
Ana, you know that I love
Ana, you know that I love everything you do. I think you are a very talented woman...please odn't worry about getting the plans up right away we will manage...we understand that you have a family...once again thank you Ana.
Jen (not verified)
Tue, 05/18/2010 - 17:51
Just a suggestion, but I love
Just a suggestion, but I love polls. How about a poll with, say, 20 plans you're considering doing (then you can keep a few juicy ones to yourself) and which ones we want the most? Then you'd have a little guidance as to what to do first. Because maybe we're all just absolutely dying for five of those plans for next week, and then you could take a vacation or a staycation at least :) I'd also love a poll on people's favorite ways to finish different kinds of wood. Polls are fun for us and less work for you. :)
Jen (not verified)
Tue, 05/18/2010 - 18:14
Was reading the "details" on
Was reading the "details" on that other place that makes chairs like these (can't remember name-Poverty Shack?). Care instructions are:
* Dust often using a soft, dry cloth.
* Protect from direct sunlight and extreme temperatures.
* Blot spills immediately with a clean, damp cloth.
I'm sure glad I'm building and finishing my own Ana White chair instead. Dust! Did they say to dust it? My children will be dripping smores on these babies! And protect from direct sunlight? I will be placing mine in direct sunlight to enjoy. I'll enjoy it even more knowing I can build four for the price of their one. Thanks Ana!!!
Melissa (not verified)
Tue, 05/18/2010 - 18:21
I love all of your plans. We
I love all of your plans. We are getting a new house soon and I can't wait to begin on some great projects using your ideas. Can you do a corner hutch design? I love these and really want one in our new home.
pogonip (not verified)
Tue, 05/18/2010 - 19:50
Making the Ana Adirondack
Making the Ana Adirondack chair just moved to the top of my summer to-do list! Now my only problem is what color to paint it--so guess I'll have to make one is each color :) Thanks a gazillion for this one, Ana!
Urban Dragon (not verified)
Wed, 05/19/2010 - 06:01
Thanks Ana!! Don't stress
Thanks Ana!! Don't stress yourself out though. I have been down that road myself. I used to offer a freebie a day on my blog (Digital Scrapbooking Kits is what I offered). I ended up stopping because it was too much for my family. That won't happen to you I am sure because you are much more energetic than I am but just be careful. I for one would rather have some plans from you than no plans from you. Thanks again :)
Ahren (not verified)
Wed, 05/19/2010 - 06:49
Ana, I totally love the
Ana, I totally love the Adirondack chair plan, it's on my list to build!! Thanks, Big Z
http://bigzcreations.blogspot.com
Allison @ Hous… (not verified)
Wed, 05/19/2010 - 16:54
I can't wait to make these
I can't wait to make these after I move this summer! Are you going to post plans for a matching side table (like in the Pottery Barn Kids link - http://www.potterybarnkids.com/products/adirondack-chairs-1/popup/more-…)?
Kristi (not verified)
Thu, 05/20/2010 - 02:01
In the nicest possible
In the nicest possible non-weird way, I love you. And your site. Five picnic tables later (the MOST appreciated birthday gift I have ever given) I'm ready to make something for us. Thank you!
And you take your time- Mom first, then all the other stuff. We'll be here waiting patiently. Okay, not so patiently because we adore what you do, but we'll be here waiting.
Jaime (not verified)
Thu, 05/20/2010 - 12:54
Thanks for the plans! I now
Thanks for the plans! I now have 2 adult sized chairs and 2 kiddo sized chairs to build. Hubby keeps telling me we don't have the tools, and while he may be right, I WILL build me a chair just me and my hand saw! I CAN do it! (it just might not look quite as pretty!
Loni (not verified)
Thu, 05/20/2010 - 15:57
Thank you thank you thank
Thank you thank you thank you! Ana, You are so freaking awesome. What you do for us is not only showing us a method for building our own furniture. You are also inspiring us, motivating us, making dreams come true, and most importantly (to me anyways) you're boosting our self esteems. Thank you a hundred times.
carie (not verified)
Fri, 05/21/2010 - 17:28
Hi Ana, I just bought cut and
Hi Ana, I just bought cut and painted my wood today! I'm super excited to put it all together tomorrow :) I had a little problem with the shopping list but I am wondering if it is my mistake because I doubled the list (except for the 2x2) to make 2 chairs. I ended up being short about 106 inches of 1x4, I ran out just before I cut the arm rests at 25 1/2". I'm thinking that maybe this happened because I cut all my boards of the same length at the same time so my scrap amount was different, I don't know. I just ran back to Home Depot and bought a 10 footer - no biggie but I thought you'd like to know.
msk171 (not verified)
Sat, 06/02/2012 - 19:02
To save some math and rearranging
The 1x4's had me a little confused when I came up short so I did the math...here are the cuts so they fit on each board. Yes, you still only need 4 --1x4, 8' long:
Board 1: 21",21",30 1/2",19 1/2"
Board 2: 21", 21", 25 1/2 ", 25 1/2"
Board 3: 21", 20 3/4", 20 3/4", 30 1/2"
Board 4: 30 1/2", 30 1/2", 30 1/2"
Drama Queens (not verified)
Sun, 05/23/2010 - 12:24
I am new to your site and
I am new to your site and LOVE this plan! I have all my boards cut and they are finishing drying after painting and priming as I speak! I can't wait to put it all together! I have never built anything really--besides helping my dad when I was a kid. I used my hubby's radial arm saw for all of the cuts--worked but not the best I'm sure--and only spent $1.50 as we had most of the wood and paint. Thanks so much for a fun project, can't wait to do more!
Drama Queens (not verified)
Mon, 05/24/2010 - 09:11
OK--so my question is--I was
OK--so my question is--I was screwing the 2x2 back support on using the 2" screws-predrilled my holes--and SOMEHOW I went all the way through the back slats! The 1 5/8 screws I have are too short, the 2" screws are too long--what do I DO???
Ana White (not verified)
Mon, 05/24/2010 - 10:28
It sounds like you may have a
It sounds like you may have a deep countersink bit. What I would do is fasten from the front face of the back slats into the 2x2, instead of from the back.
Drama Queens (not verified)
Tue, 05/25/2010 - 06:05
thanks--I actually wound up
thanks--I actually wound up improvising and cut 1/2" slats into small squares and put them between the 2x2 and the back slats and then filling the holes in the back slats. it worked for now--it was still an awesome 1st project and i learned A LOT!
Claiming Our Space (not verified)
Thu, 05/27/2010 - 11:44
I have been wanting a pair of
I have been wanting a pair of Adirondack chairs for our front yard. However the only versions in my price range have the rounded tops. The straight lines on your version will look great and echo the strong horizontal lines of our house.
Brooke (not verified)
Sat, 05/29/2010 - 02:39
Wow! This is great! Thank you
Wow! This is great! Thank you for all your hard work put into these plans. Your amazing! I will have to try these plans and about 100 other ones. I will be linking. Thanks!
Jodi@homegrown… (not verified)
Sat, 06/05/2010 - 09:51
I was able to assemble 2
I was able to assemble 2 chairs in one day. I had already cut and painted all the pieces previously. They went together well, although I did have to do some math since the widths on my boards were slightly smaller than the dimensions in the plans. No biggie, though! I'm very happy with them. I need to put on another coat of paint and find some cushions and they're done!
Loni (not verified)
Sat, 09/04/2010 - 15:07
I'm making a "big man"
I'm making a "big man" adirondack for my dad, so I'm modifying your plans a bit, I'm widening it and adding some extra stringers and legs for bottom support.
My problem I'm having now is how to beef up the back to hold more pressure. I was thinking maybe extra "legs" going from the middle back support straight down to the ground? But I'm not sure if that would really add support unless I angle them back?
Thank you in advance!
Ana White (not verified)
Mon, 09/06/2010 - 06:44
Hi Loni, If you were to use a
Hi Loni, If you were to use a 2x4 for the back support (the piece that connects the arms to the back slats, it should take care of support. Perhaps use 1x4s for the under arm supports too.
emmarosemc
Sat, 06/04/2011 - 19:22
so they sell these at HD for
so they sell these at HD for $28 dollars, is it worth it to build them? I have so many other plans still to do i dont think this one is worth making over buying
claydowling
Sun, 06/05/2011 - 06:36
Make vs. Buy
You should be able to build these for less. Even if you can't, there is a satisfaction in building it for yourself. My least useful chair is a stool that I built with my dad's help on his lathe. It's also my favorite because I made it, and I don't know anybody else with a chair like it.
Although given the state of my dining room chairs, I might need to start making that stool some grown up chair brethren soon. Too many broken spindles.
Emilio (not verified)
Sun, 06/19/2011 - 17:17
Drawing
I did the design of the Adirondack chair in Google SketchUp. The link is as follows.
http://sketchup.google.com/3dwarehouse/details?mid=b8772904c25b61ac6b2b…
And the animation is in 3D on Youtube at the following link.
http://www.youtube.com/watch?v=4WsgQ7xqgVs
In reply to Drawing by Emilio (not verified)
mrhelton
Mon, 09/03/2012 - 18:14
Thanks I appreciate this! I
Thanks I appreciate this! I just downloaded sketchup today and am in the process of learning it. I started work on the table I'm making to go with these chairs, and you've made it easy to drop the chairs in there!
Guest (not verified)
Fri, 09/30/2011 - 11:28
glider
Hi, my husband and I are anxious to make chairs for us and kids and alsoo a bench for the porch- he'd love to have a glider and I wondered if you had ideas of how to modify the bench into a glider? Thanks for all your hard work, i have such a to build list from you site! Cant' wait to start getting them done!
Guest (not verified)
Fri, 02/10/2012 - 08:48
I love this site!
I love this site!!!! Thank you ! I wish I could find a plan for a half circle diner booth for my dinning room, but I had so many of these plans on my wish list! Thank you so much!
Andra (not verified)
Sun, 02/19/2012 - 10:58
Jigsaw
Would it be possible to do this project with a jigsaw and not the fancier saws that I don't own (yet).
In reply to Jigsaw by Andra (not verified)
Lady Goats
Sun, 02/19/2012 - 11:53
Jigsaw
Andra, my first few projects were built only with a jig saw! So you definitely can! a piece of advice is to draw the full cut that you need to make, use a straight board as a guide to slide your jig saw against to get straight cuts, and (if needed), sand the cut to smooth it out. They'll be rough looking... but use a little caulk on the "seams" before you paint, and it'll look great.
Katrinaelizabth (not verified)
Mon, 04/16/2012 - 19:30
I was looking through your
I was looking through your page and noticed the Little And chairs... for some reason I can not post under their pictures. Do you by any chance have th plans for building them?
annemarie (not verified)
Sun, 05/06/2012 - 06:52
plans
i love all your plans, thank you very much
jimmyp (not verified)
Mon, 05/07/2012 - 11:39
chair
question . how much of a angle is the seat part ... the reason I ask with a BAD back , its very hard to get outta some of these , an they are very uncomfortable as well... Also wish to tll you what a great site , an great job your doing !!!!!! thank you jimmyp
msk171 (not verified)
Sat, 06/02/2012 - 19:08
1x4 cuts
To save some headaches, here are the cuts as they'll need to be done on the 1x4's so they fit on 4 boards:
Board 1: 21", 21", 30 1/2", 19 1/2"
Board 2: 21", 21", 25 1/2", 25 1/2"
Board 3: 21", 20 3/4", 20 3/4", 30 1/2"
Board 4: 30 1/2", 30 1/2", 30 1/2"
markdude
Wed, 07/18/2012 - 13:58
built this chair!
I love your plans, I made the Chaise Lounge first then I saw this and had to have one! Great plan, easy to build and very comfortable! Thanks!!!!!!!
Kevin Chapman (not verified)
Wed, 07/25/2012 - 15:18
I'm currently in the process
I'm currently in the process of building these, just as described in the above article. How has everyone else's seats fared over time? I'm just a little skeptical on the primary use of screws. So, does it hold up well? Thanks for any responses, and I must say, with the local agway selling Adirondack chairs at a price tag og roughly $200,to be able to make one of these chairs at $70 roughly, kudos on that
Mike H (not verified)
Sat, 09/01/2012 - 19:05
Hi! I just found this site
Hi!
I just found this site while googling these chairs, and loved the way your instructions were laid out. I built one and am thrilled with the results! I'm going to be building more later this weekend and probably a smaller one for my son! Great site!
Here is a picture of my chair: http://i.imgur.com/0EOcO.jpg
jimmyp (not verified)
Tue, 10/02/2012 - 11:30
Hello , Could anyone plz
Hello , Could anyone plz help me on a question on the chair ??? ,, does anyone have any idea what angle the seat is ??? Are they hard to get down or up from the sitting position ??? thank you ... GREAT SITE
blessedmess (not verified)
Sun, 11/18/2012 - 05:41
Thank you Thank you Thank you!
Just have to say that I LOVE your site, Ana!! Thank you so much for all your hard work and most of all for sharing it with all of us! You and all your followers have given me such inspiration to build things that I never knew I could!! Have made a couple pieces and I am super excited about these chairs! :)
engel6797
Wed, 04/03/2013 - 06:21
Ana's Adirondack Chair Plans w/ Straight legs in back
Where is the plan with the chairs that have the straight legs in the back, as shown on page 5 of Bragging Posts by tsrico?
In reply to Ana's Adirondack Chair Plans w/ Straight legs in back by engel6797
JoanneS
Sun, 04/07/2013 - 04:54
Ana's Adirondack chair plans w/straight legs in back
Plans for these are in Ana's book The Handbuilt Home. The adult size plan is on page 174 and the children's size plan is on page 179. These are beautiful - I want to build them too!