


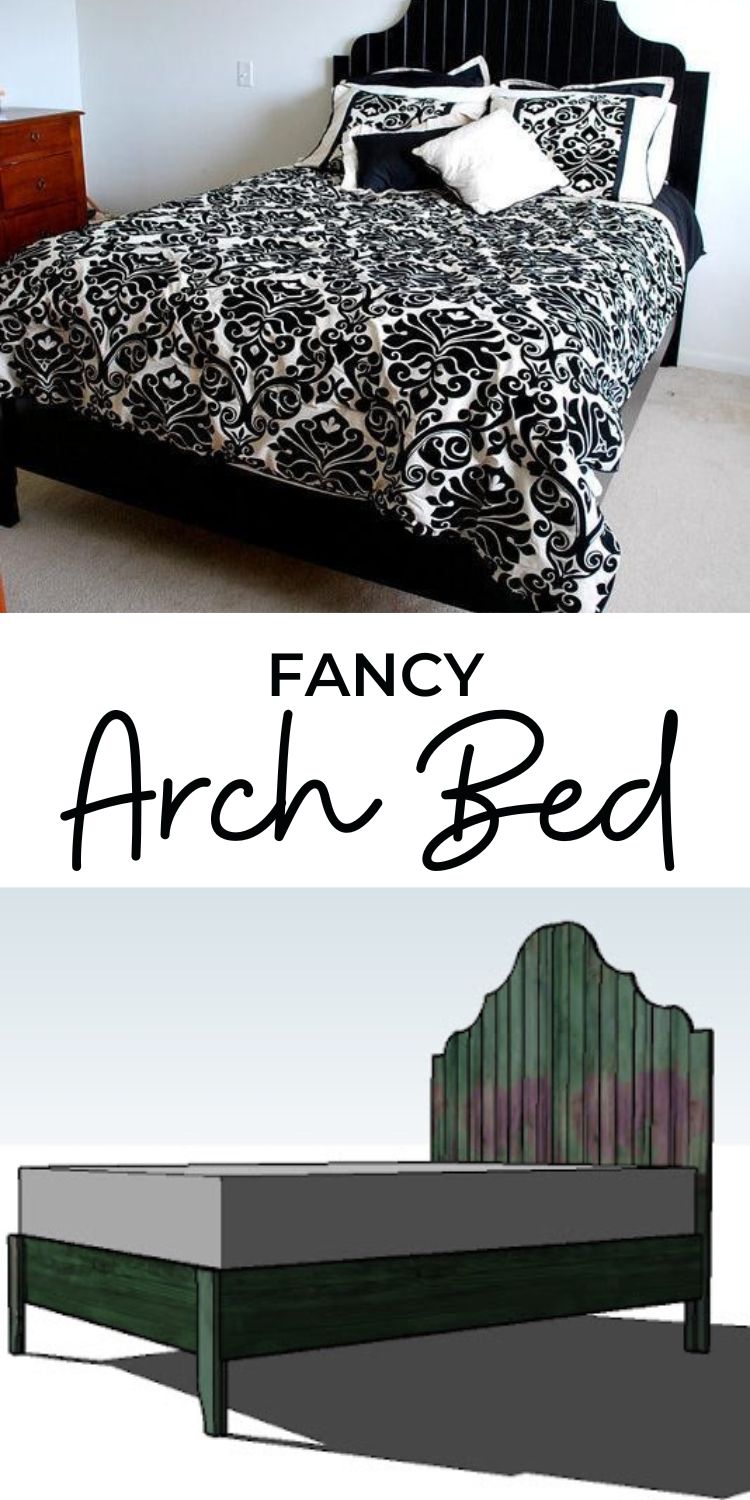
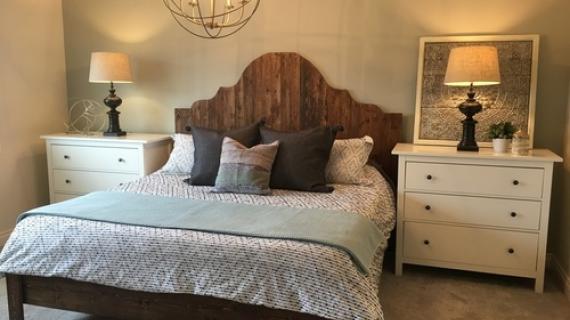
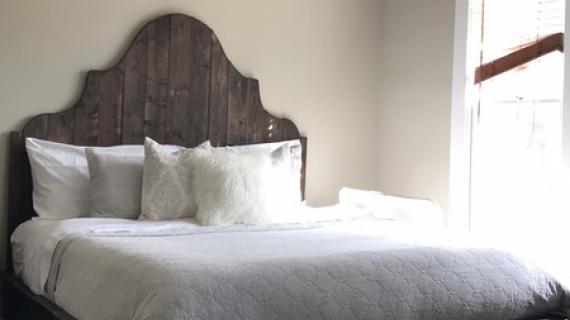
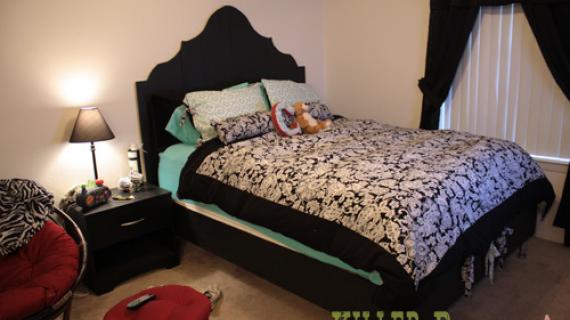
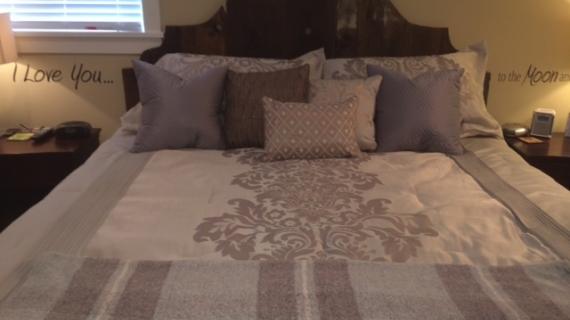
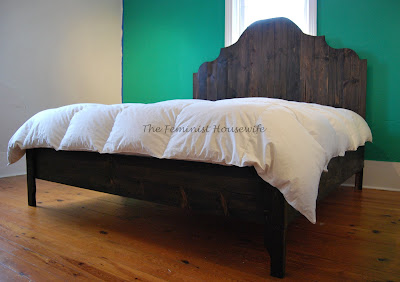
This fancy arched bed will make a glamorous statement in your bedroom! Plans are for queen sized bed. Free step by step plans with diagrams from Ana-White.com

Pin For Later!

Preparation
- 14 – 1×4 Boards, 8′ Long Furring Strips are the cheapest, but select good straight boards
- 12 – 1×3 Boards, 8′ Long Furring Strips are cheapest
- 2 – 1×2 Boards, 8′ Long Furring Strips are cheapest
- 2 – 1×10, 8′ Length
- 1 – 1×10, 6′ Length
- 1 – 1×8, 6′ Length
- 1 - 2×6, 8′ or Stud Length
- 2″ Screws (self tapping star bit)
- Wood Glue
- Wood Filler
CUT LIST for the HEADBOARD
- 10 – 1×4 @ 57 3/4″ (Panel Pieces)
- 8 – 1×4 @ 47 34″ (Legs)
- 2 – 1×2 @ 8″ (Leg Support Pieces)
CUT LIST FOR THE BED FRAME
- 2 – 1×10 @ 81 1/2″ (Side Rails)
- 1 – 1×10 @ 60″ (Foot Rail)
- 1 – 1×8 @ 60″ (Headboard Rail)
- 2 – 1×4 @ 17 1/2″ (Outer Leg)
- 2 – 1×2 @ 8″ (Inner support leg)
CUT LIST FOR THE PLATFORM
- 1 – 2×6 @ 60″ (Center Support)
- 12 – 1×3 @ 60″ (Slats)


Work on a clean level surface with straight boards (especially important for the headboard panel). Predrill and countersink yours screws. Use glue for every joint, unless the joint is a disassembly point. Be safe, have fun!
Instructions
Step 1
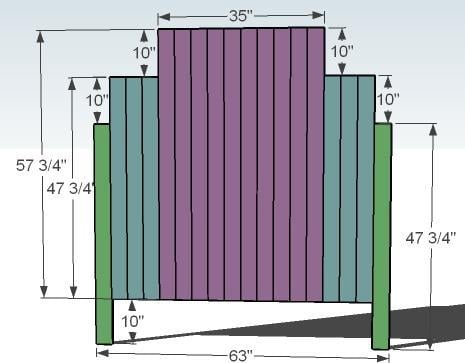
PANEL With a Kreg Jig™, join all of the panel board together, starting in the middle and working your way out. Make sure you alternate the grain of the boards (look at the end edges and alternate bark side up, bark side down) so that the panel doesn’t warp to one side. Try to keep the bottoms flush as you create this panel. But when you put the final two boards on (the green boards) check for square by taking a square from the outermost corners of the green boards to the opposite dimensional on the opposite green board. For those of you who do not have a Kreg Jig™, it is possible to use 1x2s glued and nailed to the back in a perpendicular direction to hold your boards together (use 1 1/4″ nails) but you will run into an issue of not being able to keep the boards connected at the top edges (where the top curves, see below diagram).
Step 2
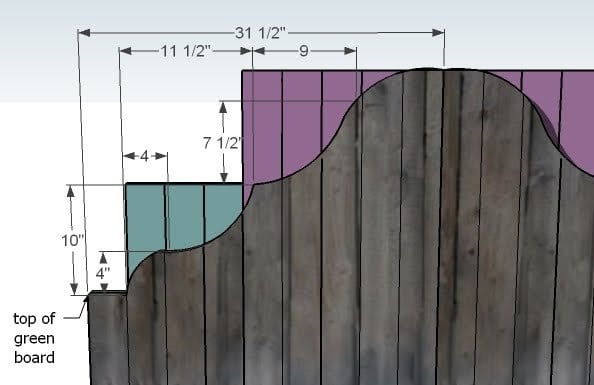
SCALLOPED PATTERN Using the Measurements shown above, mark the points listed from the coordinates shown. Then from each point draw an arch between those points (alternating up and down as shown in the pattern). You can use a variety or round objects, I use lids, buckets, and even take to freehand when necessary. When you are happy with the pattern, carefully cut one side, SAVING YOUR PIECES. Then take the scraps and use them to draw the pattern on the other side of the headboard. Cut the other side of the headboard to match.
Step 3
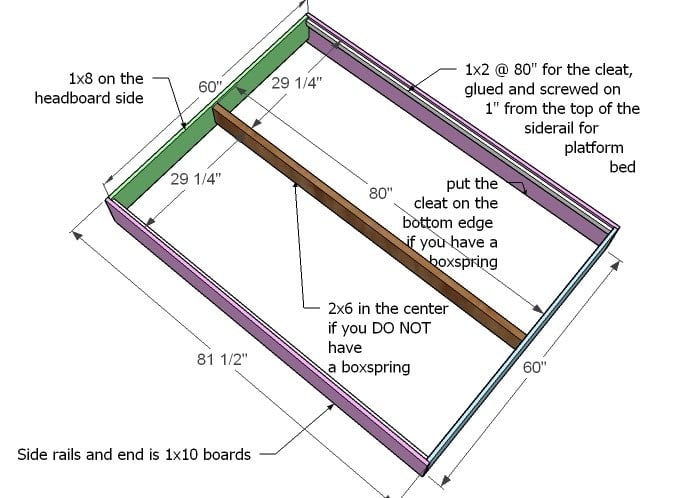
BED FRAME You can click images for a larger view. Begin by building your box of 1x10s and the 1×8 for the front. Keep top edges flush (simply build the box upside down, with the 1×8 coming up shy 2″ on it’s end). Use 2″ screws and glue. Flip over and add the cleats. If you have a box spring, fasten the cleats flush with the bottom edge of the siderails). If you DO NOT have a box spring, build as shown above, fastening your cleats 1″ from the tops of the siderails, and also the center support (the 2×6 board) 1″ from the top of the top and bottom boards, as shown above. The above view is a TOP VIEW for platform installation. Use 2″ screws and glue for the 2×6, 1 1/4″ screws and glue for the cleats.
Step 4
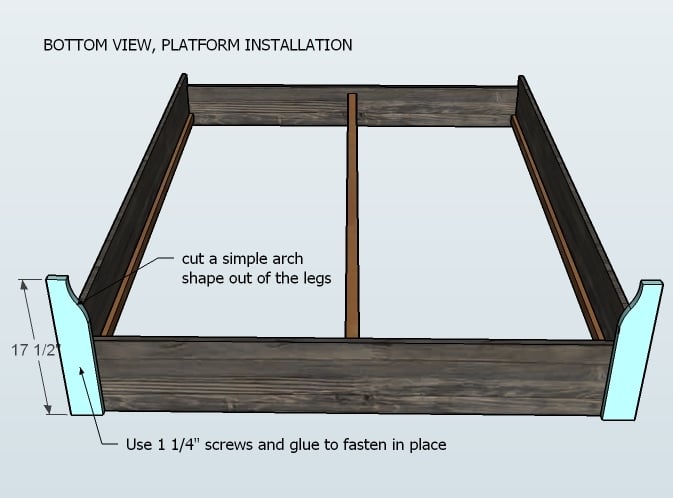
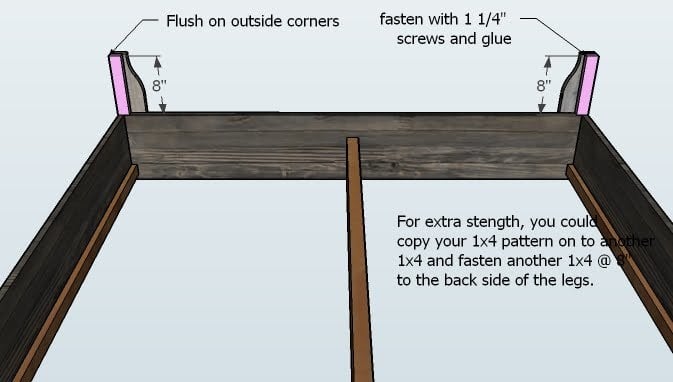
LEGS Cut an arch shape out of the legs as shown above. Then fasten with 1 1/4″ screws and glue to the end of the bed, as shown above, keeping outside and top edges flush.
Step 5
Step 6

HEADBOARD LEG SUPPORTS Use 1 1/4″ screws or nails to fasten the headboard leg support sin place as shown above.
Step 7
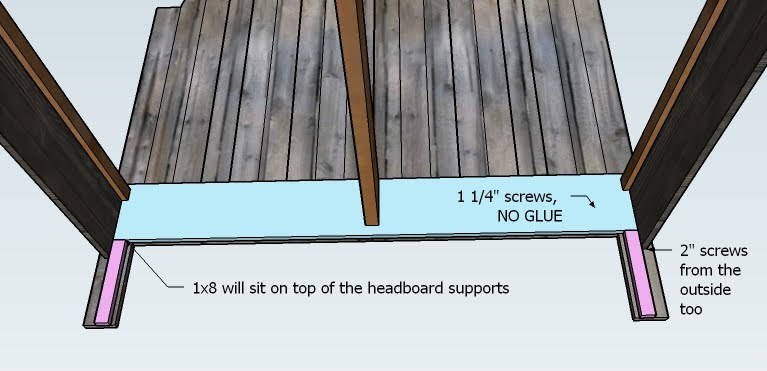
ASSEMBLY Assembly is super simple. Simply place the bed frame in line with the headboard, lining up the 1×8 frame board with the headboard leg supports. You can use 1 1/4″ screws, but you could also purchase bolts, nuts and washers to make the bed super easy to disassemble.
Step 8
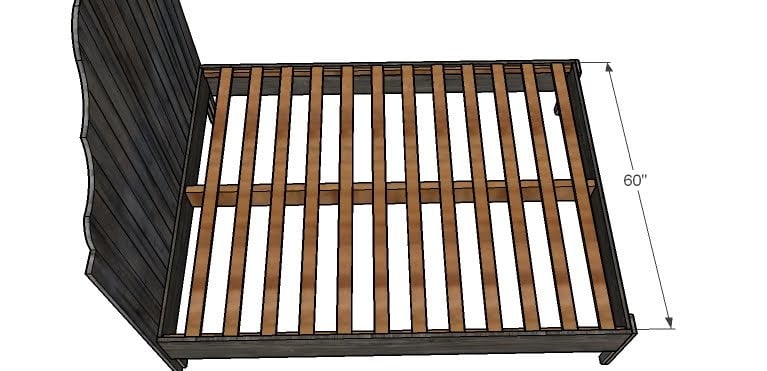
SLATS If you choose the platform installation, lay the slats on top of the side rails and screw down. Do not use glue in this step.
Comments
Ayana Huff (not verified)
Fri, 05/21/2010 - 06:28
LOVE LOVE LOVE this bed!!!
LOVE LOVE LOVE this bed!!! now i just haveto decide which one i want i my room.
Tiffany Meagan (not verified)
Fri, 05/21/2010 - 06:35
How much would it be to build
How much would it be to build this bed? I LOVE IT!
d&b photos (not verified)
Fri, 05/21/2010 - 07:01
I LOVE it too! I saw in a
I LOVE it too! I saw in a blog someone that did a scalloped headboard out of corrugated metal but with a little boy, I dont think that is a good idea!
I wish that we had held off on making on of your other beds. Maybe we will give the other to my mom! I have to have this one!
Jenny (not verified)
Fri, 05/21/2010 - 07:34
Wow! This is such a
Wow! This is such a beautiful bed. I love how fancy the headboard is.
Heather (not verified)
Fri, 05/21/2010 - 07:48
that is really unbelievably
that is really unbelievably cool. way to go Ana!
Beautifully Inspired (not verified)
Fri, 05/21/2010 - 08:34
I would love to make this
I would love to make this bed. I too wonder how much it would be to build it! Thanks for sharing your wonderful plans!
Nicole
www.sobeautifullyinspired.blogspot.com
FlossyMaeRDA (not verified)
Fri, 05/21/2010 - 09:01
That is amazing!! I can't
That is amazing!! I can't wait to close on my new house ,so I can start building stuff!! I have a wood workshop that I am going to put to good use!
chona (not verified)
Fri, 05/21/2010 - 09:03
do you fully comprehend how
do you fully comprehend how amazing you are? I know - you think this is easy once you've learned a few skills, but the confidence you've given so many to try something new is AMAZING! Thank you!!!
Tracy D (not verified)
Fri, 05/21/2010 - 10:33
I'm so glad I got to sponsor
I'm so glad I got to sponsor this bed! It is GORGEOUS!!
Rachelle (not verified)
Fri, 05/21/2010 - 10:45
Love the headboard shape! I'm
Love the headboard shape! I'm tempted to make this with a striped upholstered headboard to match my handmade quilt. Thanks!
Katie (not verified)
Fri, 05/21/2010 - 11:40
Ana, I would be your
Ana, I would be your bestestest friend ever and bring you ice cream and paint your toenails if you gave us some pointers on turning this GORGEOUS bed into a canopy version. :D
As always, you rock!
Andrea (not verified)
Fri, 05/21/2010 - 11:48
Do you know how much I love
Do you know how much I love you? :-) This is the exact bed I have saved in my bedroom ideas file I drool over every time I see it. I love - love - love you! Thank you beautiful. I am grateful. Can you tell?
Catherine (not verified)
Fri, 05/21/2010 - 11:57
Ack! I must...no, MUST have
Ack! I must...no, MUST have this bed. Any tips on making it King sized? It is GORGEOUS.
Tanjia (not verified)
Fri, 05/21/2010 - 12:59
I'd love a king sized
I'd love a king sized version, too. Love you Ana! This is amazing and beautiful. I'm getting a jigsaw next pay cheque. Or renting one.
satakieli (not verified)
Fri, 05/21/2010 - 13:03
This is absolutely stunning.
This is absolutely stunning. I have to save this one for when our horrible IKEA bed finally falls apart!
The amount my son jumps on it i'm expecting it to collapse any day and I now have a reason to let him jump on it, haha!
Bethany (not verified)
Fri, 05/21/2010 - 13:26
Thanks for the plans! I
Thanks for the plans! I really love this bed. I'm thinking guest bedroom..
Kristy (not verified)
Fri, 05/21/2010 - 20:40
It would be awesome if you
It would be awesome if you have a cutting template for the headboard and cutting measurements for the platform bed in king size. This bed is absolutely beautiful! thank you!
Jennifer Emick (not verified)
Sat, 05/22/2010 - 12:59
My bed! Any idea how to
My bed! Any idea how to adapt this to king size?
Karolina (not verified)
Sat, 05/22/2010 - 15:51
Thank you Ana!
Thank you Ana!
Laura (not verified)
Sun, 05/23/2010 - 03:08
I could not love this bed
I could not love this bed anymore!! I don't really NEED a bed, but I may have to replace one of the ones I have with this AMAZING bed. Thank you SOO much Ana!
Waner Family (not verified)
Sun, 05/23/2010 - 09:01
Oh my goodness!!
Oh my goodness!! ...absolutely beautiful!! This will MAKE my master bedroom! You just made my day (although these days, you make everyday!) I cannot thank you enough for your time, ideas, and inspiration! It is so greatly appreciated! Wood shopping time!
Allie (not verified)
Tue, 05/25/2010 - 12:06
Oh. My. God. How are my
Oh. My. God.
How are my husband and I going to choose which bed to build, now?!? Lol, I am sooooo grateful for this site! You have enabled us to make our own affordable furniture that is BEAUTIFUL and make our house look like a home. THANK YOU THANK YOU THANK YOU!!!!!!
Jess (not verified)
Thu, 05/27/2010 - 16:24
This bed is gorgeous! i know
This bed is gorgeous! i know your busy, but is there any way you could tell us how to do this in a king size? I, along with others I'm sure, would LOVE that!
ekd (not verified)
Sat, 05/29/2010 - 07:09
I second the request for the
I second the request for the canopy version. I'll start my bed project in the next few weeks. If you don't get to it, then I'll post what we come up with!
YOU ROCK ANA!
MichelleB (not verified)
Sat, 06/26/2010 - 05:14
I would love the measurements
I would love the measurements for a full sized version of this bed. It is fabulous.
The Ratcliffe Gang (not verified)
Wed, 08/04/2010 - 12:47
How would I change the
How would I change the headboard panel numbers to make this for a single bed. It's so gothic looking and I was thinking black stain, distressed with silver or old stencilling (slightly distressed of course to look old) would be so cool for his room. But this will be only our second bed we've build and the other was very boxy... not sure how to approach adapting stuff yet.
Help! :o)
Blessings!
Jennifer (not verified)
Mon, 08/16/2010 - 10:33
We have no need for a new
We have no need for a new bed, ours is only 2 years old...BUT I'm listing it on craigslist right now so I can have this one instead!!!
Can you help us out on a King version PLEASE! ;)
Natalie Schuldt (not verified)
Mon, 08/30/2010 - 14:51
I know you're busy, but is
I know you're busy, but is there any easy guide to making this a king-sized? I'm assuming measuring my mattress and altering the plans to fit it would be the way to go... hopefully it doesn't get tricky!
ana (not verified)
Mon, 08/30/2010 - 16:10
Hi Natalie, someone did do
Hi Natalie, someone did do this (look through our facebook photos) but it's not as easy as you would think because the pattern actually changes. My advice until I can get to the plans is to build a rough headboard out of 1x4s (don't worry about strength, a headboard is all about being pretty and offers no support to the bed) like in the queen bed, but use 24 1x4s instead of I believe 18. Then just start in the center and draw out a pattern. Once you are happy with one side, cut it, save your scraps, and cut the other side. Good luck, and hopefully, I will get to a plan soon!
Natalie Schuldt (not verified)
Wed, 09/01/2010 - 08:02
Thanks Ana!
Thanks Ana!
Ana White (not verified)
Wed, 09/22/2010 - 10:04
What do you all think of
What do you all think of Robin's Bed?
or the entire room?
Jill (not verified)
Thu, 12/09/2010 - 10:17
I love the room and the
I love the room and the bed...but...think it should have been painted. Would look more feminine, IMO.
Kate (not verified)
Sun, 12/12/2010 - 15:43
Shouldn't the center support
Shouldn't the center support beam be 80 inches, not 60 inches?
Caroline @ The… (not verified)
Thu, 01/06/2011 - 08:44
I built this bed in a king
I built this bed in a king size and tried to share all of the modfiications that I made for anyone else who wants to build it!
I am absolutely in love with our bed. Thanks so so much Ana!
Here is the link to building details:
http://davidandcarolineparker.blogspot.com/2011/01/master-bed-how-we-bu…
Beth (not verified)
Thu, 01/13/2011 - 11:17
You ROCK! Wahooooo!
You ROCK! Wahooooo!
Style and Stor… (not verified)
Tue, 01/25/2011 - 12:04
[...] Headboard Plan:
[...] Headboard Plan: http://ana-white.com/2010/05/furniture-plans-swedish-planked-bed-scallo… [...]
Julie 12 (not verified)
Thu, 05/19/2011 - 13:08
Has anyone made this into a
Has anyone made this into a twin size bed? I would love to make it into a twin!! Please share any advice. I've never made anything yet. Im so excited to start!
hummingbird8705
Fri, 08/30/2013 - 19:08
twin size?
I would like the measurements in this for a twin size. I would like to make this for my little one.
clairebear
Sat, 07/02/2011 - 17:03
Scallops
Hi Ana!
So we've got the materials for the bed, all the wood is cut and we will start building in the a.m.
Question for you: With what tool do we make the scalloped arches? We don't have a saw. Or do we have them do it at Home Depot?
Total novice, so these things need to be spelt out for me.
Thanks so much, I hope to have pictures of a successful project1
tinab158 (not verified)
Sun, 07/03/2011 - 17:37
Using a box spring
This may be a silly question, but what support do you use if you plan to use a box spring?
The plans say NOT to use the slats if you're using a box spring. The plans also say to secure the 1x2's to the bottom of the side rails..this I understand. However, is the box spring supposed to rest only on the 1x2's which are screwed into the 1x10 side rails? This doesn't seem like much support...? Help...I can't wait to start building, but I want to be sure it's safe to use.
Jay (not verified)
Thu, 08/04/2011 - 18:02
Hello Ana, I'm planning
Hello Ana,
I'm planning on starting to build this bed. I wanted to second the question about what tool you use to cut the arches into the headboard. Would a hand saw work? I'm super new and this will be my first project, I'm excited =). If anyone else reading this knows the answer, I'd appreciate a response. Thanks for your help!
aprice24
Wed, 07/29/2015 - 08:02
I'm building it now and using
I'm building it now and using a jigsaw for the arches. the handsaw should work for the most part but the actual curves of the arches might be difficult with the hand saw. You may be able to get the rough shape and then sand the curves more into curve shapes though.
Guest Bernadette (not verified)
Fri, 04/13/2012 - 05:17
Bedding!
Where oh where did you get that bedding? Been searching high and low for a nice damask print bed set to no avail. The only one that looked decent was a $300 set for comforter and pillow shams only!
Love the bed frame design toooooo, of course!! :-)
Autum (not verified)
Fri, 07/06/2012 - 08:22
King Size Headboard
I just finished building a king size headboard using this as inspiration. I did not make a whole bed, just the headboard. I used 1"x8" rough cut pine boards. They actually measure 7.25" instead of 8". I used 11 boards and my headboard is just shy of 80". A perfect fit for my king size bed. Hope this helps anyone wanting to make this beautiful bed in a king.
Thank you so much Ana for the hard work you do that inspires novices like me to build my own beautiful headboard.
aprice24
Wed, 07/29/2015 - 06:59
I'm a little bit confused and
I'm a little bit confused and was hoping someone might be able to explain it to me. I am in the middle of building this bed (thank you, the design is beautiful and the instructions have been great) but I noticed while working that there is a lot of math on these plans that doesn't add up. For instance, the headboard pannels show that the 10 - 57 and 3/4" pannels that you use in the middle should be 35" accross, but they are 1x4" pannels so they would be 40" (there's 10 ... 10x4= 40). looking at the measurements of the rest of the headboard, this changes a lot. instead of being 63" from leg to leg, it is actually 72" (40" mentioned above, plus the additional 8 - 1x4" pannels - 8x4= 32 and 32+40=72").
I guess I am worried that I missed something. or are the numbers off but these plans will still fit a queen sized bed? I'm just worried that with an extra 9", the bed will be too big for a queen sized mattress. Please help!!!
aprice24
Wed, 07/29/2015 - 15:28
also, the wood for the cleats
also, the wood for the cleats is not accounted for anywhere in the cut list. make sure that you have 80" of 1x2 (2, one for each side) to make the cleats to upport the slats.
jbay817
Wed, 07/29/2015 - 16:08
Dimensional lumber.....
The reason the math isn't adding up is because the boards aren't the same size that they say they are. Most wood that you buy comes in a nominal size (i.e. 2x4, 1x2,1x4, etc.), however this is NOT the actual dimensions of the wood! It has something to do with how it is milled and dried. Anyways.... boards have a dimensional/actual size and in your case the 1x4 boards that you have are actually about 0.75 x 3.5 inches in dimension! This explains why 10 1x4s are not 40inches, but are instead 35" because 10x3.5" = 35". When measuring out boards width or depth-wise, you have to be super careful to consider they are not the simple 1x2 or 2x4 inches. Hope this helps!
aprice24
Thu, 07/30/2015 - 11:53
Thank you! I measured them
Thank you! I measured them last night and I thought math just stopped working altogether because low and behold, mine measured 63"! This makes much more sense!
rosypete
Sat, 08/17/2019 - 01:24
Hi! I was wondering if you…
Hi! I was wondering if you have a full size plan for this bed? Thanks!
P.s. Thanks so much for the great plans and offering them for free.