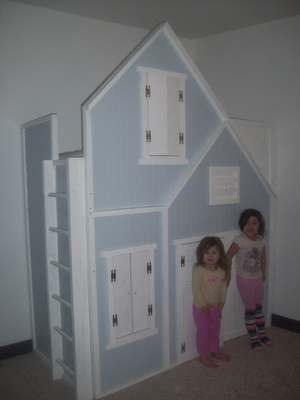


I built this bed for my daughter a few years back. It's essentially just a false front and sides on a platform bed. Some notes - this bed does reach the ceiling, so make sure you are prepared for the bed filling up your space. It's big. The interior height is suitable for preschoolers.
Pin For Later!

Preparation
4 sheets of 3/4″ plywood
Due to the great complexity of this project, please cut your boards as you go. Each step includes detailed instructions on cut lengths.


Instructions
Step 1
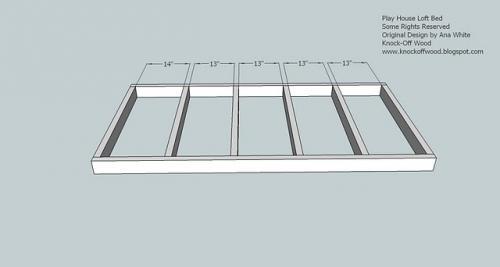
2 – 2x4s @ 75″ (Sides of the bed frame)
6 – 2x4s @ 36″ (Studs for the bed frame)
1. Build the above frame, as shown above. Use 3″ screws to screw the frame together. Make sure your project is square.
Step 2
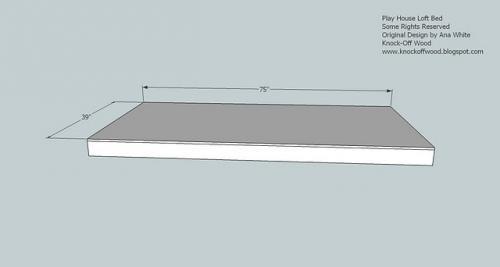
1/2″ plywood cut at 75″ x 39″
2. Attach the plywood as shown above, using 2″ screws and glue. Keep outside edges flush and make sure the frame is perfectly square before attaching the plywood (see the HOW TO section on squaring projects).
Step 3
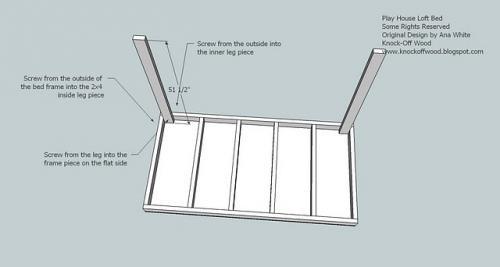
2 – 2x4s @ 51 1/2″
3. Screw the 2×4 to the bed frame as shown, with the bottom of the 2x4s flush with the plywood. This plan is for a 3 sided bed and the side without the 2x4s will be screwed to studs in the wall of the room the bed is in. You may wish to complete this step when you assemble the bed in the room to make moving the bed into the room easier. You will be building 2 legs.
Use 2 3/4″ screws and glue.
Step 4
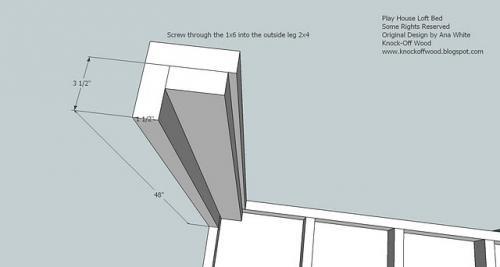
2 - 2×4 @ 48″
2 - 2×6 @ 48″
4. Screw the 48″ 2×4 to the 52 1/2″ 2×4 from step 3 first. Keep bottom edges flush. Then, keeping the outside corner flush, screw the 2×6 to the two 2x4s, as shown above. Use glue and keep the bottom edge flush. Remember, you need to build 2 legs. This completes the legs.
Use 2 3/4″ screws and glue.
Step 5
Step 6
You will need 1x2s and 1x4s.
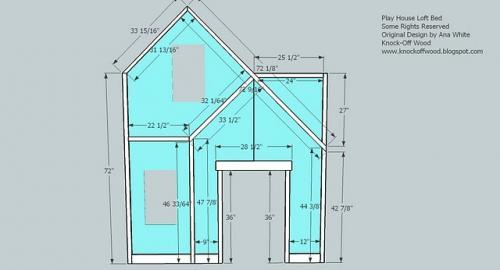
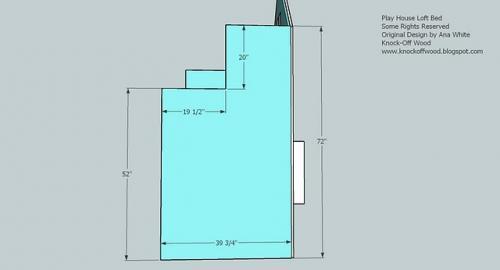
6. Starting in the lower left corner, trim the false front out as shown. The measurements shown are approximations and should only be used to guide you. Take exact measurements off your own project and cut as you go. All angles are 45 degrees. All trim pieces are 1x2s, except the trim at the bottom and the trim above the door.
Use glue and 1 1/2″ nails. Whenver possible, use 2 1/2″ nails to nail through 1 piece of trim into another on the edge.
Step 7
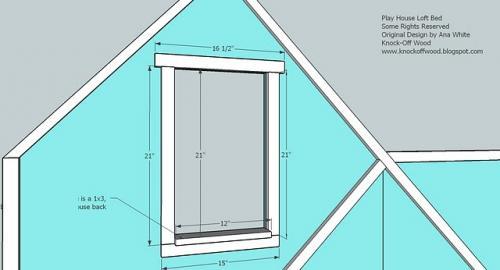
Use 1x2s to trim out the window. Start with the sides, 1x2s cut at 21″. Then measure, and add the 1x2s to the top and bottom, keeping the bottom trim flush with the sides. The top trim piece will overextend 3/4″ on either end. The measurements given are to guide you and may not be exact with your projects measurements. Once the window has been trimmed out, add the sill, a 1×3, keeping the back edge flush. Remember to trim out both windows. The measurements are the same. Use 1 1/4″ nails and glue to nail the trim to the plywood.
Step 8
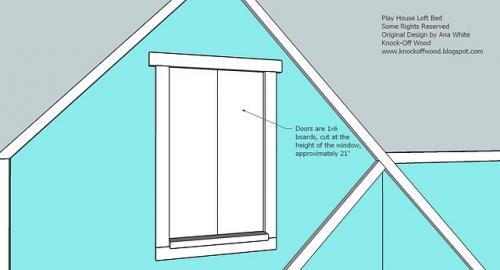
The doors for the windows are 1x6s. Take a measurement of the window and cut the 1x6s to size. You may wish to leave a large gap around the windows to prevent little fingers from being pinched. Attach the window doors with hinges after you have painted the project.
Step 9
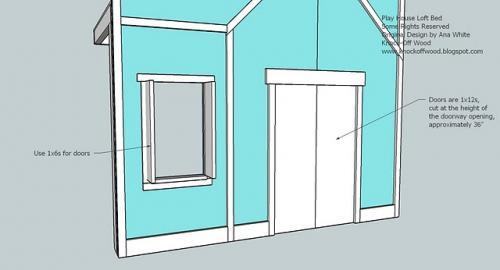
The doors for the front door are 1x12s. Follow the guidelines in step 7.
Step 10
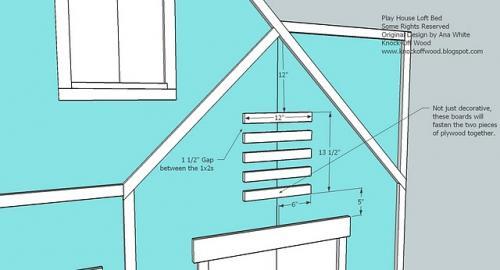
The “Vent” is actually more than decorative. It will help hold the 2 pieces of plywood together. Use 1 1/4″ nails and glue to fasten the vertical vent pieces, as shown above.
Step 11
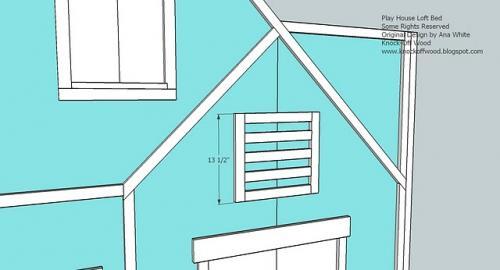
2 – 1x2s @ 13 1/2″
10. Trim out the ends of the vent as shown above. Use glue and 1 1/4″ nails. Then use 2 1/2″ nails and nail through the edges of the end trim pieces into the horizontal vent pieces from step 9.
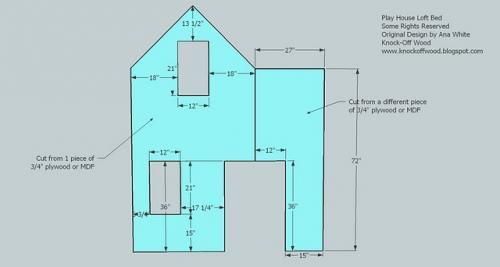
Step 12
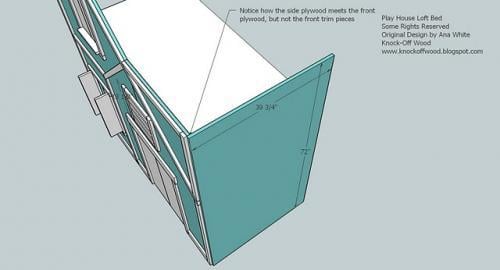
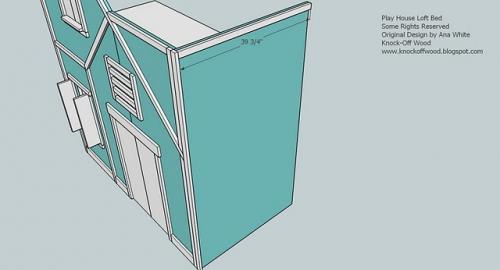
3/4″ Plywood 39 3/4″ x 72″
11. Cut plywood as shown above. You may wish to assemble the bed in place.
Step 13
1 - 1×2 @ 72″
1 – 1×2 @ 39 3/4″
12. Trim the top of the plywood panel with the 39 3/4″ piece. Then, with the 72″ piece on edge, trim the end edge of the plywood as shown above. This will make the overall dimension of the side panel 40 1/2″ wide. Use glue and 1 1/4″ nails.
See step 16 for more information on finishing the corner trim.
Step 14

2 – 1×2 @ 70 1/2″
1 – 1×4 @ 36 3/4″
13. Trim out the face of the side panel, starting with th 1x2s. Use glue and 1 1/4″ nalis.
Step 15
2 – 1×2 @ 70 1/2″
1 – 1×4 @ 36 3/4″
13. Trim out the face of the side panel, starting with th 1x2s. Use glue and 1 1/4″ nalis.
Step 16
Trim out the corner of the ladder panel, as shown above. The easiest way to do this is to first nail with 1 1/4″ nails and glue one of the 1x2s @ 72″ to the plywood, keeping outside edges flush. Then nail the remaining 1×2@ 72″ to the outside edge, covering the edges of the first 1×2 and the plywood. This is shown above.
Step 17
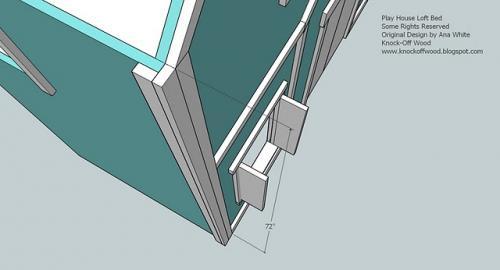
Detail view.
Step 18
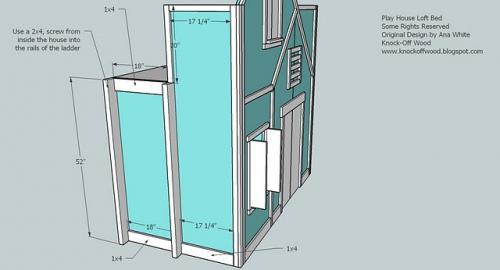
2 – 2x4s @ 52″ (Ladder Rails)
2 – 1x4s @ 18″ (Top and Bottom trim for ladder
1 – 1×4 @ 17 1/4″ (Bottom Trim)
1 – 1×2 @ 17 1/4″ (Top Trim)
1 – 1×2 @ 20″ (Vertical Trim above ladder)
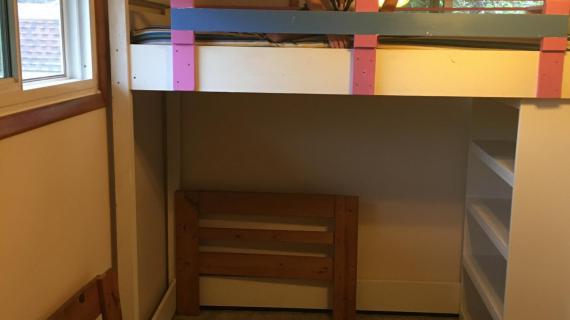
These measurements are appoximations and you should measure and cut your boards to your projects measurements. Use 1 1/4″ nails and glue to nail trim pieces in place. Use 3″ screws to screw from the inside of the playhouse into the ladder. Also use the 3″ screws to screw from the outsides of the ladder rails into the 1×4 trim pieces end edges. Please note, you may wish to complete step 19 first.
Step 19
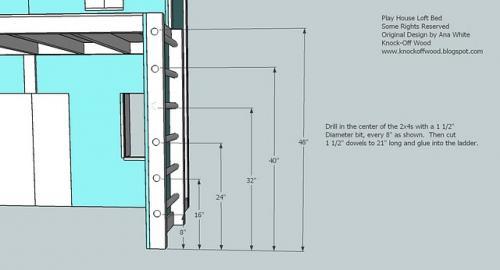
Build the ladder by drilling 1 1/2″ diameter holes in the 2 x 4 ladder rails and inserting the dowels. Glue the dowels securely in place. Use the measurement above to guide you.
Step 20
Finish the entire bed as desired. Then assemble the bed screwing the legs on securely and by screwing the bed frame into studs in the wall of the room using screws at least 3 1/2″ long on the side without the legs. The bottom of the bed frame will sit 48″ up from the floor (if you have not shortened the bed). Keep the bed level with the legs.
Then add the front panel, screwing into the legs and the bed frame from the face of the front panel. Use 2″ screws. Do the same to add the side panels.
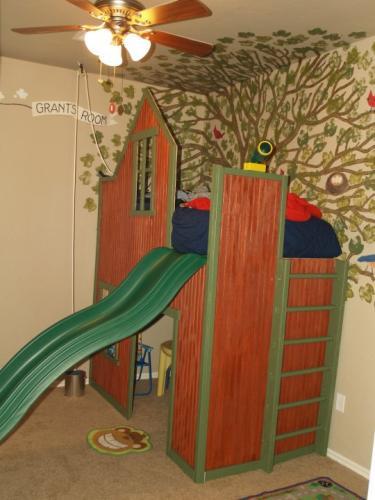
I encourage you to modify this bed as fits your child’s needs. The bed I build my daughter only had two sides and is secured to the wall on the remaining two sides. Make sure you measure your ceiling before embarking on this project.
Comments
Maryann @ Dome… (not verified)
Tue, 01/05/2010 - 11:26
Wow! That's so impressive
Wow! That's so impressive building. Ultra cute!
Sarah (not verified)
Tue, 01/05/2010 - 12:53
That is absolutely
That is absolutely phenomenal!
Kristi (not verified)
Tue, 01/05/2010 - 14:37
Wow. Great detail and an
Wow. Great detail and an awesome project!
Sew Much Ado (not verified)
Tue, 01/05/2010 - 19:36
Oh my gosh, this is amazing!
Oh my gosh, this is amazing! I wish I was young again and could have one, I'm saving this to show my husband!
{Pink Igloo Designs} (not verified)
Thu, 01/07/2010 - 20:03
I Stumbled across your blog
I Stumbled across your blog today. Where have you been all my life? (LOL)
My husband and I enjoy these types of projects to do together.
We live in Alaska and shipping up here is so expensive. So every time we see a pottery barn magazine, we examine it and try to do it ourselves. I guess we've learned through trial and error, but for the most part I'm happy with the projects we've accomplished. And now thanks to you...many more projects to come.
I just wanted to tell you thank you for giving your plans away for free. I know many hours went into making the tutorials, so just know it's appreciated!
I'll be visiting often!
Thanks,
Erika
Rachel (not verified)
Fri, 01/08/2010 - 03:10
I just stumbled onto your
I just stumbled onto your site today. It's a great site. And this bed is amazing. I love it! Thank you so much for making the plans available!
On a practical note, is it really hard to change the sheets?
Ana White (not verified)
Fri, 01/08/2010 - 06:55
Hi Rachel . . . you are
Hi Rachel . . . you are assuming she actually sleeps up there . . . and not in the middle of our bed!
Sheets can be a little tricky, but it's worth it.
The Mendoza Family (not verified)
Sat, 01/09/2010 - 07:57
This is the most amazing
This is the most amazing bed!!! i lOVE it! i really want to try it!
The Coe's (not verified)
Sat, 01/09/2010 - 15:40
I saw one of these years ago
I saw one of these years ago before I ever even had kids, and saved the page from the magazine! (before blogs! LOL)
I just had my first Girl last year, (after 2 boys) and am sooooo glad to find this tutoral here! Thanks!
Get N Together (not verified)
Wed, 01/13/2010 - 06:54
So Stinkin cute!! I have my
So Stinkin cute!! I have my first girl after 2 boys and she is just about ready to move out of her crib...I think this is my new project. Thanks!
Shanna (not verified)
Thu, 01/14/2010 - 18:47
Wow, this is amazing! And
Wow, this is amazing! And you are so pretty, btw.
Angela Rae (not verified)
Fri, 01/15/2010 - 10:06
I just stumbled on your blog
I just stumbled on your blog and I'm thrilled. It's like finding treasure you didn't even know you were looking for and now can't believe how close you came to not finding it. So I'm putting a link to yours from mine, to share the info to my friends and family. You are EXACTLY the reason I love searching blogs. What a treasure. Thank you for sharing your talents.
SRH (not verified)
Thu, 02/18/2010 - 18:26
AMAZING!! (also, as a former
AMAZING!! (also, as a former alaskan, it's always a point of pride when you stumble across another alaskan doing something impressive).
The Dafoe Family (not verified)
Sun, 02/28/2010 - 19:51
Love this! My husband and I
Love this! My husband and I plan on building this this summer for our 3 year old! Love the are you in DJ! We are in NP and saw the News Miner article! I am a do-it yourself mommy too!
Mel (not verified)
Thu, 03/04/2010 - 07:26
Someone on sewing mamas
Someone on sewing mamas posted a link to your blog. I am finding so many things here that I've wanted to make in the past, and a few for now. I'm still browsing.
We got a bed like this off craigslist. We considered building it, but we found a good deal. Glad to see it here, and I'll certainly recommend you, if anyone asks.
Jennifer (not verified)
Sun, 03/07/2010 - 10:45
OMG! That is the coolest
OMG! That is the coolest thing I've ever seen for a child's room! Crap....now that I'm gonna build this, what am i gonna do with the beds my kids already have?? LOL! Precious! you are one creative inspiration!! I found this site on accident and it was the best thing I've done all day!
Kenna and Steve (not verified)
Tue, 03/16/2010 - 10:34
I just wanted to see if you
I just wanted to see if you have a playhouse loft bed plan for a boy yet? I would love to make one for my son.
Anonymous (not verified)
Fri, 03/19/2010 - 15:40
you are AMAZING! so happy to
you are AMAZING! so happy to have found your site today!
Nicole (not verified)
Wed, 03/31/2010 - 14:30
Anyone know about how much
Anyone know about how much this costs?
Nicole (not verified)
Wed, 03/31/2010 - 14:30
Anyone know about how much
Anyone know about how much this costs?
Jalen (not verified)
Mon, 04/12/2010 - 06:14
Could this loft bed become a
Could this loft bed become a bunk bed as well? Do you think a mattress could fit in the upper and lower bunk?
Katie Little P… (not verified)
Tue, 05/04/2010 - 14:22
Ana- I LOVE this bed, but my
Ana- I LOVE this bed, but my husband and I are trying desperately to find a twin bed that will fit against a 76" wall. I know that most twin mattresses are 75" long so that doesn't give us much space to work with. Can you please tell me what the overall length of this loft bed is? Thank you SO much!
SAHDaddy (not verified)
Wed, 08/25/2010 - 14:19
love this, we just printed it
love this, we just printed it out and are planing on building this for our 3 yearold soon!
can't wait to post pics
theschwenkfamily (not verified)
Thu, 09/02/2010 - 22:00
I am so inspired by your
I am so inspired by your awesome plans I have been looking through them all reading the comments etc. for 2 hours LOL its now 3am and I am wishing I could be out in the garage building :) Thanks so much this site it awesome
Jenny (not verified)
Sat, 10/23/2010 - 20:10
hello Ana! I've been toying
hello Ana!
I've been toying with the playhouse loft bed idea for awhile. I've been set on making my own plan based on some amazing $8,000+ beds that I've found online, and was so excited to have stumbled across your plan! I wanted a simple loft bed with a beautiful facade, and your plan does just the trick! I would like to add decorative moulding on the gables, do some cut-outs on the shutters, possibly some type of portico on the entrance to the little playhouse (and OMG, have you seen the one online with the little bay window? http://www.sweetdreambed.com/girlsgallery.htm).... your plan is a perfect match for what I have in my head. I can't wait to get started. Thanks so much for the inspiration!
kag (not verified)
Tue, 10/26/2010 - 03:31
just take off the pointy roof
just take off the pointy roof top and make it flat across thhe top, then add some parts that make it look like a castle tower with turrest, like this picture: http://us.123rf.com/400wm/400/400/davidmartyn/davidmartyn0709/davidmart…
kag (not verified)
Tue, 10/26/2010 - 03:33
ugh, horrific spelling,
ugh, horrific spelling, sorry.
Ana White (not verified)
Tue, 10/26/2010 - 04:02
LOL I chuckled and thought
LOL I chuckled and thought you were talking about my spelling because it's so horrible!
mkmb129 (not verified)
Sat, 01/01/2011 - 04:57
This is amazing!! Your whole
This is amazing!! Your whole site is fantastic. I've spent hours looking through it and now have the woodworking bug! Thank you so, so much for sharing!!!!
Sharon (not verified)
Sun, 01/16/2011 - 07:52
Hi, fantastic, beautiful! I
Hi, fantastic, beautiful! I live in Italy and over here you can't find too much diy projects. Soon we're going to move in our new hom & I'm struggling through internet for some ideas. I have 2 girls, one of 10 & the other of 3.
This would be a nice project to do for the little girl,I luv it!
thanks for sharing such precious idea, can't wait to start it.
Sharon
Summer Crow (not verified)
Fri, 06/22/2012 - 21:33
SLIDE
Ana-
I actually have a question about the slide. I am making your fort beds for my twin boys but plan to join them and was wanting to put a slide in the middle. I do not want a wooden slide. Would rather a premade plastic slide. Where did you get your slide from that you used on this bed and how did you go about attaching it, if you don't mind me asking.
Thanks sooo much! Your plans and site are wonderful! I have a notebook full of things that you have plans for that I want to make! I can't wait to get started!
Thanks again!
Loraine (not verified)
Wed, 09/26/2012 - 11:16
Barn style
I have a girl and a boy that both share a room. I was thinking about a farm theme in their room and I think this would make a good "barn" if painted red with white shutters. Is there room in the playhouse for another twin mattress?