

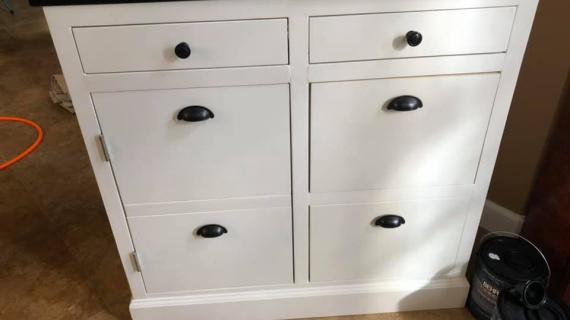
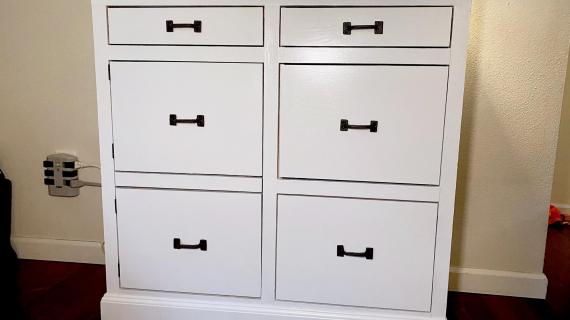
Build your own mail sorting and handling console. Features a built in shredder with EASY to dump trash, file cabinet drawer, and extra drawers for stamps, pens, tape, and more!
If you can open your mail and deal with it immediately, deal with it just once, instead of handling multiple times, you’ll save time and reduce household work.
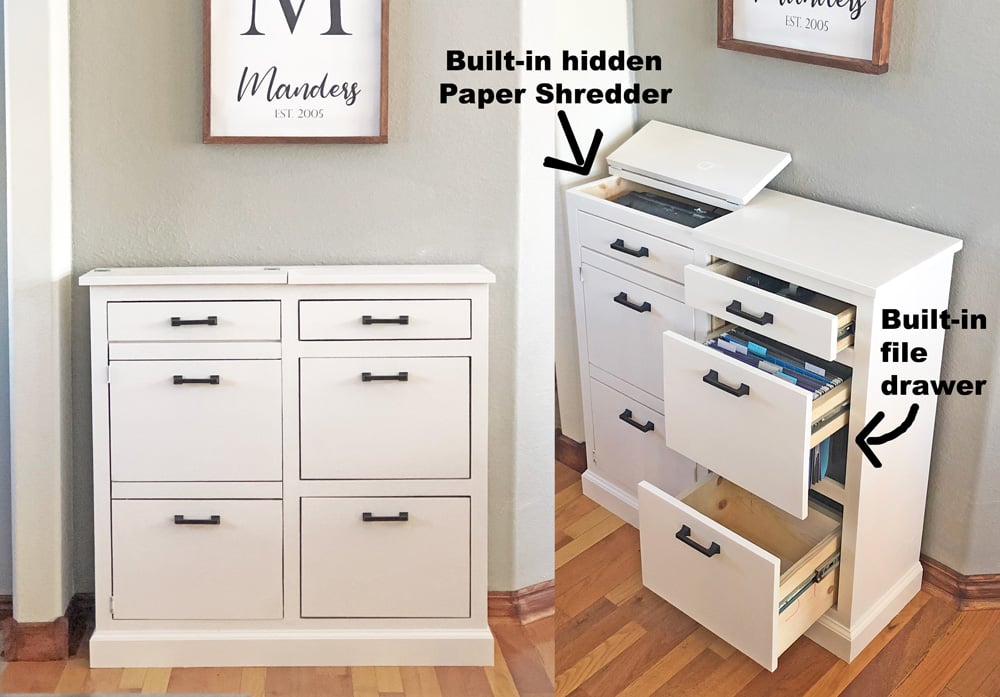
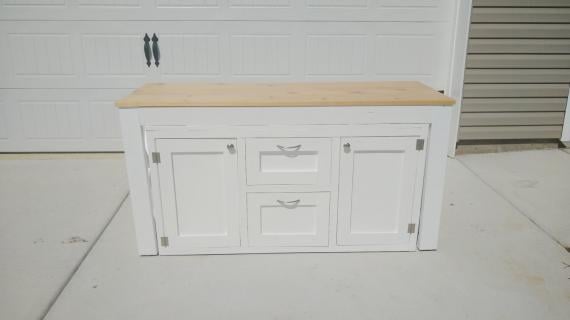
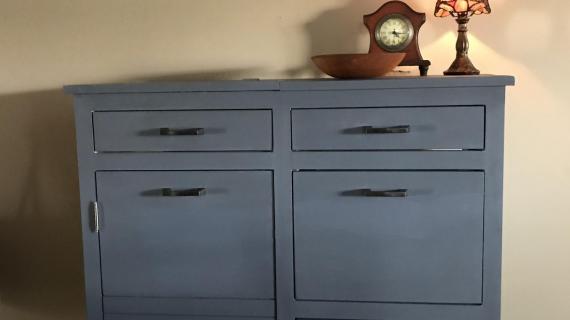
My sister had an amazing idea to create the “mail boss” - a regular looking console table with built in functionality to deal with the mail all in one spot. Here’s how it turned out-

Why it's the Perfect Mail Sorting and Organizing Solution
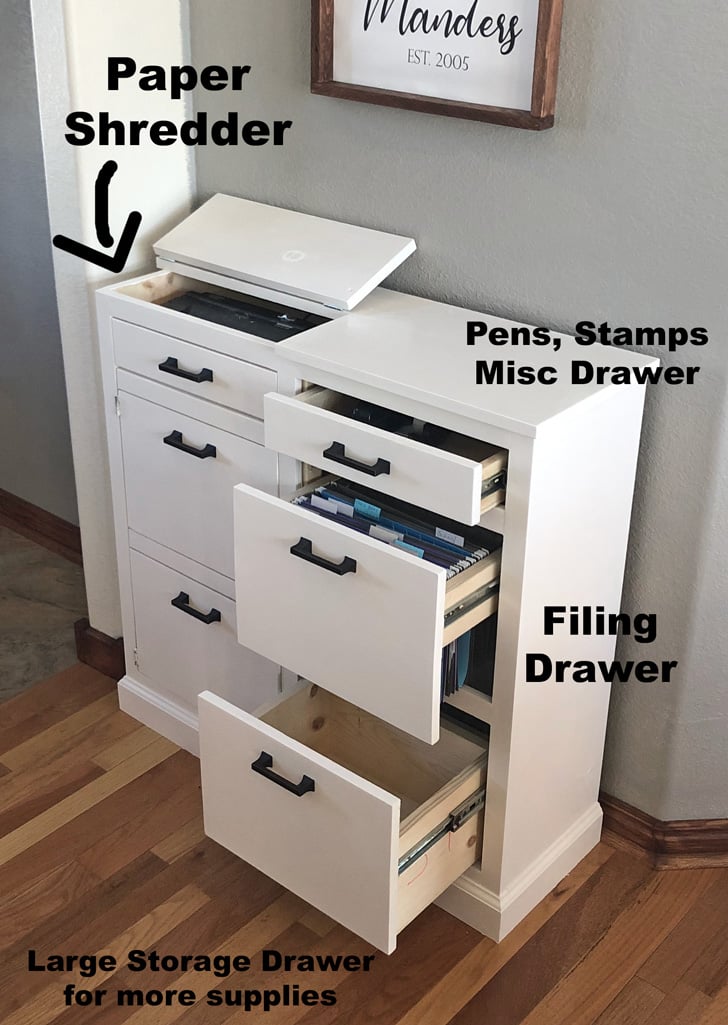
- Built in paper shredder that is easy to access but hidden
- Built in wastebasket that is easy to empty (no need to remove the shredder head to empty waste basket)
- Built in filing cabinet to file mail on the spot
- Pencil drawer for pens, pencils, stamps and other small items
- Larger drawer for envelopes, packing tape, etc
- Surface space for sorting mail, writing checks, addressing envelopes or decor
- Wall space above for calendars, wall storage solutions, pin boards, mirrors or decor
Watch Me Build It
The plans for the mail boss are below. We also show the steps and functionality in our weekly YouTube video
Take a Second to Pin It
Can't build it right now? Make sure you take a second to pin it for later. We appreciate pinning - it supports this site and helps keep the plans free and pay for website expenses.
Preparation
- 1 - 1x12 @ 8 feet long
- 2 - 1x12 @ 6 feet long
- 3 - 1x3 @ 8 feet long
- 1 - 1x6 @ 8 feet long
- 38 inches of 1x8 board
- 32 inches of 1x4 board
- 4 - 1x2 @ 8 feet long (select pine for stain grade or finger joined if painting recommended)
- 5 feet of 3-1/4” base mounding
- 24” x 48” piece of 1/4” thick plywood for drawer bottoms
- 3 - 10 inch full extension drawer slides
- 2 sets of hinges
- magnetic clasp for keeping waste basket door shut
- Wastebasket less than 17” wide, 11” deep and 24” tall
- Paper shredder head like this one
- 1-1/4” pocket hole screws
- 1-1/4” and 3/4” brad nails
Carcass
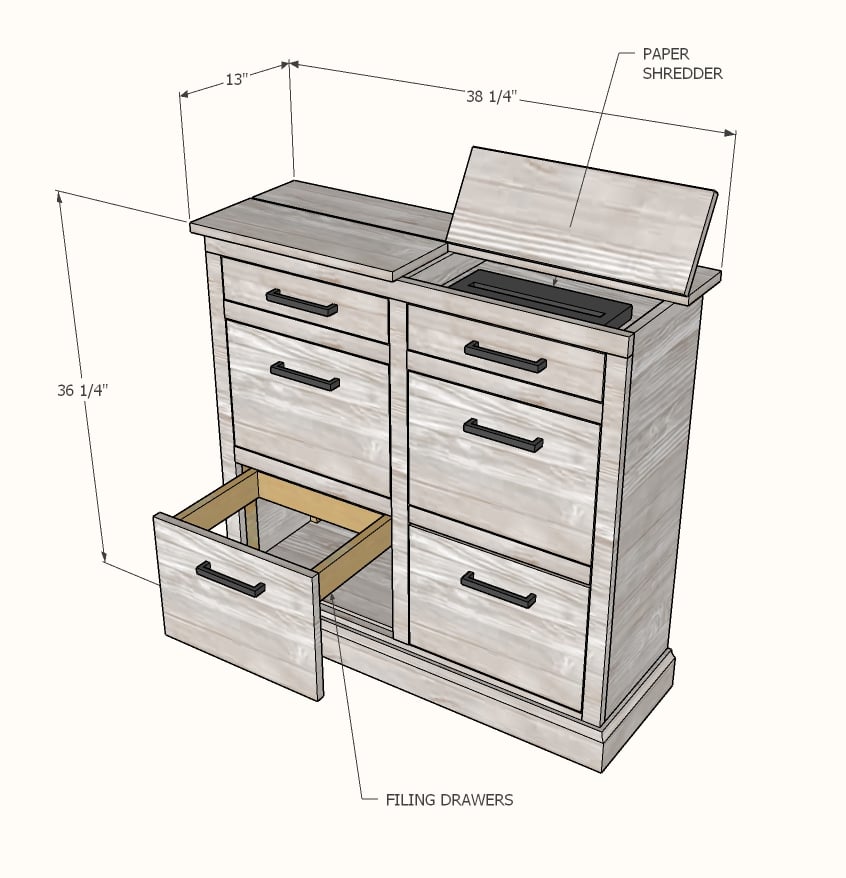
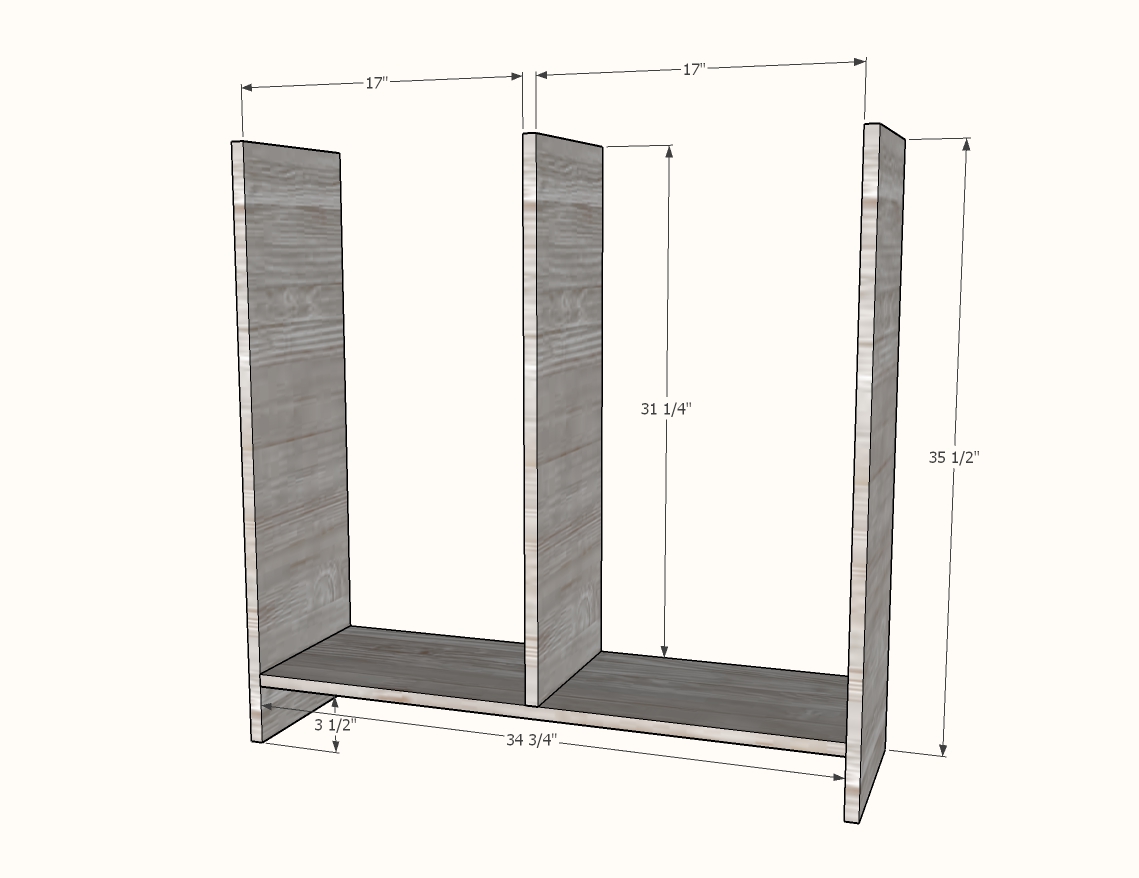
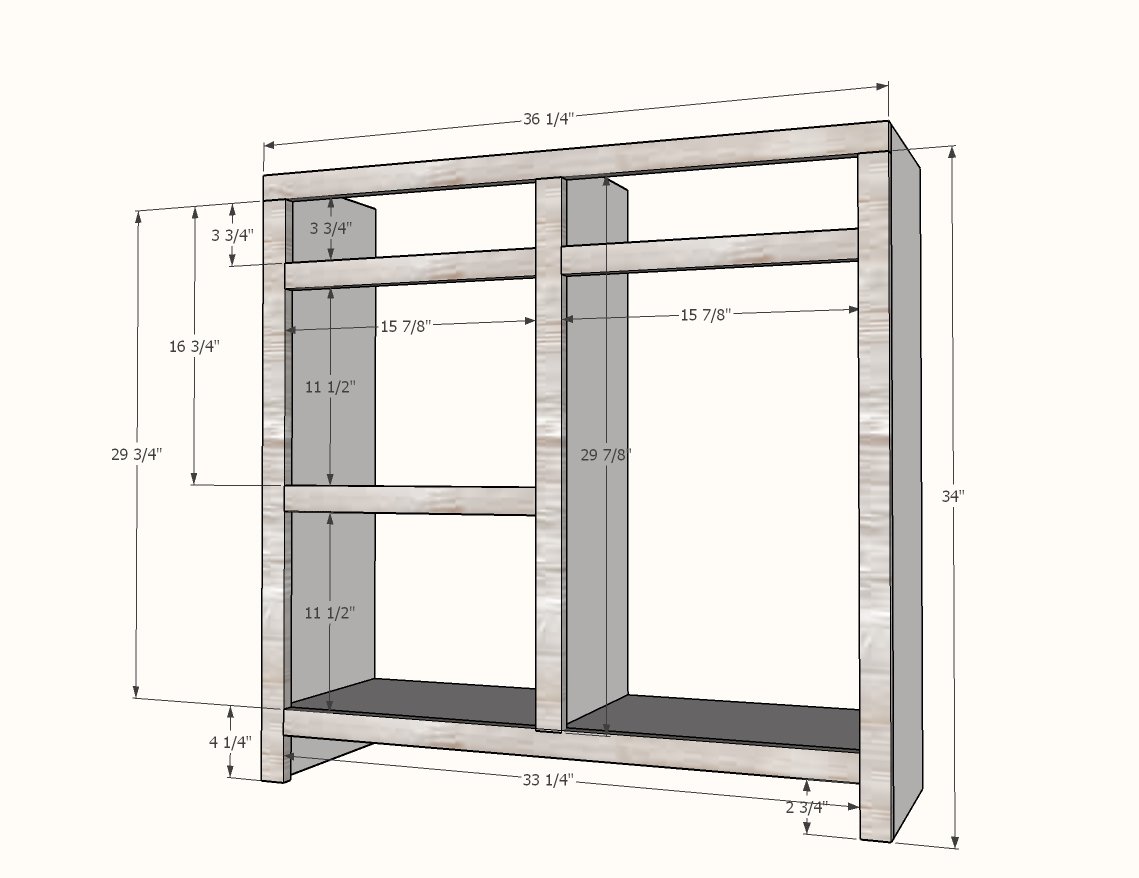
- 2 - 1x12 @ 35-1/2" - sides
- 1 - 1x12 @ 34-3/4" - bottom
- 1 - 1x12 @ 31-1/4" - divider
- 1 - 1x12 @ 17" - shredder shelf
- 1 - 1x3 @ 17" - Back support on drawer side
- 1 - 1x6 @ 37-3/4" - fixed top
- 2 - 1x8 @ 18-3/4" - hinged/small top
Face Frame
- 2 - 1x2 @ 34"
- 1 - 1x2 @ 36-1/4"
- 1 - 1x2 @ 29-7/8"
- 1 - 1x2 @ 33-1/4"
- 3 - 1x2 @ 15-7/8"
Drawers (assumes inside measurement between 1x2 cleats is 15-1/2", drawer sides are 3/4" thick each, and drawer slides require 1/2" clearance each)
- 4 - 1x3 @ 31-1/4" - Drawer carcass cleats
- Pencil Drawer: 2 - 1x3 @ 11” and 2 - 1x3 @ 12-7/8”
- File Drawer: 2 - 1x3 @ 11” and 2 - 1x3 @ 12-7/8”
- Large Storage Drawer: 2 - 1X6 @ 11” and 2 - 1x6 @ 12-7/8”
- Bottom plywood is 1/4" thick plywood @ 14-1/2" x 11”
Door and Drawer Faces
- 2 - 1x2 @ 24-1/4"
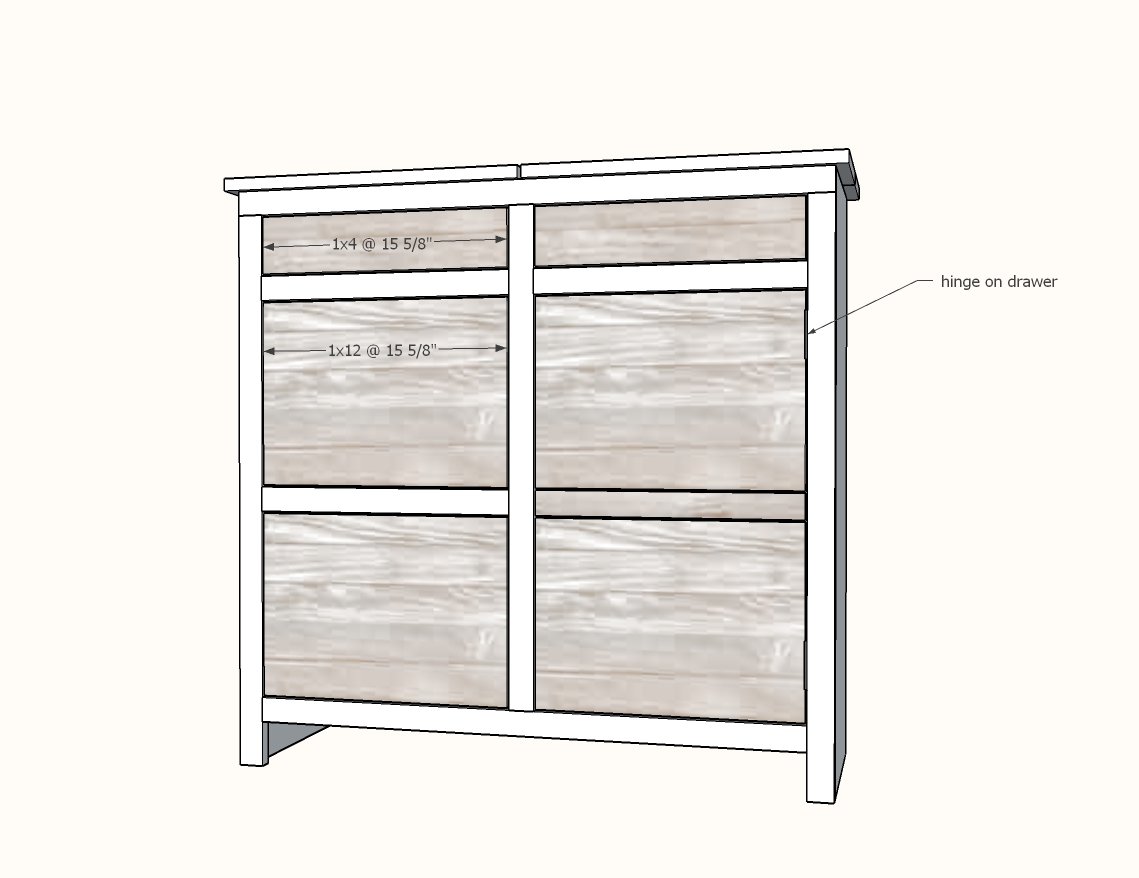
- 4 - 1x12 @ 15-5/8"
- 1 - 1x2 @ 15-5/8"
- 2 - 1x4 @ 15-5/8"


For long term durability and more professional results, I recommend using a pocket hole joinery system for wood joints. Here is a video with tips for using a pocket hole jig:
Instructions
Step 1
Cut 1x12s for the carcass with a sliding compound miter saw or with a straight edge and a circular saw.
Drill three 3/4" pocket holes on each end of bottom shelf. Attach bottom shelf 31-1/4" down from the top with 1-1/4" pocket hole screws to the two sides. TIP: Use the center divider piece that is 31-1/4" long as a spacer to get your 31-1/4" length measured.
Drill three 3/4" pocket holes on one end of the center divider. Attach centered on the bottom shelf with 1-1/4" pocket hole screws and glue.
TIP: Keep all edges flush on the front and leave any 1x12 width discrepancies on the back (if any).
Step 2

On the 1x12 @ 17", trace the paper shredder base as close to the front of the 1x12 as possible, centered on the 1x12 width wise.
Cut out with a jigsaw. You will need to start the jigsaw by drilling a large hole with a drill bit first in the center of the area to cut out, then cutting with a jigsaw.
Fit the paper shredder inside the hole, cutting more out if necessary.
When you are happy with the paper shredder fitting inside the hole, drill three 3/4" pocket holes on the underside, on each end.
Attach to the cabinet with 1-1/4" pocket holes on each end, 2" space above the top of the shelf.
For the support on the other side, drill two 3/4" pocket holes on each end of the 1x3. Attach with 1-1/4" pocket hole screws and glue to the back.
Step 3
Cut the 1x2 boards to lengths with a sliding compound miter saw.
Lay out all the boards on a flat level surface and mark locations for pocket hole drilling.
Drill two 3/4" pocket holes per joint end at every joint location.
Clamp joints and attach with 1-1/4" pocket hole screws and glue.
DOUBLE CHECK what side the paper shredder is located on in the face frame, and what side the pocket holes are on, keeping the side with the large opening on the paper shredder side, with pocket holes on the back.
With the completed face frame on a flat level surface, I recommend building the door to fit in the larger opening (shown in next step) right now INSIDE the face frame. Just lay the boards from step 4 out inside the face frame with 1/4" gaps in between, place the 1x3s on the back, and glue and nail together with 1-1/4" brad nails.
Attach the completed face frame to the front of the carcass with 1-1/4" brad nails and wood glue.
Step 4

It's best to build this door fit inside the face frame, so all your gaps are even and the door is square. Lay out inside the face frame, with spacing even between boards, and attach the 1x3s to the back with 1-1/4" brad nails and wood glue.
Step 5
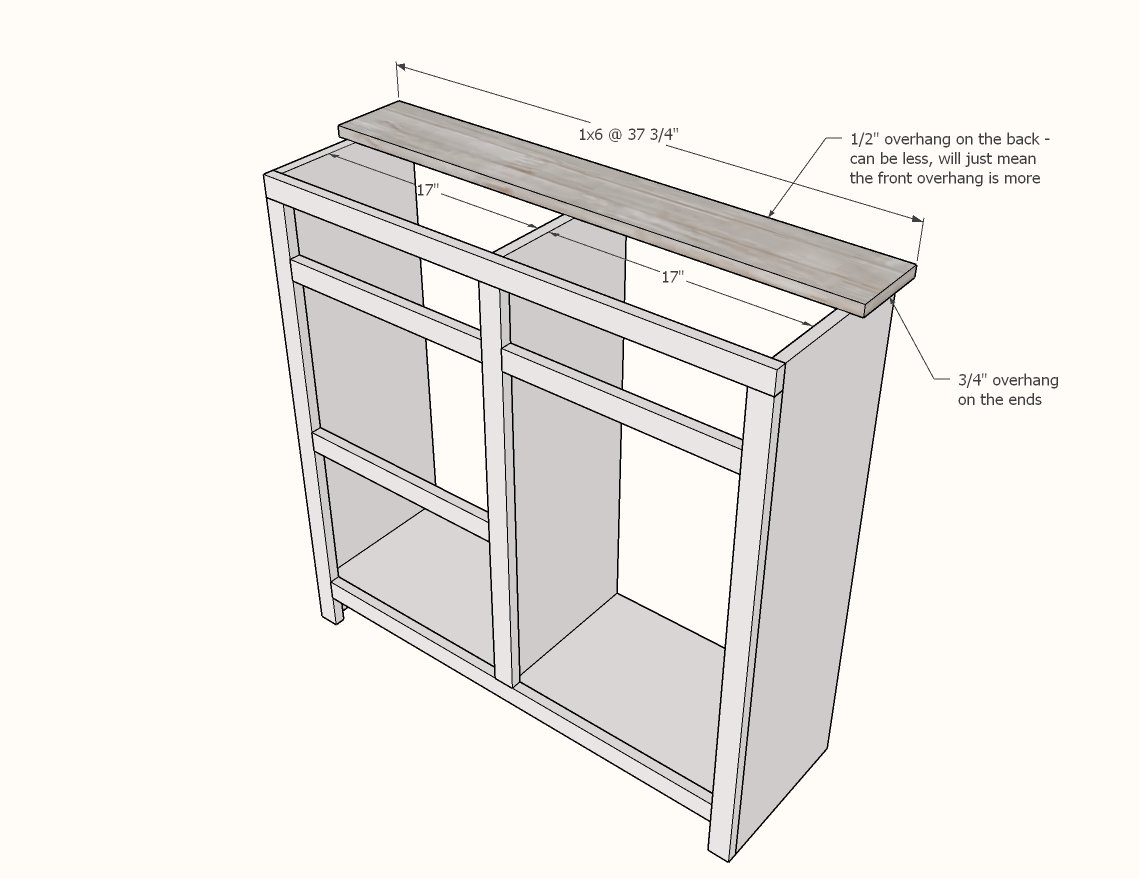
Cut 1x6 for the back with a compound miter saw.
Apply glue to top edges of the top of the carcass, on the back 5-1/2".
Place 1x6 on top, with even overhangs on sides, flush to the back.
Attach with 1-1/4" brad nails and wood glue.
You can also use screws if the top is not sucking down, but screws will be hard to hide if you are staining. If you are painting, screws can just be filled with wood filler and painted over.
Step 6
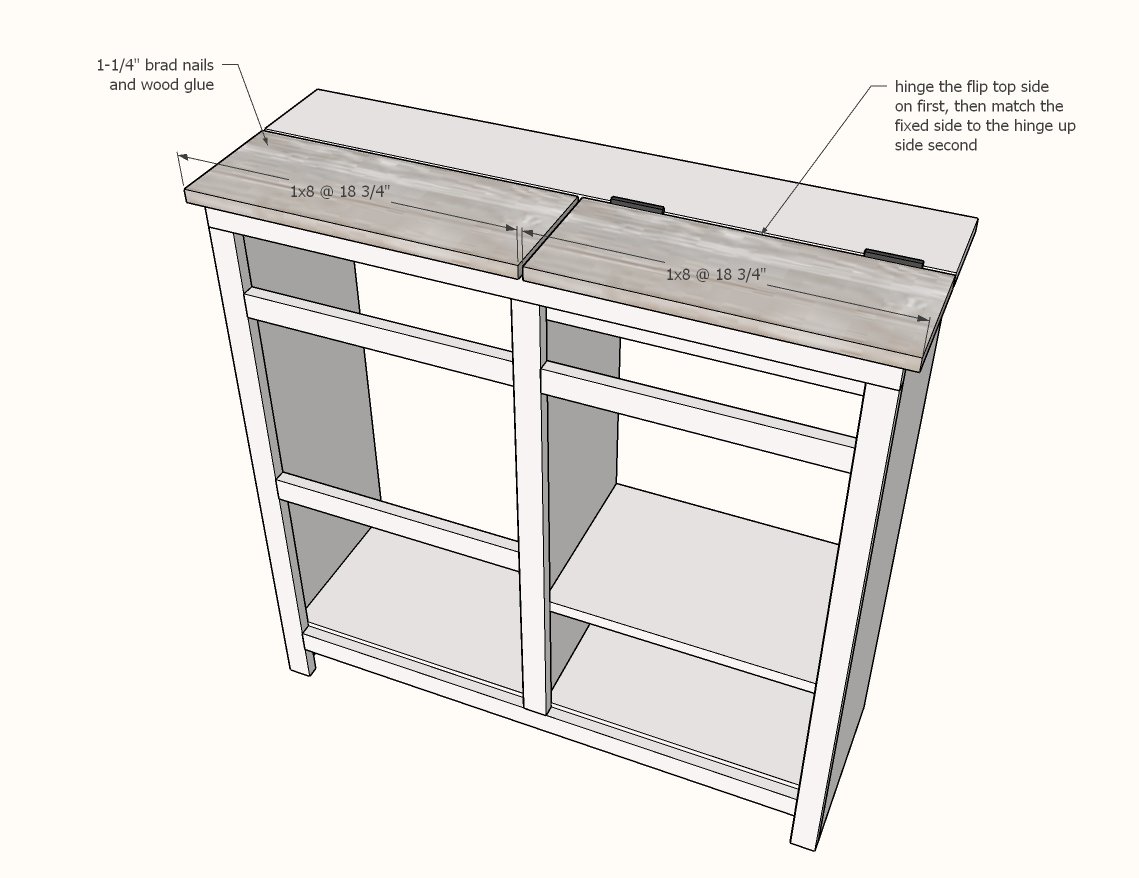
Attach front 1x8 that is fixed with glue and 1-1/4" brad nails (or screws if not sucking down).
The final piece of top is attached with hinges. We ultimately decided the hinges mounted fully on the top was the best way to go.
This completes the basic carcass - now on to the doors and drawers.
Step 7

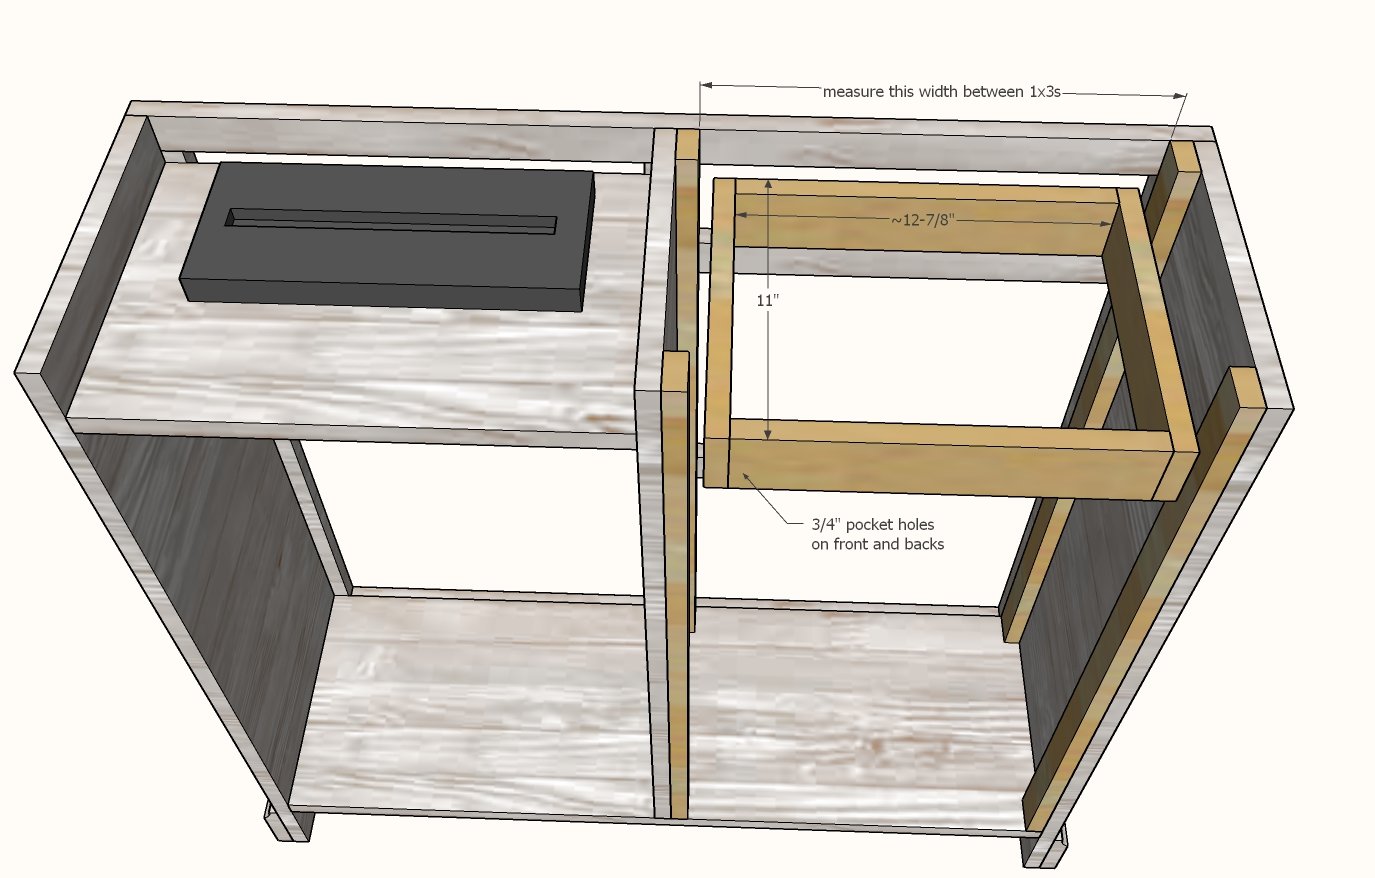
Since 1x12s can have cupping, we decided to add 1x3 spacers on the insides. This spaces the drawers slides inside the face frame.
Simply cut and nail and glue the four 1x3s inside the drawer side of the cabinet.
Step 8
Figuring the Drawer Size and Building the Drawer Box
Measure the inside width between the 1x3s installed in the previous step.
Let's just build one drawer first, make sure it fits, then build the rest.
Subtract 2-5/8" from this width and cut two 1x3s to this measurement. It should be close to 12-7/8". Drill two 3/4" pocket holes on each end of these boards.
Cut two more 1x3s to 11" long - these will be the drawer sides.
Attach the longer 1x3s with pocket holes to the shorter ones. Place the pocket holes on the outsides, since the front is later covered by a drawer face anyway.
Draw a level line, 1" down from the top edge of the drawer side that is 11" long (where the slide will go).
Step 9

Installing Drawer Slides on the Drawer
Separate out the two drawer slide pieces.
The smaller piece is the cabinet member.
Draw lines as shown in diagram, along the drawer sides, 1-1/4" down from the top.
Install cabinet member with the holes in the drawer slide centered on the line, with the front edge of the drawer slide to the front of the drawer.
Step 10

Determining Placement of Drawer Slides in the Cabinet
Here's the easy way to determine where to install the cabinet member of the drawer slide in the cabinet.
Simply hold the drawer in the place, about where you want it to be (remember you may be adding a bottom, you may have files hanging down etc) and mark the center of the drawer slide on the cabinet inside.
Put the drawer aside, and measure and draw a level line all the way down the inside of the cabinet, front to back. Repeat for the other side, lines need to be exactly parallel, the same distance down from the top of the cabinet.
Step 11
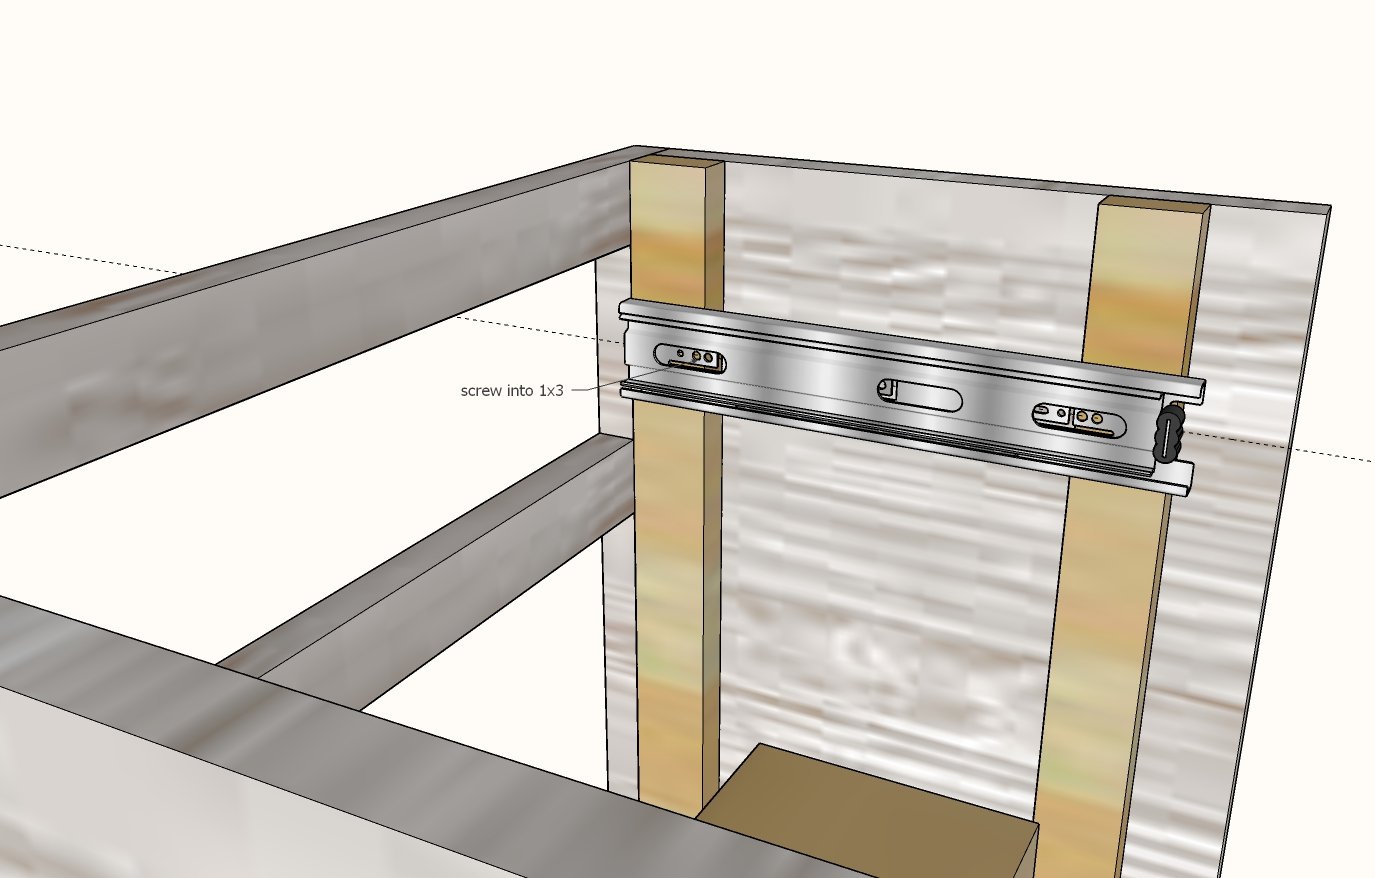
Installing Cabinet Member of the Drawer Slide in the Cabinet
Place the drawer slide cabinet member (this is the bigger piece) inside the cabinet, front of drawer slide slightly set back from front of 1x3 furring strip, with the line in the center of the holes.
Screw the cabinet member to the cabinet, with screws started in the center of your line.
Repeat for second side.
Step 12

Fitting and Customizing Drawers
Place the drawer inside the slides, lining up the slides, and fully close and open the drawer.
If the drawer is too small, on the cabinet member, you can bend the tabs on the drawer slide to bring them inward, as long as your screws are placed inside the tabs. For this reason, I always make my drawer boxes an 1/8" smaller than called for.
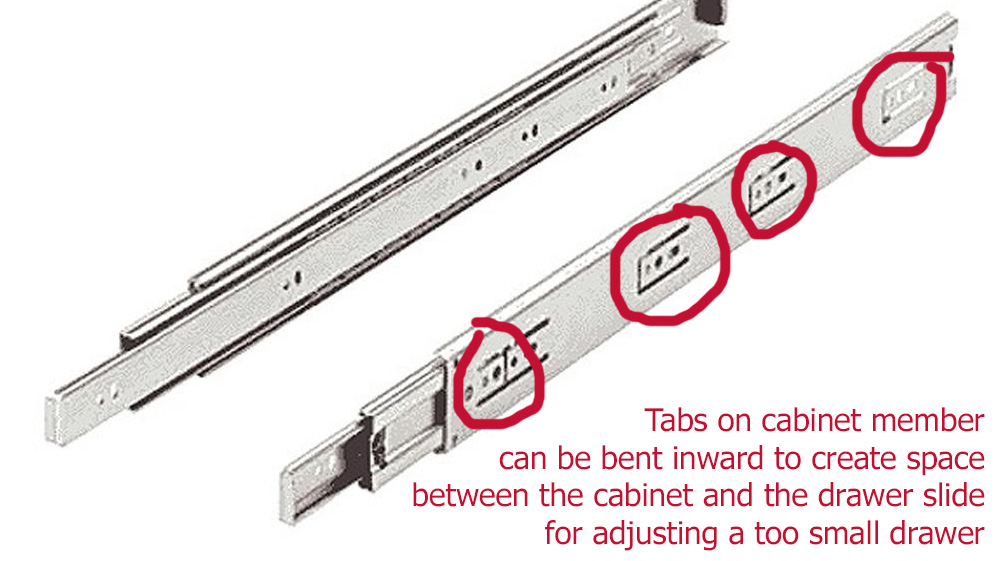
If the drawer box is too big, you have to make it smaller. That's why we just built one drawer to start with. Take apart the pocket hole screws, trim down the the width boards a tiny bit, put the drawer back together (yes, you can use the same pocket holes) and test again.
Once you are happy with the drawer slides on the top drawer, use the same cut lengths to make the other two drawers.
Drawer Bottoms
Remove the drawers that need bottoms, and add 1/4" plywood to the bottoms with 3/4" brad nails and glue.
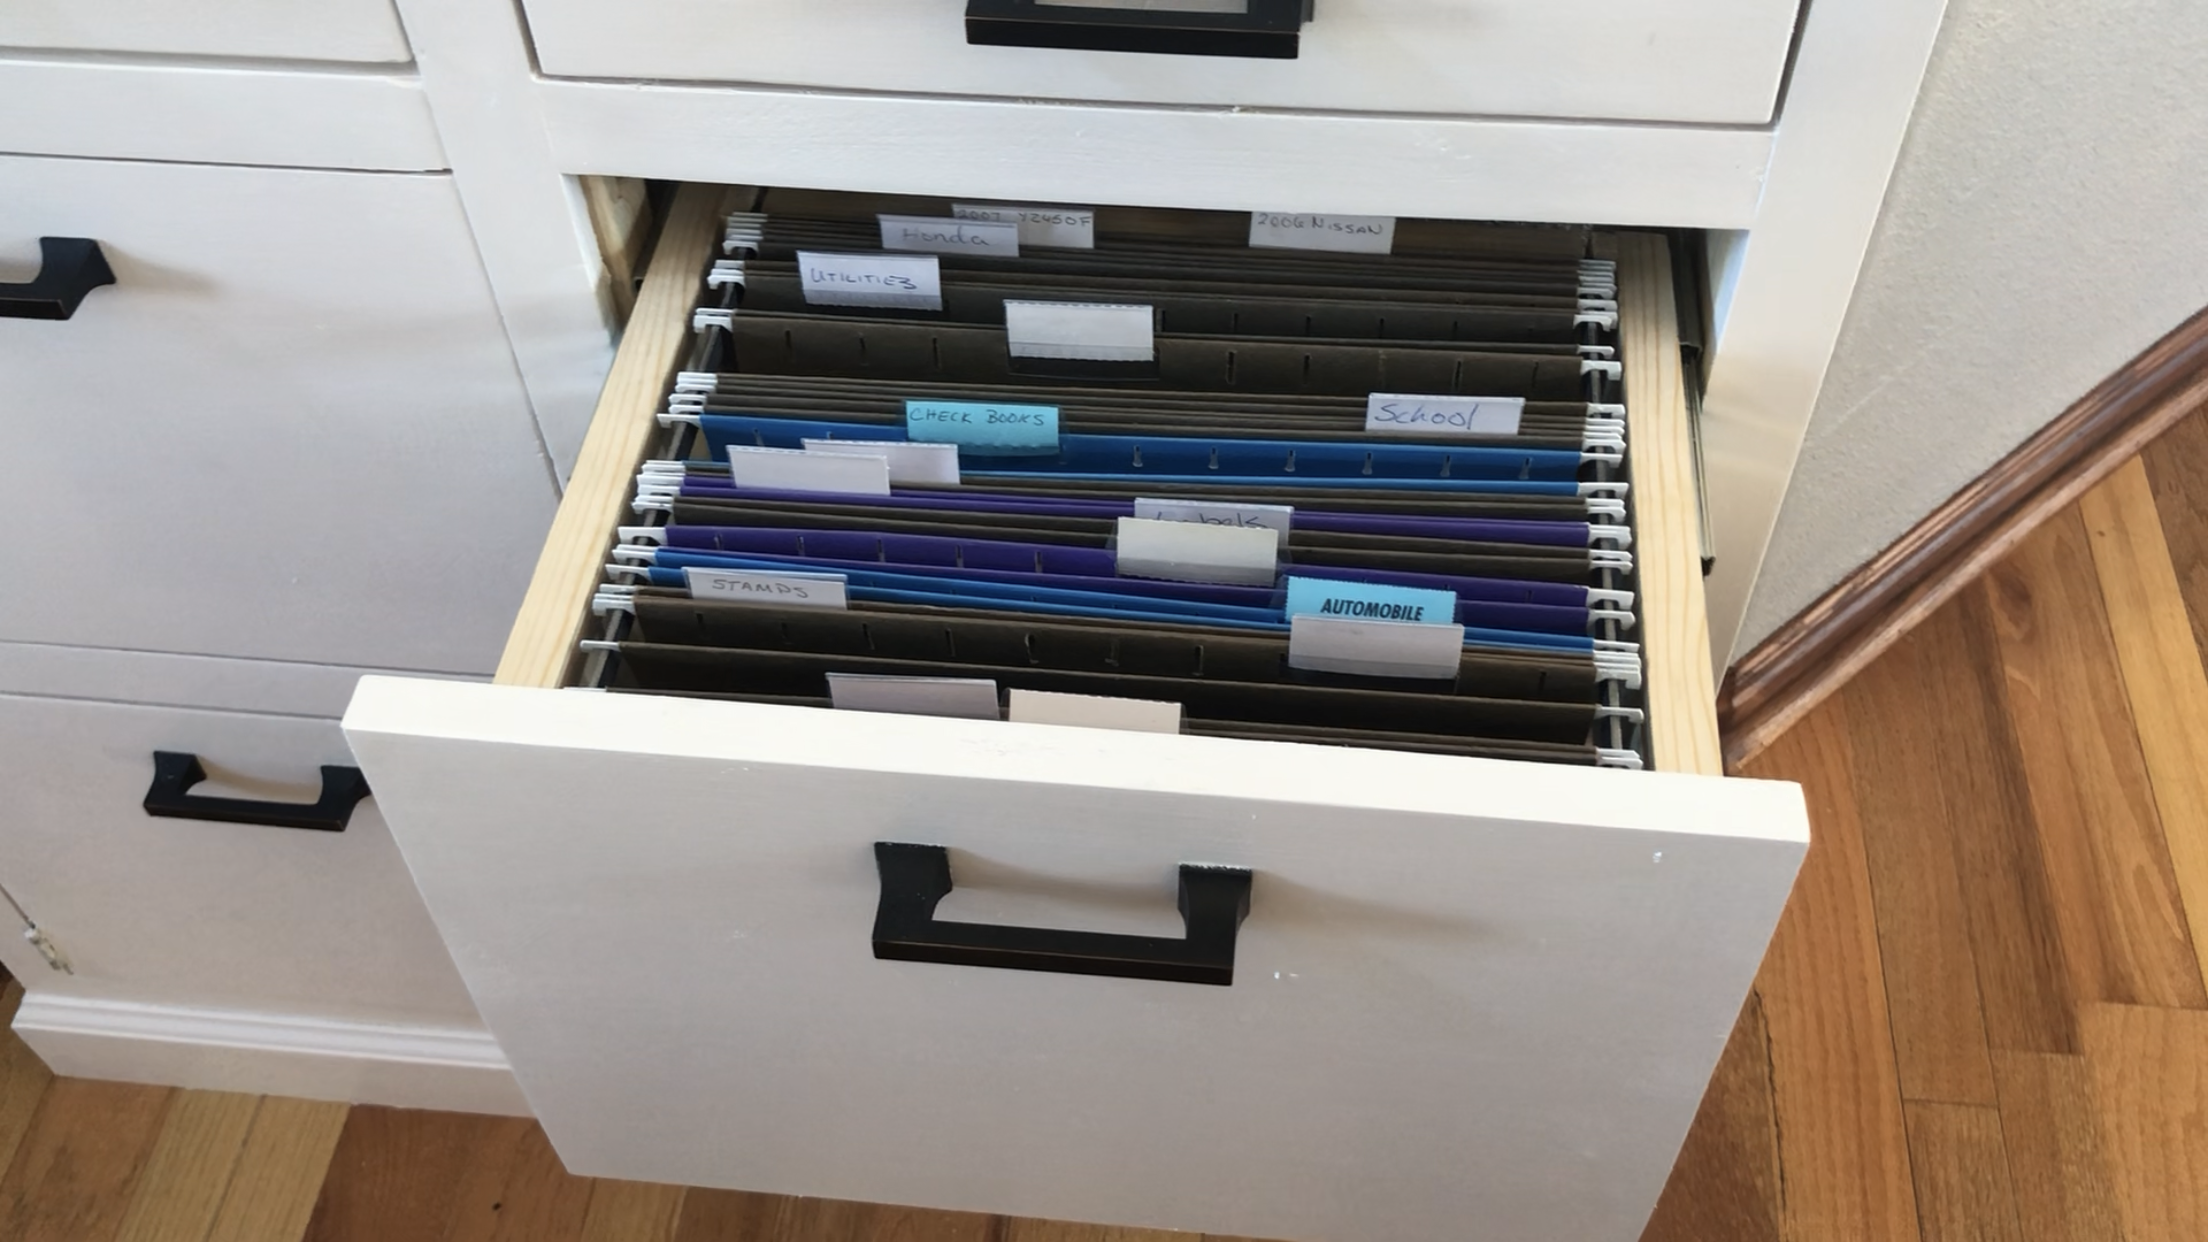
Filing Cabinet Drawer Modifications
To convert a drawer box into a filing cabinet, do NOT add a bottom.
Simply purchase 1/8" x 1/2" flat bar like this (about 2 feet per drawer) and cut to match the length of your drawer box (11" in this plan). It is easy to cut with a jigsaw, use a metal blade.
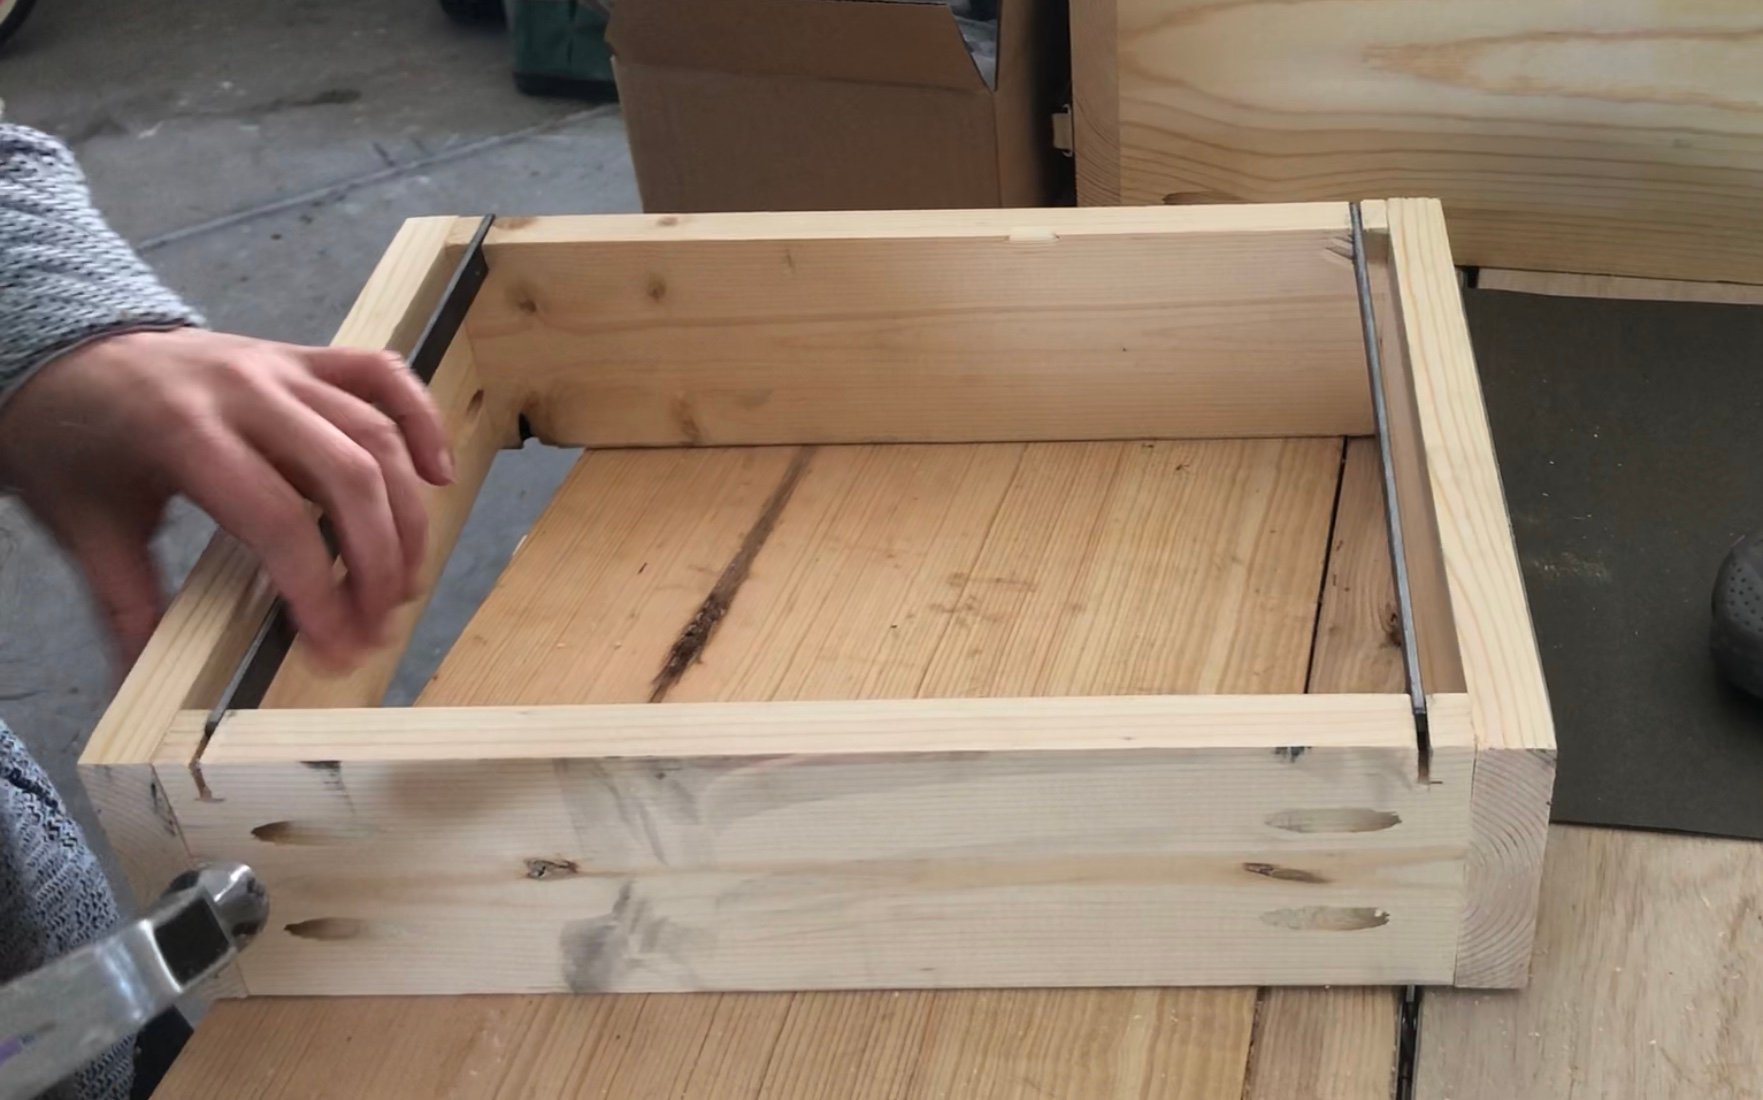
Use a jigsaw to cut 1/2" deep grooves in the front and back of the drawer box, spaced to fit your file folder tabs. Keep the grooves snug, so the flat bar is wedged into place and will not fall out without force.
Step 13
Install the door with hinges inside the face frame. Adjust until you are happy with it.
Cut drawer faces. Fit in openings with an even gap around all edges.
Use 1-1/4" brad nails and glue to attach to drawer boxes. Open the drawer and finish attaching from inside with 1-1/4" screws (yes, you can use pocket hole screw).
For the false drawer face, simply attach to the 1x12 shelf that holds the paper shredder with lots of 1-1/4" brad nails and glue.
Step 14
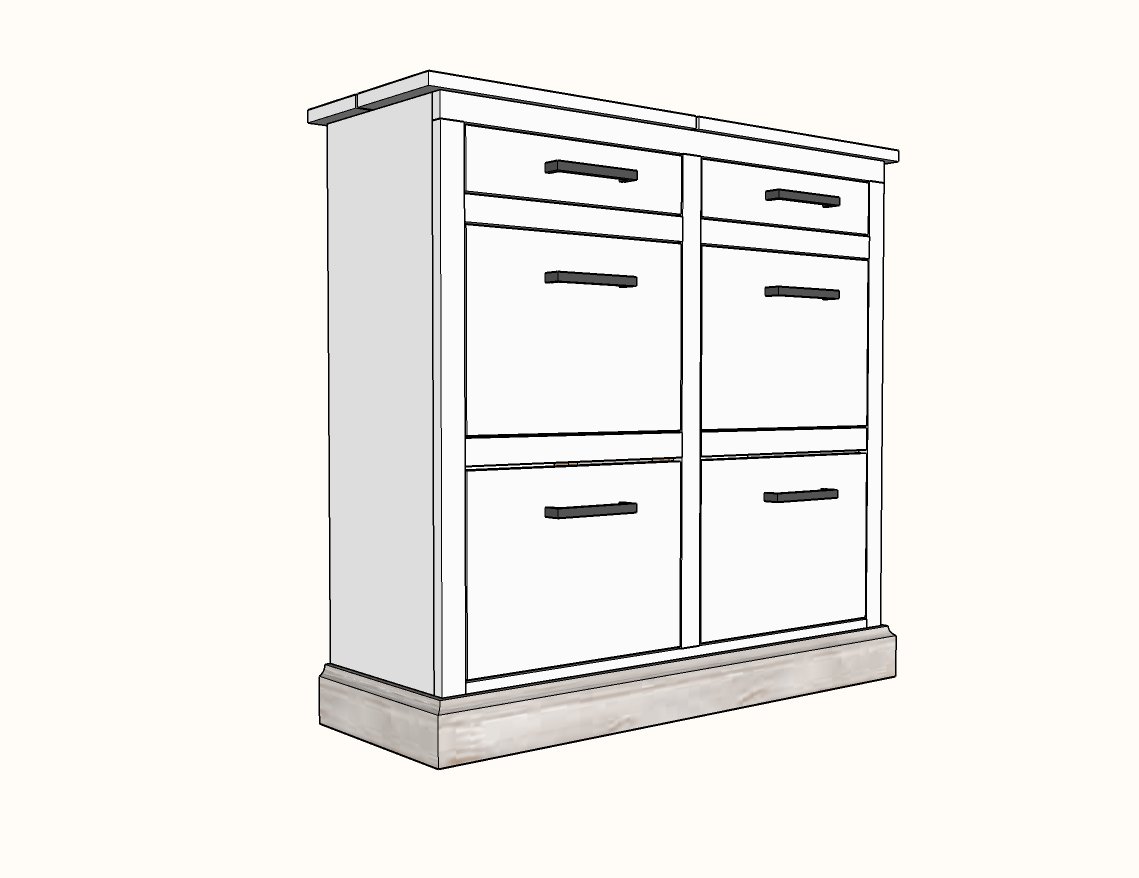
Miter base trim around base, cutting with a compound miter saw set at a 45 degree bevel cut, and attach with 1-1/4" brad nails and glue.
Sand off excess and sand entire project with medium grit sandpaper in the direction of the wood grain.
Vacuum off sanding residue.
Wipe with a lint free, damp cloth.


Comments
sherridrum
Tue, 01/21/2020 - 07:35
Mid-century Mail center?
Hi Ana
Love this! ❤️ It’s genius!! I’m wondering if the lower shelves can go all the way to the floor to give a more modern look to the outside of the cabinets and forgo the trim around the bottom? Looking for something that’s more of a mid century lock. What do you think?
nbarnhouse
Wed, 01/29/2020 - 07:28
OMG! This is Amazing! I…
OMG! This is Amazing! I have never been so excited about a piece of furniture. Can't wait to try it.
aterrel
Sun, 04/12/2020 - 20:40
Built one. Working like a…
Built one. Working like a charm. Thanks for the design!
kadybooth
Sun, 05/03/2020 - 10:26
Love
Love this so much! I’ve been searching for something like this for 2 years! There’s no way I can build this. Are you by chance making them to sell?
cjlewis
Thu, 07/01/2021 - 23:48
Shelf help Mail Biss
Can this be ordered from shelf help? If so, is there a link?
tknep
Wed, 08/04/2021 - 20:34
Hinge
What type of hinge did you use? I don’t know why this I always the thing that confuses me. Thanks!