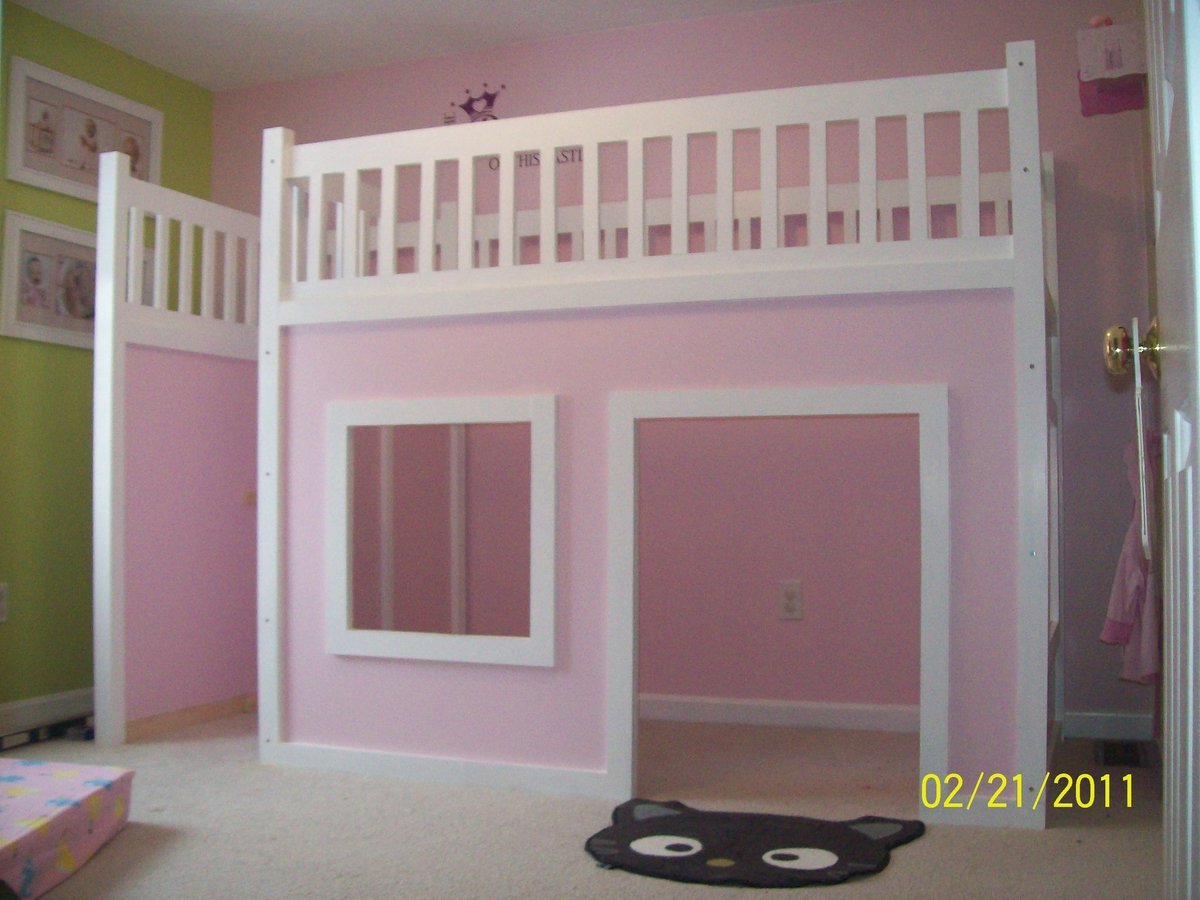


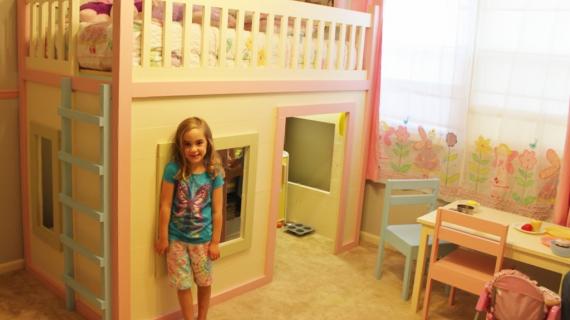
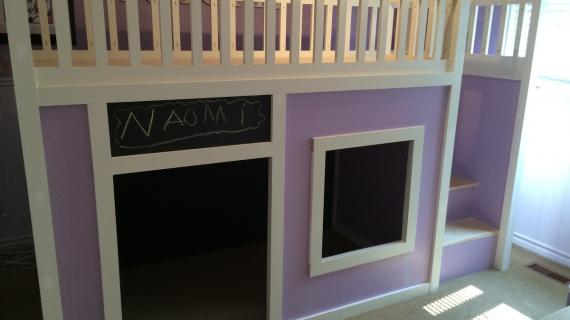
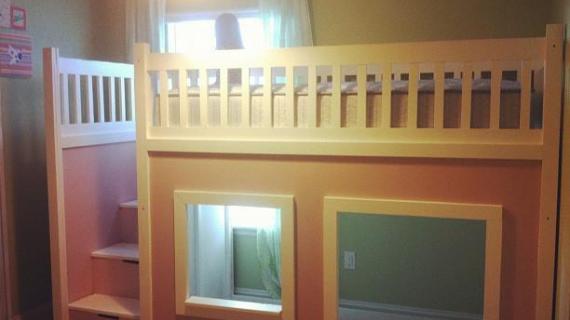
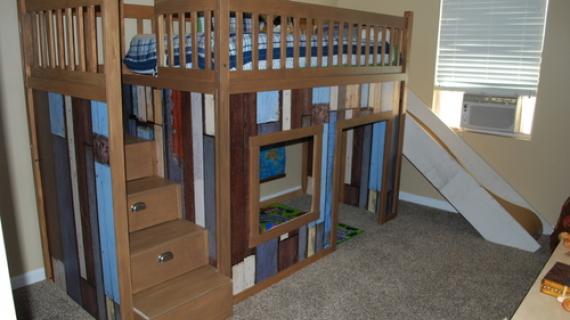
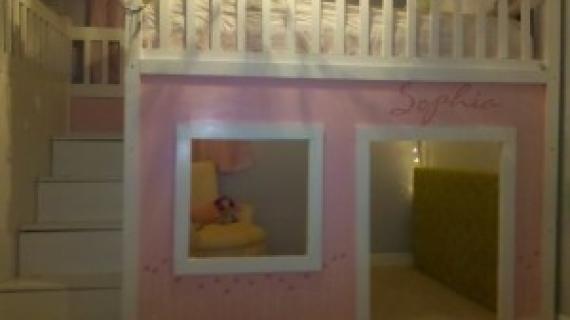
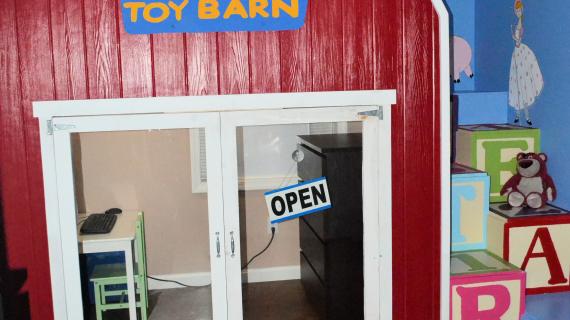
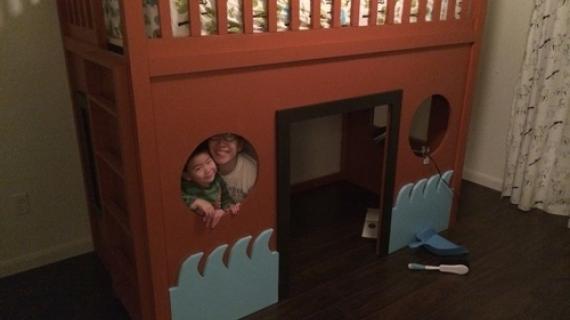
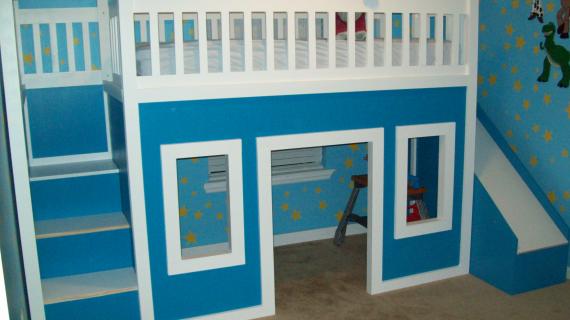
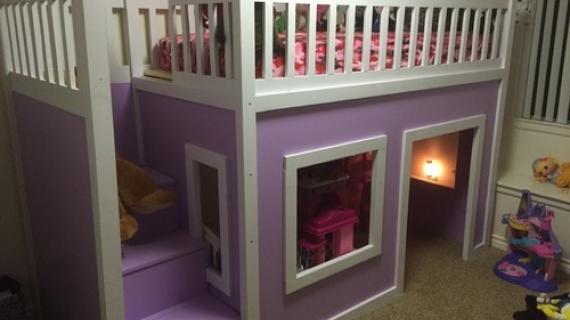
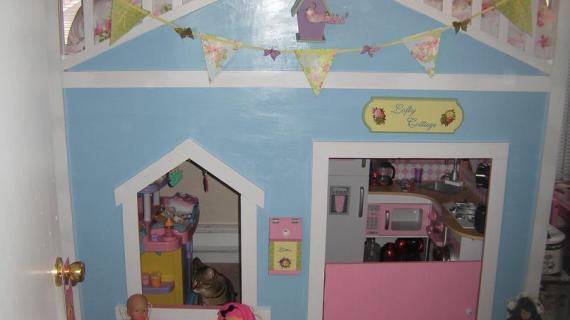
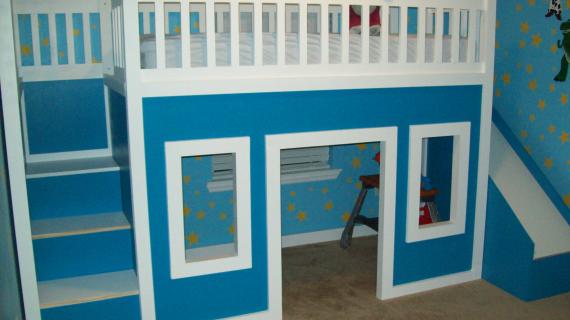
Building a playhouse bed is easier than you think with this straight forward plan. It's a big project, it's going to take patience and persevering, but as so many of our readers have discovered, well worth the hard work! Special thanks to Kimberly for sharing her amazing photos of Princess Katherine's bed.
Preparation
2 sheets of 3/4″ MDF, particle board or plywood (sanded to reduce splinters)
7 – 1x2s, 8′ long
15 – 1x3s, 8′ long (not including 1x3s for mattress slats)
6 – 1x4s, 8′ long
3 – 2×2, 8′ long
1 1/4″ pocket hole screws
2″ self tapping wood screws
1 1/4″ brad nails
2″ brad nails
wood glue
wood filler
Finishing Supplies
53 – 1×2 @ 11 1/2″ (Rails)
4 – 1×4 @ 80″ (Top and Bottoms of Rails)
4 – 1×3 @ 11 1/2″ (End of Rails – Front and Back rails)
1 – 3/4″ Plywood or MDF @ 48″ x 80″ (Front Plywood)
8 – 1×3 @ 68 1/2″ (Legs)
1 – 1×3 @ 75″ (Top Front Trim)
2 – 1×3 @ 36″ (Door Trim)
1 – 1×3 @ 31″ (Door Trim)
1 – 1×3 @ 38″ (Front Trim)
1 – 1×3 @ 6″ (Front Trim)
6 – 1×3 @ 21″ (Window Trim)
2 – 1×3 @ 26″ (Window Trim)
4 – 1×3 @ 2″ (Top Leg Filler Pieces)
2 – 1×3 @ 45 1/2″ (Back Leg Filler Pieces)
1 – 1×3 @ 80″ (Back Base Trim)
2 – 1×4 @ 37 1/2″ (Top and Bottom of Side Rail)
2 – 3/4″ Plywood @ 48″ x 37 1/2″ (Side Plywood)
4 – 1×3 @ 37 1/2″ (End Trim)
2 – 1×3 @ 25 1/2″ (Window Trim)
2 – 1×4 @ 21 3/4″ (Ladder End Rail Top and Bottom)
1 – 1×2 @ 66 1/2″ (Ladder Inside Support)
2 – 1×2 @ 43″ (Ladder Spacer)
2 – 2×2 @ 48″ (Ladder Sides)
5 – 1×2 @ 15 3/4″ (Ladder Rungs)
2 – 1×3 @ 13 1/2″ (Ladder Side Window Trim)
2 – 2×2 @ 75″ (Cleats for the mattress support frame)
1x3s @ 39″ (Mattress Slats, as recommended by the mattress company)


Instructions
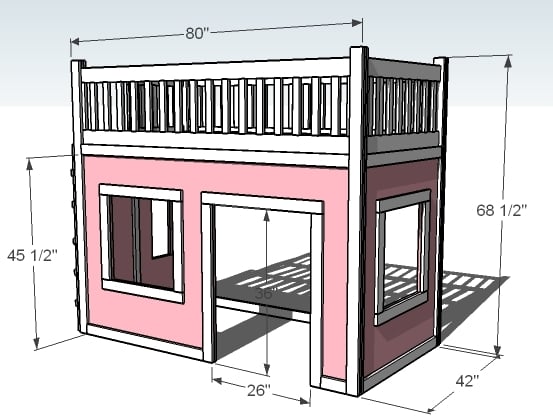
Step 1
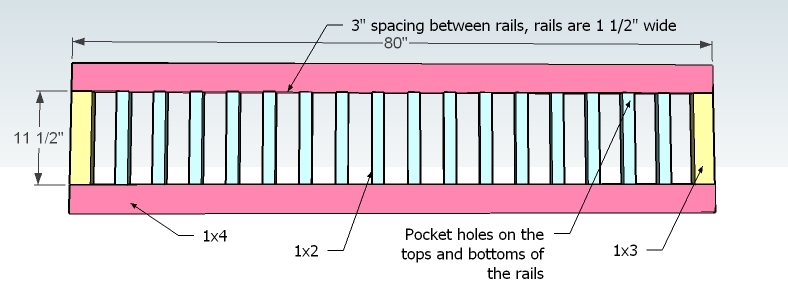
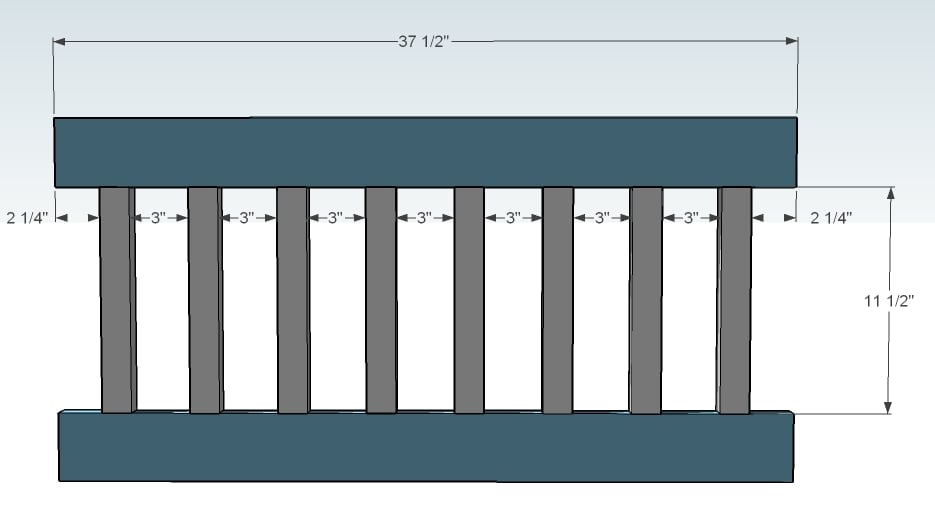
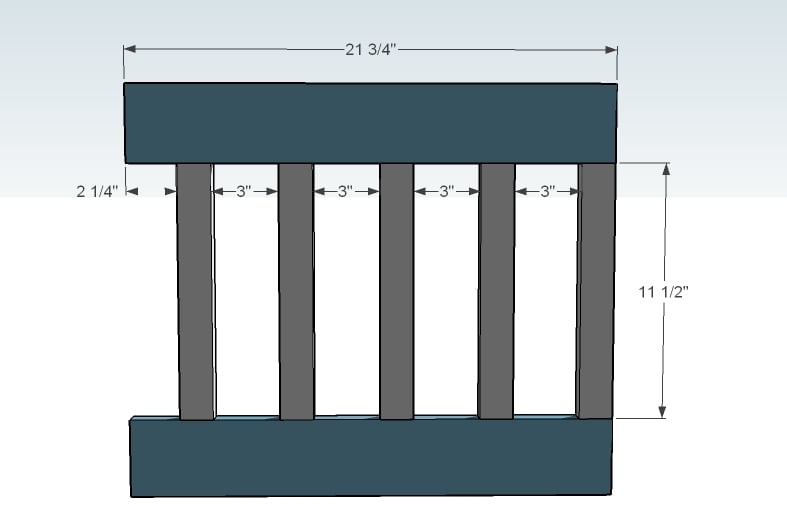
Front and Back Railing
Build two of these – one for the front, and one for the back. Simply drill two pocket holes on both ends of all of the rails (blue) and ends (yellow). Mark the top and bottoms (pink) with 3″ spaces, remembering that a 1×3 is actually 2 1/2″ wide and a 1×2 is actually 1 1/4″ wide. Use glue and 1 1/4″ pocket hole screws to attach the rails to the tops and bottoms, as shown above. Set aside.
Step 2
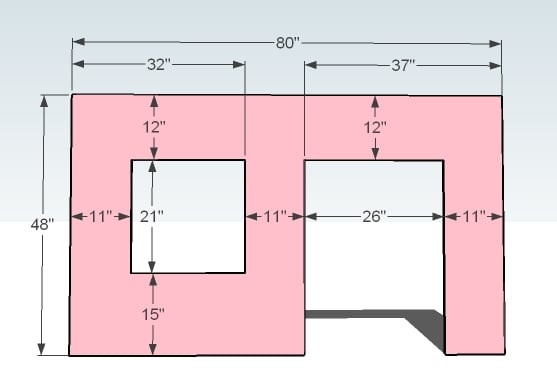
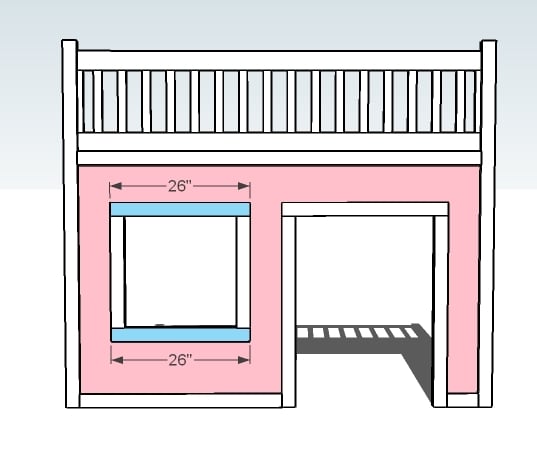
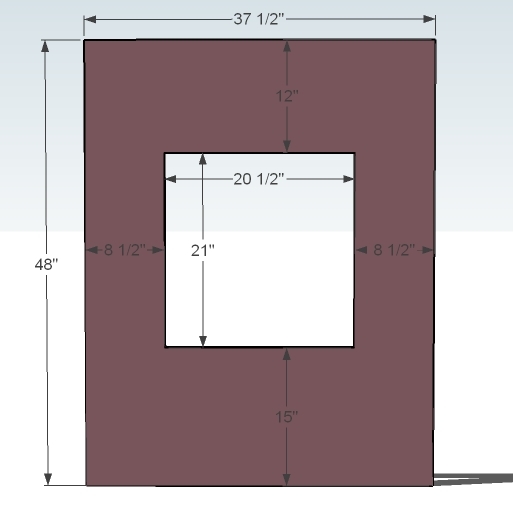
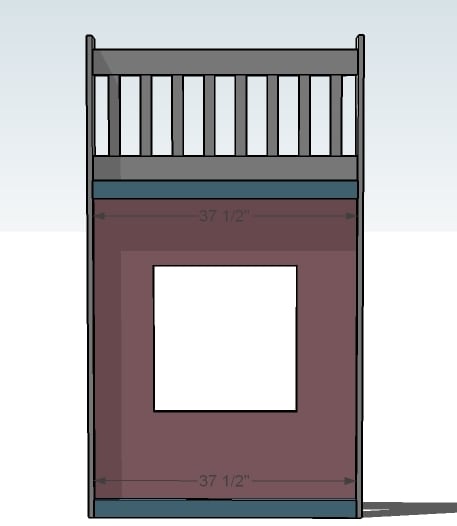
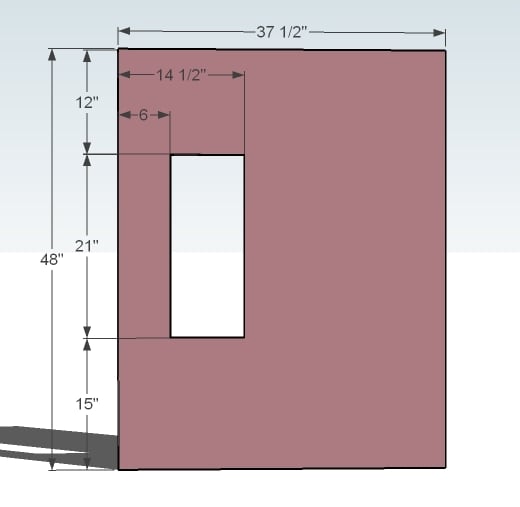
Front Plywood
Mark out your front plywood as shown above. Use a jigsaw to carefully cut out the windows and doors.
Step 3
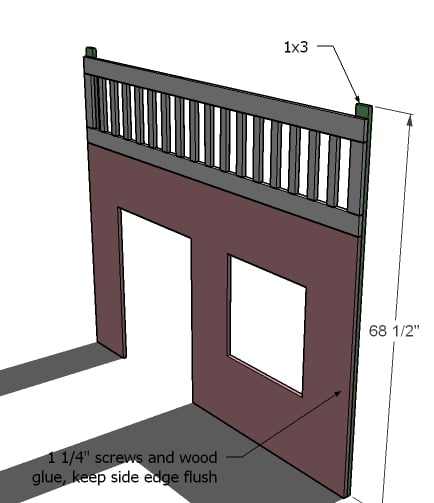
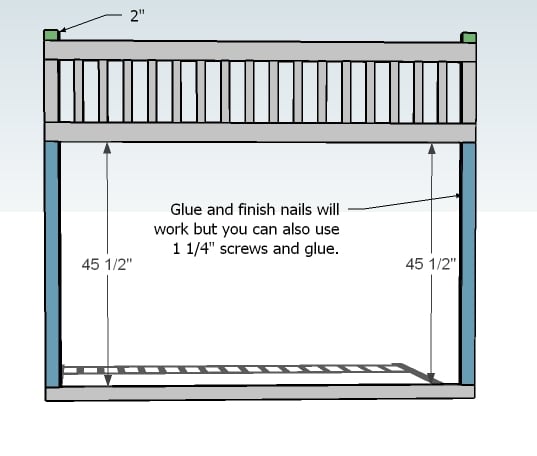
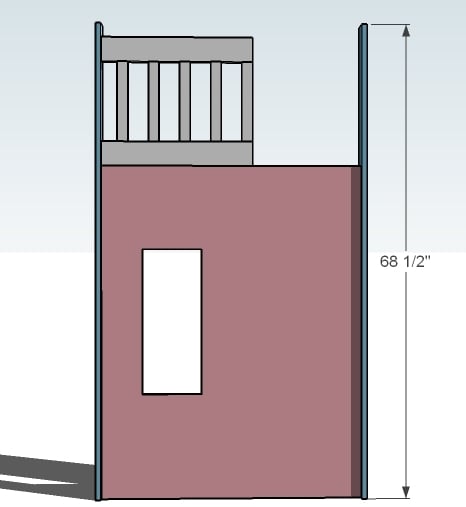
Front Legs
Use 1 1/4″ screws and glue to attach the plywood and the rails to the legs, as shown in the diagram. Keep bottom and outside edge flush.
Step 4
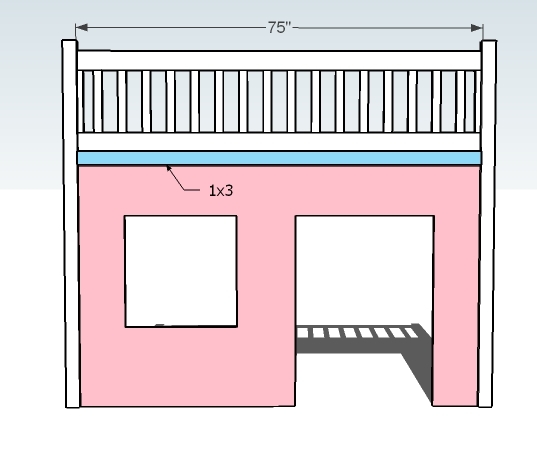
Top Trim
Attach the 1×3 to the front of the bed. Use 1 1/4″ screws and glue,overlapping the rails by 1″, hiding the joint between the railing and the plywood.
Step 5
Step 6
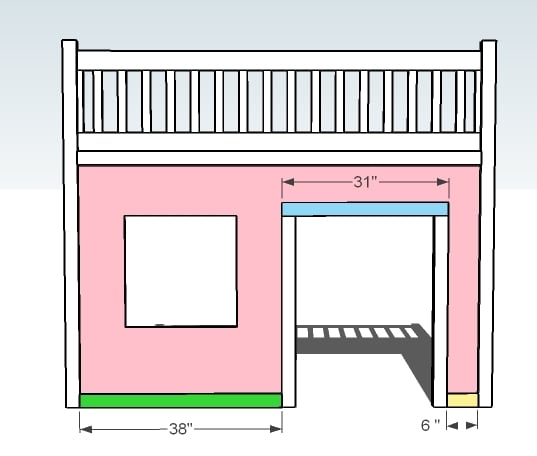
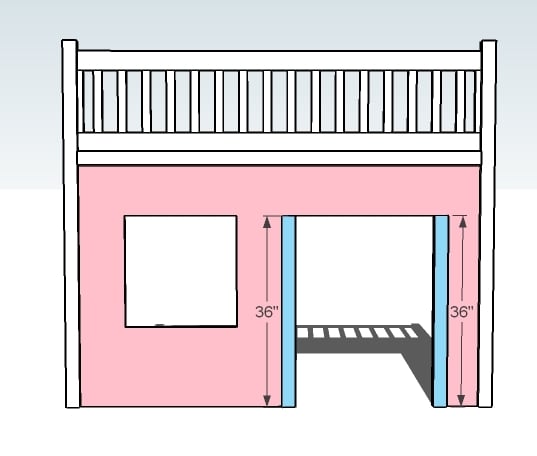
Front Trim
Add the remaining trim, as shown above. Use 1 1/4″ nails and glue.
Step 7

Window Trim
Add the window trim as shown in the diagram. Use 1 1/4″ finish nails or screws and glue.
Step 8
Window Trim
Trim out the window as shown above. You can alternately build your window frame with a Kreg Jig™, and then attach to the plywood front.
Step 9
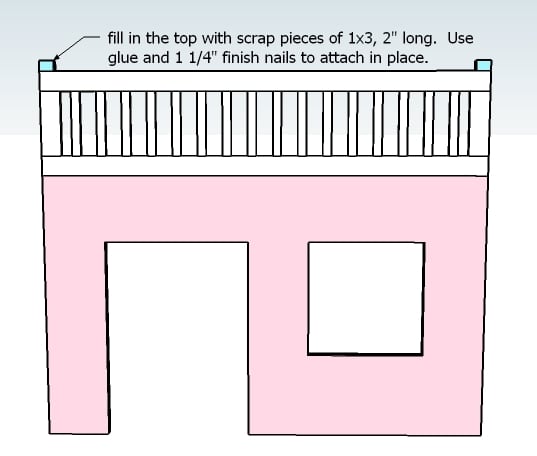
Top Fillers
Add the top pieces to the tops of the legs to fill in the gaps. Avoid overnailing and splitting the wood. Use 1 1/4″ nails and glue.
Click on the page links below for the complete instructions on building the back up next.
Step 10
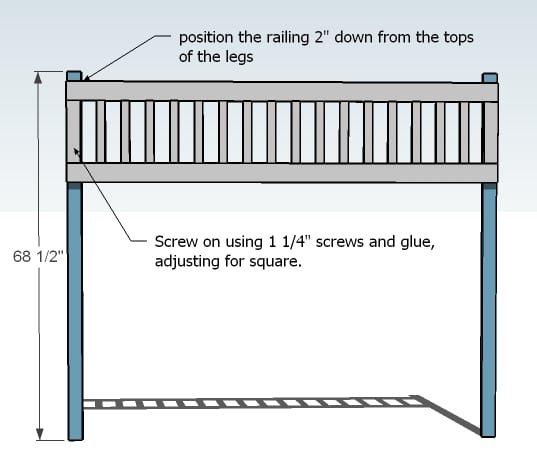
Legs and Railing
Attach two legs to the railing as shown above (on on each side – you should still have four legs left). Use 1 1/4″ screws and glue. Leave 2″ at the top of the legs. Adjust for square.
Step 11
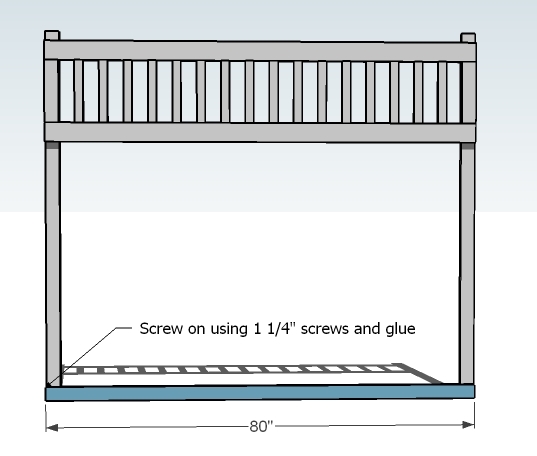
Back Bottom Trim
Attach with 1 1/4″ screws and glue the back bottom piece as shown above.
Step 12
Back Trim
Fill in the exposed gaps with 1×3 trim boards as shown above. Use 1 1/4″ fasteners and glue.
And now we have two of the wall built! Click on the page links below to see how to build the side walls.
Step 13
Build the Side Railing
Step 14
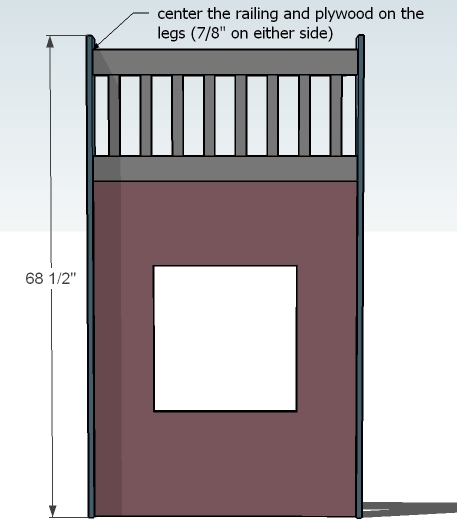
Legs
Attach the legs to the sides of the plywood and the railing. Your best bet is to use pocket holes, drilled from the plywood, screwing into the legs (same with the railing). Use 1 1/4″ pocket hole screws and glue. Center the plywood and the railing on the legs.
Step 15
Trim
Attach the trim to both the legs and the plywood,overlapping and attaching to the railing also (as you did the front,overlapping 1″). Use 1 1/4″ screws and glue, 1 1/4″ pocket holes and glue to attach to the legs.
Step 16

Window Trim
The best way to go on window frames is to build them separately with 1 1/4″ pocket hole screws, and then tap on with finish nails and glue. You can alternately attach with 1 1/4″ finish nails and glue.
This completes the end wall without the ladder. Click on NEXT PAGE below to see how to build the ladder end.
Step 17
Ladder End Rail
As you built the other rails, build the ladder end rails as shown above.
Step 18
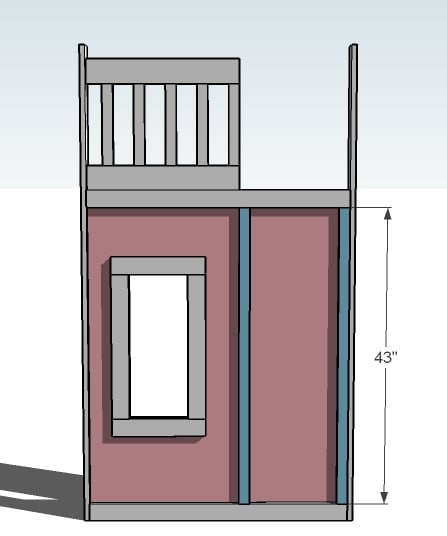
Ladder End Plywood
Cut your ladder end plywood as shown above, carefully cutting out the window.
Step 19
Legs
As you did with the other sides, add the legs to the plywood and railing. Best option is pocket hole screws (1 1/4″ pocket hole screws) or 2″ screws and glue from the outside.
Step 20
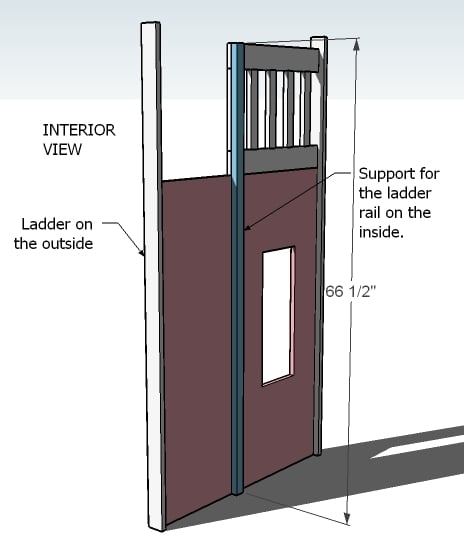
Ladder Railing Support
So I tossed and turned on this one, knowing that little hands are going to be pulling on the top of this railing and knowing it needed to be sturdy. The best bet was to run a support down the entire length of the inside. Use 1 1/4″ screws and glue to attach the 1×2 to the inside as shown above. Notice how it’s flush with the end of the railing?
Step 21

Ladder End Trim
Just like you did the other end, add the trim boards. Use glue and 1 1/4″ screws or nails. Overlap the railing by 1″ to keep the railing in place.
Step 22
Ladder Spacer
You’ll need this as a spot to secure your ladder too. Use 1 1/4″ screws and glue.
Step 23
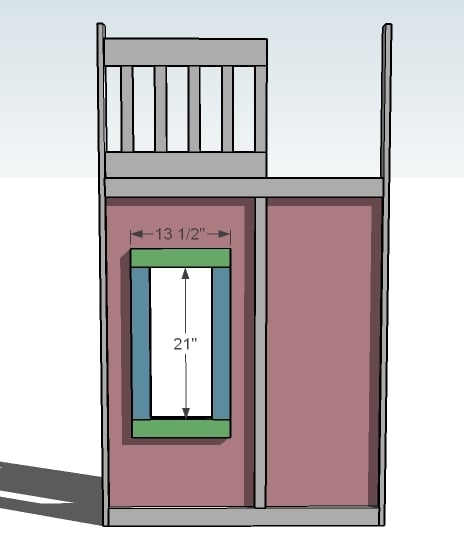
Window Trim
Best bet? Build the window frame separately with a Kreg Jig, and attach the window to the plywood with finish nails and glue. You can also attach each piece separately.
Step 24
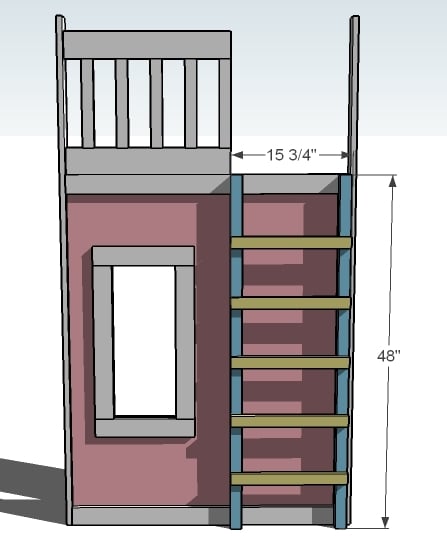
Ladder
Build the ladder with the 2x2s and 1x2s, using 2″ screws and glue. Space the rungs 7″ apart, leaving less room at the top. Screw to the end with 2″ screws and glue.
You have built all four walls! Click on the page links below to see how to assemble the four walls and add the mattress slat
Step 25
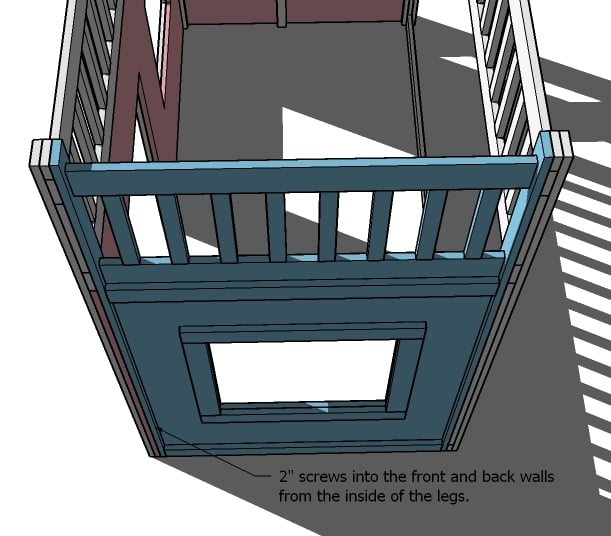
This bed is built in such a manner that you can attach the four walls easily, creating a leg that looks like a solid post. Use 2″ screws from the inside and leave off the glue for easy dis assembly. Adjust the entire playhouse for square.
Step 26
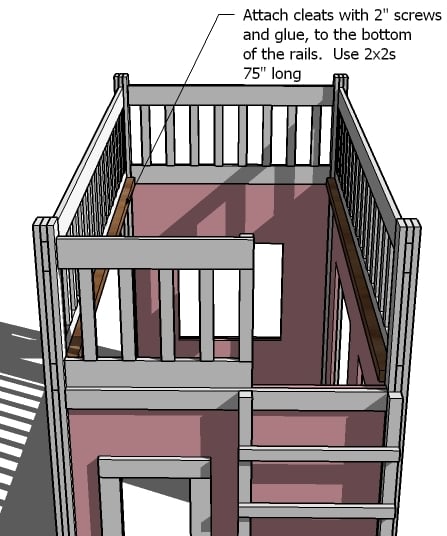
To allow your mattress to “breath” slats are the best way to go. You can purchase metal brackets, or use a 2×2, glued and screwed to the insides of the rails, as shown here.
Step 27
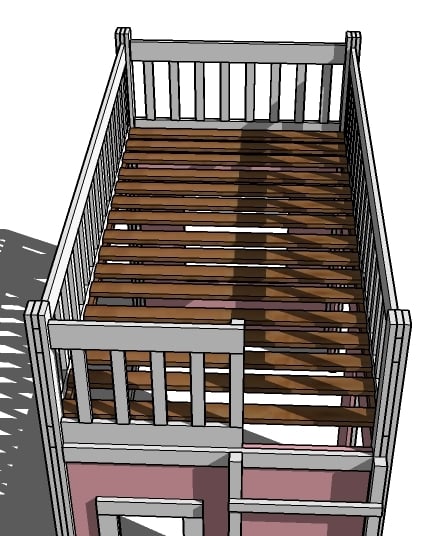
Install slats by laying on the cleat and screwing down. Leave the glue off so you can remove the slats. Place the slats according to your mattress recommendations.

Comments
kellyvarner (not verified)
Mon, 09/06/2010 - 19:19
So cute! Love it! I'm in the
So cute! Love it! I'm in the middle of the playhouse outside though... hmm does my daughter need two playhouses? Maybe... :) Do you think putting another mattress underneath would work? (practically we need bunk beds but this is too adorable!)
Ana White (not verified)
Mon, 09/06/2010 - 19:44
LOL! One for inside and one
LOL! One for inside and one for outside! They are only young once :)
dsouth20 (not verified)
Tue, 09/07/2010 - 03:31
I've seen one in a store
I've seen one in a store similar to this one but with drawers where the windows are. The playhouse can then double as a playhouse and clothing or toy storage...
chrisandpatience (not verified)
Tue, 09/07/2010 - 07:08
I wouldn't say that she needs
I wouldn't say that she needs the bed but oh my what kid wouldnt want that for a bed. Our 3 year old is currently sleeping in the top of a bunk bed that was removed from its bottom bunk. The bed is from pottery barn and we purchased it about 5 years ago. Once she hets a little older i am going to retro fit it to fit on top of your design. you are the best.
Thanks Ana for all your inspiration
Jennifer Doherty (not verified)
Tue, 09/07/2010 - 15:27
That is so cute! Boy, I
That is so cute! Boy, I really wish I'd found your website EIGHT years ago! LOL My little ones are getting too big for some of this stuff. But I love seeing your plans for it all! Soooo adorable!
..................hmmm... I do have a 9MO nephew though............................ ;)
DIY Playhouse … (not verified)
Wed, 09/08/2010 - 07:11
[...] you already got half
[...] you already got half the story in yesterday’s post of the Easy Playhouse Loft Bed. Go through and read that post. You will need to build the front and the side wall without the [...]
Roxy (not verified)
Wed, 09/08/2010 - 09:58
Love this bed!
Love this bed!
Maureen (not verified)
Mon, 09/13/2010 - 15:49
I showed this to my husband
I showed this to my husband and how we could easily make a few simple decoration additions so it would be a firetruck! We need more tools before we can tackle anything like this though!
Alyssa (not verified)
Sun, 10/17/2010 - 11:34
I would love to see this plan
I would love to see this plan with out the play house, although my son may like it, not really sure yet. But you are awesome because we needed this just in time for his birthdya in January :D
Shan (not verified)
Fri, 11/05/2010 - 07:13
Has anyone made this bed or
Has anyone made this bed or had a "questimate" of how much it would cost??? I am so glad my sister showed me this site!! I AM SO EXCITED TO BUILD THIS BED... Well my Bf will build i will paint :P
Rooms You Can … (not verified)
Mon, 11/15/2010 - 13:15
[...] Build your own
[...] Build your own playhouse loft bed with these plans. [...]
Kate{Starr Family} (not verified)
Fri, 11/26/2010 - 05:57
I saw in the above comments,
I saw in the above comments, someone requested an estimate?? I would LOVE one if possible, we plan to build this bed very soon!
Joe (not verified)
Fri, 12/10/2010 - 07:14
I have been looking for
I have been looking for detailed plans for loft beds for my 2 daughters (7 and 11). My youngest has a very small room and this leaves her with little room to play. These plans are great and look relatively easy to build. (just need to clean the garage to make room to work) I did a quick cost estimate at the big blue store and it seems that the lumber will run around $160 using MDF.
Maybe with these plans, I can convince my wife that I can build these and that it won't turn into another toy box disaster. Good and sturdy boxes, just way too big.
Rebekah (not verified)
Tue, 12/14/2010 - 18:47
This is adorable.. I'm
This is adorable.. I'm wondering if it is big enough to put another mattress in the bottom? I was thinking about bunk beds but this is WAY 2 cute!
Lisa Z. (not verified)
Tue, 12/21/2010 - 08:00
We purchased everything at
We purchased everything at Lowes with our 10%-off Military Discount, minus the front panel. Our total came out to just over $250 after the discount. We live in West Texas currently, if that makes a difference :-) HTH!
Lisa Z. (not verified)
Tue, 12/21/2010 - 08:01
I forgot to mention that we
I forgot to mention that we are building the version of this bed with stairs :-)
Laurie (not verified)
Tue, 01/18/2011 - 20:15
This is almost exactly the
This is almost exactly the type of bed I've been wanting for my boys, but couldn't afford. Their room is the size of a walk-in closet and we can't even fit their toys (currently in our family room) in there. Being that they are still young, I didn't want a bunk with a ladder. I saw the storage stairs online and fell in love, but it is so expensive! I love the lid storage way better than the drawer storage steps. I have two questions. 1. How can this be converted to a bunk bed? will it still be sturdy if you remove the walls? I would really love to make the bottom like a platform/storage bed with additional drawers/storage under the bottom bunk. 2. Can this be modified to be toddler sized beds?
Ana White (not verified)
Wed, 01/19/2011 - 11:10
Laurie, I would consider just
Laurie, I would consider just making a bunk bed, and then attaching the storage stair plans to the side. I totally get you on small rooms, the bedrooms in my house are like 8 x 10 with a closet in them too. If you did a bunk, you could then build a trundle for storage, with the storage stairs claiming every inch in your room for storage. I do NOT recommend doing a toddler bunk, as codes for bunks are 7 years and older, too old for a toddler mattress. Of course, you can do anything you wish (that's the beauty of DIY) but I can't make that recommendation. Good luck, I'm excited for you!
Calee (not verified)
Tue, 02/08/2011 - 20:55
I have had an idea somewhat
I have had an idea somewhat like this in my head forever I would like to modify your plans to make them safer for my toddlers perhaps bringing the railings all the way to the ceiling. I like to think i know a bit about woodworking but to be honest I am so scared to attepmt this project. Following you plans seem a little to complicated for me I hope that I can find someone to help.
Cherren (not verified)
Wed, 02/09/2011 - 11:17
I love this idea! Although I
I love this idea! Although I am thinking of converting it to a fort for my two little guys. I saw where one of your followers converted it to a full size. I like this idea because I am thinking of doing this for the playroom and using it as a guest bed... my question is what do you think the weight limit is for this bed???? maybe one or two adults?????
Pam M (not verified)
Wed, 08/03/2011 - 09:37
For the full size conversion
For the full size conversion that you saw, were there plans? I don't see that. Thanks.
vaneshia (not verified)
Sat, 02/26/2011 - 22:10
i really like your work, your
i really like your work, your truely talented . i want to know how much this would cost and if i get it, how do you deliver?
Kimberly Foster (not verified)
Thu, 03/03/2011 - 12:23
Daddy is making this for miss
Daddy is making this for miss Krista, age 6 soon! She is so excited and wants me to take her to this page daily! We also have decided to make this our hobby together, and we have plans to build a whole lot of things off your website. Thanks so much for sharing all the plans and details!!
Guest (not verified)
Tue, 03/22/2011 - 08:29
Can you tell me what size
Can you tell me what size mattress this holds?
Guest (not verified)
Tue, 05/10/2011 - 14:52
revised plans?
Hi, I wondered what the difference is for the left side of the bed (Kimberly & Katherine's picture) versus the drawn plans. Is the ladder replaced with stairs? Are there any pictures/plans showing the revision they did?
Seriously thinking about this!!
Britney
bittybumboutique
Wed, 05/11/2011 - 08:17
making this bed two twin beds on top
First of all I love your site. My to do list is filling up very quickly. We are about to combine my daughters into one room and are planning on building a loft bed. We have a picture of a corner loft bed with two twins. I am so glad I found your site because we were just going to go for it and have never built anything before, but now we can use your awesome plans. So my question is: I want to use this bed but I need it to have two twin beds on the top (a L shape so that it goes into the corner). How should we revise these plans to make it so that way and have one big open space underneath? Your opinion would be greatly appreciated.
jn8845
Tue, 12/30/2014 - 17:48
Did you ever make your version??
Did you ever make your 2 twin beds on top in a L shape?? Because that's exactly what I'm trying to figure out how to do.
jn8845
Tue, 12/30/2014 - 17:48
Did you ever make your version??
Did you ever make your 2 twin beds on top in a L shape version of this?? Because that's exactly what I'm trying to figure out how to do.
Samantha Willis (not verified)
Sat, 06/18/2011 - 12:55
Well,
Im almost 16 and I want this bed in my room! Maybe not pink though ;)
smcswillis
Wed, 06/22/2011 - 05:50
Confused about step 13
Step 13 directs you to a link that I can't find and in these direction it doesn't talk about the end railings and the measurements for building them. I am not going to build the door or the windows and I am going to add the stair case at the end so, I am in the process of deleting certain steps and making some changes with this plan. I need to make sure that I don't omit something that I will need in the long run. Can someone explain step 13 to me or give me the link?
And Samantha Willis will get a bed similar but not exactly. Sam is my daughter.
Jade-Elise Newell
Sat, 07/09/2011 - 19:24
Converting to Australian sizing
I'm making 2 of these for my children this Christmas using the base designs and changing a few things to make them look a little different. A Castle for my son and a Fairy Den for my daughter.
Firstly I need to convert everything over to Metric. Am quite confused about the size of the mattress. I've seen some brag posts stating that they are twin sized. Now in Aus would that be equivalent to a single or a double or a king single? I've had a brief look around the internet but I don't know if i'm getting the measurements correct.
I've also already got 2 single bed bases that I am considering pulling apart and using the slat base for. Could you see anything wrong with doing this? I am already assuming i'll have to redraw a lot to meet metric sizing. Am already feeling quite a bit overwhelmed!
Any advice or information would be greatly appreciated!
Bec (not verified)
Fri, 07/15/2011 - 01:12
Converting sizing
Hi Jade-Elise,
Itoo am from Oz and have fallen in love with this design, especially the add-on stairs, just what hubby and I have been looking (SuperAmart has a loft style bed with desk & wardrobe).
I just converted all the measurements to cm (I used this website http://www.manuelsweb.com/ft_in_cm.htm)
I did a bit of research for you (& I) on the web, Twin size measurements are: 39" x 75" which is 99.1cm x 190.5cm.
That's a great idea to use old bed bases.
Cheers Bec
MommyQ14 (not verified)
Wed, 09/28/2011 - 10:44
twin beds are single
Twin beds are single beds. Here is a website to help you convert to metric. http://www.onlineconversion.com/length_common.htm. The single bases probably won't work unless you adjust your measurements to make it work. I hope that helps.
Pam M (not verified)
Wed, 08/03/2011 - 09:35
Modifying for Full Size mattress
This is amazing. I want to make it for my little girls but I need to convert to a full size mattress. Someone in the list wrote that they saw it done, but are there revised plans for that? I would love the help please.
Abzman (not verified)
Tue, 08/23/2011 - 16:33
Converted to bunk with Full size & Single
I'm in the process of building this bed but converted the plans to suit a top Full Size mattress and inside of the playhouse a single size with 2 steps inside. Also building the stairs version but making the steps as drawers instead.
I've also raised the rails since my daughters move too much in their sleep and even get up and move about!
Finally, I'm putting a back wall and some lighting.
The width of the inside of the walls become 53" vs. 37.5.
Once I complete mine I will post the pictures and steps.
I'm doing this bed as a surprise for my daughters who are away so I'm building it on my own. Couldn't use MDF due to its weight and so using something lighter and more manageable. However, I would still recommend MDF or some hardwood.
I chose this design because of the size of the room. I had 3 designs ready until I chose this layout.
I was going to go with 5 ft height but you run into problems with wood boards being 4ft in width and then you'd have to make the design within the height of your doors so you can disassemble and move the bed. So I stuck with 4 ft high. The inside mattress will be at about 2ft height. Not that high but that's the best I could do with what I have.
thewoodbuilder
Thu, 12/01/2011 - 12:11
converted to full size
did you ever complete this? I would be interested in the plans. :0)
Thanks,
In reply to converted to full size by thewoodbuilder
Abzman
Sun, 12/11/2011 - 13:01
Finally built
Hello,
I just returned to this site to find out my previous reply to you wasn't there. So maybe it never posted. Sorry.
So I finished it and here are the pictures I posted of it:
http://ana-white.com/2011/10/custom-playhouse-bunkbed
Also see more detailed pictures here:
https://picasaweb.google.com/Resource.expert/PlayhouseBunkbedSurprise?a…
I can get you specific dimensions if interested.
Abe
mohsmegan
Wed, 05/07/2014 - 18:11
Specific dimensions
I see that your post is from 2011 but was interested in finding out if you still had the dimensions for converting this to a full size bed?
mohsmegan
Wed, 05/07/2014 - 18:11
Specific dimensions
I see that your post is from 2011 but was interested in finding out if you still had the dimensions for converting this to a full size bed?
mohsmegan
Wed, 05/07/2014 - 18:11
Specific dimensions
I see that your post is from 2011 but was interested in finding out if you still had the dimensions for converting this to a full size bed?
Mike C (not verified)
Sun, 12/11/2011 - 05:08
Brag Comment
My eldest (8 yo) and I built this for my youngest (3 yo). Link below:
http://wurstyears.blogspot.com/2011/12/sams-playhouse-loft-bed.html
As I mention on our blog post, the only real differences from the plans on Ana's site are that I was working primarily in metric units (in Europe here) and I deviated from the original ladder design.
Also, as my 8 yo pointed out, our bed is green, not pink. :)
bakwoodj
Tue, 12/13/2011 - 06:05
Weight limit?
What is the most weight this bed has held? Has the dimensions for the full size version been posted?
What is the easiest way to increase the height of the bed? I plan on building the stairs so I need to alter those, too.
In reply to Weight limit? by bakwoodj
Abzman
Wed, 12/14/2011 - 08:51
Weight Limit
Well, I did test the top bunk myself, a little over 200 lbs, but I did not build it for a large adult since the spacing is rather large width wise.
As for the bottom bunk, I laid down in it with both my kids and I'm very comfortable with it carrying over 250 lbs. In comparison with traditional kids beds I've evaluated, I built it stronger with added support.
Going back to the top bunk, I didn't do any scientific testing but based on my judgement I would be comfortable with up to 150 lbs but no horseplay!
The stairs are built using the traditional Pine stairs used in homes so they can hold quite a bit of weight. If I recall right they are slightly over 1" in thickness.
I didn't post the plans.
Regarding the height, I spent a lot of time studying the maximum height of both bunks. I optimized the height of the top bunk. You cannot go any higher unless you completely change the design and use a lot more wood boards. You are limited to 4' x 8' (standard board size).
I can get you the basic dimensions if interested so let me know.
bakwoodj
Wed, 12/14/2011 - 09:45
Weight limit
Please send me the dimensions for the fullsize bed. I'll double check my numbers with yours!
thanks your reply, i'll make some changes based on your info.
In reply to Weight limit by bakwoodj
Abzman
Thu, 12/22/2011 - 19:02
Dimensions
Sorry for the delay...
I just finished documenting some of my dimensions and included them in the photo album linked below.
Note that some might not agree with the height of my top bunk rails that hold the cleats. They are at 4' even!
Hope this helps.
I will be covering the inside walls with colored carpeting! It will also act as a noise insulator so the kids won't wake up early AM from street noise.
https://plus.google.com/photos/103590147643813514240/albums/56496973048
bakwoodj
Fri, 12/23/2011 - 07:41
Pic
I can't see your picture. Can you post the dimension here?
In reply to Pic by bakwoodj
Abzman
Fri, 12/23/2011 - 09:35
Link
Is the link not working? I click on it and it works.
Here it is again:
https://plus.google.com/photos/103590147643813514240/albums/56496973048…
bakwoodj
Sun, 12/25/2011 - 21:17
It worked!
Thank you for posting this abz! My dimensions matched yours so I will be starting next weekend. I plan on adding height to the bed by putting a 1 x 8 on the bottom so that the inside height will accommodate a 4' 6" person. I'm also making my rails with the extra height as my little one is prone to falling. I'll post pics as I work on it.
In reply to It worked! by bakwoodj
Abzman
Sun, 01/01/2012 - 00:23
Post your work
Bakwoodj,
Be sure to post pictures of your work. I'm very interested in seeing the results.
Abzman
Wed, 12/14/2011 - 11:42
Weight Limit
Ok, give me until the weekend so I can get them for you.