


Build your own simple modern bedside table or nightstand - free plans by ANA-WHITE.com
Are you looking for the perfect nightstand or bedside table to compliment your Farmhouse Bed?
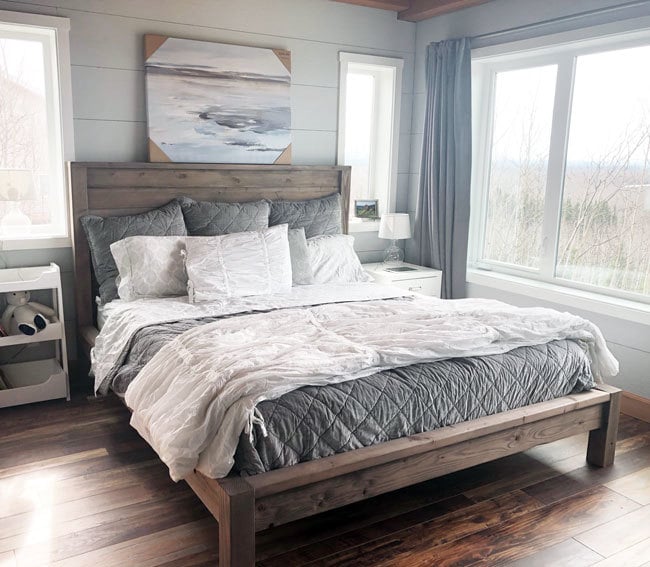
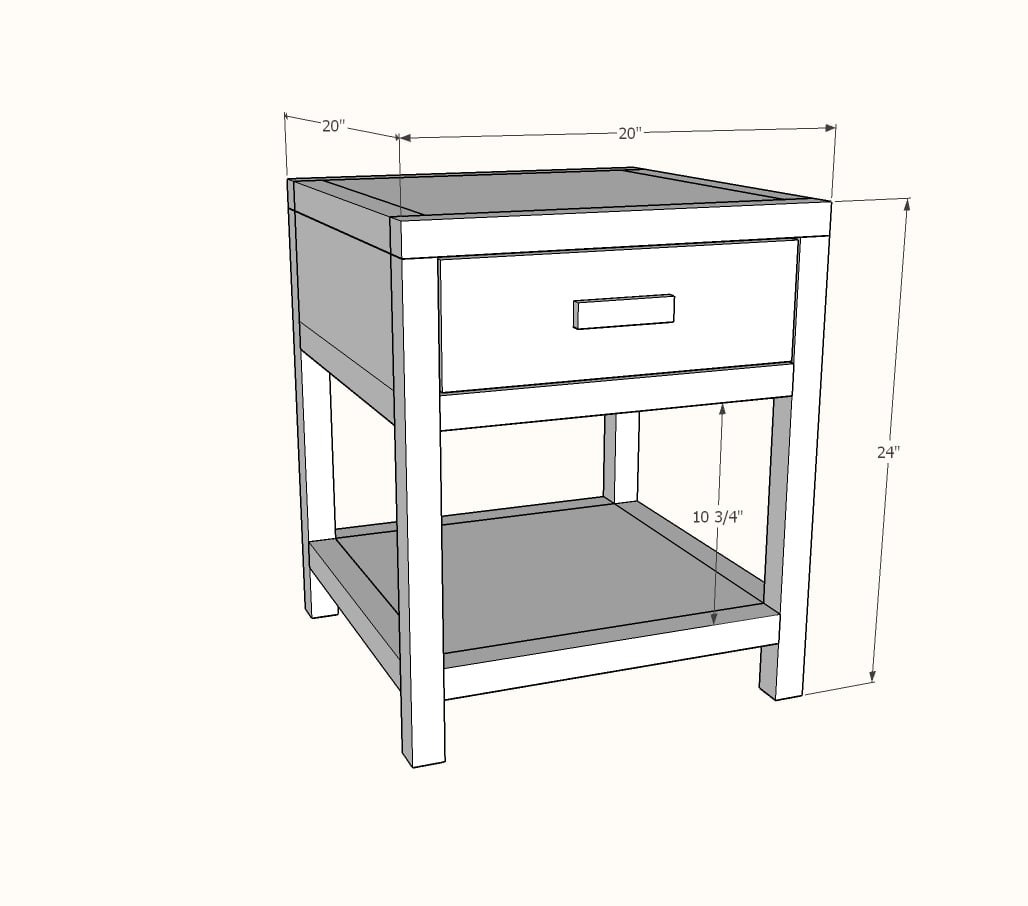
Our Modern Farmhouse bed (free plans available here) is the focal point of our bedroom, and I wanted nightstands to compliment it - not compete with it, or match so perfectly they look like part of the bed.
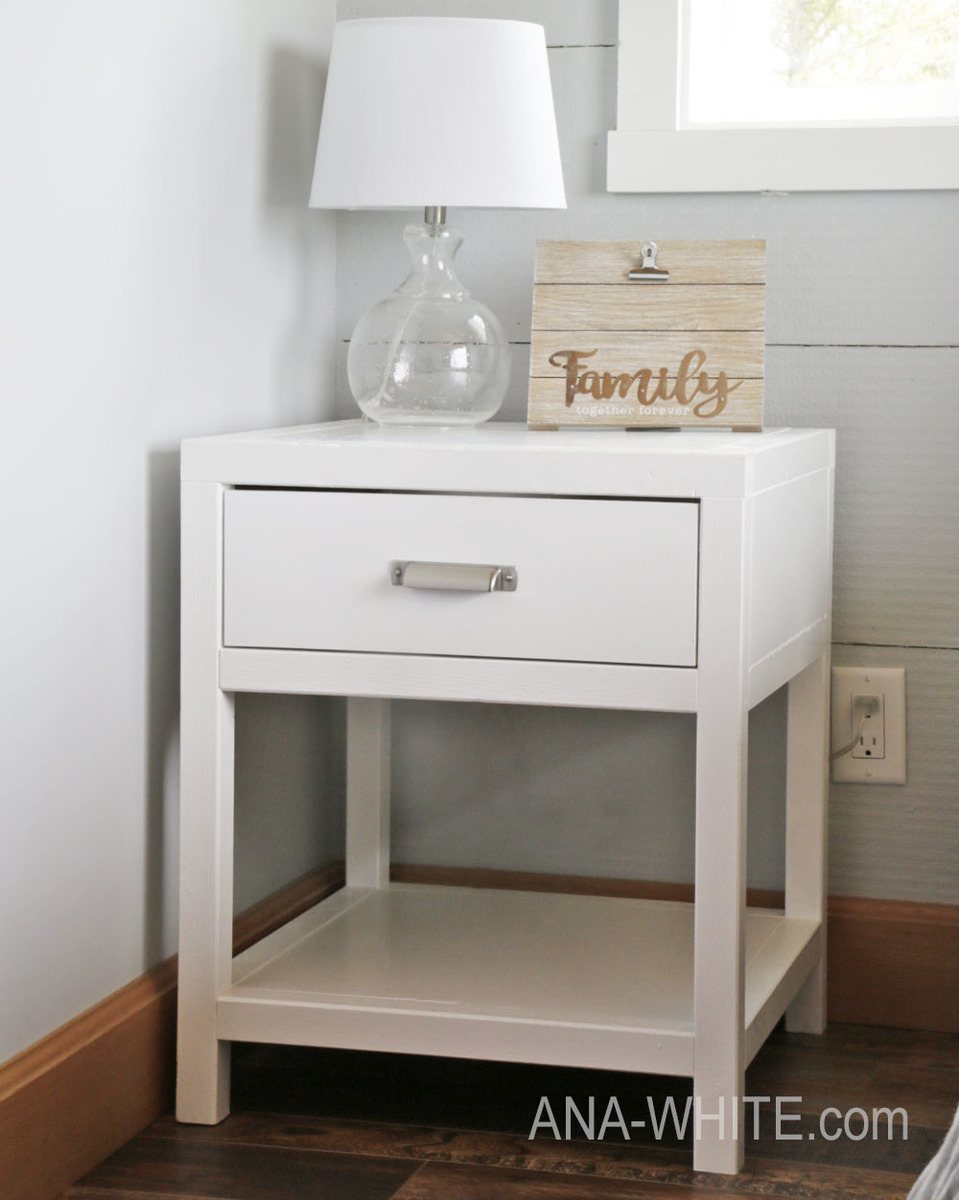
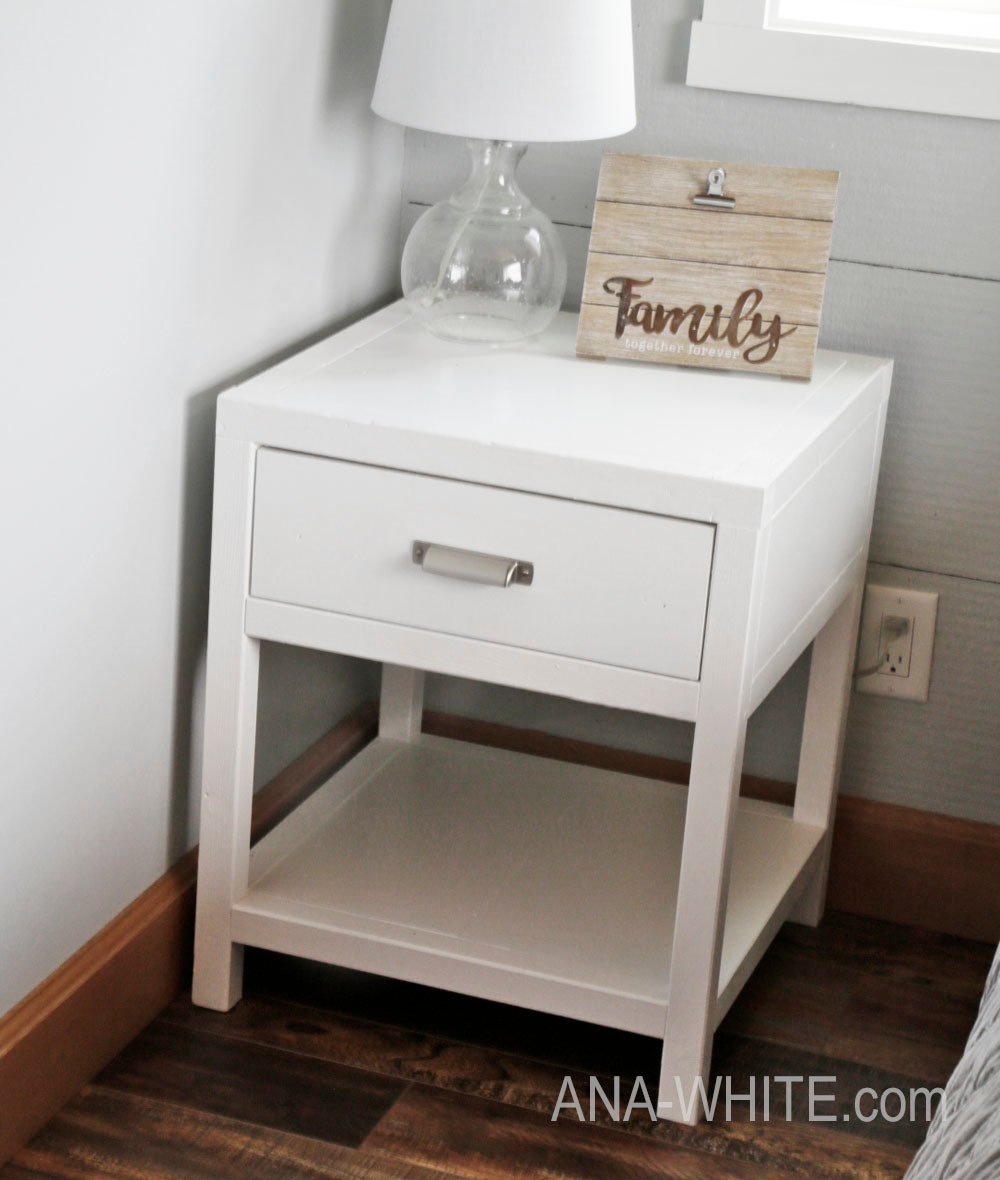
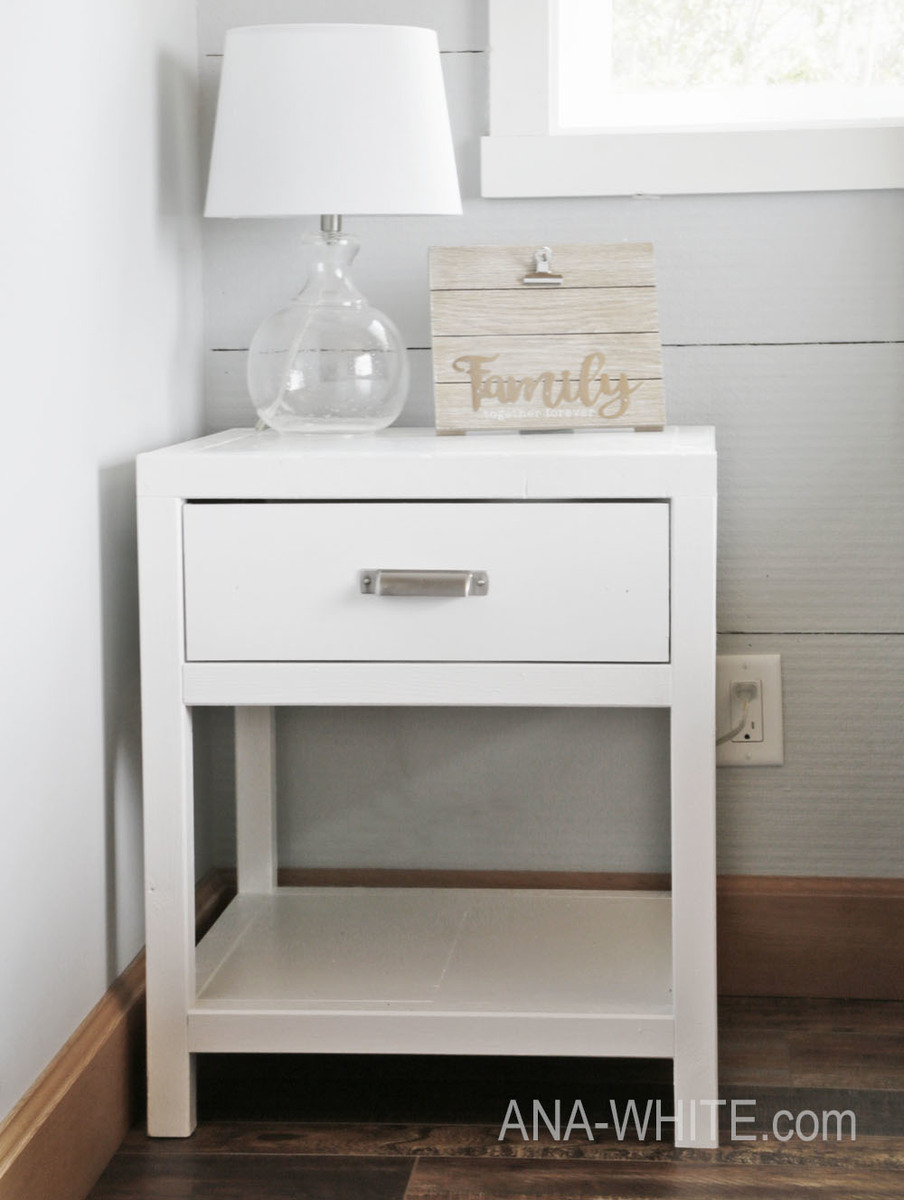
So I designed this bedside table. It is a perfect sidekick to our modern farmhouse bed - both in style and use.
I love the big roomy drawer, spacious top, and open bottom shelf.
This modern style nightstand is also just the right size to use as an end table or side table in your living room.
I had alot of scrap plywood pieces that I burned up on this project - so spent about $25 building it. But if you buy all new materials - plan on about $50 a nightstand - what a bargain for such a beautiful simple piece. And if you are building two - double the savings!
The free plans are below - do share if you build, we love seeing your projects!
XO Ana
PS - This nightstand build was featured in this video -
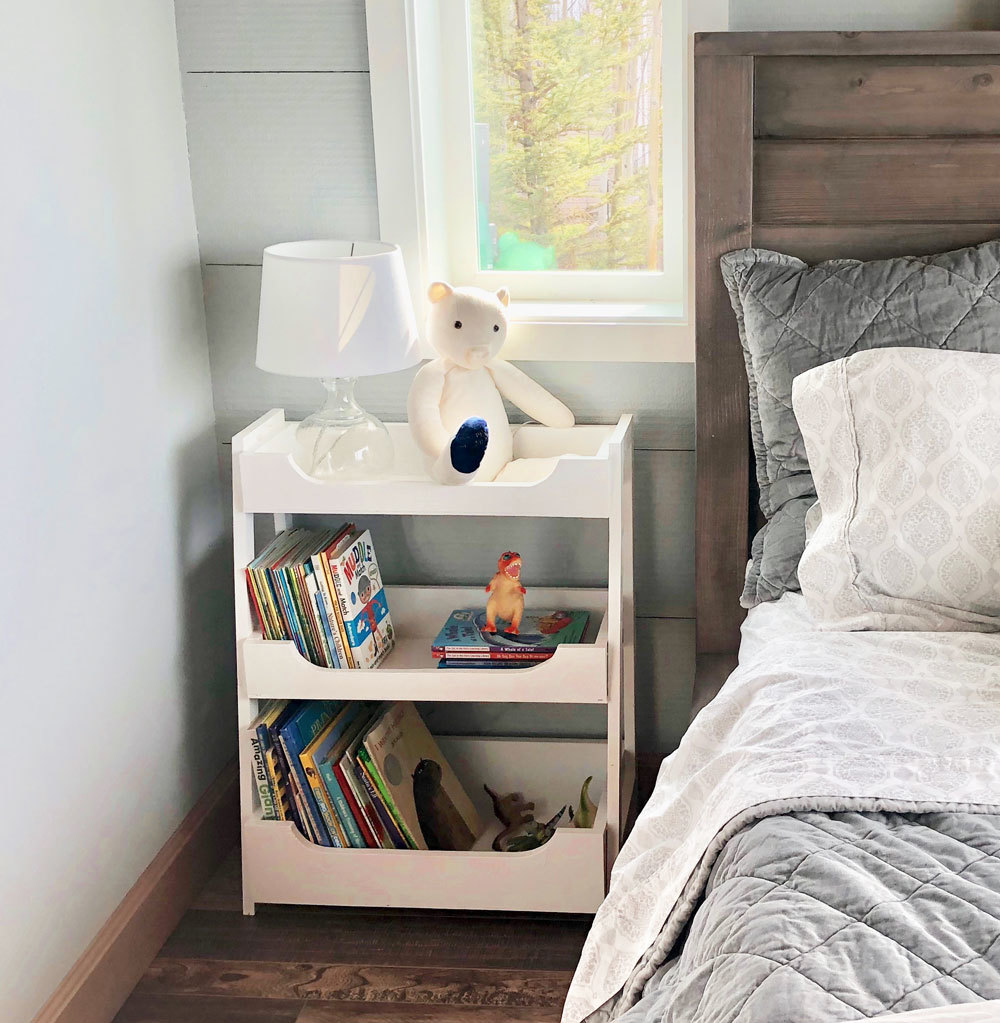
And the "kids" nightstand plans are available here -
And the Modern Farm Bed Plans are here.
PSSS - If you aren't ready to build just yet, be sure to pin for later!
Preparation
3 - 2x2 @ 8 feet long (about $2 each)
1 - 24" x 48" x 3/4" thick plywood panel (about$20)
1 - 1/4" plywood piece, at least 18" x 15-1/4" (about $7)
1 - 1x4 @ 6 feet long (about $7)
1 - 18" euro style drawer slide, 1/2" clearance needed for each slide (about $5)
4 - 2x2 @ 22-1/2" - Legs
2 - 2x2 @ 19-1/2" - Front Frame
7 - 2x2 @ 16-1/2" - Remaining Frame pieces
3 - 3/4" plywood @ 16-1/2" x 7-1/4" - side/back
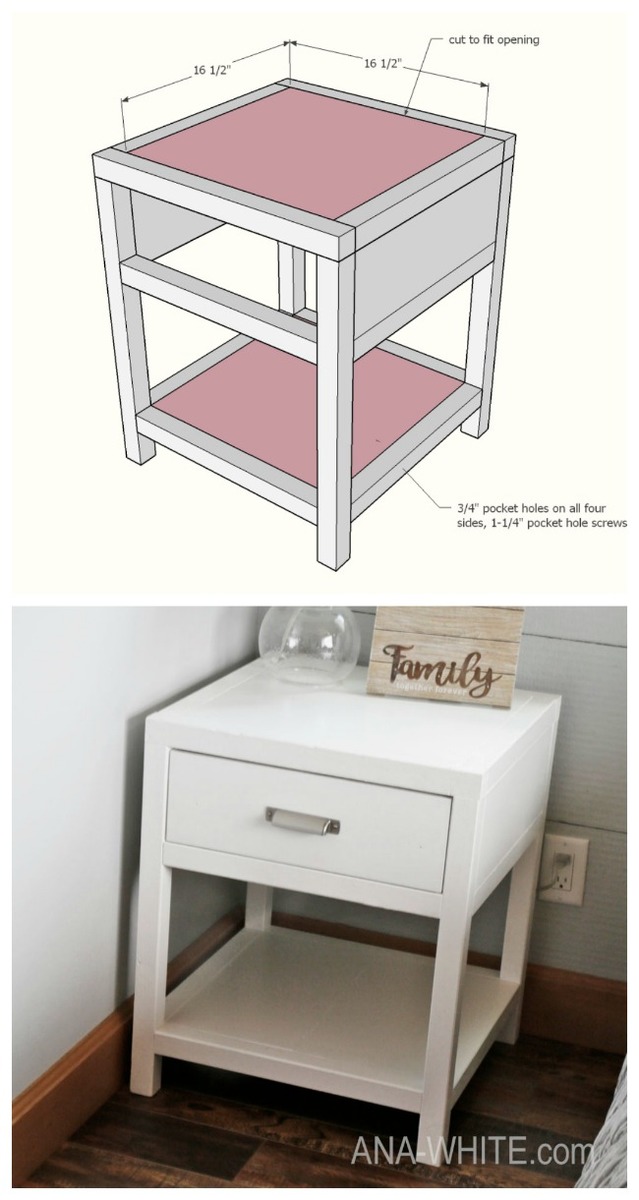
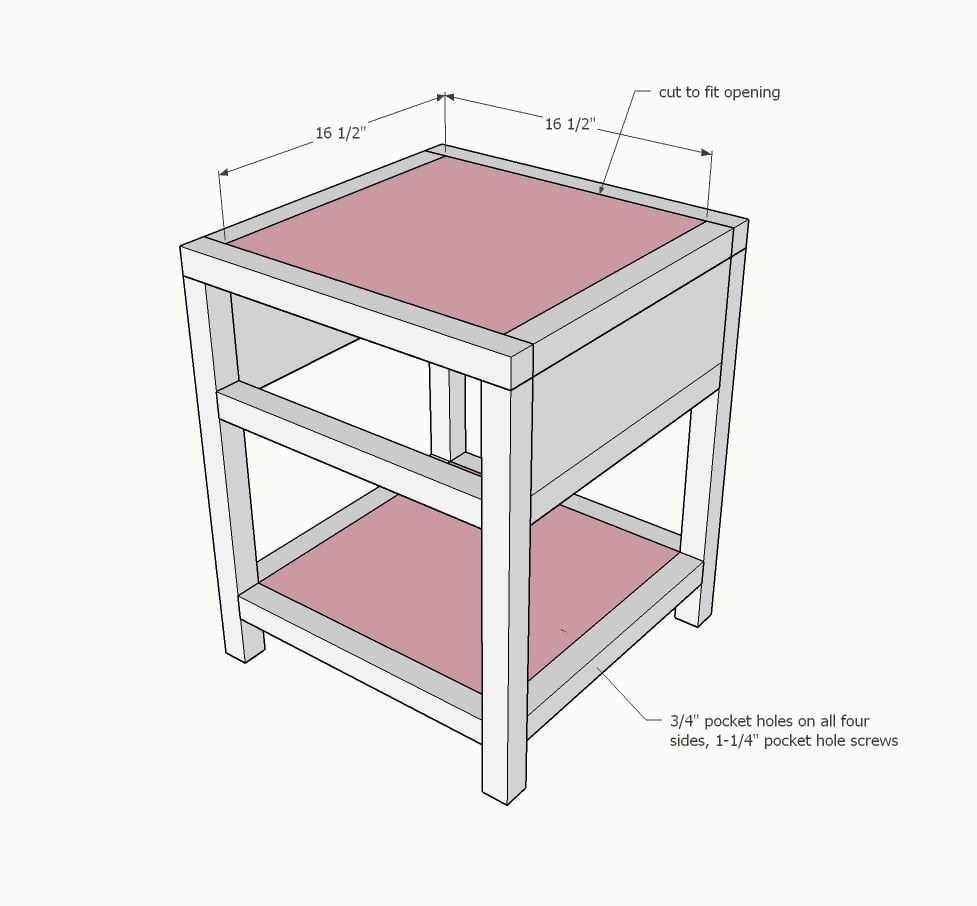
2 - 3/4" plywood @ 16-1/2" x 16-1/2" - top/shelf
2 - 1x4 @ 18" - drawer sides
2 - 1x4 @ 14" - drawer front/back
1 - 1/4" plywood @ 18" x 15-1/2" - drawer bottom
1 - 1x6 or 3/4" plywood @ 5-1/2" x 16-1/4" - drawer face
All 3/4" plywood pieces can be cut from a 24" x 48" off the shelf panel.
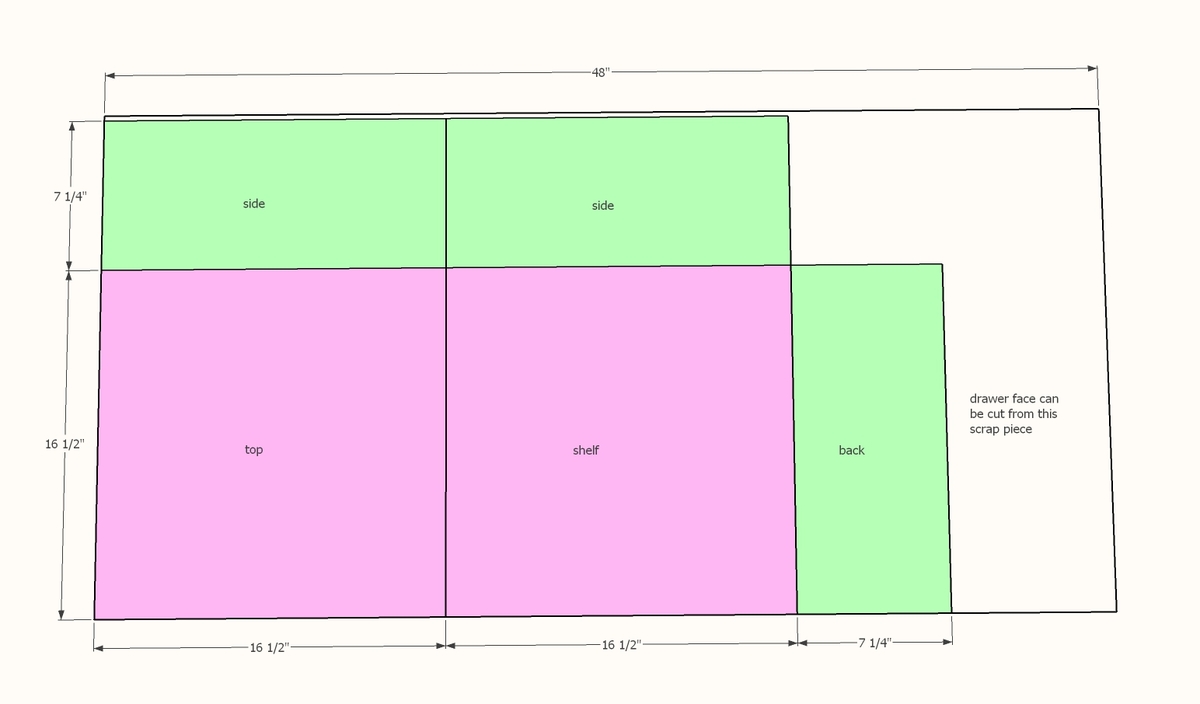
First cut a strip 48" long x 16-1/2" wide. Cut a second strip 48" long x 7-1/4" wide. Cut using either a table saw or a circular saw. If using a circular saw, it is highly recommended to use a guide or track.
Once the long strips are cut, cross cut the pieces to the right size.


Instructions
Step 1

For all 2x2 to 2x2 joints, use a single 1-1/2" pocket hole and 2-1/2" pocket hole screw, with glue.
Build two of the frames shown in diagram above.
Step 2
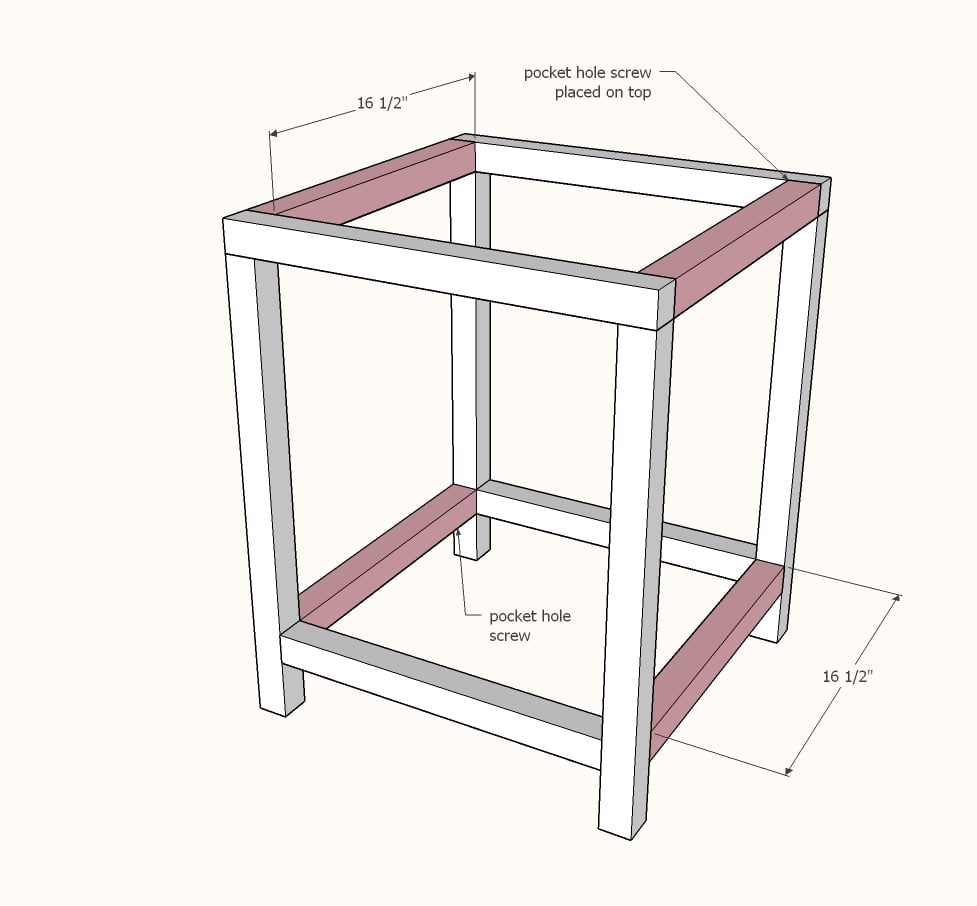
Attach front and back frames with the 16-1/2" long 2x2s.
Step 3
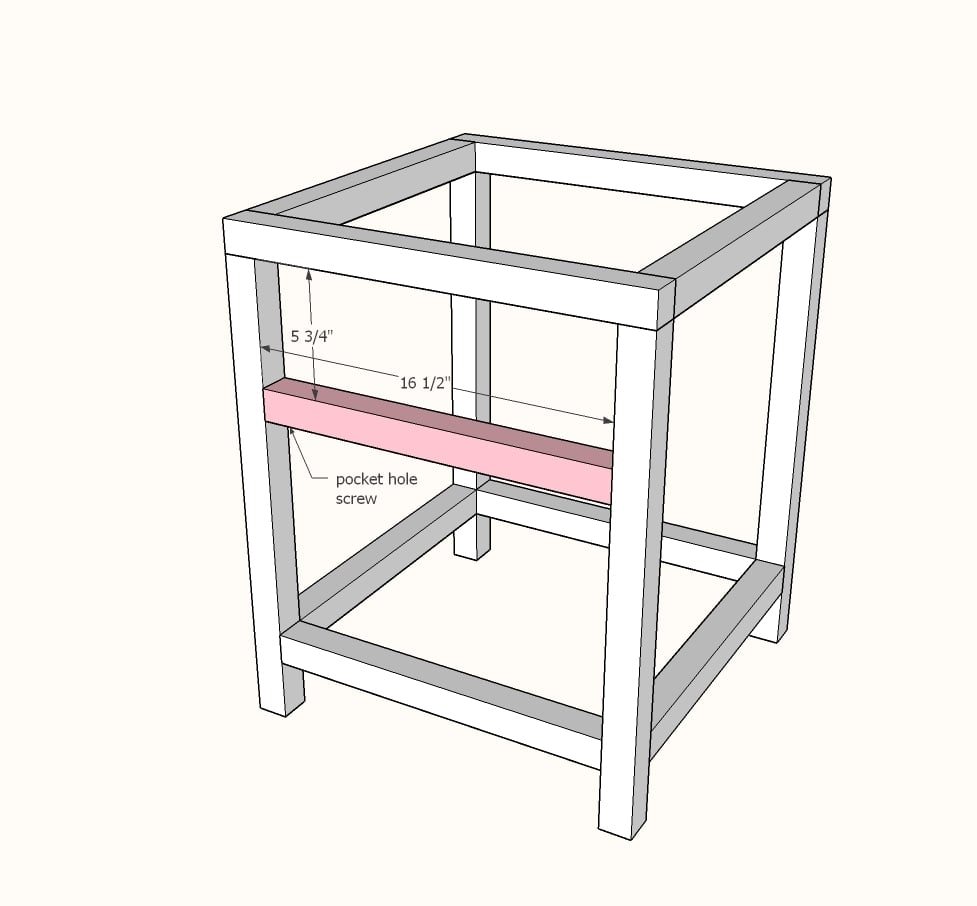
Attach front drawer frame piece with 1-1/2" pocket holes and 2-1/2" pocket hole screws and glue.
Step 4
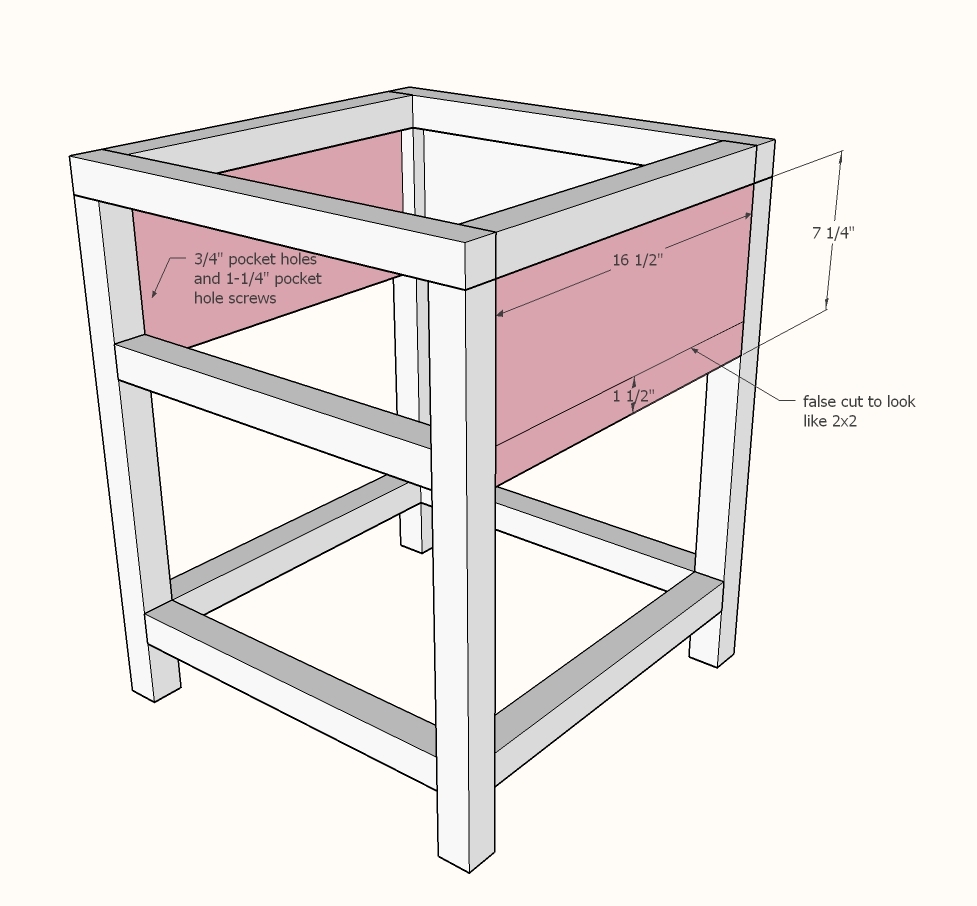
Set circular saw blade depth to about 1/8". Make false cuts 1-1/2" up from bottom edge of 3/4" plywood with circular saw to look like 2x2.
Drill 3/4" pocket holes on sides and top of plywood pieces on inside. Attach inside the 2x2 side frame flush to outside with 1-1/4" pocket hole screws.
Repeat for back (optional for bedside table).
Step 5
Step 6
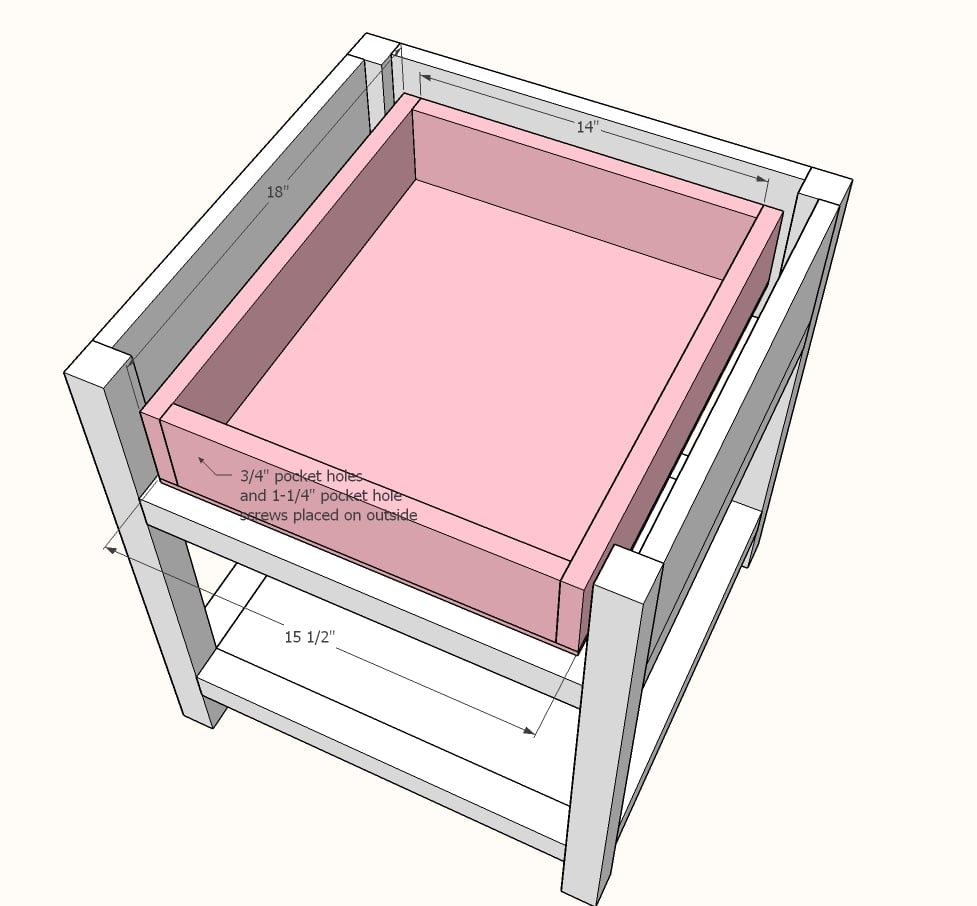
Build drawer box with 3/4" pocket holes and 1-1/4" pocket holes screws. Attach drawer bottom with 3/4" brad nails and glue, making sure drawer box is square.
Install drawer in cabinet, attaching drawer slides to the 2x2 framing.
Step 7
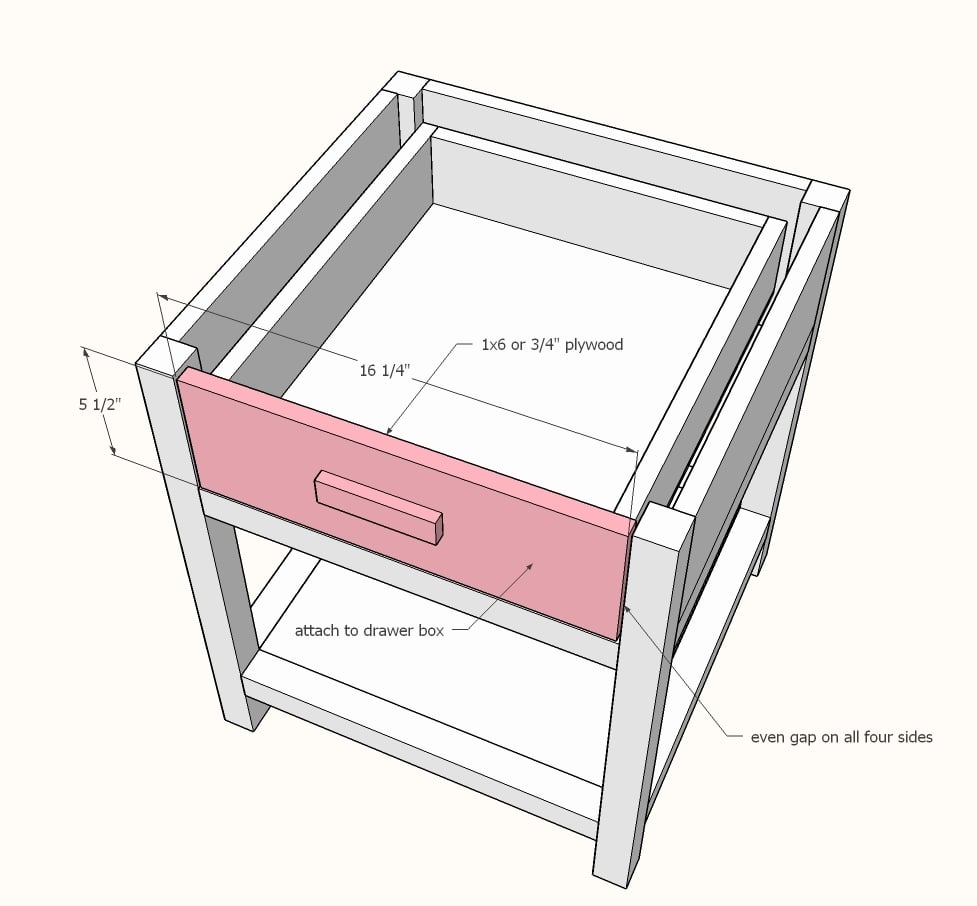
Position drawer face on drawer box with an even gap around all four sides. Attach with two 1-1/4" brad nails through face (avoid areas where knob or pull will be installed).
Remove drawer and further secure from inside with a couple of 1-1/4" pocket hole screws or similar.

Comments
Skiziks
Fri, 06/15/2018 - 09:46
Drawer slides
Plans usually simply say: Attach drawer slides....
And that's it, no further details. Installing drawer slides isn't the easy step of following a plan for some of us. There is an art, some expertise required to: "install drawer slides". Hopefully some day there will be a bit more detail to accomplish this task.
builderwifey
Tue, 04/28/2020 - 16:06
Ana-I just started this…
Ana-I just started this project and am already stuck! For step one, it says to add one 1 1/2" and one 2 1/2" pocket screw. Do I put them next to each other or different sides or one in front of the other? Also, where it says pocket hole screw on the lower support 2x2, what size should I be using? Also, the material list says 1 1/4" pocket screws, but the plans say 1 1/2", can I use either? Any help would be very appreciated!