

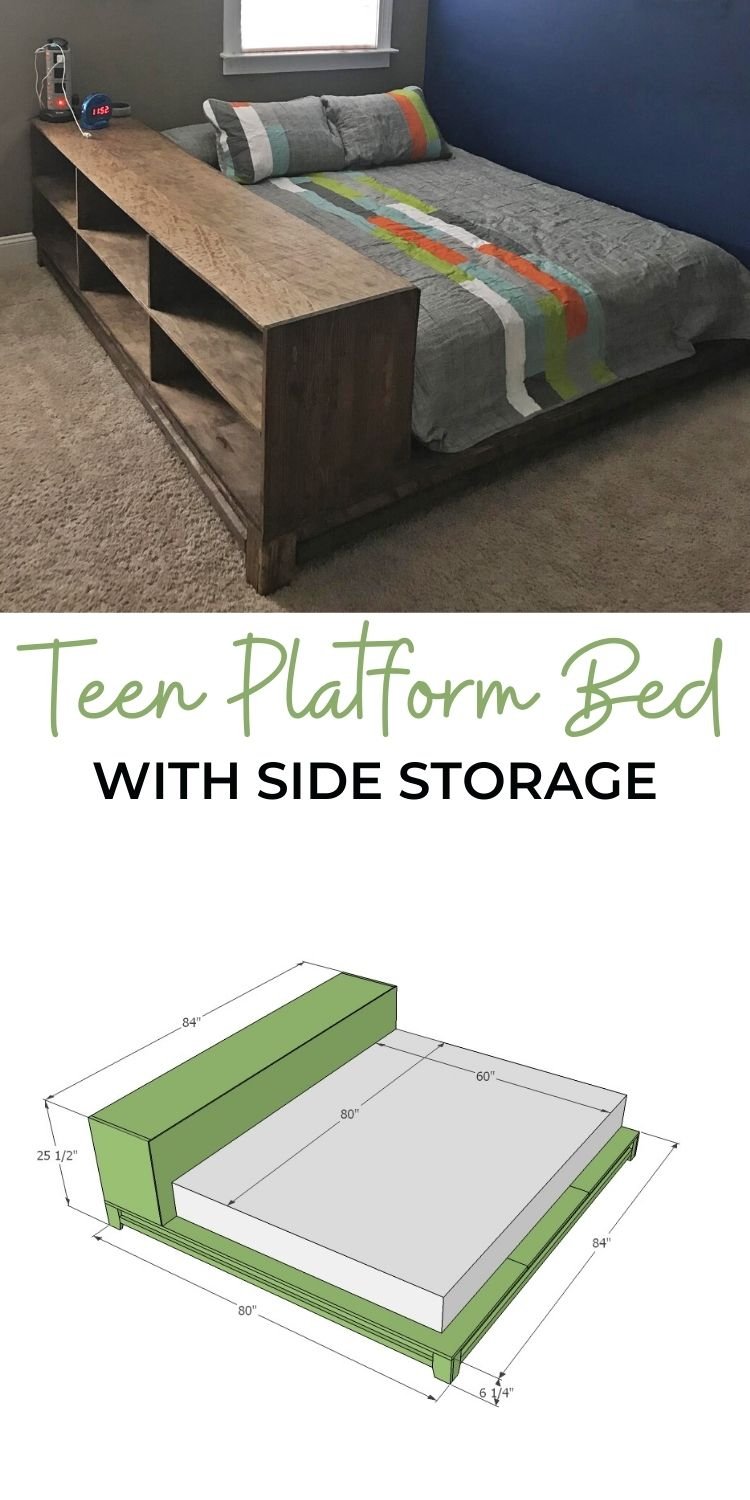
Build your own platform bed with side storage! Perfect for large, awkward room layouts.
This is a free, step by step project plan to build your own platform bed with side storage. The side storage acts as a backrest, nightstand, room divider, tabletop and storage center.
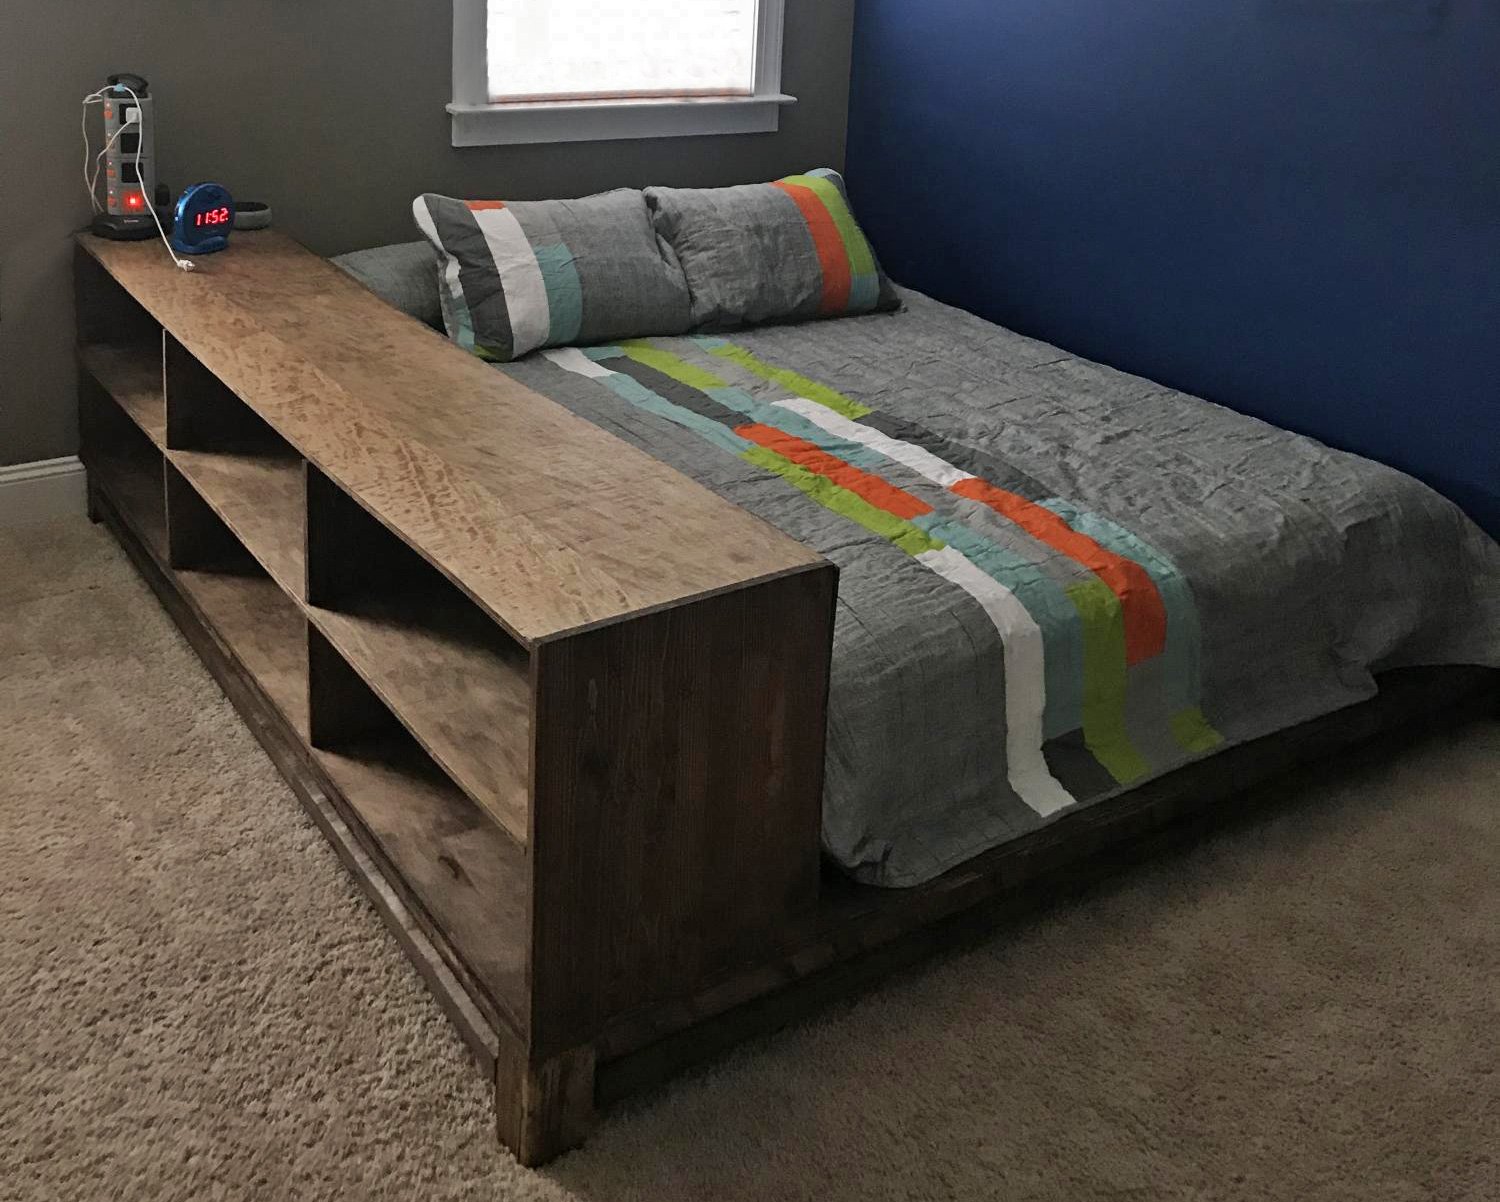
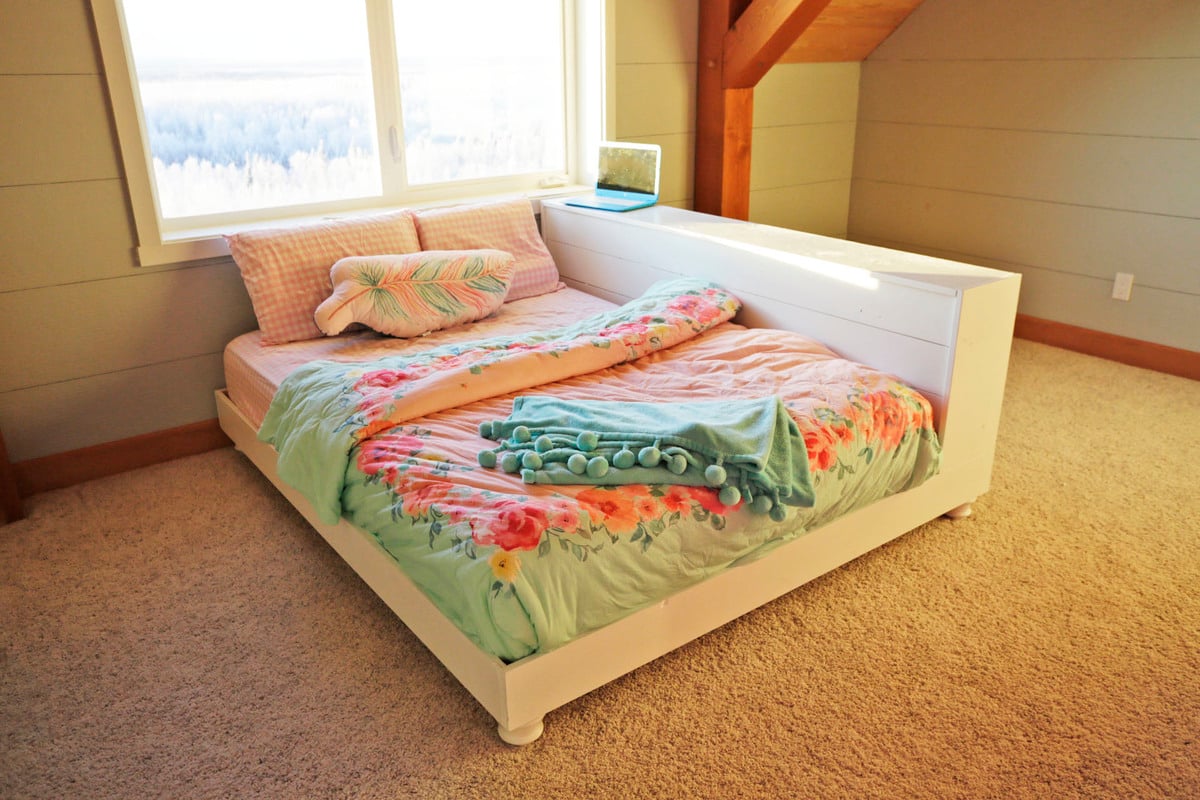
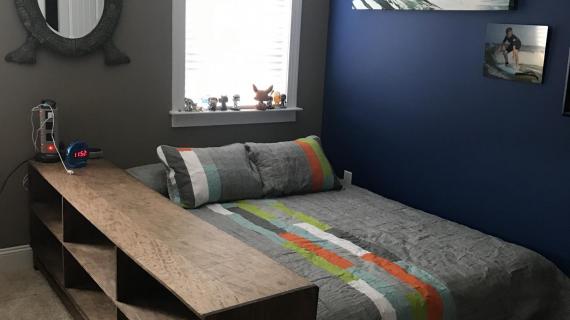
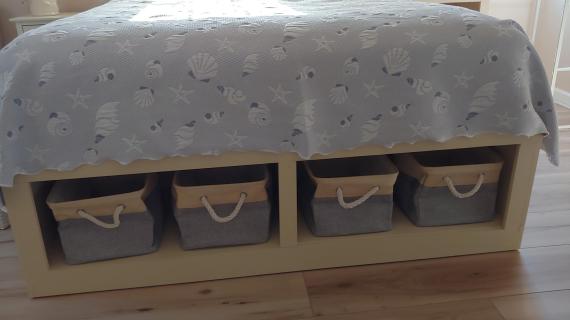
Real reader submitted photo. Free plans created by Ana-White.com
Related Plans: Platform Bed with Side Storage made from 1x12s
Don't want to rip plywood? We have an option for this bed made using 1x12 boards. Here's the free plans.
Pin For Later!
Preparation
- 3 - Sheets 3/4" Plywood, MDF or other sanded sheet goods*
- 1 - sheet 1/4" plywood, MDF or other sanded sheet goods*
- 6 - 2x4 @ 8 feet long
- 4 - 1x2 @ 8 feet long or other decorative casing or moulding
- 1 - 1x4 @ 2 feet long
- 1 - 1x4 @ 2 feet long
- 1 - 2x2 @ 8 feet long *Choose PureBond formaldehyde free plywood to increase the air quality of your teens room
- 2 - 2x4 @ 78 1/2"
- 4 - 2x4 @ 79 1/2"
- 4 - 1x3 @ 5 1/2" (Taper ends)
- 4 - 1x4 @ 5 1/2" (Taper ends)
- 2 - 1x2 or other moulding @ 73"
- 2 - 1x2 or other moulding @ 77 1/2"
- 4 - 2x2 or 2x4 @ 5 1/2"
- 3 - 3/4" Plywood @ 28" x 80"
- SHELF 4 - 3/4" Plywood @ 15 1/2" x 8 1/2"
- 3 - 3/4" Plywood @ 15 1/2" x 82 1/2"
- 2 - 3/4" Plywood @ 15 1/2" x 19 1/4"
- 1 - 1/4" Plywood @ 84" x 19 1/4"
Have your home improvement center rip your plywood into a 28" width (8 feet long) and a 15 1/2" width (8 feet long). Be careful to save all scraps - you will need them.


Please read through the entire plan and all comments before beginning this project. It is also advisable to review the Getting Started Section. Take all necessary precautions to build safely and smartly. Work on a clean level surface, free of imperfections or debris. Always use straight boards. Check for square after each step. Always predrill holes before attaching with screws. Use glue with finish nails for a stronger hold. Wipe excess glue off bare wood for stained projects, as dried glue will not take stain. Be safe, have fun, and ask for help if you need it. Good luck!
Instructions
Step 1
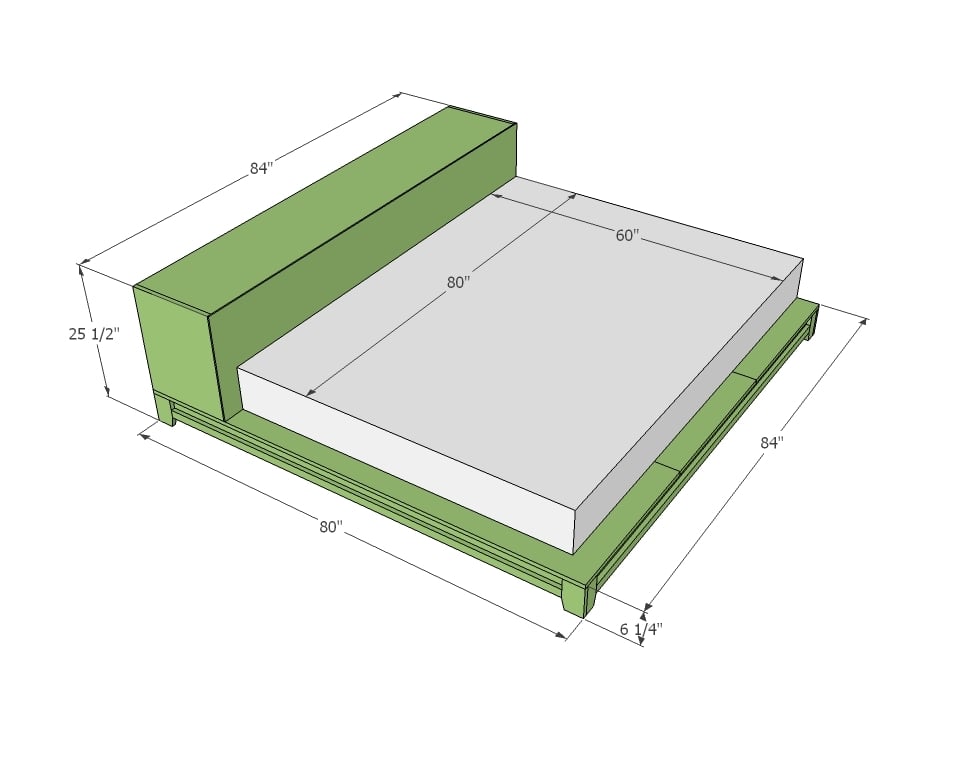
Measure your doorway to make sure you have 80" of clearance. I've got 80 1/2" and we have standard doors, so it will be tight - it may be in your best interest to build in your room for the queen size. Full and twin sizes should be more manageable.
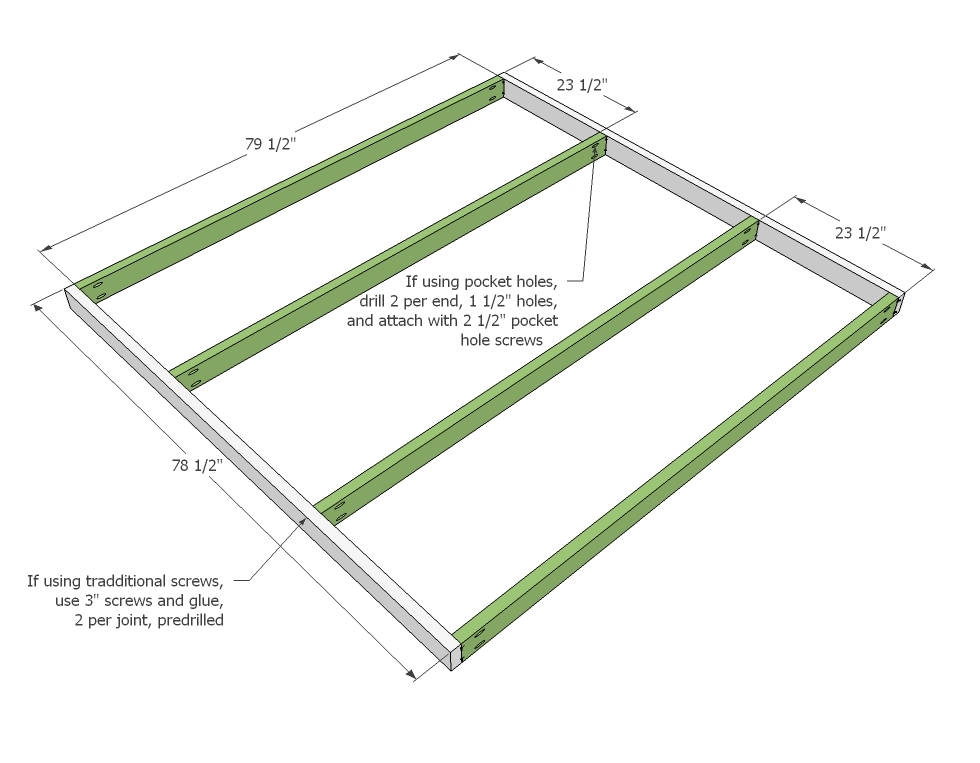
Most importantly here is having a flat level surface to work from with plenty of space, and measuring and marking out your joints and predrilling holes. If using your Kreg Jig, drill pocket holes on each end of the "studs" as shown in diagram. Build the frame as shown above.
Step 2
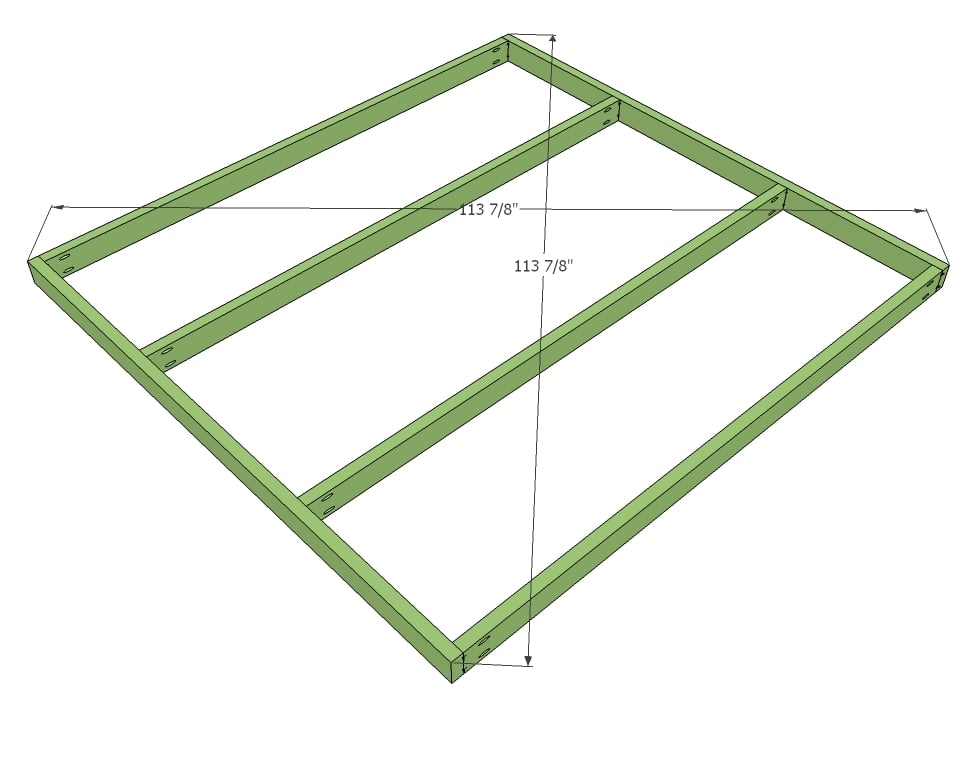
Check the frame for square by measuring outside opposite corner to outside opposite corner. If the two do not match up, push the longer measurement opposite corners together until they do. You need to do this before the glue sets up.
Step 3
I would just work upside down here. And the reality is you could use sofa feet or any other type of decorative feet in place - to get a bed like this one.
Step 4

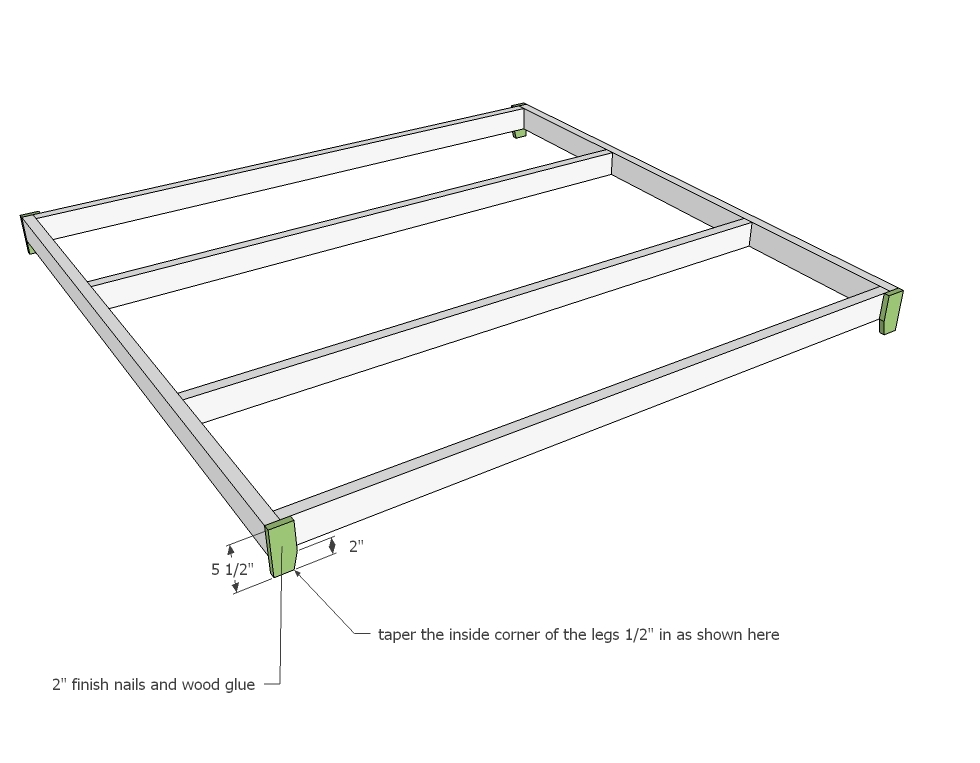
Next comes the 1x4 part of the legs to finish off the leg. Carefully keep edges flush on the outside corner with the 1x3 to make the leg look like a solid block. Attach in place.
You can also taper as you did the 1x3 leg.
Step 5
Step 6

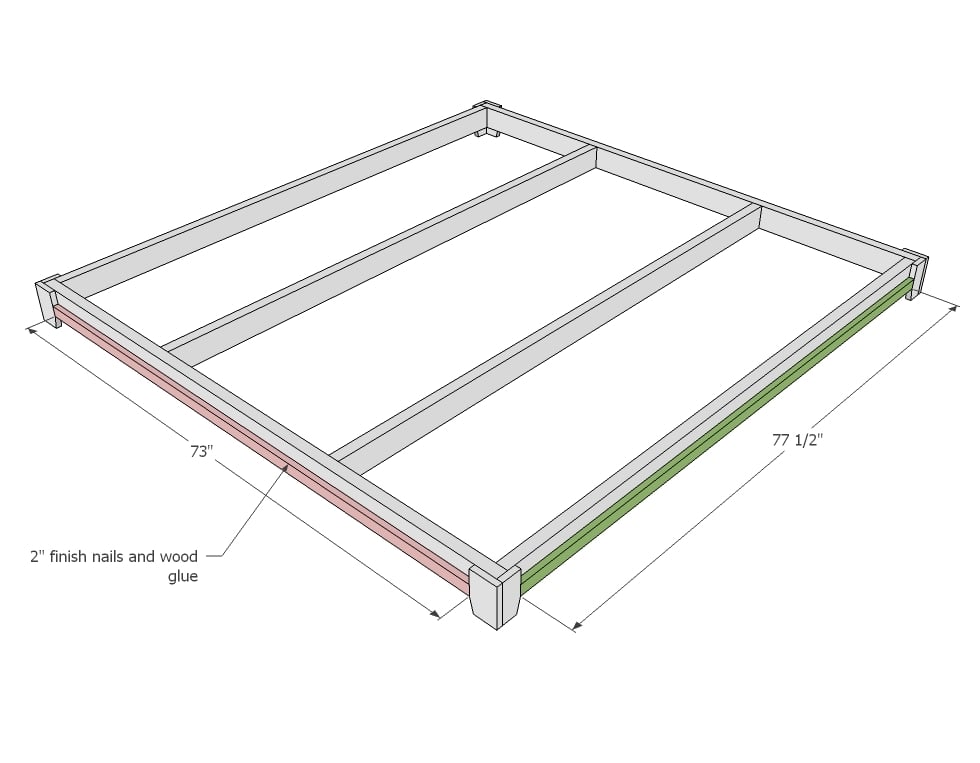
These extra legs are very important because they hold the majority of the weight from this bed. Screw legs on approximately ever 12"/
Step 7
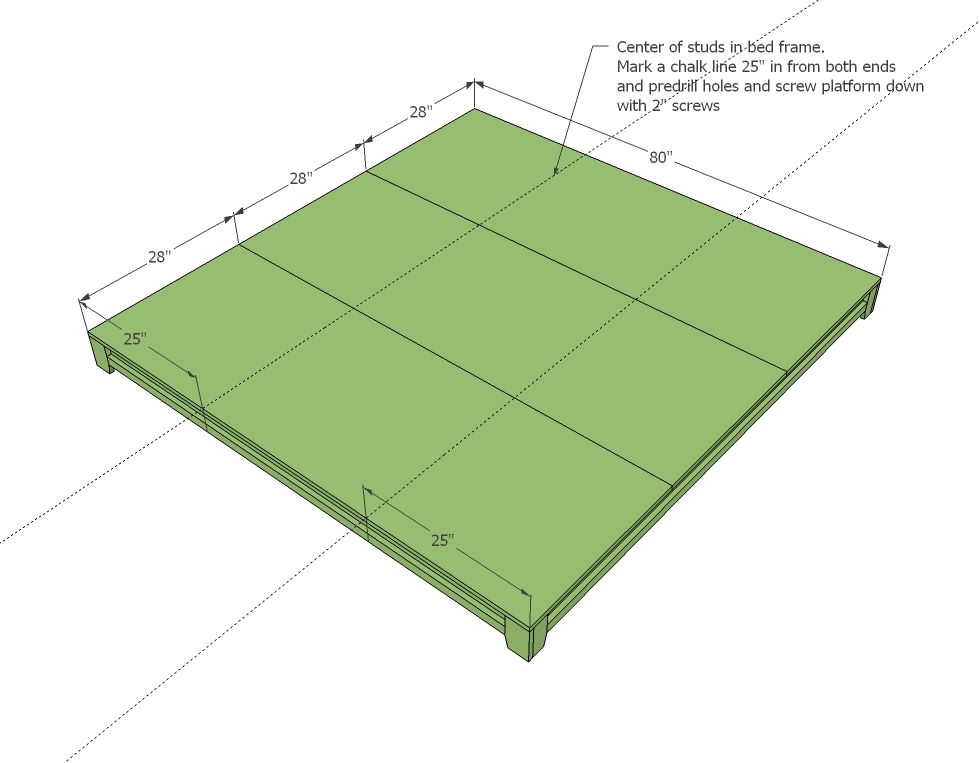
With the 1x28 strips of plywood, cover the top of the bed. Use a chalk line to draw a line as shown in the diagram (click diagrams for larger views) to mark the center of the studs underneath. Predrill holes and screw plywood down. I recommend finishing the platform bed as one, and the bookshelf separately.
Step 8
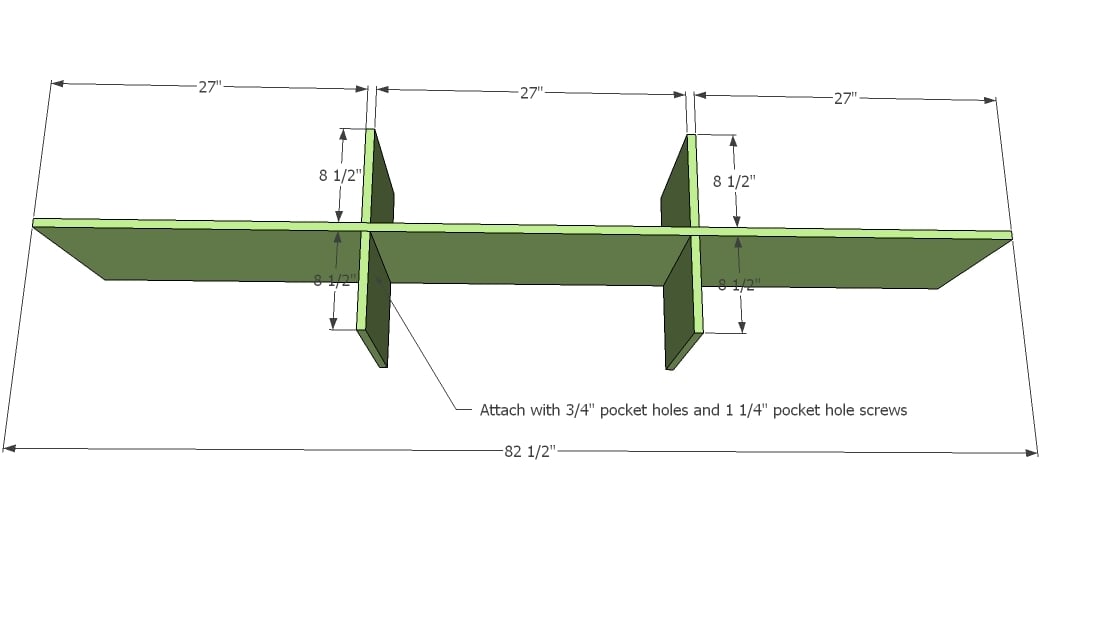
Build the interior of the shelf system first as shown above. You will need to drill three pocket holes on the inside ends of each divider to attach set for 3/4" stock and using 1 1/4" pocket hole screws. Carefully measure and mark the joint first.
Step 9

Now finish the shelf as shown above. If you prefer the Kreg Jig here, drill 3/4" pocket holes along the end edges of the top and bottom and attach with 1 1/4" screws.
Step 10

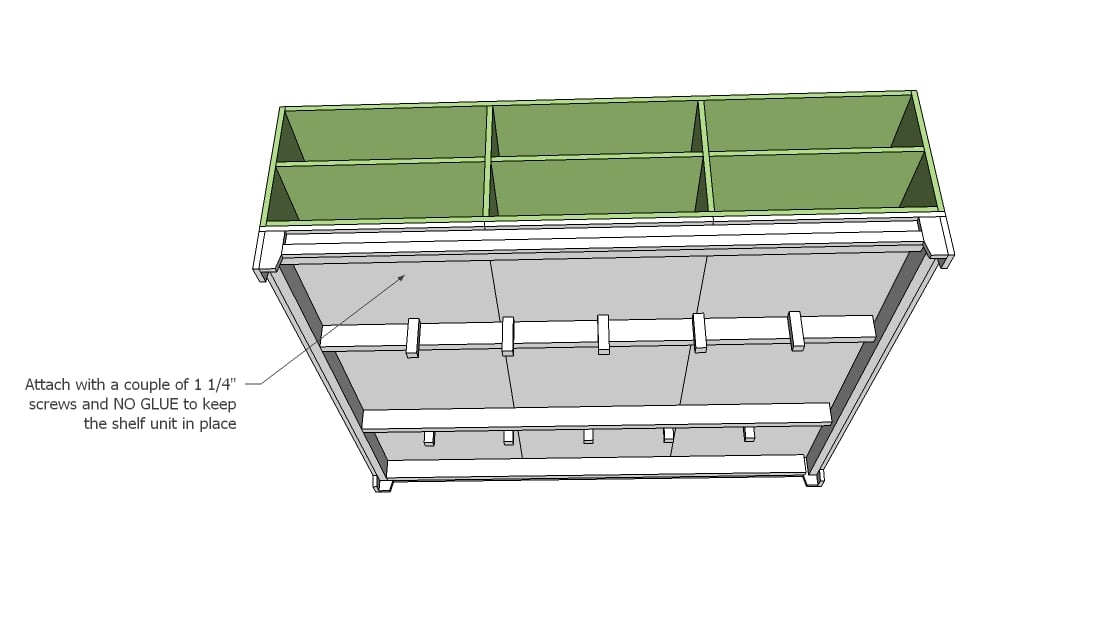
Attach the back as shown here with nails and glue. Attach to all fixed shelves.
Save the scrap back piece of plywood - you could use it to make a headboard!
Step 11
When you assemble the shelf on to the bed, you will need to add a few screws through the bottom to keep it in place.
It is always recommended to apply a test coat on a hidden area or scrap piece to ensure color evenness and adhesion. Use primer or wood conditioner as needed.
Comments
Hilary @ Katri… (not verified)
Mon, 09/19/2011 - 20:33
king?
Is this design feasible for a king-sized bed? Maybe removing the top-center storage sections to yield a bench?
Master Owner (not verified)
Tue, 10/11/2011 - 09:23
King?
This project would have to be heavily modified to accomodate a King configuration or California King. First, it would require building the base in two sections with an extra center suppport and legs. This will allow you to get it in and out of most rooms and reduce the weight of the individual pieces. I also recommend increasing the height of the headboard by 13" to allow for box springs (2 twin box springs are standard for a King) to support the mattress. Two quality-grained 2x10s of the same wood type you use for the headboard cut to provide the desired height addition and a 2x4 cut to provide cross-support between them can be Kreg Jigged between the base and bottom of the headboard to raise it. Good Luck!
TracyinOK (not verified)
Wed, 10/12/2011 - 07:45
Switch it around?
This looks fantastic, but due to the size of my daughter's room, I'd like to find a plan that's more like the Pottery Barn Teen "Display It" bed, where the shelves face the bed (so that side can be placed against a wall). Do you think this could be modified to work?
Anonymous Coward (not verified)
Wed, 10/12/2011 - 11:38
Just turn the bookcase
Just turn the bookcase section around.
Make a base for the shelf unit to get the shelves higher than the mattress
You could make them narrower and the base narrower, but then you need to make sure they don't tip over - screw them to the wall.
Guest (not verified)
Sun, 12/11/2011 - 20:43
drawers??
I love this design I've been looking all over for a knock of this pb teen bed! the only question this gal has is how would you put drawers in? I would need drawers on this because if
u also put a dresser on the room with bed it would look pretty bad. Please and thank you!
bj D (not verified)
Wed, 02/29/2012 - 05:27
Full size?
What would the plan be for this bed in a full? I have a friend asking me to build this for her son's upcoming birthday.
BJ D
Wed, 02/29/2012 - 06:40
Full size
I recently had a friend ask me to build this for her teenage son's birthday. I'm going to be converting it to a fullsize plan though. Do you already have those plans drawn up? If not, I'll be shrinking these down. I can't wait to build it for them and to put a built picture with your plan.
sjpowell67
Sun, 06/26/2016 - 18:36
full size plans
Hi, I just wondered if you had luck in making it full size? please share how you did it as I would like to try the same. thanks
Ray (not verified)
Mon, 09/17/2012 - 08:20
This is awesome!
I'm moving to a very small apartment (443 sq ft) and this bed was exactly the kind of thing I was thinking for. Not only will it serve as extra storage space, but it will also help to separate my bed from the rest of the apartment.
I'm also thinking of putting it on wheels, so it can be easily moved to give more space and to clean underneath.
Thanks so much for posting it!
Mzfloyd97
Wed, 01/23/2013 - 07:30
Love this bed!!
I first want to thank you for all of your wonderful ideas and plans. I've always wanted to make my own furniture,but had absolutely no idea where to begin, so again Thanks a bunches!! I want to make this for my daughter's birthday in April. She will be 11 and wants to upsize from a twin. Do you have the measurements for a full size bed? I looked through some of the comments but didn't see them. Thanks so much and stay warm up there!!
rossman878
Wed, 02/21/2018 - 13:41
Has anyone made this into a
Has anyone made this into a twin. My son needs an XL twin, he's 6'2. His room is very small, and I really love the shelves on this bed. I was thinking of just moving the middle boards over. Thanks for any help
In reply to Has anyone made this into a by rossman878
builtbyjessie
Thu, 02/22/2018 - 05:09
Which boards?
Middle boards??? Are you talking about the bed frame or the shelves?