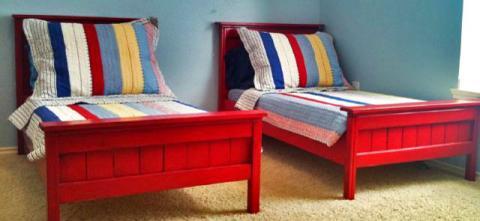


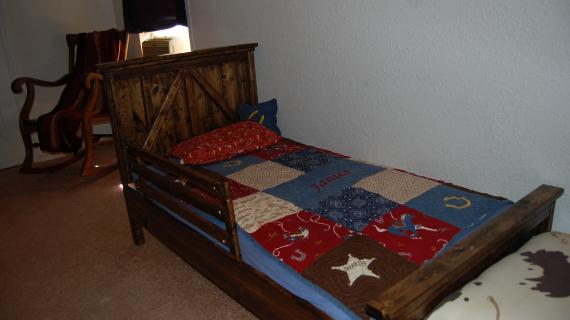
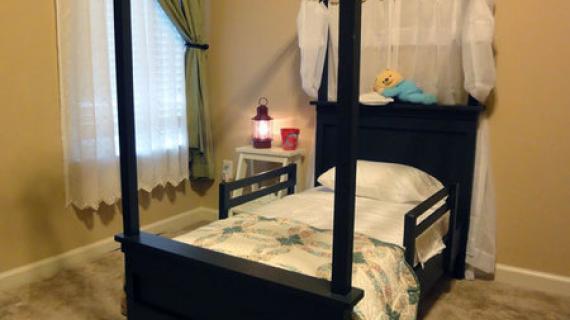
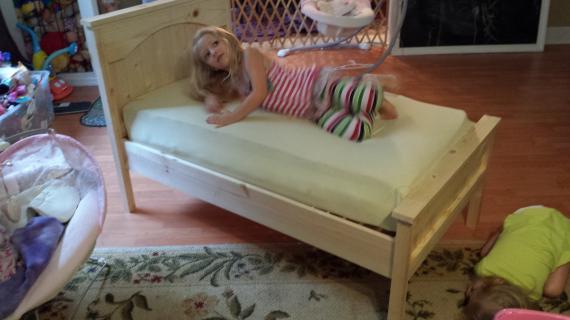
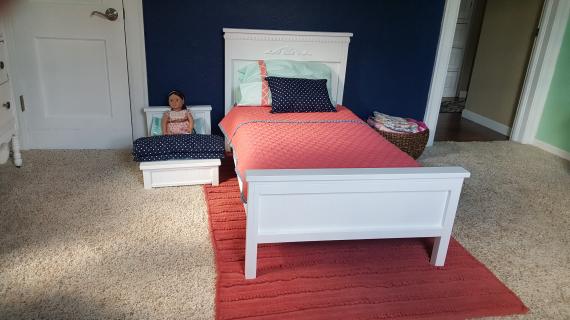
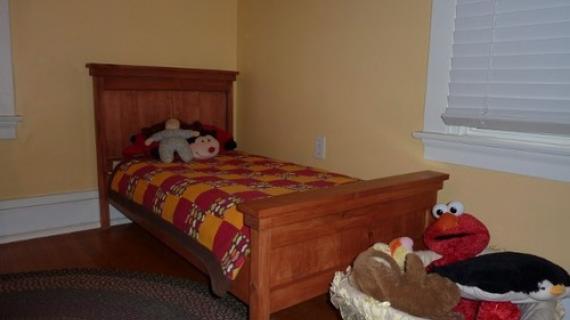
You will be amazed at just how easy it is to build these cute little farmhouse beds. And how inexpensive! Designed to fit a toddler sized mattress, please read comments as your mattress size may differ and you will need to make slight adjustments for the best fit.

Preparation
10 – 1×2 Boards, 8′ Long (about $1 Each)
1 – 1×3 Board, 8′ Long (about $1.50 Each)
2 – 1×4 Boards, 8′ Long (about $3 Each)
2 – 1×6 Boards, 8′ Long (About $5 Each)
2″ Screws
1 1/4″ Screws
1 1/4″ Nails
Wood Glue
Wood Putty
Sandpap
Cut List for the Headboard
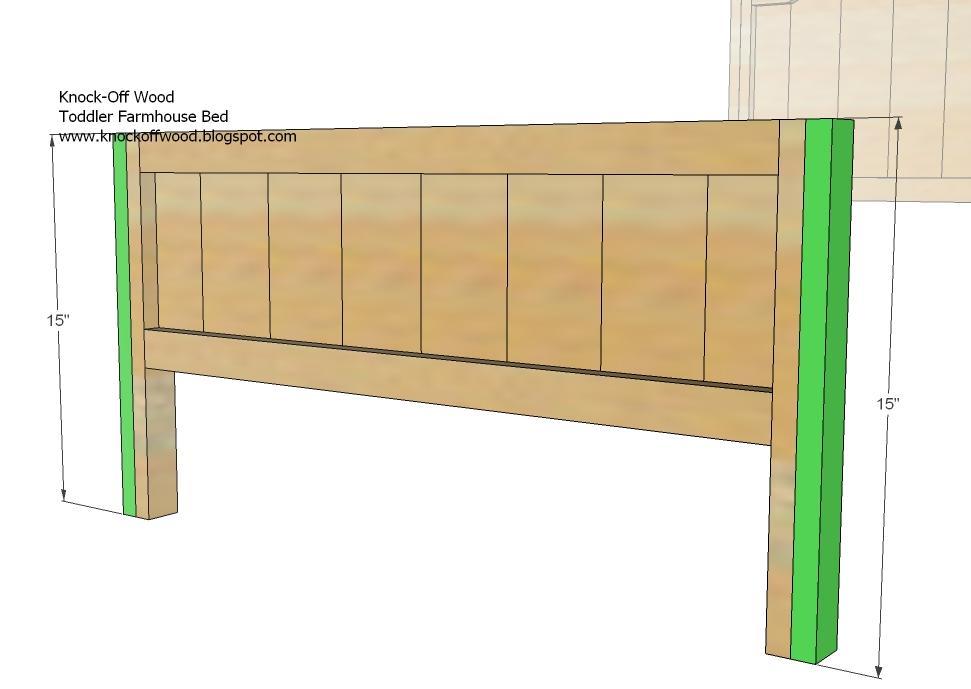
A) 6 – 1×4 @ 18 1/2″ (Center Panel)
B) 2 – 1×3 @ 18 1/2″ (Side Pieces for Center Panel)
C) 1 – 1×2 @ 26″ (Cut to measurement, headboard trim – cut 2 if you do not want a arch)
D) 1 – 1×6 @ 26″ (Cut to measurement, headboard header, use 1×2 if you do not want arch)
E) 2 – 1×2 @ 18 1/2″ (Inside Leg Pieces)
F) 2 – 1×2 @ 30″ (Full Legs)
G) 1 – 1×2 @ 29″ (Top of Panel and Legs)
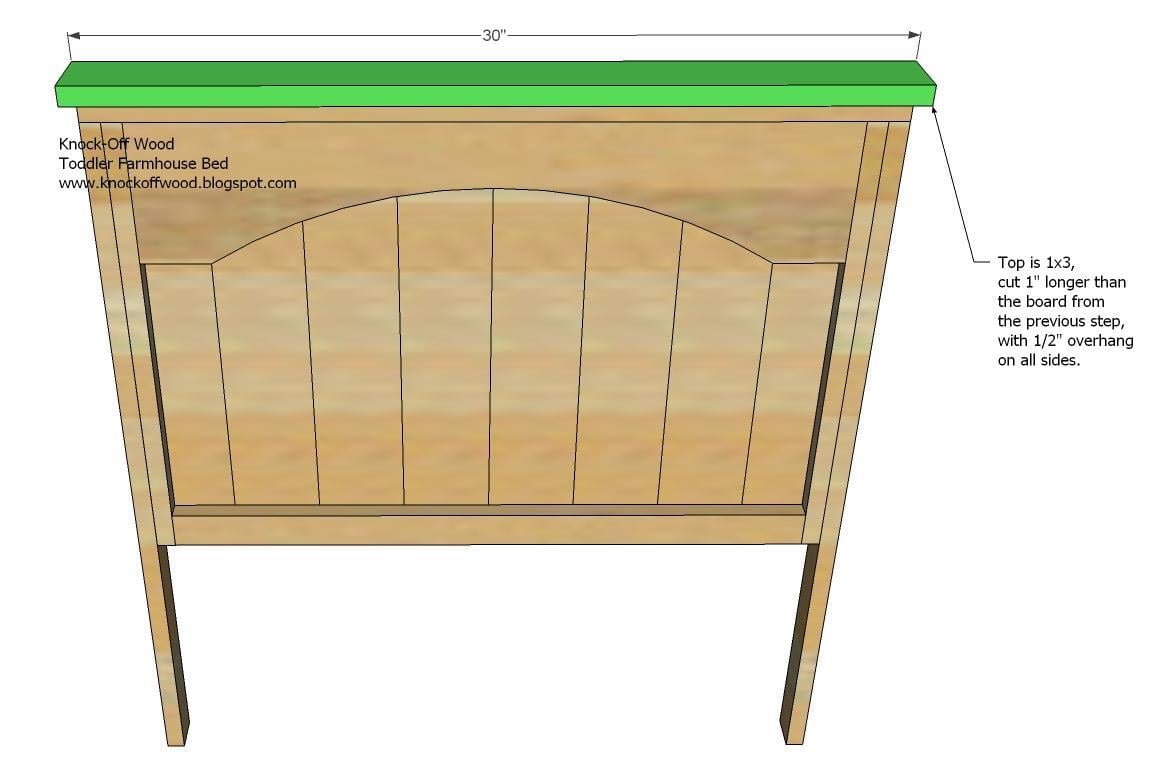
H) 1- 1×3 @ 30″ (Top of Headboard)
I) 2 – 1×2 @ 6″ (Cut to measure, Inside bottom Leg Pieces)
Cut List for Footboard
J) 6 – 1×4 @ 9″ (Center Panel)
K) 2 – 1×3 @ 9″ (Side Pieces of Center Panel)
L) 2 – 1×2 @ 26″ (Trim for the center panel, cut to measure)
M) 4 – 1×2 @ 15″ (Legs)
N) 1 – 1×2 @ 29″ (Top of the Panel and Legs)
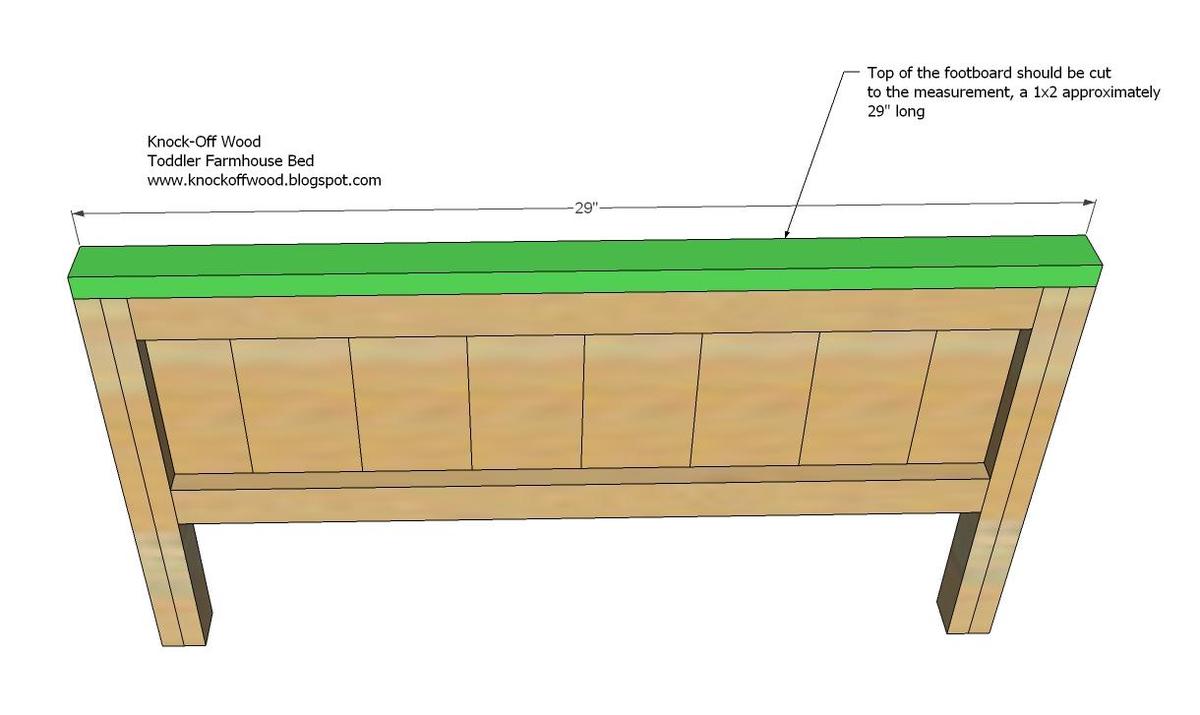
O) 1 – 1×3 @ 30″ (Top of the Footboard)
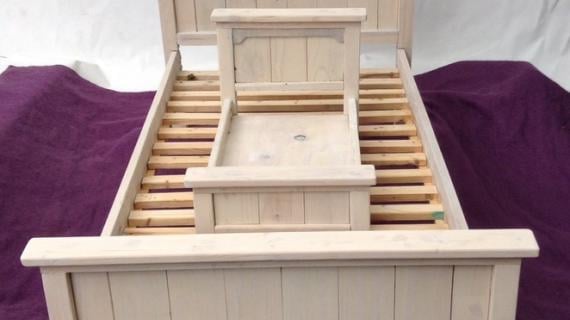
Bed Frame
P) 2 – 1×6 @ 54 1/2″ ( Side Rails)
Q) 1- 1×6 @ 26″ (Endplate)
R) 2 – 1×2 @ 53 1/2″ (Cleats)
S) 18 – 1×2 @ 26″ (Slats)
Please read comments and be aware that I designed this bed off of crib sized measurements from my daughter's mattress. Your mattress may be of a different size, and you will need to modify the plans to fit your mattress. Many people have done this successfully - please take a second to read comments.


Work on a clean level surface. Check for square after each step. Predrill and countersink your screw holes. Measure and cut all your boards. Use straight lumber. Wear eye and ear protection. Always use glue.
Instructions
Step 1
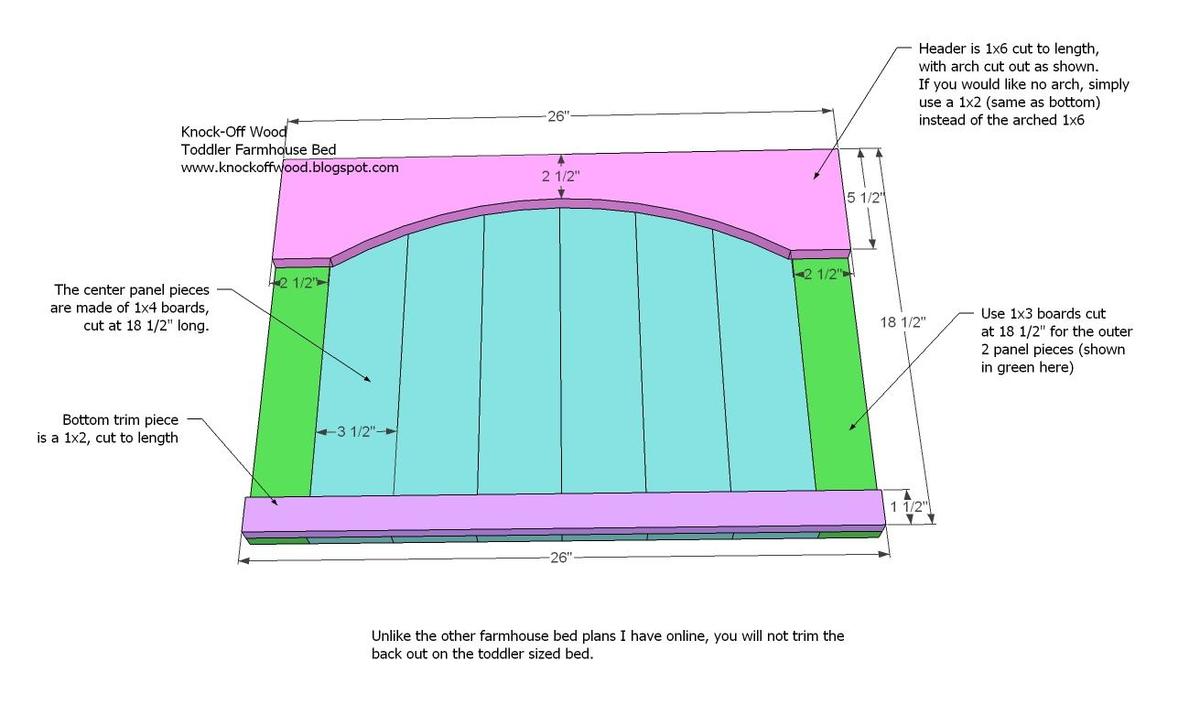
Headboard Panel. Fasten the center panel boards, shown in green and blue above, to the bottom trim piece, as shown above. I recommend using the 1 1/4″ nails and glue, and fastening from the back into the back side of the bottom trim piece. Measure and cut the bottom trim piece to fit. Then if you are choosing to have an arch, cut out the arch and fasten the header to the center panel. If you do not want an arch, you can use a 1×2 board for the header.
Step 2
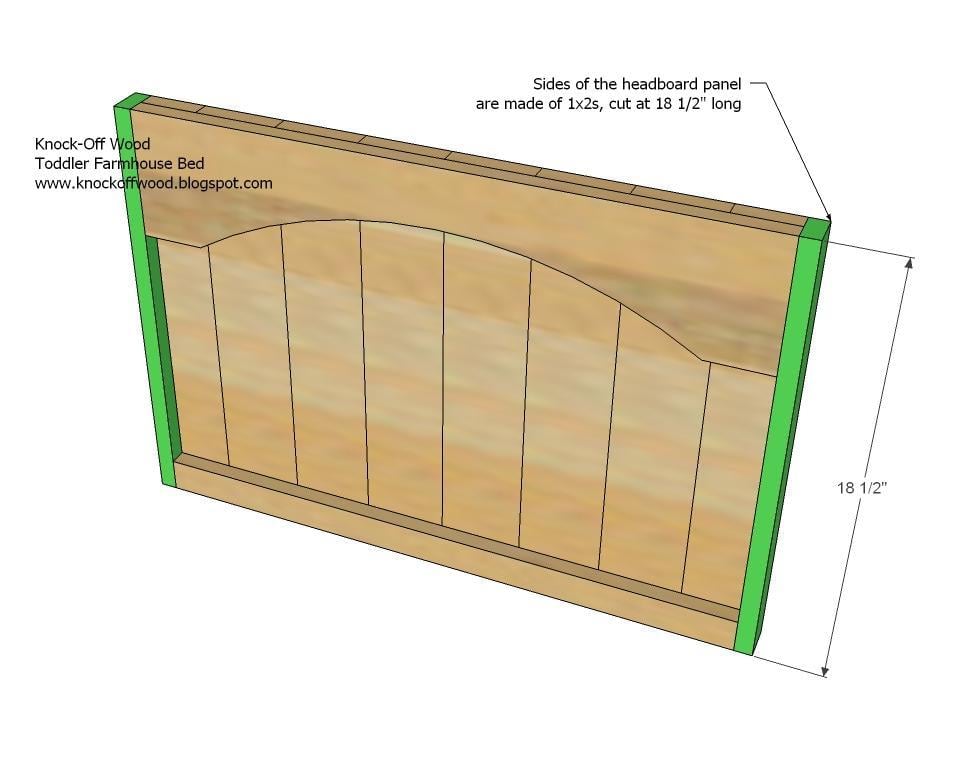
Inside Legs. Fasten the inside leg pieces to the sides of the center panel, as shown above. Use the 2″ screws and fasten to the header and the bottom trim, and the side panel piece.
Step 3

Outside Legs. Use the 1 1/4″ nails to fasten the full leg piece to the inside leg piece from step 2. Then use the 2″ nails to fasten the outside leg piece to the header and bottom trim.
Step 4

Top of the Panel and Legs. Use the 2″ nails to fasten the top piece, G, to the headboard. Measure and cut to fit.
Step 5
Step 6

Bottom Leg Pieces. Measure your 1×6 board to make sure it is exactly 5 1/2″ wide. Then use the above diagram to create a notch for the side rails. Use the 1 1/4″ nails and glue.
Step 7
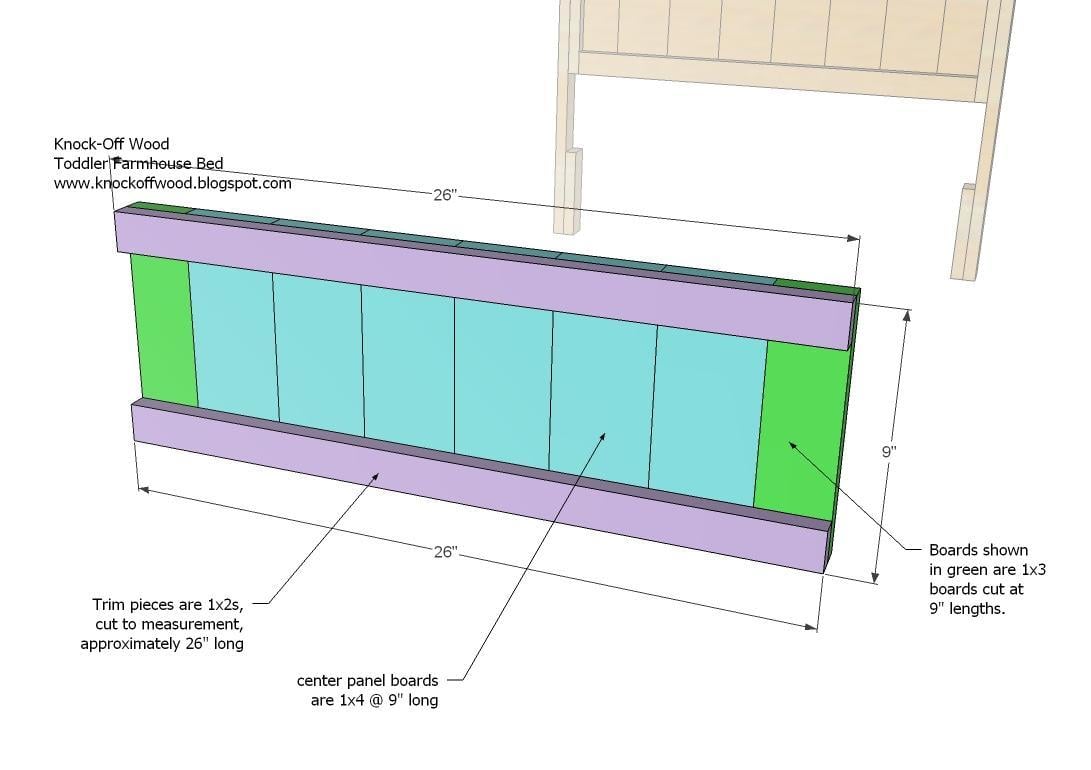
Footboard Panel. Build the footboard panel, shown above, as you built the headboard panel in step 1.
Step 8

Inside Legs. Attach the inside legs using screws to the footboard panel as you did with the headboard panel in step 2.
Step 9
Outer Legs. Fasten the outside legs in place, as you did with the headboard panel. Use 1 1/4″ nails, and 2″ nails where there is more than 2″ of backing.
Step 10
Top of Footboard Panel and Legs. Measure and cut the top of the panel and legs, and fasten in place using the 2″ nails and glue.
Step 11

Top of Footboard. As you did with the headboard, fasten the top piece to the footboard as shown above.
Step 12

Side Rails and End Plate. Begin by fastening the side rails to the end plate using 2″ screws. Then use the 1 1/4″ screws to fasten the end plate to the footboard. Then use the 2″ screws to fasten the siderails to the headboard. The siderails will fit into the opening on the headboard.
Step 13
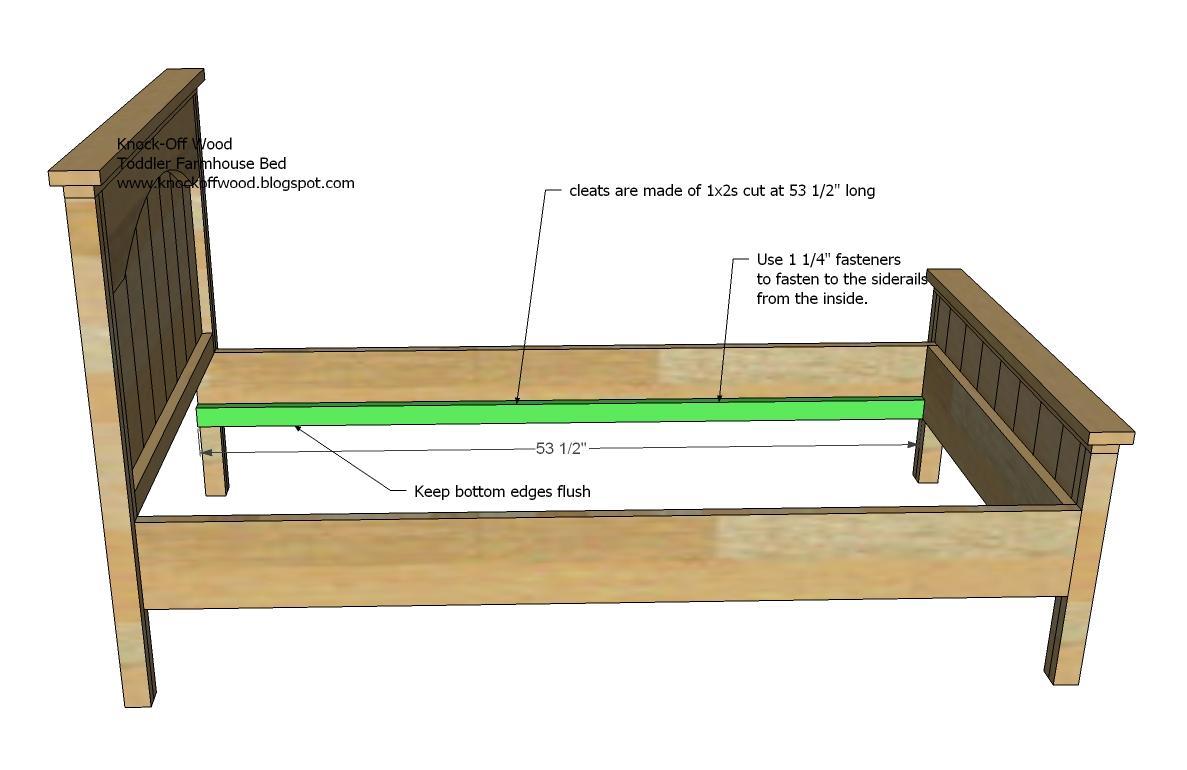
Cleats. Fasten the cleats to the inside of the siderails, as shown above. Use glue and the 1 1/4″ nails.
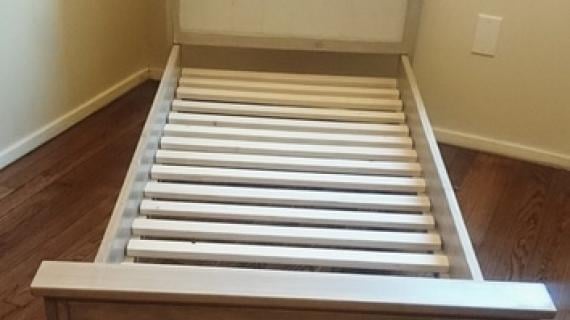
Step 14

Slats. As directed above, lay the slats on top of the cleats. Fasten in place with screws.

Comments
Kathy (not verified)
Thu, 02/11/2010 - 08:07
I am SO GLAD that I've found
I am SO GLAD that I've found your site! You are amazing! I am always thinking up things that I want my DH, who is a stonemason, not a carpenter, to build. Now I can show him your plans and he will be able to figure it all out! I plan to do a post on my blog about you and link to you, if that's ok?
Blessings.
Tiffany (not verified)
Thu, 02/11/2010 - 08:11
thanks for sharing....how
thanks for sharing....how about plans for the oh so cute stand next to the bed??!! ;)
http://stealsdealsandheels.blogspot.com/
Anonymous (not verified)
Thu, 02/11/2010 - 08:23
That is beautiful! Actually,
That is beautiful! Actually, EVERYTHING on here is beautiful! -Suzanne
Danielle (not verified)
Thu, 02/11/2010 - 08:43
My husband made a toddler bed
My husband made a toddler bed by scaling down your other plans a couple weeks ago. Wish we would have waited for your plans! Probably would have saved us a little time and a lot of trial and error!
Kristin (not verified)
Thu, 02/11/2010 - 08:44
I love this! I really like
I love this! I really like how the legs and slats are done. I wish I would have seen this before making my daughter's twin bed. I would have done my legs and slats similar to this instead!!
I second the "oh so cute stand next to the bed" comment. And I think I need one...er...um....my daughter needs one!!!
Leslie (not verified)
Thu, 02/11/2010 - 09:22
I don't have toddlers but I
I don't have toddlers but I DO have 3 pugs who I think just may have to have their own bed, since they seem to have just about pushed me out of my own. I'm putting this on my "to build" list so that, when I move in 3 months, I can get started. Thanks!
Travis (not verified)
Thu, 02/11/2010 - 09:54
Looks amazing, I plan on
Looks amazing, I plan on undertaking this project for my daughter. Out of curiosity, what software do you use to draw up your plans?
Bezzant family (not verified)
Thu, 02/11/2010 - 10:12
Does this fit a crib
Does this fit a crib mattress?
The Faveros (not verified)
Thu, 02/11/2010 - 10:34
I am glad I am not the only
I am glad I am not the only one with a toddler in my bed:) My husband wrote out his own plans after visiting Ikea but I think this would be way easier and for under $50.00 in wood you can beat it - maybe I will make a few for gifts as well:)
Ana White (not verified)
Thu, 02/11/2010 - 10:57
Hi Kathy, Thanks you for
Hi Kathy, Thanks you for offering to blog about me - I would be thrilled to be featured on your blog!
That nightstand is cute. I would just buy some turned legs and add some aprons.
I use sketchup for all my plans. It's free!
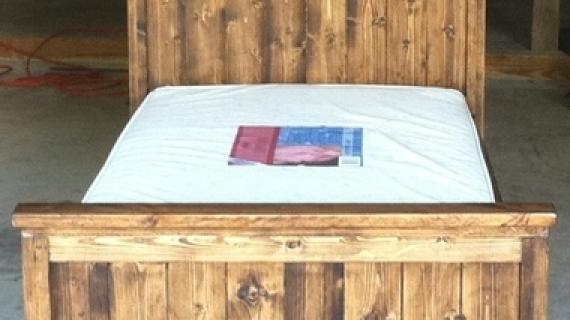
This bed is designed to fit a standard crib mattress of 26" x 52"
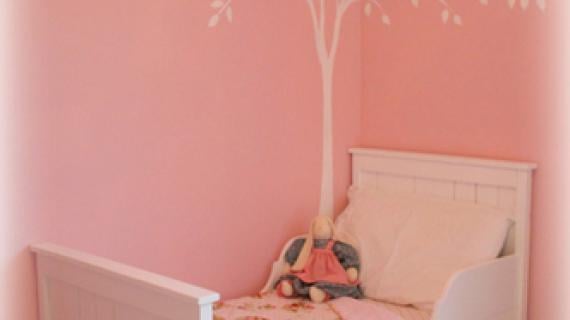
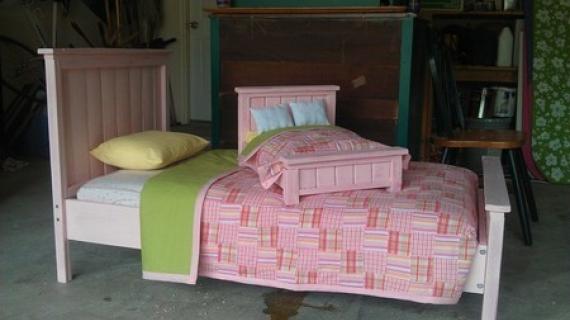
Thanks everyone for commenting. Also, I noticed Ali used 1x3s for her panel trim boards instead of 1x2s. To do this, just cut your trim boards (the 1x2s cut at 26") out of 1x3s.
The Weathered … (not verified)
Thu, 02/11/2010 - 11:26
Ana, thank you so much! That
Ana, thank you so much! That is adorable and the perfect bed I have been looking for for my little guy to soon move out of his crib! Thank you!
Kensey (not verified)
Thu, 02/11/2010 - 18:48
I really want to make the
I really want to make the thomas media stand from Pottery Barn. I can see plans for some of it, but I wondered if you had plans for the one with all of the cabinet doors so the TV is hidden. You have a few pictures of it several posts back while you are talking about different types of wood. I love your site and it has brought me new hope that we can actually have beautiful furniture! I am giddy! Thanks
*MICHELLE CAUDLE* (not verified)
Thu, 02/11/2010 - 20:06
YAY!! I'm so excited that you
YAY!! I'm so excited that you made toddler bed plans! I can't wait to get started on this with my hubby! Thank you!
My coastal home (not verified)
Thu, 02/11/2010 - 22:22
I´m so happy that I have
I´m so happy that I have found your blog! It´s just great! Thanks for sharing! / Jackie
Katherine (not verified)
Fri, 02/12/2010 - 04:36
I am soooooo impressed! Your
I am soooooo impressed! Your talent is amazing!
Keep up the creative work.
Tricia (not verified)
Fri, 02/12/2010 - 06:41
Thank you so much for these,
Thank you so much for these, Ana. My husband and I were just discussing the impening bed change that needs to happen. Your talent never ceases to amaze me.
Oh, and Ali, your little one's bed is PERFECTION!
The Martin Family (not verified)
Tue, 02/16/2010 - 09:51
My husband and I made this
My husband and I made this bed this weekend. It was so easy following your instructions, thank you. My daughter now has a new bed.
Life as Ashley (not verified)
Sat, 02/20/2010 - 17:13
When you list a nailer as one
When you list a nailer as one of the tools to use, what type are you referring to?
I have someone who will give me one of his many finish and/brad nailers.
Is this the correct type, or do I need a nail gun that uses regular sized nails?
I obviously have no clue about what type of nailer is what. :)
Ana White (not verified)
Sat, 02/20/2010 - 17:27
You will want to use a finish
You will want to use a finish nailer shooting 1 1/4" and 2" finish nails.
Leslie (not verified)
Sat, 02/27/2010 - 10:12
OK, I confess that I look at
OK, I confess that I look at these plans just about every day. My puglets are gonna have the best bed in the world! I think that, instead of a crib mattress, I'm going to make a really big mushy cushion with a cover that I can take off and wash. Ginger, my smallest pug, loves to dig around in her bedding, so this will be just the ticket. I'm counting the days until my move and then WATCH OUT!!! the saw dust'll be flyin' for sure!
Leslie (not verified)
Sat, 02/27/2010 - 17:24
This bed is so cute! I would
This bed is so cute! I would love to do it in a twin size. How difficult would it be to convert the dimensions and supplies into a twin bed?
Ryan, Cazra, A… (not verified)
Sun, 02/28/2010 - 17:54
curious Ana, could you make 2
curious Ana, could you make 2 head boards and use it as a bottom toddler size bunk with the 2 footboards as teh top toddler bunk? We have 2 under 3 and need a smaller bunkbed! BTW, I am IN LOVE with your blog. I love, love, love what you do here! And now I have a to-do list about 15 miles long (make head board, make storage and media center, etc)!
Kari (not verified)
Sun, 02/28/2010 - 18:54
First of all-thank you so
First of all-thank you so much for this site. You are so talented, inspiring and giving! Secondly-my DH built this today and noticed that it for for a 26x52 mattress. Our crib mattress is 28x52, so a few modifications needed to be made. I believe 28x52 is the standard crib mattress size, so I don't know if you want to modify your plans or just give a heads up to others. The bed turned out great. It took just a few hours to build and my daughter is sleeping in it tonight. Thank you!!!
In reply to First of all-thank you so by Kari (not verified)
Angie Overton
Sun, 04/28/2013 - 07:34
Curious as to how you
Curious as to how you adjusted? I know I could figure out the slats. But did you have to make any adjustments to the foot/headboard?
Laurel (not verified)
Tue, 03/09/2010 - 20:56
Ana,Do the plans need to be
Ana,
Do the plans need to be adjusted as Kari said? If so, how do you suggest adjusting them?
Thank you so much for all you provide. I can't look at furniture the same anymore. Everything has become an "I could build that!" instead of a "We could never afford that".
Hoogard (not verified)
Thu, 04/08/2010 - 05:38
This is the good blog with
This is the good blog with good images and good details. Please keep on posting the more stuff. I will like to hear more from you.
Bro. Cameron (not verified)
Sat, 04/10/2010 - 11:49
My friend and I just made two
My friend and I just made two of these (one for his son and one for mine). We did find that the 18 slats for the mattress was a little over-kill (we just used 8 and it is very sturdy). I plan on utilizing some of your other plans. Thanks and keep it coming for us!
dawn tt (not verified)
Wed, 03/23/2011 - 13:42
farmhouse toddler bed
how much did it cost you to make one of these beds?
Bro. Cameron (not verified)
Sat, 04/10/2010 - 12:11
The others are correct...this
The others are correct...this bed will NOT FIT a STANDARD Crib Mattress!! I think I can redo what I've done to make it fit, but it would be nice to have done it right the first time.
tech (not verified)
Sun, 04/18/2010 - 16:52
I changed the outer boards on
I changed the outer boards on the headboard and footboard to 1x4s to get the extra 2 inches needed to fit a standard mattress (28"). Increased the trim/header widths by 2 inches when needed as well. Thanks for the plans and pictures Ana, I expect to try another project after this one is finished!
701 Amphib Builder (not verified)
Sat, 04/24/2010 - 23:10
I built this bed as a day
I built this bed as a day project. Pretty easy and fun. It fits the mattress we were using in our crib perfectly.
Here are a few improvements I would like to suggest.
1) I made the slats out of cedar so my daughter's room would smell nice
2) The slats would be much easier to attach if the cleats were instead made with 2x2s
3) It would be much easier to get a better fit when attaching the side boards to the headboard if the 6" inside legs were attached last.
Thank you for providing the plans!
Janae (not verified)
Fri, 05/14/2010 - 08:50
I made this bed for my little
I made this bed for my little one. I adjusted the plan to make it more like the pink one. I used 8 1X4 for the head and foot to make the bed 28". It fit his mattress perfectly.
Tyler & Tanya (not verified)
Sat, 05/15/2010 - 21:44
I just built this bed for my
I just built this bed for my daughter and she absolutely loves it already. If i built another one i think that i would add another 1x3 in the middle of the head and foot boards. the mattress fits almost perfectly but is a little snug. all is well though it was a fun build and gives me a good reason to build more for our home. overall cost for this bed was $50 and borrowing a miter saw. time spent building was about 2hrs at a slow pace with my buddy and I, who by the way have no skills in woodwork. I really appreciate this site and will be sure to build more projects under your designs. Thank you for the time you put into sharing these designs with other people you have already saved me a lot of money as a similiar bed would have cost me over $200 and the quality would have been cut in half. again thank you and my wife and I look forward to building more items.
Janae (not verified)
Thu, 05/20/2010 - 14:51
Here is my bed.
Here is my bed.
http://janaebeth.blogspot.com/2010/05/pictures-of-bed-and-pictures-of-w…
Service Sheet … (not verified)
Fri, 05/28/2010 - 15:43
Thanks sooo much for these
Thanks sooo much for these plans. The bed turned out soo well, I didnt no DH was capable of producing such a professional looking bed.. my son LOVES it - heres the pics http://www.facebook.com/home.php?#!/photo.php?pid=4703108&id=572801668&…
Ana White (not verified)
Sun, 05/30/2010 - 08:35
SSB - Your toddler farmhouse
SSB - Your toddler farmhouse bed is beyond cute! Thanks so much for sharing, couldn't comment on FB, so I thought I would leave you a little note here. Blessings, Ana
Little Sunshine (not verified)
Mon, 05/31/2010 - 06:21
I love this bed. How much
I love this bed. How much would you modify it though to make a crib? I would love for my children's furniture to match in their room.
Bob (not verified)
Mon, 07/12/2010 - 16:36
YAY! My wife has said I can
YAY! My wife has said I can build this for our toddler, instead of buying that @$## bed from Wally World! Now I've got to borrow a miter saw and a nail gun!
Natasha Klein (not verified)
Tue, 08/24/2010 - 12:45
I love this bed my daughters
I love this bed my daughters bed is on the floor because I thought she'd be to hard on a bed (shes a monkey jumper ) will this one hold up?
Rich (not verified)
Fri, 09/03/2010 - 07:28
Quick correction note: it
Quick correction note: it looks like there may be an error on your step 12 ("Then use the 2″ screws to fasten the siderails to the headboard. "). Two inch screws will be too long for two layers of 1x lumber.
Nice work you're doing. Looking at possibly building this for my daughter.
DIY Plans for … (not verified)
Fri, 10/22/2010 - 10:31
[...] What do you think of
[...] What do you think of @craftconniptions Toddler Farmhouse Beds? [...]
Michael (not verified)
Fri, 11/12/2010 - 10:09
I built this for my son but I
I built this for my son but I regretfully did not build a guardrail. The only one I can find online that looks like it might work is from Ikea, but the website lists the height at only 3 inches. Has anyone tried the ikea guardrail? Besides the obvious solution of building one to match, are there any other suggestions out there?
Progress in Ev… (not verified)
Mon, 11/15/2010 - 19:26
[...] before we moved, I
[...] before we moved, I discovered Knock-Off wood and decided that Evelyn needed a new toddler bed. Had I known that things would shortly get as crazy as they did, I would have waited but, as it [...]
Carrie (not verified)
Sun, 12/12/2010 - 22:57
Thank you! I haven't done
Thank you! I haven't done any kind of wood working since 8th grade wood shop. This was fun, and easy, and now my daughter has a really nice bed.

Rooms You Can … (not verified)
Mon, 12/13/2010 - 18:49
[...] Toddler Farmhouse Bed
[...] Toddler Farmhouse Bed [...]
Christy (not verified)
Thu, 12/16/2010 - 23:23
I want to downgrade from my
I want to downgrade from my two 3 year olds twin sized beds. They can bunk but are unsafe as they keep standing on the top bunk. Two twin beds in their room just doesn't give them very much play space. They are also very small for a twin beds. In fact, they can both fit in one bed comfortably. It would be cheap to make 2 of these beds and they would be so cute in their room and I could give my 5 year old the bunk beds. By the time they outgrow the toddler beds they will be old enough for bunk beds so we won't have the space issue. I can give the toddler beds to my family members who have little ones. Is this a good idea?
Frank (not verified)
Sun, 01/02/2011 - 08:40
Well, I built the bed without
Well, I built the bed without measuring my mattress, and now I have a beautiful 26" toddler bed and a 28" mattress. Does anyone know where I can find a 26" mattress? I'm not finding them when I search.
Thanks.
Amy (not verified)
Tue, 01/25/2011 - 14:45
My husband and I made this
My husband and I made this for our little girl. We love it and she loves it to! Thanks for the plans. You can see it on my blog.http://thelittlebeansprout.blogspot.com/2011/01/farmhouse-toddler-bed-d…
Shiree (not verified)
Thu, 01/27/2011 - 06:43
Is this bed sturdy enough
Is this bed sturdy enough that I could stack them to make bunkbeds? Obviously I would need to alter the foot/head boards to be the same height, but are the four corners sturdy enough to support the weight if I stacked them?