Community Brag Posts

Backyard Potting Bench

Submitted by Anonymous (not verified) on Fri, 05/31/2024 - 16:34

I had built your Farmhouse Potting Bench as a gift for my parents and they just recently finished it with a stain that coordinated with their deck and painting it with a pop of color that worked with some of their outdoor furniture.

Matt Janke

Built from Plan(s)
Seasonal And Holiday

Screen door with built in dog door

Our old screen door wasn't cutting it anymore, so I built a new one, and to kill two birds with one stone, I included a built-in dog door. Now I just need to find the motivation to close off the old dog door.

I have the plans to build this screen door with a built-in dog door posted via the blog link below for anyone interested.

Estimated Cost
80
Estimated Time Investment
Afternoon Project (3-6 Hours)
Finish Used
white exterior paint
Recommended Skill Level
Intermediate

DIY Greenhouse Project -Added elevated raised beds & temp/humidity control

Submitted by Anonymous (not verified) on Sun, 07/05/2020 - 09:09

We loved this greenhouse plan from AnaWhite and wanted to be able to grow in 3 seasons so we modified the design to include humidity & temperature control & 18" deep elevated cedar beds inside with 4x4 posts for support and trellis option. We added electricity in order to have a lighted workspace and the ability to put in a circulating fan to control mold and fungus. We added 2 work tables (2x2') on the inside of the door left and right side door in order to do seed trays & store supplies. This was a wonderful project for my husband and my plants inside are doing incredibly well compared to my outside garden beds here in zone 5. Products used:

Foundation
We had a landscape company come and scape/dig a platform and then fill/compact with crushed rock
My husband then used rebar driven into a 4x4 frame in order to secure the frame to the ground and create a base upon which to build the greenhouse

Active ventilation
AC Infinity Cloudline T8 Inline duct fan
Air king range hood wall cap 8" on the bottom outside of the greenhouse wall for air intake + flex 8" duct to the fan itself
Shelter logic autovent automatic shelter vent kits (1 on each side of the front wall) in order to allow air intake from the bottom back of the greenhouse under the elevated beds to flow to the front of the greenhouse and out
Circulating fan- Hurricane wall mount fan 16" - this fan has 3 speeds with tilt function and small mounting bracket

Soil - sourced 3 yards of 50/50 loam/compost from local landscaping supply
60% loam
30% organic compost
10% organic topsoil + perlite

Soil beds
-cedar frame 2 feet wide along sides, 3 feet wide on the back wall
-galvanized metal roofing with holes drilled into it for drainage
-landscape cloth lined

Built from Plan(s)
Estimated Cost
$2000
Estimated Time Investment
Week Long Project (20 Hours or More)
Finish Used
None
Recommended Skill Level
Intermediate

Comments

bushy99

Wed, 09/09/2020 - 13:09

Thanks for that update! I was wondering how to vent this project, as Green houses need the ventilation. Good to know dollar amount also. Great photos.

bushy99

Wed, 09/09/2020 - 13:09

Thanks for that update! I was wondering how to vent this project, as Green houses need the ventilation. Good to know dollar amount also. Great photos.

bushy99

Wed, 09/09/2020 - 13:09

Thanks for that update! I was wondering how to vent this project, as Green houses need the ventilation. Good to know dollar amount also. Great photos.

Folding Workbench

Submitted by MrsCordz on Fri, 10/11/2019 - 07:47

We chose this project because we have a small garage and space is at a premium.  The dimensions of this build fit well in our limited space and allowed us to organize items such as paint, stain, screws and nails into one central location. I chose 2x4's on the sides to give it a more stable feel. Our garage and parking lot are all sloped and with the 2x4's this prevented the twisting. It feels solid and the wheels are smooth. We picked everything up at Home Depot. The screws that came with the hinges are to long and my husband used the Dremel to grind them down. You could just buy shorter screws.  This is one of my firsts builds and I've definitely learned a lot of lessons along the way. Measure, measure, then measure again before you cut a piece and use a level surface to make level pieces. Overall, everyone in my family played a part in helping me build this piece and so I love it and will cherish this piece and the memories always. Thanks Ana for all your fun videos, sharing your life with your family, and providing resources like this plan to us for free. I'm thankful for my son who bought me a compound miter saw for Mother's Day and other family for buying me a Ryobi circular saw. I'm truly blessed and loved. Thanks

Built from Plan(s)
Estimated Cost
120
Estimated Time Investment
Weekend Project (10-20 Hours)
Finish Used
I'm leaving it in the raw due to the nature of the piece. I may put a clear coat on it later.
Recommended Skill Level
Beginner

Comments

Great Plan for Garage Shelf!

Submitted by edapina on Wed, 11/26/2014 - 07:35

This was an easy project to complete in an afternoon that does not require any advance woodworking skills

Estimated Cost
About a $120 bucks considering that I had to buy all the wood and a box of 2 1/2 In screws!
Estimated Time Investment
Afternoon Project (3-6 Hours)
Finish Used
No finish used.
Recommended Skill Level
Beginner

Comments

edapina

Wed, 12/10/2014 - 09:41

This is my second completed project with plans and ideas from your website. Thanks for your good work!

Bench with soft-close drawers for Front Entry

Submitted by drickstan on Tue, 08/11/2020 - 10:43

We needed a bench to fill the space in our front entry and provide some storage for seasonal gear. We couldn't find anything to buy that would work for us, so when my wife found these plans, I had to try it! Couldn't be happier with the results. We widened the bench by a foot to 84" to fill the space. Basically, it just made each drawer 4" wider. Everything else was built to plan. The most expensive thing was the soft-close 24" drawer slides (~$100). As soon as you go above that 24" depth, they get pricier! It was also tricky to get the drawers to catch properly on the soft-close mechanisms, but I made sure to take the time to get it right before closing it all in. Now I just open and close the drawers for the pure satisfaction of it! I used premium pine plywood for the top and I find it still doesn't give that smooth finish I like, even after sanding. I think I'll create a new top out of joined knotty pine planks later and just attach it to the top.

Built from Plan(s)
Estimated Cost
$300 CAD
Estimated Time Investment
Week Long Project (20 Hours or More)
Finish Used
Primer and pearl finish paint.
Recommended Skill Level
Intermediate

Pull-out Shelves

Stationary shelves are such a hassle, especially in a deep pantry cabinet! Now I can actually SEE the contents of my pantry cabinet. Thanks for the inspiration and tutorial to get it done!

Estimated Cost
$50 for 5 shelves & framing, new hinges.
Estimated Time Investment
Day Project (6-9 Hours)

Comments

Petra's Doggie Day Bed

Submitted by Joni on Sat, 08/25/2012 - 10:33

Yes, my husband and I share our bedroom with 6 dogs and an occasional cat (or 4). Our older dog (Petra) has slept on our bed for over 10 years, and she's getting too old to jump anymore. We didn't want her to feel like she was getting kicked off the bed, so I made Petra her very own bed at the end of ours so that she wouldn't feel left out. I was inspired by MurdaRae's dog bed (http://ana-white.com/2012/06/doggie-daybed), and thought it was genius to use a toddler/crib bed. So I went looking for plans on Ana-White, and came up with a mixture between a couple of twin bed plans. I love that the plans are easy enough to modify my sizes, and come up with exactly the custom solution that I need. This was my first big project using Bri-Wax. The last one was kind of a disaster when the wax changed the stain color to something not-so-great. With this project, I learned to wait at least 2 weeks before attempting to wax it. I was blown away with the results. It is a beautiful subtle satin finish that feels great to the touch. Plus, I can easily touch up all the dog fingernail scratches that will inevitably occur. When I re-assembled the bed in my bedroom, I actually nicked it in a few places. No problem -- slap on some more Bri-Wax! My Bri-Wax was 11 years old, and pure liquid. I tossed it in the fridge (per Bri-Wax's recommendation), and it was as good as new. The only real problem I had with this project was leaking sap from one of the 4x4s. I'm still fighting this today. In talking with Rustoleum/Zinsser reps, they said that no sap could penetrate their "Seal Coat" shellac product. After 5 coats, the sap is still penetrating, but only if I turn it on it's side or upside down. I'm still baffled. I made the mattress cover out of a dog blanket, and made the cushions from some remnant fabric (suitable for dogs and weekly washing), so this was a fairly inexpensive project. It was a success because Petra slept in her bed from the fist night and loved that she had all the room to herself, and no boston terrorists (I mean terriers) attempted to bother her.

Estimated Cost
$65 for Wood, $60 for Crib Mattress, $7 for stain, $9 for Decorative Clavos
Estimated Time Investment
Weekend Project (10-20 Hours)
Finish Used
Combination of Minwax Water-based stains: 6 parts Colonial Pine: 1 part American Walnut, followed 4-5 Coats Bri-Wax (Light Brown)
Recommended Skill Level
Beginner

Comments

spiceylg

Sat, 08/25/2012 - 18:41

You did an amazing job! Looks professional and at first glance, you definitely can't tell it's a dog bed.

StacieM

Sun, 08/26/2012 - 10:24

It matches the woods in your bedroom so well and looks great! Also, I love the bolster pillows around the edges. That is something I need to make for our dog bed. Thanks for sharing.

Cedar Planter for Pole Beans

Submitted by swhitead on Mon, 07/20/2020 - 10:41

Increased width of box to 46" by using 8 fence boards instead of 3. put base at 12" down, lined box with landscaping fabric to hold dirt. Created trellis with 1x2 boards with 10" long corner braces, spaced screws 6" apart around edges and weaved cotton thread to create the trellis. Used 12" scraps of 2x2 to create a "slot" inside the center of the planter to support the trellis. Added container mix and green pole beans started in egg cartons earlier in the spring.

Built from Plan(s)
Estimated Cost
$35
Estimated Time Investment
Day Project (6-9 Hours)
Finish Used
None
Recommended Skill Level
Intermediate
Seasonal And Holiday

Sandbox with Built-In Seats

Submitted by Loral on Wed, 05/09/2012 - 15:32

This is a fun project even for beginners. If you have an interest in building a sandbox, and have some tools, I'm sure you can make this easy enough!

I used 2" X 10" wood for my sides instead of the 1" as the plans call for. This gives extra strength and more depth. When you use 2" wood, you will have to turn your 1 X 4's the other way to match the 47½" width, because with the added width of the 2 side boards, your new width is now 49¼". It's not difficult, you just have to match your 1 X 4 X 47½ boards to the proper width. It will turn out fine, they just won't match the plans or pics of those using 1 X 8's for sides.

Sorry, I'm delivering this to my grandson's house for his birthday present, so no sand, but use landscaping cloth under this sandbox, then fill with sand.

One other thing, I'm toying with the idea of matching the angle the backrest is at and re-cut new pieces of 7½" arm rests. I think that may look a little better than the rectangle blocks.

My added pics are as follows:
1. The side boards all cut, and sizing up the frame.
2. All other boards are cut; I laid them out for fit before screwing the pieces together.
3. Using a square will help you keep everything at the correct angles. Also note in this picture and the next where I used two ½" pieces of wood I ripped to keep the ½" spacing uniform. Just rip any wood to the ½" width, make 2 pieces and butt against the next board on both sides, then screw them down. Makes it VERY easy to keep a uniform gap.
4. This picture shows me using the same "spacer" when putting the hinges in place. The red arrow points to the wood spacer.
5. The first bench is complete, and working fine!!

With the wood I used in my project, I used 2½" self tapping deck screws for the frame and attaching the 1X4's to the frame; I used 2" galvanized for attaching the 1X4's to any 2X4's; and for the hinges, I used ¾" wood screws. Using these sizes prevented the screws from coming through the other side.

I bought everything needed in this project at Lowe's and it was under $90 in costs; this is all the lumber (upgrading to 2 X 10's), hinges, screws, and handles.

Estimated Cost
$90 - Everything purchased new at Lowe's
Estimated Time Investment
Afternoon Project (3-6 Hours)
Finish Used
This is a gift, so I'll leave it to my daughter and son-in-law to use fence or deck stain to match their house. All pics are un-toned raw pressure treated lumber.
Recommended Skill Level
Beginner

Comments

Lady Goats

Wed, 05/09/2012 - 16:25

I was just going to tell you how to add a brag blog when I saw that you'd already done so! YAY! Your sandbox looks awesome! You guys are all making me wish I had a tolerable yard to put a full-sized box in!!!

Loral

Thu, 05/10/2012 - 13:49

Yeah, you made the plans easy to follow. It was a lot of fun. I spanned it over 2 days, but still was only around 4 hours of work.

I'm considering cutting the "arm rests" at an angle to match the slope of the back rest. I may play with that this weekend.

Thanks for all the help!

Also, what did you use to make the sketch type pics for the plans? I know you mentioned something about not knowing how to put the hindges on them. If I can help, I can probably do it for you in PhotoShop.... Just let me know.

Thanks again!
Loral

2x4 Outdoor Sectional Sofa

Submitted by lknolan2 on Sat, 04/18/2020 - 20:19

Great Plan! Loved how easy it was to build and how little the cost was.

Estimated Cost
$200
Estimated Time Investment
Afternoon Project (3-6 Hours)
Finish Used
Outdoor deck stain by Valspar in Canyon Brown
Recommended Skill Level
Beginner

Comments

jwood4

Sun, 08/01/2021 - 18:40

Looks amazing! What method did you use (pocket holes, dowels, deck screws, etc) to join the visible portions like the arms?

Seasonal And Holiday

My Simple Outdoor Lounge Chair with 2x4 modification

I modified this chair with 2x4's as the base and 2x2 for decoration on arms, this is prior to sanding and finishing

Built from Plan(s)
Estimated Cost
$15-$20 dollars, depending on local lumber prices and finishing options.
Estimated Time Investment
An Hour or Two (0-2 Hours)
Finish Used
Unfinished
Recommended Skill Level
Beginner

Comments

RandyW

Sat, 06/13/2020 - 16:33

I always take my sander to the sharp edges and round them off

Mudroom Closet Makeover

Submitted by Anonymous (not verified) on Thu, 01/21/2021 - 07:10

The concept of hidden boot storage at the back is genius!!! I knew as soon as I saw your plan that I needed that in this space! Thank you so much for what you do!

Finish Used
Bench seat was wood conditioner, minwax early American, minwax weathered oak. Then finished with shellac. The coat hooks are from Amazon. The ring pull is from Lee Valley.

Comments

Christmas 3-tier cookie stand

Submitted by calcowoods on Thu, 12/31/2020 - 12:51

Inspired by Shara of Woodshop Diaries, created this 3 tier tray for displaying cookies for Santa. Added a 3 dimensional star as the topper and simply followed the excellent photos and schematics on Shara's website.

Estimated Cost
$5
Estimated Time Investment
Afternoon Project (3-6 Hours)
Finish Used
Minwax paste wax
Recommended Skill Level
Beginner

Comments

Farmhouse Writing Desk with Turned Legs

Submitted by kwildman on Mon, 01/07/2019 - 08:53

I modified the Small Old English Style Farmhouse Dining Table plan to build a writing desk.   I used five 1x6 boards for the top for a width of 27.5 inches.   I made my desk 56 inches in length.  I put the drawer on the long side like a pencil drawer.   I did use the legs that Ana recommended in the plan.   I love how it turned out.  I used dark walnut danish oil and dark wax for the finish.  

Estimated Cost
225
Estimated Time Investment
Day Project (6-9 Hours)
Finish Used
I used Watco dark walnut danish oil and Minwax dark paste wax.
Recommended Skill Level
Intermediate

Comments

kwildman

Fri, 10/04/2019 - 21:46

Thank you!  I used Watco Danish oil and I used Minwax dark wax.  I've tried alot of different wax brands and I always come back to Minwax.  It dries the hardest in my opinion.

Wife's Kindergarten Classroom

Been a while since I had time to actually build anything worth posting about! My wife wanted some items for her Kindergarten classroom this year, so built several items, most inspired by the Farmhouse family.

Estimated Time Investment
Day Project (6-9 Hours)
Recommended Skill Level
Beginner

Comments

sido17

Thu, 07/18/2019 - 15:27

I would love the dimensions or plans for this. Would love to make it for my classroom.

dlee69

Tue, 07/30/2019 - 12:07

Hello

Can I please get the plans to the u shape table?

Thanks

Linguine

Mon, 08/19/2019 - 12:09

I am guessing the corner posts are 2 x 4s, the top is 2 x 10s.  It looks like the width is 6’ (looking at the floor carpet tiles being 24” square). So 2 - 2 x 10s side by side for the main part of the desk top and 2 - 2 x10s perpendicular on each side of the chair.  I guess the height is subject to choice and the length of each side would also be subject to choice or to the length of the 2 x 10s to be economical.


an educated guess would be 4 - 8’  2x10s for the top and 6 - 6’ 2 x 4s for the legs?  


Anyone else have any input here?  Open to suggestions.....

Chicken Run with Turkey House

Submitted by vendo on Wed, 10/13/2021 - 10:03

My daughter helped me build this enclosure. We used Ana's chicken run plan, but just made it taller so we could walk in easily. We added an overhang to store food and pellets under, for the supports we used Ana's easy shelves angle support plan, and finally we used the playhouse base plan for the base of turkeys house. All plans used are linked below. We ran the chicken wire out under the structure and still need to bring in some large rocks or pavers, but so far no issues with predators. Turkey was getting too big to fit in the smaller coop, so we decided to have fun with his house and used cedar fence pickets and some treated 2x4's, built a box and jig sawed the shape of a turkey. As you can see in the first photo the ladder for turkey wasn't big enough, all the other chickens were in his house, lol. So I beefed up the ladder and he happily can put himself up at night now:) Overall a super successful project, I wasn't sure what to do with the top and just at that point, the neighbor walked over and offered the metal, talk about a huge win and the perfect solution! We attached the run to the previous smaller structure and now they have so much more room and are laying like crazy:) Finally, I think this would make a great dog kennel as well...

Poolside Towel Cabinet from Benchmark Cabinet Plan

Submitted by Anonymous (not verified) on Thu, 03/23/2017 - 11:21

My father and I made this awesome poolside towel cabinet using the Benchmark Cabinet plans. A super easy 1 day build and it looks amazing on the patio. Bring on the pool weather! 

Estimated Cost
$60
Estimated Time Investment
Day Project (6-9 Hours)
Finish Used
Chalk paint/Poly topcoat
Recommended Skill Level
Beginner

My Garden Shed

Submitted by jimavera on Tue, 03/13/2018 - 09:07

I used these plans of this project. Only differences are I used 2X3 studs. I also made the shed longer,, its 3ft X 8ft.. Also on the back I used two siding sheets since it wouldnt be seen. Did it over the weekend. Just needs shingles and stain. Anyway I love it. Had a spot behind the house where it fits perfectly. Thanks

Built from Plan(s)
Estimated Time Investment
Weekend Project (10-20 Hours)
Recommended Skill Level
Intermediate
Seasonal And Holiday

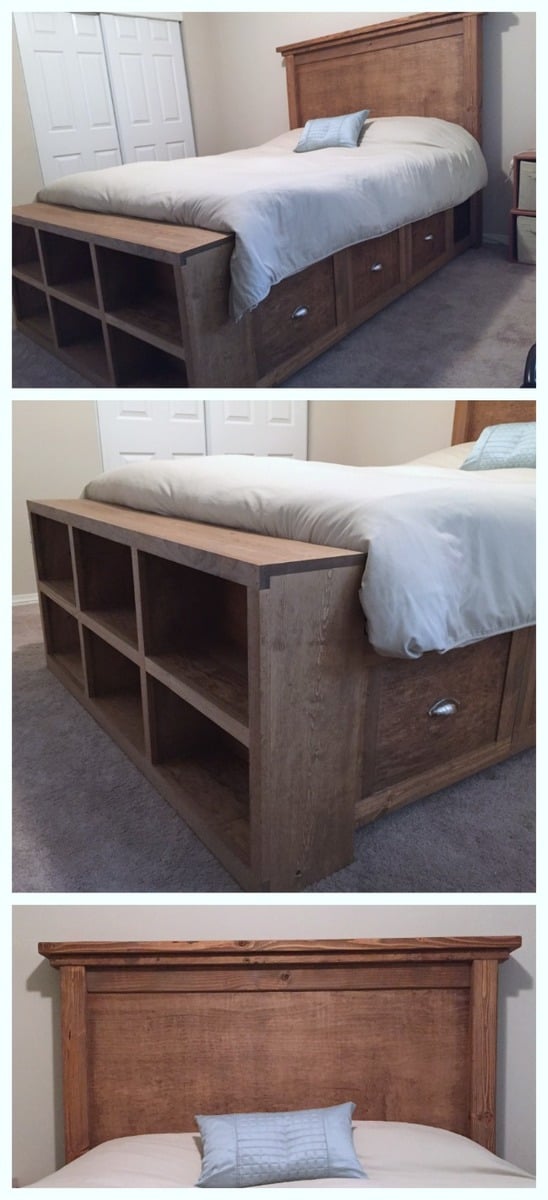
Farmhouse Bed with Storage and Bookshelf footboard

Submitted by rbgreene04 on Sat, 05/21/2016 - 15:50

I altered the plans just a bit so that I could make use of the drawer closest to the headboard, while using bedside tables as well (not the ugly ones in the pictures, but some that only exist in my mind as of now). With the plan as is, I didn't think that first drawer would be able to open if you have a nightstand. So I left about a 17" gap that can be used as an open shelf for storage, and still had room for 3 drawers. I also wanted to include a bookshelf as the footboard to make it multifunctional. We have a ton of books and no place to store them (fear not, a large bookshelf/media center is coming soon!) I also altered the top of the headboard just a bit to give it more texture and visual appeal (hopefully, but beauty is in the eye of the beholder so I've been told). Lastly, I did not put the 1/4" plywood backing on the drawer carcasses. They were pretty sturdy as is, and only got more sturdy as they were attached to the headboard and footboard; I'm not worried about racking at all. Leaving the back off also allows me to pull the drawers out and access some hidden storage in between the two drawer carcasses. 

I wanted a simple finish, so I rubbed it with dark walnut Danish oil. Super simple finish and I think it'll hold up as the bed is not like a desk that needs poly or something. 

Estimated Cost
Cost? Great question! I build things, but don't keep track of receipts. Whoops! It's a major flaw of mine, and I'm working on it. I'd estimate just shy of $300.
Estimated Time Investment
Week Long Project (20 Hours or More)
Finish Used
I sanded to 120 and then lathered on Dark walnut Danish oil. I let it soak into the wood, and boy was the wood thirsty. Then reapplied after about 30 minutes and wiped off the excess, which there wasn't much excess--did I mention the wood was thirsty?
Recommended Skill Level
Intermediate

Comments

ciara5545

Sun, 08/28/2016 - 19:50

This bed turned out amazing.  I love the modifications and agree the first drawer will be more usable.

Back