


Plans for 36" wall kitchen cabinet from Ana-White.com


DIY Friends!
Hope you are still enjoying a little down time (and maybe a little DIY time?) this Holiday season!
We are trying to stay warm up here in Alaska, and are still waiting on a very late baby to show up ... and fighting the urge to not start on kitchen number two ... talk some sense into me, okay?
More kitchen cabinet plans today - this time, it's a wall 36" wall cabinet, much like the 21" wall cabinet we shared a few days ago. But with a 36" width, it's recommended to do double doors instead of a single door. The general rule is the door should always be taller than it is wide - I personally wouldn't do any larger than a 24" wide wall cabinet with a single door - and even then, that's a pretty darn big door (and heavy).
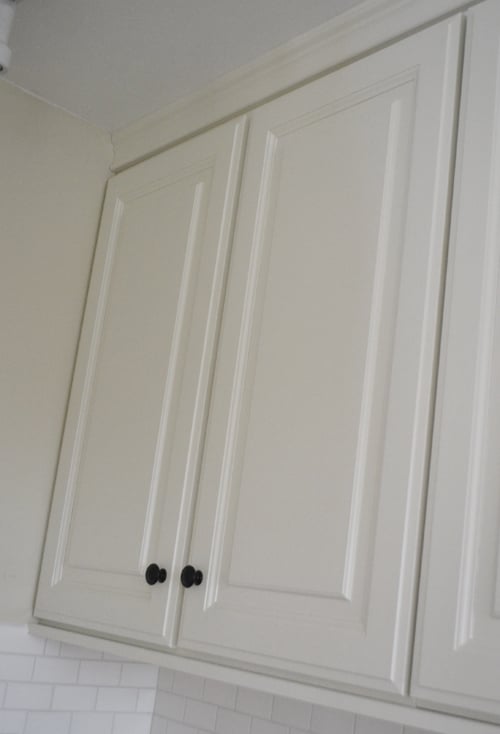
Because of the change in the double doors, you also need to add a center stile (also called a mid-stile or a vertical piece on the face frame) to cover the gap between the double doors.
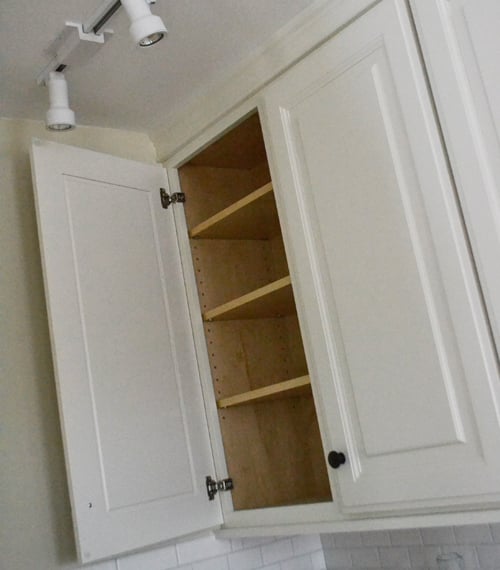
We again used PureBond Formaldehyde-Free plywood in prefinished maple (about $20 more per sheet and you can do a couple of cabinets - or more for walls - with a sheet) for the carcasses so no finishing required inside the cabinet.
In fact, the only finishing we had to do was apply edge banding to the fronts of the shelves, and paint the doors and face frames. Definitely worth the extra $$$!
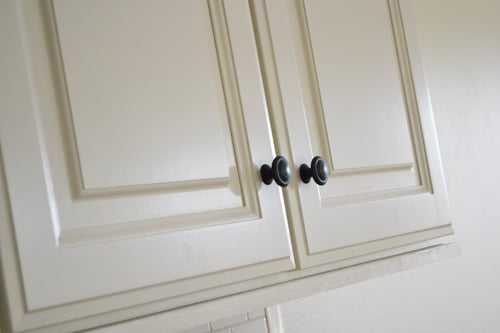
The beautiful doors were ordered from Cabinet Now - can you believe all we did was apply paint and primer to these doors? They are beautiful!
Plans for the 36" wall kitchen cabinet follow!
XO
Ana and Family

Preparation
12 feet of 1x2s for face frame
27" of 1x3s for face frames
3/4" plywood ripped into strips 10-1/4" wide (for 12" overal depth wall cabinets including face frames and full overlay doors)
1x4 or plywood scrap for the back support
1/4" plywood for back
1-1/4" pocket hole screws
3/4" finish nails for attaching back
edge banding for finishing shelf fronts
shelf pins for adding shelves
DOORS and 2 sets of 1-1/4" concealed hinges for FACE FRAMES
2 - 3/4" plywood @ 10-1/4" x 30" (Sides)
2 - 3/4" plywood @ 10-1/4" x 34" (Top/Bottom)
1 - 3/4" plwyood OR 1x4 @ 34" (Back Top Support)
1 - 1/4" plywood @ 30" x 25-1/2" (Back)
2 - 1x2 @ 30" (Face Frame stiles)
2 - 1x2 @ 33" (Face Frame rails)
1 - 1x3 @ 27" (Face Frame mid stile)
Shelves should be cut to fit depending on attaching and if you use edge banding
FULL OVERLAY DOORS (2) SIZE 17-1/2" x 29"


Please read through the entire plan and all comments before beginning this project. It is also advisable to review the Getting Started Section. Take all necessary precautions to build safely and smartly. Work on a clean level surface, free of imperfections or debris. Always use straight boards. Check for square after each step. Always predrill holes before attaching with screws. Use glue with finish nails for a stronger hold. Wipe excess glue off bare wood for stained projects, as dried glue will not take stain. Be safe, have fun, and ask for help if you need it. Good luck!
Instructions
Step 1

First, make up your sides by drilling shelf pin holes on the insides for adjustable shelves (I use a Kreg Shelf Pin Jig) - it's much easier to do this now than after assembly - and drill 3/4" pocket holes facing the front for attaching face frames in later steps (I use a Kreg Jig for drilling pocket holes).
For taller shelves, you would simply just cut the sides taller. For deeper shelves, you would simply adjust your plywood rip width.
Step 2

Drill pocket holes facing forward along front edges of top and bottom for attaching face frames in later steps (as done with sides).
Drill 3 3/4" pocket holes on each end of the top and bottom and attach to the sides, using 1-1/4" pocket hole screws. All pocket holes should be on the outsides of the cabinet and the inside of the cabinet should have no visible joints or holes.
Step 3

Attach back support inset at the top of the wall cabinet, hiding 3/4" pocket holes on back side. When you hang the cabinet on the wall, screw through this board into a stud in the wall. For additional support or heavy cabinets/contents of cabinets you can add a second support at the bottom of the cabinet as well.
Step 4

The back is not structural but finishes out the inside of the cabinet. It should not be used for hanging the cabinet. Use glue and nails to attach.
Step 5

Step 6

We used shelf pins for adjustable shelves, and cut the shelves 10" deep by 33-3/4" wide, and applied edge banding to the fronts of the shelves.
Step 7

We opted for a full overlay door using 1-1/4" overlay concealed euro face frame hinges for the doors.
It is always recommended to apply a test coat on a hidden area or scrap piece to ensure color evenness and adhesion. Use primer or wood conditioner as needed.


Comments
tbotello
Fri, 12/27/2013 - 16:00
Board at base of wall cabinets?
Ana, did you cut a full-length board to cover the underside of your wall cabinets?
In reply to Board at base of wall cabinets? by tbotello
Ana White
Sat, 12/28/2013 - 08:39
Hi - we actually added a 1x3
Hi - we actually added a 1x3 at the base - 1" extruded from the face frames, mitered around to finish off the base of the wall cabinets.
Mountainrivers
Tue, 02/17/2015 - 06:41
Dimensions of 1/4" back
Am I missing something or should the dimensions be 30" X 35 1/2" instead of 30" X 25 1/2"?
cottoncandi76
Thu, 10/15/2020 - 05:47
Cupboard doors
Did you build the doors or order them completed. I'm lost.