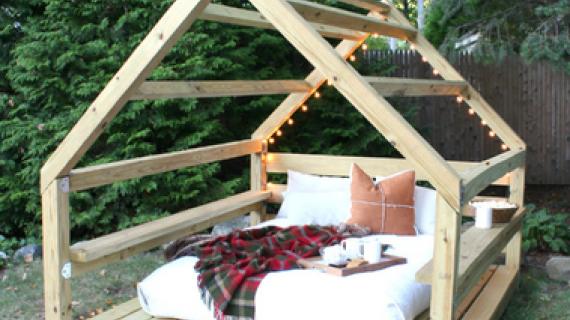
A substantial leg modern version of the Farmhouse Table.
Projects built from this plan. Thank you for submitting brag posts, it's appreciated by all!
1- 10′ long 4×4 Post, cut into 29 7/8″ pieces
10 – 2×4, 8 foot or stud length
4 – 2×2 @ 8 foot long
1 – 2×3 @ 6 foot long
2 1/2″ Screws
3″ Screws
Wood Glue and Finishing Supplies
4 – 4×4 Post @ 29 7/8″ (Legs)
6 – 2×2 @ 30″ (Joists)
8 – 2×4 @ 65″ (Tabletop Boards)
2 – 2×4 @ 58″ (Tabletop Side Boards)
2 – 2×3 @ 28″ (End Joists – you could use 2x2s here if you cannot find 2x3s)
2 – 2×2 @ 58″ (Side Aprons)
Tabletop
For those of you with a Kreg Jig™, you will want to build your tabletop first (all 10 tabletop boards) with a Kreg Jig™ and then add the supports. For those of you without a Kreg Jig™, the pocket holes will make your joints between the tabletop boards smooth and tight (like mine in the photo) but if you just can’t afford one, you can screw through the supports into the underside of the tabletop boards, minimizing the gaps between the tabletop boards as you go. Use 2 1/2″ screws and glue. For those of you looking for that super smooth tabletop – you could run your 2x4s through a table saw and trim off any rounded edges first but beware that this will change the dimensions of your support boards. I did not run mine through a tablesaw, and think that’s what a farm table is all about – being a little rustic and obviously made of real boards. Predrill all holes.
Legs
I used pocket holes to attach the legs, but you can accomplish the same thing with a countersink bit. Just carefully predrill a hole with the countersink bit at an angle from the underside of the table into each of the legs. Then attach the legs with screws and glue as shown above. The more different directions that you can put screws into the legs, the less likely the leg will wobble in the future. Don’t forget the glue.
Today I had a photo shoot for Fresh Home Magazine (make sure you get signed up for your free issue so you'll get to read the article when it publishes) and the set just needed something . . . more than a honeysuckle pink bench . . . . it needed a farm table. And you know me, if I get a chance to build a farm table, I'm building it!
It just so happens that I was in The Home Depot last week and spotted these gorgeous 4x4 posts, just $12 for a 10' long post. Some quick math 30" x 4 legs = 10 feet, and I was tracking down an orange apron and begging the associate to cut the post down into exactly 29 7/8" pieces (saw blade takes up the other 1/8"). The associate looked at me like, of course, lady, we do this every day, and made perfect cuts for me.
So I need a farm table, had 4 - 29 7/8" long 4x4 posts . . . you take a guess. What Farm Table should we build?
Many of our readers have been requesting plans for a table inspired by Crate and Barrel's Big Sur Collection. This is what they would call a win-win-win situation.
Me especially wins :) I'm having a hard time NOT moving this table into my teeny dining space or moving my computer and other office mess on top of it.
We had scrap 2x4s leftover (yes, can you believe these are the scrap pieces?) so I used them as a tabletop - thus the breadboard on the end. Aren't those 4x4s beautiful? I just sanded the whole table and haven't decided on a finish yet. For the photo shoot, au natural was best. What do you suggest?
The plans here will show you how to build a 65" x 35" x 30" dining table, but I'll also give measurements for the bench in this post. I can't show you more of the table just yet because it's part of the photo shoot, but you get the idea.
The beauty of this table is highly dependent on your access to high quality 4x4 posts. If you can't find beautiful 4x4 posts at Lowes or Home Depot or Menards, try a specialty hardwood dealer. Also, for those of you excited about spring being just around the corner, you could use cedar 4x4s and make this an outdoor table. For water drainage, I suggest spacing the tabletop boards about 1/4" apart, and also cedar boards for the tabletop and supports.
A vintage look step stool featuring two steps and a decorative footer.
Projects built from this plan. Thank you for submitting brag posts, it's appreciated by all!
1 – 1×12 @ 32″ (Sides)
1 – 1×2 @ 50″
1 – 1×8 @ 32″ (Treads)
2″ screws or 1 1/4″ pocket hole screws
wood glue, wood filler and finishing supplies
2 – 1×12 @ 15 1/2″ (Sides – cut out in step 1)
4 – 1×2 @ 12 1/2″ (Supports)
2 – 1×8 @ 15″ (Treads)
Before Christmas, I drew up this plan and meant to get to it by the Holidays. But reality happens, and I just don't get as much done as I could hope. So a printout of this plan got burried on my steel magnet wall for a month or two . . . until yesterday.
I'm working on a photo shoot for Fresh Home magazine (so excited that they have asked me to do another project for their fabulous magazine! You can go here to get signed up to get your free issue.) and the shot just needed . . . something. Something a tad vintage, a little not perfect, and a lot useful.
I wanted this stool to look well-used and far from perfect, thus the heavy distressing and uneven jigsaw cuts and exposed screws. To get this finish, I simply painted one coat of flat honeysuckle pink paint (Premium Paint by Behr in Flat) with a brush and let dry overnight. This is very important. If you begin distressing too soon, the paint will come off in gooey chunks, as opposed to a-little-wear-over-alot-of-years looking. Then just started sanding with a power sander and medium grit sandpaper, concentrating on the areas that would get natural wear. If you wanted to stain the exposed wood, you would need to apply a clear coat before sanding. The clear coat protects the non distressed areas from accepting the stain, with the exposed wood area accepting the stain. You can go the other route - stain before paint, but you would need to add primer because it's difficult to put paint over stain.
End tables featuring two drawers and a large open top shelf. Open base design. Square styling.
1/2 – sheet of 3/4″ hardwood plywood (or MDF for paint grade) measuring 48″ x 48″ or larger
4 – 2×2 @ 8 feet long
2 – 1×6 @ 8 feet long
1 – 1×2 @ 8 feet long
Hardware
2 1/2″ screws, 1 1/4″ screws, or 2 5/8″ trim screws
wood glue, wood filler and finishing supplies
2 sets of 16″ Drawer Slides
2 – 3/4″ plywood or MDF @ 17″ x 17″ (Shelf and Top)
3 – 3/4″ plywood or MDF @ 17″ x 12 1/4″ (Sides)
2 – 3/4″ plywood or MDF @ 17″ x 14 1/2″ (Drawer Bottoms – note different than dimensions shown in plan)
4 – 2×2 @ 26″ (Legs)
12 – 2×2 @ 17″
5 – 1×2 @ 17″ (Drawer Slide Spacers and Drawer Trim)
4 – 1×6 @ 17″ (Drawer Sides)
2 – 1×6 @ 16″ (Drawer Backs – note different than shown in plans)
2 – 1×6 @ 16 3/4″ (Drawer Fronts)
Cut Plywood
I was just at The Home Depot the other day, and spotted these gorgeous 4×4 posts (been lusting after Crate and Barrel’s Big Sur Table for the longest time). An associate gladly cut the 4×4 to size for me, and the cuts were just perfect and only took a minute. So if your local store has a good staff, perhaps bring this cutting diagram in. Always remember that the saw blade takes up approximately 1/4″ and you cannot just mark out all the cuts and go – your pieces will not be accurately cut. My advice is to cut two strips that are 17″ wide, and then cut the strips into the 17″, 12 1/4″ and 14 1/4″ pieces. And then from the scrap cut your final back piece.
Drawers
You will need to build two drawers. It’s basically 1x6s surrounding the bottom plywood. You should always build your drawers to fit the opening in the end table, not to shown dimensions. Check the clearance on your drawer slides (normally 1/2") and adjust the door measurements to fit your endtable.
We are DIYing our moms a Duplex in Alaska! Check out our progress so far as we owner build a home, step by step. Read the Momplex blog here.
New here? Check out our most popular free, step by step furniture plans.