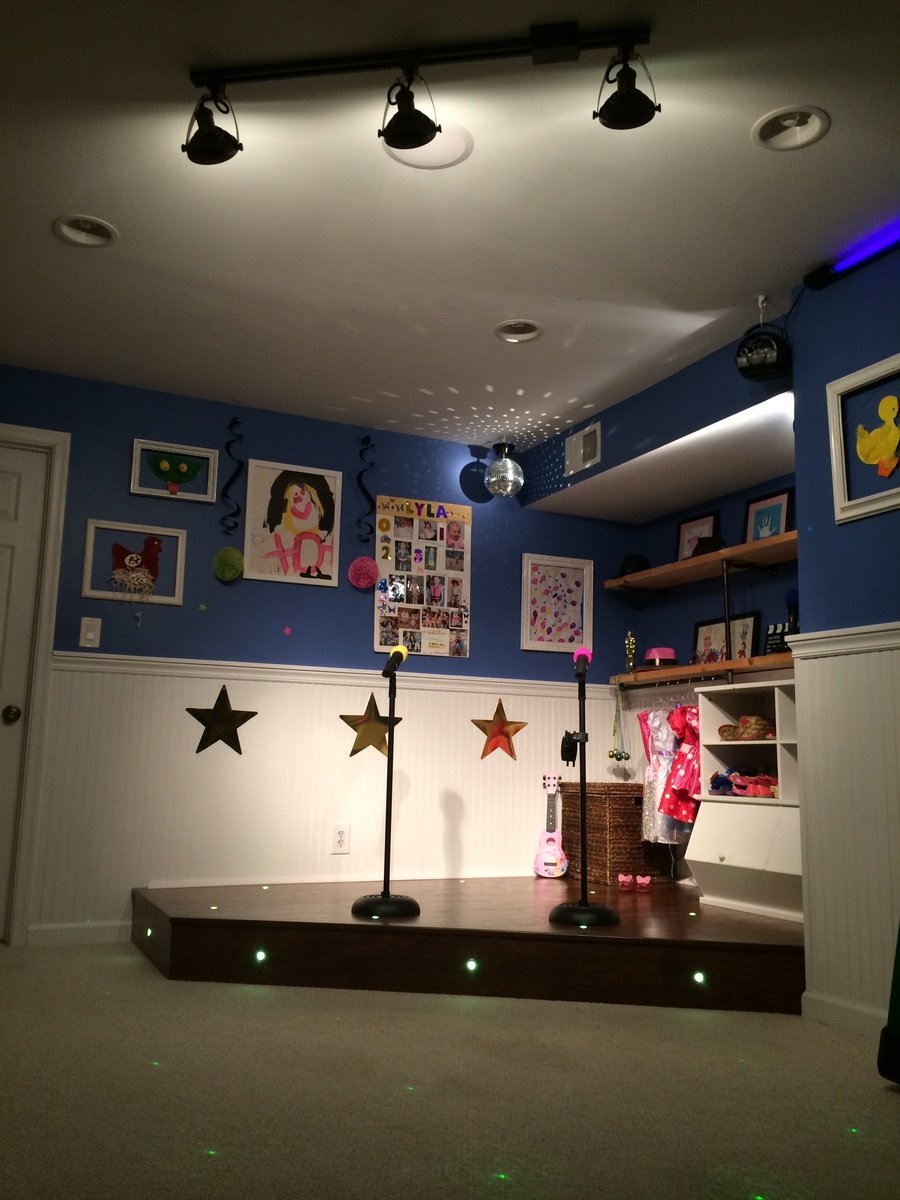
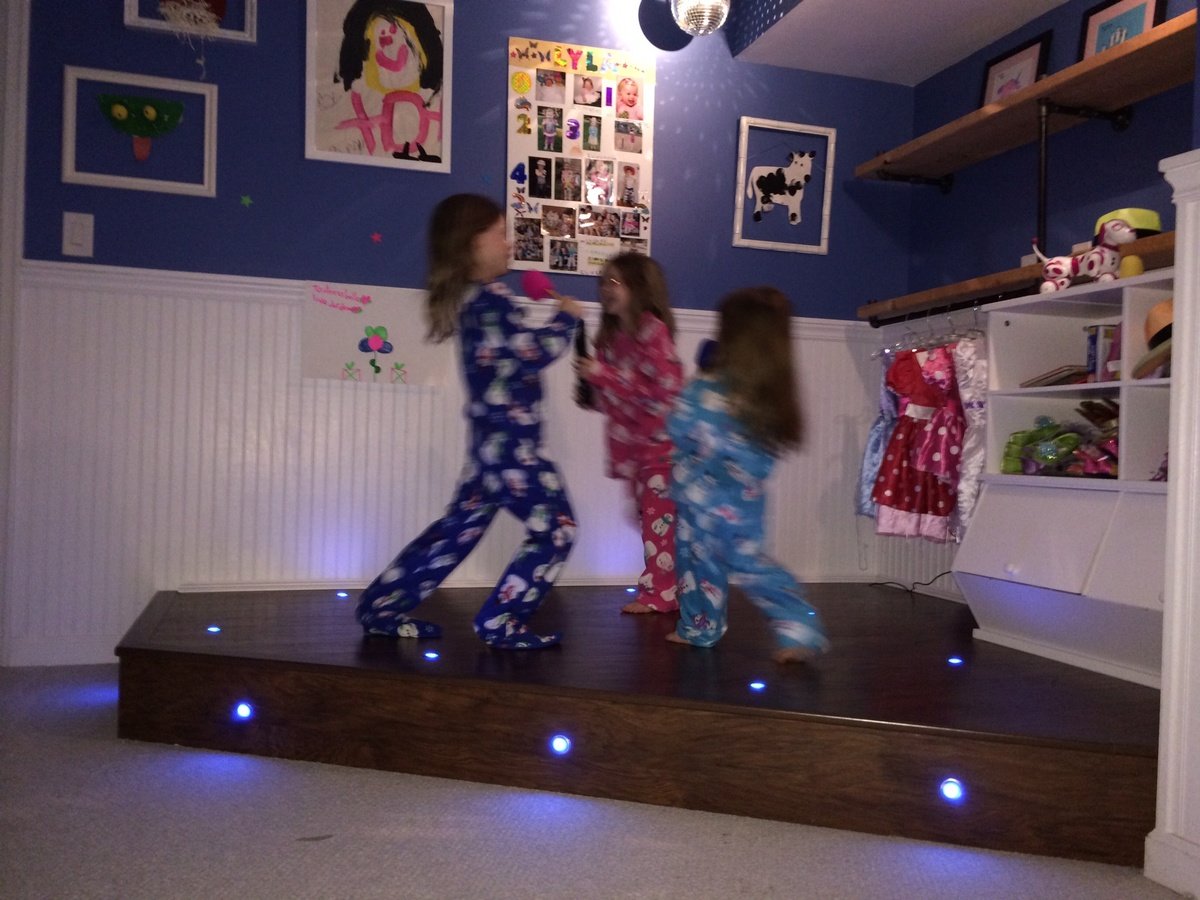
Community Brag Posts

Playroom Stage!

Submitted by kdins31 on Thu, 01/02/2014 - 09:48

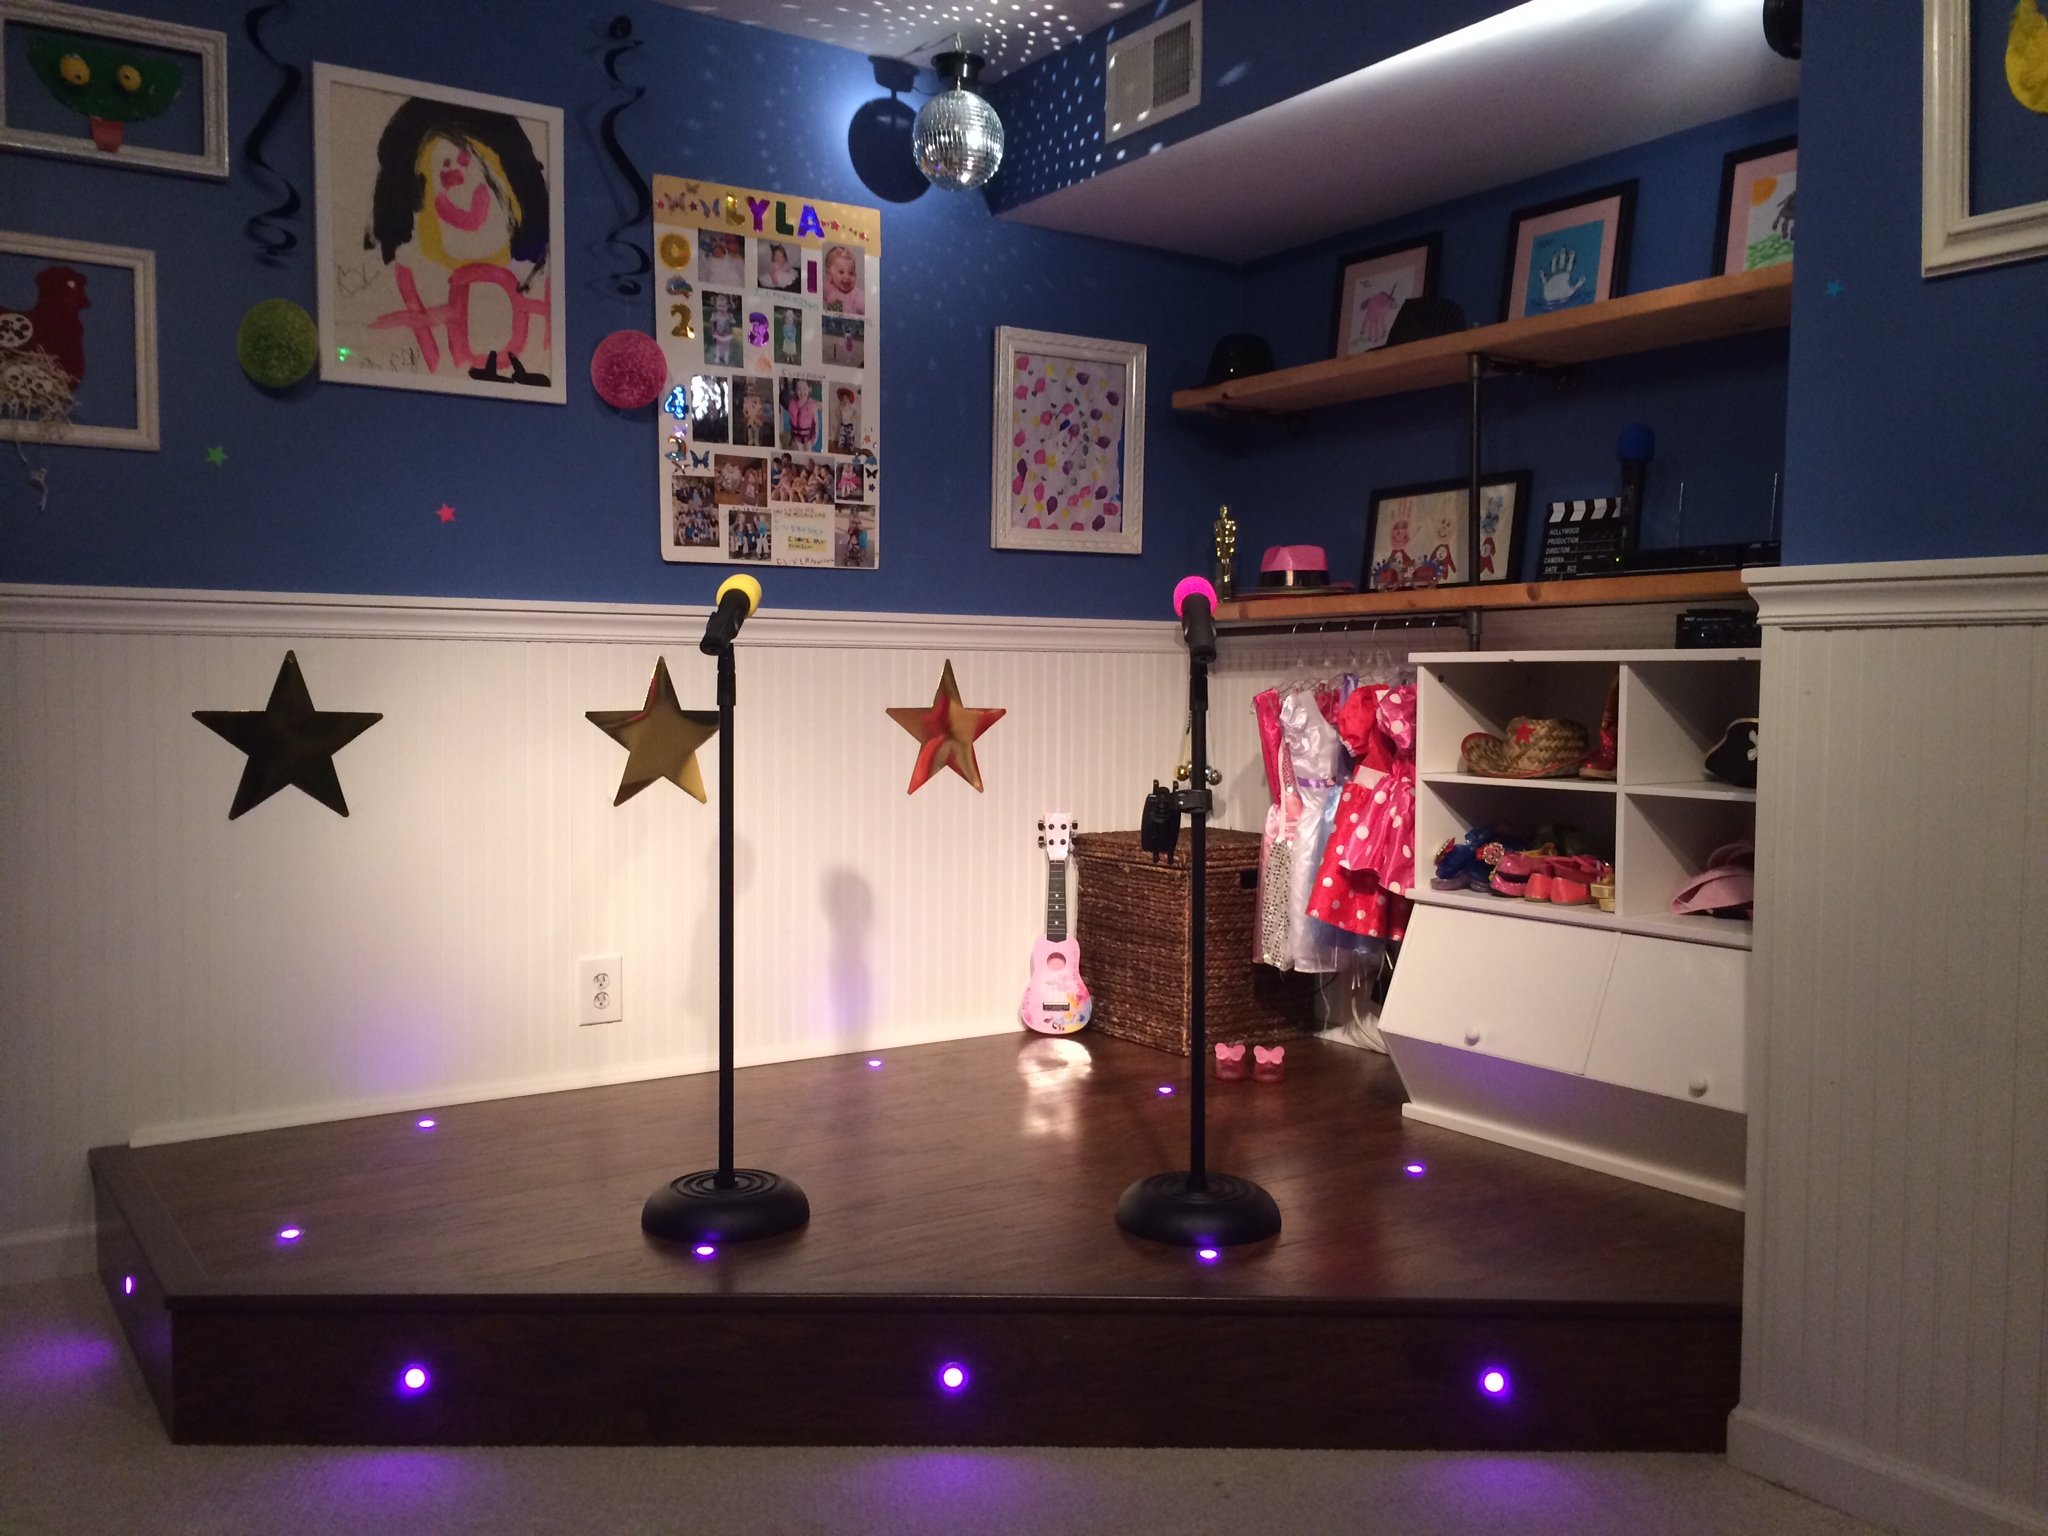
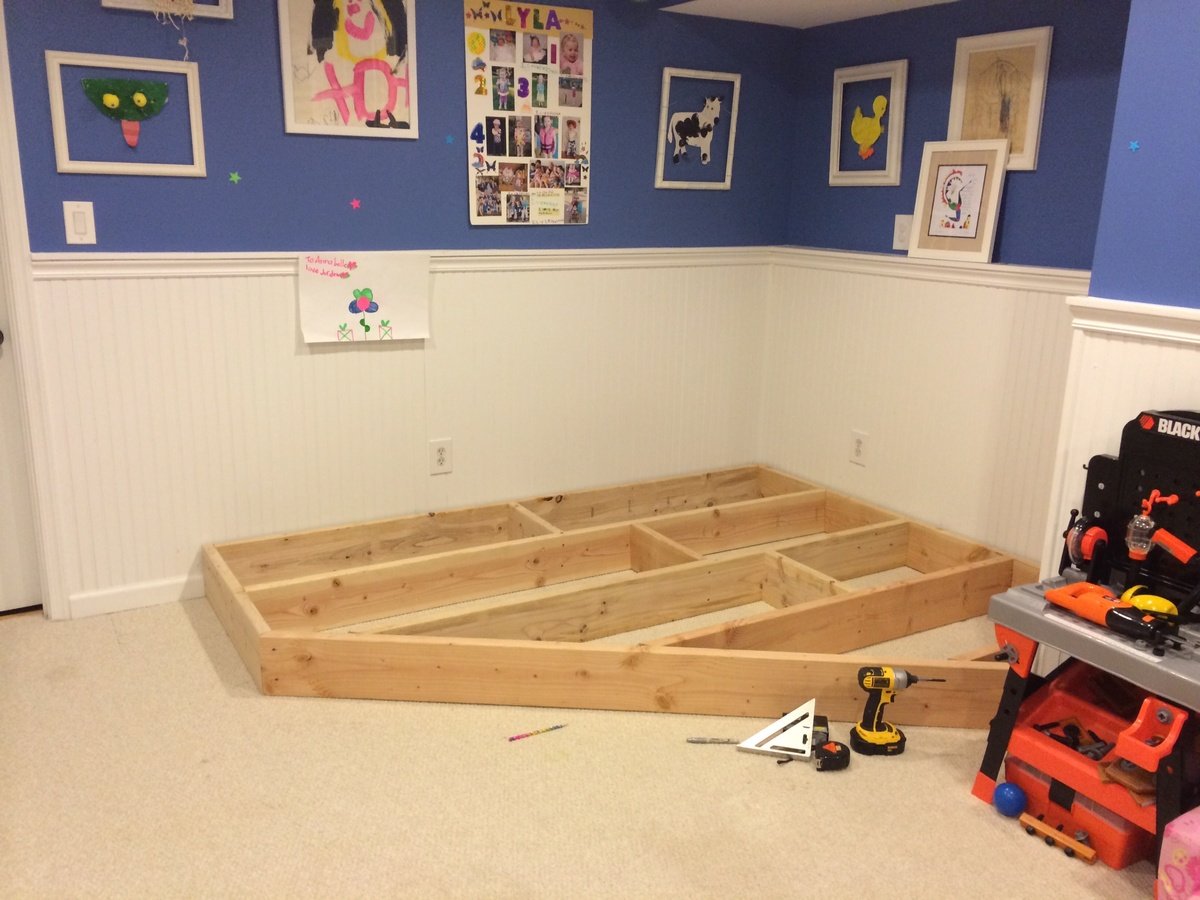
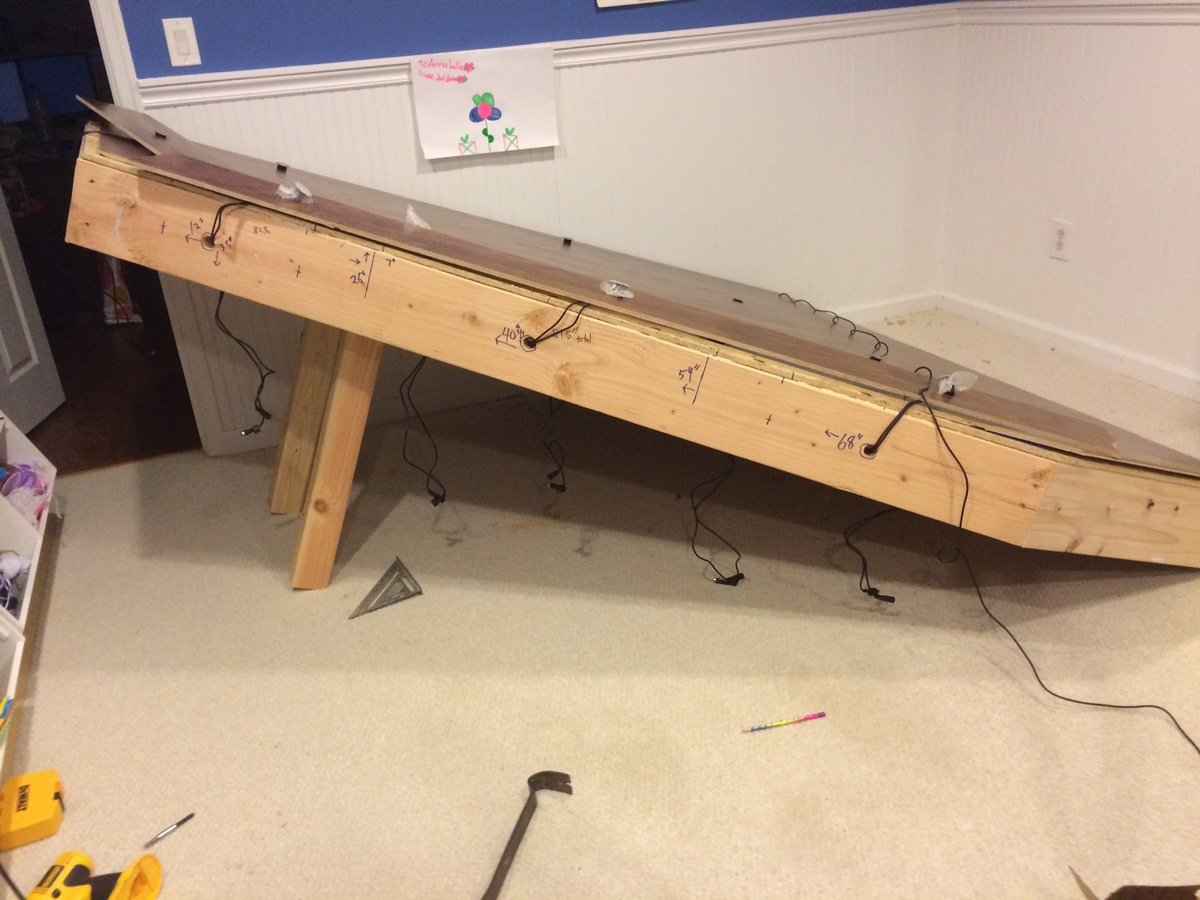
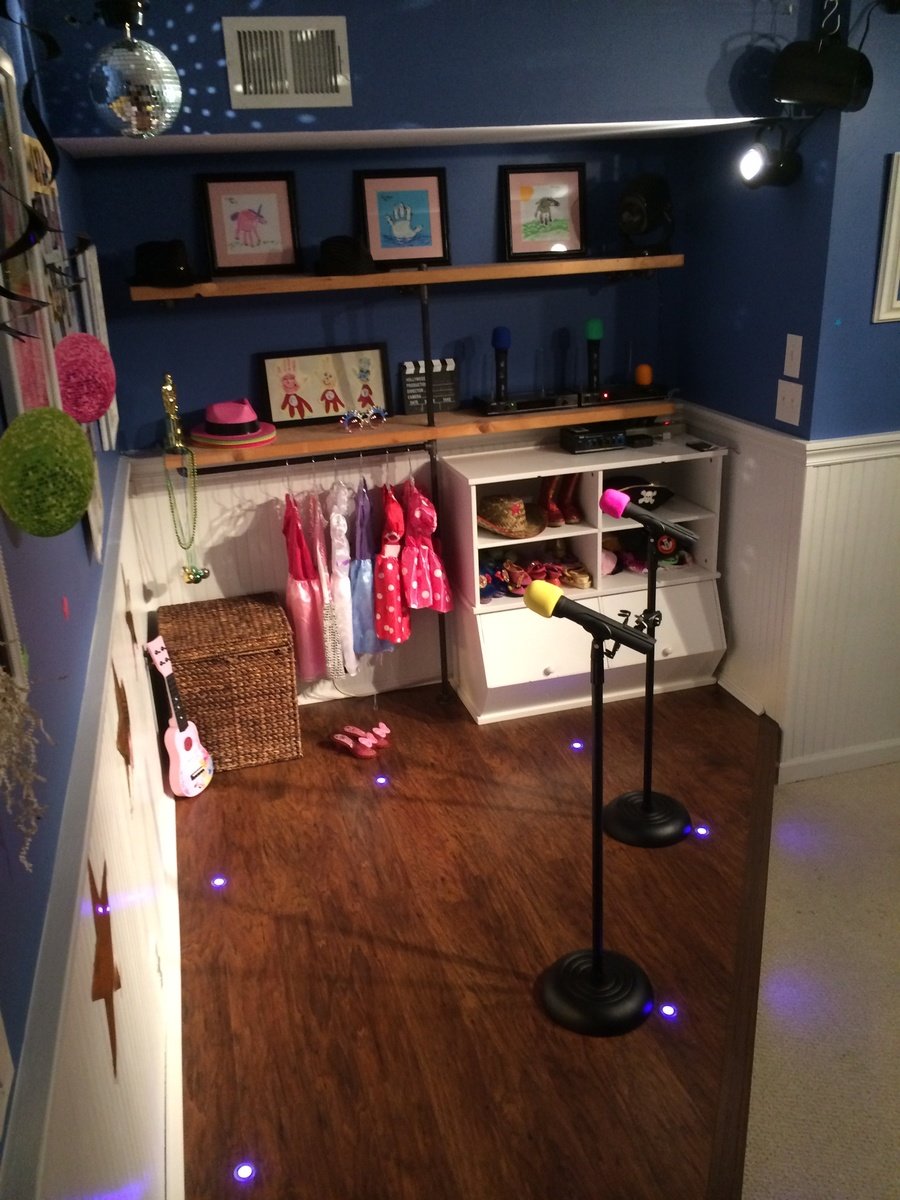
I had a perfect corner in our playroom that was reserved mostly for clutter and always wanted to do something fun with it. The base is made with 2x8"s topped with Handscraped Hickory laminate flooring. Bored holes into the floor and installed 1" diameter color-changing LED decklights. Added theatre-style tracklights, disco ball and other dance floor lighting for extra effect. Of course the stage wouldn't be complete without wireless microphones for karaoke and mic stands hooked up to a small amp and speakers in the ceiling. I made the shelving on the right side with 1/2" black pipe and used leftover 2x12" shelves from an old garage shelving install from 7 years ago! The kids were ecstatic on Christmas morning for the reveal!

Estimated Cost
$125-150 for wood, flooring and moldings. Black pipe is very inexpensive.
Estimated Time Investment
Weekend Project (10-20 Hours)
Finish Used
Send me message if you'd like to know which products I used, e.g. mics, speakers, lights, etc.
Recommended Skill Level
Intermediate

Comments

Garofola2013

Wed, 04/16/2014 - 11:53

I would like to know which products you used...e.g. mics, speakers, lights, etc. We want to do this is in our basement =)

THANKS!

Snix26

Sun, 07/27/2014 - 15:52

This is great! I was just wondering what your dimensions were? I've been looking for something like this to do for my niece but have been struggling to find a plan and figure it out myself LOL.

kdins31

Tue, 08/05/2014 - 05:58

Hello, the back wall is 8' and side wall is 6.5'. The stage comes out about 2.5' on each side then the front is around 7'.

Hope that helps, good luck!

atilley

Tue, 11/18/2014 - 19:37


Great job!! can you tell me where you got the microphones and mic stands for this?


dmbphoenix

Sun, 04/10/2016 - 14:44

Actually, I was wondering ,what lights did you use? I'm working on a very similar project and was curious to the lights your used please.

Mls4460

Wed, 11/13/2019 - 09:53

Do you have the actual plans to build this?

I would love to copy this idea for my 4 year old!

Storage Headboard

Submitted by Anonymous (not verified) on Thu, 07/20/2023 - 15:16

This project changed 3 times from the day i started.
It was supposed to be a simple vertical box to hide 2 twin mattresses
Then she decided to do a horizontal box (chest).
Then she decided to put it behind her be.
By the end it became a headboard storage and the design is Modern Geo Headboard

by Ana White

Built from Plan(s)

Double Vanity

Submitted by krmoon81 on Thu, 03/31/2016 - 22:30

Well to make a long story short I started out just replacing an old tub in the bathroom which turned into a whole remodel!! I’m talking new toilet, floor, lighting and heck while I was at it lets knock down a wall and make some room for a double vanity. After all in a few years three teenage girls  will be fighting for sink space!!! Honestly I just didn’t want to spend $800 - $1,000 on a double vanity so I decided to take matters into my own hands. This was my first time building any type of functional furniture. I made a ton of mistakes but I also learned many valuable lessons. I really took my time....about 3 weeks...ok, maybe 4. Building this vanity was like cutting 101 for me. #1 lesson I learned, MAKE SURE YOUR CUTS ARE STRAIGHT!!! I also learned the value in test cuts and having a lot of patience and extra wood on hand. Anyone can do this, just be willing to put the time and effort in…and do lots of research.

Estimated Time Investment
Week Long Project (20 Hours or More)
Finish Used
Paint
Recommended Skill Level
Beginner

Comments

Modified Adirondack Chair and Bench

Submitted by jont on Thu, 03/29/2012 - 19:11

Decided we needed some outdoor seating. Added a few modifications to make it more my own.

Built from Plan(s)
Estimated Cost
$100 for both including the paint
Estimated Time Investment
Week Long Project (20 Hours or More)
Finish Used
Exterior paint and primer mix - not sure what to call the color, maybe a neon green.
Recommended Skill Level
Intermediate

Comments

Essential Adirondack Chair - Brad's Mod

Submitted by Anonymous (not verified) on Fri, 09/08/2023 - 13:09

I modified the design to better suit my senior body.
I added 3 inches to the seat height by using 2x6s, made it 1 inch wider, and added clunky drink holders.
I also used cedar fence boards for the seats and backs because I like the look.
I went with Barn Red Stain and Thompson's Water Seal for the finish.
Thank you for this design. They are quite comfortable.
The cost was less than $40 each.

Combo of Farmhouse Bed with Farmhouse Storage Bed

Submitted by jeniroosen on Mon, 01/27/2014 - 21:39

I meshed the Farmhouse Bed with the Farmhouse Storage Bed with Storage Drawers and this is the final product. Let me know if you have any questions. I learned along the way.

A few things I modified -

I knocked off the corners of the 1x8's used in the footboard and headboard as I wasn't a fan with how they butted up straight. I liked the rounded edges of the routered boards instead.

I cove routered the tops of 2x6's and loved how they turned out

When I handed my cutlist to the kid at the big orange store, he pulled OSB instead of plywood for the storage cabinets. I realized it halfway through the cutting as I was shopping for other things and didn't have the heart to tell him halfway through the job. I had to edge band (first time) the edges and the OSB soaked up a lot of primer.

Estimated Cost
$400
Estimated Time Investment
Week Long Project (20 Hours or More)
Finish Used
Glidden Antique White
Recommended Skill Level
Beginner

Comments

Jim's Corner Cupboard

Submitted by jimmyray7 on Fri, 04/22/2016 - 13:05

This was my first large build, and it went fairly well. A few little issues here and there, but I'm the only one who will notice most of them.

Built from Plan(s)
Finish Used
White Latex paint finished with Minwax Polycrylic (spray paint can - not recommended. Next time I'll brush or wipe on the poly).
Recommended Skill Level
Beginner

Shiplap Fireplace

Submitted by Anonymous (not verified) on Fri, 09/22/2023 - 08:13

So excited for my new living room space thank you for your great tips!

Kandis white DeCarlo

Comments

The Two Towers, Master closet Makeover

Submitted by dmcarwin on Sat, 02/15/2014 - 10:22

I have been wanting to makeover my master closet for a long time! I finally decided to just give it a try, I looked at several options and finally decided to base my closet around Ana's master closet tower she made for the momplex. I loved the plan and knowing I would need two towers I set to work designing with two towers in mind. I LOVE how it turned out and the tower plans were awesome! I also used the drawer plans for the tower and added the amount I needed, that is the best part about DIY! Thanks so much Ana for all your amazing plans they gave me the jump start I needed to get this project done! For details on the rest of my closet makeover please check out my blog post. If you go to my reveal post on my blog, near the bottom it has all the links to my building posts.

Estimated Cost
Around $150 for the two towers, not including the drawers which I used scrap wood for
Estimated Time Investment
Week Long Project (20 Hours or More)
Finish Used
I used a white Bher paint that was from the oops section.
Recommended Skill Level
Intermediate

Comments

freefromburdens

Sat, 02/15/2014 - 11:42

I love this. I love the price also. I redid my closet and chose not to use the towers, but after seeing yours I plan on doing my other closets using this one. While doing research on closet organizers, the price was nothing like yours. This is really good quality for $150. Great job...

dmcarwin

Sat, 02/15/2014 - 12:48

It really was a great price, please note that without using a lot of my scraps I could not have done it, for so cheap. All of my drawers were made with scrap/reclaimed wood I had collected, and reusing wood from my old closet. The price of $150 was just for the two towers (drawers not included) and not all the other builds in my closet. I just don't want you to think that you could do it for that price if you had to buy all the wood. If you click on my blog post link I do a break down of all my costs (again not including what I had on hand) and for everything in the whole closet including the bins it was just over $300, that I personally spent. I was lucky to have so much scrap/reclaimed wood, it saved me a ton of money! Thanks again!

Modern Adirondack Chairs

We love how these modified 3-panel adirondack chairs turned out! The pillows were from Costco- $15 for a two pack.

Built from Plan(s)
Estimated Cost
$30 per chair
Estimated Time Investment
Afternoon Project (3-6 Hours)
Finish Used
The color used is Relentless Olive (SW 6425) from Sherwin Williams. These chairs got a coat of exterior primer and were finished with one quart of green high-gloss exterior enamel.
Recommended Skill Level
Beginner

Comments

Seasonal And Holiday

Dining Room Table

Submitted by Anonymous (not verified) on Tue, 05/31/2016 - 07:23

Great plans. Fairly easy project. My husband built it and I stained it, Briarsmoke by Varathane. The most difficult part was to get the bread boards to sit flush with the perpendicular boards when attached. We had to undo and re-do that part several times. We followed the plans and built the table base before adding the bread boards at the end, but my husband decided that it would have been easier to attache one end of each board to the bread board, then attach the perpendicular boards together, then attach the other bread board.

Built from Plan(s)
Estimated Time Investment
Weekend Project (10-20 Hours)
Finish Used
Wood pre-conditioner. The stain color is Brairsmoke by Varathane, folowed by two coats of matte poly.
Recommended Skill Level
Intermediate

Green House

Great little project from your site!

I put PVC to the ground vs the metal siding and added a heat sink in the middle with some old computer fans.

Built from Plan(s)
Estimated Cost
$1,300
Estimated Time Investment
Weekend Project (10-20 Hours)
Finish Used
PVC
Recommended Skill Level
Intermediate

Comments

Niccador

Sat, 05/23/2020 - 17:23

That PVC heat pipe intrigues me. Can you share a little more about it? I'm assuming it pulls hot air from the upper vent, and cools it down via the section of pipe below ground, sort of like a natural A/C. Keeps things from gettting too hot during the summer months?
Kinda looks like you'd frequently trip over it though. I'd probably have run the lower exhaust right up by the edge of the door frame, or a corner.

Mother's Day First Build - "Cameron" Vintage Storage Dining Table

Submitted by meggrs on Sun, 05/20/2012 - 17:04

This wasn't my first DIY project but it was my build from this side and first real woodworking project and it's been the most satisfying to date. I made this table for Mother's Day for my mom who has been dreaming of the PB Cameron fixed trestle dining table but couldn't take the hefty price tag. Things I changed: - I added the "pegs" on the table ends to make it look more like the PB version. They are just 1/2" round wood plugs glued to the trestles. - I was going to add two more tabletop braces underneath (again to make it more like the PB version) but I cut one of them incorrectly so I just added on more in the middle. I'm turning the boo-boo lumber into a yarn swift; waste not. Things I learned: - If the wood is going to be stained and varnished, shell out for the *good* stuff. I had to put on way to many coats of polyurethane to make the cheapo pine boards smooth enough even after I had dampened it to raise the grain and sanded it. - Don't believe the stated length of the boards you buy. 36-inch boards are actually 36 inches and a bit. I ended up having to disassemble and re-cut my tabletop supports. - Practice with your jigsaw if you haven't made curved cuts before to see how tightly you can turn. Luckily I had extra ply to make another couple trestles after I botched the first two...

Built from Plan(s)
Estimated Cost
$160 for materials
Estimated Time Investment
Weekend Project (10-20 Hours)
Finish Used
Table base:
- Stained edges with Minwax Dark Walnut.
- Two coats Annie Sloan chalk paint in Old White.
- One coat Annie Sloan clear soft wax.
- Distressed edges with sandpaper to show stain underneath.
- One final coat Annie Sloan clear soft wax and a good buffing.

Tabletop:
- One coat Varathane wood conditioner. (Pine takes stain unevenly without it.)
- Three coats Minwax Dark Walnut.
- 18-million coats Minwax Semigloss Polyurethane. (It seemed like it anyway.)
Recommended Skill Level
Intermediate

Comments

tracysmith

Sun, 05/20/2012 - 21:33

I've had to learn some of those things myself since I started building a year and a half ago. Sometimes it's frustrating and even costly, but when you learn it, you learn it and you never have to again. haha Unless you're really a gluten for punishment. ;-) Good job and thanks for sharing with us some of those lessons learned.

Console Sofa Table

Submitted by grarob1956 on Mon, 04/20/2020 - 13:13

I built this from the Ana White Console X Table plans and specs. I originally had planned on a rustic style like on your blog, but once my wife saw it she liked it and decided she had the right spot for it providing I painted it.

Built from Plan(s)
Estimated Cost
$150 with my veteran 10% discount from the local box stores.
Estimated Time Investment
Weekend Project (10-20 Hours)
Finish Used
Base : Valspar Chalky - Moonstone Ring and clear seal wax.

Top: Chalky Bonnet Ribbon and dark satin wax
Recommended Skill Level
Intermediate

Comments

Lap desk/Standing desk

Submitted by mrsnyder on Sun, 04/26/2020 - 09:01

Built this last weekend so I would have the option of standing at my desk - these plans work perfectly for that purpose! Quick and easy build that I was able to do with scraps on hand. Highly recommend for anyone who has suddenly found themselves working from home and is finding their desk chair just isn't comfortable enough for a full day of work. Easy to move out of the way when not needed and provides a nice way to quickly move work things off to the side but keep them handy for the next day. Thank you for the very timely plans!

Built from Plan(s)
Estimated Time Investment
An Hour or Two (0-2 Hours)
Finish Used
None yet. Will have to wait for some nice weather to stain/seal outdoors.
Recommended Skill Level
Starter Project

Comments

Adjusted Counter Height Farmhouse Table

Submitted by rahurtado on Mon, 05/04/2020 - 23:26

I liked the look of the “counter height table” and adjusted the height to make it a table for an office. I used 4x4s for the legs and oak for the top.
I used a biscuit joiner to join the top, a Dremel tool to carve grooves in the frame so I could attach the top with figure 8 fasteners (allows wood to move as it expands and contracts).

Recommended Skill Level
Intermediate
Back