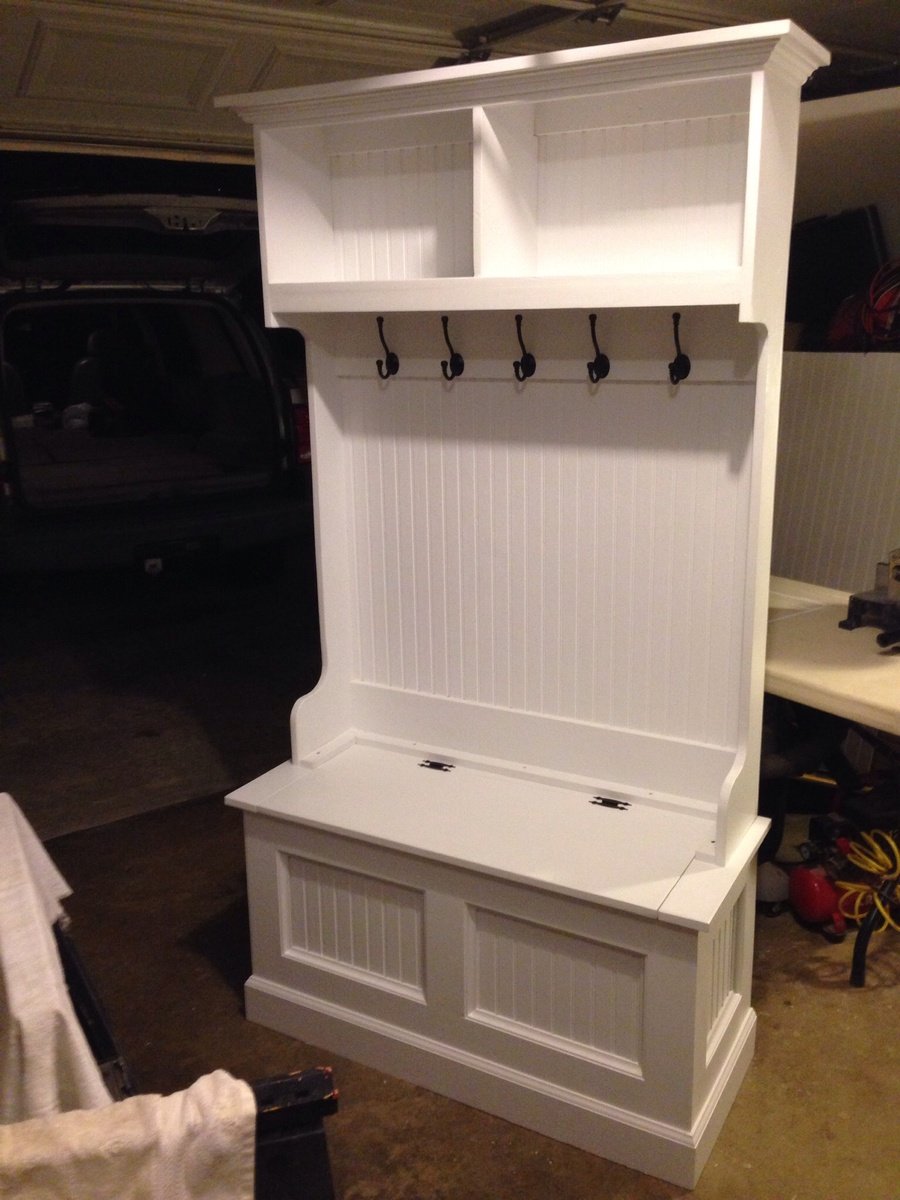
Community Brag Posts

Rustic Hall Tree

Submitted by Anonymous (not verified) on Wed, 11/08/2023 - 10:21

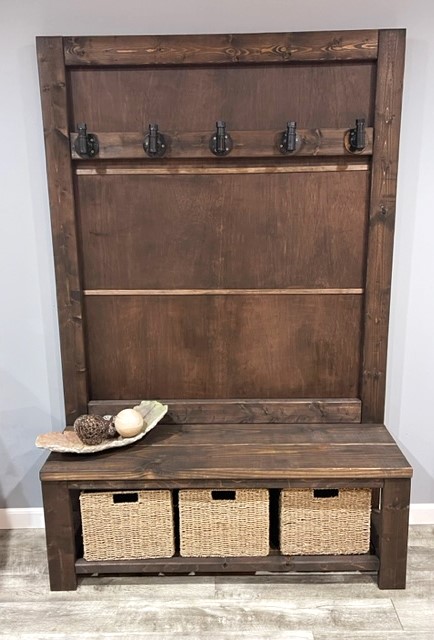
I used the Rustic X Hall Tree plans and slightly modified them. I'm very happy with how it turned out. I used black pipe for the hooks as I have a lot of this style of decor in my home. The stain color is Dark Bourbon from Varathane. The back is luan with screen bead across the front to hide the cut panels (I have a Ford escape and had them cut the luan into panels). The back is secured with 1x2s so I had something to hold my 5/8 inch brad nails for the screen bead. I didn't use the X design; I can always add it later if necessary. The baskets are from Amazon sized 12x12x10. I also didn't add the 16 inch side pieces or the top piece. I used pocket holes on 95% or more of the piece.

Built from Plan(s)

Round the corner bookshelf

Submitted by tanlines on Thu, 05/24/2012 - 07:44

My son needed organization and of course instead of buying something I thought I could build one. I've been eyeballing Ana's site and found this project. This is my very first one. I only had a manual mitre saw so it took a long time to cut all the pieces but it did get done and in the process my hubby bought me a mitre saw! It wasn't hard to put together but the instructions are very detailed. As u can see from the photo, my little man helped me with it!

Estimated Cost
$50
Estimated Time Investment
Weekend Project (10-20 Hours)
Finish Used
paint
Recommended Skill Level
Intermediate

Doing things big down in Texas

Submitted by StewartTX on Sat, 03/08/2014 - 14:54

We decided to build this a bit bigger and taller. I will caution you to be careful as we came inches to not making it through our doorways. We expanded the depth 15" to make it a full bed and we extended the length of the legs to allow for 48" clearance underneath.

We also went with a rock wall instead of a ladder. I 1st built the angle too steep; recommend at least a 30 degree angle on a wall. Kid's love it; mom not so much when attempting to make the bed! :)

We went with military theme - green rope lights, camo netting for a roof, and sandbags filled with old clothes from my high school years for a bunker underneath.

Still working on a sign for top of the door.

Great project! Thanks for the idea!

Estimated Cost
materials $350; tools needed that I did not have $250
Estimated Time Investment
Week Long Project (20 Hours or More)
Finish Used
Natural Color MinWax stain then Clear Satin Poly.
Recommended Skill Level
Beginner

Shoe Dresser

Submitted by Anonymous (not verified) on Tue, 06/07/2016 - 16:29

Made tis twice. First one was a mess, Bought more wood and started over aware of problem areas and built more carefully second time.

Built from Plan(s)
Estimated Time Investment
Week Long Project (20 Hours or More)
Finish Used
Paint
Recommended Skill Level
Beginner

American Girl Doll Storage and Bed

Submitted by advanlente on Sat, 03/28/2020 - 11:09

For my niece's birthday, I built her this awesome storage solution. Mom was super happy that everything could fit together in one spot and my niece takes this with her wherever she goes. I was so happy to find plans to build this as I was not sure what to make her for her birthday!

Estimated Time Investment
Afternoon Project (3-6 Hours)

Comments

Modified Laundry Basket Dresser

Both dressers were completed in one (long) day by my boyfriend and his father. Modifications were made to make it fit square Sterilite 1.5 Bu./ 53 L laundry baskets (serial/bar code # 073149121789).

I'm not sure what size pieces they purchased, however this is the cut list (for one dresser, 3 laundry baskets):
2 - 48" x 20" (sides) - could possibly be shorter, we had a little bit of extra space
1 - 20" x 20" (bottom)
1 - 21.5" x 20" (top)
1 - 48.5" x 21.5" (back)
6 - (2" x 2")'s cut into 20" pieces (or the metal angle option in the original design)

They did not distance the spaces perfectly for the (2" x 2")'s, but every 14-16 inches should be about right.

I'm sorry these instructions are void of a lot of information, but I hope they can help.
I think this project can take a shorter amount of time if no mistakes are made. They had to run to Lowe's 2 times in the middle of the project because they forgot to purchase a second size of screws and then they cut the back too thin.

Good luck, and have fun! It is a fabulous project and oh so very useful.

Built from Plan(s)
Estimated Cost
$50 - $100
Estimated Time Investment
Day Project (6-9 Hours)
Finish Used
Lowe's Creative Ideas for Color, "Dive In" CI 249
Recommended Skill Level
Beginner

Comments

Katie B. of Ho… (not verified)

Mon, 05/28/2012 - 09:53

This is a brilliant solution, particularly since most sorters don't have enough compartments to separate the whites, sheets and towels from each other. But we really don't want to wash them together, do we?

Love how cozy your kitty looks up there, too.

Woven back bench

Submitted by Anonymous (not verified) on Sun, 06/12/2016 - 09:55

Built for my parents 50th anniversary 

Built from Plan(s)
Estimated Cost
£60
Estimated Time Investment
Week Long Project (20 Hours or More)
Finish Used
Cupronel outdoor furniture stain (teak)
Recommended Skill Level
Intermediate
Seasonal And Holiday

Modified Hailey Platform Bed

Submitted by Jake on Wed, 05/30/2012 - 16:15

I took the Hailey Platform Bed plan and cut to a twin bed size. I used some old wood I found in the garage for the head and foot boards and the legs. Notice the legs are 4x4s. The grandkids had some old bed springs under their mattresses so I incorporated the spring into the build. That required that I lower the cleat a couple of inches and it meant I had a very complicated leg geometry in order to get it deep enough to support the bed. I built the frame with Kreg Jig pocket joints and they made the work very easy with such large and heavy timbers. Notice I attached the legs to the frame with 5/16" lag screws which allows easy removal of the legs if you need to make it easier to move. Came out very good but I think I will build the second bed without the springs and go for the slat method as shown in the plans.The result is beautiful. My neighbor commented that it looked very Pottery Barnish!

The second bed I finished yesterday is made with slats. A very smart move. The legs are so much easier to attach to the frame. Both beds are beautiful and sturdy. One grandkid told me that when the hurricane comes he is going to get under his bed because it is so strong. He may be right but I will be in Laredo or San Antonio.

Built from Plan(s)
Estimated Cost
$70 for two beds and I also got free wood from the garage.
Estimated Time Investment
Weekend Project (10-20 Hours)
Finish Used
Red Oak stain on the legs and head and foot boards. The rest was primed then given two coats of a good satin paint called Benjamin Moore Impervo. It is expensive but I used it on repainting the kitchen cabinets and it was worth the cost. Best advice is good primer, sand with 150 grit, then two coats of final paint but light sanding with 320 grit between coats.
Recommended Skill Level
Beginner

Farmhouse King Bed

Submitted by rccostner on Sun, 03/16/2014 - 15:14

This is my first project and I've spent a couple of months preparing for it. My wife loved the plans for this bed and I loved the challenge. I reviewed the plans for both the king and queen size beds and read through all of the comments before starting. The comments were especially helpful, so thanks to everyone for contributing. I took my time with project hoping to minimize beginner mistakes. We recently upgraded to a king sized mattress and already had a bed frame (we highly recommend this one)


So I adjusted the plans for making just the headboard and footboard along with the runners. I omitted the 1x3 boards to account for orienting our king bed so that it is 76" wide and 80" long. Initially, I made the mistake of thinking that 1x6 boards would be adequate for runners. But that wouldn't withstand the constant onslaught of our kids climbing into our bed, so I switched to 2x6 boards and it's much sturdier. I cut the runners 3" longer than the bed frame to allow for room for the bedding and to account for the 1" overlap from the 2x6 cap on the footboard. L brackets were perfect for attaching them to the headboard and footboard. Now that this is under my belt I'm looking forward to my next project.

Estimated Cost
300
Estimated Time Investment
Week Long Project (20 Hours or More)
Finish Used
primer, Valspar paint - Honey Milk
Recommended Skill Level
Beginner

I Love These Shelves

Wanted to make something for the house and seen these plans and though I would give it a shot. didn't think I would love them as much as I do! My wife loves them even more I think. Also added my own little touch with an old paddle that I burned our last name into. I think it makes a nice little touch. 

Estimated Cost
$100
Estimated Time Investment
Day Project (6-9 Hours)
Finish Used
Natural
Recommended Skill Level
Beginner

Workbench

This morning my dad decided to help my build the workbench I've been wanting since we moved to our new house. I would usually do it myself but being 37 weeks pregnant I wasn't wanting to get out there on my own and lift a bunch of 10 ft boards. So we got a bunch of 2x4s and some 2x6s and threw one together... it ended up being 10 ft long and around 28 inches wide and a good 36 inches tall. Now I have a nice place to put my new saw I got for Mother's Day

Estimated Time Investment
An Hour or Two (0-2 Hours)
Recommended Skill Level
Beginner

Hall Tree

Submitted by tbonia on Wed, 03/19/2014 - 13:50

This was my first attempt at building actual furniture. It went pretty well I think. I followed the plan pretty much. I made the bench longer and taller. I also added a few inches to the height if the hutch.
A couple other changes I made that I thought it needed was 2x2 bracing on the bottom if the bench for stability. I also added a band of 1x2 to the bottom of the hutch so I could screw the hutch to the bench without having to go inside of the bench and try to line it up .
I then added another board to the top band of the hutch, because with the one small board there it want wide enough to mount a decent size hook to.
That's pretty much it. If you have any questions, let me know.

Built from Plan(s)
Estimated Cost
$200
Estimated Time Investment
Week Long Project (20 Hours or More)
Finish Used
Painted White
Recommended Skill Level
Intermediate

Console Table w/Drawer & Raised Dog Bowls

Submitted by Booooozle on Tue, 06/05/2012 - 18:00

I actually designed & built this table on my own but it is very similar to Ana’s Simple, Cheap, & Easy Console Table. When we moved from an apartment to a house our lil neurotic jack Russell terrier decided he wasn’t going to eat unless we were both in the same room as him. So his food was put in a spot where he could see both of us even if we were in separate rooms, it just turned out that where that spot was, is the exact spot I wanted a console table. Well I couldn’t find a console table with a raised dog bowl shelf in it so I built my own. Now the dog bowls are up off the floor at a comfortable level for our fur babies & I keep all their vet paperwork, sweaters & toy stash in the drawer, all puppies things in one place.

Estimated Cost
$35
Estimated Time Investment
Afternoon Project (3-6 Hours)
Finish Used
Valspar Flat Black Indoor/Outdoor Enamel
Recommended Skill Level
Intermediate

Changing Table

Submitted by Eves on Fri, 06/24/2016 - 15:15

Changing Table

Estimated Time Investment
Week Long Project (20 Hours or More)
Recommended Skill Level
Beginner
Back