FACEBOOK PAGE UPDATE: On March 14, 2014, our Facebook Page was hacked, I was deleted as the admin, and the page name was changed. The hackers then started using the page to promote their own business. Finally, the page name has been changed (to Ana White) and the permalink has been restored back to www.facebook.com/knockoffwood. Unfortunately, the hackers also deleted all content on the site, and this cannot be restored. I am very sad to see so many of your photos and questions lost. We will again be using Facebook to share content and brag posts, but are working to create a safer method for you to share photos and ask questions, to debut in early summer. Thank you so much for your patience with the page and me.
---
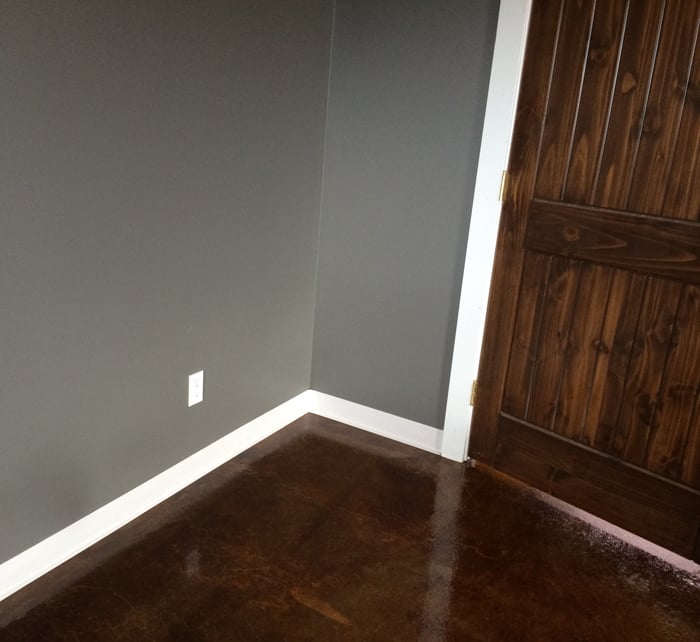
Well, you totally made my day with all the love for our stained concrete floors! It's truly one of my favorite projects in the Momplex so far - even though there was no sawdust involved.
Did you notice the base moulding we installed too?
What a difference it made! I love how the crisp white trim accented this floor!
No sawdust involved there too. What is happening to me???
We choose to use rubber base moulding for the basement of this side of the Momplex. Here's why:
- Flexibility. Concrete floors are never perfectly level. Ours is pretty good (good enough to not need an extra layer of self leveling concrete), but not perfect. So when you install wood moulding on the concrete floor, any high or low points mean your wood base moulding won't meet up, or big gaps underneath the base moulding. There are ways around this (like coping out the bottom of the moulding or raising the moulding all the way around), but we love the flexibility of rubber moulding.
- Waterproof. There's good reason you see rubber moulding in commercial kitchens and bathrooms. It's waterproof, so it resists rot and fungus growth. Not a bad choice for a basement, making it easier to mop out, or cheap insurance should an upstairs toilet overflow or the pipes freeze up on you while you are on vacation.
- Indestructible. Unlike wood moulding, which will over time accummulate dents and scratches from stuff bumping into it (and by stuff I really mean kids and possibly Mom moving furniture by herself - don't tell on me), rubber moulding is pretty much indestructible. Bring on the wheelie bugs and knee boards!
- Inexpensive. The stuff we bought is about half the cost of the wood base moulding.
- No Finishing Required. Filling nail holes, sanding, and painting base moulding is quite a chore. With rubber base moulding, there is no fastners required - you just glue it to the wall and it's done.
- New Profiles and Colors. If you want fancier trim, rubber base moulding actually comes in different profiles to mimic the look of wood mouldings, and even in wood grain colors. I was pretty suprised at what you can get!
- Easy Installation. All you need is a utility knife and adhesive to install this stuff. I'd recommend knee pads or borrowing your kids wheelie board.
We put together a new video on how easy this stuff is to install -
And for those of you who can't get video, here's the jist of it:
We bought the four foot long pieces, and just layed them out throughout the room.
Then we applied adhesive to the backs of the moulding - it's a special adhesive formulated just for rubber base moulding. There's also a special spreader tool that you can buy, but we didn't.
Then you just place the moulding on the wall,
And press firmly to remove any air pockets.
For inside corners, you score the back and notch out the base as shown below:
We didn't have any outside corners to do, but they are pretty easy to do. Find the corner, score it, and remove about 1/4 of the material at the corner on the back side (to allow for the base to bend inward). You can use a hair dryer to heat the moulding up so it will bend around the corner. Alternatively, you can purchase corners to match the moulding itself.
As much as I love all things made of wood, we love how this rubber cove base moulding turned out! Maybe not the right choice upstairs, but for a bonus room, mudroom and garage in a basement? It's perfect.
So what do you think? Have you installed this stuff before? Love it or hate it?
XO Ana + Family

Comments
Lady Goats
Mon, 05/12/2014 - 13:34
Doing my friend's bathroom
WendyW
Mon, 05/12/2014 - 19:54
I miss my rubber baseboards
brookifer86
Tue, 05/13/2014 - 08:06
Classy!
dezandseth
Tue, 05/13/2014 - 09:51
Perfect Solution!
In reply to Perfect Solution! by dezandseth
Ana White
Tue, 05/13/2014 - 19:37
Hi, thanks! Yes, we just
beejay
Wed, 05/28/2014 - 06:19
Wish I'd thought of that!
Sammykell
Sun, 07/06/2014 - 08:18
Loving the stain!