So I commited the great sin of painting all the walls white.

Well, off white ... and in the natural light, it really looks more like the intentionally blah color of primer, shouting, repaint me!!!
Or in this case, either start the biggest sanding job of your life or learn how to do a faux wood painting technique.
But I gotta keep my poker face on and pretend I love it and be strong. As soon as I show any doubt in my decisions, the crew will start doubting me, and then every decision I make will be debateable - so I just keep on acting like I'm loving those primer colored white walls.
But the show must go on - as in literally the tv show, because we've got a film crew on site, on a tight schedule (I'll let you know the very second I can when the show will air on DIY Network sometime this fall).
So today's project, the loft stairs.

Or maybe the ladder. I'm not sure yet.
We've decided the best place to land the loft stairs is in the middle of the image above. This gives access to the two "rooms" upstairs without having to walk through either of the areas (wasting space that now becomes a hallway). This is also the best spot for upstairs headroom. I also wanted the loft stairs to come up either in the living area or entryway. I couldn't find a good way to make it work in the entryway area, so this is where the stairs are going.
We've got two options -
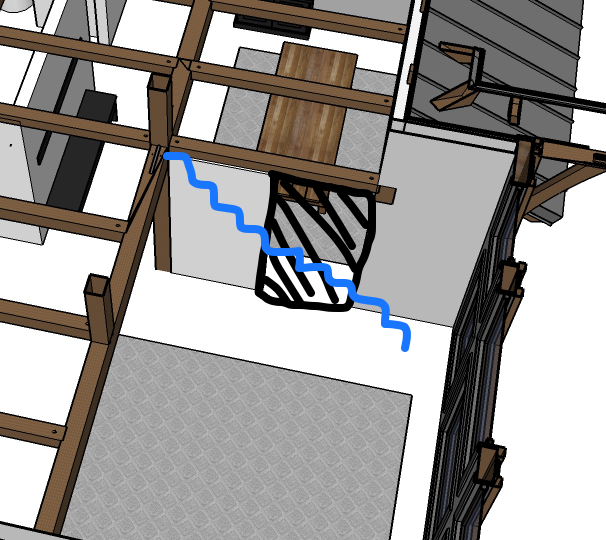
Option 1 - Take out the opening between the living room and kitchen and build tradditional stairs along the wall.
Pros - easy climbing
Cons - takes up a ton of space, blocks off the kitchen, stairs would need to not only be longer but wider
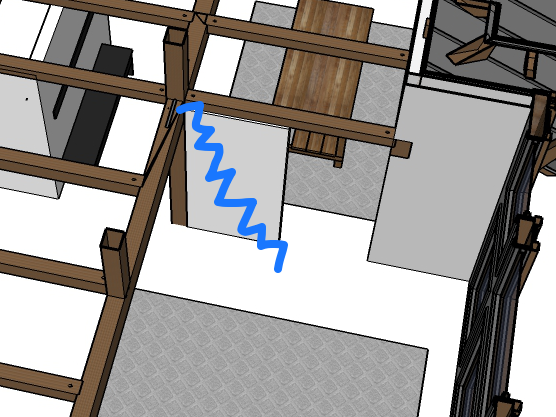
Option 2 - Keep the opening to the kitchen from the living room and build an ladder or alternative loft stairs system along the small wall
Pros - Saves space, can be narrow, keeps opening between kitchen and living room
Cons - Upstairs is difficult to access (upstairs area almost doubles square footage of cabin)
After much debate, we decided to go with option 2. We decided that as we age, we could always go back to option 1. Because I'm definitely going to that grandma that can whip out new loft stairs on a long weekend at the cabin.
But there was one big BUT - the stairs had to be built in such a way that I could walk forward carrying a baby down without having to hold on to anything else.
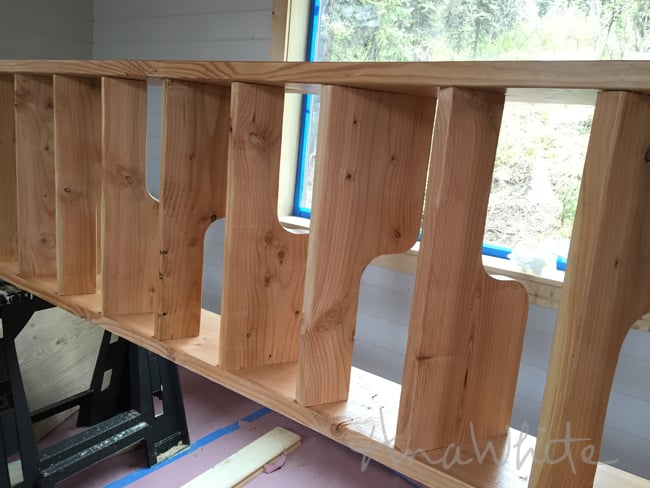
I've done alternating tread stairs before (also called ship ladders). The idea behind them is your foot only uses half of the stair, so you can cut the other half out to allow more step up room between treads that would otherwise overlap -
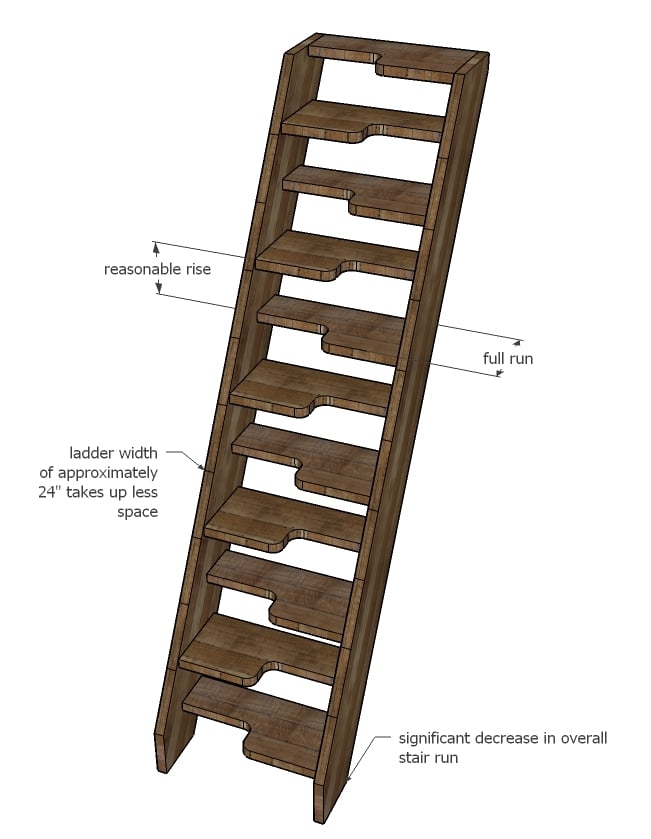
The space savings of a ladder but will full treads and a reasonable rise. I personally love them, but some people find them confusing. The trick is to start right, and only step on the wider tread area, with the correct foot - left foot, right foot, left foot ... you get the idea.
Here's how I designed my stairs -
1. I took measurements of the overall rise and run that I could work with. The rise was right at 9 feet finished floor to finished floor, and the run about 4 feet - you'd need more than double that run for a tradditional set of stairs.
2. I took the overall rise and divided that number by 8. Normally, you would divide by 7, but since I'm in a tight space, I went an inch bigger for the average stair height. I got 13.5 - so this means I need 13 steps.
3. So now to figure out the exact rise. I took the overall rise (108 inches or 9 feet) and divided that by the number of treads - 13 to get 8.3 inches. That means the distance from top of tread to top of tread will be 8.3 inches.
4. Now to figure my overlap so I can cut out my treads. I took the overall run (4 feet) and divided that by 12 (the 13th tread is the upstairs loft floor) to get 4". Yes, 4". So I set my carpenter's square to 8.3/4 - I know, it looks funny - and marked out and figured my stairs.
2. I used an online stair calculator (in manual or unrestricted mode for non code comforming stairs, I'm such a rebel, eh?) and it spit out this -

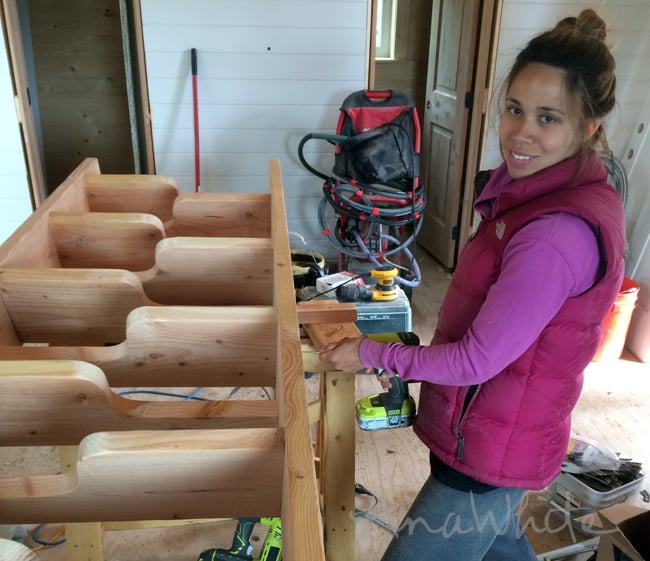
So there's the stringers! I layed out the stringers and cut them (I used 2x10 because that's what I had leftover).
The treads were a little more work.
For this rise and run, I've only got a 4" tread, meaning the loft stairs overlap (using again a 2x10 tread because that's what I have on hand) a full 5-1/4".
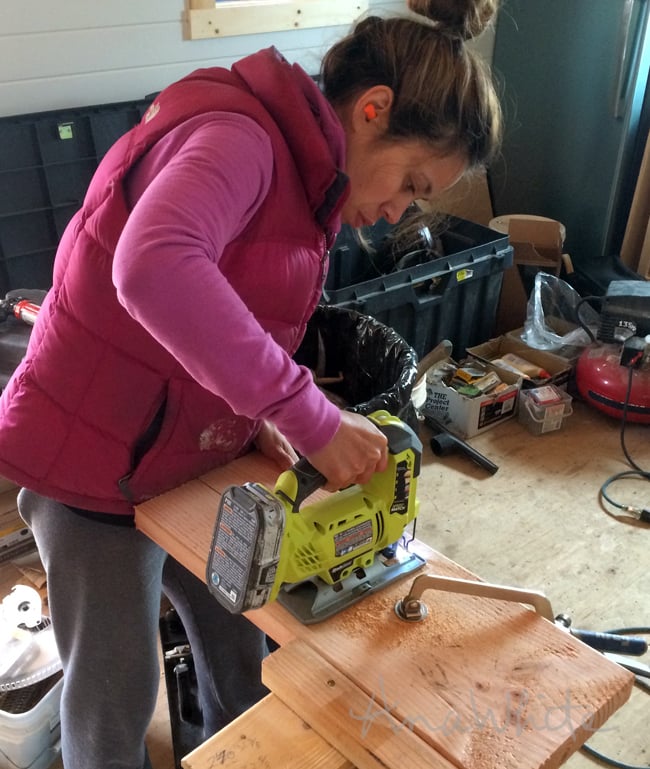
So I cut 5 -1/4" off of half of the stairs with a jigsaw (leaving 4").
I jigsawed for days. Gave me time to justify the primer colored walls.

The jigsaw will work but it's not the ideal tool for cuting through 1-1/2" thick douglas fir. A scroll saw or band saw would have been nice. But when you are out in the woods, you can't be picky. You gotta just work with what you have and be thankful you aren't holding a handsaw.
So I then sanded for days. It was actually more like a few hours, but it felt like days.
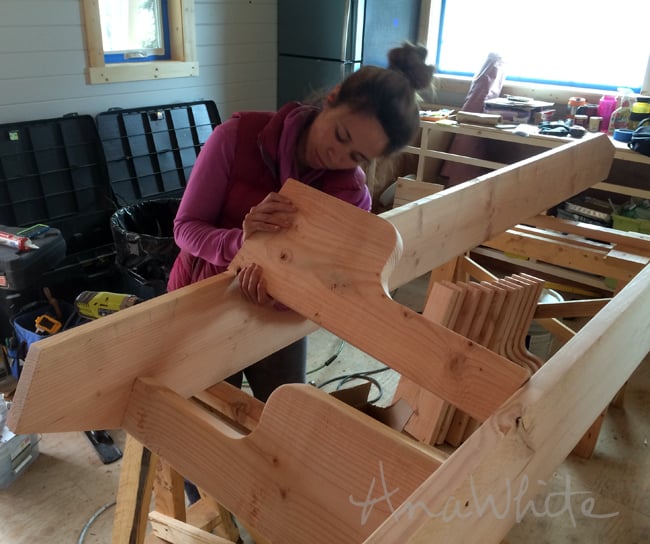
Now to see if it all fits.
I decided to not notch into my stringers, and instead just marked on the insides where the stairs would be placed. This leaves a skirt on the sides of the treads, hopefully helping to keep feet on the treads (and will give me something to add a railing handle to later on).
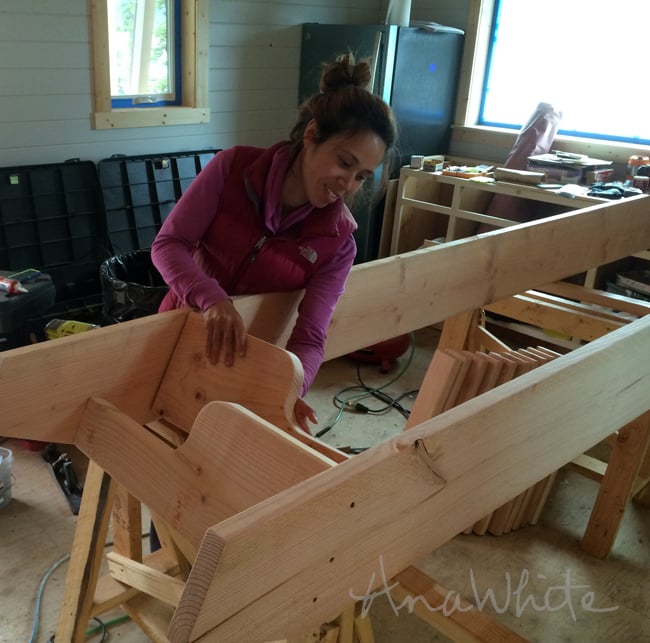
That moment when you realize your crazy project just might work.
I screwed the treads to the stringers. I decided I'd wait and see if I needed to add blocking underneath the treads for additional support. The best way to do this would have been to notch out for each tread, but we just didn't have the time at this point.
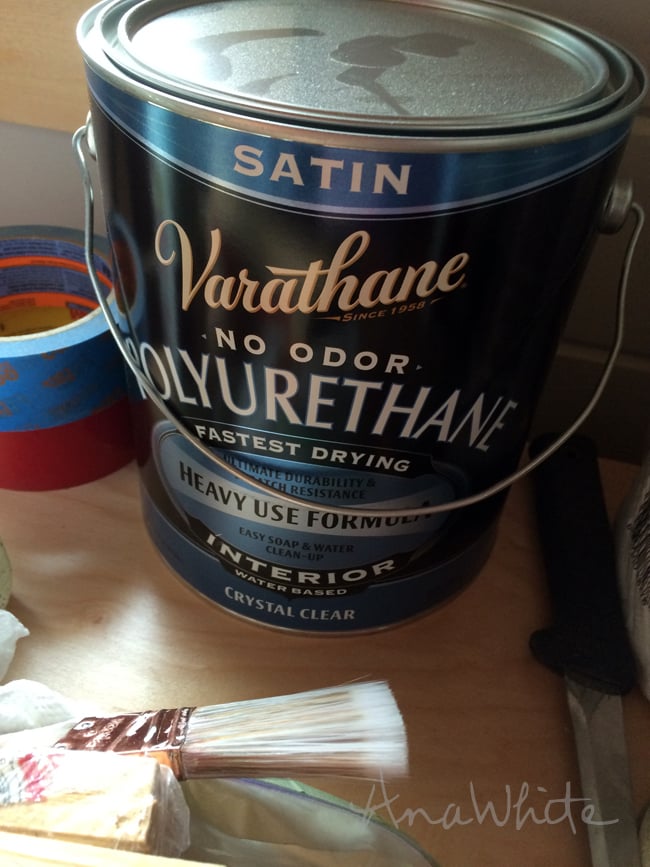
To protect the loft stairs, we brushed on several coats of Varathane Crystal Clear, an an additional coat on top of the stair treads for added durability.
Waiting for clear coat dry is even worse than waiting for water to boil. You just have to go do something else because it will not dry, not ever, if you sit there and watch it.
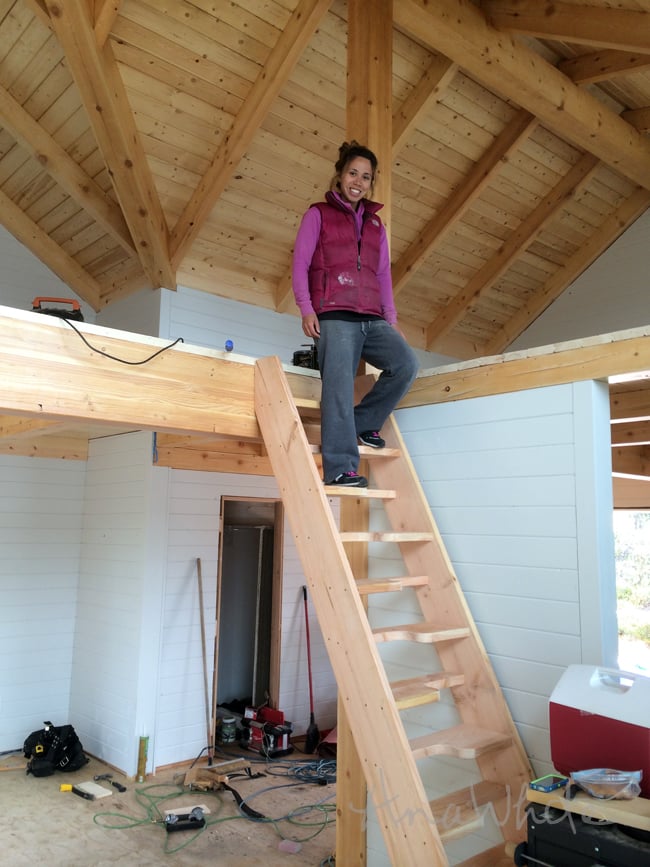
So the next day, we put the loft stairs in place,

And the moment of truth -
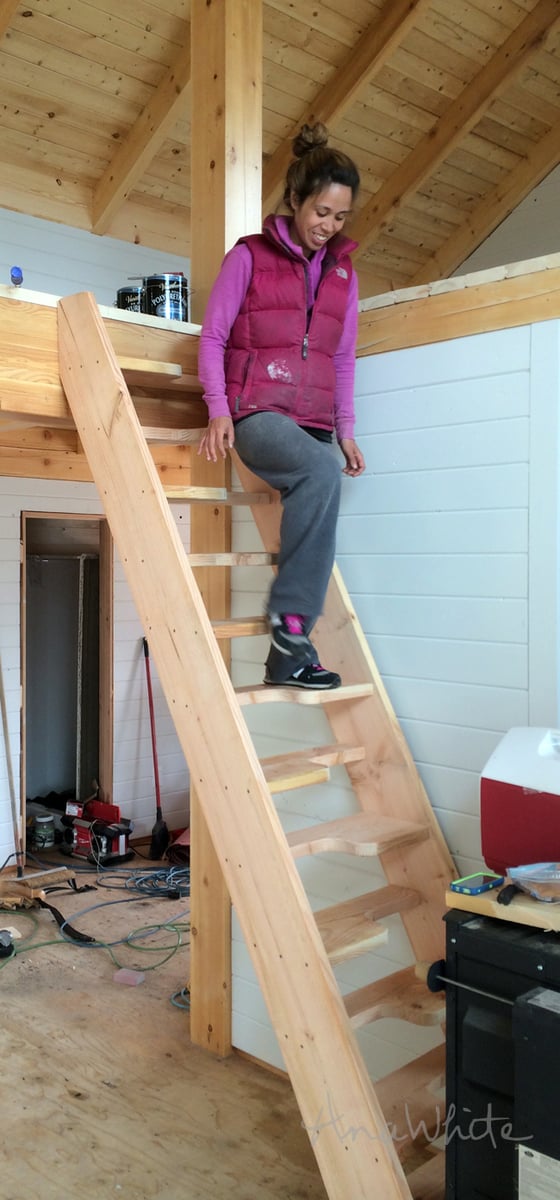
What the heck??? They actually work!!!
I'd do a happy dance, but the rules are, right foot, left foot, right foot - no dancing aloud on these stairs.
These loft stairs ended up being the perfect solution for our needs at our cabin. I wouldn't use this design for a standard set of stairs in a home, but for this application, they work perfect.
Have an awesome day!
XO Ana
Comments
balloongal247
Wed, 09/09/2015 - 13:27
Proofreading
I know in the grand scheme of things it's a minor issue, but I would recommend you spend a few minutes proofreading your posts before you set them to go live. There have been several recently that have a lot of little mistakes--misspelling, using the wrong word, etc. Particularly now that you are expanding to more outlets, I'd think it'd be worth your time to double check the little things that just reflect poorly on a writer. Most people might not care, but for those of us who do, it's extremely annoying to try to read a post with multiple language mistakes in it.
This staircase/ladder does look cool. I like the look of your curved treads better than the simple alternating treads, though the one at the end definitely looks easier!
In reply to Proofreading by balloongal247
Pam the Goatherd
Wed, 09/09/2015 - 14:20
Oh, but I LOVE the thought of
Oh, but I LOVE the thought of dancing "aloud" on the stairs! I hope she doesn't correct that one!
bhoppy
Thu, 09/10/2015 - 13:10
their they're there
I read the post twice and still have no idea what proofreading mistakes you are referring to. I would recommend you keep your negative comments to yourself and if you are easily annoyed by someone that freely shares her knowledge and plans for free with the rest of us maybe you should go to another site to be a grammer nazi.
northwoods
Tue, 10/27/2020 - 07:03
Traditional has one "d" not…
Traditional has one "d" not two, and you are "allowed" to say something "aloud" in this open forum ;-)
sam5657
Wed, 08/10/2022 - 11:53
We all make mistakes…
We all make mistakes sometimes; including you. You wrote "I am not going to that grandma that can whip out new loft stairs" etc. I think that you forgot the "be" in between "that" and "grandma." I am glad that in a world of "creative spelling" and not learning cursive writing in school that some people (you) still appreciate proper spelling and grammar.
I am that gramma too. My four grandkids range in age from 9-23 years. As I officially became a senior citizen a few months ago; I finally have the time to do some woodworking projects. Last year I built your storage coach (my first big project). It came out really good. Instead of making the 2 cushions; I made pillow shams and used 2 kingsize pillows. That way I can wash the shams and have pillows ready for an overnight guest.
Over the years, I have framed walls, done drywall, installed windows, done electrical work, and am now learning to do a little plumbing.
I am turning the 2nd floor of my house into an apartment and will replace the loft staircase with your staircase to give extra room for the closet. Maybe later on I'll use the attic space to expand the apartment.
Thank-you so much Ana for all your great projects. You've given me the confidence to do so much.
Sandra Cahoon
sam5657
Wed, 08/10/2022 - 11:56
Sorry, I thought the grammar…
Sorry, I thought the grammar comment was made by Ana; I missread it.
Sandra Cahoon
Linda7
Wed, 09/09/2015 - 18:09
Great idea!
Ana I really like your idea for space-saving stairs. This also could be a perfect solution for people who are building "tiny" homes who can't use a ladder and need to save space with stairs. Thanks for the great post.
Mirandabtaylor
Thu, 09/10/2015 - 09:11
Paint
I just have to tell you - I love the painted walls, and if you hate the color, maybe try a different shade. I usually opt to keep the wood over painting, but I always love the painted result. It's fresh and pretty and different from those of us who are too scared to take a chance! I also love how the stairs turned out.
jnovotny
Thu, 09/10/2015 - 14:24
GOOD JOB
Very cool idea Ana. Stairs look great. I'm in the process of designing my Alaskan home. Can't wait for the show to air. Thanks for all your postings in general throughout your web site. I frequently reference it for ideas on home construction projects.
jnovotny
Thu, 09/10/2015 - 14:25
GOOD JOB
Very cool idea Ana. Stairs look great. I'm in the process of designing my Alaskan home. Can't wait for the show to air. Thanks for all your postings in general throughout your web site. I frequently reference it for ideas on home construction projects.
handmadewithash
Sat, 09/12/2015 - 19:23
I love the stairs! It's a
I love the stairs! It's a very cool design. A bandsaw would definitely be a nice tool for cutting shapes out of all those boards. Heh and maybe a spindle sander too ;)
thehouseinspector
Sun, 12/27/2015 - 12:22
Ladder/Stairs - Safety
Nice job on the stairs and the write-up. Very clear.
The stairs are attached to the 'stringers' with 5 screws, 3 on the wide side and 2 on the narrow end. The screws attach and hold into the endgrain of the treads.
This is the weakest attachment and regular screws do not have the shear strength for this use. I'd recommend either using 'heavier gauge structural screws' or notching the stringers to house and suport the tread ends. For ladder/stairs already built as described in the article, hardware bracket supports could be installed at the underside joint of each tread. Everything seems fine now while the materials are new. However as the wood ages, it dries and shrinkage occurs. This has happened when you hear the steps creaking as they are used.
Also, these ladder/stairs are more ladder than stair (they are actually classified as ladders) and are not meant to be used facing forwards while decending.
And doing that while holding a baby? - not a recommendation I would make!
A hand rail?, YES. At least on the outer side.
The second design shown, in addition to being easier to build, is actually stronger as it more fully supports the treads on both ends. It is also not biased to right or left handed users.
northwoods
Tue, 10/27/2020 - 07:01
Lots of "close but no cigar"…
Lots of "close but no cigar" info in the above post. The fear of insufficient tread attachment is spot on. But it has nothing to do with the shear strength of the 5 screws. You would not be able to shear them with human weight and power. The issue is that the wood can crack in the same plane as the screw and the screw can pop out of the top surface of the step, meaning the step will pop down. Heavier fasteners will not solve this issue. Notching or blocking would help, or adding a riser. WRT ladder versus stairs, no this is not a ladder, the whole point of alternating tread stairs is to allow forward facing descent and have a stair that is steeper than is possible with standard treads. Fully agree on the handrail, there should absolutely be one!
Tom-and-Annie
Sun, 03/11/2018 - 16:36
Alternating stairs
Hi Anna
Thank you for this post. We wanted to finish our attic but the stairs were very steep and we were uncomfortable using them. Annie found your post and we are now in the middle of our project. Thank you for all the great info. (And ignore the grammar nazi)
Tom & Annie
Www.caravanband.com
Rusticus
Mon, 04/05/2021 - 06:48
Better ways of attaching treads to stringers
Ana -
Kuddos to you for thinking outside the box and using the alternating tread (AKA Jefferson or paddles) stairs for your loft. This is full of win.
However, your method of attaching the treads to the stringers concerns me - will they works loose, allowing the stringers to spread at some point in the future? Screws run into end grain don't hold very well. You've loaded the screws in shear - that's all that's supporting the treads (I'm sure they are up to it, but it's still not ideal). If the stringers spread, the screws will be loading in bending - less good, by far. And, the treads may well split out where they are being loaded by the screws, especially on the narrow ends of the treads, where there is less lever arm to resist the torque of someone standing (stomping? jumping?) on the tread near the middle of the span. This might be a good place for pocket screws - pocket the bottom sides of the treads, and run the screw threads into the cross grain of the stringers. This is hardly more work that the method you showed, but is quite a bit stronger, in my opinion.
For anyone interested in a more structurally sound method of attaching treads to stringers, with very little more work, check out the video from Next Level Carpentry:
https://www.youtube.com/watch?v=rm3qpz50fbs
His blind mortises made using a router template are pretty quick and easy, and the gang cut tread tenons are pretty quick, too. He did run the screws into the end grain of the treads, but in his build the screws are only needed to keep the joinery from shifting - much more secure. As a bonus, he does his full scale layout with only a tape measure - good stuff!
If you were really paranoid, you could build the loft stair like an old fashioned wooden step ladder, using tie rods that pass through the stringers and are nutted, with beauty washers, on the outside of the stringers. The tie rods can be re-tensioned, even if the nuts are inaccessible after installation, by wedging between the bottom of the treads and the upper surface of the tie rods. Ladder treads were usually housed in a rabbet - not as clean as NLC's blind mortise, but maybe OK for a cabin. Certainly no worse than using metal angle cleats, and most of us wouldn't turn a hair at that for cabin aesthetic.
If you really wanted to go "whole hog" you could route fully housed carriages to a template, and wedge the treads in place, the same as you would for any other quality stair - easily tightened up as moisture content and humidity dictate.
Lastly, using a third stringer up the middle would make an alternating tread stair vastly more beefy, but would change the aesthetic considerably, too. However, for heavy use situations, I'd strongly consider it.
Again, great outside the box thinking, but in the interest of safety, I'd "plus it up" just a bit.
ururk
Sun, 01/09/2022 - 07:21
After 6+ years of having…
After 6+ years of having these stairs installed, how are they working for you? Considering building one myself, but all opinions online are negative towards them and would like to get real feedback from someone who built a set and is (presumably) still using it. Thanks!