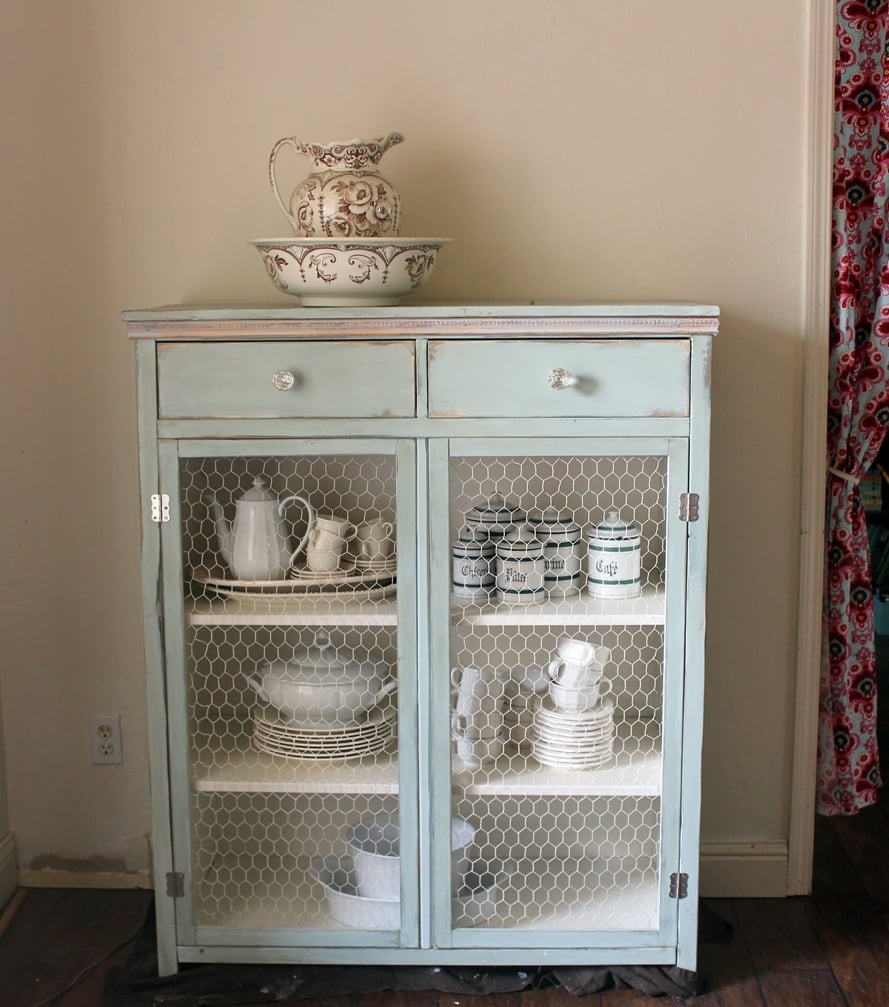


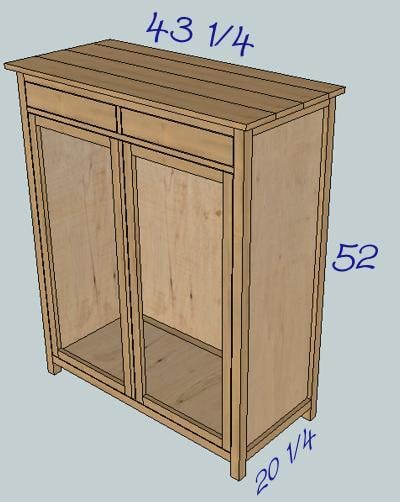
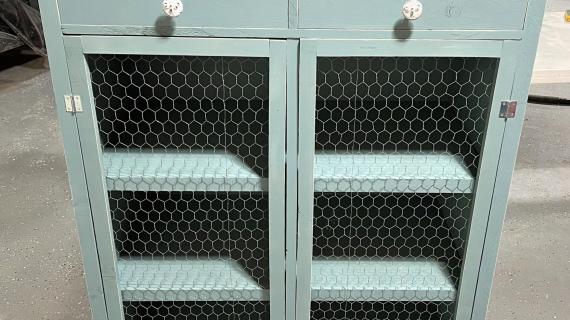
On a project page Ana posted this a picture of Ikea’s Hemnes cabinet talking about its color/finish. A lot of the commenters were interested in plans. So I started working in Sketchup: While probably not an exact duplicate, it comes fairly close. The overall dimensions are the same as on the Ikea page, but a few parts are modified to use standard sizes of lumber to simplify construction. I would say that this project is advanced compared to many of the other plans on this site. A Kreg Jig is required, as well as a circular saw with a fine (40 tooth) blade.
Preparation
2×2 — 5 @ 8′
1×2 — 5 @ 8′
1×4 — 2 @ 8′
1×6 — 2 @ 8′
1×6 — 1 @ 4′
full sheet of ¾” BC grade or Sanded Ply
full sheet of ¼” Ply
2 sets of euro drawer glides 16″ length
knobs or handles for drawers and doors
4 hinges for doors
wood glue
2″ wood screws (1 Lb.)
1 1/8″ Finish nails (small package)
1¼” pocket hole screws (100 count box)
2½” pocket hole screws (50 count box)
½” brad nails or 16 screen clips (see section on door panels)
2×2
- 4 @ 51¼
- 4 @ 15 7/8
- 4 @ 38
1×2
- 4 @ 15½
- 4 @ 41
- 3 @ 38
- 1 @ 3¾
1×4
- 2 @ 18 3/8
- 4 @ 17½ (Ripped to 3″ wide)
- 4 @ 16 (Ripped to 3″ wide)
1×6
- 3 @ 43¼
- 1 @ 43¼ (Ripped to 3¾” wide, use offcut for next piece)
- 1 @ 41 ¾x¾ Center Strip
- 1 @ 17 3/8 (Ripped to 3¾” wide, Center Divider)
¼ Ply or Beadboard
- 1 @ 47¼ x 39½
- 2 @ 17 ½ x 16¾
¾ Plywood
- 2 @ 15 7/8 x 45¾
- 1 @ 15 7/8 x 38
- 2 @ 17 1/8 x 38


Please read through the entire plan and all comments before beginning this project. It is also advisable to review the Getting Started Section. Take all necessary precautions to build safely and smartly. Work on a clean level surface, free of imperfections or debris. Always use straight boards. Check for square after each step. Always predrill holes before attaching with screws. Use glue with finish nails for a stronger hold. Wipe excess glue off bare wood for stained projects, as dried glue will not take stain. Be safe, have fun, and ask for help if you need it. Good luck!
Instructions
Step 1
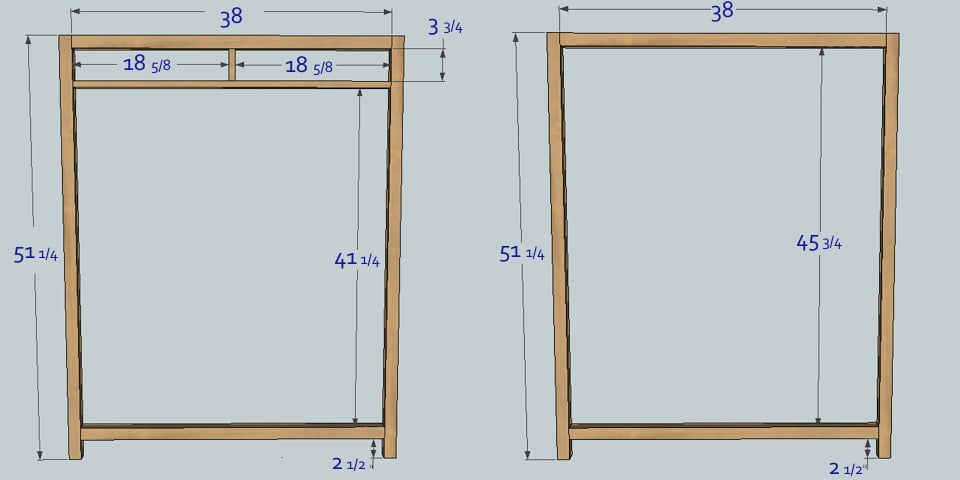
Layout of the front and rear frames:
This is the layout of the front frame. Look the wood over and put the best sides facing the front. Mark the joints onto the pieces to make it easier to assemble them later. Repeat this process for the rear frame.
One thing to consider when working with dimensional lumber is that the long edges are rounded over at the mill. When the square end of another piece is butted up to this round edge, the joint looks somewhat raw/unfinished. A way to avoid this is to round over the end of the joining piece so that both edges match. Now this is a totally aesthetic detail that has no bearing on the use or durability of the project, but it adds a nice finishing touch. It also helps camouflage a less than perfect joint alignment.
Anywhere in the project where pieces of 2×2 are joined the use of 2 1/2” screws are recommended. The extra thread length will strengthen these joints significantly. Also be sure to drill the pocket holes at the proper distance for 2x material so the screws are centered in the joint.
Step 2
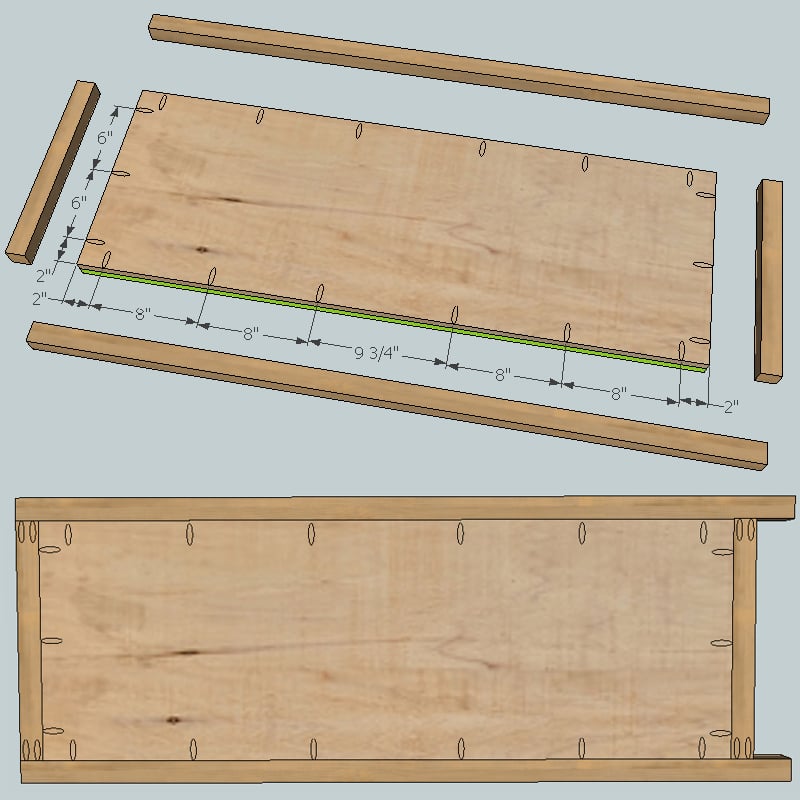
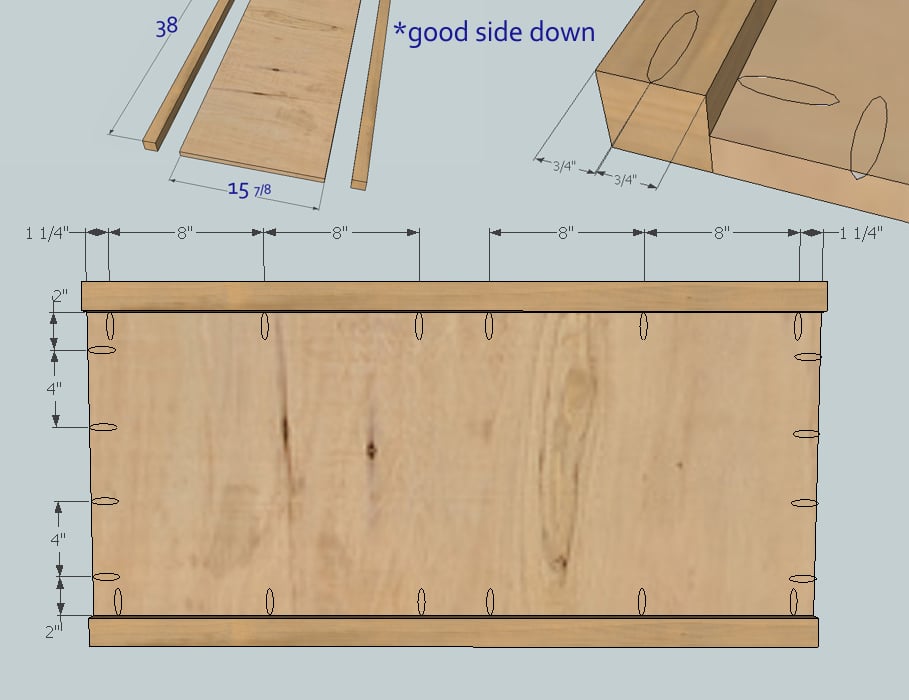
Side panels:
Now to start the assembly. On a flat surface layout parts for the side of the cabinet. The good face of the plywood goes down. We are working from the inside of the cabinet here. Place something (in the green area) under the plywood panel to bring it up flush with the tops of the 2×2′s. Some scraps of 1x material with a piece of cardboard or two should get things to the right height. Begin laying out marks for the pocket holes. Do one long side and one short side. Then transfer those markings to the other side panel. Then transfer from the second panel back to the first, swapping back and forth until all sides are marked. Drill pocket holes around the perimeter of the plywood. Drill two pocket holes on both ends of the top and bottom rails. Space them 3/8″ from the outside edges. Drive screws to create the side assemblies. Attach the shorter tops and bottoms first.
Step 3
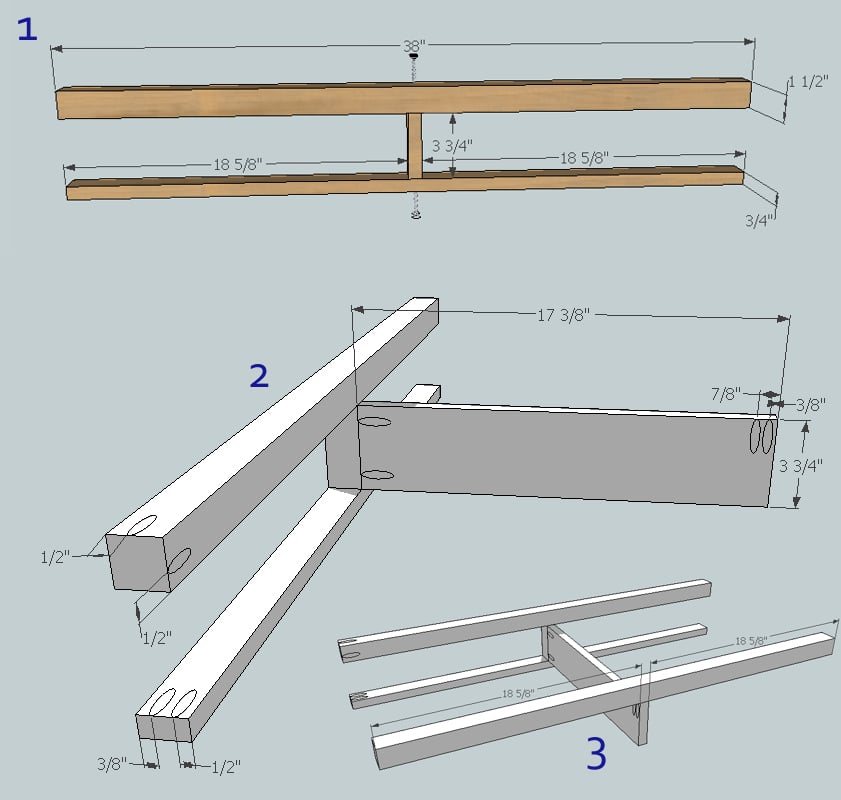
Drawer divider assembly:
Gather the pieces for the drawer divider. This is the most complex portion of this project, but it is actually fairly simple. Drill pocket holes as shown on both ends of the front rails. The center piece is fastened with wood screws from the top and bottom. Predrill and counter sink the four holes. Use the center divider as a spacer between the rails to keep things lined up while driving the screws. Next attach the center divider to the front center. Then attach the back rail to the assembly. It should be centered on the center divider. It is easier to assemble this upside down.
Step 4
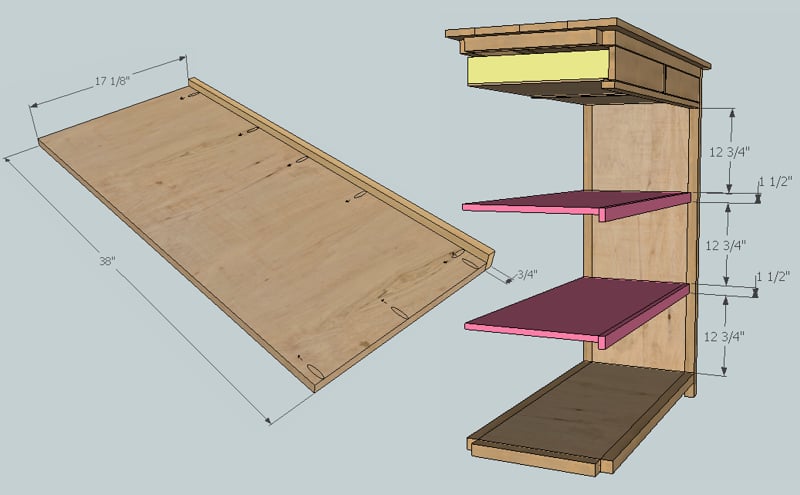
Shelves:
Depending on your needs, more or less than the standard two shelves may be necessary. Fortunately the shelves are simple to assemble and install. For each shelf a 1×2 38” long and a 38×17 1/8” piece of 3/4” plywood are needed. Put the good face of the plywood down and drill pocket holes in the locations shown. The exact layout isn’t important here as the holes will never be seen, just eyeball it. The 1×2 is attached on edge to become the outside face of the shelf
Step 5
Step 6
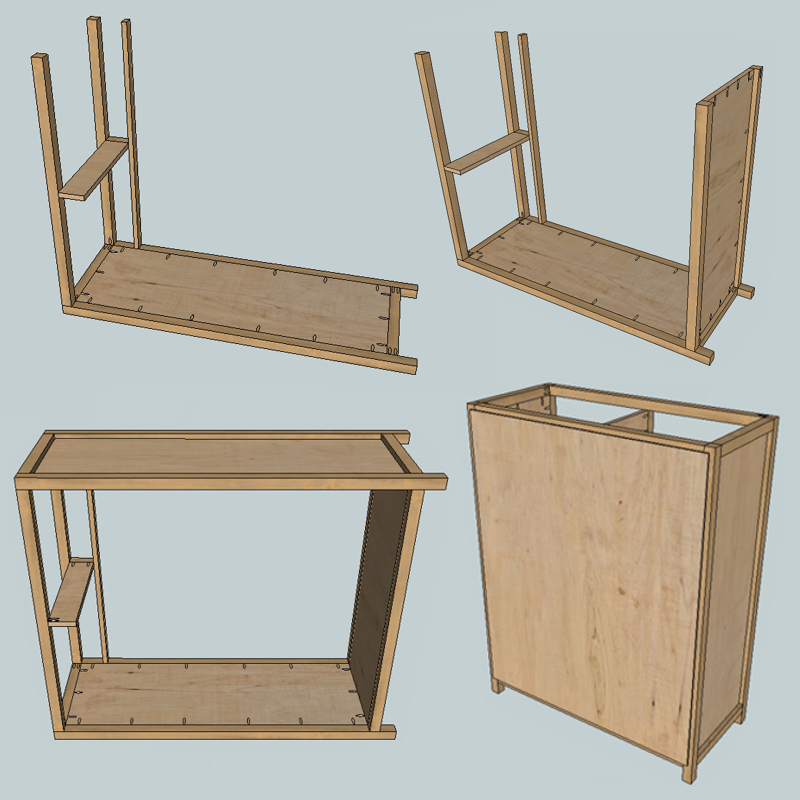
Case Assembly:
Lay one side panel face down. Take the drawer divider and attach it using the holes previously drilled. Be sure to align everything carefully with the layout lines. Now attach the bottom shelf to the side, again using the layout lines to get things in the proper position. If installing 2 shelves use the dimensions provided in the step 4 diagram. Use 2″ screws in the rear set of holes in each shelf. Lay the other side panel face down and flip the assembly onto it. Continue attaching with screws, aligning everything with the layout lines. Attach the back by rolling the unit onto its face (divider side down). Measure the diagonals to check for square and tweak if necessary. Mark the shelf locations on the back side. Now the back panel can be nailed on. There should be 3/4″ reveal all the way around. Put a nail every 6 inches. Stand the unit back up.
Step 7

Creating the top:
At this point there is the option of easing, (sanding, rounding, or scraping) the edges of the 1×6′s to give the top a plank look. Take the pieces and put the best sides face down. Pocket holes will unite the top planks into a single surface. Their precise layout and spacing are not critical. 4 or 5 screws per joint are plenty. Just be sure to keep the holes at least 2 inches in from the ends so they aren’t visible along the outside edges. Gluing as well as screwing the pieces together is recommended. The pocket screws will act as clamps and pull the boards together tightly. If finishing/staining the top is planned, now would be the best time to do so, as it will be easy to coat the underside without having to mask anything off.
Step 8
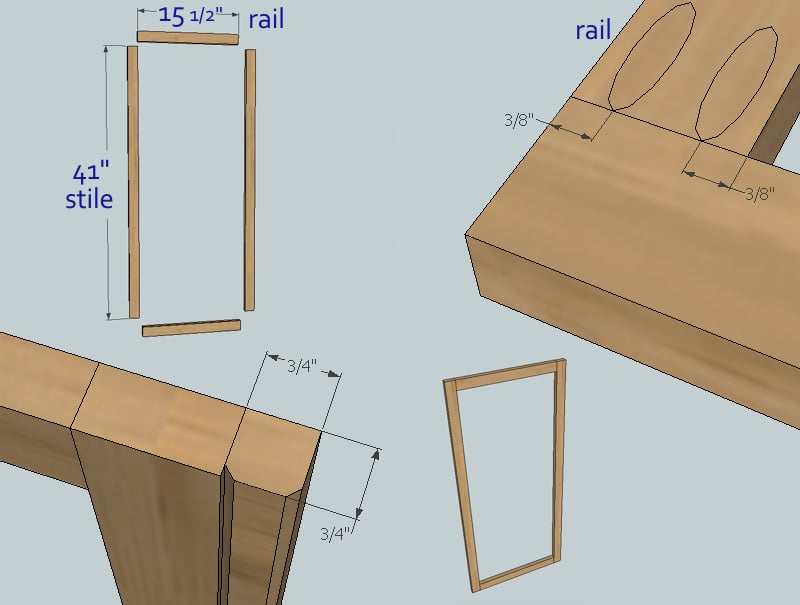
Doors
Get the 1×2 pieces for the doors laid out and ready. The shorter pieces (rails) will go between the longer sides (stiles). Drill a pair of pocket holes on both ends of all four top and bottom rails. The holes will be centered 3/8″ in from the edges. Keeping the outside edges and front faces flush, drive screws to create the door frames. Add the 3/4″ square strip to the edge of one of the doors. This center strip gives the look of a center support without getting in the way. Ease the front edges with sandpaper to give it some definition. Apply glue and finish nail from the outside edge. Install the doors into the cabinet following the directions included with the hinges. There should be an even 1/8th” gap all the way around and between the doors
Door Panels:
There are a number of materials that can be used for the door panels. Glass, mirror, plywood, punched tin, beadboard, etc. It really depends on the look desired. If the decision is made to use glass it is VERY IMPORTANT that to use the right type of glass. Regular window glass is not acceptable. Tempered glass or laminated safety glass must be used. Neither of these are cheap, but this is not an area to cut corners. The safety of everyone in the home is affected. Plexiglass is a lower cost alternative, but is somewhat prone to scratching and doesn’t look quite as nice.
Whatever material is used, the panels need to be 16 ½ by 39. This gives 1/2” of overlap all the way around. Plastic screen tabs make securing glass panels easy. Other types of panels can be nailed on using 1/2” brads.
Step 9
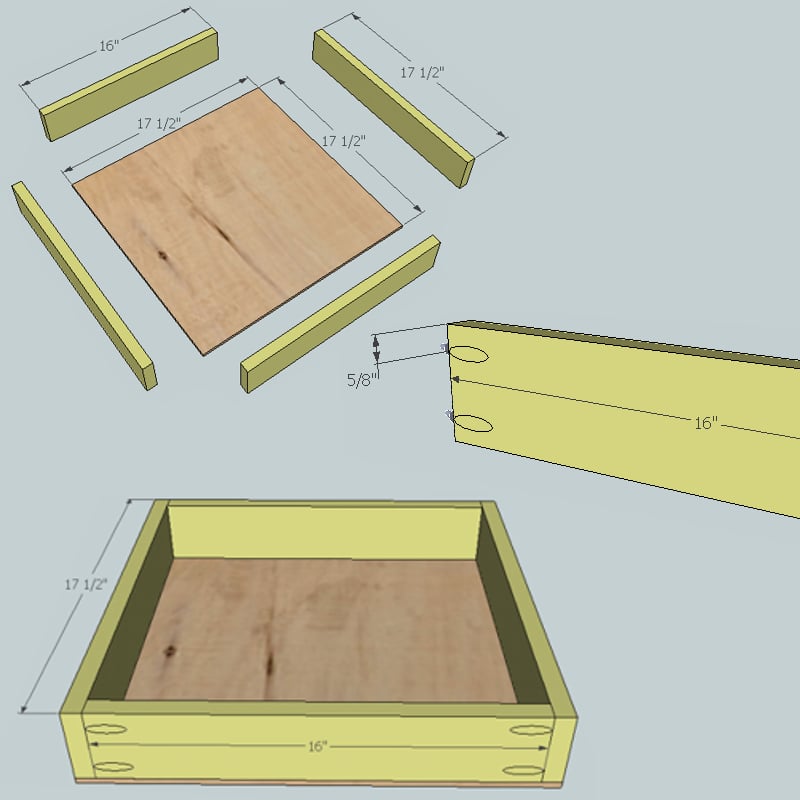
Drawer Assembly
Gather the parts for the drawers. Easing the top edges of the drawer sides is an option. The 16″ long drawer pieces need a pair of pocket holes at each end. Locate the holes about 5/8″ from the edge.
Assemble the drawer box with the pocket screws. Face the screw holes to the outside of the box. The front of the drawer will be covered later and the other set of holes will be on the backside. Nail the plywood bottom on, making sure that the plywood doesn’t overhang the box as this will cause problems with the drawer slides. Following the directions included with the drawer slides, install the drawers. The front of the drawer box should be 3/4″ from the front face of the cabinet to leave room for the drawer fronts.
NOT SHOWN: Drawer knobs or pulls need to be installed on the drawer fronts before they are attached to the drawer box.
Place the drawer front in the opening and shim it until the gap is even on all four sides (should be 1/8″). Attach the front with finish nails from the inside of the drawer box. Be sure that the nails used are short enough that they won’t protrude through the front. (1 1/8″ length nails recommended.)
Step 10
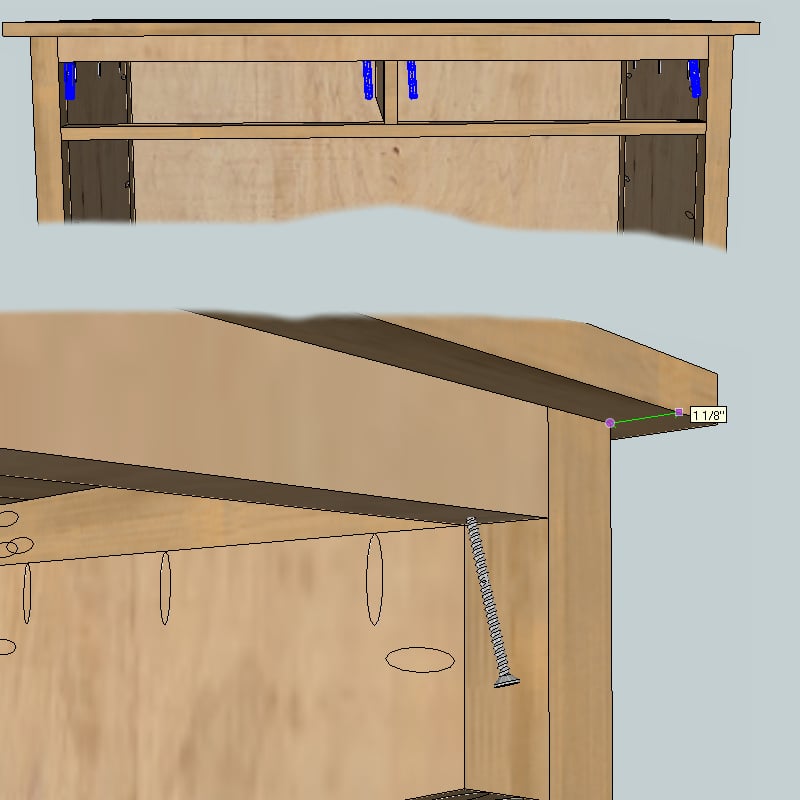
Attaching the top:
Predrill holes at each screw location to make assembly easier. The blue highlighted screws show where to predrill. The rear top rail is drilled in the same locations. The holes in the front rail will be angled inward to allow the drill to clear the drawer divider. Place the top onto the cabinet. Position the top so there is an 1 1/8″ overhang on the front and sides. Use 2″ screws to attach the top. Drive the screws flush with the bottom of the rails.
It is always recommended to apply a test coat on a hidden area or scrap piece to ensure color evenness and adhesion. Use primer or wood conditioner as needed.


Comments
paul.and.noah
Fri, 03/25/2011 - 10:09
I love this plan! Trying to
I love this plan! Trying to figure out if I use it in my dining room but I would probably use chicken wire instead of glass.
ACraftyCauldron
Sun, 03/27/2011 - 07:56
Love This!
This is so perfectly functional! Is it bad that I already have a space picked out for it in my house??? :D
apriltottle
Wed, 04/20/2011 - 08:25
HEMNES 8-drawer dresser
Nice work on the plans! I would love to see plans for the IKEA HEMNES dresser. I want to build it for my 4 yr old son and paint it navy blue. I've seen lots of home decorator bloggers use this dresser in various rooms, it's very popular right now and I'm sure the builders here would appreciate it. I haven't had a chance to play with sketchup so I have no idea where to start. If you think you want to tackle it, I'd greatly appreciate it and submit a finished product photo after we build it from your plans!
http://www.ikea.com/us/en/catalog/products/40180551
Width: 63 3/4 "
Depth: 20 1/8 "
Height: 38 1/4 "
Width: 162 cm
Depth: 51 cm
Height: 97 cm
treewoo (not verified)
Sat, 07/16/2011 - 23:43
question
how much did this run you? Thanks.
LauraS (not verified)
Wed, 08/03/2011 - 09:09
Instead of plywood?
I would like to make this unit out of all wood. How difficult would it be to replace all the plywood sections with the same procedure used to make the top of the unit?
In reply to Instead of plywood? by LauraS (not verified)
dan-k
Fri, 08/05/2011 - 23:43
Making this out of solid wood
Making this out of solid wood can be done, but it will take a while to do. I would suggest gluing up panels out of 1x6's instead of pocket hole joinery.