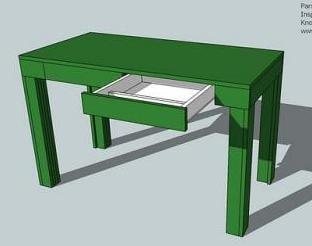


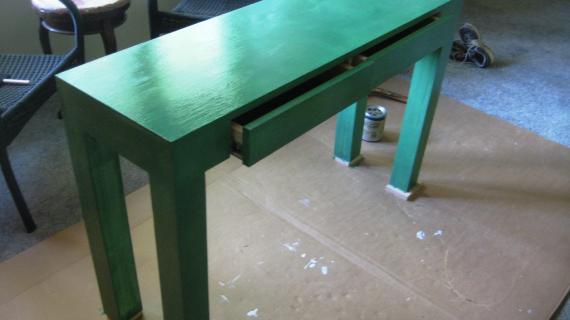
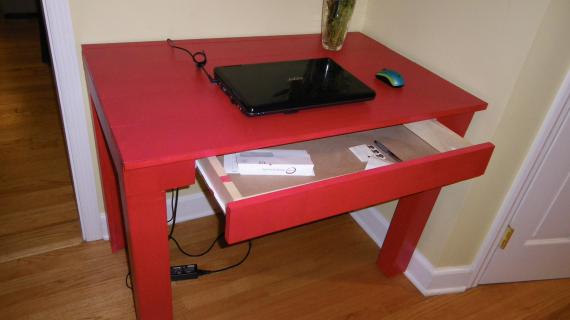
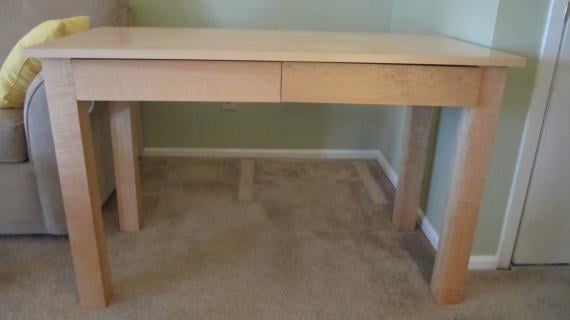
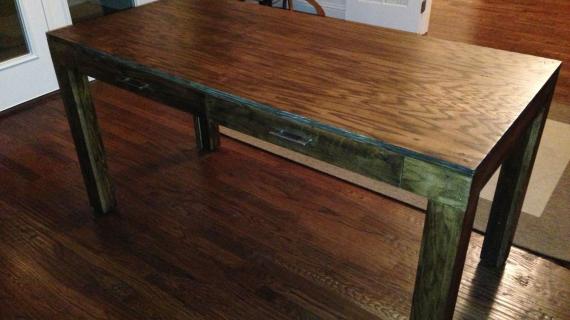
Featuring double doors and built from a standard 1/4 sheet of MDF as a desktop, this simple plan will give you a sturdy modern parson style desk.
Preparation
2 sets of 15″ drawer slides (as low as $3 each, depending on the quality, strength and features) 24″ x 48″ Project Panel (available at Lowes or Home Depot) OR 1 piece of 3/4″ MDF cut at 24″ x 48″ (about $30 for an entire sheet, you only need 1/4 of a sheet) 6 – 1×3 Boards (about $1.50 each) 4 - 1×4 Boards (about $3 each) Sanded plywood 1/4″ plywood - about 1/4 of a sheet (about $15 per sheet) 1 1/4″ Nails 2″ Nails
A) 12 – 1×3 @ 29 1/4″ (Center of the Legs)
B) 4 - 1×3 @ 25 1/2″ (Front and Back Trim for Legs, Outside Only)
C) 4 – 1×4 @ 25 1/2″ (Side Trim for Legs, Outside Only)
D) 2 - 1×4 @ 22 1/2″ (Side Aprons)
E) 1 - 1×4 @ 48″ (Back Apron)
F) 2 – 1×4 @ 6″ (Front Aprons)
G) Project board 24″ x 48″ OR 3/4″ MDF cut at 24″ x 48″ (this would be 1/4 of a sheet)
H) 1 – 1×4 @ 46 1/2″ (Back of Drawer Framing)
I) 3 – 1×4 @ 17 1/4″ (Sides and Middle of Drawer Framing) Drawers
J) 4 – 1×3 @ 16 3/4″ (Drawer sides)
K) 4 – 1×3 @ 15 1/8″ (Drawer front and back)
L) 2 – 1/4″ Plywood cut at 16 3/4″ X 16 5/8″ (bottom of drawers)
M) 2 – 1×4 @ 18″ (Drawer Faces)


Cut all your boards first and always use 2″ nails and glue unless otherwise directed. Work on a clean level surface. Square your project after each step. Most of all, have fun and work safe!
Instructions
Step 1
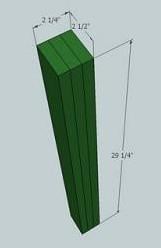
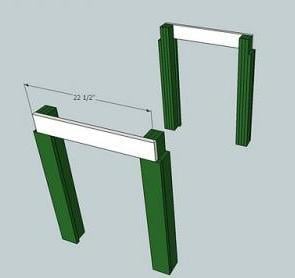
Inner Legs. Build all four legs be first using the 1 1/4″ nails to nail two of boards A together, flat edges facing, keeping all outside edges flush. Then use the 2″ nails to nail another board A to the first 2 boards A, as shown in the diagram above. Use glue and keep outside edges flush on all sides.
Step 2
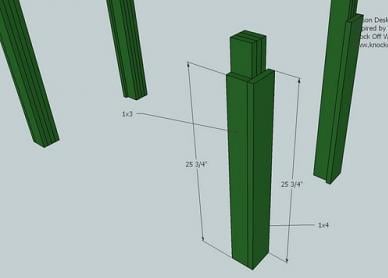
Leg Trim. Begin by adding board B to the leg from A, as shown above. Keep outside and bottom edges flush. Use glue and nail.
Then, nail in place board C, fastening to all four of the sandwiched 1×3 from steps 1 and 2. Your completed leg should look like the above diagram.
As you are building all four legs, make note taht the legs are not build the same for each corner. This is shown below.
Step 3
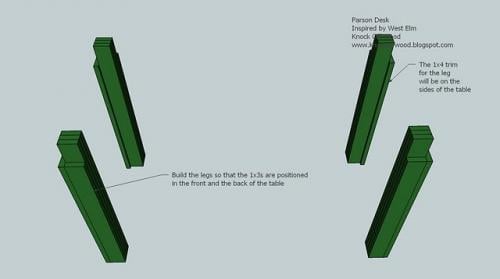
Building all 4 Desk Legs. Keep in mind that the 1×3 trim, or board B, will trim out the front and back of the desk, and the 1×4 trim, boards C, will trim out the sides. The diagram above illustrates this.
Step 4
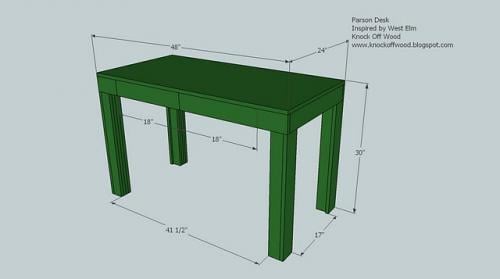
Apron Sides. Add the side aprons, D, to the top, nailing into boards A as shown above. The overall width of the table is 24″. Keep board D flush with the outside edge of the center of the legs (boards A).
Step 5

Step 6
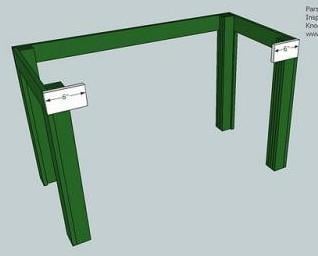
Front Apron. As shown above, nail F in place. Make sure you nail into both the side apron and the center of the legs, boards A. This is shown above.
Step 7
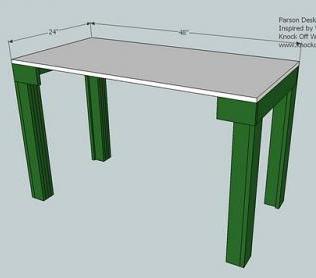
Tabletop. Add the project board or 3/4″ MDF tabletop, G, to the top, keeping outside edges flush. Make sure you nail into all the side aprons, back apron, and leg pieces.
Step 8
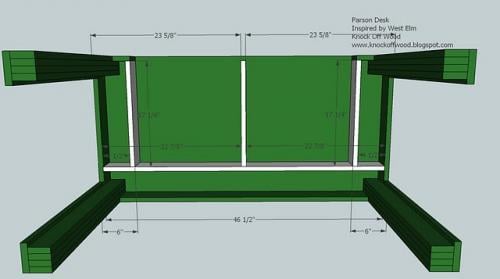
Drawer Housing. Add H and I as shown above. Make sure you add a screw at the front of the middle board I, screwing through the tabletop into the top edge of I. Cross nail and use lots of glue – these boards are going to be supporting the drawers. This is very important – make sure you add H and I exactly square. If the drawer frame is not square the drawer will not slide.
Step 9
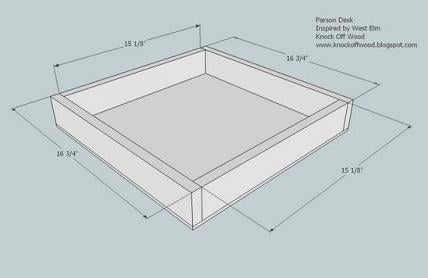
Drawers. Nail through the drawer sides, J, into the drawer fronts and backs, K. This is shown above. Make sure you take a square of the drawer. See the HOW-TO section on how to check for square. Also make sure you cut your plywood perfectly square. This is very important. Your drawers will not slide if they are not square. Add the plywood, L, to the bottom of the drawers. Use the 1 1/4″ nails and glue to nail the plywood to the bottom of the drawers.
Step 10
Drawer Faces. Add the faces of the drawer as shown above. Notice how on the inside of the drawers the overhang of the face is 7/8″ and on the outsides only 1/2″. The best way to accurately attach the face is to attach the drawers to the slides and insert the drawers into the drawer frame. Then position the face on the drawer so that it fits the opening on the aprong. Then add a couple of 1 1/4″ nails to the face. Then take the drawer out and nail through the inside of the drawer into the face.
Step 11
Optional Drawer Dividers. You can also add 1x2s as dividers built into the drawers. I suggest using a 1×2 to create a space for pens and pencils, and perhaps a second divider for small items like tacks and paper clips.

Comments
Beth (not verified)
Sat, 12/19/2009 - 04:56
Hi AnaI was brought to your
Hi Ana
I was brought to your site through Stumbleupon and I love it!
Your plans are very clear and the furniture is stunning - and exactly what I want for my house but can't afford. As soon as Himself has the workshop built I'm staging a coup:D
Thank you for posting the plans, keep up the good work
Beth
Mandy (not verified)
Sat, 12/19/2009 - 06:30
LOVE your site - I signed up
LOVE your site - I signed up to be a follower :)
How about the bookshelf in the background of the picture, the white one. Could you tell us how to build that?
Seriously - GREAT site!
Ana White (not verified)
Sat, 12/19/2009 - 08:32
Thank you Beth and Mandy for
Thank you Beth and Mandy for visiting my site. Mandy, thank you for following - knowing I have readers is what keeps me motivated!
Mandy, you are a mind reader! I am already working on those open shelves in the background - just ran out of time last night! Check your feeds - it will be there soon!
Ana White (not verified)
Tue, 01/12/2010 - 09:13
For the top, you can also use
For the top, you can also use 3/4" MDF. It will be very smooth and you can laquer it up to look just like the West Elm table.
Marissa Breann (not verified)
Fri, 01/15/2010 - 11:30
I just found your site and am
I just found your site and am so excited! I can't wait to try this out. Thanks!
Delzonya (not verified)
Fri, 01/15/2010 - 14:40
I want table like Room &
I want table like Room & Board's Parson. Can I do this plan with slimmer legs? Will this plan support a heavier tabletop like Marble?
Ana White (not verified)
Sat, 01/16/2010 - 20:31
Hi Delzonya,There is actually
Hi Delzonya,
There is actually a much easier way to build the Room and board Parson Desk. I would use 1x4s from hardwood, no sandwiching, and a couple of top supports. If you would like to see this in a plan, please post in the FB discussion page.
Also, I'm not sure if marble would work because there is not much for tabletop support. Glass doesn't need the same amount of support, as shown in the photo.
Thanks, Ana
Lindsey (not verified)
Sun, 01/17/2010 - 16:22
Dear Ana,Thank you for this
Dear Ana,
Thank you for this awesome, awesome website!! I am attempting to build the Parson's desk, but I am having an issue with the slide-in desk drawers. This question might sound silly, but how do I fasten the draws inside the desk. I do not see in the plans, how to keep the drawers in place while closed. I look forward to hearing from you.
Sincerely,
Lindsey
Ana White (not verified)
Sun, 01/17/2010 - 19:37
Hi Lindsay, you will need to
Hi Lindsay, you will need to use the drawer slides to fasten the drawers in place. The drawer slides are attached to the sides of the drawers and the "drawer box". Because ever set of drawer slides has different installation instructions, you will need to follow the instructions with the drawer slides. Most drawer slides are self-closing, meaning that the drawer will stay closed when closed. I will add this information to the plan. Hope this helps, if you need more assistance, I'm here to help.
Ana
Murray Fam (not verified)
Fri, 01/22/2010 - 14:51
Hi! I am in love with your
Hi! I am in love with your blog! I have been lusting after the entire Pottery Barn Catalog for years, but I live in Canada and if you think you are paying too much in the US, you should know that up here Pottery barn is literally 2 or 3 times more expensive. I just can't justify it at all. So thank you! I will be making many of your plans in there near future!
I am wondering if this plan can be modified to make the Porter Collector's Desk from Pottery Barn?
http://www.potterybarn.com/products/porter-collectors-desk/?pkey=cdesks…
It seems to me, like it would be a fairly similar design with the exception of the legs. Can you buy pre-made legs at Home Depot? Just curious. I just like the more traditional/farmhouse like look of the PB version rather than the more modern feel of the West Elm Version.
Jenna
Ana White (not verified)
Fri, 01/22/2010 - 16:58
Porter
Porter Desk
http://www.lowes.com/pd_833-1380-2921_0_?zipCode=99701&firstReferURL=ht…
You may have to make additional modifications to the apron, but these are the legs you would want.
Say Kaci (not verified)
Sun, 01/24/2010 - 18:30
Hi Ana,First of all I LOVE
Hi Ana,
First of all I LOVE your website. I am about to move into a new apartment after having to purge all my old furniture and I didn't know what I was going to do about buying new stuff.
I want to build this desk for my home office, but I don't have access to a pneumatic nailer. Is this tool absolutely necessary in order to follow the plan? Am I able to use a manual hammer and build it just as well?
Thanks for everything!
Kaci
Janelle Vano (not verified)
Mon, 01/25/2010 - 09:04
Wow! My 14 yo daughter is so
Wow! My 14 yo daughter is so excited right now....we just found this West Elm desk last week (Martha Stewart's website showed 2 of them pushed together with a large piece of colorful plexiglass in between as a fun way to have two desks in one office), but I told her it was too expensive. I'm definitely going to try building it now! Thank you!
Ana White (not verified)
Thu, 01/28/2010 - 08:14
I am so sorry, but I would
I am so sorry, but I would not recommend using a regular hammer and nails. The reason for this is that when you manually pound, you will get off square. You could use a drill and trim screws, just make sure you countersink and screw first. I would highly recommend purchasing a nailer - you won't regret it in the long run.
Kari (not verified)
Thu, 02/11/2010 - 11:25
Ana, you are pretty much
Ana, you are pretty much amazing! Thank you so much for sharing all of your information!
TimRudd (not verified)
Sat, 04/03/2010 - 12:57
Ana,Thank you so much for the
Ana,
Thank you so much for the plans.
Over spring break I decided to put together a new desk for my bedroom.
You can see the results here:
http://picasaweb.google.com/109912329355643593326/ModifiedParsonStyleDe…
Tim
Anna (not verified)
Wed, 06/09/2010 - 17:10
Making this right now with my
Making this right now with my husband... just want to point out that the leg TRIM on the cut list is 25 1/2, but on the diagram it's shown as 25 3/4 (which i'm guessing was the right length because I need to go cut off 1/4" from the overall leg length to get the apron to sit flush since my trim was a tad bit too short)
just wanted to point that out in case you wanted to amend/edit the plan :) Thanks!! Super excited for my desk.
Daryl (not verified)
Tue, 08/31/2010 - 10:37
Ana, In answer to a review,
Ana,
In answer to a review, you posted a link to loews.com to purchase legs for this table. I don't own a saw and don't think my local home depot will be too excited to make all of these cuts for me. Can I use the pre-made parson table legs and modify the design? Also - I am a beginnier but consider myself very handy - how long do you think something like this will take? Thanks!
Ana White (not verified)
Tue, 08/31/2010 - 12:05
Hi Daryl, of course you can
Hi Daryl, of course you can purchase parson legs and use this plan. What I would do is take a closer look at this plan as well, and basically just build a desktop, and screw legs on. The issue with building modern style furniture is the finish must be perfect, so take great care when building. If you are handy, you could build this desk in a few hours - but expect fitting drawers for the first time to take a bit longer. Good luck! Can't wait to see your desk!
Rebecca (not verified)
Wed, 09/22/2010 - 15:28
You are fantastic. Plain and
You are fantastic.
Plain and simple.
These were just the plans I was looking for! I have a couple of questions. Could I build this desk without drawers? I am planning just to follow your steps and stop at Step 7: Tabletop. From there on it is just about adding the drawers on. If I do this, will the desk have enough support with just the table top? The last thing I was wondering is if everything would work the same, if I make it smaller? If I do not have to worry about the drawers then I can just cut my tabletop down to 30'' (ish) instead of 48''. I do not need a very long desk. Whenever you get a chance please let me know.This is so great, I can't wait to start building. Thanks for being awesome!
Rebecca
Ana White (not verified)
Wed, 09/22/2010 - 16:54
Thank you! On the table as
Thank you! On the table as bar height, it definitely can be done. But what happens when you go up is your legs have less and less support at the bases. So you would need to add some sort of support for the legs at the bottoms. I'm working on a bar table right now and will be posting shortly - so check it out.
Barrett (not verified)
Sat, 10/02/2010 - 04:02
Hey Ana, My wife has me
Hey Ana,
My wife has me building one of these today. I'm looking at the West Elm site and really like how the tabletop is flush with the top of the drawers (they're beveled). Your plans have the top sitting on top of them (giving it a 3/4 profile above the drawers). Do you know if anyone has tried to set the MDF inside the outer trim, making the top flush, instead of having the trim run underneath? I'm thinking it is only a matter of adjusting the trim pieces for the added length and width, giving you a slightly bigger tabletop. I'm heading out to my local rental store to see about the price of a nailer for the day, too, since I don't own one yet and saw your warning above about a hammer and nail set. Renting may be worth saving myself the headaches, until I can find a decent, low-cost nailer.
I love the free plans, and I love how excited my wife gets about your furniture. I've got a background in woodworking, but no shop (or time), so your stuff fits our small house and young family very well!
tatiana (not verified)
Tue, 10/12/2010 - 06:20
I love this desk! I want to
I love this desk! I want to build a dining table just like this but without drawers. Is it possible to just make it longer and a bit wider with out adjusting anything major? I know NOTHING about building furniture. Thank you!
Barrett (not verified)
Sat, 10/16/2010 - 09:11
Well, I learned my lesson
Well, I learned my lesson today about altering your plans... don't! lol. I thought altering it would be so simple, but never thought of all the ramifications, like how low the drawers would hang. My wife rolled her eyes at me when I asked if the desk NEEDED to have drawers, and said "I told you not to change them."
You have earned my trust and admiration! But it was a learning experience.
joe (not verified)
Tue, 11/02/2010 - 12:39
My daughter sent me the
My daughter sent me the Parson's desk plans & suggested we build it together. I picked up the materials & thought I'd try to get started so when she got here over the weekend we could finish it up together. Things went very well til I got to the drawers. The dimensions for the 3 (ur plans call for 2 pieces but I quickly realized I needed the 2 side pieces & the 1 for the middle) drawer framing pieces call for these pieces to be 1x4 @14 1/4" long. After I cut the pieces & attached them to the under side of the desk top I made the drawers The drawer sides were to be cut @ 16 3/4".. I didn't realize the mistake til I cut the drawers & put them together. Of course they are too big for the "box" I'd built. The diagram on page 6 of the plans shows the distance from the front of the desk to the back of the drawer housing to be 171/4"...not the 141/4" called for on the cut list. the good news is my daughter wants 2 desks built so I can make smaller drawers for the desk I'm finishing up now & use the drawers I have made for the next desk which I will make to the longer specs. I don't write this to complain...only to alert others who might be planning on building ur desk. My daughter & I are very excited about her saving $200 to $250 per desk by building these ourselves.
Thanks
joe
Guest (not verified)
Mon, 03/12/2012 - 19:18
I am glad to se someone else
I am glad to se someone else found these directions not right. I guess they never built one of these with their own plans
sara (not verified)
Mon, 11/15/2010 - 07:12
Can you modify this to make
Can you modify this to make the west elm parson console table? The dimenions are 54"w x 18"d x 33"h.
Allison (not verified)
Fri, 01/21/2011 - 22:32
Ana, First, thanks a
Ana,
First, thanks a billion for all the plans. I need a quick answer before I start building this: what is the depth of a "project panel"? I have seen this referred to on your site a lot, but cannot find anything listed as a "project panel" in my local store. Is it 1/4" deep?? Thanks again!!!
Matt Katz (not verified)
Mon, 05/09/2011 - 08:50
Love these plans
I might just put one together. You should also know that your plans are getting mirrored - you can send a note to the wordpress folks and they will help you out.
https://furniturehacked.wordpress.com/ seems to be snatching your plans verbatim.
Josh newberry (not verified)
Sun, 05/15/2011 - 16:27
15" drawer slides
I have been looking everywhere for the desk slides and I'm only finding 14" and 16”. Does anyone know where I can find it?
BJ D
Wed, 03/21/2012 - 14:39
sketchup plans
I'm looking to modify this plan , Ana, is there sketchup plan available?
JoziLerato
Mon, 09/16/2013 - 06:38
3 questions before tackling the Parsons desk
Hi there,
Thank you for this plan, and just generally having such an amazing site! I've been looking at your plan for the Parsons Desk and have a couple of questions I'd appreciate some help with before I go out and start.
1. At Step 8, you say "cross nail". Could you please explain what this means?
2. At Step 10, I'm not totally understanding how the overhang will sit. Does this mean that the plywood "square" will hang over the drawer front so as to accomodate the face, or does it mean something else? What do the inside and outside overhang measurements (7/8 and 1/2 respectively) in that step refer to?
3. Finally, are all drawer sliders standard sized? I'm wondering whether I should double check your measurements against my table once I get to this stage so as to make sure that the drawer fits flush - i.e. not too wide or too narrow. What is the chance that the thickness of the slider could take up more or less room than the one that you use?
Thank you in anticipation. Your help will be so appreciated. Looking forward to having a final piece soon that I might be able to share with the AW community!
L
toddgroendyke
Mon, 09/16/2013 - 14:41
1 1/4 and 2 inch Nails
What kind of nails are the 1 1/4 and 2" nails? Can I use my 18 gauge brad nailer for these?
gazelle
Wed, 03/12/2014 - 18:12
READ ME FIRST
READ ME FIRST: If you are planning on building this desk read this first:
Some of the directions in the cut list are WRONG. The measurements in the images are right but some of them are just hard to read.
Here is the corrections I made (double check with the images):
- B) and C) are supposed to be cut @ 25 3/4".
- I) 3 1x4 @ 17 1/4".
In reply to READ ME FIRST by gazelle
ndelanuez
Sat, 08/27/2016 - 06:32
WHAT?
I did not see this post until now that I have completed the project, I wish Ana would have updated the cut list. :(
ndelanuez
Sat, 08/27/2016 - 06:29
Wrong measurements on cut list
These measurements are incorrect, unless I'm not understanding this right...Someone please HELP?
L) 2 – 1×4 @ 14 1/4″ (Sides and Middle of Drawer Framing)
If these are SIDES and middle framing, there should be 3 not 2
So that the drawers may fit inside the framing, the should be 17 1/4 and not 14 1/4 as the diagram shows in step 7. Did anyone else not have this issue?
stops1124
Fri, 05/15/2020 - 16:22
Simple desk step 8 figure
Ana,
Please look over this plan. In step 8 figure is not clear. The I boards measurements in the figure say 17 1/4, but in the cut list they are 14 1/4. There are measurements in this figure were you can't tell where you are measuring from. There is a measurement across the I boards at the bottom of figure step 8 that is unreadable. Also, on the cut list you need 3 I boards cut not two.
ld6772
Fri, 03/12/2021 - 12:56
Cut List Mistake
This is a great build. I just wanted to point out a mistake in the cut list:
I) 2 – 1×4 @ 14 1/4″ (Sides and Middle of Drawer Framing)
This should be 3 not 2, and they are supposed to be 17 1/4" not 14 1/4.
Thanks
Luke