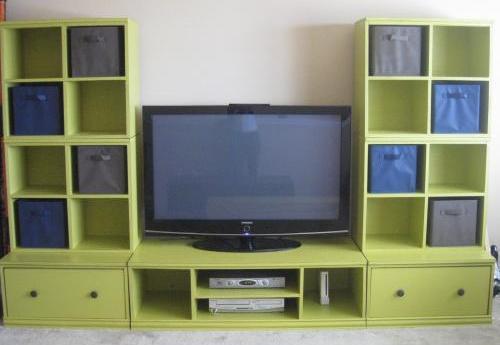


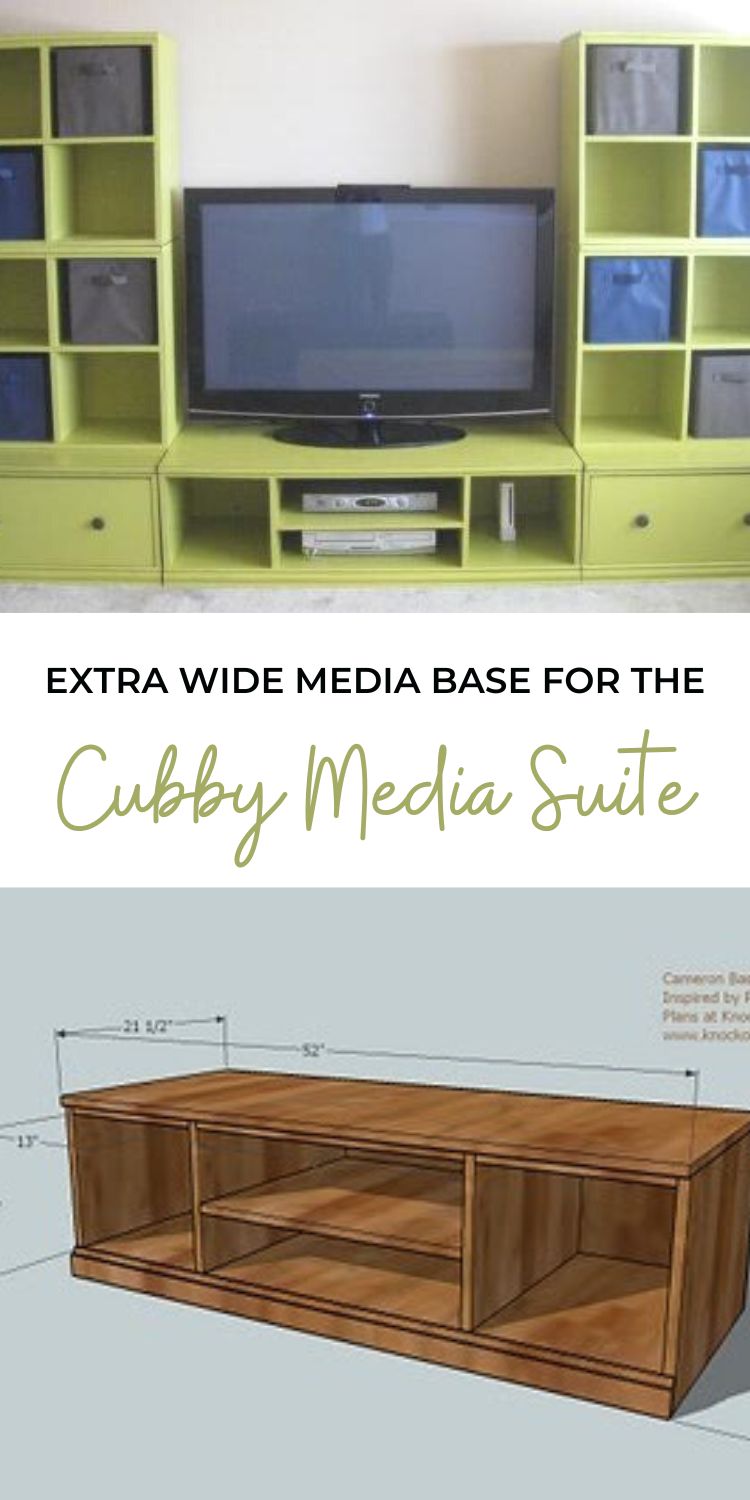
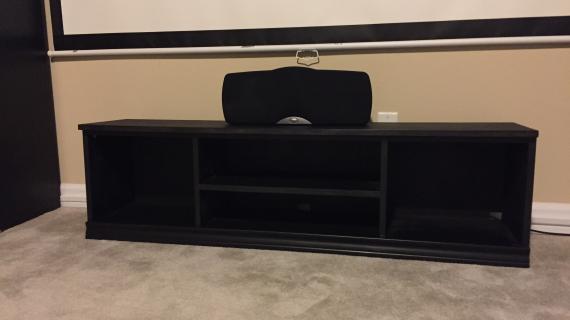
Designed to fit those giant flat panel tvs, this extra wide media base is open for storage of your gaming consoles, controllers, board games, and other entertainment accessories. Works with the rest of the Cubby Collection to create an entire media storage suite. Photos courtesy of Shanty2Chic.
Pin For Later!
Preparation
1 sheet 3/4″ Hardwood Plywood or MDF (estimate) 2″ Finish Nails or Drywall Screws (for MDF) or Wood Screws (for Plywood) 1 1/4″ Nails or Screws 1/4″ Plywood for the backs (You can use scrap 3/4″ MDF or Plywood, but 1/4″ plywood is cheap, about $10 a sheet, compared with MDF at $30 a sheet and Hardwood Plywood at $50 a sheet). 1 – Base Moulding, 2 1/2″ overall height, at least 52″ long (see examples in other cameron base plans) Wood Putty Sand Paper Wood Glue Finishing Supplies (Paint, Stain, etc)
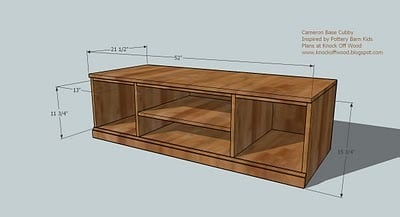
A) 1 – 3/4″ Plywood or MDF @ 23″ x 21″ (Center Shelf) B) 2 – 3/4″ Plywood or MDF @ 12 1/2″ x 21″ (Vertical Cubby Dividers) C) 1 – 3/4″ Plywood or MDF @ 52″ x 21 1/2″ (Top) D) 2 – 3/4″ Plywood or MDF @15″ x 21″ (Sides) E) 1 – 3/4″ Plywood or MDF @ 50 1/2″ x 21″ (Bottom Shelf) F) 1 – 1/4″ Plywood or MDF @ 52″ x 15 3/4″ (Back) G) 2 – 1×2 @ 13″ (Cubby Top Trim Pieces) H) 1 – 1×2 @ 23″ (Center Top Trim Piece) I) 1 – 2 1/2″ Base Moulding @ 52″ (Base Moulding)
Because you will most likely be building multiple pieces from this collection, I will not be providing a plywood cutting layout. To build your own plywood cutting layout, simply make a list of all the pieces you need, group the pieces into same width sizes, and layout on graph paper. By grouping into same width sizes, you will minimize your number of cuts. Also, layout your larger pieces first, then work with your smaller pieces.


Cut all your boards first. Make sure you cut your plywood perfectly square. Mark out with the square where each board will be fastenend to other boards. If you are fastening with screws, predrill and countersink your screws. If you are using MDF avoid fastening within 1″ of the edges of the MDF. Also predirll the entire length of your screw to avoid the MDF from splitting. Use drywall screws with MDF (drywall screws have a straigh shaft and will not split the MDF). I have had success with finish nails and MDF – just make sure you use lots of glue. Because this collection is frameless, my recommendation is to use screws over nails. Use the 2″ fasteners unless otherwise directed. Check for square after each step. Work on a clean level surface.
Instructions
Step 1
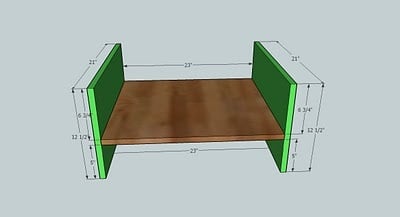
Center Cubby. Attach the center shelf (A) to the cubby sides (B, Green), as shown above. Please note that the placement of the center shelf can be adjusted to your specific needs. You could also add another shelf if you for example had multiple DVD players and gaming consoles.
Step 2

Top, C. Attach the top, C, shown in Green above, to the vertical cubby dividers, B. Mark out the dimensions first. Also, keep back edges flush. The front of the top will overhang 1/2″.
Step 3
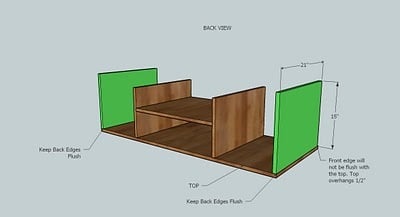
Sides, D. Fasten the sides in place as shown above. Remember, keep the back edges flush. The top will overhang 1/2″.
Step 4
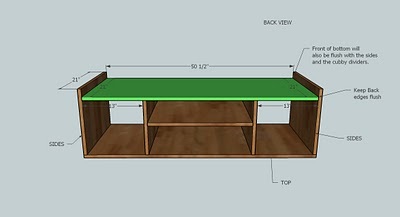
Bottom Shelf, E. Fasten the bottom shelf in place as shown above. Make sure you fasten through the sides and also to both of the vertical cubby dividers. Keep the bottom flush with the vertical dividers and the sides.
Step 5

Step 6
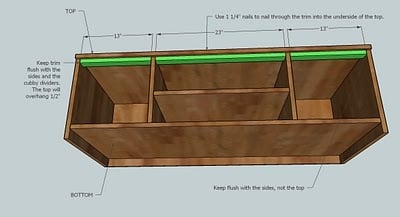
Trim Pieces, G and H. Attach the trim pieces, G and H as shown above in green. First fasten the pieces G (the shorter trim pieces) to the tops of the cubbies. Make sure you fasten through the sides and vertical cubby dividers into the end edges of G. Then fasten H in place to the top, using the 1 1/4″ fasteners. You may also wish to fasten pieces G to the top using the 1 1/4″ fasteners.
Step 7
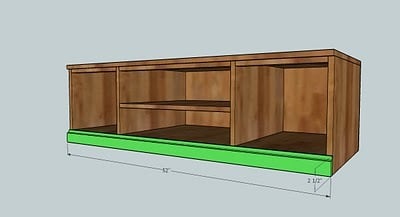
Base Moulding. Fasten the base moulding to the bottom, as shown above.
Comments
Ana White (not verified)
Tue, 01/12/2010 - 09:19
ooooops! I meant to scedule
ooooops! I meant to scedule the post of this plan while I'm on vacation! Too, late, glad to share it with you!
Enjoy, Ana
Andrea (not verified)
Tue, 01/12/2010 - 10:03
Oh my gosh! I'm so SO SO SO
Oh my gosh! I'm so SO SO SO glad I found your blog. I do have to say my husband might hate you though. ;) I wish I'd found your blog sooner. This Christmas I designed a play kitchen for my son around Pottery Barn's Gourmet Kitchen set. There was no way I was paying that much for it, plus mine fits the dimensions of the space I had and the fridge is chalkboard and magnetic with soft closing freezer & broiler drawers for storage etc. But it took me forever to figure out the plans and we had a few missteps along the way. BUT it was SO worth it! I'm so glad I found your blog so I can create all SORTS of this stuff! :) THANK YOU again! It took me forever to make the plans for our kitchen, it can't be that easy to make and post all these plans all the time!
~Andrea
lanisanford (not verified)
Tue, 01/12/2010 - 11:28
I'm glad to know you are
I'm glad to know you are scheduling posts! :D don't know what I'd do while you were on vaca. Nail gun is supposed to arrive today! whoot whoot!
MrsOrtelle (not verified)
Tue, 01/12/2010 - 13:39
I wish I had a space in my
I wish I had a space in my house where this would fit! LOVE your plans! Keep 'em coming! ;)
~ RM (not verified)
Tue, 01/12/2010 - 20:21
I am passing a blog award
I am passing a blog award along to you! No pressure to accept, but I wanted you to know I enjoy your blog, and i was thinking of you!
Gina (not verified)
Mon, 01/18/2010 - 08:34
AMAZING!!!! I have already
AMAZING!!!! I have already shared your blog with a whole bunch of friends that are following you on facebook! :)
I am wondering though, would it work and look ok to have 2 wide media bases stacked on top of each other? My husband and I prefer that the tv be higher but I LOVE this set-up! I would love to get your opinion! :)
THANKS!!!
Gina (not verified)
Mon, 01/18/2010 - 08:51
My email address is
My email address is wardcircus@yahoo.com :)
Anonymous (not verified)
Mon, 01/18/2010 - 09:01
I LOVE your blog, so glad I
I LOVE your blog, so glad I found it off of Shanty 2 Chic! The wheels are turning! I love this storage unit. I don't have a playroom, but I do have lots of kids stuff in my Family Room, so this would be perfect...any ideas how to dress it up a little bit? I also was wondering about making the TV up a little higher, any suggestions?
amyprice@sbcglobal.net
Amy
Jan (not verified)
Tue, 01/26/2010 - 09:57
Wow, I just find your blog
Wow, I just find your blog and it got me excited. My dad is retired and loves working with wood. Seems like a fun father/daughter project. Oh probably more like a father/son-n-law project since I'd likely rope my hubby in on it too.
Joel (not verified)
Sat, 11/06/2010 - 09:36
Ana - Love the plans on your
Ana - Love the plans on your site. I plan to build the Cubby Storage Wall Collection but the link appears to be broken. I have searched and searched, but can not find them. Can you redirect me as to where I can find the plans? Much appreciated.
Thanks again.
Joel
Gareth (not verified)
Tue, 01/25/2011 - 13:12
We just finished the project
We just finished the project and although the painting wasn’t too fun the building was relatively easy and your plans were amazing. Thanks! It's a great addition to our loft/playroom. (next project is getting a new TV)
http://3.bp.blogspot.com/_KOmlbTGCvMY/TS9UGt1rWPI/AAAAAAAAGK0/im4bCUJcG…Guest (not verified)
Fri, 07/08/2011 - 13:22
I just bought something
I just bought something similar to this from Ashley Furniture...spent a lot more. Wish I would have seen this earlier! Thanks for the post!