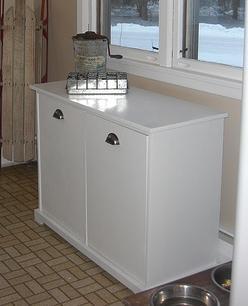
Make recycling a part of your life by building a dedicated recycling center. This simple plan is for a two drawer/door recycling center, at tabletop height.
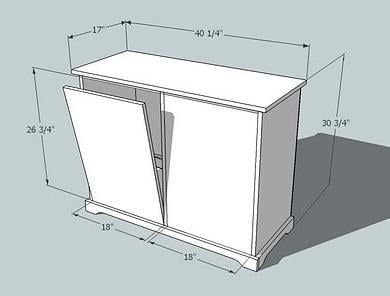
Preparation
1 – Sheet 3/4″ A1 Plywood (for Staining) or MDF (for Painting)
2 sets of Hinges and 2 sets of Hinge Supports for Tilt Out
Cutting List for Base Unit
Cutting List for Doors (Tilt Out and Slide Out)
Cut all your boards. Cut your pieces square, preferably using a table saw. Mark out where each board will join other boards. Predrill all of your screw holes with a countersink bit first. If you are using screws on MDF, you will need to use DRYWALL screws and NOT wood screws, and also predrill the entire length of your screws. If you are using nails on MDF, avoid fastening within 1″ of the sides of the board on the end edges. Use 2″ nails or screws unless otherwise directed. Always use glue. Work on a clean level surface. Take a square of the project after each step (visit the HOW-TO section). Have fun and be safe.
Instructions
Step 1
If you are using MDF (standard measurements for 1 sheet are 97″ x 49″) then disregard this. If you are using A1 plywood (standard measurement for 1 sheet is 96″ x 48″) the length of your bottom of drawers (shown in blue above) will be slightly shorter (about 1/4″) if you choose to use the above plywood cutting layout. This will not make a difference in the plans. You can alternately purchase another sheet of plywood or MDF.
Step 2
Cut all your boards. Cut your pieces square, preferably using a table saw. Mark out where each board will join other boards. Predrill all of your screw holes with a countersink bit first. If you are using screws on MDF, you will need to use DRYWALL screws and NOT wood screws, and also predrill the entire length of your screws. If you are using nails on MDF, avoid fastening within 1″ of the sides of the board on the end edges. Use 2″ nails or screws unless otherwise directed. Always use glue. Work on a clean level surface. Take a square of the project after each step (visit the HOW-TO section). Have fun and be safe.
Step 3
Step 4
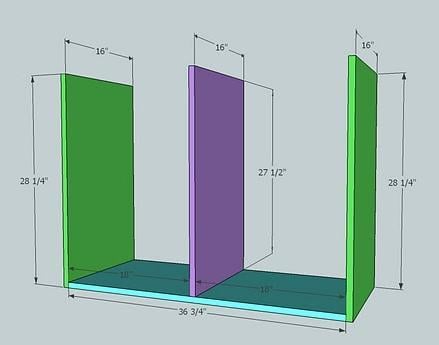
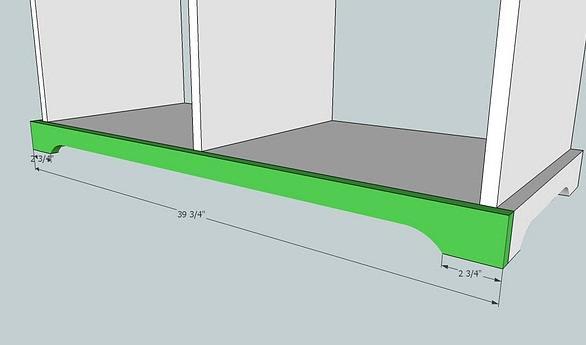
please note that the measurement shown above is to the outside of the recycle center. Your 1×2 top support should be 36 3/4″ long, as noted in the cutting instructions.
Top Support, E. Attach the top support as shown above, fastening through the sides into the end edges of the support. Also fasten to the center divider. Make sure you measure and are certain the center divider is centered on the top support. Use the diagram from step 1 to shoe you the measurements.
Step 6
Step 7
Step 8
Step 9
Step 10
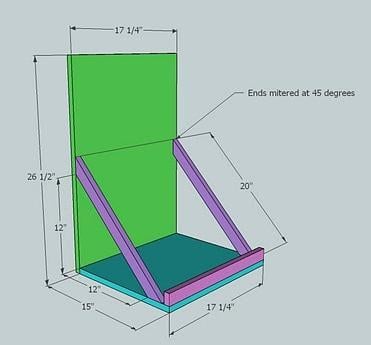
Slide Out Drawer Option. If you are building a slide out, first fasten the drawer bottom to the drawer slides and fit into the base unit. make sure that the door bottom fits 3/4″ inset from the base unit. You will need to leave room for the door. Then fasten the face to the drawer bottom by centering the drawer face on the opening for the bins with the drawer bottom pushed all the way in. Nail into the drawer bottom. Then pull the drawer out and fasten the supports and back cleat in place.







Comments
Jill (not verified)
Fri, 01/15/2010 - 07:43
THANK YOU ANA! This will be
THANK YOU ANA! This will be great for our recycling center in the garage! And how awesome to add the slide-outs instead. Love that a lot more.
Jill @ boobearybinks.blogspot.com
Jennifer Burgett (not verified)
Fri, 01/15/2010 - 07:48
You are THE BOMB!!!!
You are THE BOMB!!!!
FleaMarketTrixie (not verified)
Fri, 01/15/2010 - 07:56
You are amazing! What
You are amazing!
What computer program do you use to show the instructions on how to make each project?
Your work is great and thanks for sharing it with us.
mommieof4munchkins (not verified)
Fri, 01/15/2010 - 08:45
WOW I am in love! I just
WOW I am in love! I just found your website a couple of weeks ago and I am still in Awe! I would love to see plans for this with 3 sections for laundry as we do lights/darks/whites.....
lil mama (not verified)
Fri, 01/15/2010 - 09:22
Honestly, I have no idea how
Honestly, I have no idea how I'm going to choose which project to start first! I'm thinking this one....
Thanks!!!
MommaP (not verified)
Fri, 01/15/2010 - 11:26
Thank you so much for making
Thank you so much for making the plans for me! I love it. I can't wait to make it!
Erin (not verified)
Fri, 01/15/2010 - 11:34
I just found your blog from
I just found your blog from YHL, and I have to tell you, you are a genius!!!! I am SO THRILLED to have found you. Thank you so much, and keep up the great plans! I can wait to start building!
Samantha2818 (not verified)
Fri, 01/15/2010 - 11:55
You are amazing. I get so
You are amazing. I get so much furniture made for me inspired by Pottery Barn and you are getting me all fired up to have a go myself. I've given you a Kreativ Blogger award as I love your blog!
ANDY, JEN & KIDDIES (not verified)
Fri, 01/15/2010 - 13:15
Love the idea of using it as
Love the idea of using it as a laundry sorter. So smart!
Dawn (not verified)
Fri, 01/15/2010 - 13:43
I found your blog through a
I found your blog through a friend and love your ideas and your ambition! My mom, sisters and I have a 'redo' blog down here in AZ and I've featured you on it! Check us out at www.sweetpeasinapod.blogspot.com
Dawn (not verified)
Fri, 01/15/2010 - 13:46
Sorry, that's
Sorry, that's
www.4sweetpeasinapod.blogspot.com
Jack Fisher (not verified)
Sat, 01/16/2010 - 00:25
Well drawn
Well drawn self-explanatory.
Well done-good job
Jack
Kasey Hunt (not verified)
Sat, 01/16/2010 - 12:11
That is so cute!! I may have
That is so cute!! I may have to show this to my husband.
Momma In Pearls (not verified)
Sun, 01/17/2010 - 09:13
trying it! love this idea and
trying it! love this idea and your blog! glad I found it !!!
Katie (not verified)
Sun, 01/17/2010 - 13:33
this is amazing! you could
this is amazing! you could also tweak the plans for this project to turn it into a shoe holder... kind of like this: http://www.ikea.com/us/en/catalog/products/60156121
thanks for starting this blog! you've really inspired me to make my own furniture. :)
- Manda (not verified)
Mon, 01/18/2010 - 09:48
I've actually owned a piece
I've actually owned a piece of furniture where the base unit had a 3 sided box inside and the tilt out was achieved by a pipe through the bottom front of the inside box.
melissa (not verified)
Sat, 01/23/2010 - 00:06
Amazing!!I shared a link to
Amazing!!
I shared a link to this post (and your blog in general) on my blog.
http://undomesticmumma.blogspot.com
I've got about ten of your plans bookmarked already!
Asttrid (not verified)
Wed, 01/27/2010 - 09:52
I love, love, love your site.
I love, love, love your site. And I love this project, but I always get caught up in the details. How and where do you attach the support hinges?
Twill Jill (not verified)
Wed, 01/27/2010 - 12:16
You are AMAZING! I found you
You are AMAZING! I found you on One Pretty Thing and I'm so glad I did.
Erin (not verified)
Wed, 02/10/2010 - 17:53
Awesome...thank you so much
Awesome...thank you so much for clear instructions...definitely on our spring to-do list.
Sarah (not verified)
Tue, 02/16/2010 - 17:19
This would make a great
This would make a great storage piece for our dog food!!
Erin (not verified)
Mon, 02/22/2010 - 13:44
OMG THANK YOU! I found this
OMG THANK YOU! I found this last week and when my husband saw the PB price it was a no go. Now I can put him to work : )
Amanda (not verified)
Wed, 02/24/2010 - 07:18
I will be building this in
I will be building this in the near future. I'm so looking forward to keeping my toddler out of my recycling bin! Thanks so much!
Maxine (not verified)
Fri, 03/05/2010 - 06:12
I came across your blog a few
I came across your blog a few weeks ago, and I have to say I have become obsessed!! I can't wait to try some of these projects!! Thank you so much for the amazing plans!!
maximumbht.blogspot.com
MommaP (not verified)
Sun, 03/07/2010 - 09:26
Ana, I found a tiny
Ana, I found a tiny error...We cut our doors to this plan according to the picture of the plywood cutting and then looked at your breakdown of how to cut everything into it's pieces and discovered their different measurements. Just thought I'd let you know. :)
Anonymous (not verified)
Mon, 03/08/2010 - 08:57
What size are the garbage
What size are the garbage bins? I love this recycling center! Can't wait to build it...or attempt to!
Liz (not verified)
Fri, 03/12/2010 - 11:04
Love this!! Our garbage &
Love this!! Our garbage & recycling cans have never fit below the sink, so they've sat out and I've hated that look, just not sure how to fix it. Now I know, thank you so much! I think this will be my first project...
Katy (not verified)
Sun, 07/25/2010 - 13:50
This is the first project
This is the first project we've tried from your site. We almost finished in a weekend but there aren't any 15inch drawer slides in fbx! Can someone help us...should we cut an inch off the 16inch slides and how would we do that? Or should we order some 15inch slides on-line, if so where would you recommend?
Thanks you so much Anna, looking forward to making a picnic table (using a pallet) next weekend!
Robyn (not verified)
Sun, 10/10/2010 - 18:52
We plan on putting our trash
We plan on putting our trash on one side and recycling on the other. But, I've gotten so used to moving the trash can to the cutting board, sink, fridge, etc. that we decided we will be placing ours on wheels and adding a hinged top for easier access to both sides (and to make it easier for the hubby to take out both bags at the same time). Yes, I know, it sounds pretty lazy, but that's reality around our house!
Lynne (not verified)
Tue, 12/07/2010 - 06:15
Ana, I love your site - and I
Ana, I love your site - and I love you for posting this!! I have a border collie rescue who is a hunter - of anything she decides is worth eating around the house. Currently, we have our trash in a small bucket on top of the refrigerator (ha - my dogs rule my life, no doubt about that), but I'm moving very shortly to another apartment, and would like to have a normal trash basket again. She's managed to get into every one I purchased in the past, no matter how secure the tops were - I know this is my solution. (Now to figure out how to hang all our food from the ceiling, hahahaha, as she is remarkable in stealing anything within reach).
I think I'm going to follow Robyn's idea, and make the opening in the top. Doesn't sound lazy to me (but then again, I'm creative in finding easier solutions). I also wouldn't be surprised if my Emma didn't find a way to open those doors... if this works out for me, I'm making one to store the dog food, too.
aprairiegirlin… (not verified)
Tue, 01/25/2011 - 05:42
ooooo I am like a kid in a
ooooo I am like a kid in a candy shop I am so excited!!!!!!!!!!! I have been wanting exactly THIS!!! and my husband and I have been thinking and figuring how on earth we could build one and now- POOF!!! here are the plans!!! thank yo so much Ana:) you rock:)
Guest (not verified)
Wed, 04/27/2011 - 09:18
Nice Plans
Ana,
Thanks for the plans. I was having to keep my trash can on a chair so my lab would not get into it. The recycling center works great for our kitchen trash on one side and recycling on the other. I used hinges for mine and found it a bit difficult to attach once everything was assembled. Thankfully I was able to remove the pins so that I could paint. I also covered the sides with bead board for a country look. http://www.flickr.com/photos/49984694@N06/5661190597/
Veemaree (not verified)
Tue, 09/13/2011 - 00:36
Larger Sizing
Any chance of getting the measurements for a set of larger 13 gallon trash cans?
faethunder
Tue, 04/10/2012 - 18:13
finishing plywood edges
Curious as to how the plywood edges are finished in this project. I don't see anything in the instructions for finishing off the edges--or do the edges of an A1 sheet of plywood not need finishing before being painted? I've only ever seen BC etc type of plywood, nothing better, and I know those cut edges aren't pretty and I'm not sure paint alone would finish those off.
Dave the rookie
Sat, 05/31/2014 - 17:28
Recycling Center - Hinge question
There isn't a lot of detail/information on the hinge installation. What hinges should I use? From the build it looks like the hinges are concealed -- can you please let me know what type of hinges (and hinge supports) to purchase for the tilt out option? Thank you so much!
If anyone else knows the answer to this please email dave.stratuik@gmail.com