
Shall we talk kitchens?

Needs Roof
Ceiling Lights

Source: elegantabode.blogspot.com via laura on Pinterest
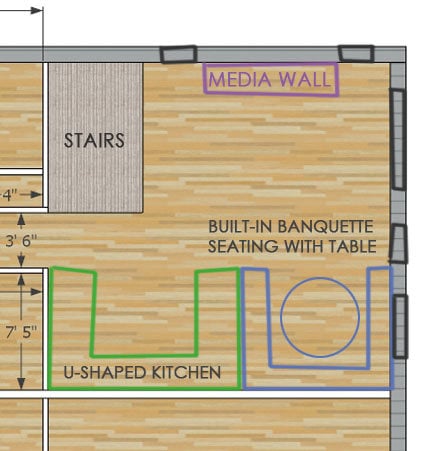
Option 1: The W

Source: creativejuicesdecor.blogspot.com via Ana on Pinterest


Source: google.com via wynne on Pinterest
BUT it's not all good ... the dining area will be difficult to expand on, and there are two corners in the kitchen cabinets, and me no likey corners.
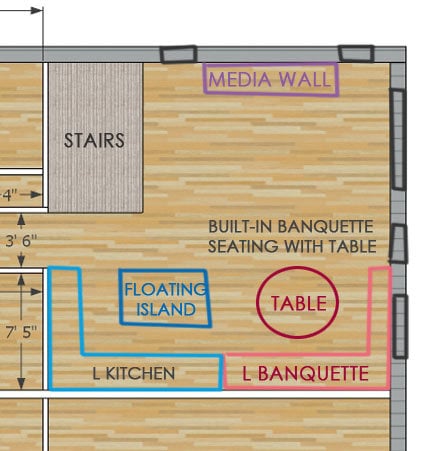
Option #2: The Double L

Source: tipjunkie.com via April on Pinterest
This kitchen layout would be very very similar to the Momplex kitchen ... notice the perfect lighting?

Source: Uploaded by user via Ana on Pinterest

Source: flickr.com via Ana on Pinterest

Source: braitmandesign.com via Ana on Pinterest
And the banquette would be more like this one, a simple L shape with chairs on the open sides.

Again, perfect lighting. With the Double L shape, we scrap some corners and add an island. The banquette seating will be more accessible and the space more open. But we loose some storage. What do you think of the Double L?
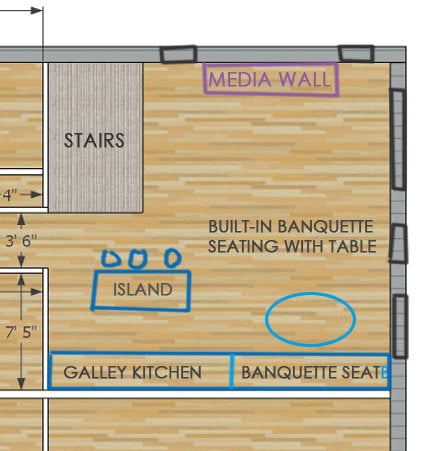
<h1>Option #3: Straight Line</h1><div>This one is my favorite because I feel like it enables the greatest opportunity for expansion. When it's just the Mom's, the simple kitchens will be easy to store and no corners mean easier access to everything. When the house get's cozy with visitors at the Holidays, the space can accommodate a larger table with ease.</div><div><br></div>
<div style="padding-bottom: 2px; line-height: 0px"><a href="http://pinterest.com/pin/477732333/" target="_blank"><img src="http://d30opm7hsgivgh.cloudfront.net/upload/40250990389208507_I1eXsUhe_…; border="0" width="470" height="620"></a></div><div style="float: left; padding-top: 0px; padding-bottom: 0px;"><p style="font-size: 10px; color: #76838b;">Source: <a style="text-decoration: underline; font-size: 10px; color: #76838b;" href="http://funkyjunkinteriors.blogspot.com/2011/03/sns-73-brings-you-kitche…; via <a style="text-decoration: underline; font-size: 10px; color: #76838b;" href="http://pinterest.com/antiquewhite/" target="_blank">Ana</a> on <a style="text-decoration: underline; color: #76838b;" href="http://pinterest.com" target="_blank">Pinterest</a></p></div>
<div style="padding-bottom: 2px; line-height: 0px"><a href="http://pinterest.com/pin/477692155/" target="_blank"><img src="http://d30opm7hsgivgh.cloudfront.net/upload/40250990389208498_k6xlUlEi_…; border="0" width="490" height="640"></a></div><div style="float: left; padding-top: 0px; padding-bottom: 0px;"><p style="font-size: 10px; color: #76838b;">Source: <a style="text-decoration: underline; font-size: 10px; color: #76838b;" href="http://primitivedecorideas.com/farmhouse-kitchen-islands">primitivedeco…; via <a style="text-decoration: underline; font-size: 10px; color: #76838b;" href="http://pinterest.com/antiquewhite/" target="_blank">Ana</a> on <a style="text-decoration: underline; color: #76838b;" href="http://pinterest.com" target="_blank">Pinterest</a></p></div><div><br></div><div><br></div>
What more do you need than a pantry, stove, sink, dishwasher and fridge?<div><br></div><div>
<div style="padding-bottom: 2px; line-height: 0px"><a href="http://pinterest.com/pin/477729926/" target="_blank"><img src="http://d30opm7hsgivgh.cloudfront.net/upload/40250990389208506_bmmCnjU2_…; border="0" width="470" height="616"></a></div><div style="float: left; padding-top: 0px; padding-bottom: 0px;"><p style="font-size: 10px; color: #76838b;">Source: <a style="text-decoration: underline; font-size: 10px; color: #76838b;" href="http://primitivedecorideas.com/farmhouse-kitchen-islands">primitivedeco…; via <a style="text-decoration: underline; font-size: 10px; color: #76838b;" href="http://pinterest.com/antiquewhite/" target="_blank">Ana</a> on <a style="text-decoration: underline; color: #76838b;" href="http://pinterest.com" target="_blank">Pinterest</a></p></div><div><br></div><div><br></div>
And a great island of course!
</div><div><br></div><div><br></div>
<div style="padding-bottom: 2px; line-height: 0px"><a href="http://pinterest.com/pin/484877532/" target="_blank"><img src="http://d30opm7hsgivgh.cloudfront.net/upload/40250990389210255_vx5NfPdq_…; border="0" width="360" height="480"></a></div><div style="float: left; padding-top: 0px; padding-bottom: 0px;"><p style="font-size: 10px; color: #76838b;">Source: <a style="text-decoration: underline; font-size: 10px; color: #76838b;" href="http://www.bhg.com/kitchen/island/kitchen-island-designs-we-love/?sssdm…; via <a style="text-decoration: underline; font-size: 10px; color: #76838b;" href="http://pinterest.com/antiquewhite/" target="_blank">Ana</a> on <a style="text-decoration: underline; color: #76838b;" href="http://pinterest.com" target="_blank">Pinterest</a></p></div><div><br></div><div><br></div><div>The island could be much longer because of the missing L part. Stools could be added to the island for kitchen company.</div><br><div style="padding-bottom: 2px; line-height: 0px"><a href="http://pinterest.com/pin/477705938/" target="_blank"><img src="http://d30opm7hsgivgh.cloudfront.net/upload/40250990389208500_bBTDIXGC_…; border="0" width="450" height="585"></a></div><div style="float: left; padding-top: 0px; padding-bottom: 0px;"><p style="font-size: 10px; color: #76838b;">Source: <a style="text-decoration: underline; font-size: 10px; color: #76838b;" href="http://prettystuff.tumblr.com/post/285185942">prettystuff.tumblr.com</a…; via <a style="text-decoration: underline; font-size: 10px; color: #76838b;" href="http://pinterest.com/antiquewhite/" target="_blank">Ana</a> on <a style="text-decoration: underline; color: #76838b;" href="http://pinterest.com" target="_blank">Pinterest</a></p></div><div><br></div><div><br></div>
And we could continue on with more cabinets, for more storage in the dining space.<div><br></div><div><br></div>
<div style="padding-bottom: 2px; line-height: 0px"><a href="http://pinterest.com/pin/485087823/" target="_blank"><img src="http://1.bp.blogspot.com/_LwUVBC9oKxs/TAe45SmO63I/AAAAAAAABVE/xUCWiKk9b…; border="0" width="464" height="537"></a></div><div style="float: left; padding-top: 0px; padding-bottom: 0px;"><p style="font-size: 10px; color: #76838b;">Source: <a style="text-decoration: underline; font-size: 10px; color: #76838b;" href="http://lovethattoo.blogspot.com/2010/06/banquette-seating-ideas.html">l…; via <a style="text-decoration: underline; font-size: 10px; color: #76838b;" href="http://pinterest.com/antiquewhite/" target="_blank">Ana</a> on <a style="text-decoration: underline; color: #76838b;" href="http://pinterest.com" target="_blank">Pinterest</a></p></div><div><br></div><div><br></div>
Or a dining nook surrounded by cabinets.
So what do you think?
Comments
Ivy (not verified)
Thu, 11/10/2011 - 11:26
What about a combination?
Tissarah (not verified)
Thu, 11/10/2011 - 14:07
agreed.
YooperinTX
Thu, 11/10/2011 - 11:34
#2!
Jeanine (not verified)
Thu, 11/10/2011 - 13:22
Number 2 - definitely!
BethAlice (not verified)
Thu, 11/10/2011 - 11:34
I most definitely do not like
Lady Goats
Thu, 11/10/2011 - 11:34
I'm all for the straight line
In reply to I'm all for the straight line by Lady Goats
Lady Goats
Sat, 11/12/2011 - 07:13
I think I changed my mind
YooperinTX
Thu, 11/10/2011 - 11:41
#2!
Sarah Roman (not verified)
Thu, 11/10/2011 - 11:40
#3 with slight variation
Guest (not verified)
Thu, 11/10/2011 - 11:43
What about...
Amanda
Thu, 11/10/2011 - 11:49
Kitchen plans
Erica EH (not verified)
Thu, 11/10/2011 - 11:50
#3 with modifications!
seesaw
Thu, 11/10/2011 - 11:52
#2! I love the layout and
Amy W (not verified)
Thu, 11/10/2011 - 11:53
So exciting
Amy W (not verified)
Thu, 11/10/2011 - 11:53
So exciting
Ainhoa (not verified)
Thu, 11/10/2011 - 11:59
I think I'd something else:
Jenn Zynn (not verified)
Thu, 11/10/2011 - 12:00
Thoughts: I like the double L
Greg (not verified)
Thu, 11/10/2011 - 12:01
1/2 #2 +1/2 #3
Guest (not verified)
Thu, 11/10/2011 - 12:01
#2
Mary E (not verified)
Thu, 11/10/2011 - 12:03
I like option #2.. but
cwow (not verified)
Thu, 11/10/2011 - 12:04
double L!
spiceylg
Thu, 11/10/2011 - 12:06
I agree with Guest above
Tina S (not verified)
Thu, 11/10/2011 - 12:07
Kitchen Plans
Rachel W (not verified)
Thu, 11/10/2011 - 12:09
#2!
In reply to #2! by Rachel W (not verified)
spiceylg
Thu, 11/10/2011 - 12:13
Smart
Alycia Woolsey (not verified)
Thu, 11/10/2011 - 12:15
I'm on the #2 bandwagon
Joshua Spurgeon (not verified)
Thu, 11/10/2011 - 12:16
option 3 seems the best to me
Charisse (not verified)
Thu, 11/10/2011 - 12:19
I agree with those saying an
Matthew (not verified)
Thu, 11/10/2011 - 12:27
Option #2, but scrap the banquette
Sunny (not verified)
Fri, 11/18/2011 - 13:46
I'm with you Matthew!
Charlie (not verified)
Thu, 11/10/2011 - 12:30
Kitchen
Guest (not verified)
Thu, 11/10/2011 - 12:32
I like number two - storage
Guerrina Hernandez (not verified)
Thu, 11/10/2011 - 12:37
#2 with a great island
Guest (not verified)
Thu, 11/10/2011 - 12:51
#3 kitchen with #2 seating
Guest (not verified)
Thu, 11/10/2011 - 12:54
"What more do you need than a
Amber (GYE) (not verified)
Thu, 11/10/2011 - 12:55
L-shaped!
Guest (not verified)
Thu, 11/10/2011 - 13:01
My favorite is the W shape
amanda.leonard
Thu, 11/10/2011 - 13:13
Love Option #2
Sally (not verified)
Thu, 11/10/2011 - 13:21
I choose
ltl_lisa
Thu, 11/10/2011 - 13:23
#2 without appliances in the island
Guest (not verified)
Thu, 11/10/2011 - 13:35
Another thing to consider
Guest (not verified)
Thu, 11/10/2011 - 13:35
Another thing to consider
Guest (not verified)
Thu, 11/10/2011 - 13:35
I'm in love with two like
RW (not verified)
Thu, 11/10/2011 - 14:01
So many great ideas!
Stephanie Majors (not verified)
Thu, 11/10/2011 - 14:13
L shaped kitchen straight Banquette
CrysKay (not verified)
Thu, 11/10/2011 - 14:40
#3 ish
Sara B (not verified)
Thu, 11/10/2011 - 15:03
I like #2, the double L. And
Guest (not verified)
Thu, 11/10/2011 - 15:38
As someone with a U-shaped kitchen...
m4marya
Thu, 11/10/2011 - 16:14
Corner Cabinets
Bonny Eicher (not verified)
Thu, 11/10/2011 - 17:09
Drawers
In reply to Corner Cabinets by m4marya
spiceylg
Fri, 11/11/2011 - 05:03
Love!
Jenn Hoff (not verified)
Sat, 11/12/2011 - 23:48
AWESOME! I've never seen
Guest (not verified)
Thu, 11/10/2011 - 16:48
My vote
Bonny Eicher (not verified)
Thu, 11/10/2011 - 17:08
Kitchen Vote
Raelynn (not verified)
Thu, 11/10/2011 - 17:16
Hard choice!!
DrNIkki (not verified)
Thu, 11/10/2011 - 17:26
#2
Pam the Goatherd
Thu, 11/10/2011 - 18:15
I vote for the combo #2/#3
emmarosemc
Thu, 11/10/2011 - 18:50
For option two i would extend
Amy Eavou (not verified)
Thu, 11/10/2011 - 18:59
#3 Hybrid
kahrani
Fri, 11/11/2011 - 01:02
I think I'd prefer the L
Jen Y (not verified)
Fri, 11/11/2011 - 05:17
#2 modified
mebohn
Fri, 11/11/2011 - 05:56
Counter space!
Jack H (not verified)
Fri, 11/11/2011 - 07:27
2+3, NOT #1
Guest (not verified)
Fri, 11/11/2011 - 08:16
#2 with a couple changes
Sue_McL
Fri, 11/11/2011 - 08:37
Double L, of course!
mariakathh
Fri, 11/11/2011 - 09:46
I agree with so many here: hybrid 2 and 3, the really big L
Guest (not verified)
Fri, 11/11/2011 - 10:09
definitely option #2!! i
DirtSquirt
Fri, 11/11/2011 - 10:20
I don't like #1 either. I
Jodi G (not verified)
Fri, 11/11/2011 - 11:02
I like option 3 the best.
UlrikeDG
Fri, 11/11/2011 - 12:32
#1 or #2
Emily H (not verified)
Fri, 11/11/2011 - 13:15
Storage
guest (not verified)
Fri, 11/11/2011 - 13:22
dimentions?
dena-stewart
Fri, 11/11/2011 - 16:16
I vote for 3 but...
nishja
Fri, 11/11/2011 - 17:40
K word
redhead_61
Fri, 11/11/2011 - 20:21
per home owner
S J (not verified)
Sat, 11/12/2011 - 01:32
I've been looking at building
Guest (not verified)
Sat, 11/12/2011 - 06:11
I think you should ask the
Tsu Dho Nimh
Sat, 11/12/2011 - 10:17
Suggestions
annalea
Sat, 11/12/2011 - 12:14
I <3 Islands.
tannisg
Sat, 11/12/2011 - 15:18
I vote #2 - love the banquette!
Sarah R. (not verified)
Sat, 11/12/2011 - 18:14
#3 for the win!! Actually I
Lynn Babjak (not verified)
Sun, 11/13/2011 - 09:35
Option 3 with Option 2
GuestErw (not verified)
Sun, 11/13/2011 - 09:42
Bench seat backed up to island
In reply to Bench seat backed up to island by GuestErw (not verified)
spiceylg
Tue, 11/15/2011 - 08:23
wow
Melanie (not verified)
Sun, 11/13/2011 - 10:25
corner cabinet drawers
AndreaT (not verified)
Sun, 11/13/2011 - 13:41
I like the double L. Are you
Guest (not verified)
Sun, 11/13/2011 - 16:49
Go for a combo!
Guest (not verified)
Mon, 11/14/2011 - 05:38
counter space
Frannie (not verified)
Mon, 11/14/2011 - 07:21
I live with a one-butt
LisaG (not verified)
Mon, 11/14/2011 - 11:57
I like #1 or #2 - I don't
CathyT (not verified)
Mon, 11/14/2011 - 15:23
Kitchens
Pamela Butler (not verified)
Wed, 11/16/2011 - 15:27
Blend #2 and #3
Guest (not verified)
Thu, 11/17/2011 - 10:17
Love #2!
birdsandsoap
Fri, 11/18/2011 - 03:02
I like the U-shaped kitchen.
Guest (not verified)
Fri, 11/18/2011 - 08:11
Kitchen
Nanner10 (not verified)
Tue, 12/20/2011 - 11:29
Sorry if this has been posted
darkjuan
Tue, 08/06/2013 - 10:35
NOVEMBER 10, 2011 post.... unable to see pictures