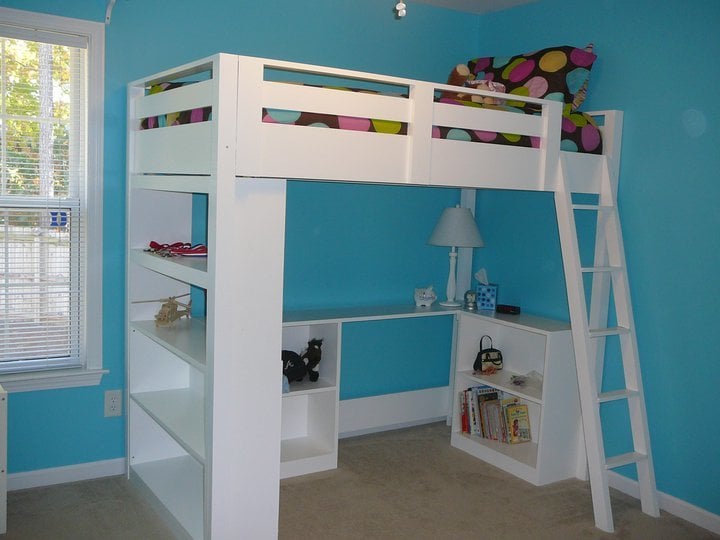


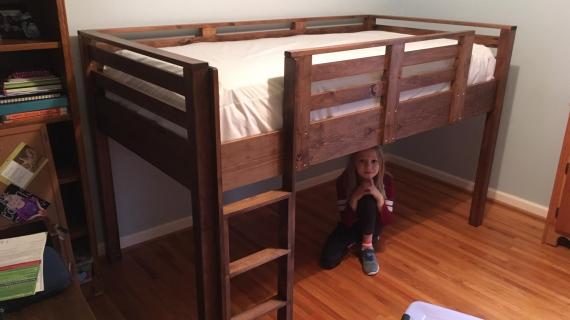
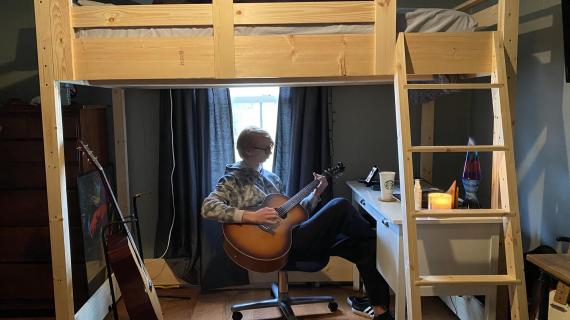
A loft bed that works with an entire system of plans to get your teen more space and storage in their room. Step by step plans from Ana-White.com
This plan works with our Loft Bed tall bookcase plan and our Loft Bed desk and small bookcase plans.
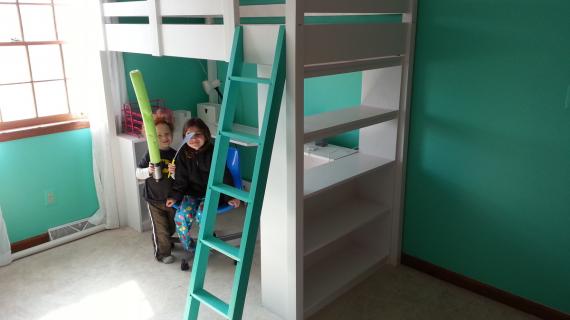
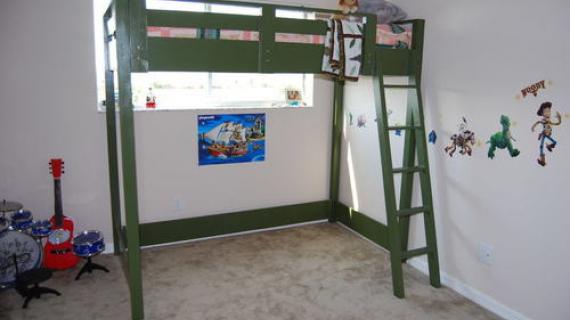
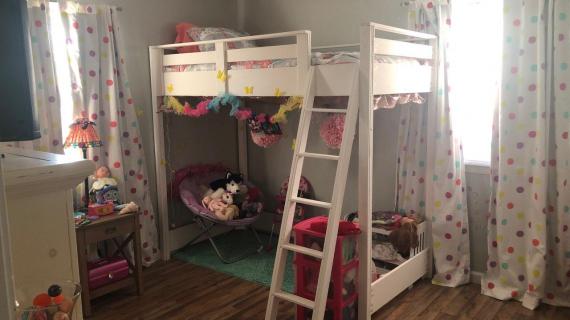
 Special thanks to Anne for sharing her photos from this plan.
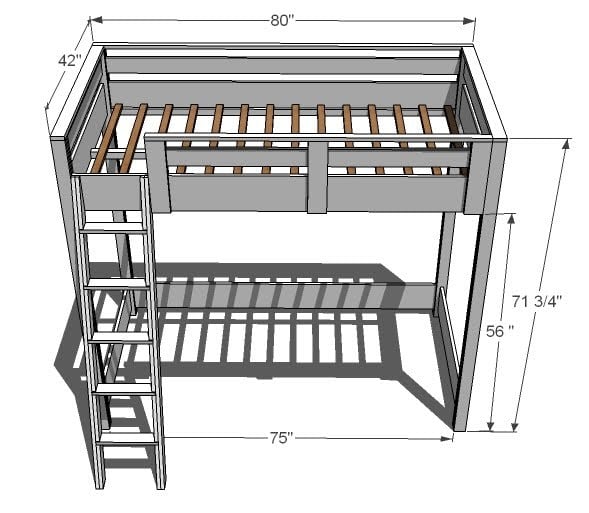
This plan is just for the loft bed. You can customize the storage underneath by adding a tall bookcase and a desk system. (plans linked)
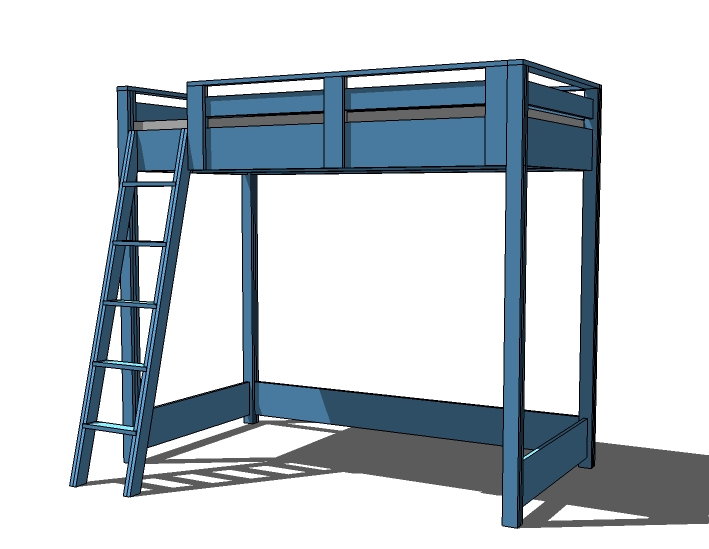
This plan uses a built in slat system as shown. You can use any type of 3/4" material - check your mattress recommendations for slat spacing. I usually will burn up scrap wood here.
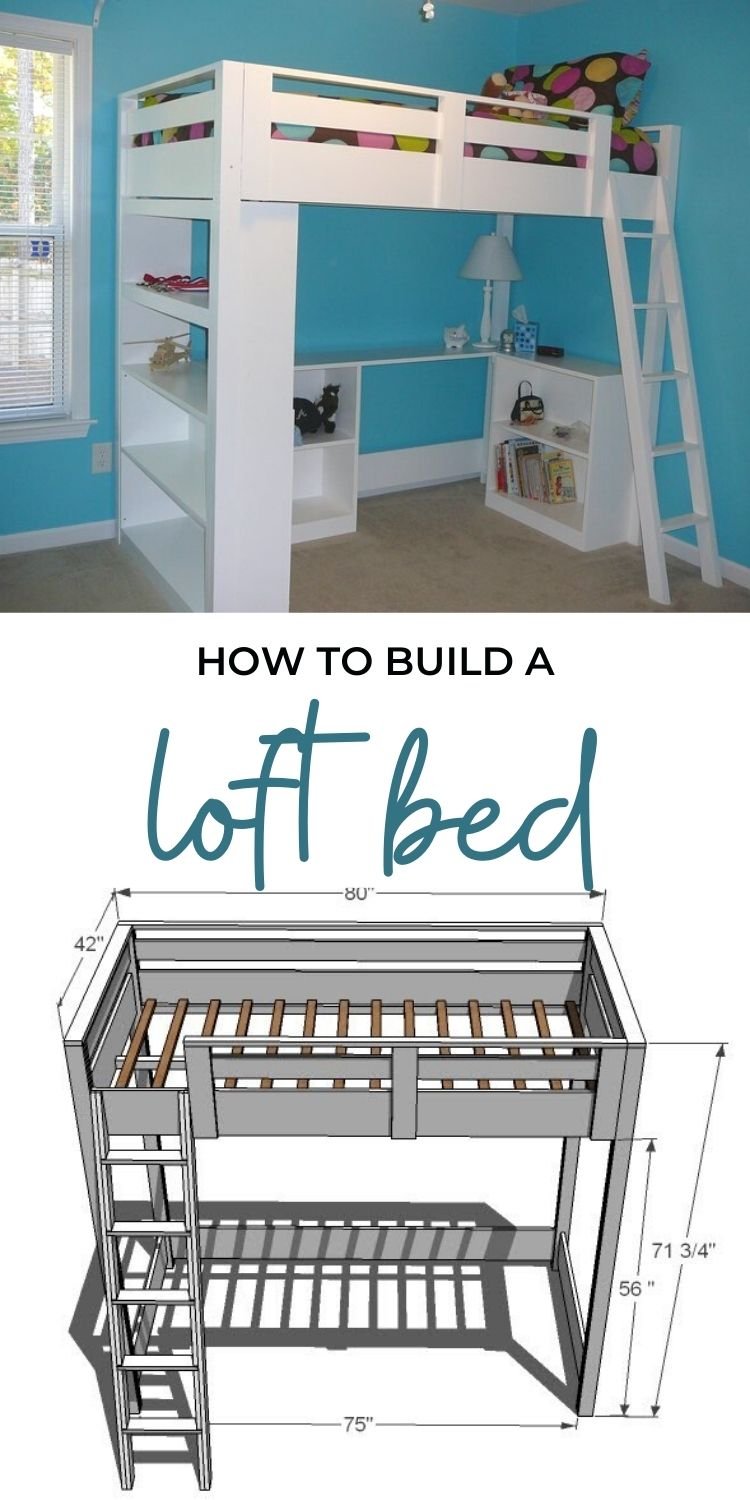
Pin For Later!
Preparation
- 15 – 1×3 Boards, 8′ Long
- 3 – 1×8 Boards, 10′ Long (cut one long and one short cut from each)
- 1 – 1×8 48″ Long (cut 1 short cut from this one)
- 3 – 1×4 Boards, 8′ Long
- 1 – 2×2 Board, 8′ Long
- 11 – 1×2 Boards (Less if you have a bunkie board or box spring), 8′ Long
- 1 1/4″ self tapping screws (can also use brad nails and glue)
- 2″ self tapping screws
- Wood Glue
- Finishing Supplies (Wood Filler, Sand Paper, Paint, Brushes, etc)
Cut List for Loft Bed
- 8 – 1×3 @ 71″ (Inner Legs and Outer Legs)
- 4 – 1×8 @ 37 1/2″ (Large Planks, Ends)
- 2 – 1×4 @ 37 1/2″ (Top Planks)
- 3 – 1×8 @ 80″ (Front and Back Rails)
- 1 – 1×4 @ 80″ (Top Back Rail)
- 2 – 1×3 @ 46 1/2″ (Back Filler Piece, Long)
- 6 – 1×3 @ 2″ (Back Filler Piece, Short)
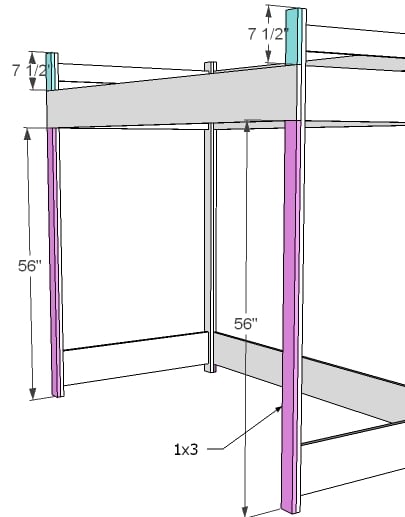
- 2 – 1×3 @ 56″ (Front Filler Pieces, Long)
- 2 – 1×3 @ 7 1/2″ (Front Filler Pieces, Short)
- 1 – 1×2 @ 80″ (Back, Top Piece)
- 2 – 1×3 @ 40 1/2″ (End, Top Pieces)
- 2 – 1×2 @ 75″ (Cleats)
- 1 – 2×2 @ 76 3/4″ (Center Support)
- 14 – 1×2 @ 39″ (Slats)
Cut List for Guard Rail
- 1 – 1×4 @ 61” (Rail)
- 1 – 1×2 @ 61” (Top)
- 3 – 1×4 @ 15” (Uprights)
- 6 – 1×4 @ 2” (Filler Pieces)
Ladder Cut List
- 2 – 1×3 @ 65 3/4″ Overall (Bottom end cut at 15 degrees off square, top at 75 degrees off square)
- 10 – 1×3 @ 10 3/8″ (Spacers, ends cut parallel at 15 degrees off square)
- 5 – 1×3 @ 12 1/2″ (Treads)
- 2 – 1×3 @ 10″ (Top Spacer, cut to match top sides)
Converting to Full Size This bed can easily be converted to full size. You will simply need to add 15″ to all boards that run parallel to the ends. This includes the planks, end top pieces and the slats. Shopping list will need to be adjusted as well.


On a large project such as this one, it is crucial that you build straight and square. To do this begin by working on a clean level surface. Select boards that are straight and free of cracks or other imperfections. Check for square after each step. Predrill and countersink all of your screw holes to avoid splitting the wood and to hide your screw heads. Use glue unless otherwise directed. Of course, you should be safe and have fun! Remember, you can click images for larger views.
Instructions
Step 1
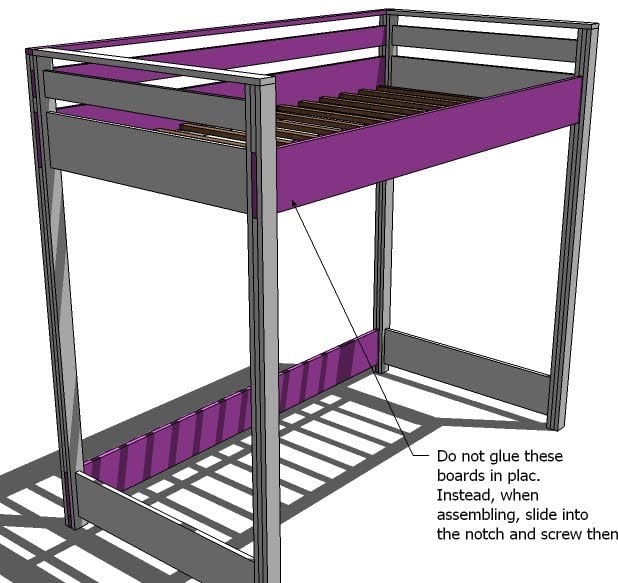
UPDATE: If you have narrow door opening (or are building the bed in a full size) you may need to assemble the bed in the room or not use glue so that the bed can be assembled and disassembled. The boards shown above in pink are not to be glued to the bed, and will be inserted in the slots on assembly. You will then on assembly use screws to fasten the rails to the bed ends.
Step 2
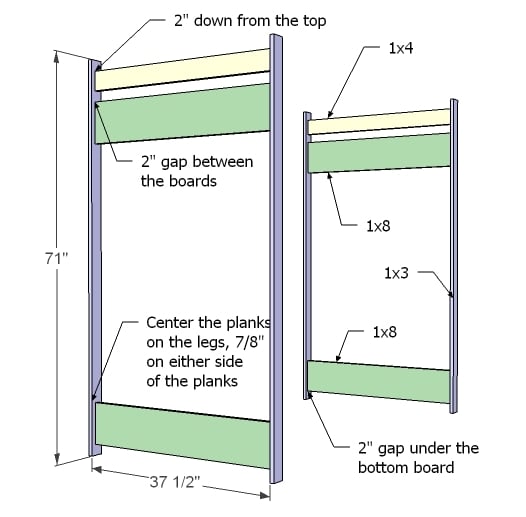
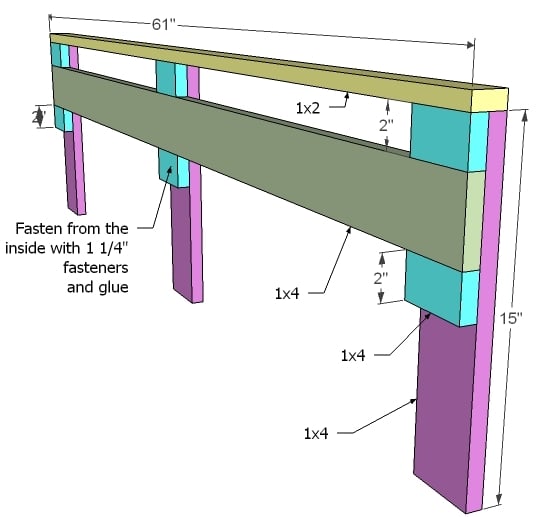
Ends Begin building the ends by screwing with 2″ screws and glue the planks to the inside legs. Center the planks on the inside legs, leaving 7/8″ on either side of the planks. Use the measurements above to guide you. Glue these pieces.
Step 3
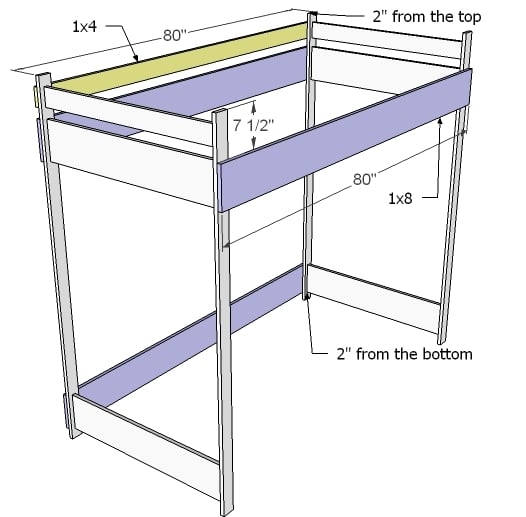
Front and Back Rails Instead of fastening the front and back rails, mark their positions on the ends, as shown above. You can use one or two screws to fasten each board in place temporarily.
Step 4
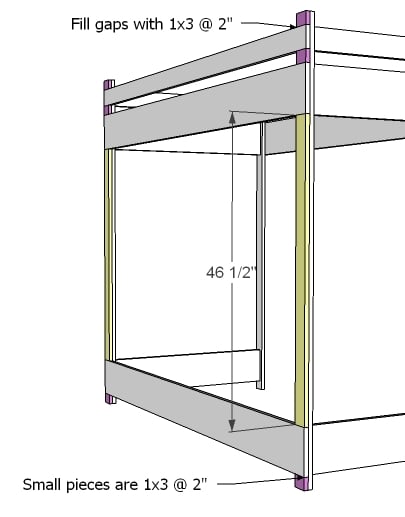
Back Filler Pieces Measure and cut your filler pieces to fit the back as shown above. You can save yourself quite a bit of time by gluing and clamping these pieces in place. When you fasten the outer leg on, it will secure these pieces with screws. If your nailer is handy, a few 1 1/4″ nails would hold everything in place. You can use glue in this step. The filler pieces will hold your rail boards (the one’s you did not glue down in step 2) in place for now.
Step 5
Step 6
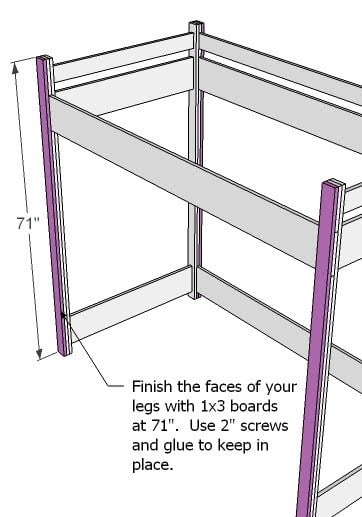
Outer Legs Pieces First unscrew the rail boards that you loosely screwed in step 2, and remove. Then, using 2″ screws and glue, predrill and countersink your screws as you fasten the outer leg boards to the inner leg boards. If you are staining or leaving natural, I highly recommend using a measured bolt pattern or screwing from the inside of the legs on this step.
Step 7
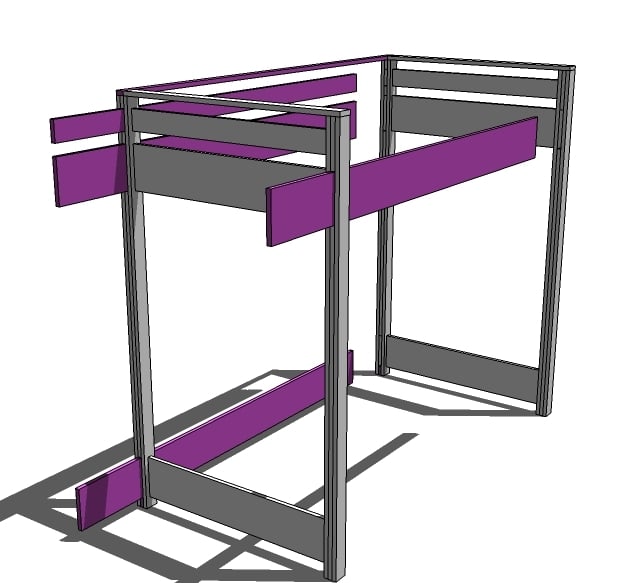
DO NOT FASTEN in the gaps left for the rail boards. Test fit your rail boards to make sure they fit in the opening. The diagram above shows how the rail boards should be removable.
Step 8
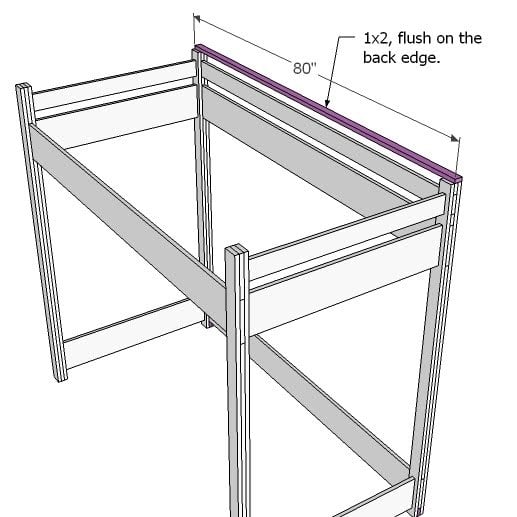
Back, Top Using 2″ screws, fasten the back top piece to the tops of the legs. The back top piece will be flush with the outside of the legs, but not the inside. Do not use glue. This board will be removed to move the bed through a doorway.
Step 9
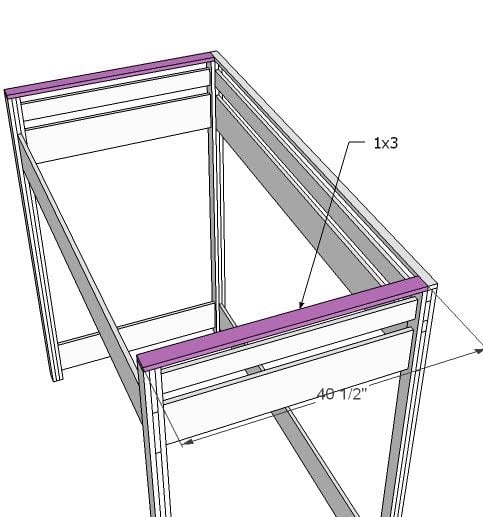
Top, Ends Using 2″ screws and glue, fasten the top end piece to the top of the ends, as shown above.
Step 10
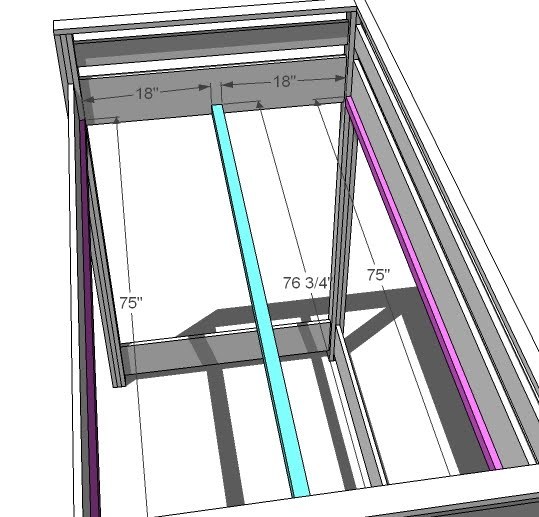
Cleats On assembly, fasten your side cleats to the side rails, flush with the bottom edge. Use 1 1/4″ screws. Then fasten your center cleat to the end planks, flush with the bottom of the 1×8 plank, using 2″ screws and NO glue. Center the support on the plank.
Step 11
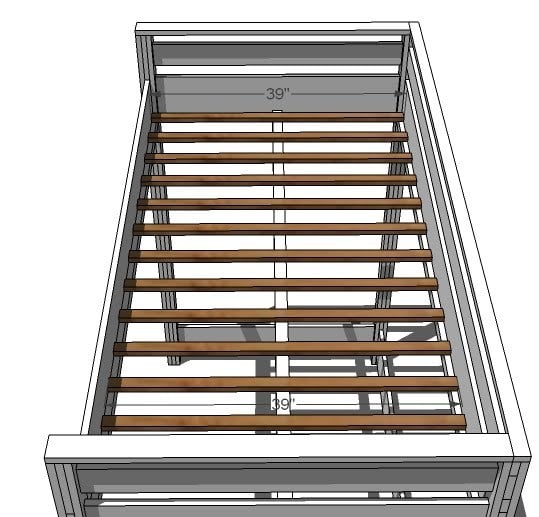
Slats Position your slats with approximately 4″ gap between the slats. TIP: Cut 2 1×2 scraps at 4″ and uses as a spacer between the slats as you are assembling. Screw the slats down with 1 1/4″ screws. For extra support, you can also screw a couple of the center slats from the outsides of the 1×8 rails using 2″ screws.
Step 12
Guardrail Use 1 1/4″ fasteners (nails would work just fine) to build your guardrail. Fasten from the inside to hide holes. Then add the 1×2 top, keeping all outside edges flush.
Step 13
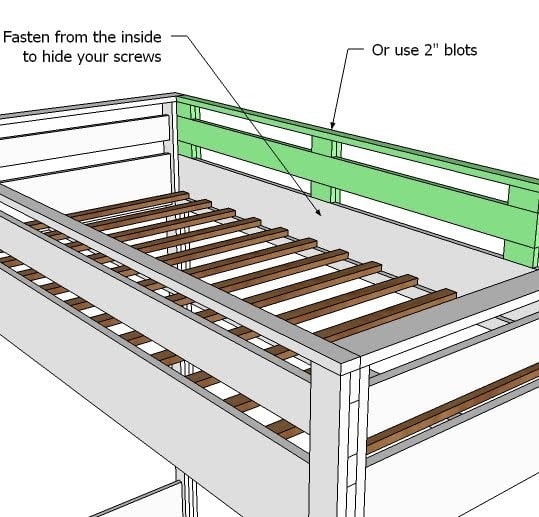
Guardrail Attachment Attach the guardrail to the bed as shown above. From the inside, use 1 1/4″ screws. Don’t use glue so you can remove it.
Step 14
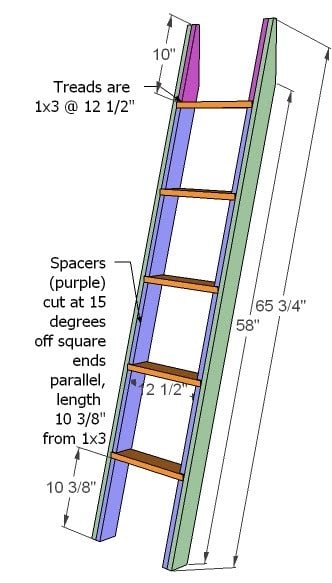
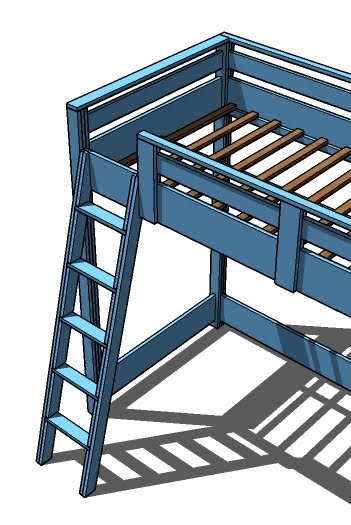
Ladder So cutting the top of the sides is going to be a little tricky. Think of it this way, you are leaving a 15 degree angle on the top of the board, then trimming off the top 2 1/4″ to remove the sharp pointy end. The best way to do this is FIRST cut your top angle at 75 degrees off square (leaving 15 degees on the board). You will need to use a jigsaw or circular saw. Then snip off the top 2 1/4″ at a right angle (90 degrees) from the back of the top (where the leg rests against the bed. THEN measure down the leg 65 3/4″ and cut your 15 degree angle on the bottom of the leg. Then use the top as a pattern when cutting the top filler pieces. Construct your ladder as shown above, using 1 1/4″ screws when joining the filler pieces to the leg sides, and 2″ screws to join the treads to the leg sides. Don’t forget your glue. See an exploded view below.
Step 15

Step 16

Assembly The boards shown in pink above are removable and are not glued down. You should be able to slide the boards out of the notches to disassemble the bed and move. Slide the boards back into the notches to assemble and use 2″ screws to screw from the outside of the leg into the rail boards. Also screw the back top to the top as show above. In this method, you should be able to easily assemble and disassemble the bed without destroying the finish.


Comments
Jennifer (not verified)
Tue, 12/28/2010 - 14:59
Ana, Thank you so much for
Ana, Thank you so much for this loft bed plan. My son wanted a desk for Christmas and his room was too small for one. I looked at this loft bed at PB and it was just to expensive. I came across your plans and we decided to make it for him. It turned out great.
Thanks again,
Jennifer
<a href="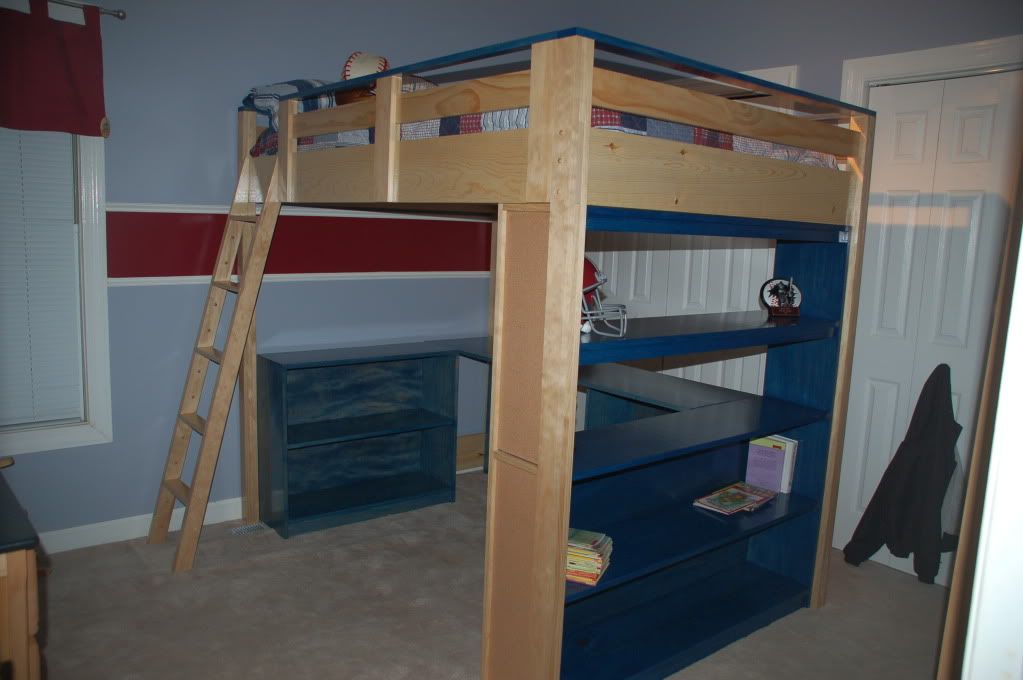 "><img src="
 " width=50% height=50% />
A New Bed for … (not verified)
Sun, 01/02/2011 - 18:12
[...] used this plan from Ana
[...] used this plan from Ana White’s site. She is awesome and her plans were spot on with the directions and measurements! The best part [...]
Angela Deutsch (not verified)
Mon, 01/03/2011 - 14:03
I know it says how to make it
I know it says how to make it a full but I am not sure which ones to add 15 inches to. Has anyone done this so that they can make it more clear for me? Thanks in advance!
Girls Room Pic… (not verified)
Mon, 02/07/2011 - 20:06
[...] to-do list for Jason.
[...] to-do list for Jason. Luckily he LOVES messing with all those tools and stuff in the garage! So here’s the plan he used, and he built it for about $170! Another tip, call around for wood prices before you buy [...]
sleeplessmom (not verified)
Sun, 02/13/2011 - 05:18
I have been looking for a
I have been looking for a loft bed for my son and the only one I found that was solid wood was from Ikea. It's $300 + the gas money to go pick it up over 2 hours away. My Brother-in-law made on for my niece so I asked my Sister if he had plans. Her response "Does Ana White have plans for one?". DUH! I didn't even think to look here and you have just what I want! Yay!
A few of the comments talk about stability. I've read a million reviews for store bought loft beds and everyone of them use just screws to put the bed together.
David (not verified)
Mon, 03/28/2011 - 15:15
Excellent plans
Just finished making this for my 12 year old daughter. She loves it. Thanks for the plan.
Guest (not verified)
Tue, 03/29/2011 - 06:59
Couple of questions: 1.
Couple of questions:
1. Will Lowes or Home Depot cut the boards for me if I provide them the cut list?
2. Can this be built to be disassembled and reassembled when we move into a new house in the future?
rlcollins3
Fri, 07/22/2011 - 16:47
1. Yes they will. We had to
1. Yes they will. We had to have them cut some of our wood because we didn't have the right tools to cut the bigger pieces. They are supposed to charge you per cut but you may find a nice worker that will do it for free. The guy that helped us was nice and didn't charge us.
2. There are some pieces that are not glued in order to make it easy to disassemble. However, with ours some of those slats were a super tight fit. Not sure if we could get it apart. So just watch out for that. If the fit is not tight it shouldn't be a problem to take it apart again.
Maija (not verified)
Tue, 03/29/2011 - 14:24
Yay!
I'm so glad I saw this! You know...shipping to Northern AK is super expensive, so I'm happy to find this!
My daughter needs a loft bed because she has the smallest room and needs room for her piano and desk!
I spent exactly $48 on my wedding dress, made my girls dresses, made the men's Kuspuks, went to Burlington for their shirts, pants and ties and we all wore mukluks. My homemade wedding cake was leaning just a bit, but that's OK.
Guest (not verified)
Mon, 04/04/2011 - 10:24
Loft bed - full sized
Do you have the plans for this but for a full sized bed instead of twin?
Guest (not verified)
Mon, 04/04/2011 - 14:42
weight limit
Hi, I'm a college student and am considering making a loft bed using these plans. What I need to know though is how much weight can it safely hold. I weigh 130 but i imagine my 160lb roommate will at some point end up sitting up there with me. Can this bed support nearly 300lbs?
Gem
Thu, 04/07/2011 - 06:41
Wow, maybe won't have to adapt cabin bunk plan!
I had seen the cabin bunk bed plans, and was thinking of adapting them to do a loft instead, but these seem much simpler! Thanks!
Guest (not verified)
Thu, 06/02/2011 - 14:40
Can you make a loft bed in
Can you make a loft bed in Queen size? (With out it falling apart)I gave my daughter a queen size bed and promised my husband I won't change her mattress until she moves out. Then now her birthday is coming up and she wants a loft bed more then anything. Help!
Guest (not verified)
Tue, 06/07/2011 - 12:44
Would it work to use the ends as a ladder if..
If I were to add more of the 37 1/2 in boards to the ends would they hold up to use as a ladder? Would it make the bed tippy at all when being climbed on? I would then make both side rails go from end to end instead of the space for the ladder. In my mind it would give the bed more support too but I have never built anything like this bed. My husband is doubting my ability but I want to prove him wrong! The ladder seems beyond my capability though. Thanks!
Guest (not verified)
Thu, 06/09/2011 - 18:16
What type of wood do you use?
It might sound stupid but what type of wood do you use?
Thanks
In reply to What type of wood do you use? by Guest (not verified)
claydowling
Thu, 06/09/2011 - 20:48
Dimensional lumber
Most people make this just using the regular dimensional lumber you can pick up at the home center or lumber yard. It's likely to be pine, but could be generic white wood, which is probably spruce or hemlock (which is actually red and smells bad).
Guest (not verified)
Wed, 06/15/2011 - 12:48
Just wondering if you could
Just wondering if you could update the shopping list for the full-size bed? It says to add 15 inches, but I'm not sure which ones from the shopping list that would be. Thanks!
Schaeferjrcs (not verified)
Fri, 07/08/2011 - 12:07
Twin Bed Loft
Anna,
Thanks for your site and assistance here. One question before my husband and I move forward with this. Our youngest son will be using this loft in his small room to create more space. He is almost fourteen years old. He is 6' tall and still growing and is over 240 lbs. The pediatrician says he will wind up around 6"4" and about this weight. I can figure out how to make the bed long enough and get a longer twin set up. My / our question is this, do you believe this loft will be sturdy enough to support our son? He's a big guy and I'd hate to see the desk under it and lap top and books get ruined.... oh or him get hurt. We also don't have the funds to spend money buying one so this option would be great if it will work. Thanks and God bless.
claydowling
Fri, 07/08/2011 - 12:18
Beefing up the design
The 2x2 support in the center I'd worry about a little bit. You can beef that up to a 2x4 and it should be fine. If you're really concerned, putting a 3/4" piece of plywood over the slats will also add a lot of support by distributing the weight more evenly, but the 2x4 center support beam should really be enough.
Tara Byrd (not verified)
Thu, 07/14/2011 - 21:22
Cost for this project
Do you know an approximate cost for the loft bed, bookcase, desk and small bookcases? Also, I was hoping to close in the end bookshelf by creating drawers for a dresser. Do you have any suggestions on that?
rlcollins3
Fri, 07/22/2011 - 16:41
Loft Bed with Bookcase
Ok so our youngest needed some extra space in his room. We decided to go with this style bed. Saw the project and decided to tackle it. We made some adjustments to it. We made the end of the bookcase magnetic and left the back of it off. This allowed him to access his books from both sides. Here are some pictures. (and yes I know some of them are sideways. Thought I could fix them once I uploaded them.)
http://www.flickr.com/photos/rebeccac3/sets/72157627257887354/
Enjoy!
Denver (not verified)
Sat, 02/25/2012 - 07:11
Plans for Bookcase
I love the idea of a bookcase on the end. Do you or anyone have the plans or the materials and cut list for this addition?
WannaMakeA LOFTBED (not verified)
Mon, 08/06/2012 - 22:23
Bookshelf Plans
Some bookshelf plans for this loft can actually be found on ana-white.com.
http://ana-white.com/2010/06/plans/what-goes-under-loft-bed-how-about-b…
Hope this helps!
hook Fam
Sun, 07/24/2011 - 09:38
Ladder treads strong enough?
I am almost finished this build, and the last thing I have to do is the ladder. Have those of you who have built this using 1x3 found that they are strong enough? I am concerned that they may bend. But I really don't want to use a 2" board, it just looks so thick compared to the rest of the bed. I would love feedback!
rlcollins3
Sun, 07/24/2011 - 11:09
My husband and I are both
My husband and I are both able to climb on the ladder. Should not be a problem.
In reply to My husband and I are both by rlcollins3
hook Fam
Sun, 07/24/2011 - 13:54
Thanks!
Thank you, I took the plunge and it seems to be working quite nicely.
In reply to My husband and I are both by rlcollins3
hook Fam
Sun, 07/24/2011 - 13:54
Thanks!
Thank you, I took the plunge and it seems to be working quite nicely.
Bob Kennington (not verified)
Fri, 08/12/2011 - 10:37
weight
whatis the maximun weight load for this bed ?
Guest (not verified)
Tue, 08/16/2011 - 10:22
Cost?
I was also hoping that someone who had made this plan (preferably as a double) would be willing to share how much it actually cost them in materials. I would really like to build this, but it definitely depends on the price.
claydowling
Tue, 08/16/2011 - 10:31
Figuring cost
The cost will vary widely based on when and where you acquire your materials. Lumber is a commodity which varies by both time and location. So what I pay for materials will be nothing like what you would pay for the same materials.
You can take your materials list and price it out at the local lumber yard though.
DirtSquirt
Wed, 08/24/2011 - 12:44
Ladder for shorter bed?
We are planning on making this bed for our daughter but are planning on making it lower. For the ladder, is it just as easy as making it shorter as well or will it change the angles? If I make the bed 12 inches shorter, do I just make the ladder 12" shorter too or is there a formula to use to figure out the new length? If I wanted to make the ladder on more of an angle how would I figure out what length to make it? If I increased the angle so that 20 degrees was left on the board at the top instead of 15 degrees, would the spacers also be cut at 20 degrees? If not, how would I figure out the angles? If there is a better place to ask this question or if anyone has any great links to where I could learn these things, I would love to know.
Thanks!
Wayne (not verified)
Wed, 08/24/2011 - 18:41
cost
I live in north east Ohio. I just got back from Lowes and purchased all the materials for $74. Tha included a rope light to string on the underside and some wood filler.
My brother is coming over this weekend to help me put this together for my three year old. we are so psyched to have these detailed plans. thanks
AJ (not verified)
Sat, 08/27/2011 - 16:42
Queen Size?
How would I go about making this into a queen sized bed? And after that point would it still be stable enough or would I need to increase the width and depth of the legs?
Guest (not verified)
Fri, 11/25/2011 - 13:26
how much weight?
I'm thinking of making the loft. How much weight can it have on it? Like if i had a friend on it. So around 250 pounds?
ashinshaw
Wed, 11/30/2011 - 06:36
Weight limit
We are getting ready to build this for our two children, but my husband is concerned about the weight limit.
Annee (not verified)
Wed, 01/04/2012 - 00:11
I want to build this bed
I want to build this bed badly BUT in a full size. What would be the differing sizes on my supply list and cut list? Please advise!! Thank you for the great idea and inspiration!
I really think I can do this!
Lanie (not verified)
Wed, 01/11/2012 - 19:19
adjustments?
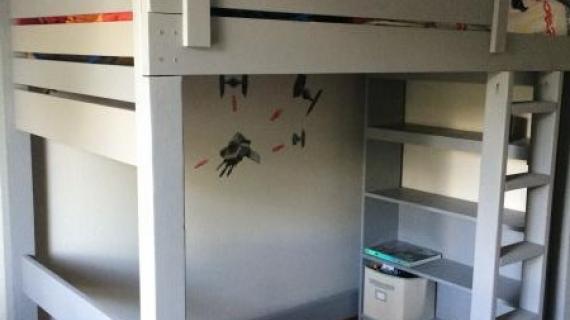
In the photo that there is a book case in, with it all in white I couldn't tell if the bookcase is the leg, or if there is a bookcase just sitting inside of the loft..... if it is the leg, which I would prefer, are there alternate plans to adjust the construction?
Guest (not verified)
Thu, 01/12/2012 - 08:45
how much time to build this?
This is THE bed I need for my boys. It's just a matter of convincing my very capable, yet time-pressed husband, to make the time to do it.
Can you give some idea of how long it takes to complete this bed?
Thanks,
Sue
Tom S. (not verified)
Fri, 07/06/2012 - 16:31
Making the Loft Bed
I made this bed for my 7 year old daughter. I made the full bed version with the desk and bookcase. The total cost was less than $250 and it took me one day to cut all of the wood and another to assemble the bed (with my daughter's help). She loves her bed and she has been using it for about a year now and it is the perfect bed for her small room.
claydowling
Thu, 01/12/2012 - 09:08
Time Estimate
Sue, if you're going to be waiting for somebody else to build it, I would put the estimate in years. If you're going to build this, and learn the construction skills yourself, I'd guess a couple of weekends. That depends on the age of the boys and how easily you can pawn their care off on somebody else (siblings and friends with kids are awesome for this).
Guest (not verified)
Thu, 01/12/2012 - 11:02
Thanks Clay, I really wish
Thanks Clay, I really wish that me building the beds was a realistic option. So, since it's not, I'm looking for a time frame I can present to my husband and I can say something like, "Honey, it will only take (fill in the blank) hours and your wife and children will be ever so happy and grateful"
D Velarde (not verified)
Thu, 02/02/2012 - 16:46
Room Color & Awesome Bed
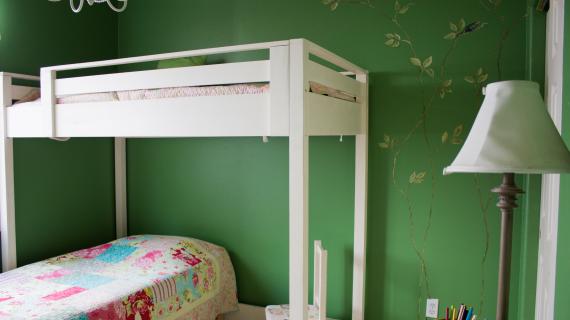
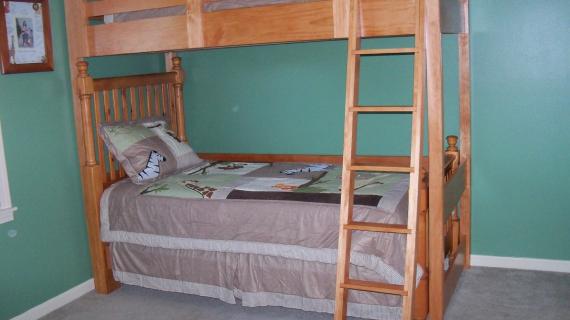
Hi Ana! We are re-doing my daughter's room for her 12th birthday. She has always wanted the PBTeen loft bed. I could not believe it when my husband came across this bed - it is perfect! He is starting on it soon. On top of that, the picture you posted of it in the turquoise room - that is (seemingly) EXACTLY the color my daughter wants! I am beyond frustrated trying to pick, match, buying color samples that aren't right. Can you PLEASE tell me if you have the specific color info for this room? Thank you so much for your time!
Guest (not verified)
Sun, 02/05/2012 - 20:05
loft
How much did the loft cost to make yourself trying to decide if its easier and cheaper to buy from walmart its y 250 there let me know please
J-Lon (not verified)
Wed, 02/22/2012 - 12:40
I too am curious about the
I too am curious about the cost. It is so funny that you posted regarding the loft beds at Walmart---I have been considering the Twin Premium Metal Loft Bed, White for $169. We need two, and we need them in about a month's time. I am thinking it would be so much easier to buy then make, but the plans are all right here, spelled out to clearly . . . (Thanks Ana White for sharing your AWESOME talent and time!!)
Curious about the cost of the bed in these plans?
In reply to loft by Guest (not verified)
claydowling
Wed, 02/22/2012 - 13:19
Cheaper to build
There's no way for somebody else to predict the cost. Material availability and price vary too widely. What I can predict is that you can build it for less, and if you buy good quality materials and construct it properly, it will last a lot longer than anything you can buy in stores.
Recently we went to Ikea as a family, and my dad and I were looking at the dining room sets they sell. It was a nice set, with a table and four chairs, for $100. To make a profit, I could only make the table for that money (and that would be a bit low).
But, looking at the construction of the Ikea table, it will last probably one year, two at most. The table I build, my grand-daughter can serve dinner to her grandchildren on it.
6lilmonkies
Wed, 02/22/2012 - 14:24
build it :)
I would say even if it is a little more expensive to build it, I would. We have a futon from wally world and it has been rebuilt at least 6 times (I am building our new couch this year) and we have a playground from wally world as well it started falling apart before it crossed a year. This year it is been completely torn down and we are building our own. Between the two it was almost $1000 wasted, imagine what we could have built for that money!
Even factoring time; I have six kids, I home school, have a disabled child, etc and I am going build 3 lofts. Well maybe I'll finish two this year on top of the other 'to dos'. Good luck :)
In reply to loft by Guest (not verified)
claydowling
Wed, 02/22/2012 - 15:34
Building with Home Schooling
Building it with your kids is an ideal way to integrate building the furniture you need with practical home schooling. Lots of good applied mathematics and practical geometry.
keithmay1986
Tue, 02/21/2012 - 20:23
Downsizing to toddler?
This bed dewsign is awesome. I want to build it to fit a toddler mattress and add a second bed to it. Is there a formula to reduce the size? Or does anyone know what the new dimensions would be?
Denver (not verified)
Sat, 02/25/2012 - 07:03
Bookcase
I love the idea of a bookcase on the end. Do you or anyone have the plans or the materials and cut list for this addition?