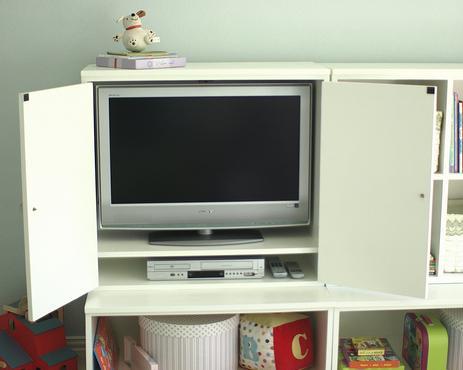


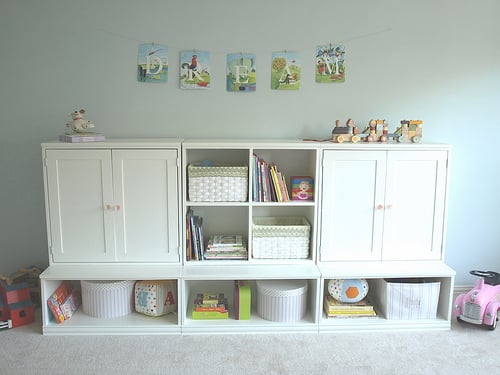
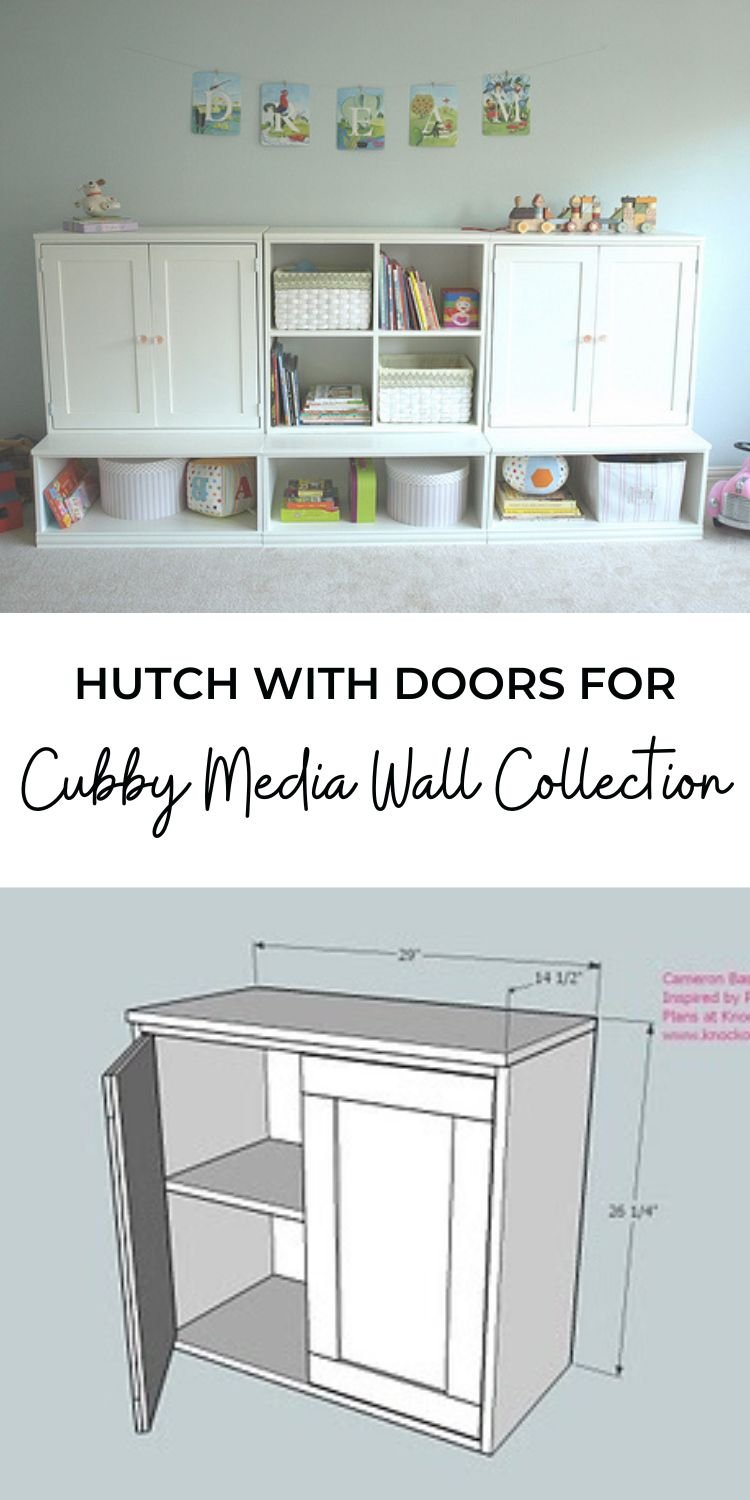
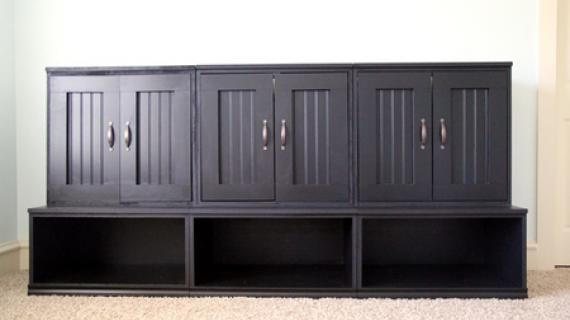
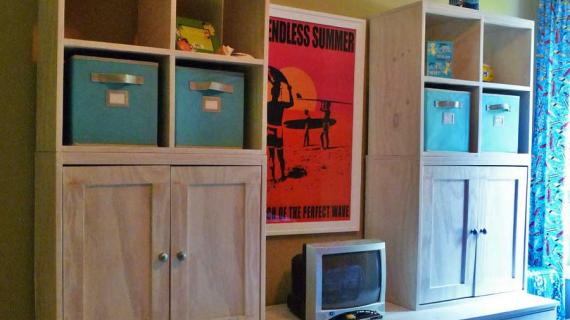
A cute storage piece that hides everything . . . even a TV! Works with the Cubby Storage Collection to tidy up not just children's rooms, but any room of the home. Special thanks go to our readers for sharing their photos.
Pin For Later!
Preparation
1 - Sheet of 3/4" MDF 1/4 Sheet of 1/4" Plywood, paneling, hardboard or MDF (back and door rails and stiles) 1/4 Sheet of 1/2" Plywood, paneling, hardboard or MDF (doors) 1 - 1x2 @ 4 feet long
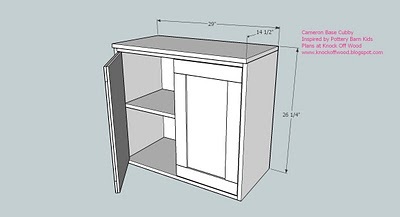
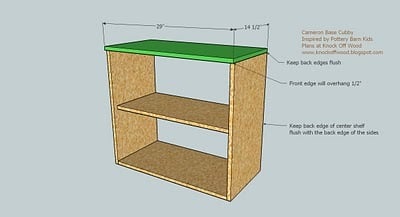
Cutting List for ONE Hutch A) 2 – 3/4″ MDF or Plywood @ 25 1/2″ x 14″ (Sides) B) 1 – 3/4″ MDF or Plywood @ 27 1/2″ x 14″ (Bottom) C) 1 – 3/4″ MDF or Plywood @ 27 1/2″ x 13″ (Shelf) D) 1 – 3/4″ MDF or Plywood @ 29″ x 14 1/2″ (Top) E) 1- 1/4″ MDF or Plywood @ 29″ x 26 1/4″ (Back) F) 1 – 1×2 @ 27 1/2″ (Top Trim) Cutting List for TWO Doors (to fit on 1 Hutch from above) G) 2 – 1/2″ MDF or Plywood @ 23 3/4″ x 13 1/2″ (Back of Doors) H) 4 – 1/4″ MDF or Plywood @ 13 1/2″ x 2 1/2″ (Door Rails) I) 4 – 1/4″ MDF or Plywood @ 18 1/2″ x 2 1/2″ (Door Stiles)


Please review the instructions for building the Open Cubby Hutch, because these plans are essentially the same. If you are building this plan, you most likely have scraps leftover from building the open cubby base and the drawer. I recommend using your scraps if possible to maximize savings. Therefore, I will not be posting a plywood cutting layout. I recommend getting some Graph Paper before begining to build any of these pieces and draw up a cutting layout for all the pieces you are building. My trick is to group boards of the same width (for example, 14″ or 21″) and place these boards in progression. Then have Home Depot rip your plywood into that width. This will also help you get your squarest possible cuts. Work on a clean level surface. Make sure your boards are cut square. Use 2″ nails or screws and glue, unless otherwise directed. Always countersink and predrill your screws. Measure and mark out where boards will join prior to fastening. If using MDF, use drywall screws or finish nails, avoiding fastening within 1″ of the edges of the MDF. Square your project after each step. Remember to have fun and be safe!
Instructions
Step 1

Build the Box. As I often say, build the box. It seems whenever we build a storage piece, it is essentially a “box” that is trimmed out. This one is no different. Simply fasten the sides to the bottom and the shelf, using the measurements above to guide you. Keep back edges flush.
Step 2

Top. Fasten the top to the hutch, keeping back edges flush. The front will overhang 1/2″.
Step 3
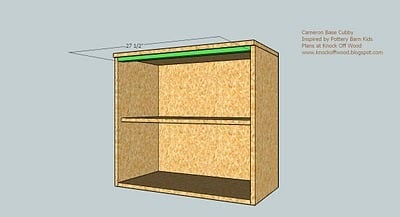
Back. Use 1 1/4″ nails or screws and glue to fasten the back in place as shown above. Make sure you fasten to the center shelf, top, sides and bottom.
Step 4
Top Trim. Add the top trim as shown above. Use the 1 1/4″ fasteners to secrure the top trim ot the top of the hutch. Then use the 2″ fasteners to fasten the sides to the end edges of the top trim.
Step 5
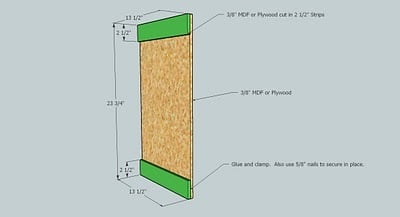
Rails and Back. Glue and fasten using 5/8″ staples or nails the rails to the the back of the doors, as shown above. Make sure edges are flush.
Step 6
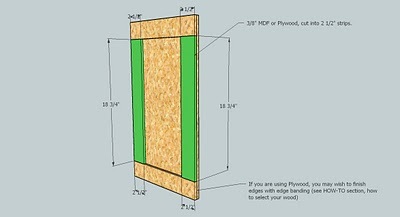
Stiles. Glue and fasten your stiles in place, as directed in step 2. Lay the door flat to dry, and clamp or stack heavy objects on top of the door. You want to make sure your doors dry flat.

Comments
These are the … (not verified)
Sun, 01/17/2010 - 09:16
THANK YOU!!!!!Nikki
THANK YOU!!!!!
Nikki
Sue-z (not verified)
Sun, 01/17/2010 - 09:59
This is absolutely amazing -
This is absolutely amazing - just like all of your work. I wish I was as talented. I do have one question about the plans. What type of hardware would you use to hang the doors? Thank you for sharing your ideas with us.
Ana White (not verified)
Sun, 01/17/2010 - 10:11
Sue-Z, I didn't realize I
Sue-Z, I didn't realize I missed this. You will need to attach the doors with hinges. I always use a standard hinge that fits on the inside edge of the door. You can also use self closing or certain european mount.
Rhoda @ Southe… (not verified)
Sun, 01/17/2010 - 11:22
Nice to meet you, Ana! What a
Nice to meet you, Ana! What a creative site you have & great to see a girl with power tools. I don't have many myself, but use a few handtools & am a huge DIYer myself.
Michelle (not verified)
Sun, 01/17/2010 - 14:39
I am new to your site. I
I am new to your site. I LOVE everything I've seen and I can't wait to give things a try. We've been married for 10 years and still don't have a nice bed. I intend on making yours. :)
THanks so much for sharing your talent with us! I look forward to all that I will learn from you!
~Michelle
mamatamera (not verified)
Sun, 01/17/2010 - 22:17
I am so impressed! I love
I am so impressed! I love the Cameron wall and want to build it. Thank you so much for sharing all your hard work. I blogged about you on my little private blog.
Its So Very Cheri (not verified)
Mon, 01/18/2010 - 20:45
I love your blog. I signed
I love your blog. I signed up to follow and would love to have you come over and do the same. I just did a PB knock off post a couple of days ago.
Cheri
Sarah - Roots … (not verified)
Fri, 01/22/2010 - 06:40
This is just amazing! We're
This is just amazing! We're moving to a teeny tiny apartment next month where storage is going to be our biggest obstacle. The Cameron system will probably save the day, though!
I have one question - Can I build the base and open cubbies and then add the doors to the cubbies later? Or are the cubbies built differently when using doors? I'm not sure what our exact needs will be, and want to leave that option open. Sorry if I just misunderstood the plans!
Thanks so much for all the great plans. But, please slow down because my Must-Have Furniture List list is getting longer than I can handle! ;) haha!
Lara (not verified)
Tue, 03/23/2010 - 13:49
Ana, I feel honored that you
Ana, I feel honored that you used my photo for this post! Thanks SO much! I also added some other photos to your Facebook Fanpage so if you want to use those you can! Thanks again SO much for these plans and your awesome website!
Calvin & Chrissy (not verified)
Wed, 06/23/2010 - 14:10
HiI was wondering if you
Hi
I was wondering if you could tell me how you get such a great finish on your mdf projects.
Thanks
Matt & Elaine (not verified)
Thu, 07/01/2010 - 06:39
Just thought I'd let you
Just thought I'd let you know, the cutting list has the wrong measurement for the vertical door stiles. Should say 18-3/4".
Thanks for all your great plans! We've already made a couple of toddler picnic tables and are almost finished the Cubby Media Wall. I'll get pics soon. Thanks again!
Craft This! We… (not verified)
Mon, 09/20/2010 - 12:59
[...] do until something
[...] do until something better comes along (no, I’m not going to buy that–the plans are here [...]
Joann (not verified)
Mon, 10/25/2010 - 08:05
Just wondering about the
Just wondering about the doors - do you just leave the edge of the large panel exposed? I suppose it would work all right with MDF, but wouldn't it be pretty rough with plywood? (Just fyi, I think that Orange and Blue could make a fortune if they'd come up with some sort of DIY door edging that you could fasten to a panel to make a finished door.)
DIY Playroom S… (not verified)
Sun, 01/09/2011 - 14:00
[...] For plans and TONS of
[...] For plans and TONS of inspiration visit: Ana-White.com. I used the plans for the Open Base and the Media Hutch with Doors. [...]
Lora (not verified)
Wed, 01/26/2011 - 15:15
I just wanna give you a GIANT
I just wanna give you a GIANT HUG!! Thanks so much for taking time to maintain your website the way that you do! I am planning on building a storage unit for my son's new playroom upstairs. We have never really used the upstairs and I thought...what a waste of space...you inspired me!! I plan on builing three "Open Base Storage", two "Cameron Cubbies" and one Hutch for the center! Thanks so much! Once I collect all the materials I will post! Thanks so much!!!!!
Guest (not verified)
Sun, 07/10/2011 - 15:21
Doors
I just want to let you know that on the cut list for the door stiles it is listed at 18 1/2 x 2 1/2 and then in the picture that you show in step 7 of the directions it is shown as 18 3/4 x 2 1/2. It does actually need to be 18 3/4. Also for the doors to fit perfectly you may want to specify that you need a true 1" x 2" board. The ones sold at most hardware stores are actually 3/4" not a full inch. Otherwise, thanks so much for your designs!! We are almost done!!
Richard Lavallee (not verified)
Wed, 04/04/2012 - 16:29
Doors for the Cubby Media Wall Hutch
The plans call for the stiles and the rails to be placed on the back of the doors. But the picture of the doors at the beginning of the project, under the dimensions, show the rails and stiles on the front of the doors. Which one is correct, and could you do it either way?
jtayloraf
Mon, 01/18/2016 - 08:39
Incorrect Specifications
Hey Anna, this project is great! I noticed some typos on the measurements. The Cut list specifies I) 4 – 1/4″ MDF or Plywood @ 18 1/2″ x 2 1/2″ (Door Stiles). This is not consistent with the diagram, which shows the length to be 18 3/4". I double checked, and the 18 3/4" is what the cut list should say.
cori1312
Mon, 06/10/2019 - 05:53
I find no instructions…
I find no instructions regarding hanging the doors or recommended hinge types?