


How to pour concrete sidewalks and outdoor pads. Step by step with photos.
Are you every guilty of starting one project, getting almost done - ALMOST - and then ....
get sidetracked and start a second project?
Have you ever done that?
Oh, good, now I don't feel so bad!
Because years ago we started building a house.
And then when we were almost done - ALMOST - we thought .... hmmmmm ... wouldn't it be a good idea to build both of our Mom's a new house?
And we've been busy working on the Momplex ever since.
And our first project has been put on hold.
Now I do know better. I know that once you start a project, you HAVE to finish it before starting the next. If you get sidetracked, it's easy to loose enthusiasm and move on to the next project.
And that's exactly how I feel about our own house.

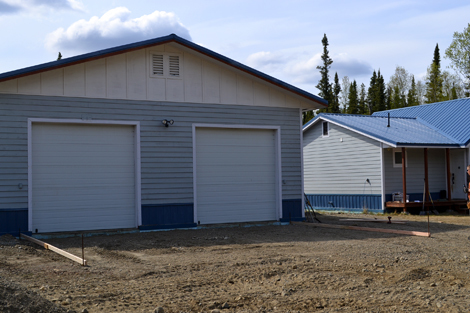
We LOVE our house. We built the entire house and garage, DIYed every single step - with the exception of the rock work on the front - one paycheck at a time over years and years.
But when we started working on the Momplex, we stopped working on our house. And a few little projects that have been on our to-do list just haven't been getting done.
So I talked to my mom and said, Mom, can we take a little break and tackle some of the projects around our house. It will delay your move in date by a little bit - but it will allow us to enjoy our own outdoor space this summer.
What do you think Mom said?
So we made a list of the projects we want done in our own yard and started by tackling the first - a concrete pad in front of the garage and sidewalks between the house and garage.
Yes, we currently live surrounded by dirt and a patchy lawn that someday we will landscape. Someday.

Someday, we will have less dirt to sweep up inside, because we will have a sidewalk between the house and garage.

Someday, we will have a concrete pad in front of the garage so I can work outside in the summer.
Someday ....
Hey, we love our Moms!
But today, it's our day!
We are pouring concrete, and I'm going to show you how -
Instructions
Step 1
Remove Material
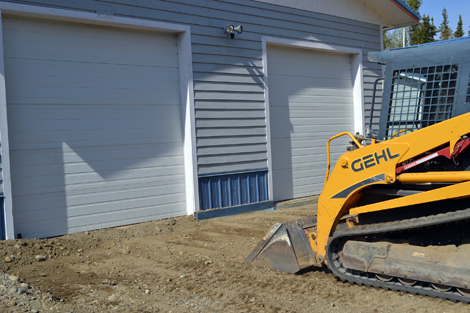
The first step is to remove material to be replaced by concrete. We have rented a skidsteer for $300 for the weekend to help out.

But this does NOT remove the need to use a shovel. Be prepared to sweat! And struggle to get out of bed the next morning.
Step 2

Check Grade
We set up a laser transit that we purchased last year to use at the Momplex to help us determine how deep to dig. It's pretty simple. The transit shoots a line exactly level 360 degrees around. You use the receiver on a measuring stick to measure up or down from this line to find your desired height.
Step 3
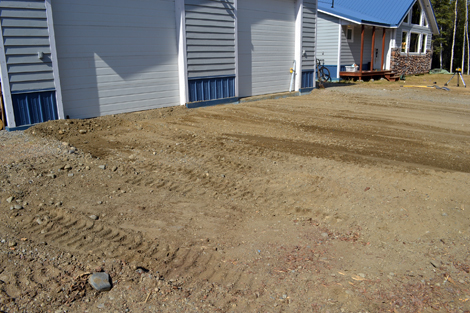
Ready for Forms
For the entire area to be poured in concrete, all material is removed and grade checked using the transit. We have the pad and sidewalks also sloping for water drainage. We are ready to build forms!
Step 4
Finding Corners
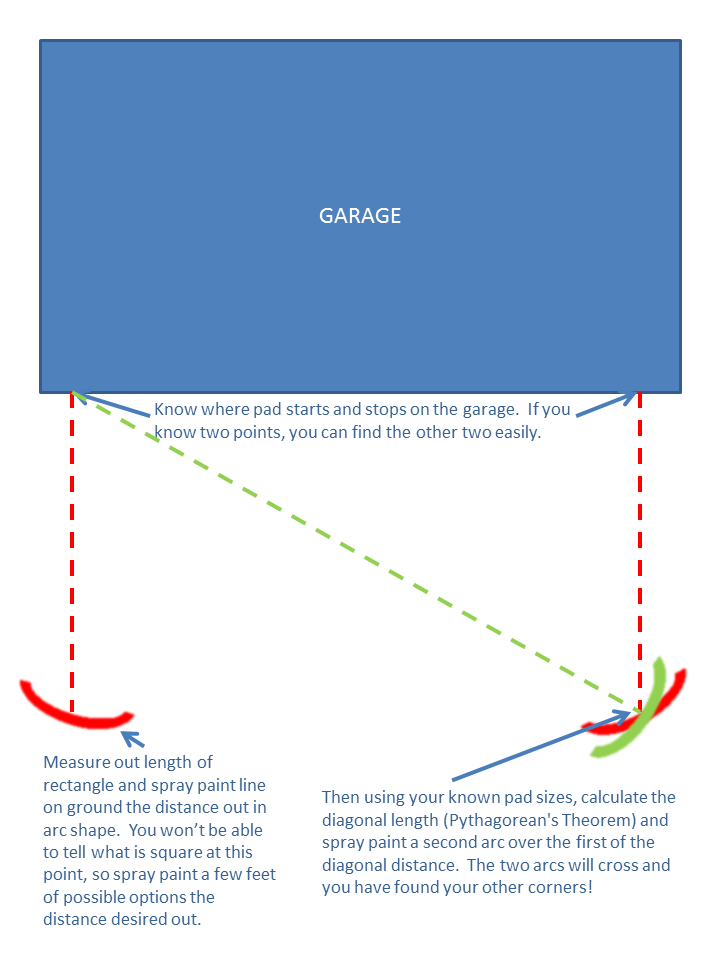
We know where the concrete pad starts and stops on the garage, and we know the garage is square. And we know how big the pad is going to be - 28x20. So we can calculate the diagonals out with Pythagorean's Theorem - you know the A squared + B squared = C squared one? - and use all this information to find the remaining two corners of the pad.

So first we find those garage side point and mark with a Sharpie.

And then using all those things that we do know, we find the points and pound stakes in.
We can adjust the stakes a little later on to make sure we are exactly square before we pour.
Step 5
Step 6

Bringing in Reinforcement
Now the concrete is going to need something to keep it together. We are going to use wire mesh. It comes in really awkward to handle rolls 5 feet wide by 150 feet long.

We lay the wire mesh down and tie it to concrete dobbies to elevate the mesh into the concrete.
Step 7

Divide and Conquer
Now we will need something to guide us in making sure the concrete is level all the way across. So we divide up the pour into three sections.
And then we call the concrete truck!
Step 8
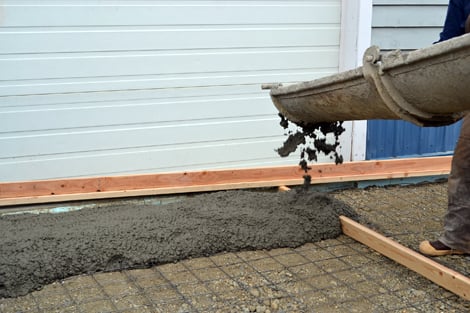
Pouring Concrete
Because we will need a whole truck load of concrete, we are not handmixing today. The concrete truck pours in the first section.

And a screed board is used to level the concrete.

Along we go ... one section at a time ....

We have help today - Grandpa Tim and the Ram's cousin Jared. When you pour, plan on having 3-4 people to help out.

The screed board is two 2x4s put together.

When all the sections are poured, the dividers are removed.

And the void is filled in with a smaller 2x4, working backwards.
Step 9

Finishing
Once the concrete is poured, it's time to finish. First up, the concrete is bull floated.

And the edges are scraped clean

Followed by a special edging trowel used to create those smooth sidewalk edges.

Up here in Alaska where ice is a problem, we did not want a smooth finish. So we broomed the top of the concrete.
NOTE: If you are pouring sidewalks, consider also creating break lines in the sidewalks - we will have to cut ours in because of the size of the garage pad.
Step 10

Signing
And of course we have to sign the concrete!

Littlest to biggest ....

And Grace wanted to add one more thing to the concrete.
We had just watched the American Girl Movie about Kit Kittredge - which we enjoyed greatly. And Grace had an idea.
The hobos during the Great Depression had a special language they used to help other hobos made up of different signs. One house had a fish bone scratched on it's fence - meaning good garbage. Other signs were used to warm of danger.

And a cat meant a nice family lived there.
It is always recommended to apply a test coat on a hidden area or scrap piece to ensure color evenness and adhesion. Use primer or wood conditioner as needed.
Comments
kathy c (not verified)
Tue, 05/29/2012 - 12:57
Thank you for sharing your
Thank you for sharing your concrete pouring adventure. I am always so impressed how you will try anything, that nothing sees to be too much. I have some projects that I want to do but am so scared that I will not do it right. I hope that I can be brave like you
and try. I am a teacher and just got out of school, this summer I plan to make a potting shed, table for my deck, and a couple of benches. Wish me Luck!!
Sandy L (not verified)
Tue, 05/29/2012 - 13:30
Wow!
Wow...you constantly amaze me with all that you guys DIY!! You are an inspiration Ana! And boy oh boy is Grace a beautiful little girl... LOVE that you all 'signed' the cement and added the cat sign. I would like to learn how to use power tools this summer and start with the $10 ledges and cedar raised garden beds. My two little girls want to help garden this year! :)
Kathen
Tue, 05/29/2012 - 15:50
I have always wanted to know
I have always wanted to know how a driveway/parking pad/sidewalk was done, thank you so much for posting this. I know now that my little rental place will get stepping stones or pre-made sidewalk squares, but thanks anyway, this was fascinating!
LOVE the little cat!
Lady Goats
Tue, 05/29/2012 - 16:48
I love Grace.
Can you tell her that a total stranger, that has watched her grow since she was in diapers, just wants to squeeze the heck out of her?! Seeing that you guys are working on your house is great. It really is. But it's the little things that always make me grin. That picture of Grace holding up her dirty hand had me staring at the computer with a dumb grin on my face. Mr. Goats had to come check out what I was doing because of my expression :-)
redhead_61
Tue, 05/29/2012 - 17:14
Amazing
You guys amaze me. I hope you hibernate in the winter because it sure seems you tackle one huge project after another every possible moment now that there is no snow up there. It's inspiring (and a little exhausting from my pregnant vantage point).
My dad designed the house I mostly grew up in and we lived without a front yard for 8 years, still only a big pool in the back, and still no carpet in the library! Guess you pick and choose where the money goes!
Will you tell all your awesome family and friends that they are amazing for all of us. I think it is great that they come to help on so much of what you all do. That is true family loyalty!
SingleMomThriving
Wed, 05/30/2012 - 10:28
Good Timing....
I was considering a concrete pad for my garbage cans (otherwise, the get stuck in the mud on rainy days) and your timing couldn't have been better. Now I feel capable to tackling this little job all by myself. :)
Thanks
~Dona
Krystle P (not verified)
Sun, 06/03/2012 - 23:10
Want to try....
My house is old and has a gravel driveway. If it didn't cost so much for a cement truck I'd do this in a heart beat. I hate gravel and those annoying drivers who use our big driveway as a turn around and then creat holes in our cravel which we then have too fill. This would take away that annoyance. Maybe someday soon. ;) Thank you so much for the how-to. Might just try and tackle a smaller area first though cause I'm a scared-eey Cat! LOL
The Quaint Cottage
Tue, 06/05/2012 - 08:57
Love this!
This takes me back to the large patio I "helped" my dad build on the back of the house. And by "helped" I put my hand in it and my name. Great job.
Roberto Gatti (not verified)
Tue, 06/05/2012 - 15:27
ENJOYING
Dear Ana . I am italian and I live in Italy... I discovered not a lot of time ago your wonderful very agreable site on DIY and I am becoming loved of it every day more :)) You are fantastic in your making all with your hands and in the love that u put in everything you do with your marvelous family. I visit every day your site looking all sections of it and everytime I take ideas and wish to do some with my hands for my house and my family.... :)) I need thanks you for to share all this with other peoples i nthe world, this is like a treasure discovered and we can take all what is of precious inside it :) I will follow you all time looking at your site and i never will be tired to say you THANKS for you availability and kinderness...my best regards and go on so :))
Roberto Gatti from Turin, Italy.
Guerrina
Fri, 06/22/2012 - 14:02
Thank You!
I have wanted to have a walkway between my back door & front sidewalk since I moved in 6 years ago for the same reason you want one between your house & garage. Now I believe I should add it to my DIY list!