This I promise is the last post on these little roofs!

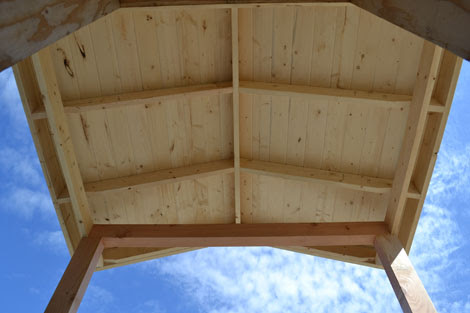
We just finished the underside of the little roofs - the part that you look up and see - with locally milled tongue and groove. And man is she pretty!!!
But we've run into a potential problem. Our tin screws are 1" long. Will the screw tips show through the beautiful tongue and groove?

There's only one way to find out. We take a scrap piece of tin and a scrap piece of tongue and groove, sandwich in between a piece of tar paper ...

Sign .... sometimes you get lucky. And sometimes you have to figure something else out.

Are you eyeing that plywood covering the basement windows too?
We pulled it off the windows, ripped it down to size.

And screwed it on top of the tongue and groove.

And no screw tips show through!!!
It's the extra mile that you will go when you do it for yourself that makes all the difference. Or in our case, do it for your moms.

Over top of the plywood, we rolled out tar paper, starting at the bottom and working upward. On exterior work, water is the enemy, and you are always thinking about how you can lap things so water - if it every got under the tin roofing - would drain downward.

It's like a giant sticker.

And guess who gets stuck picking up the backing?

Putting stickers on is always funner, isn't it?

The ends are just trimmed in place for a perfect fit.

After we put the second row of tar paper up, it's time for tin!

First we'll take a quick moose break ...

And then get right back to work!

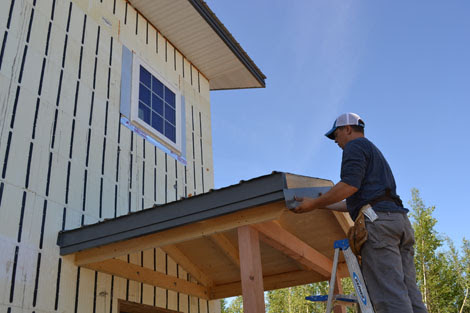
First we start with the eave trim. Notice it wraps both the building and front?

Then we cut our tin. We chalk an extra few lines too ...

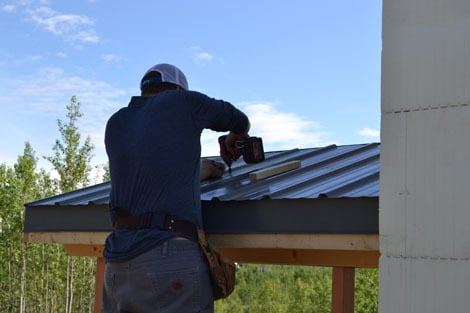
So we can predrill holes for screws on the ground. This way, we aren't predrilling holes up in the air, and we are predrilling through multiple sheets at once to keep the screw pattern consistent. Who knows? Mom might look out the bedroom window and think, how nice, all the screw heads are lined up neat and nice for me.

And then we lay the tin on the roof.

We've gone exactly two sheets wide on the roofs so we won't have to rip tin. #planningiseverything

We use a scrap block of wood to keep the overhangs consistent on all of the roof edges.

And then the tin is screwed on through the predrilled holes.

We are doing full wrap tin on the Momplex - which I highly recommend - and it just slips underneath the eave trim.

Certainly much easier and longer lasting than paint! Done deal - guaranteed for 40 years!!! You can also get the full wrap stuff in white if that's your preference.

We use a square to find the 4/12 angle of the roof and mark it on the front full wrap flashing.

And then it gets place on the gable end of the roof.

In the front, the center is rounded past halfway to cover the seam from underneath.

So when the second piece of tin is put up, it cover the first, and looks finished.

And then over the front goes the gable end trim. It just gets screwed right on top and to the front.

And all that's left is the ridge cap.

The ridge cap gets attached to the top

And we are completely done with roofing up at the Momplex!!!!

Comments
Lady Goats
Thu, 07/26/2012 - 11:51
One MAJOR check of the to-dos!
Carra (not verified)
Thu, 07/26/2012 - 14:17
Love the Momplex Posts!
Guerrina
Thu, 07/26/2012 - 17:32
They Are Beautiful!
oana (not verified)
Fri, 07/27/2012 - 05:31
yay!
birdsandsoap
Sun, 07/29/2012 - 14:47
woo hoo!
ferbit
Mon, 08/06/2012 - 17:09
Mom might look out the bedroom window and think, how nice....."
phlebcircsyleed1985 (not verified)
Mon, 11/05/2012 - 10:18
There are a number of things
ngessipasa1986 (not verified)
Sun, 11/11/2012 - 10:21
Great subject matter
Chad S. (not verified)
Wed, 01/16/2013 - 05:42
We get to see roofs everyday.
anthonyansel
Mon, 03/11/2013 - 21:37
Steel roofing is a kind of
andrewamos89
Wed, 03/13/2013 - 13:37
system consist of large
jaffwatson
Thu, 06/06/2013 - 02:36
Roofing Tacoma
jaffwatson
Thu, 06/06/2013 - 02:38
Please come up with some