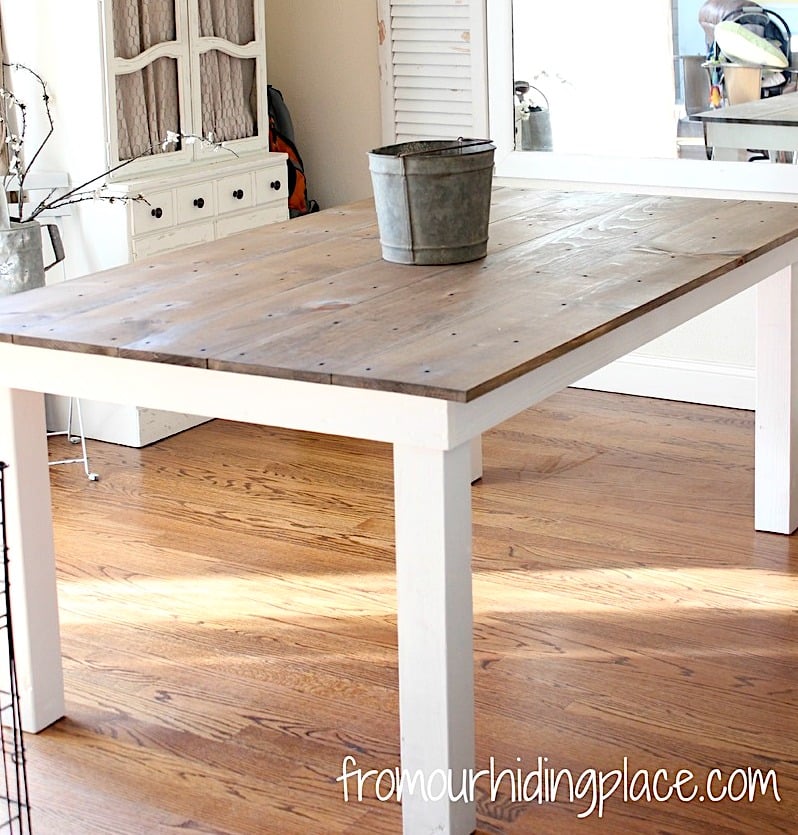


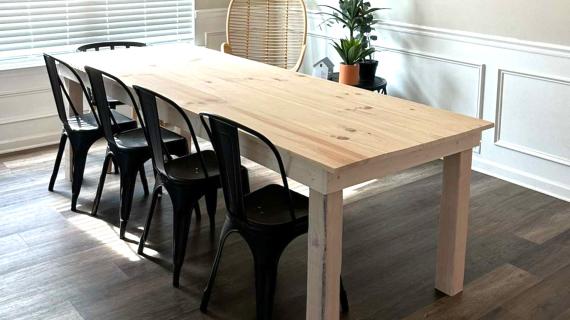
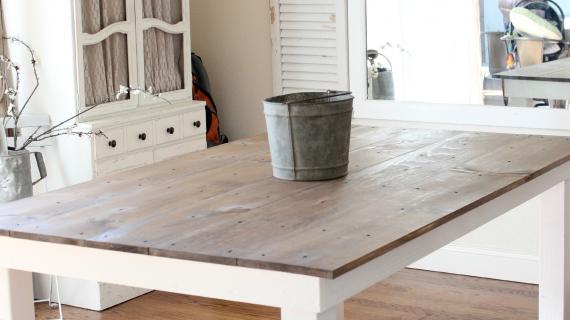
A beautiful, easy to build table that features a 1x top simple legs. This table is designed to look like something one might find and treasure. Step by step plans from Ana-White.com
Preparation
- 4 – 2x2s, 8′ Long
- 3 – 1×4, 8′ Long
- 4 – 1×10, 8′ Long
- 1 – 4×4, 10′ Long
- 2″ self tapping wood screws (star bit)
- 1 1/4″ self tapping wood screws (star bit)
- (16) 3" long self tapping wood screws (star bit) for attaching legs
- wood glue
- wood filler
- sand paper
- 2 – 1×4 @ 90 1/2″ (Side Aprons)
- 2 – 1×4 @ 36″ (End Aprons)
- 8 – 2×2 @ 34 1/2″ (Under Tabletop Supports)
- 4 – 1×10 @ 96″ (Tabletop Pieces)
- 4 – 4×4 @ 29 1/4″ (Legs)
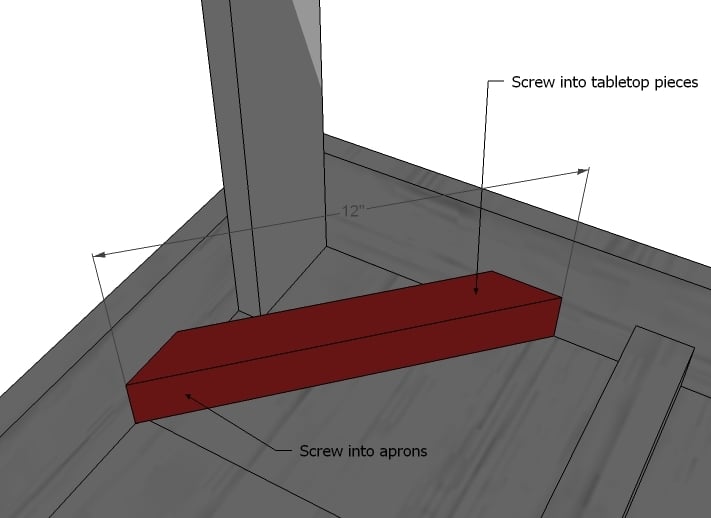
- 4 – 2×2 @ 12″, ends mitered at 45 degrees (cross supports)


Predrill and countersink your screw holes. Keep outside edges flush. Take a square after each step. Work on a clean level surface and use necessary safety precautions.
Instructions
Step 1
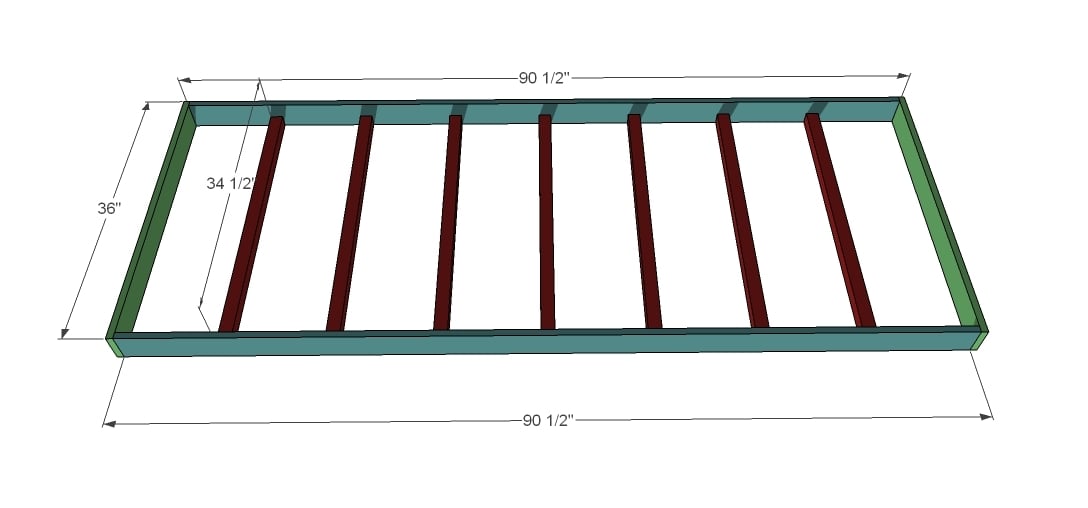
Table Top Supports and Apron. Build the tabletop supports and aprons as shown above. The supports are spaced 10″ apart. Use 2″ screws and glue, countersinking the screws.
Step 2
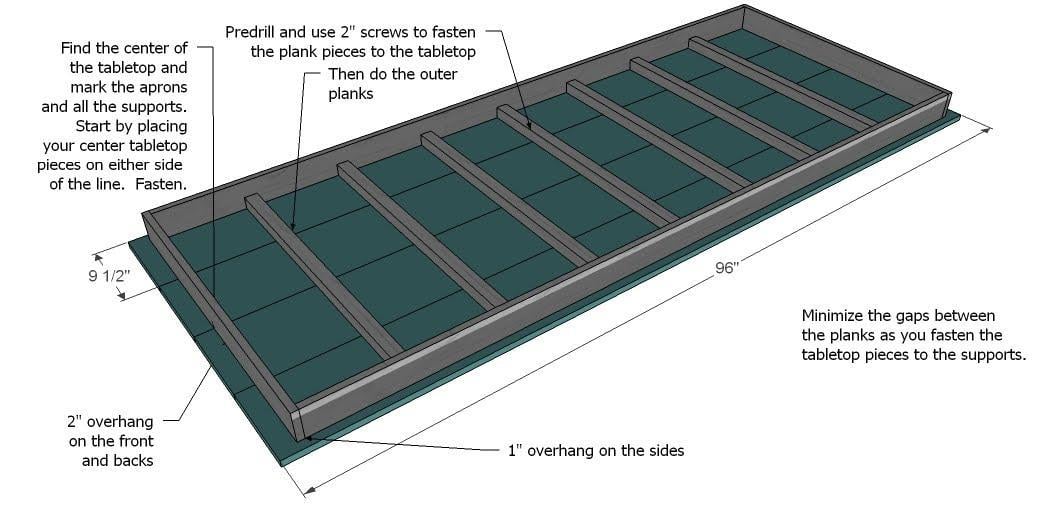
Tabletop Pieces. Take a square of the tabletop. Then find the centers of the tabletop supports and the end aprons and mark. Line up the center tabletop pieces with these marks and fasten through the bottom using 2″ screws and glue. Minimize the gap between the tabletop boards as you go.
Step 3

Tabletop Screw Hole Patterns. Mark out the screw holes on the tops of the table as shown above. Then predrill and screw the tabletop pieces to the end aprons. Make sure the table is square prior to doing this. Use the 2″ screws and glue.
Step 4
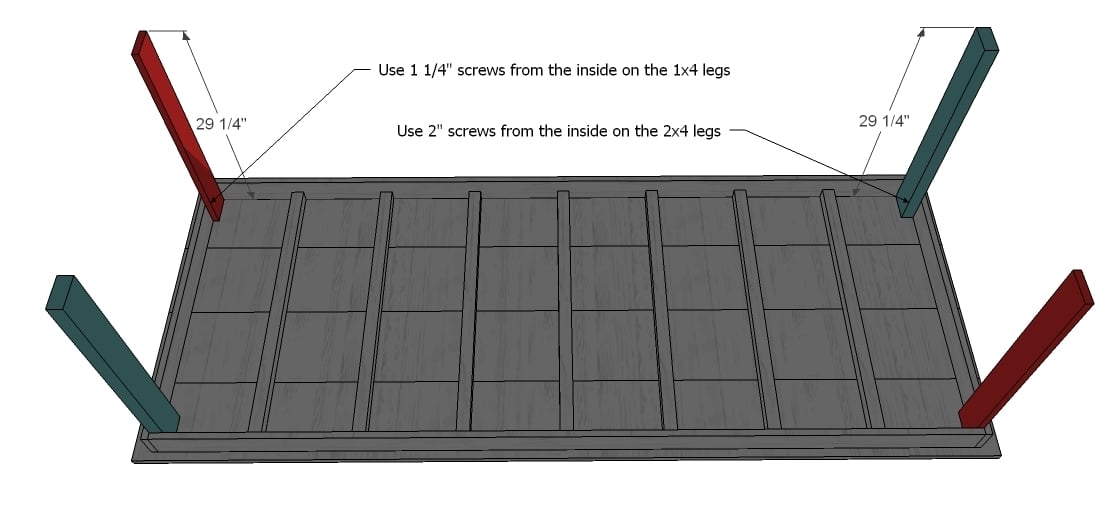
Legs. Fasten the 4x4 legs to the aprons from the outsides with the longer screws. Do not use glue if you would like the legs removable.
Step 5
Fill nail holes with wood filler. Sand, distress, and finish as desired. Then send Ana your brag photos!</p>


Comments
Shannon Lambert (not verified)
Wed, 03/17/2010 - 20:19
Sounds like a great magazine.
Sounds like a great magazine. Wonder if we have them here in Canada. Will keep an eye out.
Also, I find it funny that there is always a new post from you when I check my blog feed at the end of the night. Thanks for staying up late to get these posted.
Karyn @ Candar… (not verified)
Wed, 03/17/2010 - 20:28
o.k. I was about to leave
o.k. I was about to leave without leaving a comment, and scrolled back up the page... Your image you made... That is a stone floor! And your chairs have perfect fabric, AND there is shadow! Ana, YOU ROCK!!!
Heather (not verified)
Wed, 03/17/2010 - 21:12
Lowe's & Home Depot both sell
Lowe's & Home Depot both sell 2x3's for really El Cheapo studs. LOVE your blog!
hockamama (not verified)
Thu, 03/18/2010 - 00:42
thanks for yet another set of
thanks for yet another set of fantastic plans! my hubs and I (mostly the hubs) are in the gathering stage of making the farmhouse table, gleaning old barn wood from a friend. I can't wait to actually have it in my house!
p.s. I love, love, LOVE the black and white parsons chairs in your first photo! I would like to try my hand at parsons chairs one of these days...
Ana, I know I'm just one of MANY, but I can't tell you enough how much I adore your blog, and you. thank you for all you do for us!
TracyD (not verified)
Thu, 03/18/2010 - 01:16
I see that someone has
I see that someone has already stated that HD and L's carries 2x3's...and I have found that to be true also :)
Jeannine (not verified)
Thu, 03/18/2010 - 02:29
I got a copy of this magazine
I got a copy of this magazine a couple months ago for a long plane flight - it very much reminds of you!!!
I love the new table design I want to make a big long narrow table this summer for our lake house to keep outside. Would you use pressure treated if you were going to leave it outside?
Menards also carries 2x3', just bought some to use as supports for a desk we are making.
Keep up the good "fight" and the good work.
KBaker (not verified)
Thu, 03/18/2010 - 03:07
what's the estimated cost for
what's the estimated cost for this one? looks pretty simple. thanks!
Anonymous (not verified)
Thu, 03/18/2010 - 03:21
Thanks! I just found you last
Thanks! I just found you last week and have been obsessed ever since! I sold my table yesterday on Craigslist! Now I have to decide which of yours I am going to replace it with!!! Thank you!
Melodie (not verified)
Thu, 03/18/2010 - 03:50
This is *exactly* the table
This is *exactly* the table plan I drew up for myself last week. I hope to tackle it this weekend. Thanks for sharing!
Anonymous (not verified)
Thu, 03/18/2010 - 03:51
Looks easy. I would actually
Looks easy. I would actually do this for outside dining.
Serena (not verified)
Thu, 03/18/2010 - 04:52
Oohh... I really like this.
Oohh... I really like this. Now I have to decide between this and the Farmhouse table for our dining room.
Also, no pressure, but I can't wait till you post plans for the Parson chair. If you needed someone to test one out before you posted, I would totally do it for you. = )
Heather (not verified)
Thu, 03/18/2010 - 05:04
This mag looks similar to
This mag looks similar to Lowe's Creative Ideas, which I LOVE. I just subscribed - can't wait to get it!
Laura PARING DOWN (not verified)
Thu, 03/18/2010 - 05:58
Gorgeous - and you would be a
Gorgeous - and you would be a great fit for the mag!
Mike (not verified)
Thu, 03/18/2010 - 06:00
I don't normally find
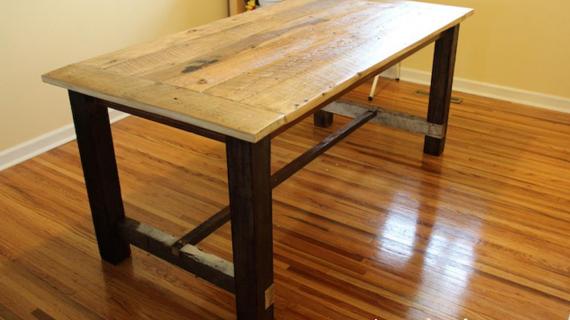
I don't normally find anything to question with your designs, Ana, but it looks like you left off part of the legs. Aren't they made with two pieces at 90-degree angles, rather than single boards? Sure looks that way in the photo.
Thanks for posting the cool plans. I get lots of ideas from you!
Mike (not verified)
Thu, 03/18/2010 - 06:15
BTW, I think you should
BTW, I think you should contact the magazine about doing some writing for them. It would gain more attention for your blog, and maybe for the book and the possible TV show.
Maria (not verified)
Thu, 03/18/2010 - 06:36
I agree with Mike, the legs
I agree with Mike, the legs lack a necessary 'chunkyness' both for the aesthetics and to eliminate some wiggle. Love this- I'm gonna build it with the 2 piece legs like in so many of your other plans. Humm... do I want to sandwich 2 2x4 or or do the perpendicular L shape? I've learned so much from you!
Ana White (not verified)
Thu, 03/18/2010 - 06:39
Just want to take a second
Just want to take a second and let everyone know you can build the legs however YOU like. My plans just tried to duplicate the photo, and of course you could throw in a 4x4 post or a turned leg that is 29 1/4" long. Would love to see someone build this with a turned leg! Just remember standard table height is 30"
And I learn something everyday! We don't have 2x3s, but we have 4x4s up here. Thanks for correcting me, everyone!
orange sugar (not verified)
Thu, 03/18/2010 - 06:45
Wow 100 miles to the nearest
Wow 100 miles to the nearest bookstore. I love Fresh Home magazine!
Any tips on where to find turned legs like the one on this table?
http://tinyurl.com/ygkbpu4
Samantha Levang (not verified)
Thu, 03/18/2010 - 06:48
Candle wax?? How exactly
Candle wax?? How exactly does it affect the paint? Can someone explain this to me?
Mary (not verified)
Fri, 03/19/2010 - 11:27
I went to the bookstore (the
I went to the bookstore (the very same one you went to, in fact!) to pick up a copy of this magazine. And while I did like it, I must admit I was disappointed with the "Hire or Do It Yourself?" article. They recommended hiring someone for almost everything! I personally plan to do most work on my house by myself, and it makes me sad that really only recommended painting walls.
McMomtolots (not verified)
Sat, 03/20/2010 - 03:36
By the way...you are amazing
By the way...you are amazing and I am so excited to get my 15yo daughter working on some of these projects! Thinking it would be neat to have the kids learn such a practical skill.
Anonymous (not verified)
Sun, 03/21/2010 - 11:09
Too funny! I bought this very
Too funny! I bought this very magazine for the first time EVER the same day that you posted about it. I loved the magazine - lots of great inspiration photos. I've been reading your blog for a couple of months and the list of projects I am planning to make keeps getting longer! I just need to find a way to borrow or buy a nail gun first! Thanks for all the awesome plans. I passed on your blog to a friend with a tight budget, a love for PB furniture and a handy husband and she is very excited! When I build my first piece - I will send a photo!
Jennifer
aimee.franklin (not verified)
Fri, 04/09/2010 - 09:07
Would love to build this
Would love to build this table- what is the approximate cost??
Thanks!!
-Sydney- (not verified)
Tue, 05/04/2010 - 03:50
Would it be possible to put
Would it be possible to put the legs a little further in from the corners? I mean so you would have a ledge of sorts overhanging on either end. I suppose you'd have to make the underframe shorter to do this. . .hmm just thinking. I LOVE your site and am so excited to get started on some projects this summer!
Gretchen (not verified)
Sun, 05/09/2010 - 03:30
I cant wait to try this--I
I cant wait to try this--I want to make the table 48" wide--how do I extrapolate the plans to make that work???
Christy (not verified)
Tue, 05/11/2010 - 06:46
hmmm I think if I make it
hmmm I think if I make it taller and use 4x4s for the legs and then make the top smaller...it just might work for a work surface/table in my laundry room! then I'll be able to slide laundry sorters under it! thanks ana!
Lost in the Laundry (not verified)
Mon, 05/24/2010 - 18:21
I'm in the process of making
I'm in the process of making this table and have run into a "hmmm...I wonder how to handle this" question. Let me state that this is my first project ever, so I'm a newbie. My problem is that there are gaps between my table top boards. What is the best way to minimize the gaps? I've sanded a little here and there, but I'm beginning to wonder if I'll ever get these boards to lay nicely side by side w/o gaps. I started with straight boards, so that shouldn't be too much cause for my error. Also, how should I fill any little gaps - wood filler or some sort of rubber sealer? Any suggestion would be welcomed. Love the website Ana - its inspiring!
Kelley (not verified)
Tue, 06/15/2010 - 13:21
Ana- you are awesome! I am
Ana- you are awesome! I am almost finished with my first project- the bankable bookcase for my baby's room, and am looking for project #2- a dining table!
Has anyone made this table wider? I am thinking about adding 10'' to the width of the table, and was wondering if anyone has had success with that! Thanks!
Ana White (not verified)
Fri, 09/17/2010 - 11:35
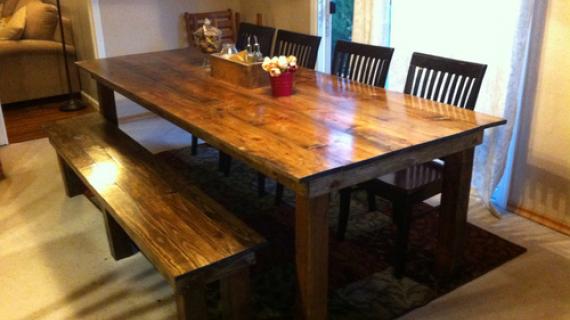
Check out Carri's Table!
Check out Carri's Table!

Ana White (not verified)
Fri, 09/17/2010 - 11:40
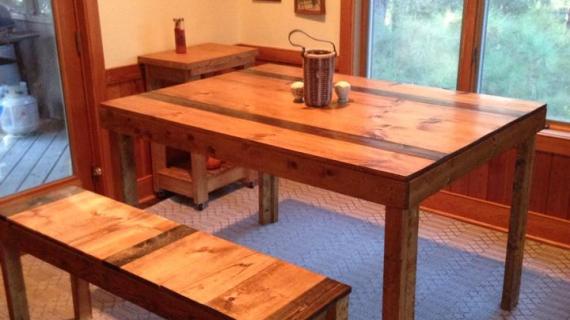
And Amy's Table!
And Amy's Table!

Ana White (not verified)
Fri, 09/17/2010 - 11:48
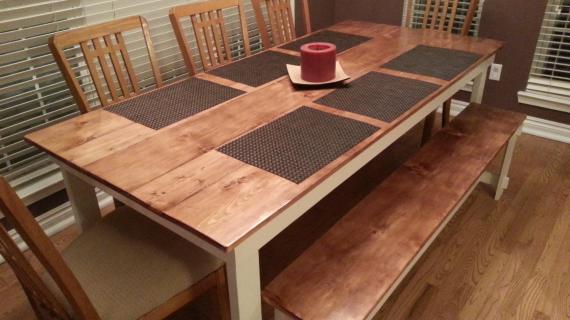
And another table from Jaime!
And another table from Jaime!
thedigipix (not verified)
Sun, 09/26/2010 - 12:10
So For those who have built
So For those who have built this table Can someone please post the total Cost?
kimmy (not verified)
Tue, 11/02/2010 - 20:44
What type of wood did you use
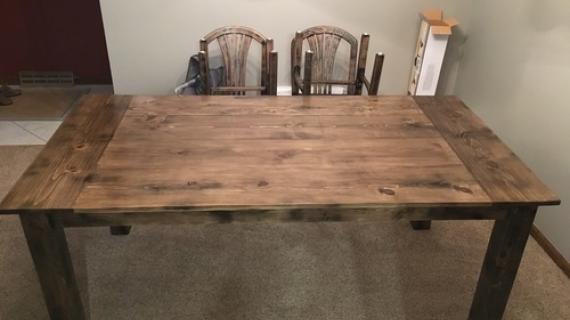
What type of wood did you use for the top picture?
Did Jamie use the same type of wood on her table?
Also, what color stain?
AHh too many questions. Sorry! I'm starting to build this table with my Uncle on Saturday. It's a surprise gift for my parents for Christmas. They have been searching for "the perfect" dining room table. Well I say, what's better than a homemade one? right? :D Any help would be awesome and very much appreciated!
Stacy (not verified)
Fri, 11/12/2010 - 17:42
Where are the plans for these
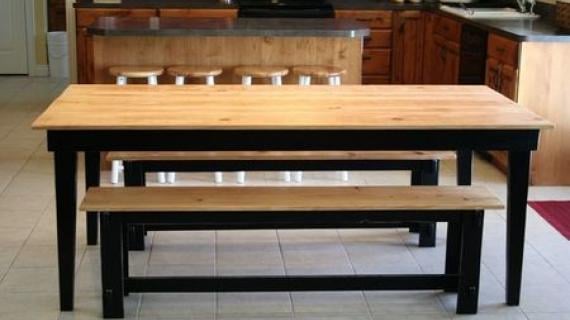
Where are the plans for these benches that I see in the sample photos? Are they Ana's or are they somewhere else?
Brad (not verified)
Sun, 12/05/2010 - 13:00
One issue I have with these
One issue I have with these plans is that it lists the 1x10s as 9.5" wide, but they are actually 9.25" wide. This means instead of having 1" of offhand on the sides you only have 1/2" overhang, which isn't really enough. We threw a 1x4 into the middle (since we had already built the apron/supports before we noticed) and it turned out fine.
Also, it says to cut 8 2x2" under table supports, but the plans only show 7 of them being used.
Overall, the table was simple enough, and it turned out great. We shortened it to only 6' long, but only because our dining room wouldn't handle the full 8'.
Rooms You Can … (not verified)
Mon, 12/13/2010 - 17:06
[...] a dining table from
[...] a dining table from these plans. To see the entire house, you can go [...]
Bren (not verified)
Tue, 12/14/2010 - 20:41
Great table! Thanks for the
Great table! Thanks for the plans.
We are thinking of making this table but would like the final height to be counter height (36 inches). Can we just lengthen the legs? Or will other modifications need to be made?
HAddison (not verified)
Thu, 01/06/2011 - 07:40
I'm thinking of building
I'm thinking of building this, but with 4x4s for the legs, but I was wondering do the cross supports need to be lengthened for a 4x4 leg?
shaunk (not verified)
Mon, 01/10/2011 - 06:26
new to this site, but I have
new to this site, but I have been lurking for a few weeks. I have built a couple of things from your plans. Here is the rustic table with rustic benches unfinished. The only thing I might change are the legs. I think I am going to replace what I have on the table with 4x4's. http://farm6.static.flickr.com/5122/5342733689_cf577ea7f1_b.jpg
Jenna (not verified)
Wed, 01/12/2011 - 08:45
I cannot wait to make this
I cannot wait to make this table, it is just what I have been looking for for our dining room. The only problem is that our dining room cannot support that size. How would I modify this plan to make it 5' long? Thanks for any help :)
annie (not verified)
Tue, 02/15/2011 - 07:50
my husband is currently
my husband is currently making this table and we ran into the same problem as brad- he is adding a 1X6 in the middle as I wanted a little bit more of an overhang.
he also made the legs 4X4's and we went spendy on the table top. so far the approximate cost is $175dollars.
Kristy Burns (not verified)
Sun, 05/29/2011 - 10:18
What Magazine?
What magazine is everyone talking about? I can't find anything on this page giving a name... It sounds fantastic though and something I'd like to get me hands on.
Josh Souder (not verified)
Fri, 12/02/2011 - 19:12
Need help table toooooo wobbly
ok. I made it! it rocks!!!!! Just the table. I used 3 1/2 by 3 1/2 legs that screw into a screw in plate I put on the bottom. Problem... table wobbles! even when legs are screwed on as tight as possible. Now... there is nothing on the table yet, which will help. Is it just that it's 8 feet long? I mean, these legs are THICK! Please help!!!!! These legs HAVE to be removable for storage... thanks so much!
In reply to Need help table toooooo wobbly by Josh Souder (not verified)
MikeB
Fri, 12/02/2011 - 20:18
just a thought....
Can you determine which leg is the problem? Is one a little shorter then the rest on a level surface? By shorter, I mean, one side of the table may be a little out of square. If you used store bought table legs, I am sure they are all the same length.
Is it possible to put washers between the table and the plate to lower that plate enough to get the leg firm to the floor with the rest of the legs? Might be able to put washers on the thread of the table leg (between the plate and the leg) as a way to "test". If the washers are hidden, then just leave it. If not you may need to add the washer between the table and the plate. Hope this helps. Just throwing out ideas...
claydowling
Fri, 12/02/2011 - 20:21
Wobbly Legs
If you add weight to the table you'll just change the frequency of the wobble.
Your problem is that the attachment isn't secure. If I understand what you've done correctly, you are trying to use a screw into end grain to secure the legs. That's not a secure joint.
There are a few ways to make a secure leg joint, and they all rely on mechanically making sure that it's impossible for the leg to move. I have a photo of one method I've used at knockdowndesk.com. I also talk a little bit there about some of the lessons I learned about making a secure leg joint, because my first efforts were not a raging success.
caronhjc
Wed, 12/21/2011 - 00:35
Plans for benches
I would like to build this table and at the same time build the benches that go with it. Are there any specific plans that go to this Rustic Table? Please let me know. Thanks.
In reply to Plans for benches by caronhjc
spiceylg
Wed, 12/21/2011 - 04:39
Bench plans
How about this?
http://ana-white.com/2010/01/plans-rustic-bench-pottery-barn.html
j (not verified)
Wed, 06/27/2012 - 17:09
would it be possible to make
would it be possible to make this table into an island by extending the legs?
PA PA B
Wed, 06/27/2012 - 17:50
Also need help with atable top
I have made the Providence table twice using the lumber in the plan However, the table tops (2x6) are not level with each other. I inspect the lumber at the yard. I do not have a planer, but the plans do not call for that tool.
What am I to do? or other words what am i doing wrong and how can i fix it?
emwins (not verified)
Mon, 07/09/2012 - 23:47
HELP!
Hi Ana, thank you for making woodworking seem so accessible and affordable to all! This is my first EVER project, which I started in order to teach myself some basics- I am not a very detail-oriented person, and I thought carpentry would help me develop that attention to following steps! Well, it didn't work that well, and I ended up drilling all the planks for the top of the table from the top down, instead of bottom-up! I have screw tops all over my table, but since I used the countersink bit as instructed, there is enough of a space to fill it with wood putty. However, the wood putty looks awful and it got crumbly, I guess I should sand it down and re-fill it? Also, won't it look awful when I stain it and it's covered in funny-looking polka dots?
epic fail.
Obviously I am learning a lot as I go and the next time I attempt one of your projects I will read all of the directions through TWICE before attempting.
thank you!