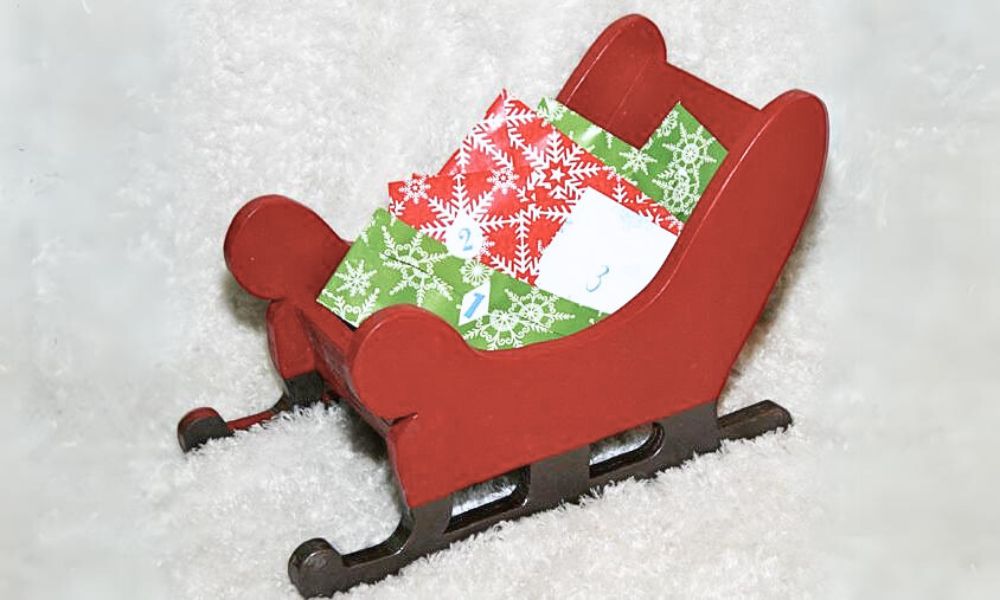


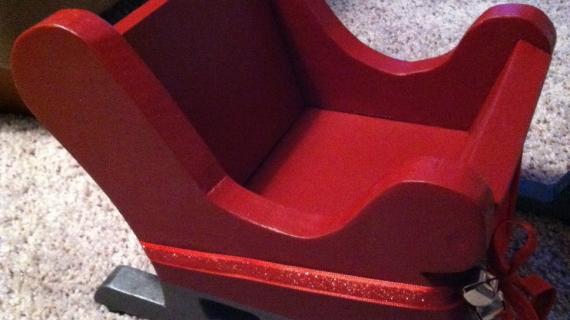
Free plans to build as small wood sleigh! Perfect as a Christmas Decor piece, can hold cookies, letters to Santa, and more!


Isn't this wood sleigh simply darling?

Another idea? Why not wrap up little boxes of gifts and stack to make an advent calendar?

Here's from Rebecca:
We are introducing an elf to our Christmas family this year. I love traditions and fun things I can do with my kids. I have it all planned out and wanted a cute special way to have the elf arrive at our home. My mom had a Santa sleigh decoration that I loved growing up. It looks so cute with a little Santa in it and a few little gift wrapped packages. I knew I wanted to make one if I could. I was going to get it done on my own but thought I would email Ana and see if she wanted to draw up a plan for everyone to enjoy. She is amazing and did it super quick.
The plan is fairly quick but takes a bit of sanding to get the details to look nice and smooth. I did complete this with a jigsaw but some of the angles are pretty tight. It might be easier with a band saw. The entire thing is wood but I painted the "legs" with a metalic paint. I think it is so stinking cute I love it. It fits just right for my little elf, or for some 25 days if Christmas envelopes. Or it is pretty stinking cute with a little 5 month old along for the ride!

Preparation
- 1 - 1x12 @ 3 feet long (you can use plywood here too)
- 1 - 1x8 @ 2 feet long (any width board or plywood could be used - just keep the widths consistent - shown in plan with 1x8 width)
- 1 1/4" screws or brad nails and glue
- 2 - 1x12 @ 18" (or 2 3/4" plywood @ 18" x 11 1/4")
- 1 - 1x8 @ 7" (bottom)
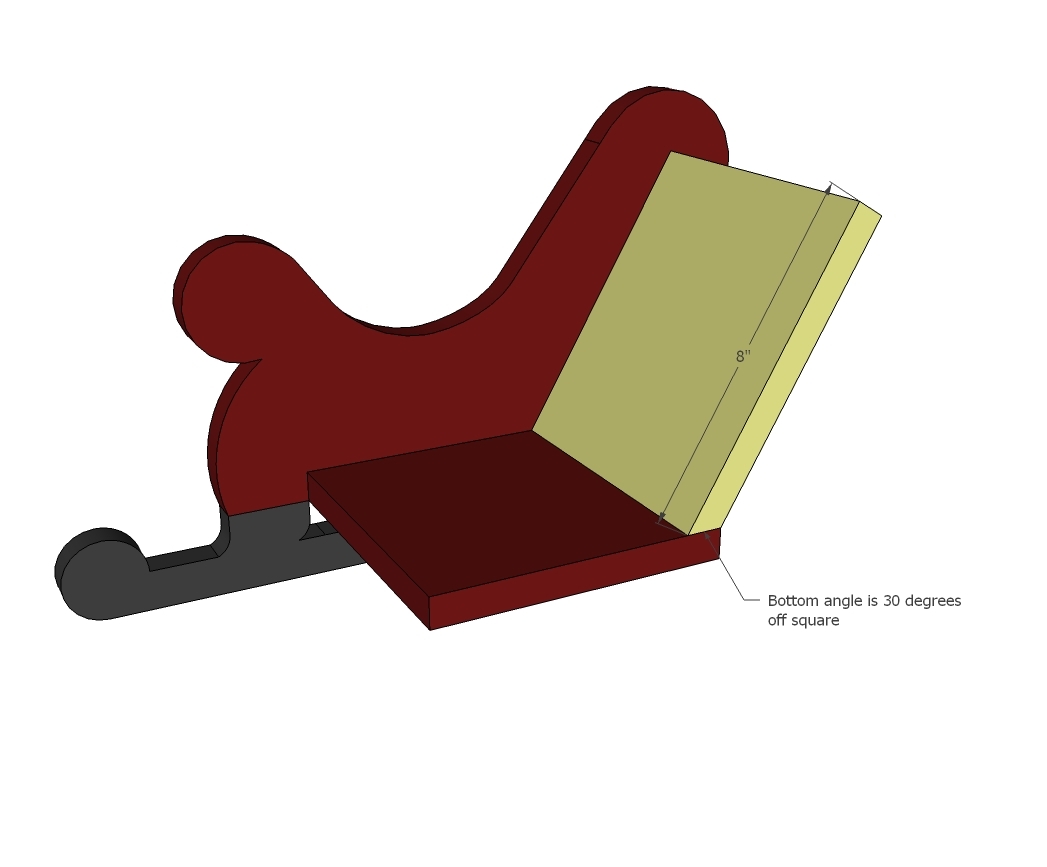
- 1 - 1x8 @ 8" (longest point, cut bottom edge at 30 degrees BEVEL off square)
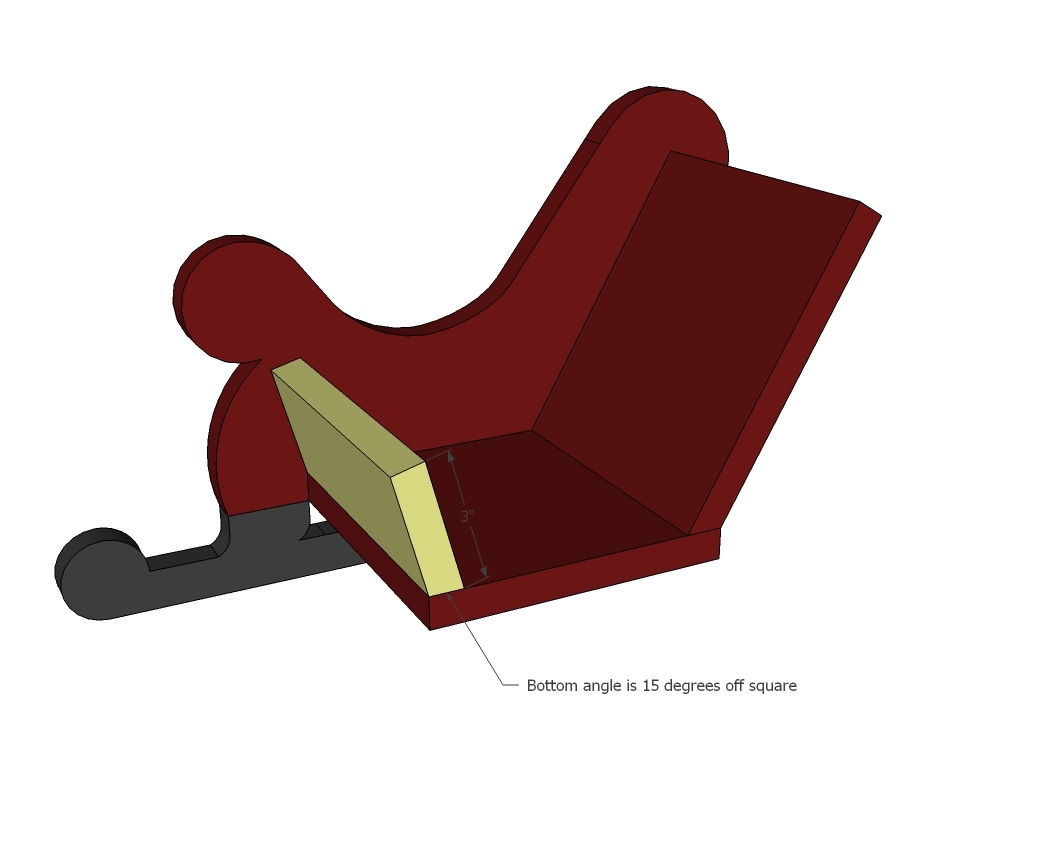
- 1 - 1x8 @ 3" (longest point, cut bottom edge at 15 degrees BEVEL off square)
NOTE: If you don't have a miter saw, these edges could be cut square - you'll never see a difference on the outside, but the insides won't match up perfectly)


Please read through the entire plan and all comments before beginning this project. It is also advisable to review the Getting Started Section. Take all necessary precautions to build safely and smartly. Work on a clean level surface, free of imperfections or debris. Always use straight boards. Check for square after each step. Always predrill holes before attaching with screws. Use glue with finish nails for a stronger hold. Wipe excess glue off bare wood for stained projects, as dried glue will not take stain. Be safe, have fun, and ask for help if you need it. Good luck!
Instructions
Step 1

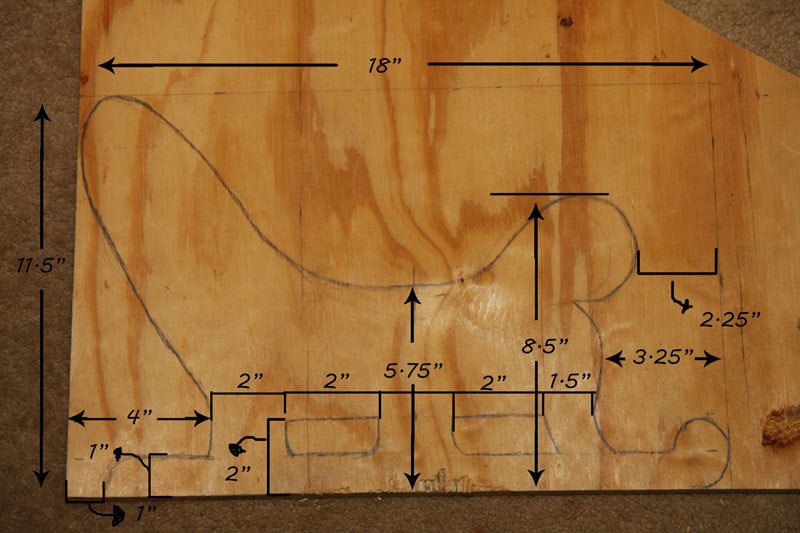
Start by printing out this diagram and tracing on to your 1x12. You don't have to cut it out, you can just use a ball point pen over the paper, pressing firmly. It will leave a small indent in the wood.
Set your printer to print actual size. You can also use the PDF (above) to print from if that works better for you. If you don't have a printer, I've also included Rebecca's wood sketch at the end of this plan that you can use to draw your own sleigh pattern.
Some tips - try using a drill bit the size of your jigsaw blade to drill holes at all starting and stopping points so all you have to do is connect the dots with your jigsaw. Use clamps to hold the board down. Just go slow and pause as you go.
The main thing with a jigsaw is just to go slow, make sure that blade isn't beveling, and use the right blade. Here's a little video I put together on jigsaw cutting curved cuts:
Be safe!
Step 2

NOTE: It may be easier to paint pieces first.
Once you get your two sides, it's easy peasy from there out. Attach bottom so it's flush to first opening on sleigh legs. You can use nails, countersunk screws or Kreg Jig - it's up to you here. If you use nails, use glue.
NOTE: For a wider sleigh, use a wider width board!
Step 3
I took the sleigh side out just for demonstration purposes. Fit the back in and nail and glue in place.
Step 4
And then fit the front in and nail and glue in place.
Step 5
It is always recommended to apply a test coat on a hidden area or scrap piece to ensure color evenness and adhesion. Use primer or wood conditioner as needed.
Comments
Cindy W (not verified)
Mon, 11/26/2012 - 13:44
I just love so many of your
I just love so many of your patterns. My husband has been really busy making your doll bed and picnic table for our granddaughters AG doll. I just informed him that he has "one" more project. He did a small groan and told me to print it out. LOL
Thanks for all the great patterns!!
Cindy
John B - Cubmaster (not verified)
Mon, 11/26/2012 - 18:16
Love it! May spend my day off
Love it! May spend my day off cutting out a dozen of them to make kits for my cub scouts.
Idea 1:
Turn the 1X8's the other way and you can make it as wide as you want and it will be stronger too. (and in my case, I can rip the edge of an 8 footers on the table saw and then use the chop saw to make 12 of each.)
Idea 2: Scale it up using 3/4 inch plywood sides and some 2X4 and 2X12 and turn it into a bench.
JoanneS
Mon, 11/26/2012 - 18:32
Completely Adorable!
This is just sooo cute! Love it as the scenery for Christmas baby pictures. I just looked up the elf on the shelf tradition, what a hoot!! :) Happy Holidays!
redhead_61
Tue, 11/27/2012 - 16:39
OH ANA!
This plan turned out SO amazing. Thank you for turning my 'rough drawing' into an amazing plan for everyone to enjoy.
My five yr old did see this in the garage being worked on and I told her it was a big surprise. I think that the story I told her held and she still is excited about the "magic" of it all! THANK you.