


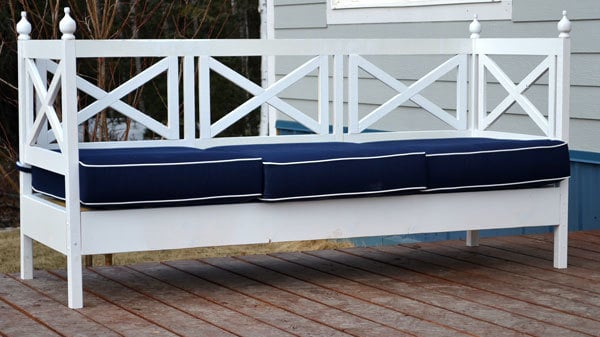
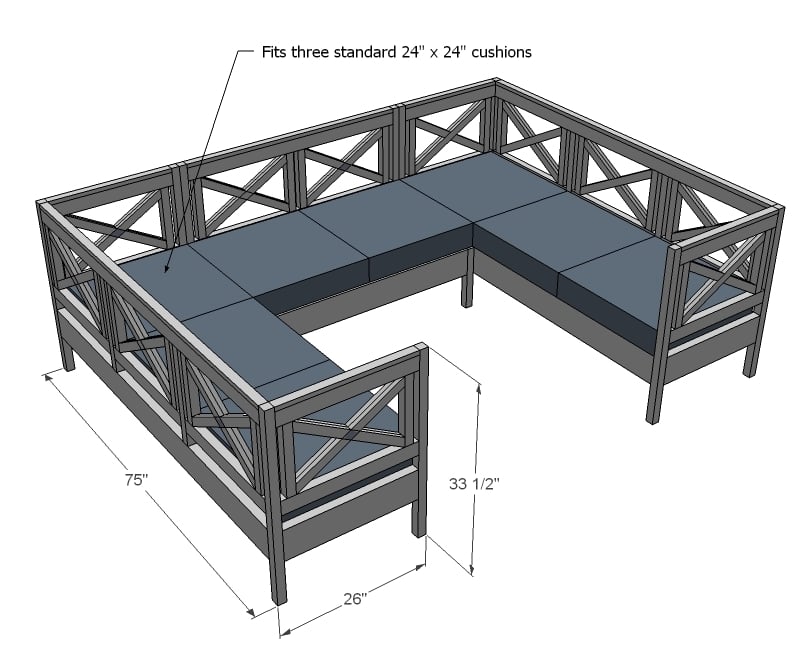
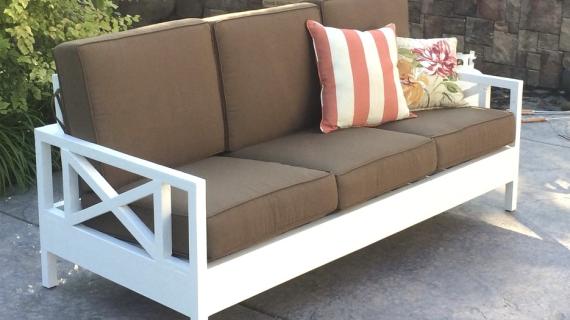
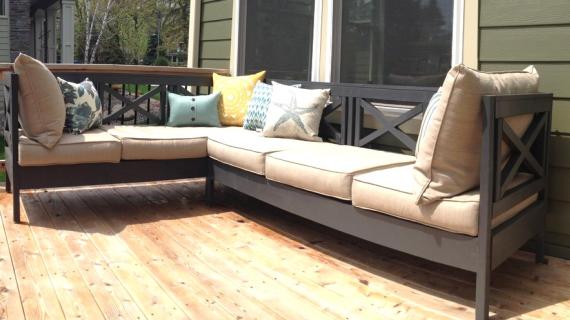
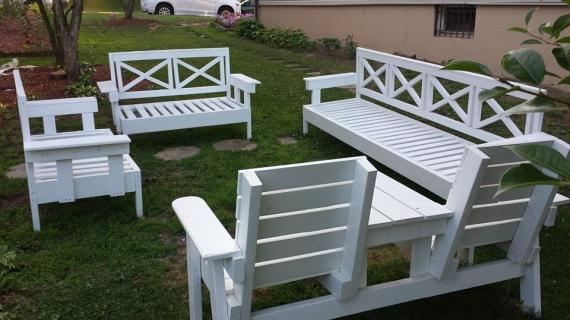
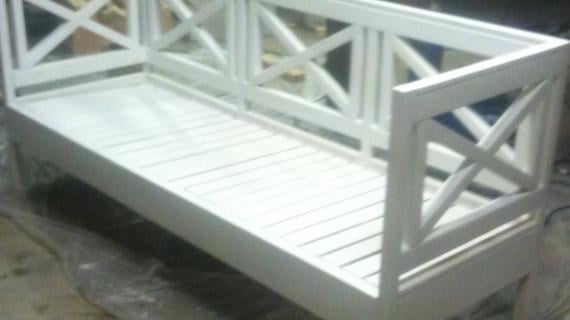
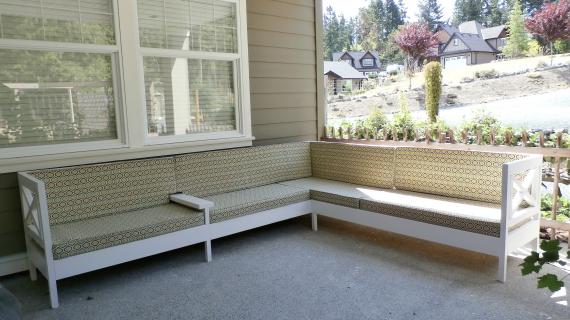
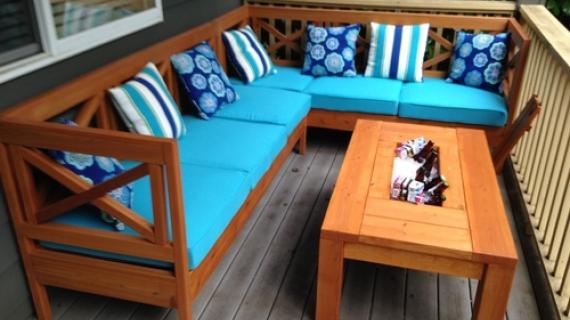
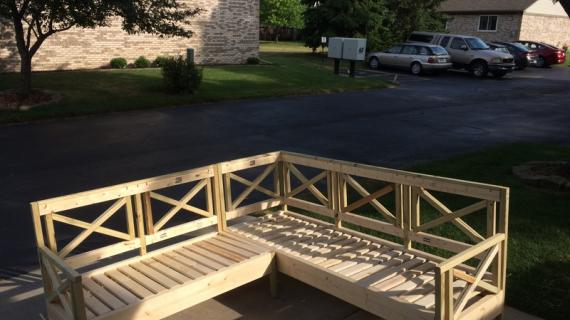
The sofa for the Weatherly section. Featuring large X styling, finials, and can work to create a sectional.

I'm pretty excited about today's post . . . but first, I gotta give you good reason why the piping on my cushions don't quite line up


Preparation
7 - 1x2 @ 8 feet long
10 - 1x2 @ 20 13/16" (Large X pieces - cut both ends at 30 degrees off square, ends PARALLEL to each other)


Please read through the entire plan and all comments before beginning this project. It is also advisable to review the Getting Started Section. Take all necessary precautions to build safely and smartly. Work on a clean level surface, free of imperfections or debris. Always use straight boards. Check for square after each step. Always predrill holes before attaching with screws. Use glue with finish nails for a stronger hold. Wipe excess glue off bare wood for stained projects, as dried glue will not take stain. Be safe, have fun, and ask for help if you need it. Good luck!
Instructions
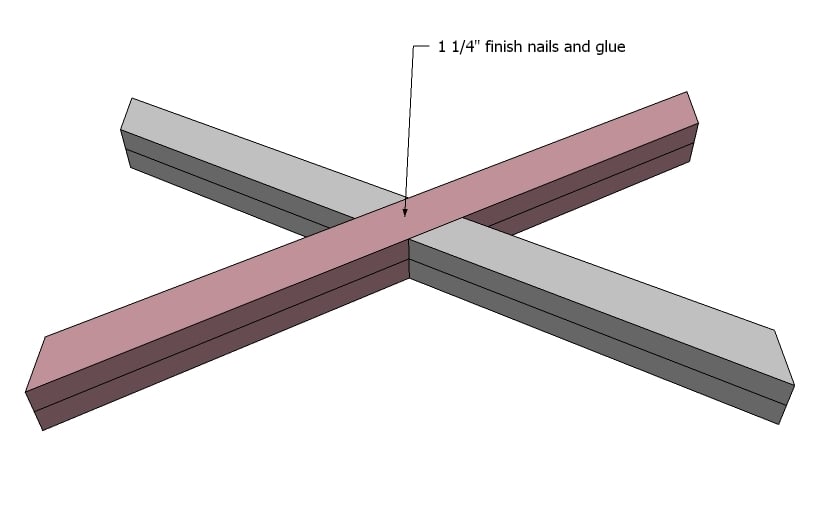
Step 1

Start by nailing the shorter angled 1x2 pieces to the longer 1x2 pieces as shown above. Test to make sure that you can fit a 1x2 in the middle (see next step). You will need to build ten of these.
Step 2
Then take the ten halves and make five big Xs as shown above. Lay the Xs on top of each other to make sure they match.
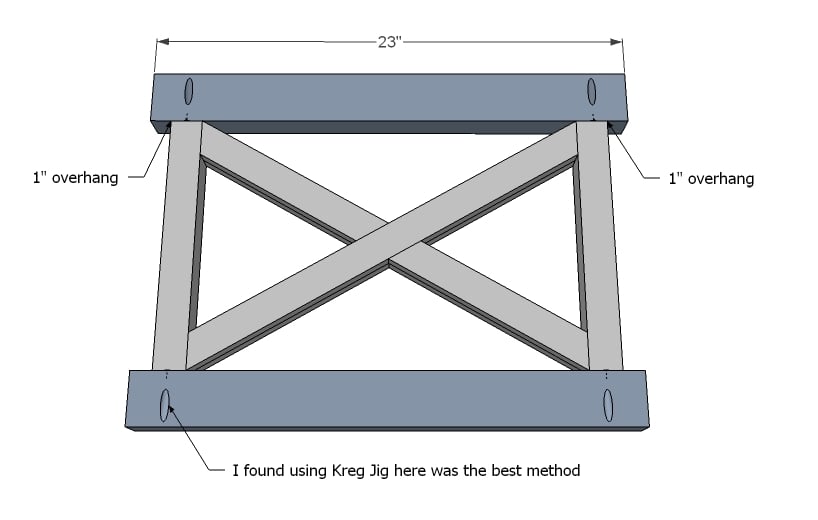
Step 3
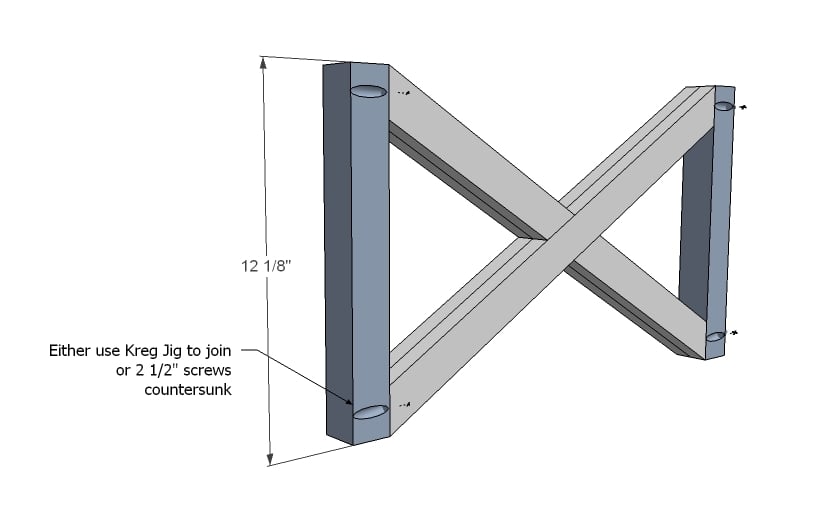
On all five of the Xs, attach the 2x2s @ 12 1/8" as shown above. You can either use the Kreg Jig™ (set for 3/4" stock and 1 1/4" pocket hole screws - it's okay if the pocket hole "hangs over" the edge of the board) or 2 1/2" screws or finish nails and glue to attach.
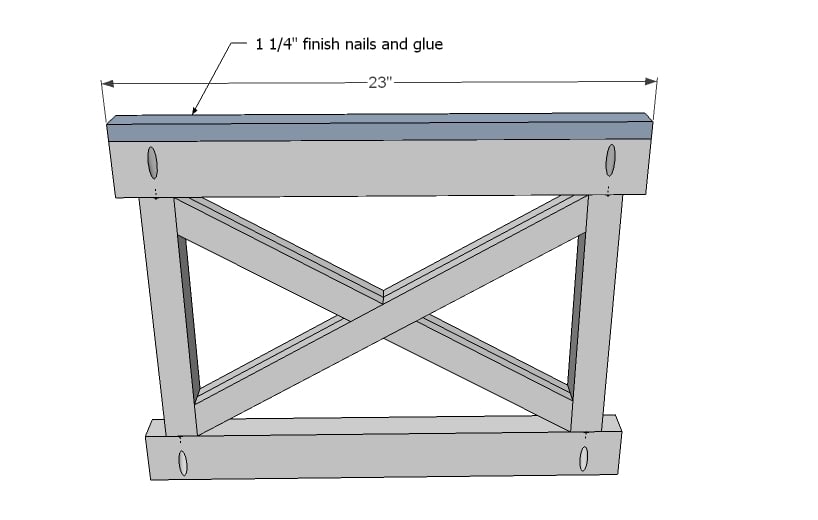
Step 4
On two of the X pieces, attach tops and bottoms from 2x3s as shown above. I used the Kreg Jig™ as shown above.
Step 5
Step 6
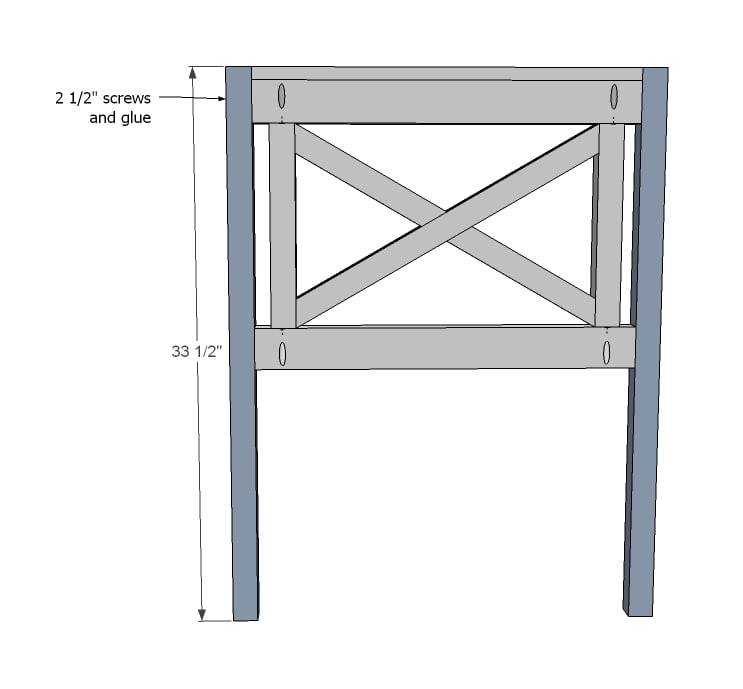
Now add legs to the two ends that you are working on as shown above.
Step 7
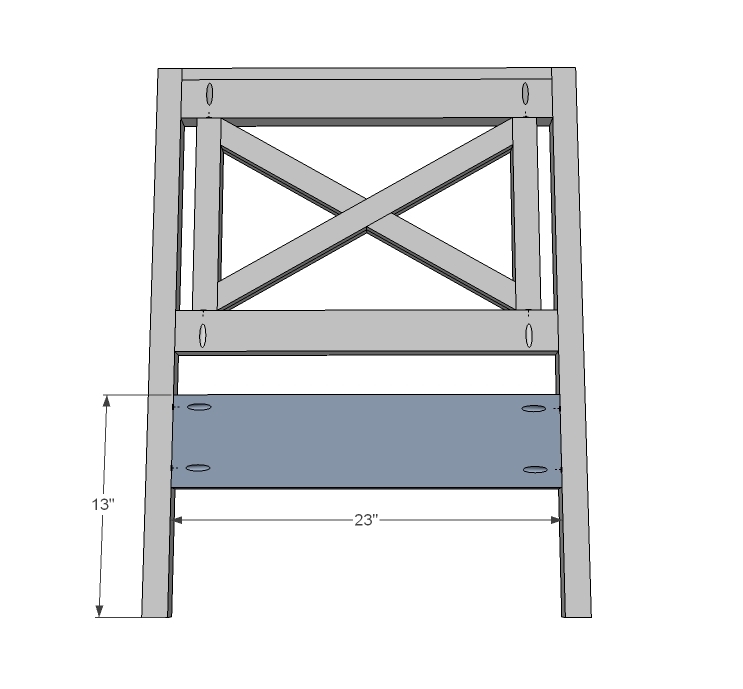
Finish the two ends by adding the 2x6 as shown above. You can either use the Kreg Jig™ or 2 1/2" screws countersunk from the outside. Set the two ends aside.
Step 8

Next, you will need to construct the back. I laid all the pieces out and marked the joints, and drilled pocket holes with my Kreg Jig™ set for 1 1/2" stock, with 2 1/2" pocket hole screws. Check to make sure everything is square. This is definitely the longest step, but take your time - it's important to get this back right.
Step 9
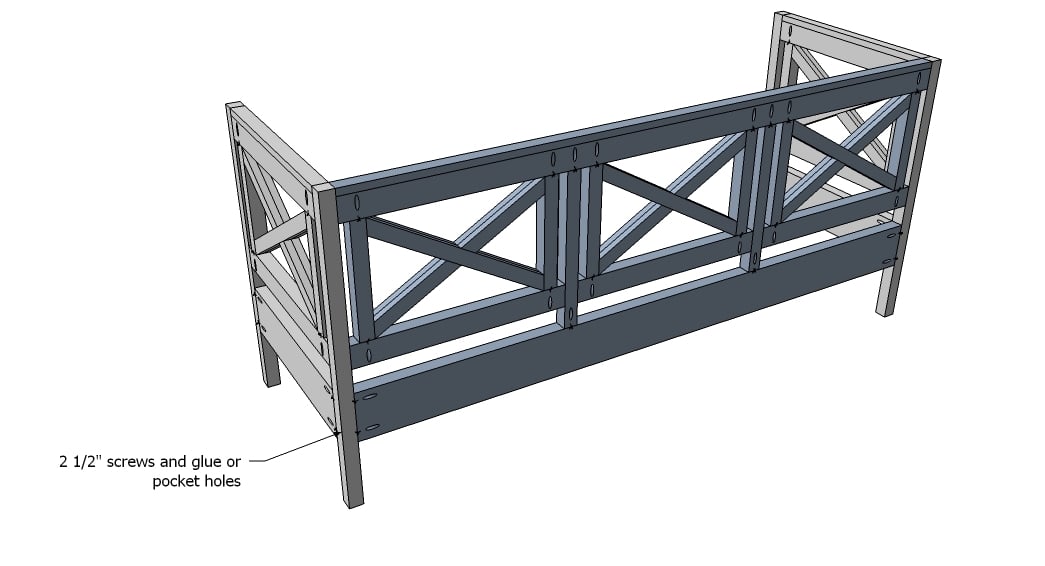
Once your back is finished, you can attach it to the sides. I used 2 1/2" screws and glue. Adjust for square.
Step 10
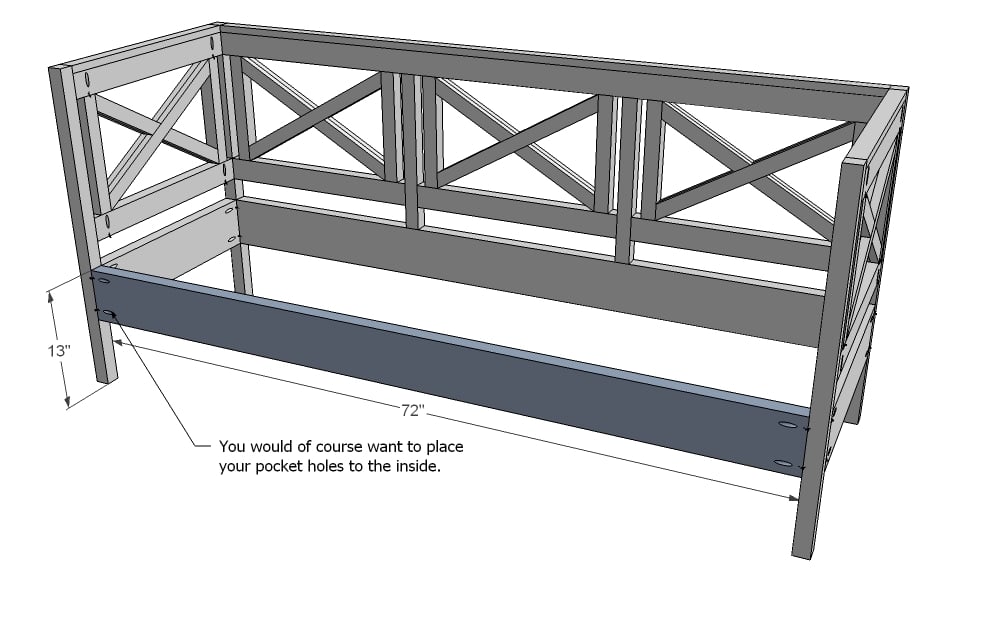
Finally, attach the front rail.
Step 11
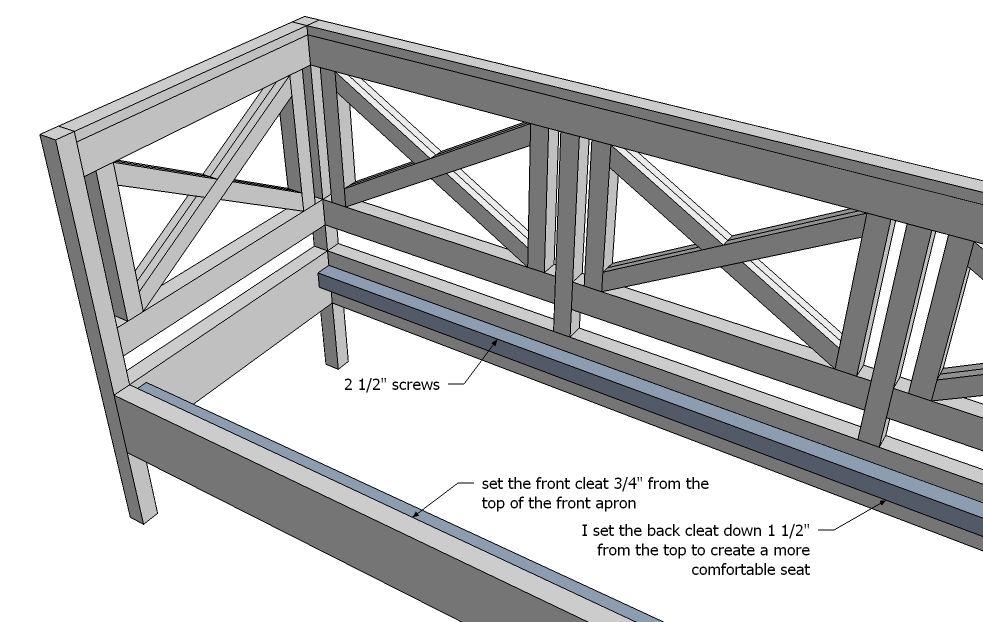
Now it's time for the cleats. One trick that I did different than the loveseat, I lowered the back cleat a tad, so the seat reclines slightly. I found this made the seat much more comfortable.
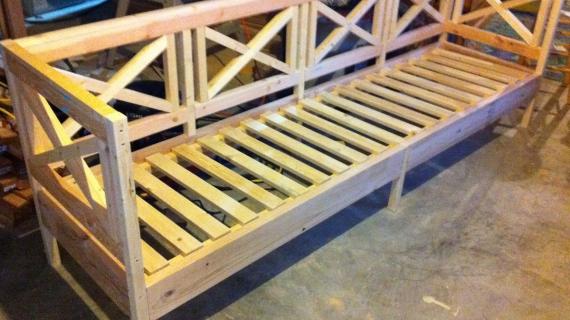
Step 12
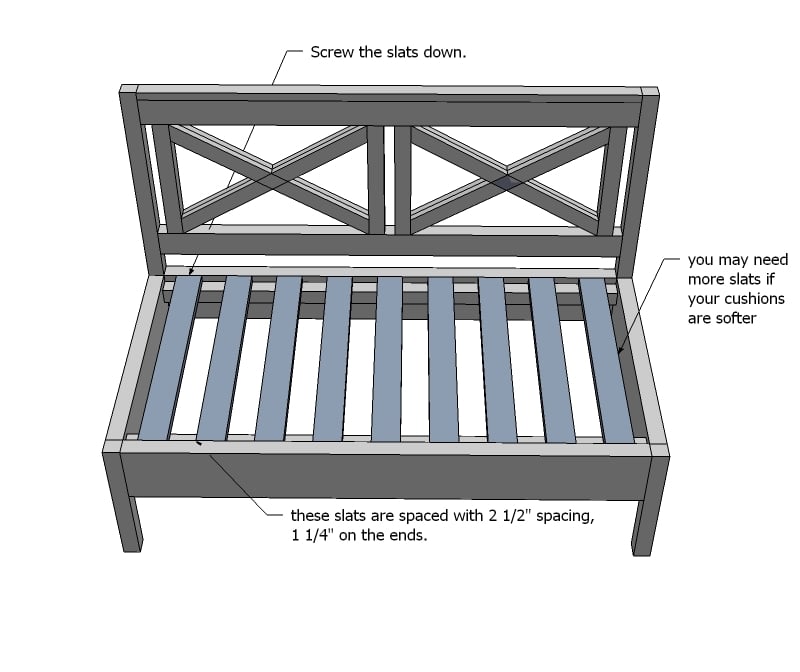
Now lay your seat slats. Screw down. (image from Loveseat) You may need to add more seat slats depending on the firmness (or softness) of your cushions.
It is always recommended to apply a test coat on a hidden area or scrap piece to ensure color evenness and adhesion. Use primer or wood conditioner as needed.
Comments
Kim Breier (not verified)
Tue, 04/19/2011 - 21:06
RH Cushions
Hi Ana-
In reply to RH Cushions by Kim Breier (not verified)
Ana White
Tue, 04/19/2011 - 21:37
I called too!
I thought the same thing and called and actually insisted on having the rep open the box and confirm that there was a full set of cushions (three box seats and three box backs) for $189. Didn't believe it until I actually got the box!
Nora (not verified)
Tue, 04/19/2011 - 21:22
Awesome!!!
Sara Jayne (not verified)
Wed, 04/20/2011 - 02:06
Seems meant to be ...
... except I am in Canada and the shipping will cost me $195 - $295!!! I have been dreaming of an outdoor sofa for the last 5 years and this year decided I would like a colour scheme outside of primarily navy and white with some spring green and beige thrown in. So these cushions would be perfect, if only free shipping applied to me! Still want to make the bench though, it really is gorgeous. I just have to find cushions elsewhere or make my own. On another note, how sad am I to see that there is less snow in Alaska than in Alberta LOL!
Tsu Dho Nimh
Wed, 04/20/2011 - 07:50
That can't be Grace! She's
That can't be Grace! She's not wearing pink.
Great furniture, and the cushions are on sale all over town as we move into summer here.
Ian (not verified)
Wed, 04/20/2011 - 10:46
Thanks A TON!
Ana, just wanted to thank you from the bottom of my pocket book! I've been looking for cushions for weeks to build your simple sectional, I've already got some loungers. These cushions are cheaper than you can make them for! I too called and the rep confirmed that they were 6 cushions per lot, Making them just over $30 per. I've been a long time reader and today it's really paid off. Thanks a million and keep up the great site!
Guest (not verified)
Wed, 04/20/2011 - 14:13
Cushions
I just saw indoor/outdoor 24x24 cushions, probably 8in-1foot thick, at Costco for $19.99 each. I know they're probably not as nice as the RH ones, but they're only $20 each. :)
Ian (not verified)
Wed, 04/20/2011 - 14:20
if you're looking for 6
if you're looking for 6 cushions, These are only $10 more than the flimsy 1" thick ones at your costco...totally worthy, just sayin
Ian (not verified)
Wed, 04/20/2011 - 14:22
sorry re-read your 1 FOOT
sorry re-read your 1 FOOT thick.... thats not a bad price then!
Guest (not verified)
Wed, 04/20/2011 - 14:14
Just saw the $189 was for 6,
Just saw the $189 was for 6, I thought it was for 3. Wow...that really is an amazing deal!!
34me
Thu, 04/21/2011 - 03:22
I love it!
I love love love it! And I love the navy cushions. It looks fantastic!
wiscousonian (not verified)
Tue, 05/10/2011 - 11:49
Sweetness
Just got my cushions! WOW these things are great! Hopefully some others got in on the super pricing! Now off to build the sectional for them.
spiceylg
Mon, 05/16/2011 - 09:26
Weight limit?
Hi Ana, do you know what the weight limit would be per couch? I would really like to build a whole sectional, but it will have to be able to hold bigger people and I wondered if I would have to reinforce by using thicker lumber like 4x4s instead of 2x2s, etc. I would appreciate any advice!
Ana (not verified)
Mon, 05/16/2011 - 09:56
As far as a weight limit . .
As far as a weight limit . . . I can't give you an exact number, but I can tell you my family has no issue, and the RAM weighs over 200 pounds.
If you are concerned about weight, I would recommend adding additional "legs" under the seats. You would do this by running 2x4s (two would be good) below the slats/cleats, and then adding a leg (could be a 2x4) under it. That way the weight is resting right on a leg, but you do not have to change the styling.
Guest (not verified)
Tue, 05/17/2011 - 14:01
Problems with Step One
I am having trouble with step one and the cut measurements I did. I did the cut list exactly as described for the 1x2 pieces and they look exactly like the picture shows, but if you leave the 1.5" gap in between for the crossing board, the wood does not match up on the two layers and hangs off the edge. I have re-measured everything several times and had others look at it too. Is the 1x2 that is cut 20 13/16" supposed to actually be longer and it was a typo? It seems I am off by about 3/4". Any help from Ana or anyone else is appreciated! I love this design and am eager to figure something out and make it work!
Guest (not verified)
Sun, 05/22/2011 - 18:59
The measurements worked for
The measurements worked for me. Are your angles right? Also heads up,paint/stain this before you put it together. I couldn't make up my mind on a color and painting it assembled is a nightmare...but it's a dream to have this awesome sofa!
Thank you Ana for all your hard work. You're amazing!
Guest (not verified)
Sat, 06/11/2011 - 13:40
Same problems with the measurements!
Bummer. I have the exact same problem with step one! Did you figure out the problem because my measurements are the exact same and I can't figure out what happpened. Did I use the wrong size wood?
Urg. Thanks for any advice anyone can give. FYI, Walmart has 24"x24" cushions for $24.00 each. They are 5" thick too. Just ordered some hoping I could get the sofa made before they get here.
cs (not verified)
Wed, 08/17/2011 - 11:04
Question:
I'm going to attempt to build this with my husband. What is the best type of wood for long-term outdoor use? Does anyone put anything on the wood to keep it from splitting, etc?
I've never built anything in my life, so any and all help is greatly appreciated :)
LanceThruster (not verified)
Thu, 01/05/2012 - 11:54
weather proofing
I haven't used it yet but I plan to get a product called "Cedar-Shield" which seems to be a very effective and economical treatment for sealing and restoration. Let me know if you have any difficulty in finding it on your search engine (I use dogpile.com).
Since I am in the California high desert where weathering can be intense (all four seasons), I also plan to have material on hand to put a "new skin" over the old one when required (more applicable to my crate projects than this sofa frame but still relevant). I save various styrofoam packaging to create insulation walls as well as repurpose all sorts of plastic and aluminum from office potlucks (think in terms of cutting scraps to form "shingling" of weather and waterproof properties).
Theoretically, you could cut up plastic soda and water bottles in a manner to protect the woodwork of the sofa frame. I also use large tarp and cover peices (like my neighbor's old hot tub cover) to make sturdy cover segments much the the BBQ covers for sale. This keeps my patio furniture clean and protected virtually for free, and if it gets too beat up, I pitch it or cut it up into smaller scraps to protect something else.
One "MacGuyver" design idea that really comes in handy for outdoor furniture (resin chairs and such) is using that plastic banding strap, some aluminum pop tabs as "buckles", to create tie downs to keep the lightweight furnishings from blowing over in the wind. The aluminum tabs are threaded to make a buckle at each end of the banding strap, the buckles are threaded through the slats in the chair (you just turn the buckle to make a "t" or you case close the loop if you prefer), and a paver brick or two is placed on top of the loop sitting on the ground. Takes just seconds to remove or you might find that they can be left in place without disturbing the seat occupant.
These have been tested in the high winds of the high desert with my chairs and loungers on the top of my favorite backyard scenic vista spot hill. 100% reliable regardless of wind and rain conditions (the "snow" test will be here soon).
Regards,
LT
LanceThruster (not verified)
Thu, 01/05/2012 - 11:33
Weatherly Sofa construction
Wonderfully executed piece.
I have a one acre horse property (w/o equines) in the high desert, and one of the county code stipulations is that all fencing must be open style (i.e. split rail or chain link). Through your fantastic site (and others), I have found marvelous ways of creating designated living and storage spaces that comply with code. I make crates of all dimensions for barriers and dividers (as well as doubling for tables and decks), and your weatherly sofa does double duty for seating and privacy structures as it is used in conjunction with the other architectural design features to create designated spaces in the open acreage.
Many, many thanks and best regards to you all.
I'll provide pictures as the projects reach completion.
Guest (not verified)
Mon, 02/20/2012 - 14:19
I believe one of the
I believe one of the measurements is incorrect. I noticed someone else ran into the same problem. The 10 5/8 inch pieces should be 9 15/16 inches in order to accommodate the 1X2's to complete the x's.
saintsmd
Tue, 09/18/2012 - 08:55
thank you
Thank You! I couldn't believe it when I followed the instructions and then found out that there wasn't going to be 1.5 inches between. I wasn't sure what to do and then I thought, maybe someone else had the same problem too. Thanks for the adjustment in length.
Arialvetica
Sat, 05/18/2013 - 13:47
Measurements ARE correct as published
We just built two of these (that's 10 Xs!) and the 10 3/8" cuts were correct.
We purchased our wood at HD in Minnesota and didn't have problems with any of the measurements as stated in Ana's cut list.
AlisonSummers
Thu, 06/27/2013 - 11:08
2x3's
I have searched high and low for 2x3 lumber....I'm feeling like I'm missing something because no one else has said that. How can I modify to use lumber that I can get at the big box hardware down the street?
In reply to 2x3's by AlisonSummers
Lindelium18
Wed, 07/03/2013 - 17:08
2x3's
Well, I can tell you that the Big Orange here in Southwest Ohio has 2x3's but they are not pressure treated. If you want a pressure treated 2x3, then you can buy a 2x4 and cut 1" off the 4" side. This can either be done with a table saw with the guide (fence) set to 2-1/2" (remember a 2x3 is actually 1-1/2x2-1/2) or use a circular saw with a guide bar. Hope that helps!
Lindelium18
Tue, 07/30/2013 - 19:54
Video assistance
Hey ya'll, I just finished my second one of these couches. On my second one, I filmed a bit of the build and tried to get some key parts explained. If you go to http://youtu.be/9BrvQlbL38g, it is a 40 minute video about my experience building the Weatherly Couch. I hope it helps and I hope you don't mind Ana!
cajunitalian
Sun, 11/29/2015 - 14:32
New Build
So I am building this and almost done - we are looking at cushions but I cannot find any 24x24 cushions for a good deal like the ones referenced above, any help would be awesome!
Sbriesac
Tue, 10/16/2018 - 18:16
Measurements
Hi, I have bought all the wood necessary for this project. I'm having trouble with some of the measurements made on here. Step 1: A) Angle cut should be around 45 instead of 30 degrees, B) The parts doesn't quite line up to make a complete X as there are about 3/4" gaps in the middle. Step 3: The parts together doesn't leave any space to fit under 23" with inch overhang. I am confused here. Am i missing something?