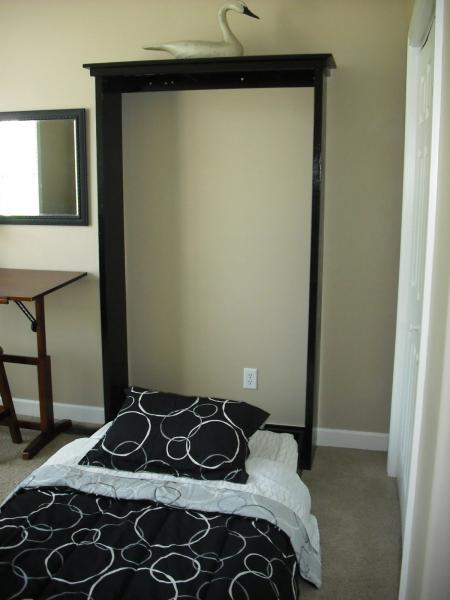


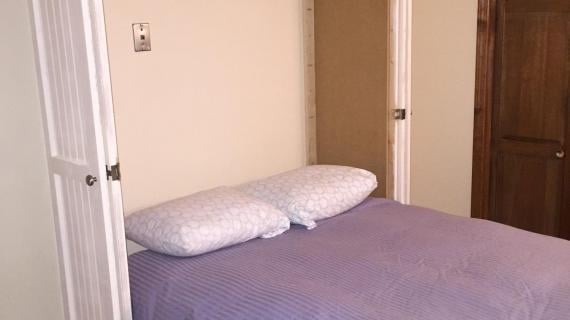
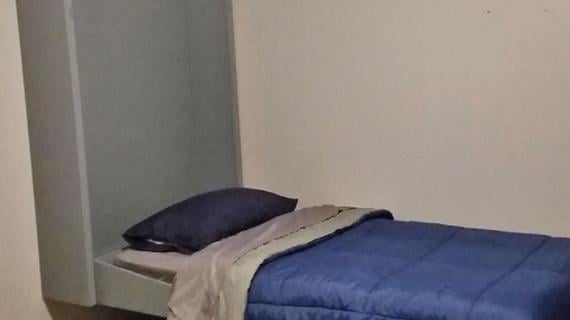
Do you need a guest sleeping spot, but don't have a guest room? Or is your guest room also a nursery or office? Add a hidden murphy bed with this easy project plan. The bed folds away into a cabinet that looks like an armoire. Easy instructions, no special hardware required.
Preparation
1 – Sheet of 1/2″ Plywood or MDF
3 – 1×12, 8′ Long
1 – 1×8, 8′ Long
1 – 1×4, 8′ Long
1 – 1×3, 8′ Long
3 – 1×2, 8′ Long
2″ Screws
2″ Nails
1 1/4″ Nails
5/8″ Brad Nails
Glue
Wood Filler
Sand Paper
1/4″ Thick Hobby Boards
Hinges (preferably heavy duty door hinges or continuous piano hinge)
Heavy duty magnetic clasp to keep the bed from falling open
Optional compression hinges to slowly lower the bed in place
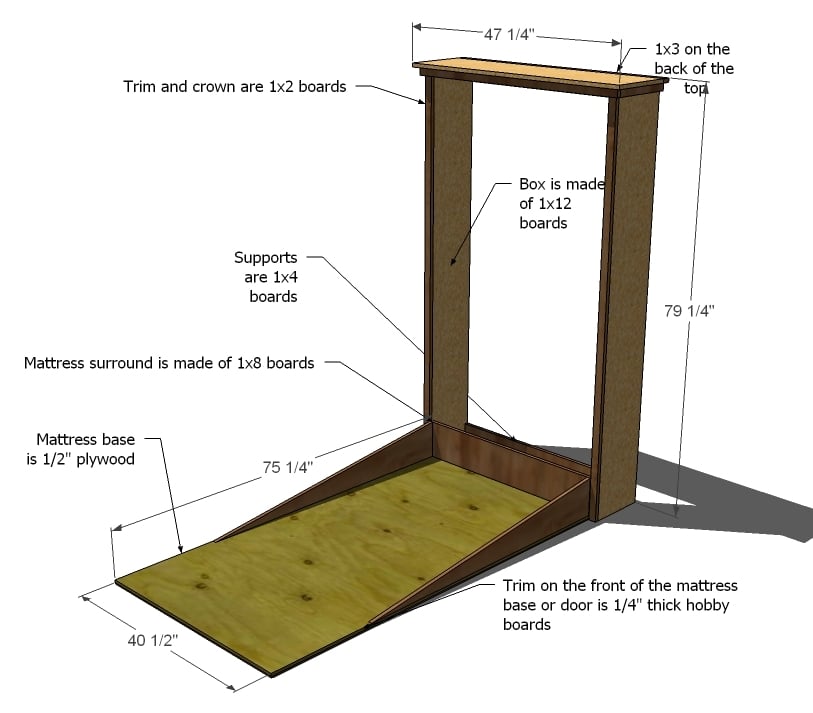
Cut List for the “Box”
2 – 1×12 @ 78 1/2″ (Sides)
1 – 1×12 @ 42 1/4″ (Bottom)
2 – 1×4 @ 42 1/4″ (Back Supports)
1 – 1×2 @ 43 3/4″ (Front Support Trim, Top)
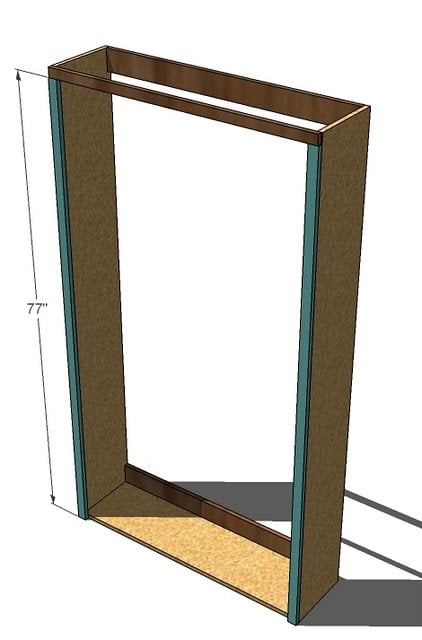
2 – 1×2 @ 77″ (Side Trim)
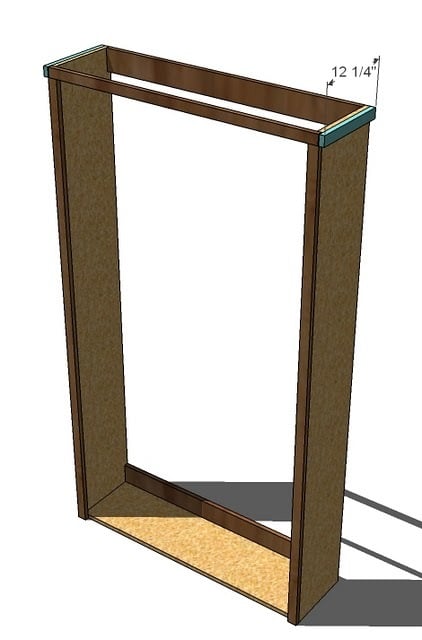
2 – 1×2 @ 12 1/4″ (Top Side Trim)
1 – 1×2 @ 45 1/4″ (Front Top Trim)
1 – 1×3 @ 47 1/4″ (Top, Back)
1 – 1×12 @ 47 1/4″ (Top, Front)
Cut List for the “Bed”
1 – 1/2″ Plywood @ 40 1/2″ x 76 1/2″ (Back)
1 – 1×8 @ 40 1/2″ (Bottom)
1 – 1×8 @ 55″ (Cut Length wise at a diagonal as shown in the plan to get 2)
Trim as desired with 1/4″ thick hobby stock


General Instructions. Work on a clean level surface. Use proper safety precautions and equipment. Take a square of your project after each step. Use good straight boards. Countersink and predrill all of your screw holes before fastening.
Instructions
Step 1

Build the Box. Using the 2″ screws and glue, fasten the sides to the bottom
Step 2
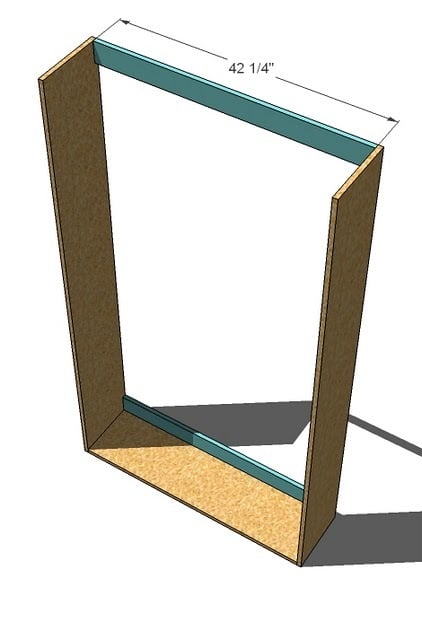
Back Supports. Fasten the back supports to the box, flush with the top and back. Also fasten through the bottom of the box into the bottom support. Use 2″ screws and glue.
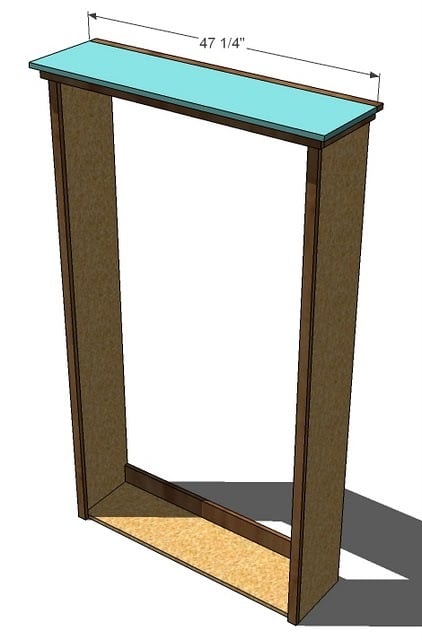
Step 3
Front Support. Fasten the front support to the box as shown above. Top edges are flush. Use 2″ screws and glue.
Step 4
Side Trim. Using 2″ nails and glue, fasten the side trim to the box. Outside edges are flush. You will need to also fasten to the bottom of the box and fasten through the top of the top trim into the top end edge of the side trim.
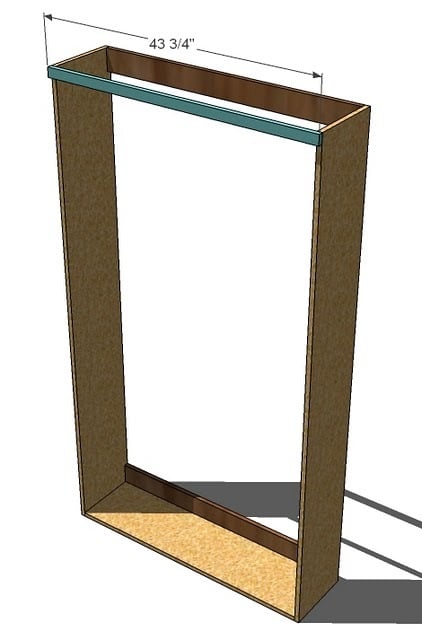
Step 5
Step 6
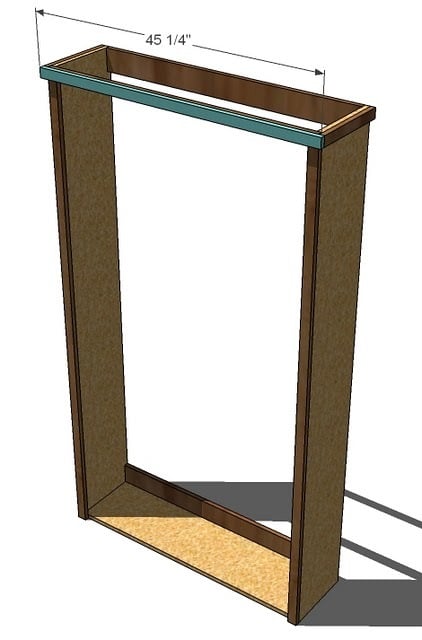
Front Top Trim. Fasten the front top trim in place using 1 1/4″ nails and glue. Keep top and outside edges flush. Use 2″ nails on the ends to fasten to the side trim and the sides.
Step 7
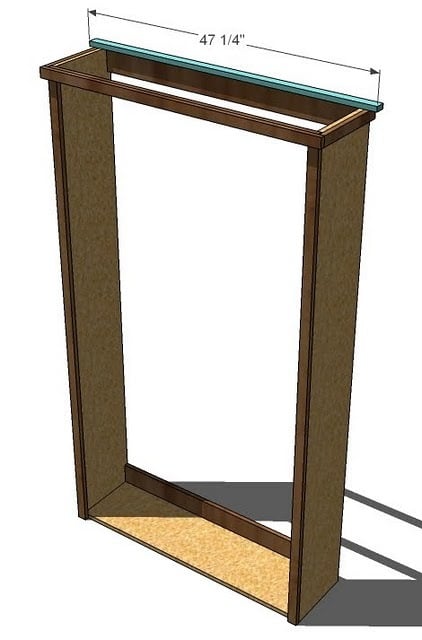
Top, Back. Using 2″ nails and glue, fasten the top back piece to the top, leaving 1″ overhang both ends. Back will be flush.
Step 8
Top, Front. Leaving a 1″ overhang on front and sides, attach the top as you did the top in step 7.
Step 9
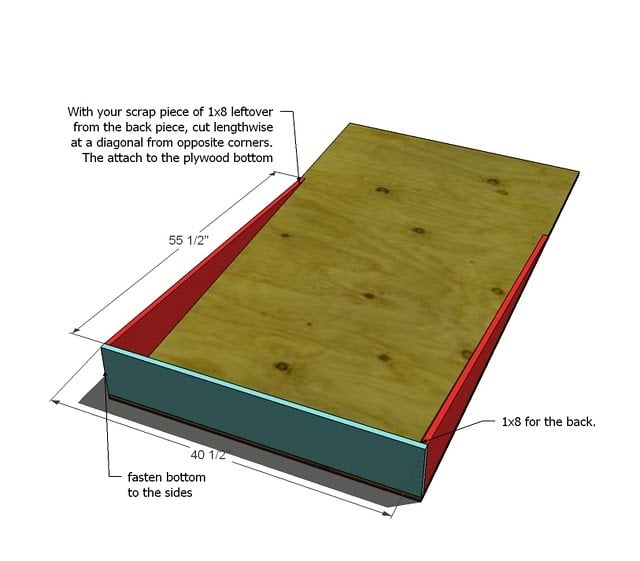
Mattress Box. Build the mattress box by using 2″ screws to screw the bottom 1×8 board to the plywood bottom. Use glue. Then fasten the sides to the bottom and the back using 2″ screws and glue. The sides are simply the scrap 1/8, cut at a diagonal to create two boards. You can cut with a jigsaw or a circular saw.
Step 10
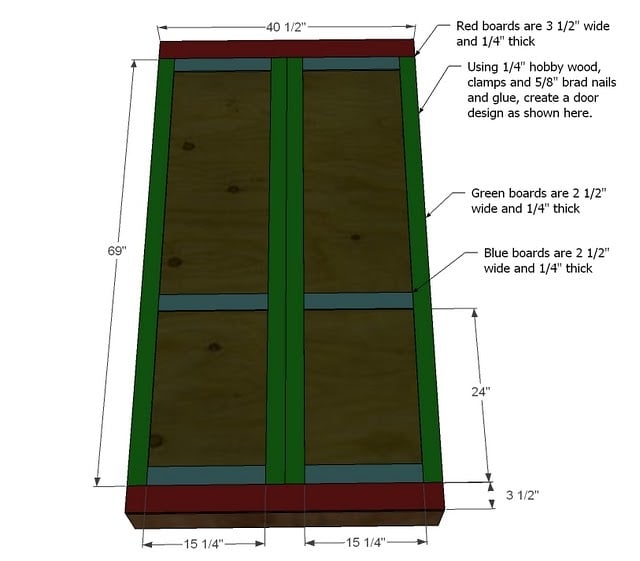
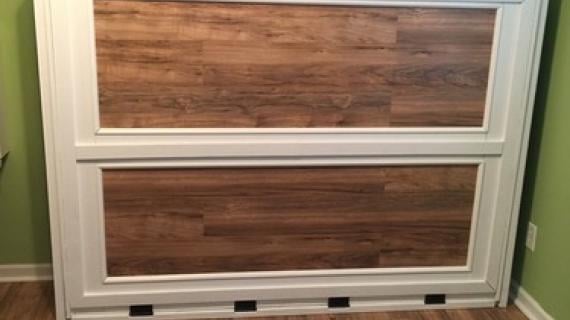
Door Decorations. Using 1/4″ thick hobby stock, fasten your desired door pattern to the face of the door (mattress bottom). Secure with glue, 5/8″ nails and clamps and let dry. Dimensions shown are for the sample pattern above.
Step 11
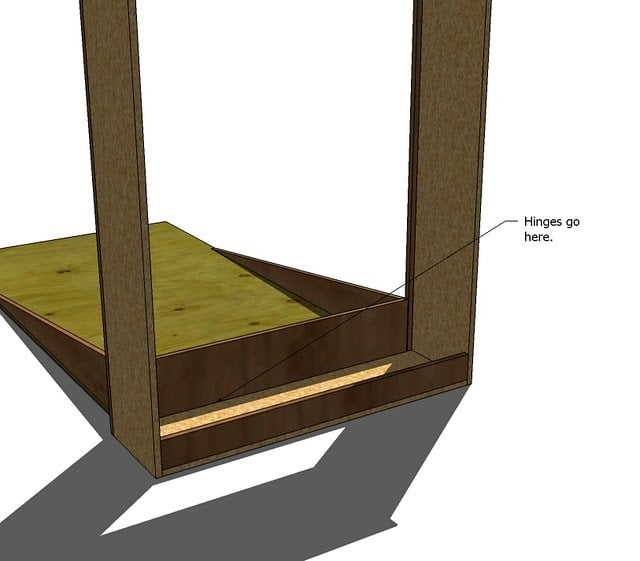
Hardware. Use the hinges to attach the mattress box to the wall box as shown above. You should also use a clasp to keep the door from falling open when shut. You can also use support hinges to keep the door from free falling open when unlatched.
Step 12
Finishing. Fill any nail or screw holes with wood filler and sand and finish as desired.
Step 13
Installation. You will need to use screws to fasten through the 1×4 support boards into a stud in the back wall. This recommended on the top and bottom. Also recommended is a wide elastic strap secured to the plywood door to keep the top of the mattress in place when the door is closed.
Fits a standard twin mattress 39″ x 75″

Comments
Thyri
Thu, 04/04/2013 - 21:22
Raised bed
I had a thought for a raised bed. Build the Murphy bed on top of a set of the cubbies from this site, then build another set of cubbies that rests on top (for horizontally mounted) or are stacked on top of each other next to the Murphy bed (for vertically mounted) put the moveable cubbies where the bed folds down to as a prop. Also, I think it would be cool and reasonably easy to mount a fold out table to the bottom like in this video: http://www.youtube.com/watch?v=9nljmEUeLbY
vgb777
Mon, 04/29/2013 - 14:36
Hinges
Like the design a lot and would like to try it. I have a question about the hinges. If I go with the piano hinges how wide should they be: 1.5", 2" or wider? Thanks.
LuvDesign
Tue, 04/30/2013 - 13:18
Help!?!
Looking for sideway plans for a queen bed sitting off the ground. I also had an idea for the exterior part showing to have a fold down table. Any help, ideas, suggestions would be greatly appreciated. Also if you have plans it would help me get my husband to tackle this project instead of us fussing to try & figure it out lol. thanks in advance! faith.within@yahoo.com
carolined
Wed, 05/22/2013 - 21:43
queensize? incorporating hardware?
hey guys! has anyone built the queen yet? if so did you use murphy hardware to make it safer/aid with the lifting/lowering? if so, do you have the plans or any tips?
cynthiavallem
Wed, 05/29/2013 - 13:31
I'm wondering about
I'm wondering about dimensions for a queen also. Would love to make this!
cynthiavallem
Wed, 05/29/2013 - 13:31
I'm wondering about
I'm wondering about dimensions for a queen also. Would love to make this!
APinkey
Thu, 07/04/2013 - 05:13
Queen Plans
Would love a copy of the plans for a queen size! Has anyone been able to get them? Please let me know. Thanks!
beka49
Thu, 10/31/2013 - 12:32
I am attempting to build a
I am attempting to build a horizontal murphy bed with a bookcase on top and when folded up it will double as a desk, (using a similar plan to your fold down art desk) for my daughter, do you have any suggestions on what I could use to make it easy for her to lower and lift the bed herself? Like springs of some sort, I do want to pay $300 for the kit I found through the link posted here in the comments. Also do you have any suggestions on what should be used as a foot for the bed?
JohnHSTennant
Sat, 01/25/2014 - 11:20
D.I.Y. Murphy & Wall Beds
Very nice, but one concern I have is the bed would appear to open heavy for most people. Also the mattress seems to lay at floor level which is not very comfortable for most people to get in and out of. For not much more money, there are Hardware options available online. www.MurphyBedHardwareKits.com will price match all of their mechanisms, even after you purchase. They also have free designs right on their website. All mechanisms make the bed normal bed height, and use fingertip operation, so the beds will never fall open. No magnets needed. Safer option, specially if you have kids that could try to open it.
zackburnet
Thu, 02/27/2014 - 08:31
First time I see this design
Hey Ana , this is first time I see this design , it is foldable right ? Save lot of space , my plans doesn't have that , thank for sharing Ana !
cloerzel
Thu, 09/11/2014 - 17:47
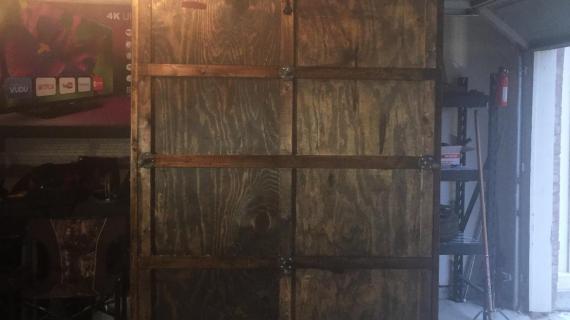
Han Solo in Carbonite Murphy Bed
For the Star Wars fan. It's not a faithful reproduction, just an inspired project. Used the basic plans here and modified it as needed. Hope you like it! My son does.
I still have to complete the rest of the room.
CSaintD
Fri, 09/12/2014 - 10:25
Hans Solo never looked so good!
Fabulous idea! I'm sure your son loves it. Belongs on "The Big Bang Theory" show! :)
booksnotbombs
Fri, 09/12/2014 - 12:40
I showed this to my star wars
I showed this to my star wars obsessed friend, and she loves it. I'm pretty sure she'd pay you for one. haha
cloerzel
Fri, 09/12/2014 - 17:08
Available for Special Order !!!
That would be fun to build stuff like this for a living, but this took me about 8-10 hours stretched over a month. So I would have to charge 30,000$ each. hahaha
Actually the poster was 50$ on ebay, then the rest maybe another 50$ or so. But I think I can justify the 30,000$ price tag because of the endless return trips to Home Depot because I forgot to get something else. So that's 29,900$ in gas money.
Ashiq1
Sun, 09/28/2014 - 01:07
Murphy Bed
I don't know hou much I can afford. But they are so cool Item. I just love http://murphybedikea.com
emigum
Tue, 02/24/2015 - 02:52
Horizontal?
I'm interested in making this horizontal. Has anyone done it?
In reply to Horizontal? by emigum
Ana White
Tue, 02/24/2015 - 12:06
horizontal
Check this out http://www.joy2journey.joy2journey.com/?p=156
Coreycoff04
Sat, 08/08/2015 - 19:11
queen bed compression springs
Ana, what kind/type of compression hinges do you recommend for a queen bed? Afraid of how heavy it will be when coming down vertical I do not wants I buy the kits as I will put it on the floor
demetriusleitao
Mon, 08/10/2015 - 14:11
Cama Murphy - Projeto
Cama Murphy - Projeto
HaliFanizza
Tue, 12/26/2017 - 21:54
How to make it Horizontal
My place isn't tall enough for vertical but is fine for horizontal. What dimensions would I have to tweak to make it work.