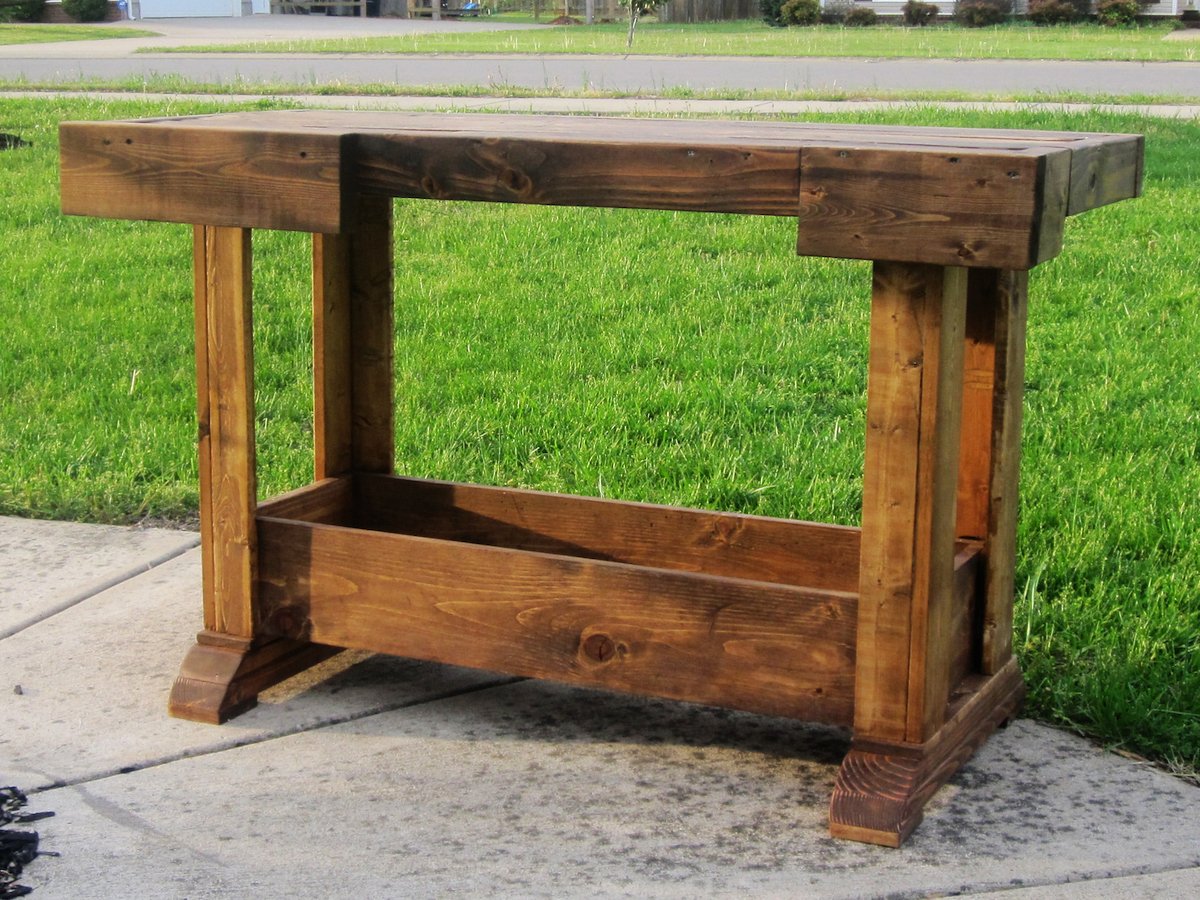


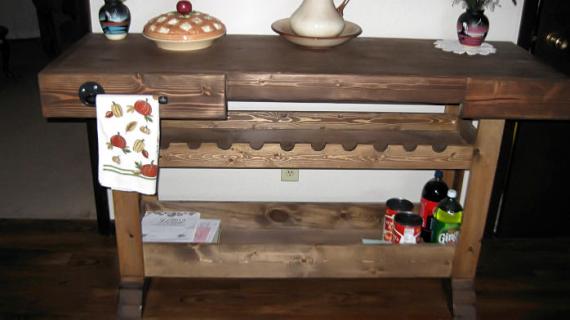
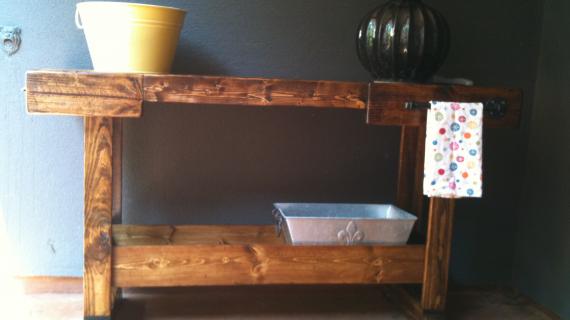
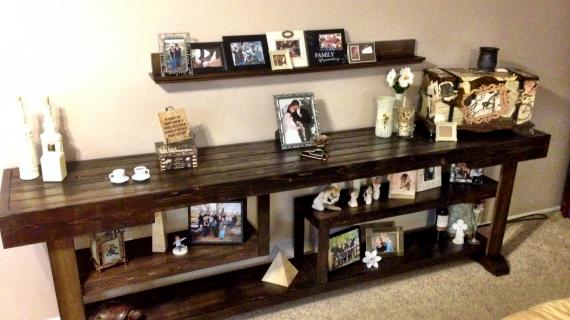
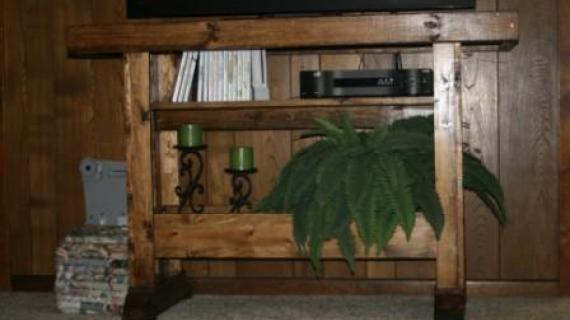
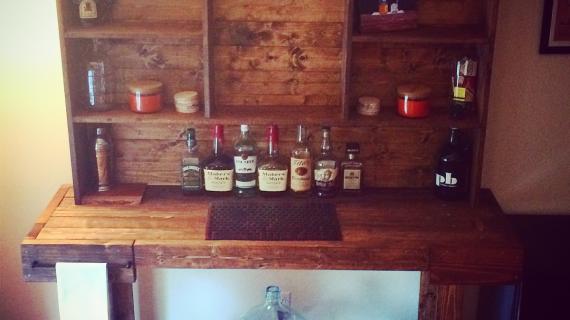
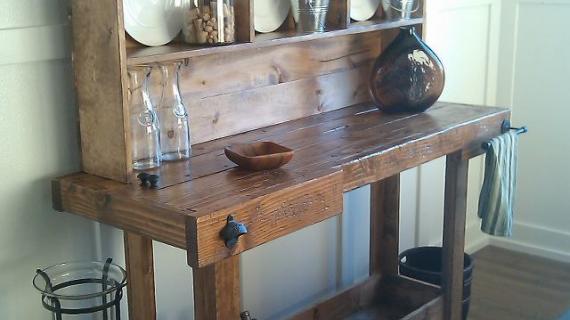
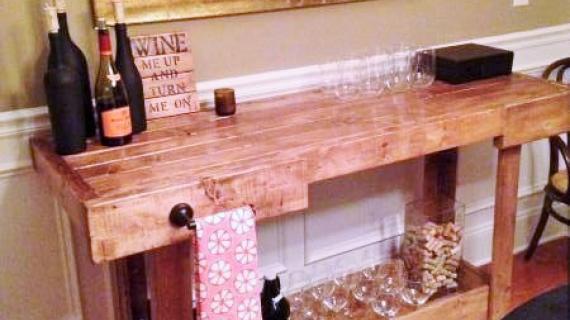
Are you looking for a unique console table, to keep your space stylish and interesting? Reminiscent of an old workbench, this rustic console table can be used as a bar or console table.
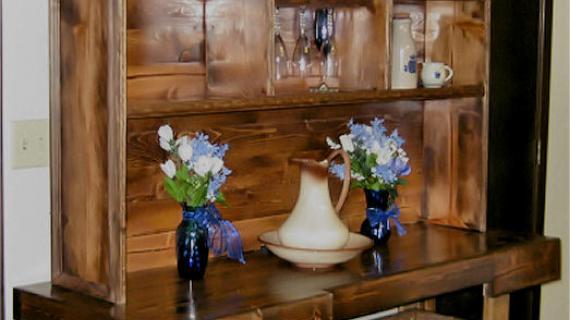
This is a free DIY project plan from Ana-White.com that includes step by step diagrams, shopping and cut lists. Matching hutch plans also available.
Preparation
- 6 – 2×4, 8 feet long
- 1 – 1×6, 8 feet long
- 1 – 1×12, 4 feet long
- 2 – 1×3, 8 feet long
- 2 – 1×4, 8 feet long
- 1 – 2×2, 4 feet long
- 1 – 2×6, 8 feet or stud length
- 2 1/2″ and 2" Self Tappng Star Bit Wood Screws
- 2-1/2″ Pocket Hole Screws
- 1 1/4″ Pocket Hole Screws
- 2" and 1-1/4″ Brad Nails
- Wood Glue
- Finishing Supplies
- Towel Bar
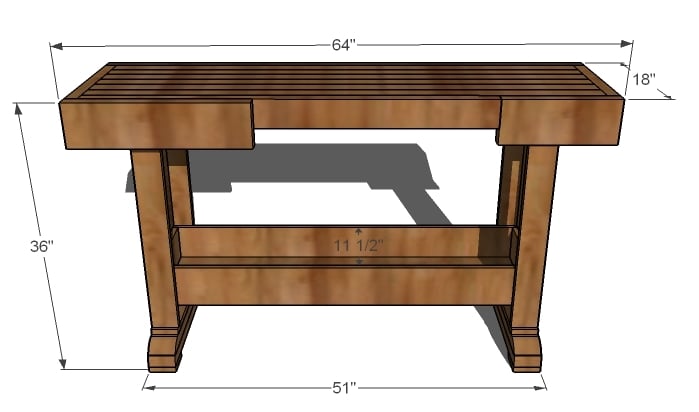
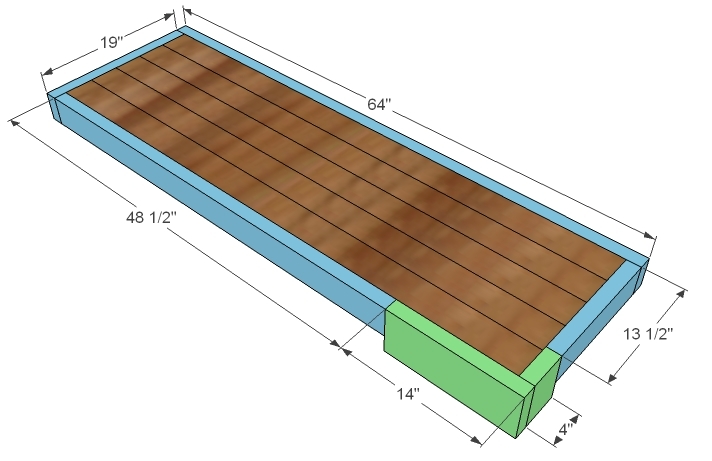
- 2 – 2×4 @ 19 1/2″ (Top, Feet)
- 2 – 2×4 @ 21 1/2″ (Bottom, Feet)
- 4 – 1×4 @ 3 1/2″ (Feet “soles” )
- 4 – 1×4 @ 30 3/4″ (Leg Fronts and Backs)
- 4 – 1×3 @ 30 3/4″ (Leg Sides)
- 2 – 2×2 @ 13″ (Top of Legs Support)
- 2 – 1×4 @ 15 1/2″ (Bottom of Legs)
- 1 – 1×12 @ 48″ (Bottom of Shelf)
- 2 – 1×6 @ 11 1/2″ (Shelf Ends)
- 2 – 1×6 @ 49 1/2″ (Shelf Sides)
- 5 – 2×4 @ 61″ (Tabletop Boards)
- 1 – 2×4 @48 1/2″ (Tabletop Trim)
- 1 -2×4 @19″ (Tabletop Trim)
- 1 – 2×4 @64″ (Tabletop Trim)
- 1 – 2×4 @13″ (Tabletop Trim)
- 1 – 2×6 @ 4″ (Tabletop Trim)
- 1 – 2×6 @14″ (Tabletop Trim)


Instructions
Step 1

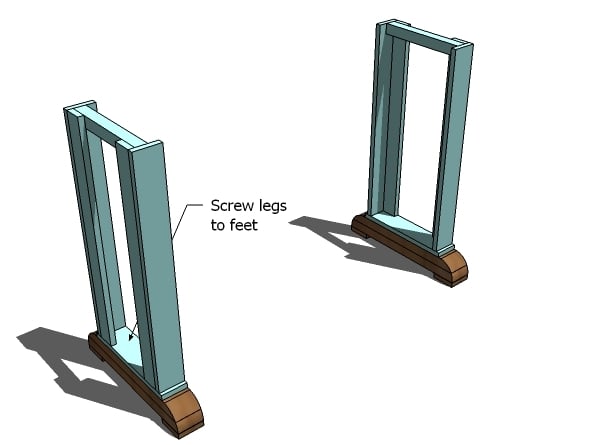
Cut the Feet From the two 2x4s cut at 19 1/2″ long, cut the ends at 45 degree angles, so the long point to long point measurement remains 19 1/2″. Cut the two 2x4s 21 1/2″ long end off at 30 degrees off square so the long point to long point measurement remains at 21 1/2″ long. Line one of each board up, as shown above, and screw together with 2 1/2″ screws and glue. Sand the ends to rounded with coarse sandpaper. Then finish with medium and fine grits.
Step 2
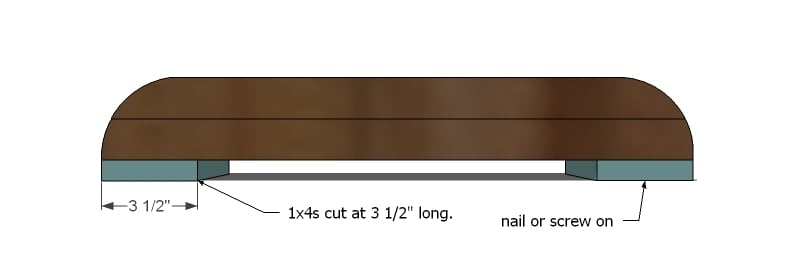
Feet Soles Nail or screw the feet soles to the bottoms of the feet. Use 1 1/4″ screws and glue or nails.
Step 3
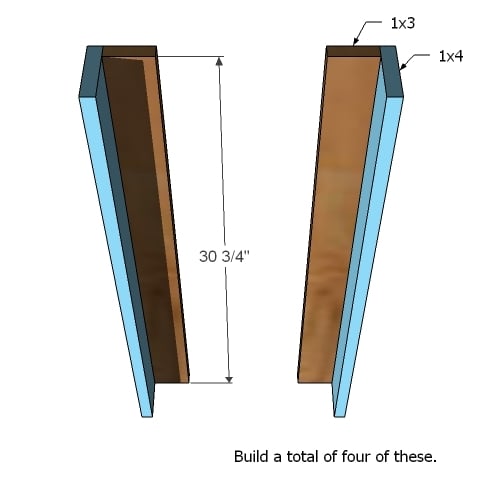
Build the Legs Build the legs from 1x3s and 1x4s as shown above. Build four. I used Kreg Jig™ to build the legs from the insides, hiding my screw holes. I choose to use an open leg for a few reasons. 4x4s are difficult for many people to find. If 4x4s are not dried properly, they can crack when brought inside. And using the open leg makes attaching the bottom shelf so much easier. But you can use 4x4s instead of the open legs, just add a 1×4 to top and bottom, instead of the 2×2 on top, and make the legs 30″ long. (shown below)
Step 4
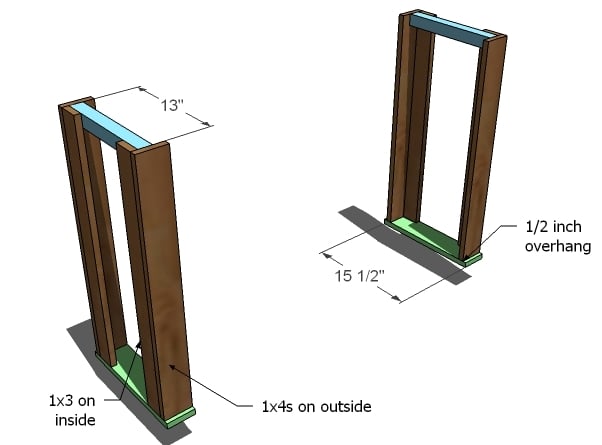
Leg Supports, Top and Bottom Screw the leg bottom support to the legs and the top support to the legs with 2″ screws and glue.
Step 5
Step 6
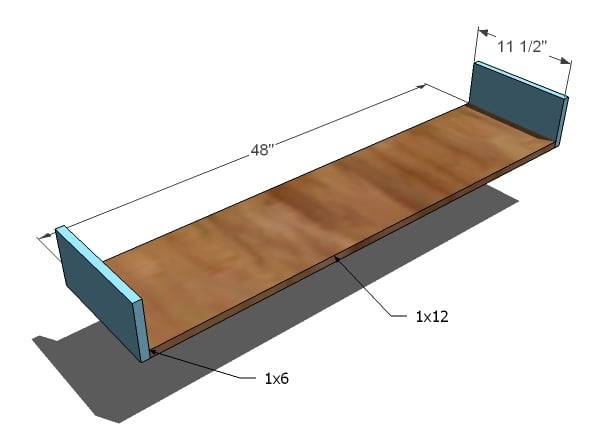
Bottom Shelf I used the Kreg Jig™ to attach the sides to the bottom shelf. I used 1 1/4″ pocket hole screws. Screw the 1×6 to the 1×12 as shown above.
Step 7

Shelf Sides Attach the sides to the bottom and ends as shown above. I used the Kreg Jig™ and 1 1/4″ pocket hole screws.
Step 8
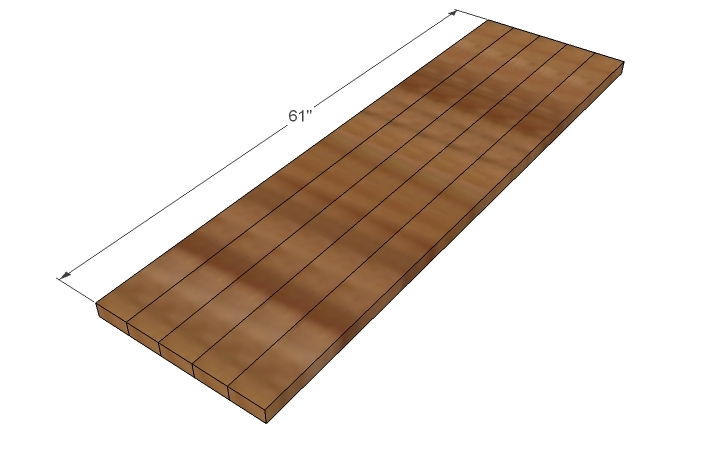
Tabletop Drill pocket holes and join the tabletop boards with 2″ pocket hole screws.
Step 9
Tabletop Trim Screw tabletop trim to the sides of the tabletop using 2 1/2″ screws and glue. Blue boards are 2x4s and green boards are 2x6s.
Step 10

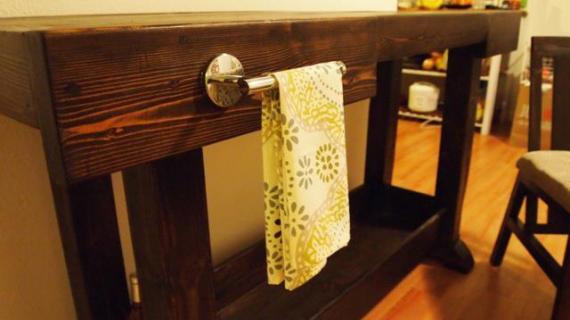
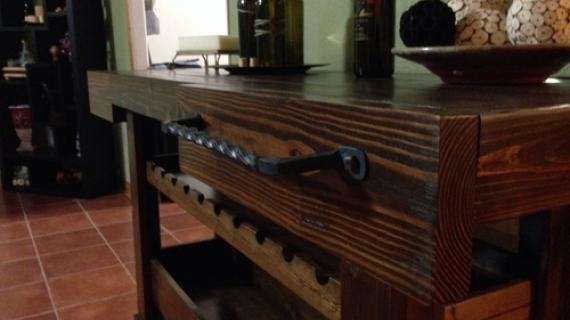
Final Trim Screw the remaining 2x6to the front. Attach towel bar to this board.
Step 11

Assembly Use 2 1/2″ screws to screw supports to top, joining the base to the top. Finish as desired. I used Minwax Early American.


Comments
chrisandpatience (not verified)
Mon, 09/20/2010 - 03:35
This really looks amazing. I
This really looks amazing. I just wish i had a place for it. I might just build it for the heck of it and give it away. I do the same with all my wine corks. Nice job Ana, you keep topping yourself. Cant wait to see whats next
Jennifer Doherty (not verified)
Mon, 09/20/2010 - 04:59
Wow, that's absolutely
Wow, that's absolutely gorgeous! You're right about the regular stud-grade boards. They give this console the perfect look. I wish I needed something like this. LOL about the toilet paper holder! :)
binah06 (not verified)
Mon, 09/20/2010 - 05:58
I saw this last night on
I saw this last night on Facebook and I loved it. My husband even walked by and stopped to look. I think I might have hooked him into helping me! Yea!
KaraHart (not verified)
Mon, 09/20/2010 - 06:22
YAY YAY YAY YAY YAY!!!!!!!!!!
YAY YAY YAY YAY YAY!!!!!!!!!! I'm SO excited that you posted these!! There's a wall in my kitchen that has been sitting empty just WAITING for these plans. I actually told my hubs this weekend that I needed to go to PB to SEE one so I could figure out how to build it. You are so awesome...thank you!!! Yours looks absolutely amazing...great job with the finishing work! We all know your building is going to be impeccable :-)!!
jennhoff (not verified)
Mon, 09/20/2010 - 07:22
Wow, Ana, that is seriously
Wow, Ana, that is seriously gorgeous! I gasped when I first saw it and I thought it was from a magazine. I love how you decorated it, too!
Tsu Dho Nimh (not verified)
Mon, 09/20/2010 - 08:22
Ana - If you have piles of
Ana - If you have piles of shed antlers, why not cut them up and use them for the towel holder? It's not as though the caribou or moose are going to be coming back for them and there is a limit to the number of rod and gun racks a house needs, even in Alaska.
The shed base makes a nicely textured pull, and various prongs and branchings make good robe hooks and larger drawer pulls.
southernbohemian (not verified)
Mon, 09/20/2010 - 10:31
Gorgeous! Did you use a
Gorgeous! Did you use a stain conditioner or just stain?
jmomof3 (not verified)
Mon, 09/20/2010 - 13:53
Hi Ana. What a great idea
Hi Ana. What a great idea that you are thinking about a writing career. You really have what it takes to attract readers. I have been mesmerized by your blog for the last week now.
About a year ago, I started thinking about becoming a writer. I did some research, I decided that the best thing to do would be to create my own website and sell ebooks from it. Then I ran into a big snag because I couldn't figure out how to make my website visible on the Google search engine. That's what amazes me, Ana. How did you make your blog so easy to find? I typed in "woodworking projects" on Google search and your blog came right up. I would love to know how you did that.
I think that right now, while you've got so many readers' attention, you should put all of your ideas into an ebook and sell the ebook from your blog. I would love to buy such an ebook from you right now. Searching your website is slow, because I have to wait for each page to load. The more information you add, the harder it is to navigate. An ebook can be better-organized and can be navigated and searched very quickly. It can contain hundreds of pages and as many color photos as you want. It is very cheap to produce, almost free, and unlike print books which cost at least $7 per book, and cost way more with color photos.
Loni (not verified)
Mon, 09/20/2010 - 14:16
Thank you so much! I LOVE
Thank you so much! I LOVE LOVE LOVE this!!! And Beautiful set up you have there! Makes me wish the deer out here commonly had large racks :)
Ana White (not verified)
Mon, 09/20/2010 - 18:18
Bad Ana was in a hurry
Bad Ana was in a hurry (deadlines ugh) and didn't use stain conditioner. I use a rag to apply it. It's so beautiful in person!
Ana White (not verified)
Mon, 09/20/2010 - 18:18
Thanks Jenn!
Thanks Jenn!
CreativeCarol (not verified)
Mon, 09/20/2010 - 18:57
LOL. I actually thought that
LOL. I actually thought that the "towel holder" was part of a vise - it is a work bench, right?
Thanks for adding instructions to your plans on the use of a Kreg Jig. I've bought myself one but I don't always know how to use it.
zoebird (not verified)
Mon, 09/20/2010 - 19:23
I have a place for this! now
I have a place for this! now i just need to get cracking.
I can build starting two weeks from now. 80 crates is the first order. then 7 desks. THEN i can build a hutch (for my fermenting goodness in my kitchen! for letting bread rise! for storing preserves and canned goodies! away from busy, busy little hands!). and then a modification on the farm table. and some chairs. a basic, basic chair. i might buy chairs. LOL
cassijean (not verified)
Mon, 09/20/2010 - 21:09
I love this so much. It's
I love this so much. It's exactly what I'm going to build for my dining room. I really put my heart in to refinishing my cabinets in the kitchen last weekend and my husband and I got the beadboard and all the trim up in the dining room yesterday. This is going to make a fabulous addition. You have to promise to post the hutch soon!
Sha~ (not verified)
Tue, 09/21/2010 - 00:28
So awesome Ana. We have a
So awesome Ana. We have a meat bandsaw, and I have also thought about it! THIS would go perfect in my country home!
staceykeithslp (not verified)
Tue, 09/21/2010 - 01:44
Would it be a shame to
Would it be a shame to actually make this for a workbench? Hubby's bugging me to make a workbench (while I put every other piece of furniture first :-). Or, would anyone suggest a different plan for a garage workbench? Advice needed! Thanks!
moni (not verified)
Tue, 09/21/2010 - 03:12
THANK YOU, ANA!!!! it is
THANK YOU, ANA!!!! it is beautiful and simple, I really love it... you are like a fairy, I asked for the PB hutch plans and you you made my wish come true! thanks!!!
I can hardly wait building it!
safetyglasses (not verified)
Tue, 09/21/2010 - 04:19
3 hrs? I would spend 3 hrs
3 hrs? I would spend 3 hrs with my husband arguing about the stain.
I buy deer Antlers for $2 an ounce at the Pet Store - Dogs love to chew on them. Maybe that's a good job for your little girl when she gets a little older. :-)
Bethany (not verified)
Tue, 09/21/2010 - 06:16
3 hours!!! I can't wait until
3 hours!!! I can't wait until I am that fast. :) Thank you for sharing the stain you used - it is absolutely GORGEOUS. This may be one of the most beautiful pieces you have created. Thank you for sharing!
Tsu Dho Nimh (not verified)
Tue, 09/21/2010 - 08:42
This is too small to make a
This is too small to make a good workbench - make him a nice big farm table, but a bit taller for working standing up and top it with a sheet of "masonite" that can be replaced when it gets too dinged up.
melissa2 (not verified)
Tue, 09/21/2010 - 09:03
I've used Minwax Early
I've used Minwax Early American and wanted to add a second endorsement of the stain color. It "takes" so uniquely on wood--almost shades of yellow in areas where the wood is light, and shades of brown where the wood is dark. Some people may not like it because it is so variable. Ana, this is beautiful!
Ana White (not verified)
Tue, 09/21/2010 - 09:41
I use a Farm Table with
I use a Farm Table with stretcher turned bottom shelf. My husband attached garage organizer to the sides to hold screws, tools and glue. Then he screwed the Kreg Jig to the top - it's so perfect. And the table is super sturdy and strong, you can pound nails on it!
Lauren (not verified)
Tue, 09/21/2010 - 14:02
I was taking another look at
I was taking another look at this today, and looking forward to building it, and I have a silly question for you. We don't own a jig, and I'm not sure I'd know how to use one if we did... Is there another way to assemble the tabletop without pocket screws? Is there a particular reason to use pocket screws as opposed to something else?
I'm probably just displaying my ignorance here... sorry! :(
Ana White (not verified)
Tue, 09/21/2010 - 14:19
Hi Lauren, you can definitely
Hi Lauren, you can definitely use different methods to join the top boards. Check out how that is done in this table - just add a 2x2 to the shopping list.
A Kreg Jig is basically a tool that enables you to drill a hole at an angle in a board, and then screw a screw through that hole into a second board. Definitely check out the Kreg website (www.kregtool.com).
Thanks for asking - I'm sure others share your question too.
jolie (not verified)
Tue, 09/21/2010 - 15:46
As a new member, I was so
As a new member, I was so blown away when I came across on this website by shear luck. I'm extremely impressed. PB - eat your heart out. I'm sure there are people that are probably regretting having bought all those expensive PB furniture. I'm attempting to make a wooden wall plate rack (exposing the front of the plates), Ana, would you have any suggestions?? Say 42" across x 52" high. Please take a bow w/the applause for an excellent job well done :)
jolie
Lauren (not verified)
Tue, 09/21/2010 - 17:31
Oh, hooray! Thank you! (I was
Oh, hooray! Thank you! (I was feeling sort of dumb not knowing that!) It sounds like a nifty thing to have though -- we'll check it out!
Also, thank you again for making this!! I'm so excited to try it! (Though I'm sure it will take me more than three hours -- Ana, you're a rockstar!)
:)
Squish49284 (not verified)
Thu, 09/23/2010 - 06:52
What a life saver....I have
What a life saver....I have been looking for just the right legs to add to a very cool 100+year old door with ornate hinges and door knob to turn into a counter/island/breakfast bar for my daughter's apartment. This is the exact thing I had in my head but didn't know how to get it out into real world wood. Thanks so much now I will actually be able to get this done before she graduates and moves on. Hubby will be happy to see the door move on to college life too. You may have just created more harmony in our house with this plan.
Michelle (not verified)
Wed, 10/06/2010 - 10:53
I have looked at this so many
I have looked at this so many times!! I was trying to figure out why it looked so familiar to me and why I wanted it so much. Then the other day I was going through the pics on my phone and came across a picture that I took while I was at pottery barn last winter. It was this table! I forgot all about it, I just remember walking around the store and having a moment when I saw this. I am so glad you made plans for it. Now I know how much I need it, I have to find a place to put the need ;D
Thanks Ana you really are inspiring!!
Dina (not verified)
Thu, 10/07/2010 - 10:55
Anna, If you ever have the
Anna, If you ever have the desire to visit South East Idaho...I would glady trade you a place to stay for decorating tips!!! I am TERRIBLE at getting my home that 'homey' feeling :( and with my budget being next to broke...it is hard to fit what I have into what I would like...if that makes sense...
Keep the creative juices flowing!!
Mike (not verified)
Fri, 10/08/2010 - 06:00
I have found it easy if not
I have found it easy if not more ecconomical to look for used serviceable power tools in the newspaper or in pawn shops and even garage sales. many tools we're well used, some in new condition some just need to be cleaned up,maby a new belt or light bulb.When one is retired & on a fixed income,shoulden't mean one can't enjoy working on projects & building things. I have the Kreg Master set with several vise grip clamps.,Thank God my girlfriend has no Idea what she got me for Christmas.At least now I have another Item to make things easyer,surely one of the best tools I've ever owned
Lisa (not verified)
Tue, 10/12/2010 - 12:37
LOL Carol - I had the exact
LOL Carol - I had the exact same thought!
Mina (not verified)
Mon, 10/25/2010 - 06:34
Hi Ana. Just wondering if the
Hi Ana. Just wondering if the plan for the hutch for this is already posted? Thanks. Am thinking about doing this next. :)
Rebecca 'Robbi… (not verified)
Sun, 10/31/2010 - 11:50
I am making this workbench
I am making this workbench console for my dining room to go with my farmhouse table that I made last month but haven't finished because I wanted to finish both at the same time to get the same exact finish.
You need to add a 1X6 for your shopping list. You cannot get the cut list requirements out of only one.
I'll send picture when I am finished
Rebecca 'Robbi… (not verified)
Mon, 11/08/2010 - 05:13
Add two more 2X4 as well to
Add two more 2X4 as well to get what you need! It is looking beautiful!
Amanda (not verified)
Sat, 12/04/2010 - 17:57
I'm in the middle of building
I'm in the middle of building this as well! I noticed a few things were missing from the shopping list - can't complain when these awesome plans are free! :)
Has anyone else had problems with the bottom shelf fitting in the leg frames? My 1x12 was only 11 1/4" wide, rather than 11 1/2", so now I have quite a gap to figure out how to fill when attaching the shelf to the legs...any suggestions?
Can't wait to finish this piece - still searching for the perfect towel bar and possibly a bottle opener to mount on the right side (just like the Pottery Barn version!). Will post pictures!
montygal453 (not verified)
Sun, 12/05/2010 - 15:07
I have just finished this
I have just finished this workbench console, now I am ready for the hutch. I am not sure where to start... I think that I am going to just go with one of the other hutches on this site just checking on the measurements.
I LOVED making the feet! My husband caught me looking at the belt sanders in Home Depot this morning, but I did not indulge I just used my little rotary sander. The feet look great!!
I did break down and buy the Kreg Jig Master System and watch all of the videos on their site before starting this project. That made this a learning project for me, but now I would rather drill pocket holes than build any other way! This has been a fun websitte!
Ana White (not verified)
Sun, 12/05/2010 - 20:29
Thanks for taking your time
Thanks for taking your time to come back and comment - really appreciate it, and so glad to know that you love pocket holes and the feet worked for you! Ana
Kim (not verified)
Wed, 12/15/2010 - 07:32
Ana- I absolutely love this!
Ana- I absolutely love this! Is there plans for the hutch? This would be the greatest addition to my new kitchen redo! You are such an inspiration! :)
Katy (not verified)
Sun, 12/26/2010 - 13:42
I have been waiting for the
I have been waiting for the plans for the hutch too! I need to knock out some kitchen cabinets and move my fridge to where the new space will be and then I will be able to finish putting down the vinyl flooring.... BUT before I do that I need somewhere to store my dishes, cups, crystal, and serving bowls. Hopefully they will be up by the time I have the work bench built. I plan on using cedar from an old deck we tore out last year. The wood is VERY aged...lol.
Josey (not verified)
Tue, 01/04/2011 - 12:25
I see that the first photo in
I see that the first photo in the post was submitted by "Amanda" - but I don't know how to determine which Amanda. I LOVE the stain she chose and her WALL PAINT COLOR! I must know what it is! Amanda, if you're reading this, please respond to jpayne.nesl@inbox.com if you're intersted in sharing your paint and stain colors. Ana, if you could tell me which Amanda submitted the picture, that could help too! Thanks ladies!
Josey
Kristen (not verified)
Thu, 01/06/2011 - 10:05
Just a thought, has anyone
Just a thought, has anyone tried backing the hutch with pegboard for a julia child's kitchen effect? I'm thinking of building this and wondering if that's a good idea. I need more pots/pans storage in my kitchen nook!
1916home.net (not verified)
Sat, 01/15/2011 - 16:52
Im with you on people who
Im with you on people who bought the items at PB. Many of their items, including this console, use veneer which will chip and peel eventually. Paying $2000 would be heartache enough, to have it peel and chip after paying that would be downright horrible :)
Lori (not verified)
Thu, 02/03/2011 - 12:06
Does anyone know where I can
Does anyone know where I can get a towel bar like the one used on this project?
Shelley (not verified)
Mon, 02/14/2011 - 19:40
Would those legs/feet work on
Would those legs/feet work on one of your farm table tops? I want to build one of your farm tables but modify it with just two centered leg sets like this - do you think it would be stable enough if the table is 8' long by 4' wide? I hope I'm describing this right!
Katie (not verified)
Wed, 02/23/2011 - 10:53
Hi Ana! Thanks SO much for
Hi Ana! Thanks SO much for such an awesome website and all these great plans. I'm a total newbie to building stuff, so I'm wondering if this workbench could be used with a set of wheels on the bottom? I'd love to have a wheelable workbench in my garage, but I don't know much about whether there are structural issues to consider when adding the casters.
Thanks!
Antiques (not verified)
Fri, 02/25/2011 - 01:49
Antique consoles/shelves are
Antique consoles/shelves are a good way of decorating your home. The tips and instruction in this post are very helpful in building benches and consoles. thanks for sharing this post.
Anneke McConnell (not verified)
Sat, 03/12/2011 - 23:00
Bottle Opener
This is yet another plan on my to-do list. I love how Pottery Barn has a bottle opener on the side of theirs, so I searched online and found a whole website devoted to bottle openers (or even amazon...there are others too). You just screw them into the wood...nice! The one I am looking at is the basic black @ $7.95 plus shipping. Not bad. I unforunately have to build mine at about half the width, but I CAN'T WAIT!
http://www.bottleopener.com/Black-Plain-STARR-X-Bottle-Opener-p-116.html
Guest (not verified)
Fri, 01/20/2012 - 15:55
2" PHS
Just curious why 2" pocket hole screws for the top boards and not 2 1/2" since the boards are 1 1/2" thick?
Just wanting to make sure i need to get the 2" ones before I start thanks.
wesleyjack
Wed, 02/22/2012 - 08:10
stability
For those who have made this is it pretty stable?
In reply to stability by wesleyjack
claydowling
Fri, 02/24/2012 - 06:52
Stability
I just built something nearly identical as an outfeed table for my table saw. Provided you make your joints tight and square, this is a very stable table.