Hi everyone! I've been wanting to start a tool talk on this blog for ages. Today, it's finally happening!
I'm pretty excited to talk about a tape measure. I know this sounds rather elementary and how much can you really talk about a tape measure, right? But it's my most used tool and one I can't live without, and you may be suprised to learn something new about this simple tool.
And after you learn all the tips and tricks, a tape measure properly used can make building easier, faster and better. The more accurate the measurement, the easier it will be to build, and the more desirable the outcome of the project. You'll also save tons of time by using your tape measure to it's fullest potential. There are many brands of different tape measures, but most retractable ones boast similar features. For this tutorial we are using an inch and foot tape measure (standard measurement system) but alot of the same principles will apply to a metric tape.
The Right Sized Tape Measure for DIYers
Standard tape measures range in measuring length 6 feet to up to 30 feet. I like to use a 16-foot long tape measure in the shop. It's small enough to fit easily in my hand and is lightweight, but with 16 feet, can still measure most rooms when you need your tape beyond the wood shop. Go for a tape that is easy for you to read quickly and precisecly.

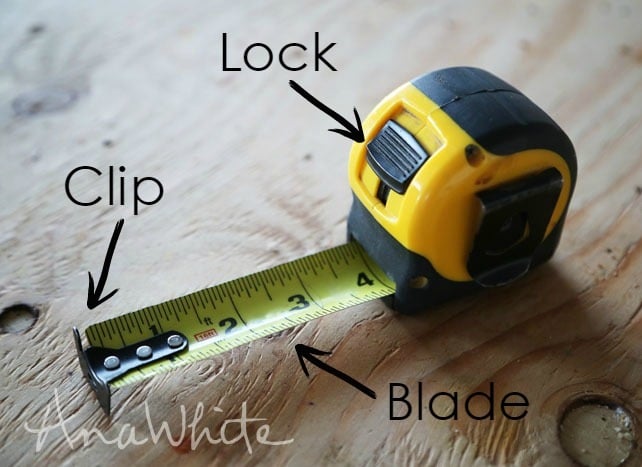
A tape measure is pretty simple, consisting of the blade, clip, lock and a beltloop.

LOCKING DEVICE
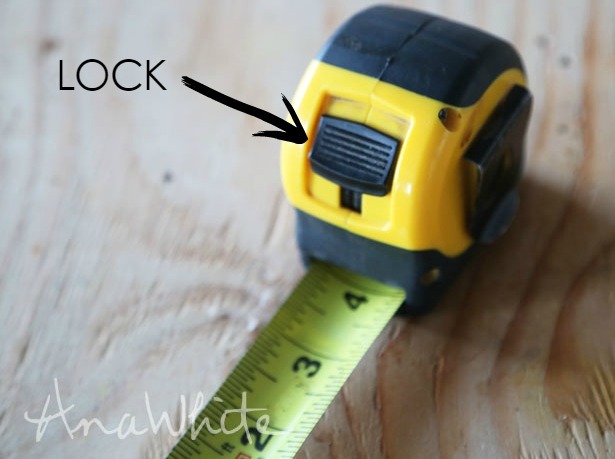
You'll notice that there is a locking device on the retractable side of the tape, we call this the "lock". This device is used to assist you when you are trying to keep the tape from retracting. So once your blade is extended, press downward on the lock, and that will assist you in keeping your blade extended at that distance without having to hold the blade from retracting. Some tape measure are self locking, and that means that when you extend the blade it self "locks" until you press the "button" and that enables the blade to retract (I'm kinda fond of self lockers).

ADJUSTING END CLIP
Attached with rivets to the very end of the blade, there is a metal peice called the clip. The clip is engineered to hook on the edge of a board to assist you with the measurement, holding the end of the tape in place. At the end of the clip, there is a knotch - this is designed so that you can accurately measure even when the tape is clipped on the corner of a board.
Take care of your tape measure, because its easy to bend these clips, and if your clip is damaged, measurements won't be accurate. Dropping your tape or throwing it can bend the end clip. The rivets that secure the clip to the blade can also wear with lots of use, so check old tapes by measuring with the clip first, and then measuring again starting at 10" (and subtracting 10" from the overall measurement) periodically, checking to see if the two measurements are the same.

"PLAY" AT THE END OF THE CLIP
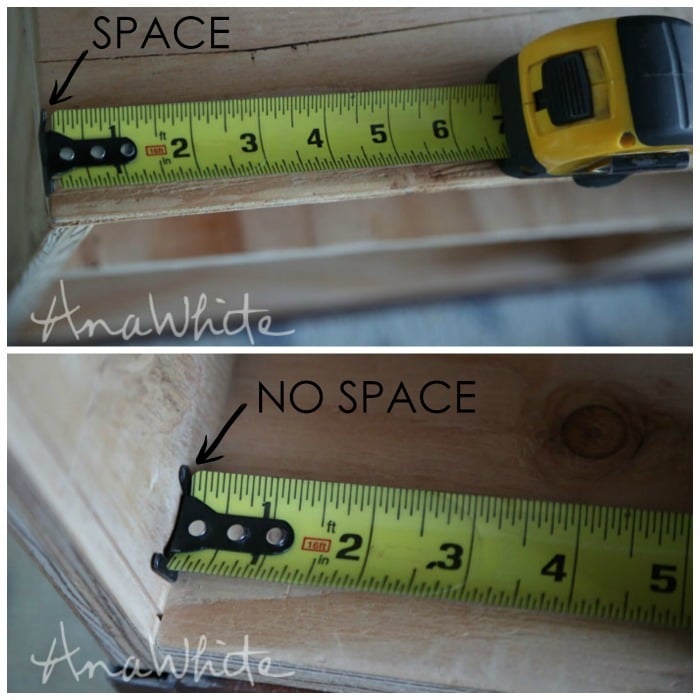
You'll notice that there is play at the end of the clip. This is not a damaged end clip. The play should be equal to the clip metal thickness. This is engineered so that you can take accurate measurements whether the clip is pushed or pulled - taking into account the width of the clip on a pushed measurement.
You'll notice in the top picture (above) that the tape measure is clipped on a board and that there is a space between the clip and the blade. In the picture (above) below it the tape measure is extended and pressed against a board, and you can see that there is no space. If the clip is undamaged this is self adjusting to assist you in getting accurate readings on your measurements, regardless if you are taking the measurement by pushing or pulling.

READING YOUR TAPE
Once a tape blade is extended you can see that there are markings on the foot, the inch, and all the way down to the 1/16 of an inch. The foot usually is highlighted in some form, on this one you can see that it's a large black arrow. The inches are usally marked with lines all the way across the blade and has the number in inches.

The 1/2 inch line is essential when measuring. You'll see on this tape that it's about 1/3 of the way accross the blade and the second longest mark. In this photo the 1/2 in mark is marked at 5 1/2 inches. The 1/2 inch mark is just half way between the inch marks.

The next shorter mark on the blade is the 1/4 inch mark. You'll notice that there are two 1/4 inch marking in each span of the inch. Those are the 1/4 and 3/4 inch marks. These are essential marks to remember on the blade for most of my projects.
The next smaller marks are the 1/8 inch marks, and then the 1/16 inch marks are the smallest, but it is super rare that I would post a project plan that required you to know those, as my intention is to make building as uncomplicated as possible!
USING YOUR TAPE MEASURE

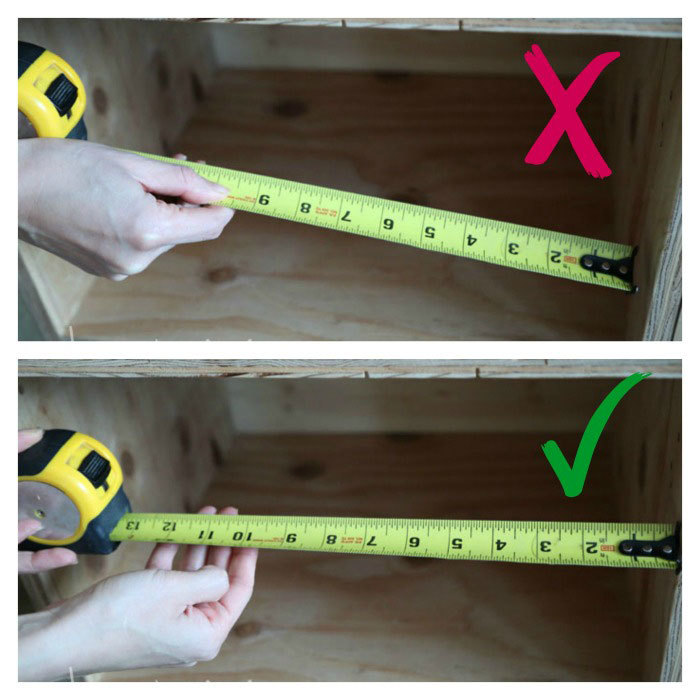
Always make sure that the tape measure is level or plumb to take accurate measurements. Measure parallel to the side of a board, not across at an angle.

Toi take an accurate inside measurement, press against one side, and the back side of the tape measure agaist the opposite side of the frame, and add that distance to the size of the tape measure (which is usually printed on the side of the tape measure). This is a more accurate way to take inside measurements.

Another way you can take an inside measurement is by holding 10. For very precise measurements on an inside or with a damaged clip, hold the tape at the 10 inch mark. Then simply subract 10" from your measurement.
A FEW MORE TIPS
- Use a mechanical pencil for accurate marking, or for extremely precise measurements, cut mark with a utility knife blade.
- Always remember that the saw blade takes up space (called the "kerf") and you will need to cut one one side of the line, and not on the line itself (unless you are marking with a carpenter's pencil).
- You can use your tape to check for square by measuring opposite diagonals and adjusting your project until the diagonals are exactly the same.
- Take care of your tape measure. The slightest bend in your clip may cause you to have inaccurate measurements.
I hope this tutorial is helpful to you and if you have any extra tips/tricks of the tape please share!
Happy Measuring!
Ana

Comments
alli84
Wed, 01/21/2015 - 14:09
16"
Also, every 16" is red. Wall stud spacing is typically 16" on center, so on a long span wall, if you find a stud, stretch out the tape and every 16" will typically be the placement of another wall stud. (exceptions may be for structural support, closer to doors/windows, etc.)
Armstrong3012
Mon, 01/26/2015 - 04:02
19.2"
Most tapes also have triangle indicators at 19.2" increments. Standard walls have 6 studs per 96" of wall length. In some applications (depending on code, of course) it is acceptable to use 5 studs per 96" of wall length. In these cases, the triangle indicators are very useful because quickly locating 19.2", 38.4", etc. is quite challenging!
jackiemacrae
Wed, 01/21/2015 - 22:24
Carpenter's pencil
Thanks for the tips. I was with goy until the end- why do you ignor the kerf and cut on the line with a carpenters pencil?
Thanks!
In reply to Carpenter's pencil by jackiemacrae
Danielzore
Thu, 01/22/2015 - 08:31
Carpenters Pencil
Carpenters pencils are larger than regular pencils, they are also flat so as not to roll away. The pencil could be used to take into account the kerf thickness, but you would need to check that is matches. The best ways to account for it are to use calipers to check the thickness of the blade kerf, (at the widest point where the blades are, not the body of the blade) and measure what you are drawing with to get the perfect cut, or like posted above cut on the outside of the pencil marking. Remember it is always best to cut slightly oversized instead of undersized, that way you can plane, or sand or make small cuts to fit the piece accurately.