48" Wide Closet Units from HGTV Show

The free plans on this website are made possible with advertising and affiliate links.  Thank you for helping us keep plans free.


closet shelving centers
Difficulty
Intermediate
| Print this plan

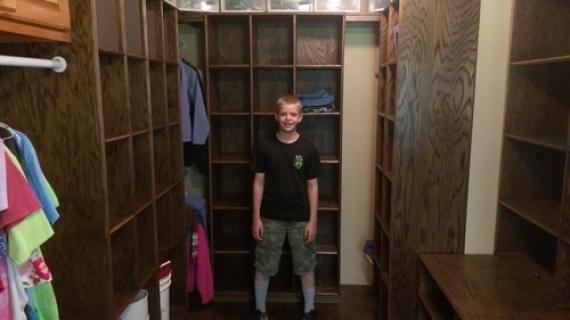
I built a giant closet system for HGTV show using plywood.  This closet was absolutely massive.  The homeowner wanted alot of shelving for sweaters and shoes.  We ended up building three of these 48" wide units, and then adding hanging in between the units.  This turned out so great and was an inexpensive DIY solution for such a huge space.

I am happy to share the plan that I used to build this closet system below.
Several years ago, we did a few shows for HGTV.  One of the projects was converting a part of a garage into a master suite for a homeowner (who has since become our good friends!)

We still look at this room with pride!  And a few weeks ago, the homeowner happened to be in our area, and so we had lunch.  They are still thrilled with their new space!  Totally made our week!

The big project in this garage-turned-bedroom-redo was this huge dream master closet.  Can you believe Jacob built and installed this closet in two days?  And not just any two days - two days borrowing a workspace with cameras rolling.  

Oh, and we spent about $1400 in total.  And we didn't scrimp and use MDF or particle board - that's all PureBond maple plywood! Did you know the homeowner actually had a custom closet quote for ten times that amount?

This project was simple enough - we stuck to making the closet towers 48" wide to maximize material use and limit cutting.  We also cheated a little by having the plywood supplier (a local custom woodworking shop that actually carried PureBond plywood in prefinished off the shelf) rip the plywood into 15-3/4" wide strips first.  Then we edge banded all of the strips with prefinished edge banding.  From there, it was just cutting and pocket holing!

We had to take the extra steps to use prefinished plywood and prefinished edge banding because we knew there wouldn't be time to paint and in March in Alaska, it's still winter so spray painting outside is not an option (and we didn't have access to a spray booth for this project).  If you are building this at home not on a tight tv filming schedule, you could paint or stain and save even more money.  

PS You can find the bed plans here and the nightstand plans here.

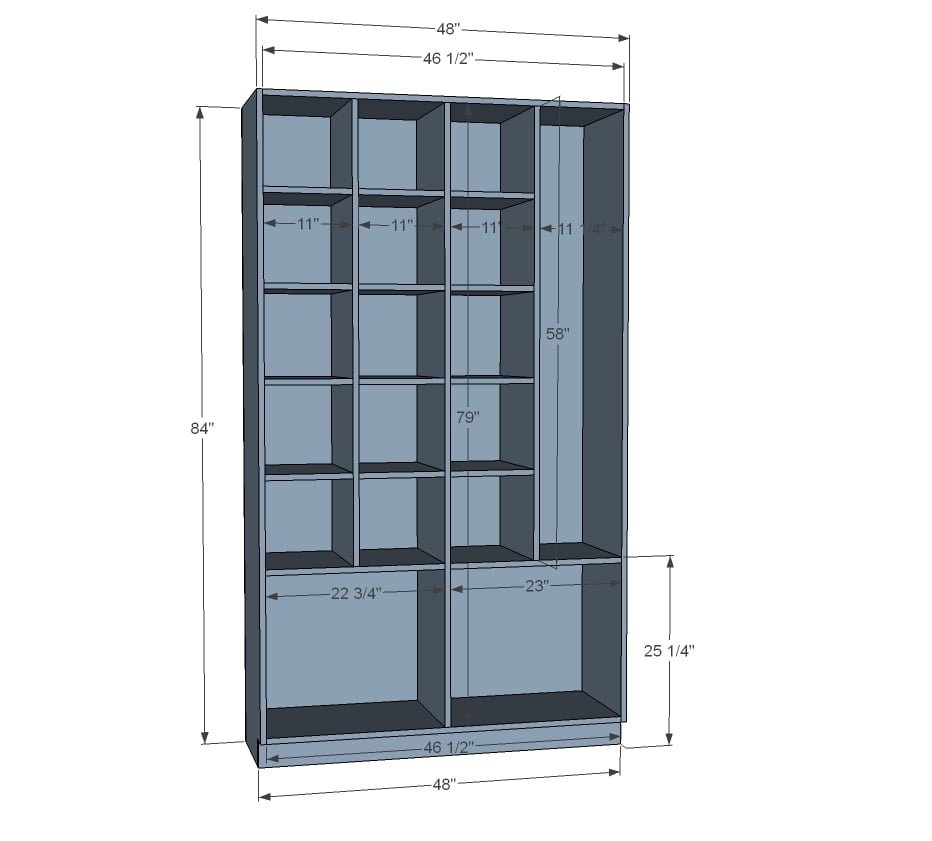
Dimensions
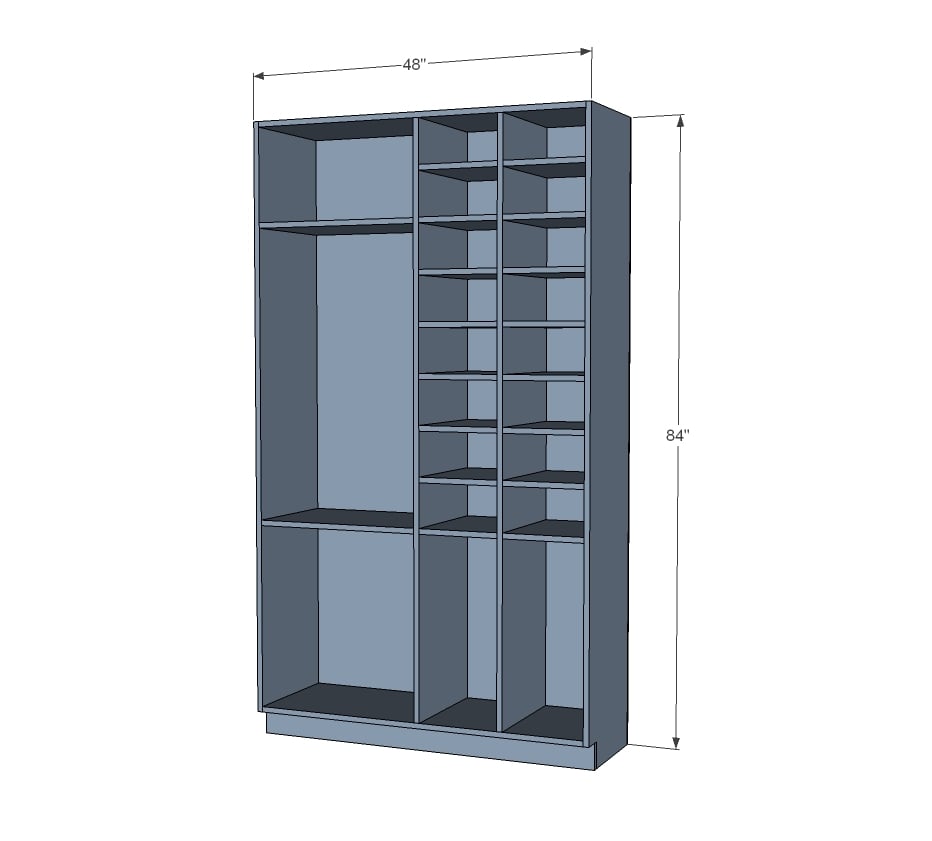
closet tower with shelves
Dimensions shown above - when you plan your closet, consider how you will move the pieces into the closet. You may wish to make your tower(s) shorter to allow passing under doorways.

Preparation

Shopping List
  • 3/4" plywood cut into strips 15-3/4" wide x 8 feet long, edge banded on front side (if planned well, two sheets of plywood per organizer)
  • 1/4" plywood in matching species for backs (one full sheet)
  • 1x4x4' boards in matching wood species for toekick
  • 1x4x8' pine boards for underneath supports (cheaper than the matching wood species boards)
  • 3/4" brad nails for attaching backs
  • 1-1/4" pocket hole screws

*NOTE: For paint grade, you can use birch plywood or MDF and pine or poplar for the toekicks.

Cut List

For closet shown in dimension diagram - see later steps for alternative configurations

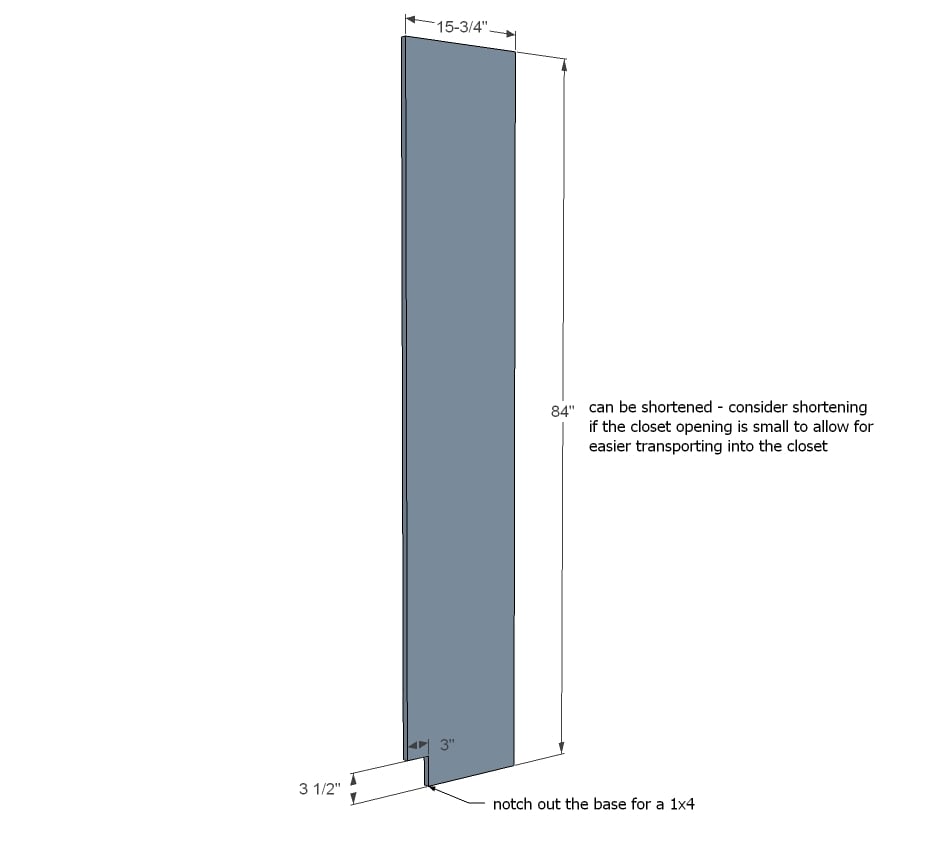
  • 2 - 3/4" plywood @ 15-3/4" x 84" (sides)
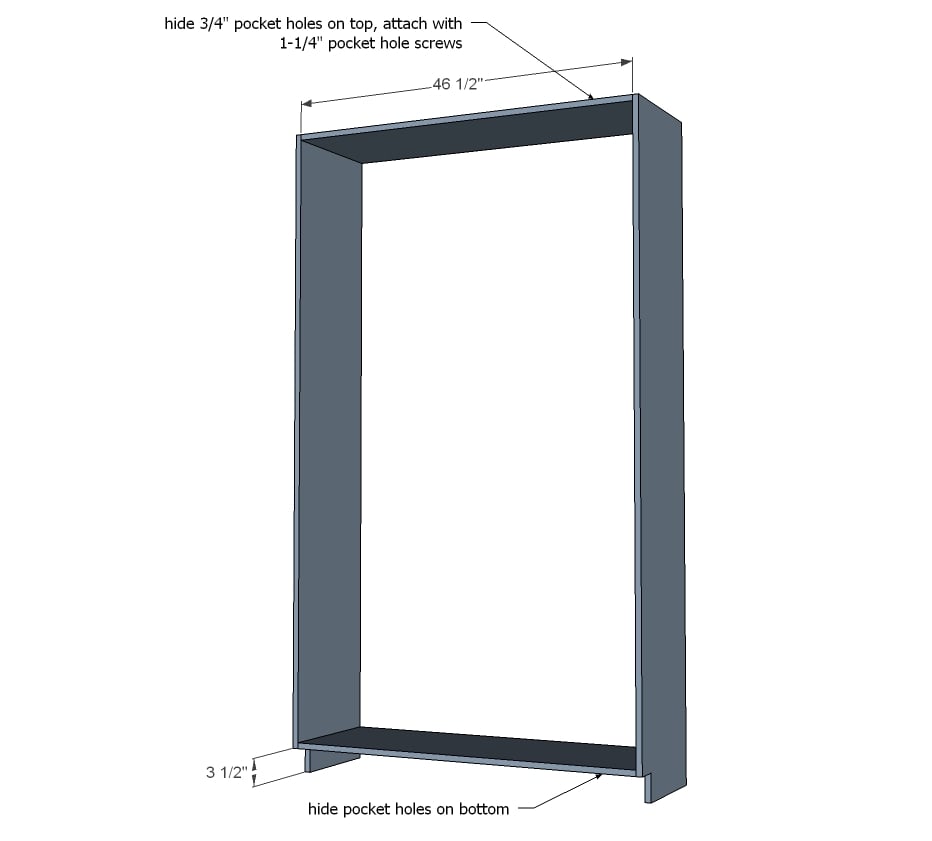
  • 2 - 3/4" plywood @ 15-3/4" x 46-1/2" (top and bottom)
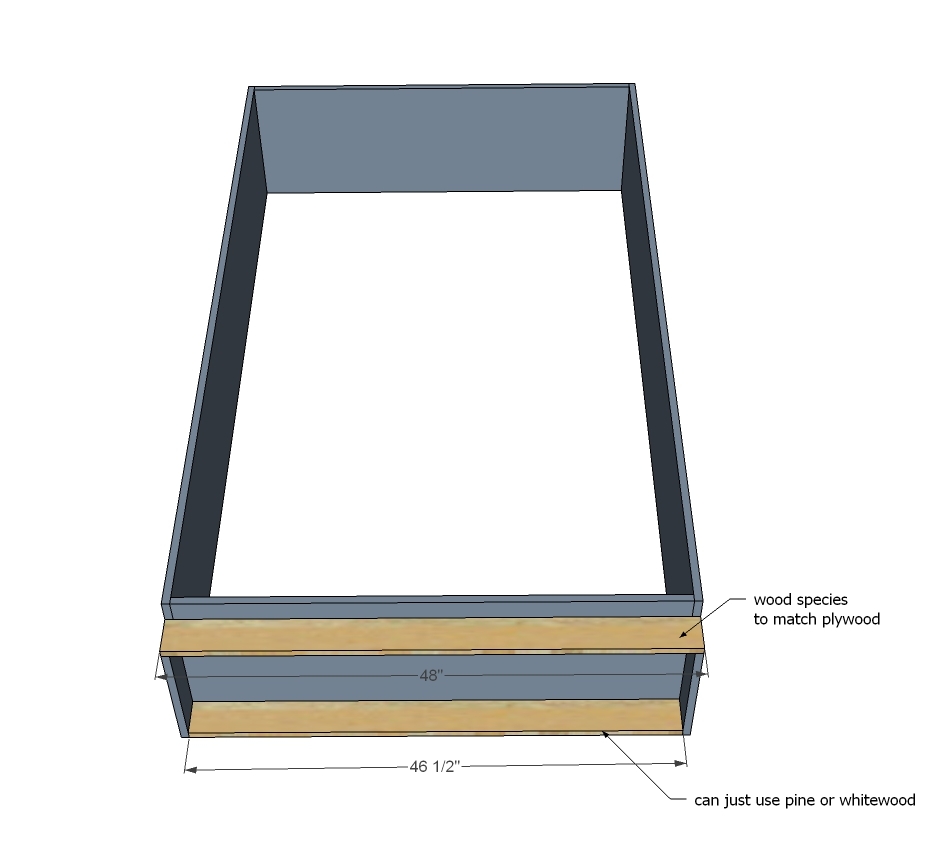
  • 1 - 1x4 matching wood species @ 48" (toekick)
  • 1 - 1x4 pine or whitewood @ 46-1/2" (support)
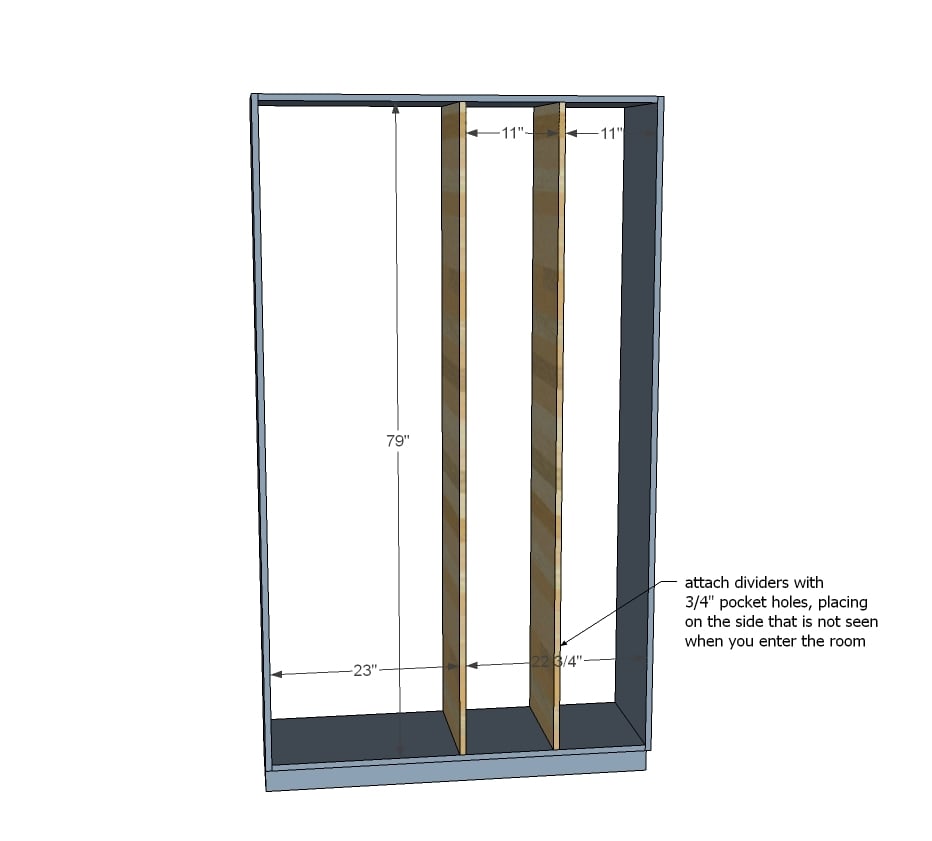
  • 2 - 3/4" plywood @ 15-3/4" x 79" (dividers)
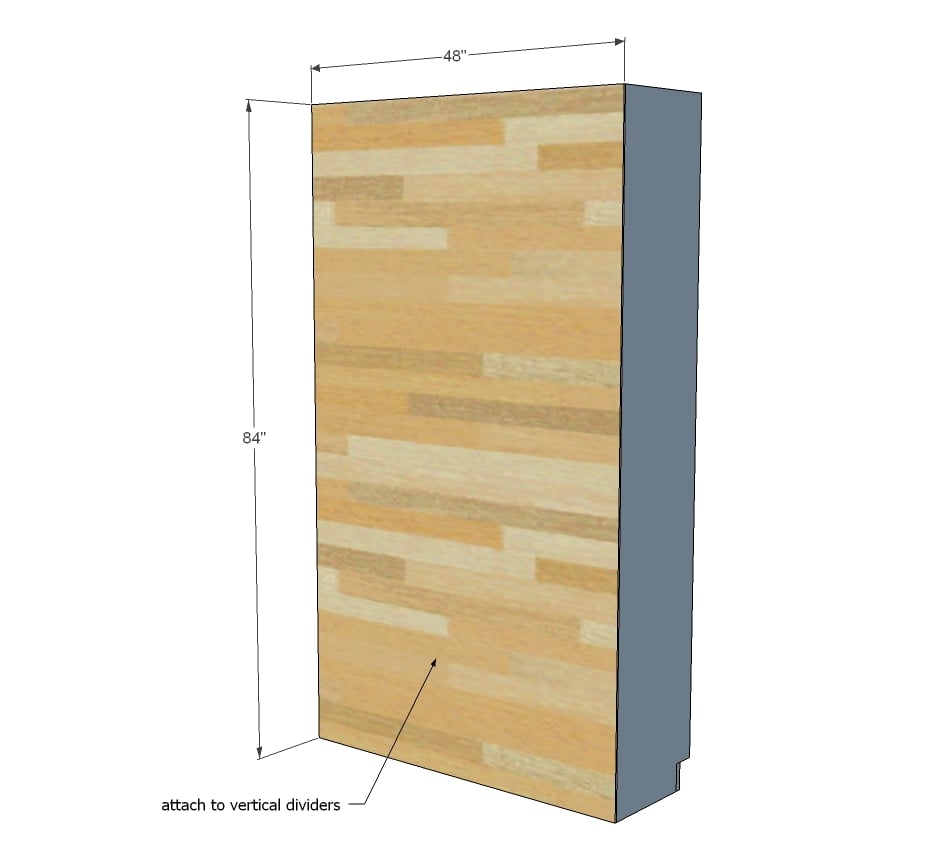
  • 1 - 1/4" plywood @ 48" x 84" (back)
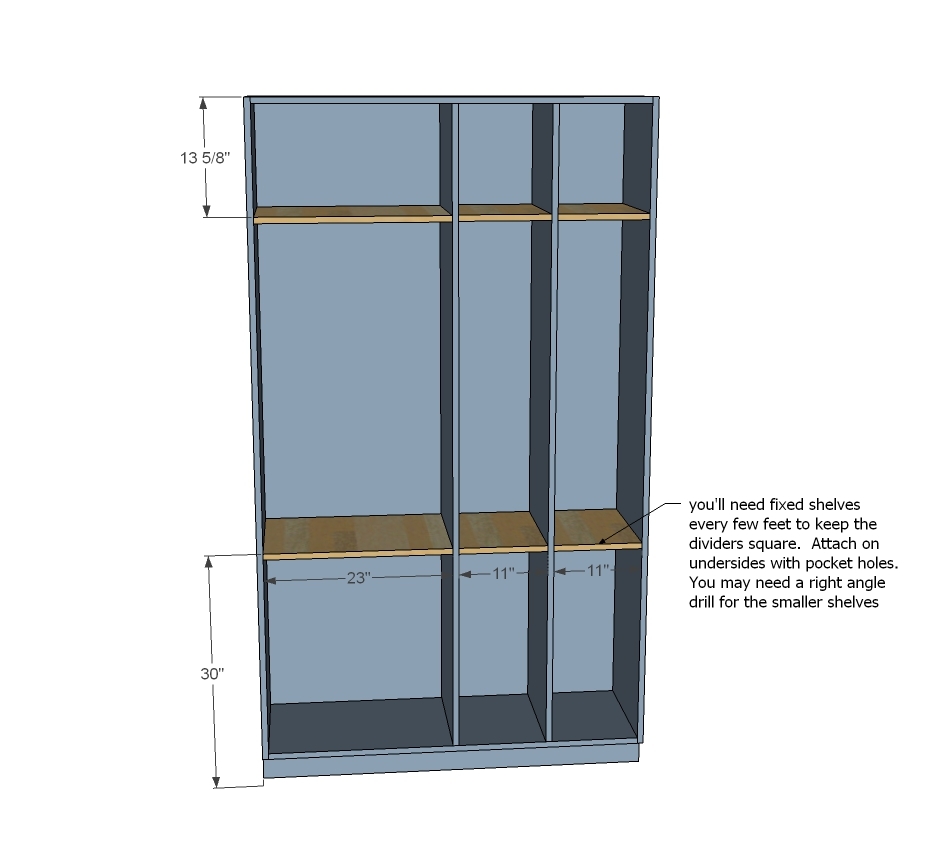
  • 2 - 3/4" plywood @ 15-3/4" x 23" (large fixed shelves)
  • 4 - 3/4" plywood @ 15-3/4" x 11" (small fixed shelves)
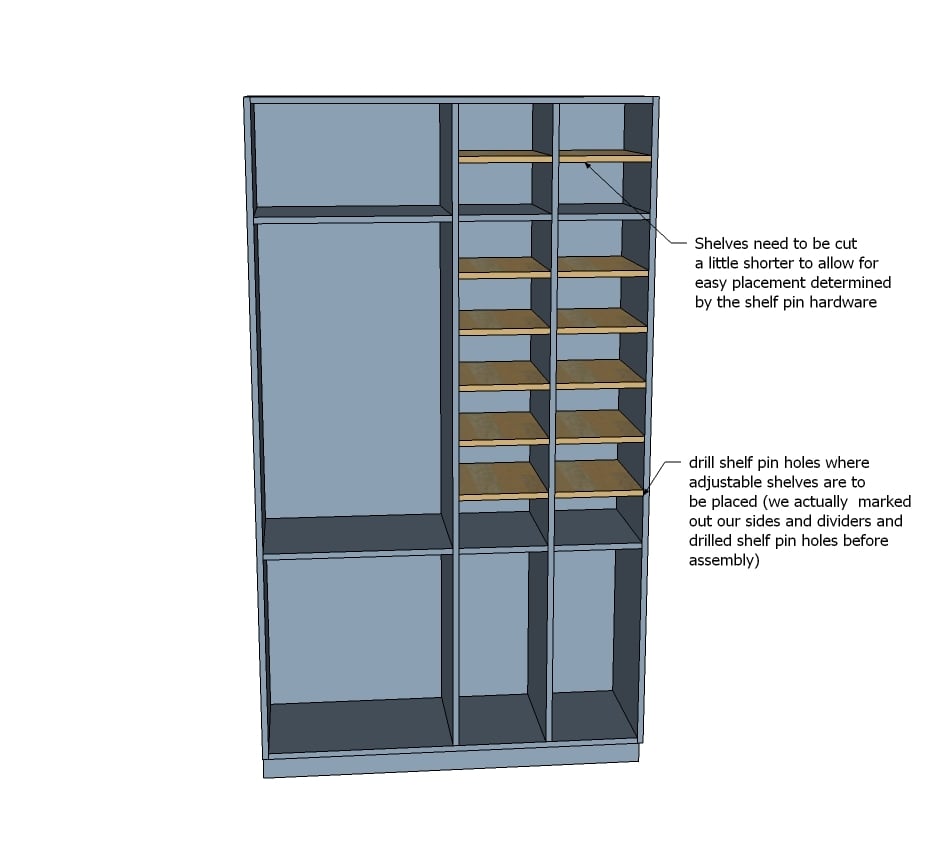
  • 12 - 3/4" plywood @ 15-3/4" x 10-3/4" (adjustable shelves)
Tools
Tape Measure
Speed Square
Pencil
Safety Glasses
Hearing Protection
Kreg Jig
Drill
Circular Saw
Miter Saw
Table Saw
Brad Nailer
General Instructions

Please read through the entire plan and all comments before beginning this project. It is also advisable to review the Getting Started Section. Take all necessary precautions to build safely and smartly. Work on a clean level surface, free of imperfections or debris. Always use straight boards. Check for square after each step. Always predrill holes before attaching with screws. Use glue with finish nails for a stronger hold. Wipe excess glue off bare wood for stained projects, as dried glue will not take stain. Be safe, have fun, and ask for help if you need it. Good luck!

Instructions

Step 1

Notch out bottom of the sides to allow for a toekick. Also, we marked the location of shelf pins and carefully drilled them (be VERY careful doing this, if you are off even the tinest bit your shelves will wobble).

Step 2

Attach top and bottom to the sides with 3/4" pocket holes and 1-1/4" pocket hole screws.

Step 3

Attach bottom support and toekick to the base. We drilled pocket holes on insides facing upward to attach to the bottom shelf (since we are using prefinished every single screw hole had to be hidden, but if you are painting you could just nail or screws from the top).

Step 4

Attach dividers to top and bottom.

Step 5

Step 6

Nail or staple the back to all dividers and fixed shelves and outside edges.

Step 7

Cut the adjustable shelves and drill shelf pin holes (if you haven't already).

Step 8

Here's an alternative configuration that I also loved - perfect for sweaters and larger items.

Step 9

To attach the towers together we used hardwood boards in maple (to match the prefinished plywood but if you are painting you could use pine, whitewood boards, MDF or poplar) attached to the wall underneath the shelf. We also added 1x2s under the shelves on the front. Then we just set the shelves on top and screwed down. This is something you'll want to do in place, as walls are rarely perfectly square.

Finishing Instructions
Preparation Instructions
Fill all holes with wood filler and let dry. Apply additional coats of wood filler as needed. When wood filler is completely dry, sand the project in the direction of the wood grain with 120 grit sandpaper. Vacuum sanded project to remove sanding residue. Remove all sanding residue on work surfaces as well. Wipe project clean with damp cloth.

It is always recommended to apply a test coat on a hidden area or scrap piece to ensure color evenness and adhesion. Use primer or wood conditioner as needed.

Comments

Email Me
Free Plans

Get new plans sent right to your inbox for free!

    We won't send you spam. Unsubscribe at any time.