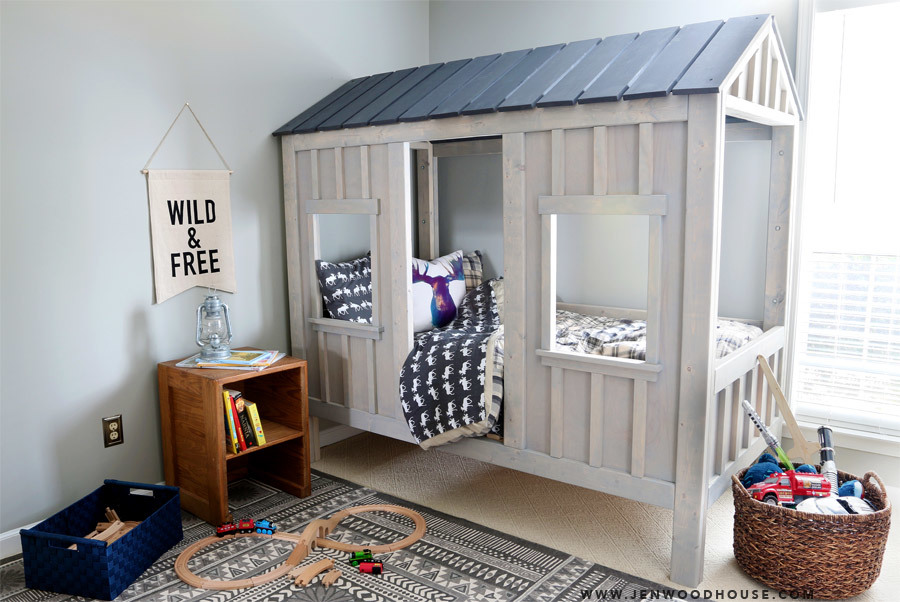


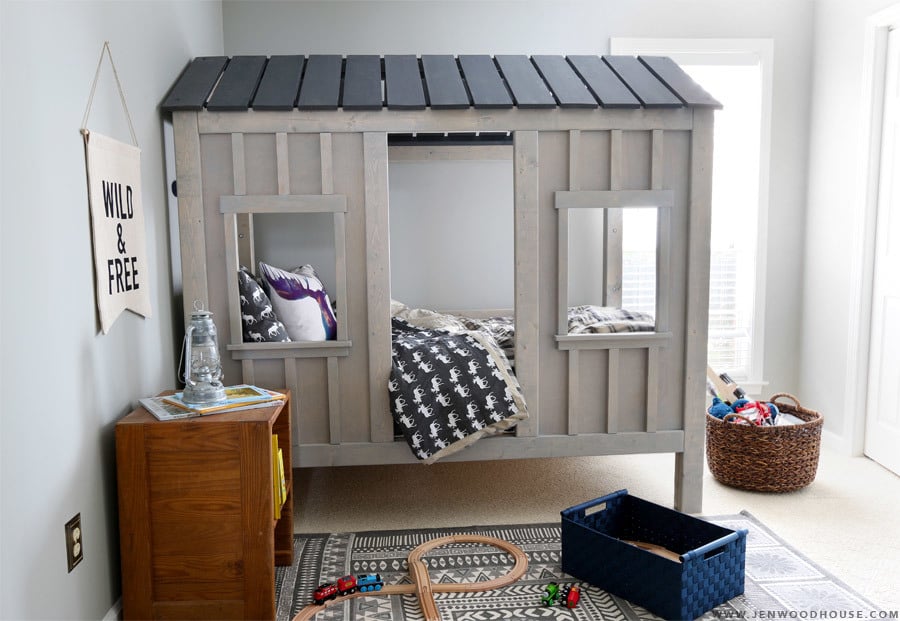
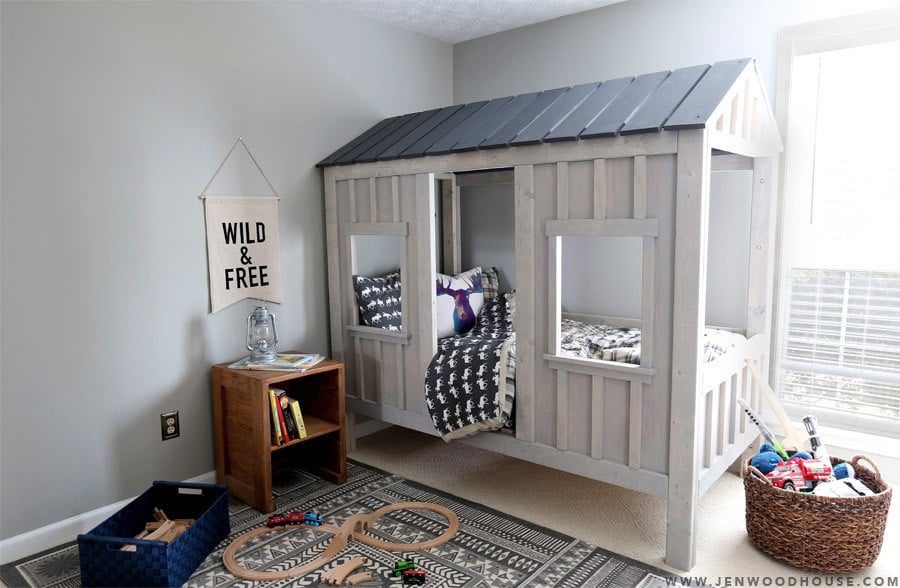
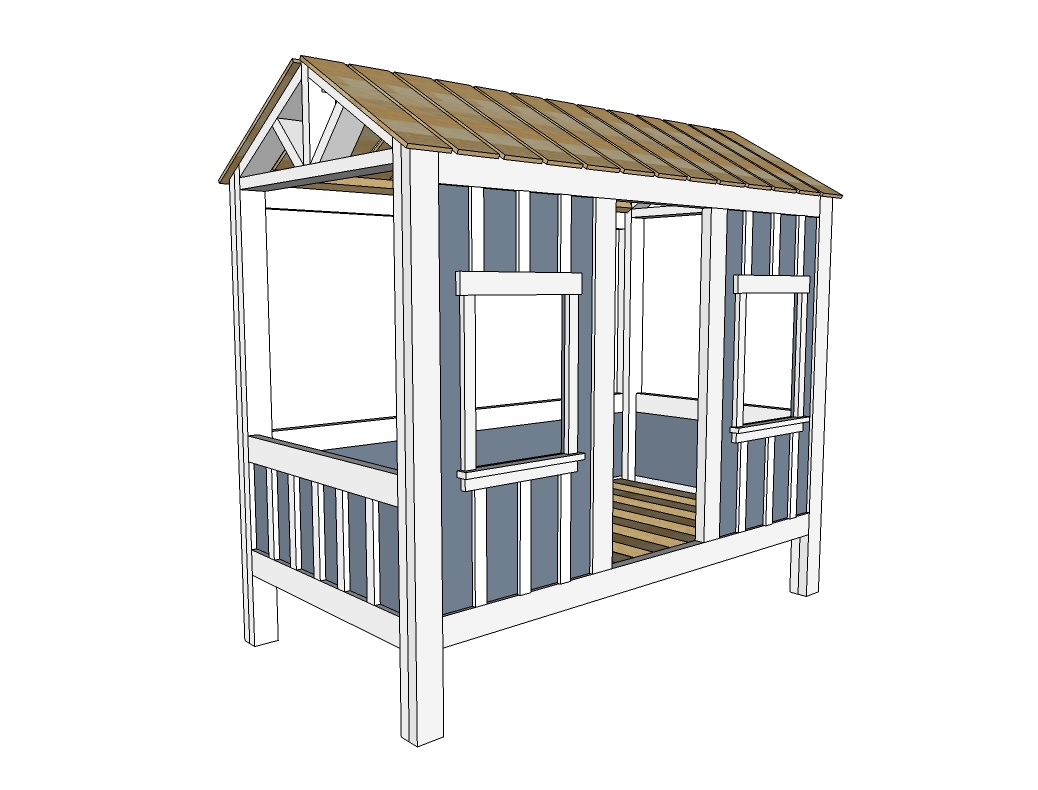
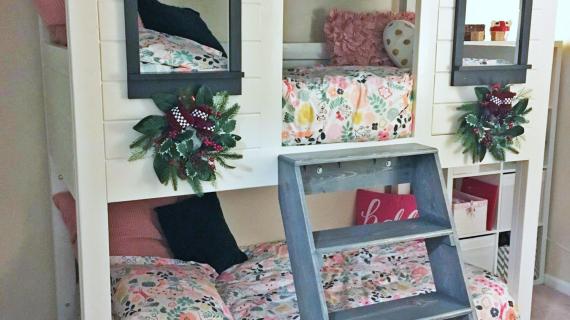
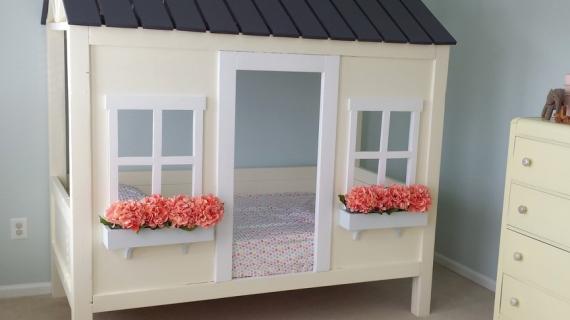
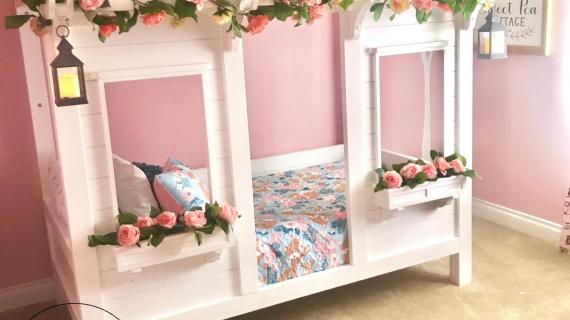
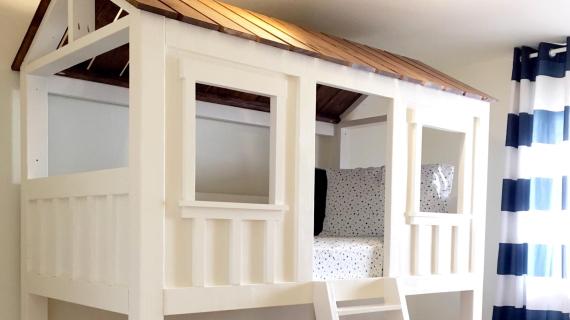
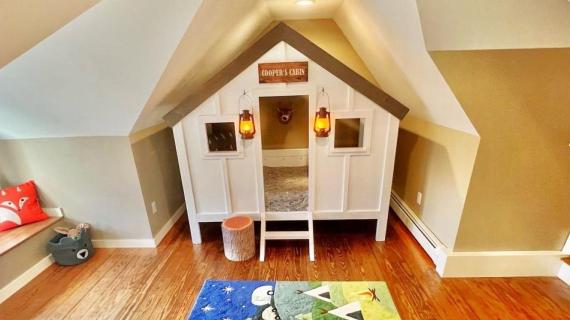
DIY cabin bed, made from plywood and lumber. Free plans by Ana-White.com built by jenwoodhouse.com

Oh my goodness, guys! I have an amazing treat to share with you today.
It's always a treat when I get to work with the lovely, smart, kind, and talented Jen Woodhouse, but this is like a quadruple scoop of salted carmel ice cream ... on top of a godiva cheesecake!
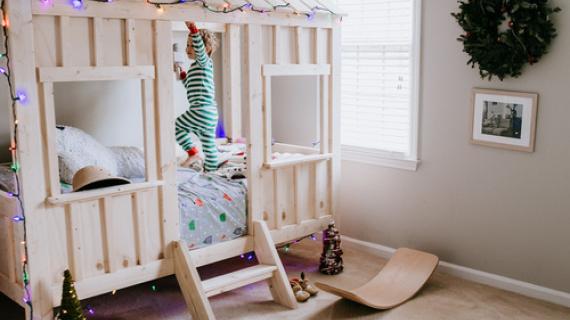
How amazing is this bed that Jen Woodhouse just built?
I'm so thankful to have had a chance to work with Jen to create this bed plan!

Jen wrote me a little while back about partnering up to build her son a new bed. She really loved this bed, but the cost ($2800-$3000 before tax and freight) was prohibiting, and Jen is also conscientious about the materials she brings into her family's home, and wanted to avoid formaldehyde because it off-gasses (especially in a child's bed, where the child could spend 1/3 of their developing life).
It was important to Jen that the bed be made using sustainable, clean materials, with minimal off gassing. So we worked to design the bed to be built with plywood, using PureBond Plywood. We both love PureBond Plywood because it is formaldehyde free, beautiful, dimensionally stable, and sustainably harvested and distributed.
We also worked together to create a design that could be easily assembled and disassembled, as Jen's family is in the Service. We both loved that the panel design breaks the bed up into sections to work on, and then each panel is something you can still handle by yourself.
Want to build it? You can do it! Here's Jen's quick video outlining the steps -
So, the plans follow, but before you check them out, head on over to visit Jen Woodhouse for lots more photos, building tips, room styling inspiration, and more!
XO Ana
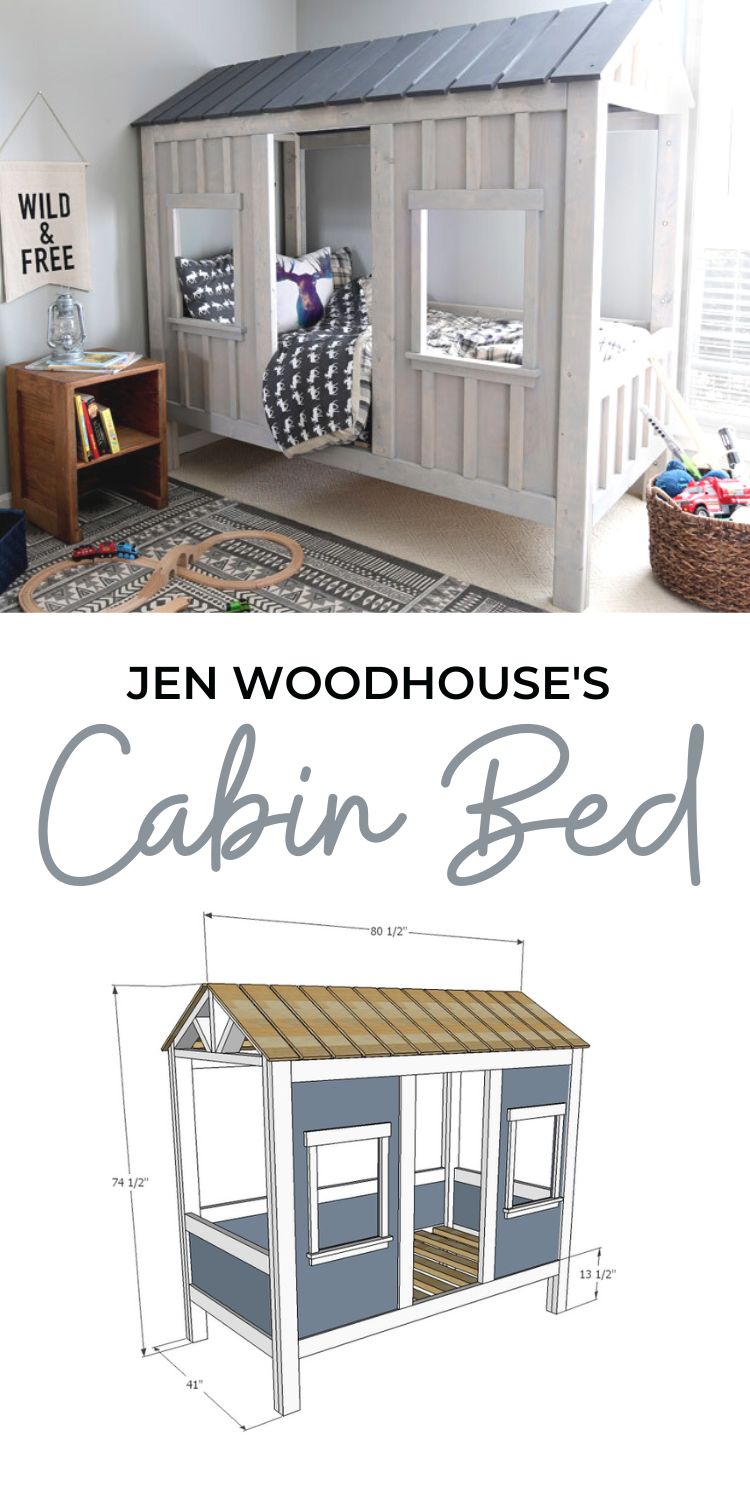
Pin For Later!
Preparation
1 sheet of ¾” plywood, ripped into 2 – 12” wide strips and 1 – 23” wide strips, all 8 feet long
17 – 2x4 @ 8 feet long
6 – 2x2 @ 8 feet long
2 – 1x2 @ 8 feet long
1 – 1x3 @ 4 feet long
2 – 1x6 @ 10 feet long and 4 – 1x6 @ 10 feet long
2 – 3/4” self tapping screws
1-1/4” finish nails or screws (for attaching roof slats and window trim)
2” screws or similar for attaching bed slats to cleats
Cut ¾” plywood into two strips 8 feet long x 12” wide. Cut remaining piece 23” wide (for front panels).
SIDE PANELS
2 – 2x4 @ 11-3/4” (truss center)
4 – 2x4 @ 63-7/16” – one end cut at 30 degrees off square bevel, SHORT point measurement
6 – 2x4 @ 35” 2 – 2x4 @ 19-5/16” - both ends cut at 30 degrees off square bevel, long point to short point measurement
4 – 2x4 @ 10” long (see steps for additional cutting instruction)
2 – ¾” plywood @ 12” x 35”
BACK PANEL
2 – 2x4 @ 63-7/16” – one end cut at 30 degrees off square bevel, LONG point measurement
3 – 2x4 @ 71-1/2”
1 – ¾” plywood @ 12” x 71-1/2”
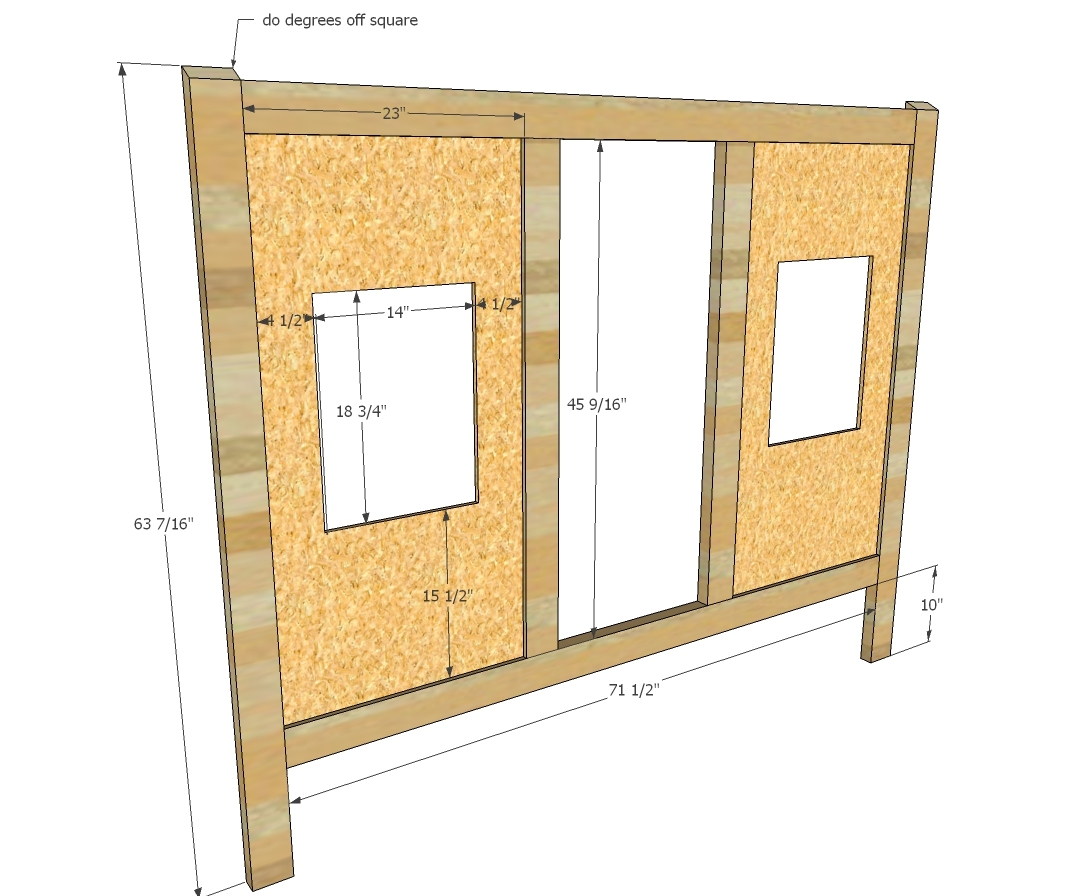
FRONT PANEL
2 – 2x4 @ 63-7/16” – one end cut at 30 degrees off square bevel, LONG point measurement
2 – 2x4 @ 71-1/2”
2 – 2x4 @ 45-9/16”
1 – ¾” plywood @ 23” x 45-9/16”
WINDOW TRIM
2 – 1x3 @ 18”
4 – 1x2 @ 18-3/4”
2 – 1x2 @ 18”
2 – 1x2 @ 17”
ROOF 1 – 2x4 @ 75” (ridge)
4 – 2x2 @ 71-1/2” (make sure can fit inside roof easily)
26- 1x6 @ 23-3/4”
BED SLAT SYSTEM
2 – 2x2 @ 71-1/2”
10 – 2x4 @ 38” (can use different materials or less or more depending on mattress)


Instructions
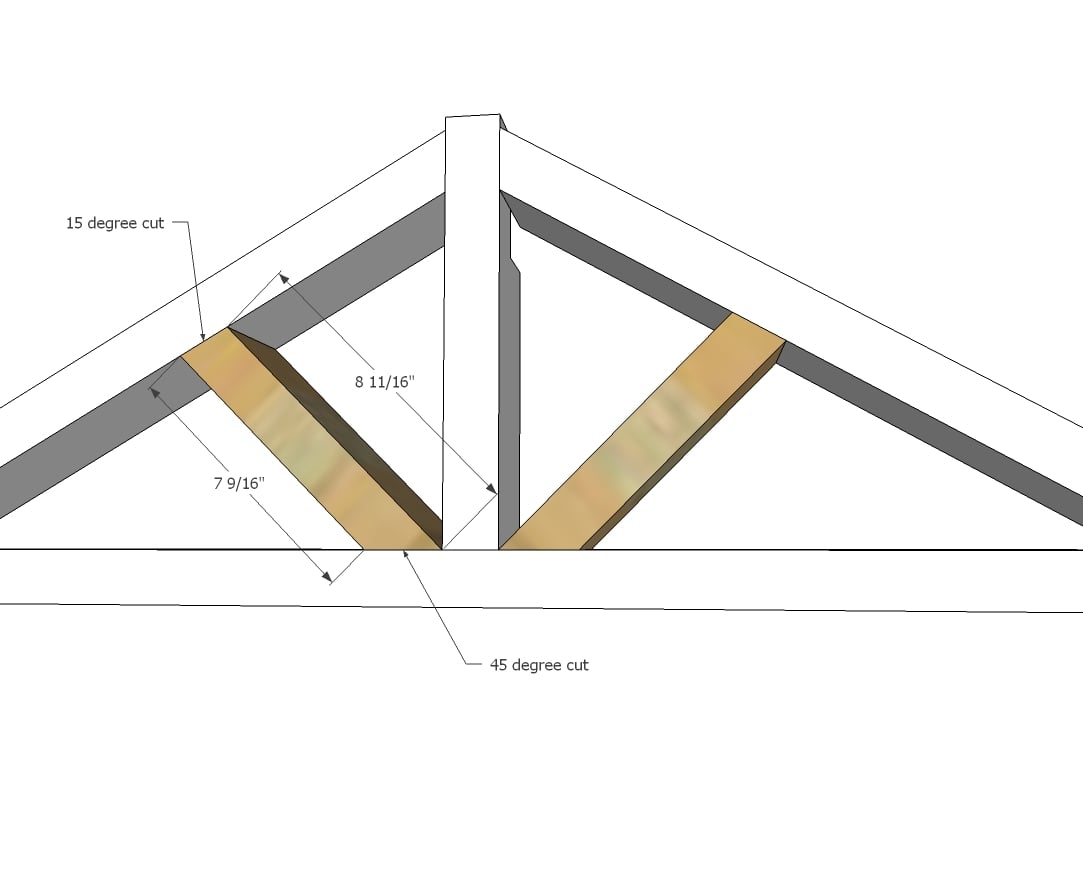
Step 1
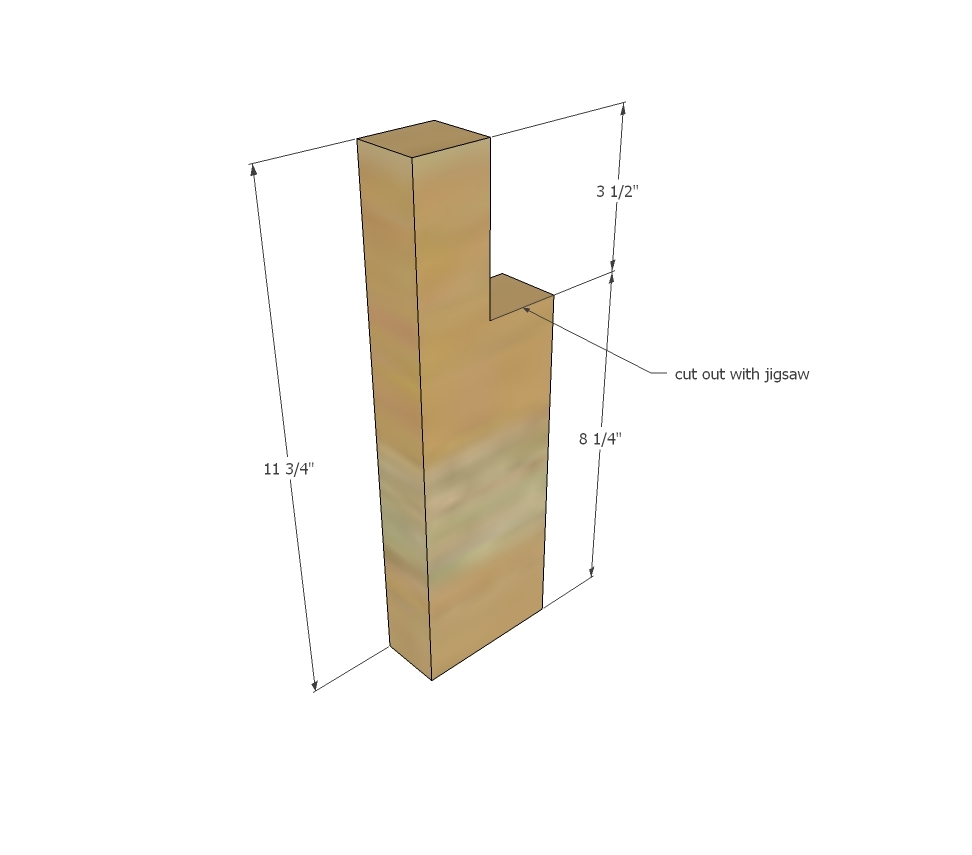
Notch out the center truss pieces as shown. Use a jigsaw to cut out.
Step 2
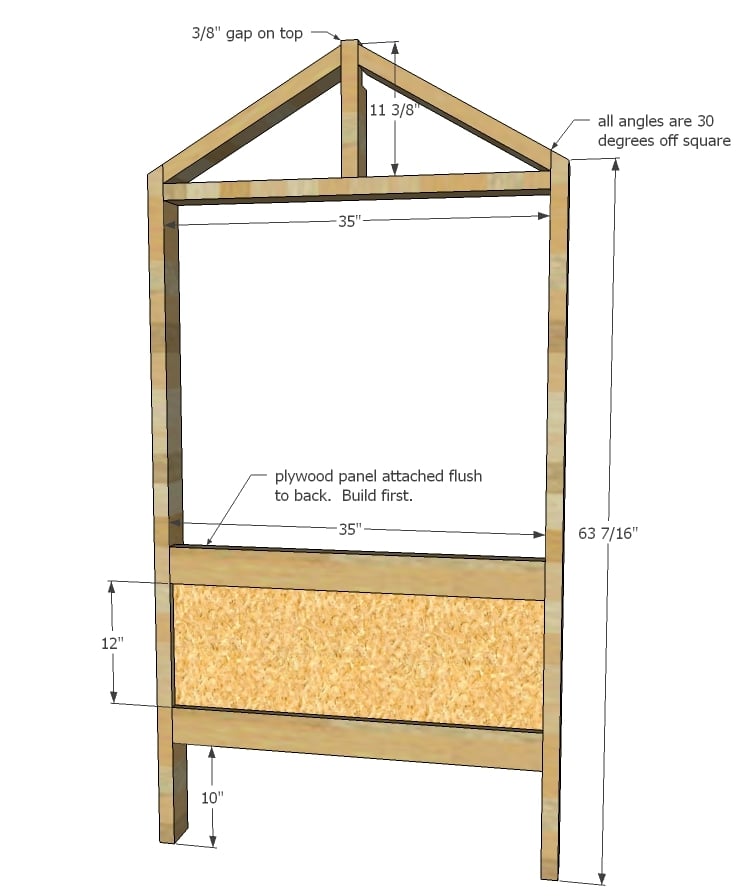
Attach plywood panel to two of the 2x4s that are 35” long with ¾” pocket holes and 1-1/4” pocket hole screws on back side, with everything flush to back. Also drill pocket holes in plywood panel and 2x4s for attaching to legs. Attach to legs with pocket hole screws, leaving 10” space under bottom 2x4, 2x4s are flush on the outside. Lay out the top pieces. Attach remaining 2x4 that is 35” long to center notched 2x4, matching centers. Attach rafters and screw to legs. Use either 2-3/4” screws or 2-1/2” pocket hole screws. Build two that exactly match.
Step 3
Add rafters inside side headers. Screw from outside with 2-3/4” screws to attach.
Step 4
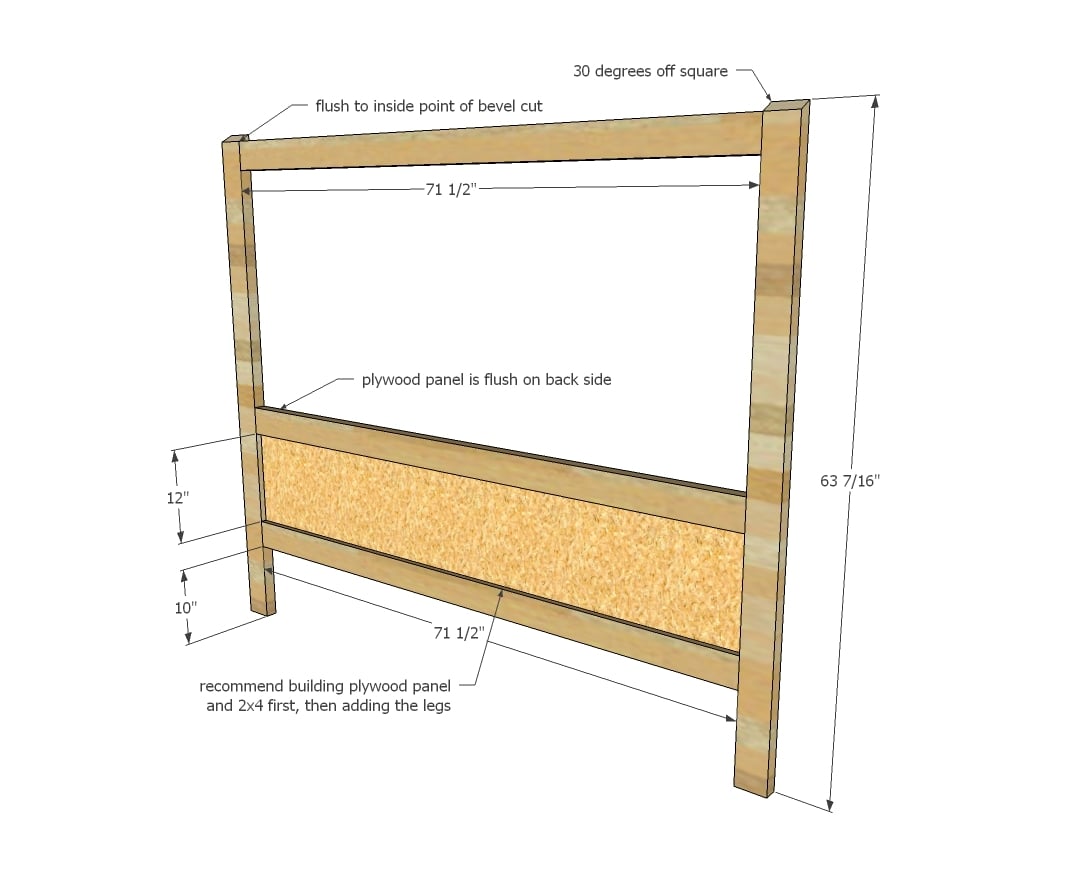
Attach plywood panel to 71-1/2” 2x4s first, as you did the side panels. Remember to drill pocket holes (3/4” in the plywood, 1-1/2” in the 2x4s) for attaching to legs. Leave a 10” space below panel and attach to legs with pocket hole screws. Attach top 2x4 to legs. Everything is flush to inside.
Step 5
Step 6
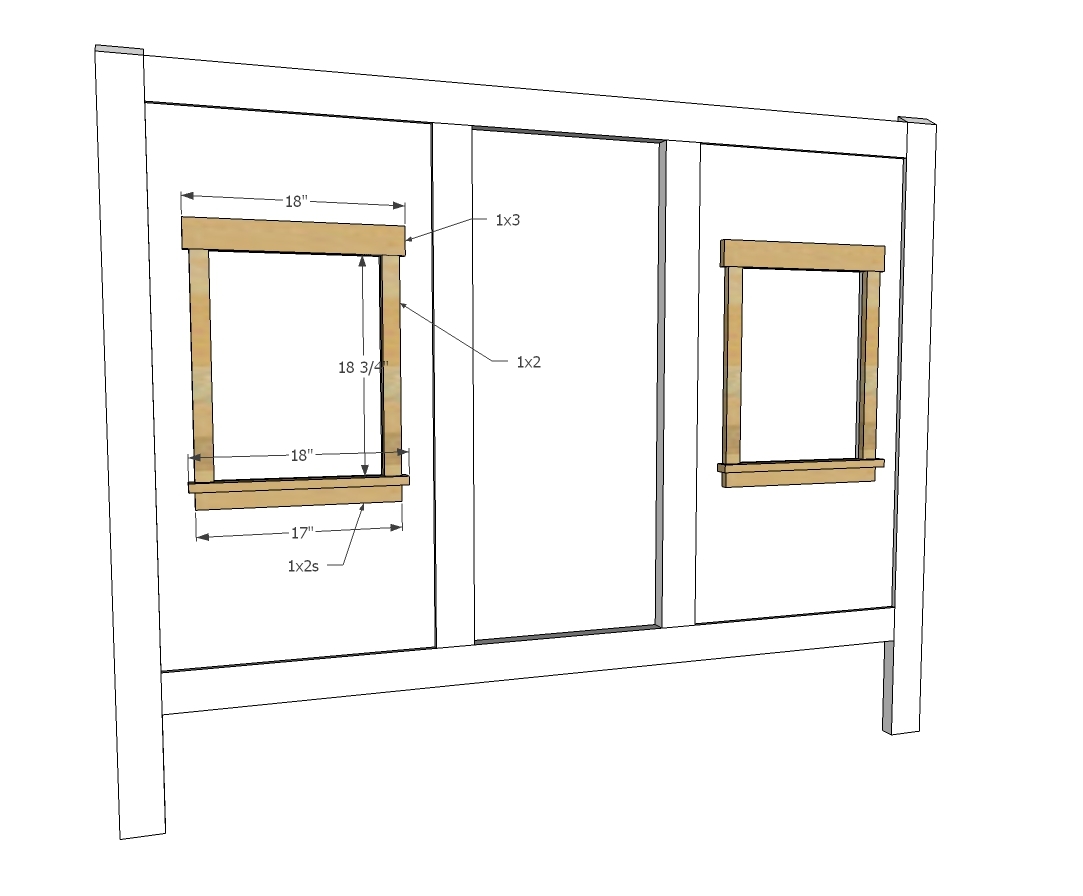
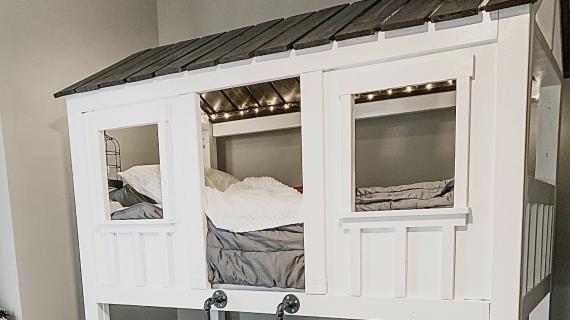
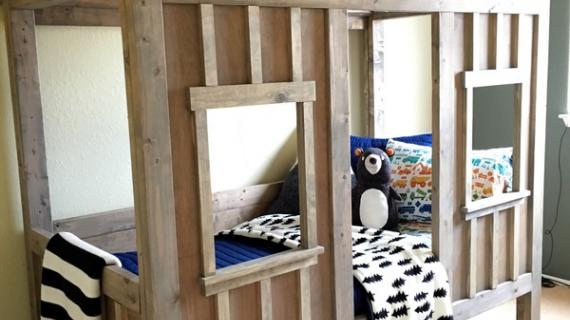
Trim windows out with 1x boards. Nail on with 1-1/4” finish nails.
Step 7
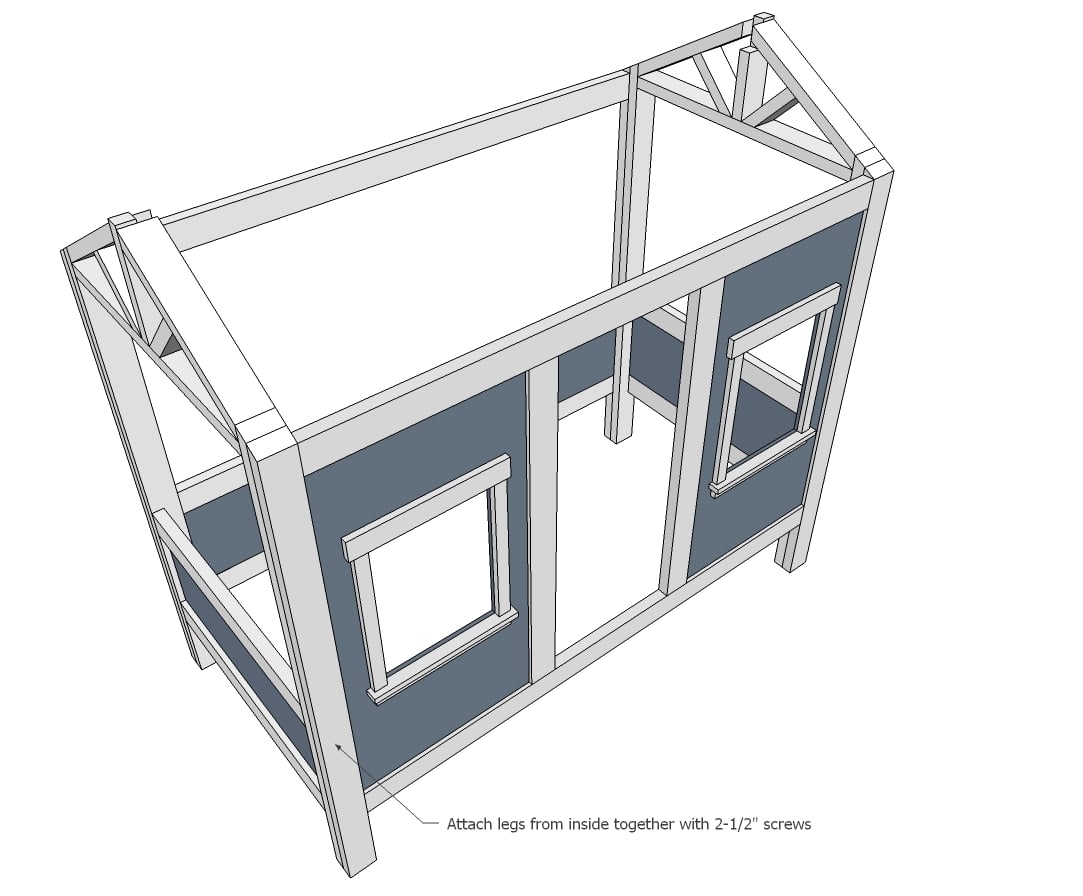
Fill all pocket holes on the panels. Paint or finish as desired. On assembly, screw from INSIDE the four panels together to create the bed with 2-3/4” screws.
Step 8
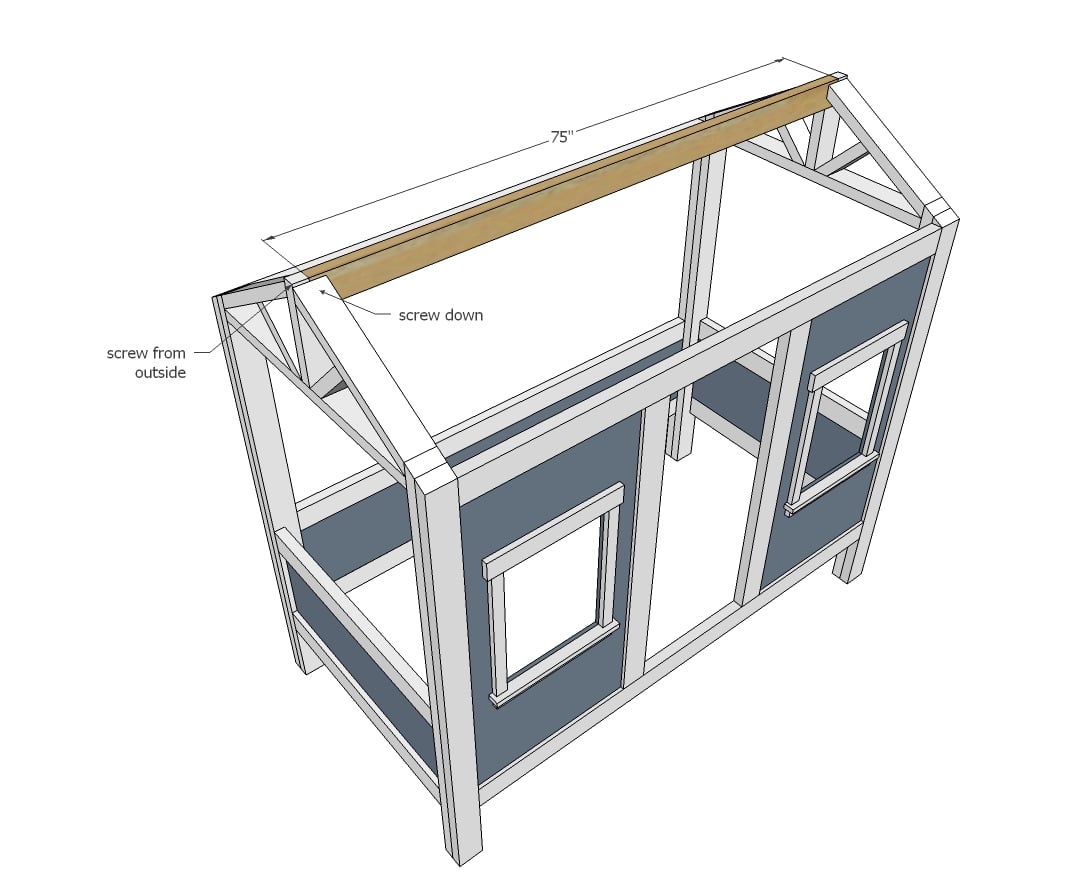
Set ridge inside end trusses and screw down with 2-3/4” screws.
Step 9
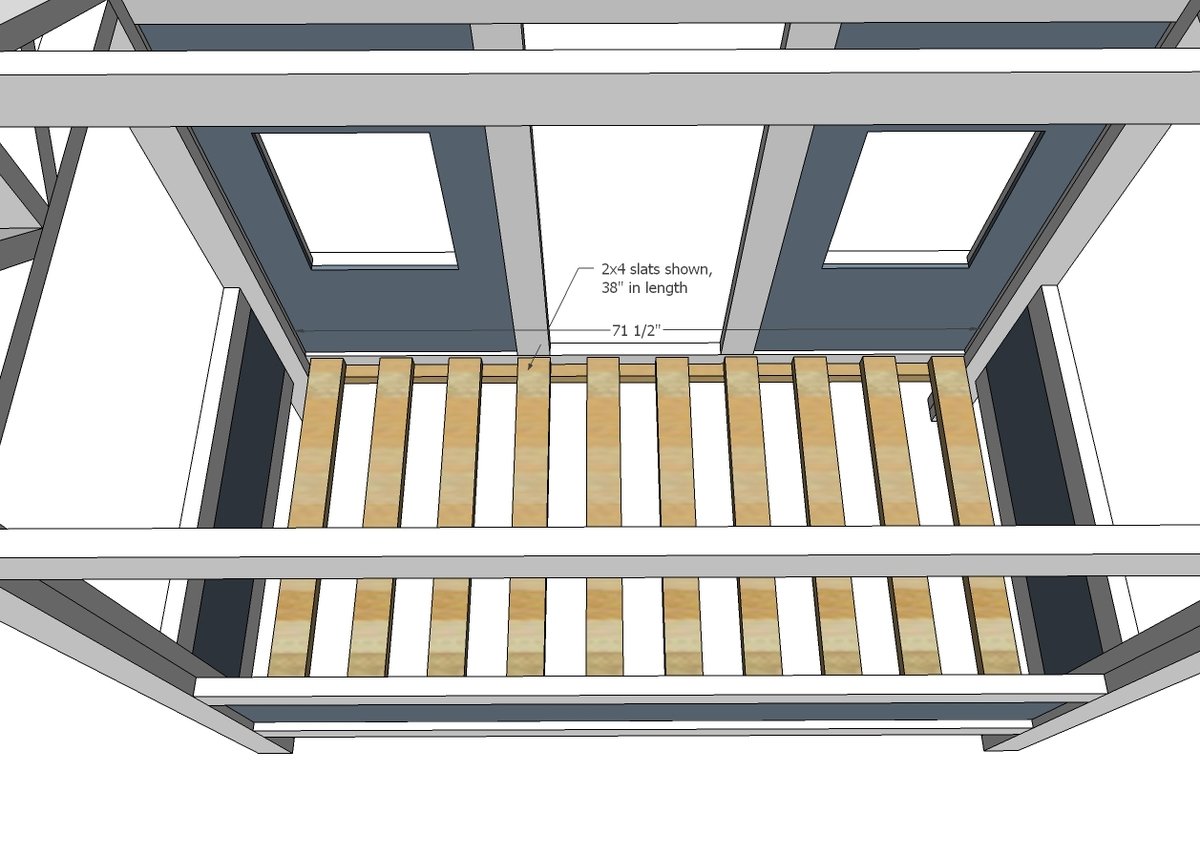
Build the bed slat system by using 2-3/4” screws to attach cleats to side panels, flush to bottom of side panels. Add slats on top and screw down.
Step 10

Build roof system by laying out 1x6 boards with 2x2s on top. Adjust for square. Attach with screws, leaving ¾” gaps in between the roof slats. On installation, set roof panel in roof. You must screw the top 2x2 to the main ridge pole for adequate strength.
Step 11
Additional 1x2s can be added to plywood for the board and batten look with 1-1/4” nails and glue.

Comments
ChillyBaker
Fri, 01/22/2016 - 10:07
LOVE IT! BUNK BED PLANS?
I so dearly love this plan, I can't even tell you!!! Is it possible to make this into the ultimate bunk bed? We have 9' ceilings and this would be perfect!
In reply to LOVE IT! BUNK BED PLANS? by ChillyBaker
Ana White
Sun, 01/24/2016 - 22:03
That is a really great idea!
That is a really great idea! I will have to do some work to see if it could be done or a modified version - my kids would love it!
abedones
Sun, 01/31/2016 - 05:55
Love the Bed - Full Size Mattress Version
Terrific bed. I've had my eye on the RH version also but have not purchased due to the cost. I would love to take on this challenge and see if I can build it for my 5 yr old son. I was wondering if you have plans available for a full size mattress version of this bed? I'm a beginner at building so I'm afraid if I try to estimate the plans for a larger mattress I'll miss something on the sizing and will have to start over after I realize my mistake. I'm also considering building a trundle mattress box to fit within the legs for friend sleepovers. Thanks for the great plans.
Wren's Mongo
Sat, 08/20/2016 - 14:19
Great Bed! Full size mattress plans?
Thank you for making these plans available. His bed looks amazing and I can't wait to build it. My only problem is we have a full use mattress and wanted to avoiding buying a Twin. Could we get the plans for full size or perhaps a version of the plans in a format we can modify? Thank you.
Lindshawes
Sun, 01/31/2016 - 20:49
This bed is amazing!
We love this bed and are wanting to make it for our daughter. Do you have a tutorial or any info on the paint used for this project? And did you paint it before or after assembly? Thanks for all your amazing tutorials we love your stuff!
Ashleygross1011
Sun, 02/21/2016 - 18:29
In process
My husband and I are in process of building this. My husband is fairly handy and here are a few tips that we learned:
make ke the larger cuts first as you might be able to use the scraps if you mess up.
Also the 2x4 cuts are straight it's, not at a 35 degree angle. With it being on the same line as an angle cut, we thought it was to be cut at An angle and had to go out and buy 10 more 2x4 bc we made wrong cuts!
Ill ll post a pic of our final project!
nadbasic
Wed, 06/01/2016 - 05:47
question
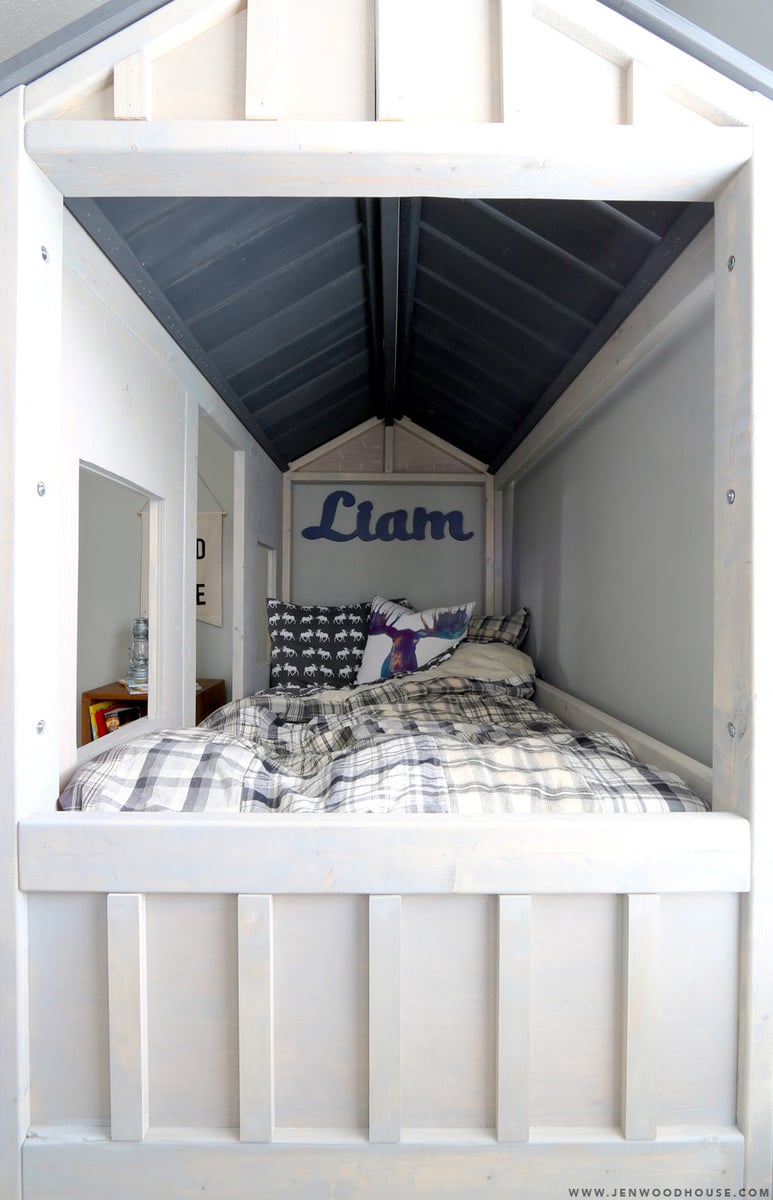
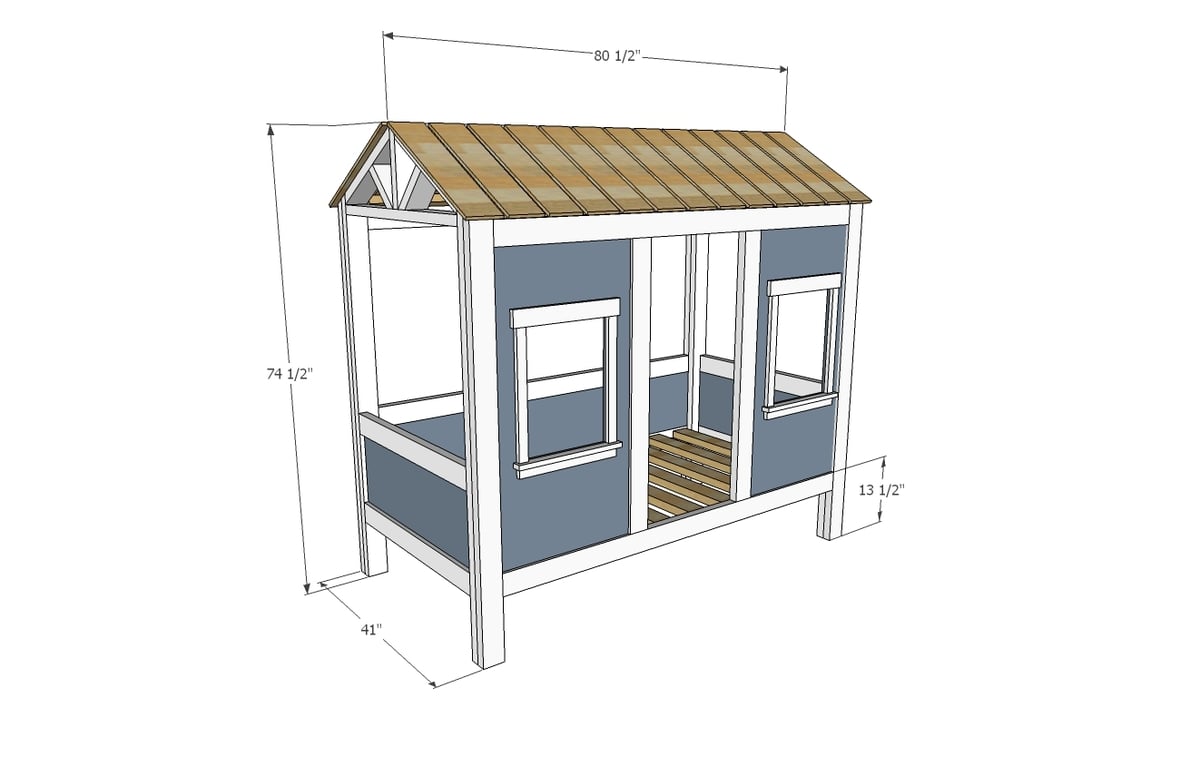
I see the interior dimensions of 71.5" length (step 8 photo) and 35" width through the window (Step 1 photo), a twin bed avgs 39x74... accounting for the additional width of two 2x4s (3") it looks like it would be 1" too short and very tight length wise with definate intrusion at the corners. What bed size did your friend select? How much room does she have to tuck-in sheets/blankets if any?
Ari Gold
Wed, 07/13/2016 - 14:15
Dimension wrong?
Has anyone had this question answer/figured it out on their own? A standard twin bed is 39*75 so not sure how one would fit in here.
Ana anyway we could get the sketchup plans?
Wrestling1
Fri, 03/20/2020 - 15:57
Bed size
I have just built all four sides and am getting ready to put it together, what bed do you get? And did you have to modify the plans any to make a twin mattress fit?
Im nervous as I am just noticing the comments...
Wrestling1
Sun, 06/21/2020 - 13:37
The plans worked perfect and…
The plans worked perfect and the mattress fits like a glove! And my son loves it!
Natehair
Fri, 09/30/2016 - 13:56
Great Looking Bed..Full Size Plans?
Hello, Thank you for posting these amazing plans, but do you have them for a full size mattress? 54x74
marsb007
Fri, 12/30/2016 - 18:17
Did anyone ever figure out
Did anyone ever figure out the full size mattress plans? I'm assuming the sides would be relatively easy to adapt, as would the mattress supports, but I'm worried about the roof truss to make it the same angle as in the plans. I guess Home Depot will be my friend for the next few weeks.
fla_diyer
Thu, 12/08/2016 - 07:13
Notch depth?
Thanks for these plans! I'm ready to get started but got stuck on step 1, lol. How deep should the notch on the center truss be? I'm guessing 2" since the illustration looks to be about halfway through the 2x4, but I wanted to double check. Thanks!
mattyb
Thu, 01/19/2017 - 12:42
Full Size
Hello all, I made this frame for a full size mattress.
Let me start off by saying it is NOT HARD to adapt the plans for a larger mattress, however there are a couple things to keep in mind. When you make the sides wider for the larger mattress (54 inches for a full size mattress), you will also be adding height to the ridgeline of the roof and lengthening the diagonal pieces that form the roof (including the actual roofing slats). Also, you will have longer pieces forming the slats that the mattress lays on.
With that said, I didn't make any changes to the front or back. However, the sides are a different story. The horizontal six 2x4s and two plywood inserts are changes to 50inches from 35inches. This will widen the frame (there are other posts that question the original 35 inches, please feel free to size to your mattress). The center truss is 16 1/4 inches, up from 11 3/4. The diagonal pieces are 28 1/2 inches up from 19 5/16. To be honest the way i found those dimensions was simple, I built the lower half the sides, then laid them flat. I cut the end of one 2x4 to 30 degrees and laid it in place. I then measured up from where the center truss should be, to find the end of the diagonal (again this should be a 30 degree angle). This also gives you the length the center truss should be. Repeat for the other side of the truss, this pieces should be the same. That should take care of the hardest part of the changing the build. The only other change is the 26 roof slats will be at least 33 inches up from 26 inches, this will also depend on how much overhang you want on the bottom end.
Now, there are a few things that I would like to point out. The shopping list for materials will also change. My advice is to think about how you plan to cut all of your piece before you buy your lumber. 2x4s come in 96inch and 104inch and so on, so if you need 50 inch pieces think about the longer 2x4s so you have less waste. Same goes for the plywood, you will need two sheets.
Also, on a side note, if i was going to make this again i would make the plywood inserts for the sides and back wider maybe 18 or 24 inches. The 12 inch pieces are ok, however the "walls" are very low (this also depends on the thickness of the mattress, ours is 9 inches), and if you have the extra plywood, why not use it.
Ana, a huge thank you for these plans, my son loves his new bed.
Niversen
Sun, 01/28/2018 - 14:55
Were you short a substantial
Were you short a substantial number of 2x4s?
HerrJensen
Mon, 01/01/2018 - 12:08
Plan
Hello,
we love the bed and I wan to build it for our son.
I need to translate to metric and i guess also adjust the to european mattress size.
Also I guess I'll run into trouble cause the place of the bed will be at the second floor close to the roof
so I might need to do some modifications.
Can you send me your seketchup file that ic can adopt it to my needs?
Greetings
Jens
And Happy new year to everybody.
In reply to Plan by HerrJensen
Ana White
Tue, 01/02/2018 - 14:30
Hello,
Hello,
I'm sorry we are not offering this service at this time.
Kind Regards,
Jen
HerrJensen
Thu, 01/11/2018 - 11:34
OK then I start converting
OK then I start converting and drawing.
Can you help a little please?
2x4 does it mean 2" x 4" approximately 50 mm x 100 mm ?
What kind of wood do you use for the frame?
Greetings
Jens
Marroyo786
Fri, 01/05/2018 - 12:34
Question
Amazing job! I would like to inquire if have the plans for this bed in full size? Thanks!
Niversen
Sun, 01/28/2018 - 14:54
Seriously inadequate materials list
This is very frustrating. I have not seriously gotten into the build yet but it looks like the materials list is seriously inadequate.
It it appears to be short at least five 2x4s or more.
Also no one has ever answered. Is a twin bed even going to fit?
zduchene
Tue, 10/30/2018 - 18:25
I have not built it yet but
I have not built it yet but did take a look at the plans. A twin will fit, the full interior dimension is 38"x75.5" so it may be tight on the sides but you have a half inch to play with on the length. I am planning on adding some sort of spacer in there depending on the mattress I buy, only because making the bed could be a challange if it is really tight on the sides.
abankhead
Fri, 01/24/2020 - 08:46
I have started cutting my…
I have started cutting my material and it looks as if the 2x4’s should have been ten foot long. You would be able to get more of the cuts from 17 ten foot boards. I wish these plans would have a cutting diagram so you could see which cuts to do with one board(easier to see if you have enough materials)
zduchene
Mon, 11/05/2018 - 21:06
Twin Mattress Size
This plan is indeed very tight for a standard size twin mattress. If anyone is interested I did make a Sketchup plan for an actual twin size mattress (38x75).
Here is the link to download it.
Warning, it is not a complete drawing, it is just enough to get the right sizes for the critical components, I did not draw the roof or the matress slats. I also have 14.5" under the bed instead of 10" due to a storage need that I have. Good Luck!