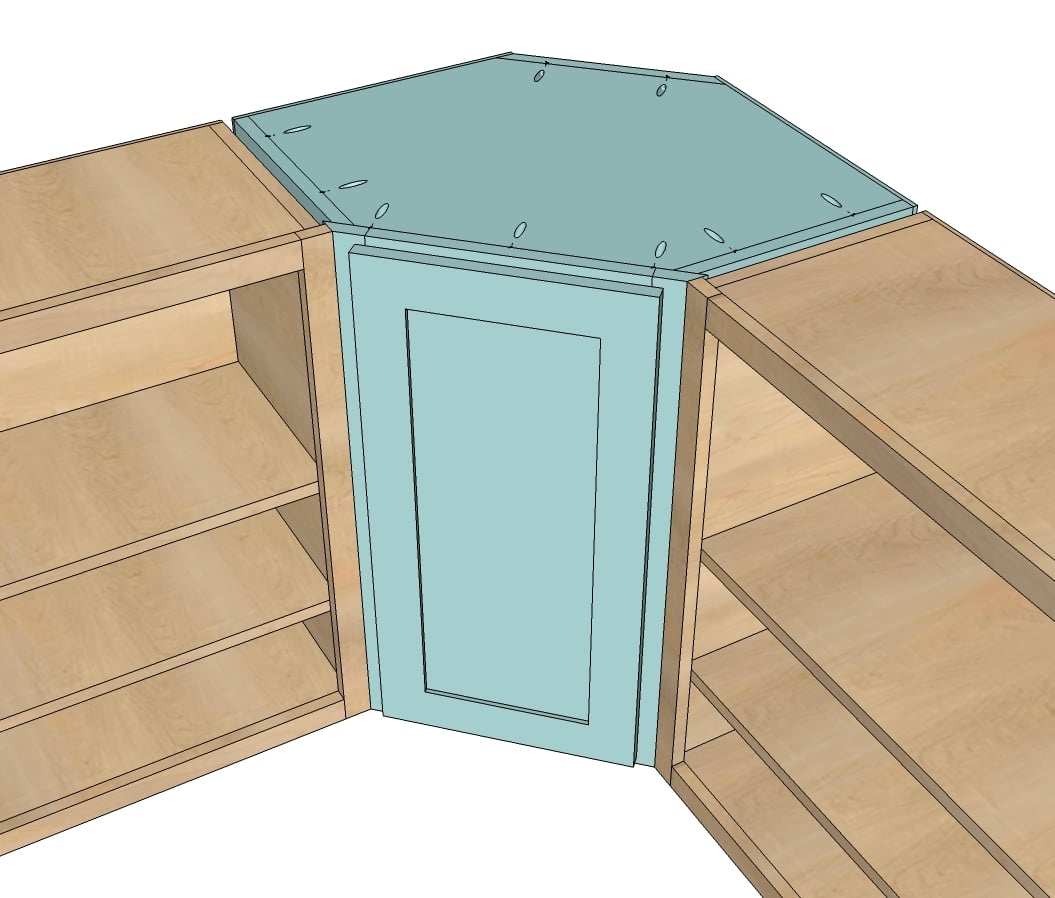
Free plans to build a wall corner kitchen cabinet from ana-white.com
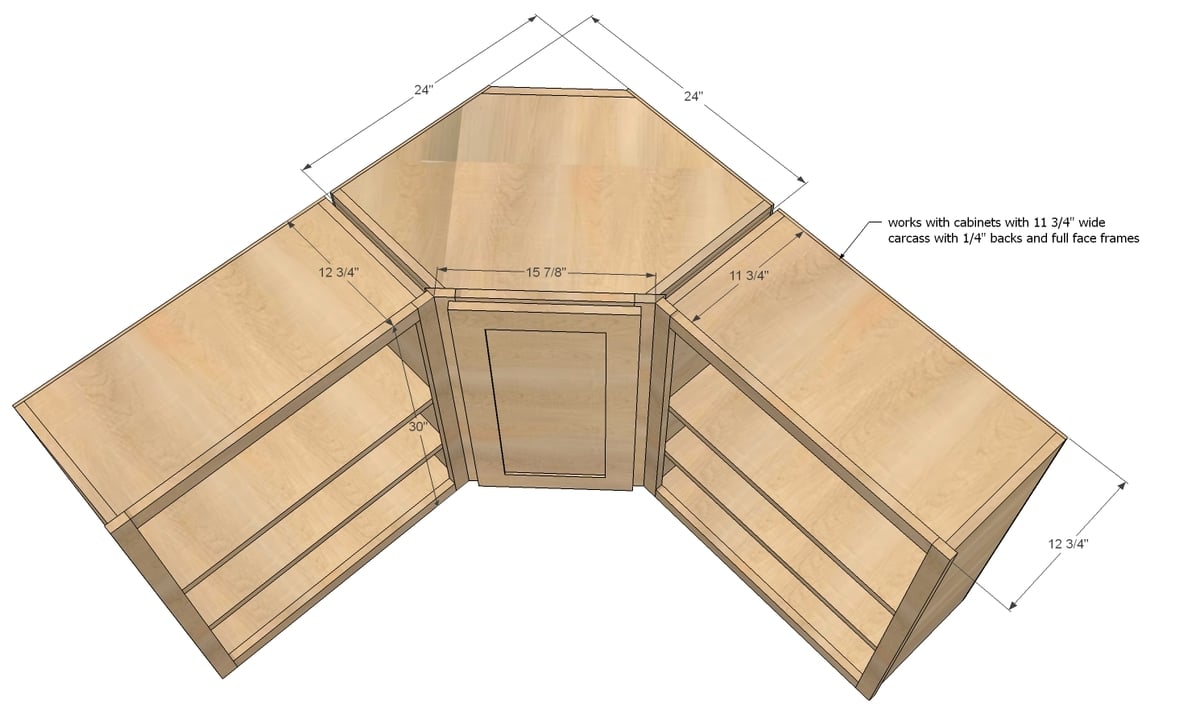
Preparation
1 - sheet 3/4" hardwood cabinet grade plywood (shown in PureBond Oak)
1/2 - sheet 1/4" hardwood cabinet grade plywood for backs and door panel
8' - 1x2s in matching hardwood veneer
6' - 1x3s in matching hardwood veneers (you'll need another 8' for doors if doing doors)
Edge banding in matching veneer for finishing off shelf fronts
Shelf pins and shelf pin jig for attaching adjustable shelf
1 1/4" pocket hole screws
wood glue
1" finish nails for attaching back
1/2" Overlay Face Frame Concealed Euro Style Hinges (2) - get the ones that attach to the face frame
CARCASS CUT LIST
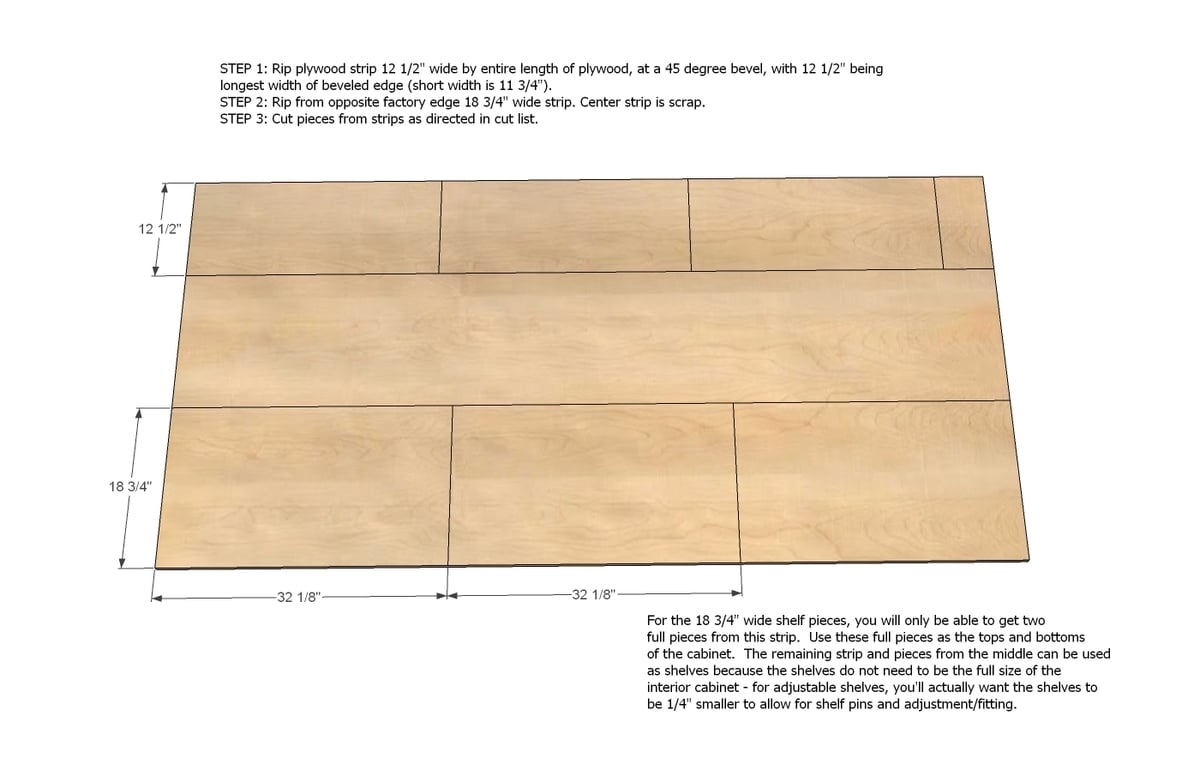
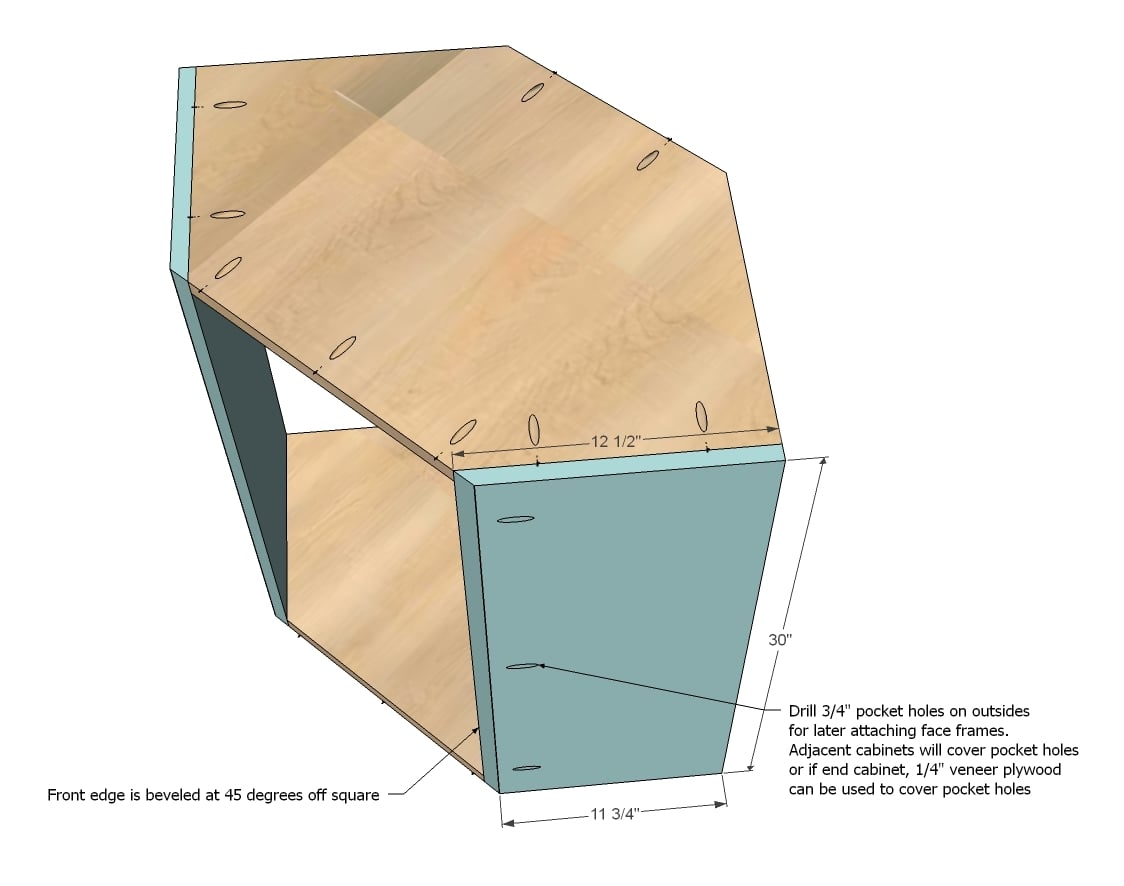
2 - 3/4" plywood @ 12 1/2" x 30" (one edge beveled at 45 degrees, widest width is 12 1/2")
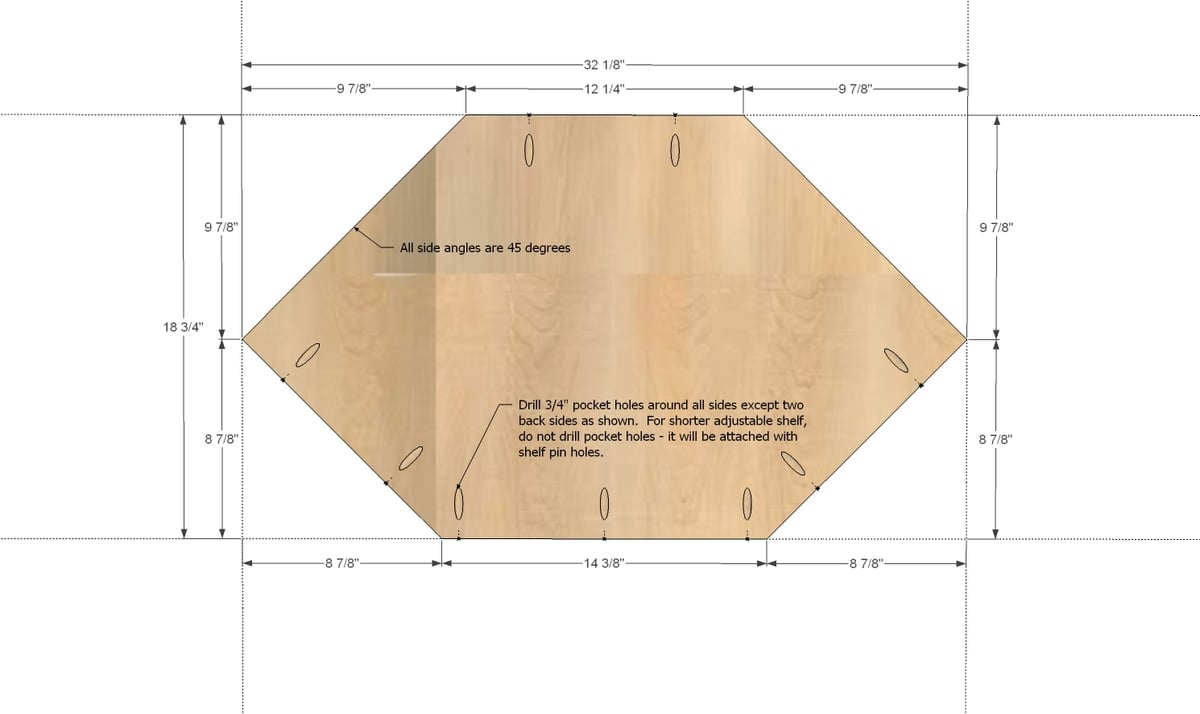
2 - 3/4" plywood @ 32 1/8" x 18 3/4"
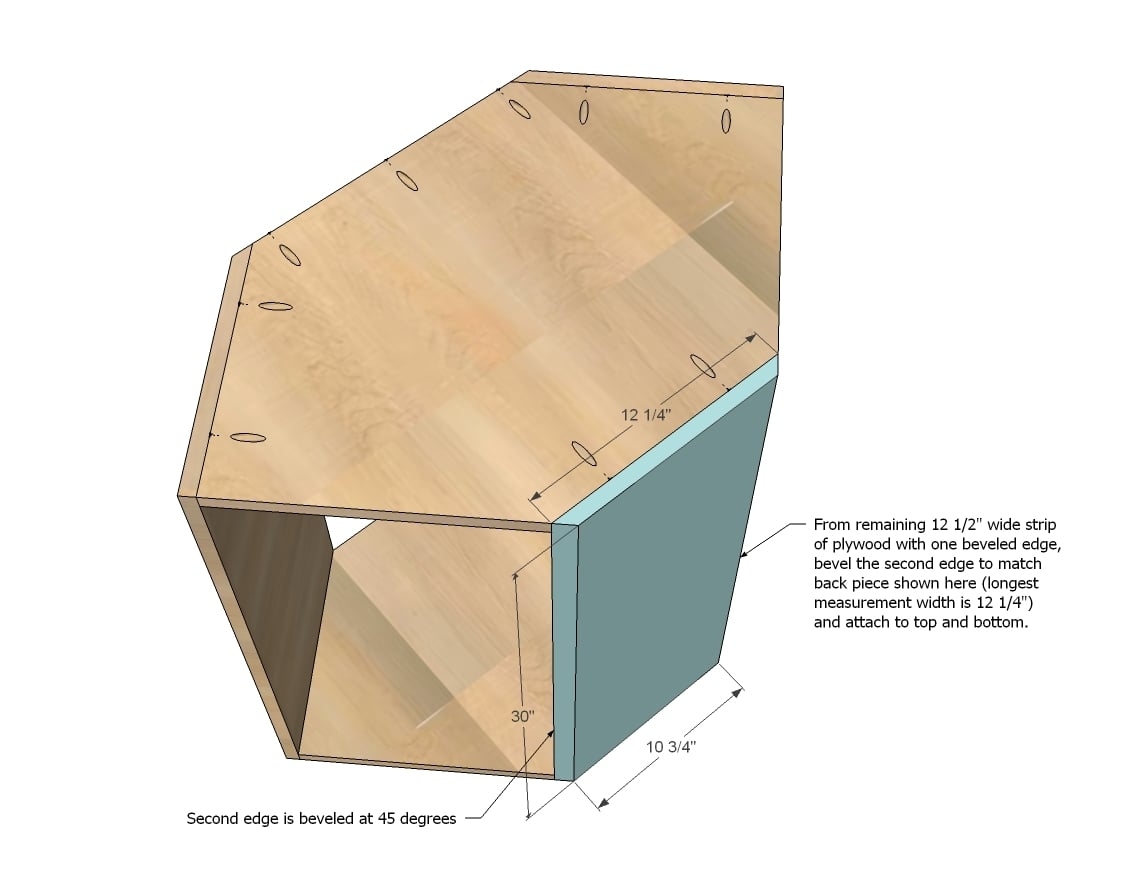
1 - 3/4" plywood @ 12 1/4" x 30" (both edges beveled at 45 degrees, widest width is 12 1/4" - cut this from 12 1/2" wide strip - see step 1)
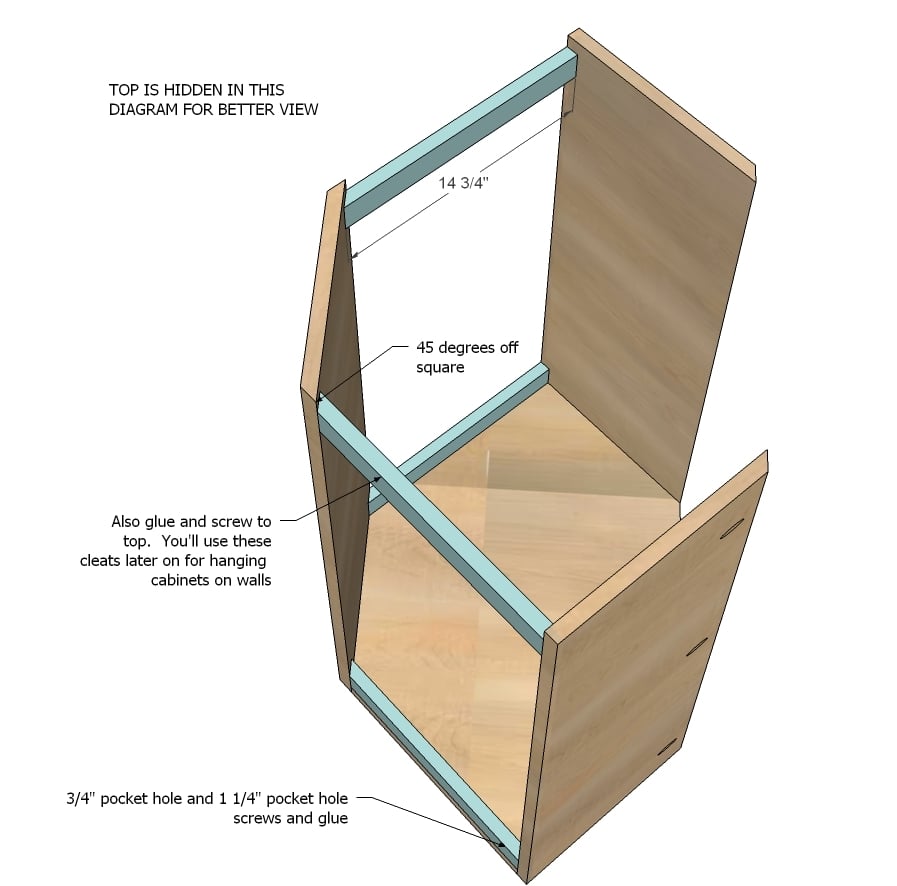
4 - 1x2 @ 14 3/4" (longest point measurement, one end cut at 45 degrees bevel)
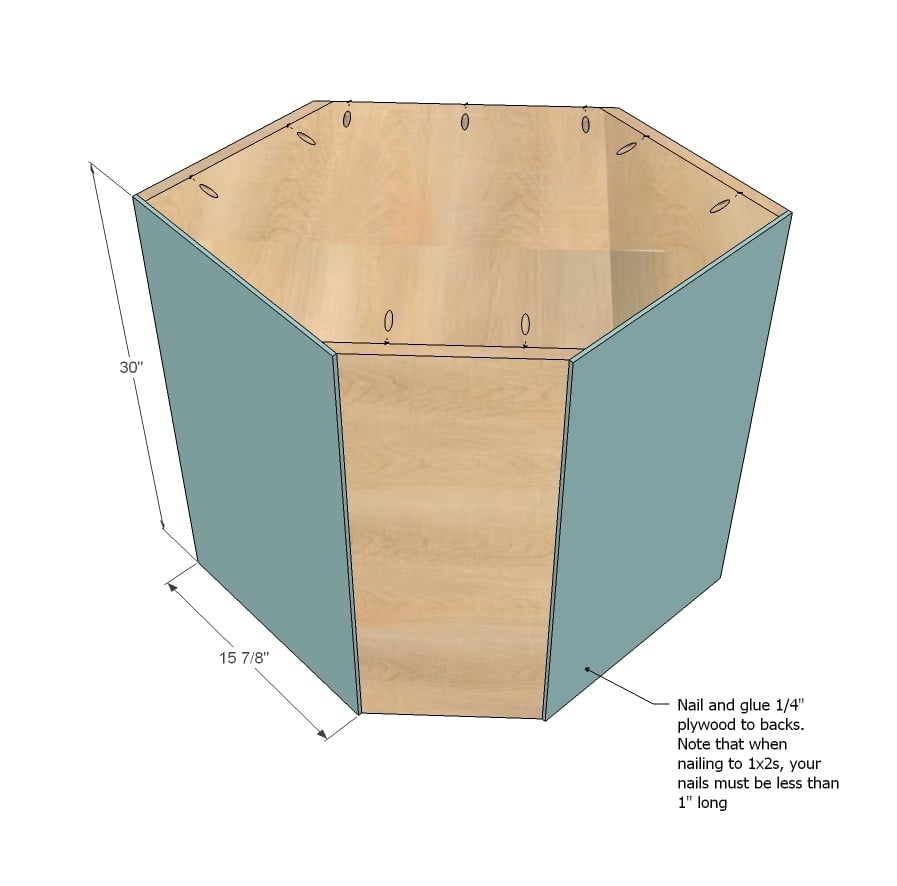
2 - 1/4" plywood @ 30" x 15 7/8"
FACE FRAME CUT LIST
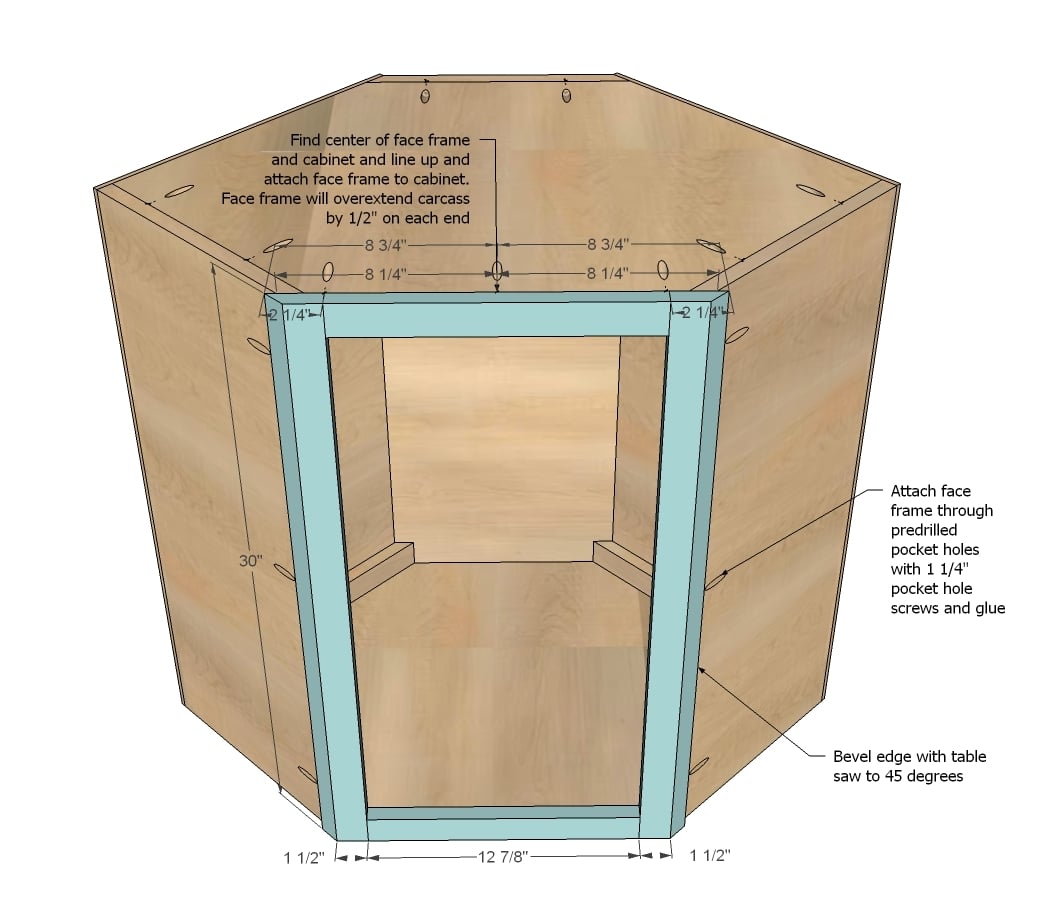
2 - 1x3 @ 30", ripped down at a 45 degree bevel to shortest side width of 1 1/2", longest side width of 2 1/4"
2 - 1x2 @ 12 7/8"
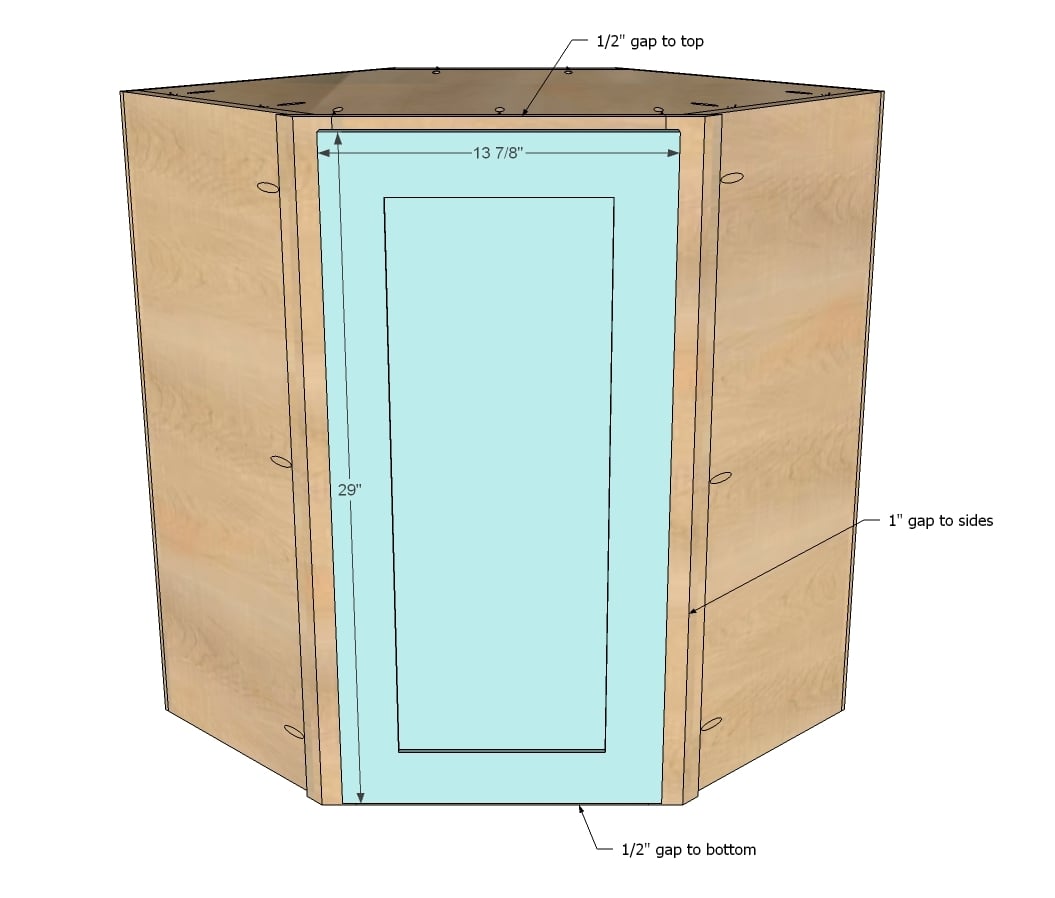
DOOR MADE TO FIT - Overall Dimensions 29" x 13 7/8" x 3/4"
Please read through the entire plan and all comments before beginning this project. It is also advisable to review the Getting Started Section. Take all necessary precautions to build safely and smartly. Work on a clean level surface, free of imperfections or debris. Always use straight boards. Check for square after each step. Always predrill holes before attaching with screws. Use glue with finish nails for a stronger hold. Wipe excess glue off bare wood for stained projects, as dried glue will not take stain. Be safe, have fun, and ask for help if you need it. Good luck!
Instructions
Step 1
For this cabinet, I highly recommend a high quality table saw. But you could use a circular saw that cuts a beveled edge at 45 degrees off square. If you do this, you'll need to clamp a board to the plywood and follow it to get straight cuts like I do in this video.
For table saw, set bevel to 45 degrees and rip plywood to a 12 1/2" width, with the 12 1/2" being the longest width on the beveled edge. I highly recommend taking a second to test cut on scrap before committing to cutting the full sheet. The short beveled edge width is 11 3/4".
Once you have these cuts, you can cut the remaining strip 18 3/4" wide for the top, bottom, and shelf. The center is scrap, but you may wish to use it for additional shelves.
Step 2
From the 18 3/4" wide strips, cut two pieces 32 1/8" long. Then from those pieces, mark as shown in this diagram, and cut out top and bottom. Use this also as a pattern to cut remaining shelf - it can be a little smaller, especially on the pointed corner ends, as it's just the shelf.
For tops and bottoms, drill 3/4" pocket holes as shown in diagram.
Step 3
Next attach the sides to tops and bottoms. Drill the 3/4" pocket holes first facing forward for attaching face frames in later steps. The adjacent cabinet will cover the pocket holes, and if this is an end cabinet, you will put 1/4" plywood over the end to finish it out.
For bottom shelf, place pocket holes on bottom where they will be hidden. For top shelf, place pocket holes on top where they will be hidden.
Step 4
Step 7
Next, build the face frame.
To keep the look consistent, you'll need to rip the 1x3 boards down to 1 1/2" reveal on the short side of the rip, beveling the edge at 45 degrees. Do some testing first to make sure your cuts are accurate. Then build your face frame with glue and pocket holes (3/4" and 1 1/4" screws). Attach to face of cabinet, with overhangs approximately 1/2" on each side.
Step 8
Step 9
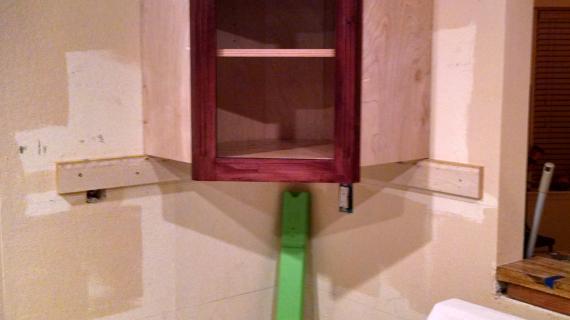
To install, you always start with the corner first and then work your way around. Corners need to be screwed to a stud in the wall and properly hung. I know these cabinets can get heavy, so make sure you have adequate support. There will be a 1/2" gap between cabinets to give you some "wiggle" room in case your walls aren't perfectly square. Just make sure the face frames line up perfectly. Shim the gap and screw cabinets together from insides. We also like to hide a few screws to connect face frame to face frame for a seamless look.
It is always recommended to apply a test coat on a hidden area or scrap piece to ensure color evenness and adhesion. Use primer or wood conditioner as needed.



Comments
snohotina
Fri, 02/01/2013 - 14:54
Link to the original wall cabinet not correct
Ana, I was trying to click to the link that the corner cabinet links to and its pointing to a video on how to use a circular saw.
Thanks
Tina
Ana White
Fri, 02/01/2013 - 15:51
Thanks for the heads up - all
Thanks for the heads up - all fixed up!
trailsingr
Fri, 02/01/2013 - 16:16
Wow! that was fast!
Ana, if I don't build my own cabinets I sure won't be able to blame it on you - I can't believe you got this plan posted so quickly after the upper cabinet plans! Thank you!
whitney_smith
Mon, 02/04/2013 - 04:30
Yes...
You really did make it easy. The face framing is probably the only really tricky part. Can't wait to see Momplex cabinets!
jsh2001
Mon, 02/04/2013 - 11:24
Thanks
Can't thank you enough for all of the cabinet plans. Now if I can build a trial cabinet to meet the wife's demands we may be on our way to a new kitchen.
Growler48
Sun, 03/10/2013 - 08:08
Wood Grain Pattern
Ana,
Can you please share what wood grain pattern you used on this project? Learning Sketchup now and would like to use the same on my projects.
Lady Goats
Sun, 03/10/2013 - 11:06
Um. How did I miss this plan?!
I've been waiting for the perfect time to pester you about this diagonal wall cabinet again, and it's already here! Uhh, YAY! Thank you!!!!
Dsturtevant
Thu, 01/08/2015 - 13:13
Diagonal Wall Cabinet
Ana i have constructed some modular lockers from your plans that i plan to connect and now that i have them in the space i want to make use of the corner by building a diagonal wall cabine with an open face that is 7 ft tall. How do I adjust your plans to accomodate the build...help!
Dsturtevant
Thu, 01/08/2015 - 13:31
I would like to add that my
I would like to add that my lockers are 18 inches deep and the space from the corner to the wall is 30".
seandramsey
Tue, 03/24/2015 - 19:56
I am looking for the same
I am looking for the same plans did you ever figure it out.
JimmyLJ1970
Sat, 01/02/2016 - 07:20
Dimensions Step 2 Instructions
Hello Ana, I was doing my layout and noticed the top measurements don't equal, 9-7/8 + 12-1/4" + 9-7/8" only equals 32 and diagram shows 32-1/8.....the bottom 3 measurements equal 32-1/8, so I can either change front by 1/8" or when adding back make it 12-3/8 instead of 12-1/4
xanderman
Mon, 02/08/2016 - 09:49
Top plate
I hope you don't mind me asking, but why is the top of the cabinet always set inside the carcass, beside the side front and back, rather than on top.
Wouldn't it provide a lot more strength by having the top set on a ledge?
Grandmawoodworker
Sun, 03/01/2020 - 18:40
Why cut the back corner?
Why is there so much of the back corner cut off? I'm sure all walls don't have perfect corners but is this a lot of wasted storage space or is it really necessary to cut this much off the corner?